- Manuals
- Brands
- Plustek Manuals
- Scanner
- SmartOffice PS286 Plus
- User manual
-
Contents
-
Table of Contents
-
Troubleshooting
-
Bookmarks
Quick Links
Installation
Usage & Maintenance
Related Manuals for Plustek SmartOffice PS286 Plus
Summary of Contents for Plustek SmartOffice PS286 Plus
-
Page 1
Installation Usage & Maintenance… -
Page 2
Trademarks © 2011 Plustek Inc. All rights are reserved. No portion of this document may be reproduced without permission. All trademarks and brand names mentioned in this publication are property of their respective owners. Liability While all efforts have been made to ensure the accuracy of all contents in this… -
Page 3: Table Of Contents
Placing Documents with the Protection Sheet (Protection Sheet is not included in all scanner models) ………………….. 20 Scanning Documents………………..22 Scanning via TWAIN Interface ………………. 23 Scanning from Plustek DI Capture Program …………..26 Scanning from the Scanner’s Front Panel…………….27 Scanning from the On-screen DocAction’s Execute Menu ……….29 III. C ……………
-
Page 4
Statement of Limited Warranty …………….. 41 FCC Radio Frequency Statement…………….42 ………………43 ONTACTING LUSTEK… -
Page 5: Introduction
NTRODUCTION Thank you for choosing us as your scanner supplier. Your new scanner will improve the professionalism of your day-to-day computing tasks by allowing you to input images and electronic text into your computer system. You can easily scan single-sided or double-sided documents with your scanner. Like all of our products, your new scanner is thoroughly tested and backed by our reputation for unsurpassed dependability and customer satisfaction.
-
Page 6: Conventions Of This Guide
ONVENTIONS OF UIDE Bold —Represents commands or contents on your computer screen. ALL CAPS —Important note or first use of an important term in a chapter. Italic —Represents buttons on your scanner OR important notes. This guide uses the following icons to point out information that deserves special attention.
-
Page 7: Minimum System Requirements
4. Damaged wire could cause fire or electrical shock. Keep the power cord straight and without being twisted, bended, or scraped. 5. Unplug this device if you don’t need to use for a certain period of time, such as, during night or long weekend, to avoid any risks of causing fire. 6.
-
Page 8: Box Contents
ONTENTS 1. Scanner 2. USB Cable 3. AC Adapter 4. Stacker 5. Quick Guide 6. Setup/Application CD-ROM 7. Calibration Sheet 8. Memo Label 9. Extended Paper Width Slider (2 pieces) 10. Protection Sheet 11. Padded Carry Bag 12. Cleansing Cloth 13.
-
Page 9: The Scanner Features
CANNER EATURES 1. PAPER CHUTE COVER—Helps keep the paper in place. Open paper chute cover when using the scanner. 2. PAPER WIDTH SLIDER—Adjusts the paper width slider for the paper size you are using. Information Extended Paper Width Slider (accessory in the box content) —Hold the paper uprightly so as to avoid the paper feeding to be askew.
-
Page 10
8. UP BUTTON—Press to move forward the scanning task number indicated in the function number display. 9. DOWN BUTTON—Press to move backward the scanning task number indicated in the function number display. 10. FUNCTION NUMBER DISPLAY—Indicates the number of the predefined scanning task selected by the up or down button. -
Page 11
included AC adapter. 16. POWER SWITCH—Use this to turn the scanner ON or OFF. -
Page 12: Chapter I. Installing The Scanner
(NewSoft Presto! PageManager), the scanner’s driver, DocAction, and the image capture software (Plustek DI Capture). All of these software applications use approximately 400 megabytes of hard disk space after they are installed into your computer. To ensure ample room for the installation, as well as for scanning and saving images, a minimum of 1 GB of hard disk space is recommended.
-
Page 13: Installing And Setting Up The Scanner
NSTALLING AND ETTING UP THE CANNER Please follow the step-by-step procedures described below to install the Plustek scanner. Choose a Proper Site First! Always place your scanner on a level, smooth strong surface before proceeding the scanner setup or any scanning task.
-
Page 14: Step 2. Installing The Software
the scanner. 4. Plug the rectangular end of the USB cable to an available USB port on your computer. 5. If you plan to connect your scanner to a USB hub , make sure that the hub is connected to the USB port in your computer. Next, connect the scanner to the USB hub.
-
Page 15
Select Install the software automatically recommended and click the Next button. Click the Next button in the window that appears. Afterwards, please skip to procedure 7. 5. For Windows Vista: Select “Locate and install driver software (recommended)” when the “Found New Hardware”… -
Page 16: Step 3. Install The Extended Paper Width Slider
9. Follow the on-screen instructions to install all software that your new scanner requires. 10. After the software is installed, close all open applications and click the Finish button to restart your computer. 11. After the computer is restarted, you will be prompted to perform the scanner calibration.
-
Page 17: Step 4. Install The Stacker
Insert the tabs on the stacker onto their slots on the scanner. The installation of stacker is optional, if you have limited desktop space. Information The following describes how you can check if the scanner is properly functioning with your computer and the scanning software by performing your first scan with our bundled application NewSoft Presto! PageManager.
-
Page 18: Installing Additional Software
Click the Windows Start button to launch NewSoft Presto! PageManager. (If you have only one scanner connected with your computer, please skip to Step If you have more than one scanner or other imaging device installed on your computer: Click Select Source from the File menu of Presto! PageManager and then choose this scanner as the default scanning source.
-
Page 19: Chapter Ii. Scanning
II. S HAPTER CANNING Your scanner needs to be driven by certain type of software program. Since all documents or images (whether text or pictures) that are acquired from the scanner are treated by your computer as images, most scanning will probably be done from an image-editing program where you can view, edit, save and output the scanned images.
-
Page 20: Checking Document Conditions
Proper document preparation prior to the scan can prevent paper feed errors and damages to the scanner. Checking Document Conditions Loosening Documents Make sure the size and ream weight of your documents are acceptable by the scanner. Refer to “Appendix A: Specifications” of this guide for more information. To scan multiple documents in a batch from the ADF can increase your work efficiency and make large scanning tasks easier.
-
Page 21: Loosening Documents
Paper with an odd (non-rectangular) shape Tracing paper Carbon paper, pressure sensitive paper, carbonless paper Items other than paper, e.g., cloth, metal foil. DO NOT use the ADF to scan photographic sheets or particularly valuable document originals; wrinkles or other damages can happen in case of paper feeding errors.
-
Page 22
2. If you need to scan longer documents, unfold the paper chute extension and side guide to provide further support for the documents. 3. Adjust the paper width slider for the paper size you are using. The paper width slider should be gently touching both sides of the documents. -
Page 23: Placing Business Cards
DO NOT load more than 50 sheets of paper (70 g/m , 18 lb.) to the ADF. Paper scanned from the ADF must be a minimum of 5.08 x 5.08 cm (2” x 2”, W x L). Make sure there are no gaps between the document stack and the paper-width slider;…
-
Page 24: Placing Documents With The Protection Sheet
The plastic card can be embossed credit card, driver license, ID card, insurance card, medic-care card or any membership card. Make sure to load the embossed face of the embossed card face down into the scanner. 1. Horizontally load the plastic card, headfirst and face down, toward the center of the ADF.
-
Page 25
Cover open lever ADF cover 2. Remove the pad module by pinching both sides of the pad module and pull it out. 3. Close the ADF cover by pushing it back down until it snaps back into place. 4. To scan a document with large page size, spread the page to be scanned facing outwards and neatly fold it in half from the center. -
Page 26: Scanning Documents
7. For single-sided scans, load the protection sheet face down. For double-sided scans, load the protection sheet in desired order. 8. Adjust the paper width slider to the protection sheet width. The paper width slider should be gently touching both sides of the sheet. When you are using the protection sheet for scanning, please load the sheet of papers one by one.
-
Page 27: Scanning Via Twain Interface
The TWAIN program is a very important piece of software that comes with your scanner. This program acts as an interface between the scanner hardware and the image-editing software you are using to view and edit images. The TWAIN program allows you to adjust a number of settings to define the quality of the scanned image.
-
Page 28
4. Adjust the scanning settings. For ADF (Duplex) scan, you can tailor settings individually for front and rear sides of the documents. Click Front Side button to adjust the scanning settings of document front side and then click Rear Side button to adjust the scanning settings of document rear side. -
Page 29
Click the Help button within the TWAIN window for more information about the settings. Scan within ABBYY FineReader Sprint Plus: 1. Click on the Windows Start button, point to All Programs > ABBYY FineReader Sprint Plus and then click ABBYY FineReader Sprint Plus to launch the FineReader program. -
Page 30: Scanning From Plustek Di Capture Program
Next time when you want to scan similar documents and apply the same settings, you can just select this profile from the drop-down list and then click the Scan button. Click the Help button within the TWAIN window for more information about the settings.
-
Page 31: Scanning From The Scanner’s Front Panel
Scan Profile Toolbar Select the scanner Viewer Folde Pane Pane Browser Pane Scan Settings Pane 2. Within DI Capture, select this scanner from the drop-down list of 3. Select a document from the Folder Pane to store the scanned images. (To create a new folder and/or a new document, click the New Folder and/or New Document button from the toolbar.) 4.
-
Page 32
When you scan by the OCR button of DocAction program, in each batch you can scan up to either 50 sheets of paper for single-sided scans or 25 sheets of paper for double-sided Attention scans because of the limit from ABBYY FineReader 6.0 Sprint Plus. -
Page 33: Scanning From The On-Screen Docaction’s Execute Menu
It’s optional for you to write down the customized button number settings on the included memo Information label and place this memo anywhere on the scanner. Click the Help button within the Button Configuration window for more information about the settings. View Button Settings There are three ways to view the button settings: Double-click the icon…
-
Page 34: Chapter Iii. Care And Maintenance
III. C HAPTER ARE AND AINTENANCE Your scanner is designed to be maintenance-free. However, constant care and maintenance can keep your scanner working smoothly. LEANING THE CANNER Paper powder, dust, ink and toner from paper being scanned may make the inner ADF dirty, which leads to poor image quality or document-feeding errors.
-
Page 35
Cover open leve ADF cover 2. Gently wipe the following areas with the cloth dampened with the cleaner. Be careful NOT to scratch their surfaces. Clean Feed Roller: Wipe the Feed Roller from side to side and then rotate it. Repeat this until its entire surface is cleaned. -
Page 36: Replacing Consumables
Clean ADF Glass: Do not spray cleaner directly onto the scanner glass. Excess liquid residue may fog or damage the scanner. Attention 3. Wait for cleaned areas to dry completely. 4. Close the ADF cover by pushing it back down until it snaps back into place. EPLACING ONSUMABLES As a guideline, it is recommended to replace the pad module every 20000 sheets of…
-
Page 37: Replacing The Pad Module
1. Open the ADF cover by pulling the cover open lever. 1. Open the ADF cover by pulling the cover open lever. Cover open lever ADF cover 2. Remove the pad module by pinching both sides of the pad module and pull it out.
-
Page 38: Calibrating The Scanner
ALIBRATING THE CANNER Please uninstall the extended paper width sliders before you start the calibration. Attention Calibrate the scanner if colors appear in areas that should be white, or colors of the scanned image and the original vary a lot. This allows you to adjust and compensate for variations that can occur in the optical component over time by its nature.
-
Page 39: Power Save
3. Click Start > All Programs > Your scanner model name > Calibration Wizard. 4. Click Next from the Calibration Wizard that pops up and then click Calibrate Now..5. Click on the Start button to begin the calibration process. 6.
-
Page 40: Chapter Iv. Troubleshooting
IV. T HAPTER ROUBLESHOOTING If you encounter problems with your scanner, please review the installation and scanning instructions contained in this guide. Before you ask for customer service or repair, please refer to the information in this chapter and consult our FAQ (Frequently Asked Questions) in which you can find useful self troubleshooting information.
-
Page 41
Do not try to pull jammed or half-scanned documents out of the ADF without first opening the ADF cover. Doing so may permanently Attention damage the ADF. 4. Close the ADF cover by pushing it back down until it snaps back into place. -
Page 42: Ppendix A: Specifications
A: S PPENDIX PECIFICATIONS Plustek PS286 Plus, Plustek PS288 Optical Resolution 600 dpi Max. Hardware 600 x 600 dpi Resolution Color: Input 48-bit; Output 24-bit Scan Modes Grayscale: Input 16-bit; Output 8-bit Black & White: 1-bit Technology Color Contact Image Sensor (CIS) 1.
-
Page 43
FCC Class B, CE… -
Page 44: Appendix B: Customer Service And Warranty
PPENDIX USTOMER ERVICE AND ARRANTY For further assistance, visit our website or call our customer support phone number listed on the last page of this guide. One of our representatives will be happy to assist you from Monday through Friday in office working hours. To avoid delays, please have the following information available before calling: Scanner name and model number Scanner serial number (Located at the bottom of the scanner)
-
Page 45
TATEMENT OF IMITED ARRANTY This Statement of Limited Warranty applies only to the options you originally purchase for your use, and not for resale, from an authorized reseller. The manufacturer warranty includes all parts and labor, and is not valid without the receipt of original purchase. -
Page 46
Some jurisdictions do not allow the exclusion or limitations of incidental or consequential damages, so the above limitation or exclusion may not apply to you. This Limited Warranty gives you specific legal rights, and you may also have other rights that vary from jurisdiction to jurisdiction. FCC R ADIO REQUENCY… -
Page 47
ONTACTING LUSTEK Europe: Plustek Technology GmbH An der Strusbek 60-62 22926 Ahrensburg Germany Tel.: +49 (0) 4102-8913-0 Fax: +49 (0) 4102-8913-500/508 E-mail: support@plustek.de Website: www.plustek.de North America: Plustek Technology Inc. 17517 Fabrica Way, Suite B Cerritos, CA 90703 U.S.A. Tel: +1 -714-670-7713…
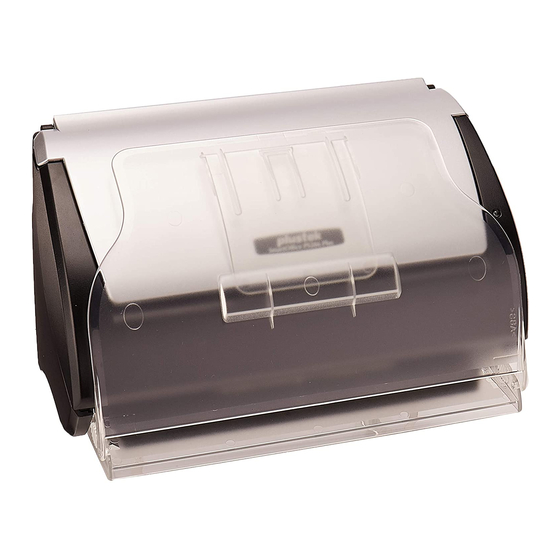
Plustek SmartOffice PS286 Плюс

![]()
Сканер документов SmartOffice PS286 Plus со скоростью 25 страниц в минуту для ПК и компьютеров MACINTOSH оснащен встроенной системой обработки изображений для получения высококачественных изображений и повышенной точностью распознавания текста, надежной обработкой бумаги для уменьшения количества застреваний и повторного сканирования, а также встроенными программными приложениями, повышающими производительность труда пользователей. Сканер также оснащен светодиодной подсветкой с мгновенным включением без разогрева и емкостью автоподатчика на 50 страниц.
ОСНОВНЫЕ ХАРАКТЕРИСТИКИ
- Скорость сканирования 25 страниц в минуту / 50 изображений в минуту в режиме оттенков серого
- 1500 страниц в день рабочий цикл
- Улучшенное качество изображения и надежная обработка бумаги
- Сканирует длинные документы до 50 дюймов
- Устройство автоматической подачи документов на 50 листов
- Компактность — легко транспортируется и помещается в многолюдном офисе
- Сканирование одним касанием в популярные форматы, включая PDF с возможностью поиска, PDF / A, Word, Excel, JPEG и TIFF
- Сканирует жесткие карты, включая страховые карты, удостоверения личности, водительские права и т. Д.
ФУНКЦИИ И ОСОБЕННОСТИ
Простой в использовании MacAction
Пользователи могут сканировать на свой ПК или компьютер Mac с помощью SmartOffice PS286.
Плюс сканер простым нажатием кнопки. DocAction (ПК) и MacAction (Mac) позволяют пользователям создавать и сохранять 9 различных заданий сканирования, включая сканирование в папку, сканирование в электронную почту, копирование, создание PDF-файлов и многое другое. Для сканирования просто вставьте бумагу, выберите задание и нажмите кнопку сканирования! FileСохраняются в любом из следующих форматов PDF с возможностью поиска, PDF / A, Word *, Excel *, JPEG и TIFF.
Универсальная работа с документами
SmartOffice PS286 Plus разработан для сканирования деловых документов длиной до 14 дюймов и жестких карт, таких как удостоверения личности и водительские права, толщиной до 1.2 мм без дополнительных настроек оператора. Смешанные партии документов можно сканировать без сортировки благодаря лучшим в своем классе средствам обработки бумаги и обработки изображений.
Расширенное сканирование нажатием одной кнопки
С эксклюзивным программным приложением Plustek DocAction пользователям нужно только правильно разместить документ на сканере, нажав кнопку «Сканировать». Что лучше всего, отсканированное изображение можно напрямую отправить в желаемые целевые приложения. Эти функции позволяют напрямую сканировать в PDF, PDF / A, OCR и BCR с возможностью поиска, а также беспрепятственно получать доступ к программам, таким как Excel, Word, электронная почта, копировать и сохранять в File непосредственно.
Совместим с большинством приложений для обработки изображений
Стандартные драйверы TWAIN в сочетании с TIF, JPG, PDF и Microsoft Office file форматы обеспечивают совместимость с тысячами программ сканирования и обработки изображений. Plustek OCR включен *, чтобы легко создавать файлы PDF с возможностью поиска и управлять ими одним нажатием кнопки. Встроенная обработка изображений обеспечивает высочайшее качество изображения, сокращает количество повторных сканирований и повышает точность распознавания текста.
- Автоматический порог *
Автоматически преобразовать текущее изображение в двоичное черно-белое изображение.
- Автоматический поворот*
Автоматически поворачивает документ в зависимости от его содержимого.
- Автоматическая обрезка и выравнивание *
Автоматически выравнивает и обрезает изображение до фактического размера документа.
- Исключение цвета * Удаляет красный, зеленый или синий цвет при сканировании форм.

- Удаление пустой страницы * Автоматически удаляет пустые страницы без ручного редактирования.


* Функции доступны только в версии для ПК
 Быстрое двустороннее сканирование со скоростью до 25 страниц в минуту в режиме оттенков серого.
 Эффективное сканирование с помощью большого автоподатчика документов до 50 страниц.
 Оцифруйте бумажные визитки в легко управляемые и отсортированные контакты, а ваши визитки — в информацию.
 Сканирует жесткие карты с тиснением, такие как удостоверения личности, страховые карты, водительские права и кредитные карты толщиной до 1.2 мм.
Идеально подходит для вертикальных приложений, таких как здравоохранение, аптека, бухгалтерский учет. гостеприимство и т. д.
 Сохраняйте бумажные документы в виде PDF-файлов с возможностью поиска одним нажатием кнопки и быстрее находите нужную информацию.
 Позволяет легко загружать files или отсканированные изображения на совместимый сервер по вашему выбору, включая Google Docs, Microsoft SharePoint, Box, Dropbox, Twitter и FTP-серверы.
ПРОГРАММНОЕ ОБЕСПЕЧЕНИЕ
Plustek DocAction
Кнопочная утилита для упрощения сканирования документов. DocAction позволяет вам указать ваши персональные настройки конфигурации сканирования и сканировать документы одним нажатием кнопки. Отсканированные документы автоматически отправляются прямо на принтер, электронную почту, папку или FTP. DocAction также позволяет сканировать напрямую во многие приложения для обработки изображений и управления документами. DocAction сохраняет отсканированные документы во всех распространенных форматах изображений, включая JPEG, TIFF и PDF.
Plustek MacЭкшен
Plustek MacAction — это служебная программа, которая позволяет сканировать простым нажатием кнопки. Простая в использовании функция предоставляет пользователям платформу для редактирования настроек сканирования и изменения места сохранения.
MacAction также позволяет сканировать напрямую и сохранять отсканированные документы во всех распространенных форматах изображений, включая JPEG, TIFF, MULTI-TIFF, BMP и PDF.
Встроенное распознавание текста
Плюстек OCR
Plustek OCR (на базе ABBYY) помогает конвертировать отсканированные бумажные документы, фотографии и PDF-файлы. files в редактируемые форматы. С помощью Plustek OCR вы можете преобразовывать бумажные документы в редактируемые форматы, включая Microsoft® Word® и Excel®, редактировать полученные документы и повторно использовать их текст и другое содержимое.
Требования к оборудованию
- Процессор Pentium IV 2.0 ГГц (рекомендуется процессор Pentium IV 3.0 ГГц)
- CD-ROM драйвер
- Один доступный порт USB (рекомендуется USB 2.0)
- Рекомендуется 1 ГБ ОЗУ или больше
- 800 МБ свободного места на жестком диске (рекомендуется 1 ГБ или больше)
* Plustek является зарегистрированным товарным знаком Plustek.
ABBYY ™ FineReader ™ © ABBYY. OCR от ABBYY. ABBYY и
FineReader являются товарными знаками ABBYY Software, Ltd., которые могут быть зарегистрированы в некоторых юрисдикциях.
Любые другие названия продуктов или компаний, упоминаемые в этом документе, являются товарными знаками или зарегистрированными товарными знаками соответствующих компаний.

Спецификация
| Датчик изображений | СНГ x 2 |
| Источник света | LED |
| Оптическое разрешение | 600 точек/дюйм |
| Аппаратное разрешение | 600 х 600 точек на дюйм |
| Режимы сканирования | Цвет: Вход 48 бит, выход 24 бит оттенки серого: Вход 16 бит, выход 8 бит Black & Белый: 1-бит |
| Емкость АПД |
Примечание: Максимальная емкость АПД зависит от плотности бумаги. |
| Скорость сканирования (АПД) | 25 страниц в минуту / 50 изображений в минуту (режим оттенков серого, 200 точек на дюйм, A4 книжная ориентация) 25 стр. / Мин. / 50 изобр. / Мин (черно-белый режим, 200 точек на дюйм, A4, портрет) 8 стр. / Мин. / 8 изобр. / Мин (цветной режим, 200 точек на дюйм, A4 книжная) 6 стр. / Мин. / 6 изобр. / Мин (цветной режим, 300 точек на дюйм, A4 книжная)Примечание: Результаты могут отличаться в зависимости от вашего приложения сканирования, процессора компьютера и системной памяти. |
| Область сканирования (Ш x Д) | Максимум. 216 x 2500 мм (8.5 x 98.42 дюйма) Мин. 13.2 x 13.2 мм (0.52 дюйма x 0.52 дюйма) |
| Допустимые размеры бумаги (Ш x Д) | Максимум. 220 x 2500 мм (8.66 x 98.42 дюйма) Мин. 50.8 x 50.8 мм (2 дюйма x 2 дюйма) |
| Допустимая плотность бумаги (толщина) | От 50 до 105 г / л (от 14 до 28 фунтов) |
| Ежедневное сканирование (листы) | 1,500 |
| Срок службы ролика (сканирование) | 100,000 |
| Срок службы пэда (сканирование) | 20,000 |
| Кнопка действия | 3 кнопки: вверх, вниз, сканирование. 9 функциональных клавиш. Все настраиваемое. |
| Напряжение питания | 24 В постоянного тока / 0.75 А |
| Интерфейс | USB 2.0 |
| вес нетто | 1.66 кг (3.66 фунта) |
| Размеры (Ш х Г х В) | 263 x 128 x 148 мм (10.36 «x 5.02» x 5.83 «) |
| протокол | TWAIN-совместимый |
| OS | Windows XP / Vista / 7/8/10 Mac 10.12.x ~ 11.2.x LINUX SANE для системного интегратора. Обратитесь в местный отдел продаж. |
© 2021 Автор ![]() Все права защищены. Все зарегистрированные товарные знаки являются собственностью соответствующих владельцев.
Все права защищены. Все зарегистрированные товарные знаки являются собственностью соответствующих владельцев.

Документы / Ресурсы
Рекомендации

plustek.com
Инструкцию для Plustek SmartOffice PS286 Plus на русском языке, в формате pdf можно скачать с нашего сайта. Наш каталог предоставляем Вам инструкцию производителя фирмы Plustek, которая была взята из открытых источников. Ознакомившись с руководством по эксплуатации от Plustek, Вы на все 100% и правильно сможете воспользоваться всеми функциями устройства.
Для сохранения инструкции «Сканер Plustek SmartOffice PS286 Plus» на русском языке на вашем компьютере либо телефоне, нажмите кнопку «Скачать инструкцию». Если активна кнопка «Инструкция онлайн», то Вы можете просмотреть документ (manual), в своём браузере онлайн.
Если у Вас нет возможности скачать инструкцию по эксплуатации либо просмотреть её, Вы можете поделиться ссылкой на эту страницу в социальных сетях и при удобном моменте скачать инструкцию. Либо добавьте эту страницу в закладки Вашего браузера, нажав кнопку «Добавить страницу в закладки браузера».
Перед вами файл pdf, где представлена инструкция (руководство) на русском для PLUSTEK SmartOffice PS286 Plus. Вы можете скачать ее либо изучить в онлайн режиме.
Подробные сведения об инструкции:
Устройство из раздела: сканер
Бренд-производитель: PLUSTEK
Наименование модели: PLUSTEK SmartOffice PS286 Plus
Язык: Руководство на русском языке
Файл: pdf
Размер файла: 2,05 MB

Скачать инструкцию к HARPER HDT2-1110
ЗАГРУЗИТЬ
Просмотр инструкции онлайн

Сканеры Plustek SmartOffice PS286 Plus — инструкция пользователя по применению, эксплуатации и установке на русском языке. Мы надеемся, она поможет вам решить возникшие у вас вопросы при эксплуатации техники.
Вы можете скачать инструкцию к Plustek SmartOffice PS286 Plus по ссылке ниже, если не хотите ждать загрузки. Если остались вопросы, задайте их в комментариях после инструкции.
«Загружаем инструкцию», означает, что нужно подождать пока файл загрузится и можно будет его читать онлайн. Некоторые инструкции очень большие и время их появления зависит от вашей скорости интернета.
Полезные видео
Остались вопросы?
Не нашли свой ответ в руководстве или возникли другие проблемы? Задайте свой вопрос в форме ниже с подробным описанием вашей ситуации, чтобы другие люди и специалисты смогли дать на него ответ. Если вы знаете как решить проблему другого человека, пожалуйста, подскажите ему


Часто задаваемые вопросы

Как посмотреть инструкцию к Plustek SmartOffice PS286 Plus?
Необходимо подождать полной загрузки инструкции в сером окне на данной странице или скачать кликнув по специальной кнопке.
Руководство на русском языке?
Все наши руководства представлены на русском языке или схематично, поэтому вы без труда сможете разобраться с вашей моделью
Как можно распечатать инструкцию?
Скачайте ее по специальной кнопке над формой чтения на ваше устройства и отправьте на печать.