Вертикальный слайсер Berkel серии DOMINA Информация о продукте Серия DOMINA Серия DOMINA включает три модели: SLG 315, SLG 350 и SLG 370. В серию также входят две другие модели: SLL 315, SLL 350 и SLL 370, а также SLH 315. , SLH 350 и SLH 370. Основные компоненты Кнопка «Пуск» Кнопка «Стоп» Толщина среза …
Подробнее «Руководство пользователя вертикального слайсера Salumeria серии DOMINA от Berkel»
РУКОВОДСТВО ПО ЭКСПЛУАТАЦИИ НАСТОЛЬНЫЕ ХЛЕБОРЕЗКИ 348BSL1 1″ Slices 348BSL12 ½” Slices 348BSL58 %” Slices 348BSL34 3/4″ Slices БЕЗОПАСНОСТЬ При использовании электроприборов необходимо всегда соблюдать основные меры предосторожности, включая следующие: Содержите рабочую зону вокруг машины в чистоте и порядке. . Учитывайте условия окружающей среды, окружающие машину. Не используйте машину во влажных, мокрых, …
Подробнее «Руководство пользователя настольной хлеборезки Estella 348BSL1 1 Inch Slices»
camry CR 4702 Food Slicer УСЛОВИЯ БЕЗОПАСНОСТИ ВАЖНЫЕ ИНСТРУКЦИИ ПО БЕЗОПАСНОСТИ ИСПОЛЬЗОВАНИЯ ПОЖАЛУЙСТА, ВНИМАТЕЛЬНО ПРОЧИТАЙТЕ И СОХРАНИТЕ ДЛЯ БУДУЩЕГО ИСПОЛЬЗОВАНИЯ Гарантийные условия отличаются, если устройство используется в коммерческих целях. Перед использованием продукта внимательно прочитайте и всегда соблюдайте следующие инструкции. Производитель не несет ответственности за…
Подробнее «Руководство пользователя camry CR 4702 Food Slicer»
Fritel SL 3710 Slicer Slicer – SL 3710 Для всех тех, кто печет свой собственный хлеб или любит сам нарезать сыр, ветчину или салями, FRITEL предлагает великолепный слайсер SL 3710. Этот металлический слайсер оснащен наклонной кареткой для достижения оптимального результата нарезки. Fritel, Со вкусом сделано! Уникальный продуктtages Слайсер для: …
Подробнее «Руководство по эксплуатации слайсера Fritel SL 3710»
Слайсер Fritel SL 3855 TWIN Внимательно прочтите руководство пользователя перед использованием прибора! Храните руководство бережно. Поздравляем! Вы только что купили высококачественный прибор, который будет радовать вас долгие годы. Пожалуйста, внимательно прочтите инструкцию по эксплуатации, прежде чем приступить к использованию прибора. Бережно сохраните эту инструкцию! Все лица, имеющие…
Подробнее «Руководство пользователя Fritel SL 3855 TWIN Slicer»
Fritel SL 3080 Synthetic Slicer Внимательно прочтите руководство пользователя перед использованием прибора! Храните руководство бережно. Поздравляем! Вы только что купили высококачественный прибор, который будет радовать Вас долгие годы. Пожалуйста, внимательно прочтите инструкцию по эксплуатации, прежде чем приступить к использованию прибора. Бережно сохраните эту инструкцию! Все лица, имеющие…
Подробнее «Руководство по эксплуатации слайсера Fritel SL 3080 Synthetic»
Бытовой слайсер Berkel Home Line Plus 200 МОДЕЛЬ: HL PLUS 200 – HL PLUS 250 ОБЩИЙ ПЛАН МАШИНЫ Кнопка «Пуск» (белая) Кнопка «Стоп» (красная) Фирменная табличка, техническая информация и маркировка CE Ножки Ручка регулировки толщины Пластина для измерения толщины Защитные ограждения Стол для мяса Держатель пресса продукта Лезвие Защита лезвия Крышка лезвия Основание Держатель продукта …
Подробнее «Руководство пользователя бытового слайсера Berkel Home Line Plus 200»
IAN 498380_2204 MULTI-CUTTER Инструкции по использованию и уходу: Храните следующие инструкции вместе с оригинальной упаковкой. Передайте все документы при передаче товара третьим лицам. Перед использованием изделия прочтите инструкции по использованию и уходу, особенно содержащиеся в нем инструкции по технике безопасности. Использование по назначению Изделие предназначено для резки мягких, …
Подробнее «Инструкции по использованию универсального резака SPICE SOUL для слайсера»
0929680020000 Слайсер Deli Руководство по эксплуатации 0929680020000 Слайсер Deli В СБОРЕ ВЫМОЙТЕ ПРИБОР ПЕРЕД ПЕРВЫМ ИСПОЛЬЗОВАНИЕМ. ПОЖАЛУЙСТА, ОБРАТИТЕСЬ К РАЗДЕЛУ ОЧИСТКИ В ЭТОМ БУКЛЕТЕ. Когда все кусочки будут чистыми и сухими, разверните корпус слайсера. Поместите устройство перед собой, ручка должна быть обращена к правой руке. Установите ручку. Толкать …
Подробнее «Руководство по эксплуатации слайсера Starfrit 0929680020000 Deli»
GRAEF SKS 500 Бытовой слайсер Продукт законченview Описание изделия Корпус двигателя Стопорная пластина Скользящая пластина лезвия Регулировочная ручка Переключатель для прерывистой и непрерывной работы Лоток для резака Держатель наконечника с защитой большого пальца Крышка лезвия Алюминий profile Защелка Предохранительная задвижка Общие аспекты Уважаемый покупатель, Вы сделали правильный выбор, купив профессиональный универсальный резак …
Подробнее «Руководство по эксплуатации бытового слайсера GRAEF SKS 500»
- Manuals
- Brands
- Bizerba Manuals
- Kitchen Appliances
- VS12D
- Operating instructions manual
-
Contents
-
Table of Contents
-
Troubleshooting
-
Bookmarks
Quick Links
Slicer
VS12D, VS12CD, VS12D-R, VS12D-V,
VS12D-V/R
Operating instructions
6.083.98.5.10.10 en
Related Manuals for Bizerba VS12D
Summary of Contents for Bizerba VS12D
-
Page 1
Slicer VS12D, VS12CD, VS12D-R, VS12D-V, VS12D-V/R Operating instructions 6.083.98.5.10.10 en… -
Page 2
All rights reserved Tous droits réservés Reservados todos los derechos Tutti i diritti riservati © 03/2013 Bizerba GmbH & Co. KG, 72336 Balingen P.O. Box 10 01 64 72301 Balingen, Germany Telephone (+49 7433) 12-0, Fax (+49 7433) 12-2696 Email: marketing@bizerba.com… -
Page 3
Chapter index About these instructions About this machine Safety instructions Installation Machine and operating elements Operation Troubleshooting Maintenance Technical data Appendix 6.083.98.5.10.10 en… -
Page 4
6.083.98.5.10.10 en… -
Page 5: Table Of Contents
Name of components VS12D ……..2 -…
-
Page 6
Distance between slices during shingling ….. . . 5 — Selecting operating mode for VS12D ……5 — 5.2.1… -
Page 7
Dimensions VS12D-V …….. -
Page 8
Contents Operating instructions VS12D /C /-R /-V /- 0 — 4 6.083.98.5.10.10 en… -
Page 9: About These Instructions
The machine may only be operated by trained personnel over the age of 14. This means that the operator has to be familiar with the contents of these operating instructions. Installation, maintenance and repair must be performed by Bizerba authorized specialists only.
-
Page 10: Warnings
About these instructions Operating instructions VS12D /C /-R /-V /- Warnings Warnings are divided into danger levels by the signal word above the warning symbol. Structure of warnings and meaning of signal words are described in these instructions as follows.
-
Page 11: About This Machine
About this machine About this machine Intended use The slicers in the VS12D series are technical tools exclusively intended for commercial use. They may only be operated by instructed personnel over the age of 14. The VS12D series includes all types listed in the enclosed declaration of conformity.
-
Page 12: Machine Description
About this machine Operating instructions VS12D /C /-R /-V /- Applications The slicers in the VS12D series are intended for installation in the sales area. Installation in preparation areas is permissible, making allowances for a cleaning plan and protection type IP 33.
-
Page 13: Name Of Components Vs12D
Operating instructions VS12D /C /-R /-V /- About this machine Materials The complete machine housing as well as the gauge plate, blade cover and carriage, are made of anodized aluminium. Optionally the surface can be finished with Ceraclean (VS12CD). The back panel , the slider guard and the remnant holder plate are made of transparent, break-proof and food-grade plastic, which is approved for foodstuffs.
-
Page 14
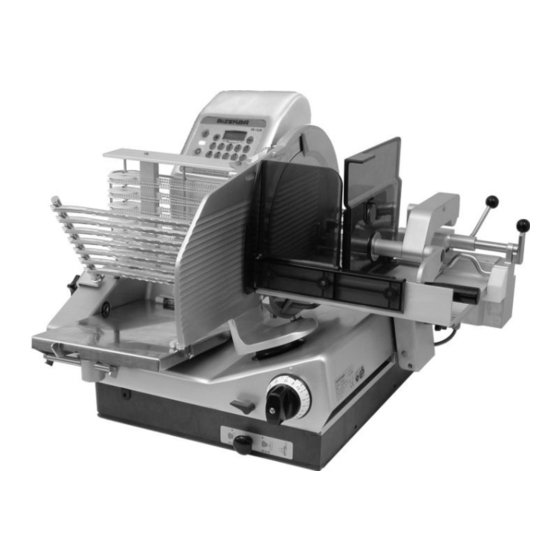
About this machine Operating instructions VS12D /C /-R /-V /- The machine is available in different versions. The figure shows an example: Blade guard ring Blade Blade cover Pusher protection Locking lever Remnant holder plate Remnant holder Product fixation device… -
Page 15: Name Of Components Vs12D-V
Operating instructions VS12D /C /-R /-V /- About this machine 2.2.2 Name of components VS12D-V Fig. 2: Name of components VS12D-V The machine is available in different versions. The figure shows an example: Blade guard ring Blade Blade cover Product support…
-
Page 16: Accessories
Feed roller with cam Depositing arm Chain frame Membrane keyboard Accessories Only use the original Bizerba spare parts and accessories in order to ensure safe and trouble-free operations. standard – Accessories kit including sharpener, paper felt, cleaning cloth, scrubber and brush and service oil –…
-
Page 17: Disposal Of The Machine / Environmental Protection
To ensure that the machine is recycled environmentally friendly, return the machine to the manufacturer or the dealer after intended use has expired. Naturally, Bizerba and its dealers will take back free of charge old machines no longer in operation.
-
Page 18
About this machine Operating instructions VS12D /C /-R /-V /- 2 — 8 6.083.98.5.10.10 en… -
Page 19: Safety Instructions
Protective devices may not be removed, modified or bypassed. DANGER Open the electrical installation area! Risk of life from electric current. – The electrical installation area may only be opened by Bizerba Service. – Pull power plug before moving the machine. WARNING Unauthorized persons! Serious injuries to fingers and hands and damage to health.
-
Page 20: Safety Instructions For Transport And Installation
Safety instructions Operating instructions VS12D /C /-R /-V /- Safety instructions for transport and installation CAUTION Carriage might move due to its unladen weight. Risk of hand injuries due to crushing! – Be careful when unpacking. Safety instructions during operation, slicing…
-
Page 21: Protective And Safety Equipment
Back panel, not removable – Product holder on or behind the product – Forced guidance of product holder in cutting range less than 60 mm (VS12D) – Protective circuit in case of voltage cutoff – Sharpener with protective cover of open blade area Remaining risks that cannot be excluded by technical measures: –…
-
Page 22
Safety instructions Operating instructions VS12D /C /-R /-V /- 3 — 4 6.083.98.5.10.10 en… -
Page 23: Installation
Installation and assembly Installation, start-up, as well as instructions on how to operate, clean, maintain and service the device are provided for the first time by the relevant Bizerba customer services or the Bizerba trade consultant. Only lift the machine at the lifting straps. The drawing «Packing/unpacking the machine» is included.
-
Page 24: Position On Bench
Installation Operating instructions VS12D /C /-R /-V /- The installation surface needs to: – provide sufficient space, Dimensions, see chapter 9.1 until 9.2 – be horizontal and flat – be slip-proof and tilt-proof – be stable and rigid, Machine weight, see chapter 9.1 until 9.2 The recommended table height is approx.
-
Page 25: Start-Up
Bizerba machines Start-up Initial start-up as well as instructions on how to operate, clean, maintain and service the machine are initially provided by the responsible Bizerba service department or by a Bizerba specialist. 4.3.1 Switching the slicer on Press the green key <I>.
-
Page 26: Placing Out Of Operation
Installation Operating instructions VS12D /C /-R /-V /- Placing out of operation If the machine is not going to be used for a longer period of time: Switch off machine. Pull out power plug. Clean machine as per cleaning instructions.
-
Page 27: Machine And Operating Elements
Operating instructions VS12D /C /-R /-V /- Machine and operating elements Machine and operating elements Membrane keyboard VS12D, VS12D-V Fig. 3: Membrane keyboard VS12D, VS12D-V Display of number of portions and number of slices Function keys Set maximum speed <Gradually reduce carriage speed>…
-
Page 28: Function Keys
Machine and operating elements Operating instructions VS12D /C /-R /-V /- 5.1.1 Function keys <Plus> Input key to increase number of slices or portions For number of slices there is an overflow of 99 over U (infinitely) to 1. For number of portions there is an overflow of P9 over PU (con- tinuous operation w/o counting) to P1.
-
Page 29: Change Of Depositing Programs
Operating instructions VS12D /C /-R /-V /- Machine and operating elements Depositing program <Circular pattern> with 5 slices per circle, large product diameter (key on the <right>) The number of slices for the selected depositing mode can be changed up to 99 using <+> and <-> keys. This number re- mains stored until a new depositing program is selected.
-
Page 30: Distance Between Slices During Shingling
Machine and operating elements Operating instructions VS12D /C /-R /-V /- 5.1.3 Distance between slices during shingling The distance between slices during shingling cannot be influenced depending on the se- lected number of slices (see table, rounded values). Number of slices…
-
Page 31: Automatic Operation
Operating instructions VS12D /C /-R /-V /- Machine and operating elements Applied for – delicate products – with low number of slices – thick slices Pull push button until its stop. Fig. 4: Push button MAN Set locking lever to MANUELL.
-
Page 32
Machine and operating elements Operating instructions VS12D /C /-R /-V /- Applied for – non-delicate products – with high number of slices – for slicing with depositing program, e.g. to fill up the service counter Press push button until its stop. -
Page 33: Slice Thickness Setting
Operating instructions VS12D /C /-R /-V /- Machine and operating elements Slice thickness setting The slice thickness is adjusted by means of the rotary knob. Large fine adjustment range between 0 to 3 mm. With slice thickness setting below «0» the tilting device is unlocked (black marking).
-
Page 34: Product Holder
Machine and operating elements Operating instructions VS12D /C /-R /-V /- Product holder VS12D When placing the product on the carriage, the product holder can be lifted up to its un- stable equilibrium. For slicing purposes, the product holder is set on top or behind the product.
-
Page 35: Product Fixation Device
Operating instructions VS12D /C /-R /-V /- Machine and operating elements Product fixation device VS12D The correctly positioned product support holds the product in place and prevents de- flecting and turning of product during the slicing process. The product fixation is irreversibly self-lock- ing on its shaft and is movable across the full width of the carriage.
-
Page 36: Paper Holder
Machine and operating elements Operating instructions VS12D /C /-R /-V /- Paper holder The paper holder is used when the sliced product has to be delivered straight on to paper or foil. Positioning of several sheets of paper or film:…
-
Page 37: Operation
Operating instructions VS12D /C /-R /-V /- Operation Operation Only products approved in compliance with the specifications of this documentation may be sliced. See chapter on Intended Use. Inserting and slicing product with the VS12D WARNING Rotating blade! Cut injuries –…
-
Page 38
Operation Operating instructions VS12D /C /-R /-V /- Switch on machine. Depositing program <Stacking 1 time> is the default setting of the device at delivery. Select desired function on membrane keyboard. Depositing table and depositing arm move towards their initial position. -
Page 39: Inserting And Slicing Product With The Vs12D-V
Operating instructions VS12D /C /-R /-V /- Operation Inserting and slicing product with the VS12D-V WARNING Rotating blade! Cut injuries – Do not allow yourself to become distracted. Concentrate on the task in hand and avoid time pressure. – During operation, do not reach into the path of the carriage.
-
Page 40
Operation Operating instructions VS12D /C /-R /-V /- Using the left hand, position product against carriage rear wall and push against holder. With the right hand, push lever of the holder downwards causing prongs to enter the product and holding it firmly. -
Page 41: Slicing With Round Platter (Optional)
Operating instructions VS12D /C /-R /-V /- Operation Slicing with round platter (optional) WARNING The round platter is equipped with magnets to ensure a fast and easy mounting. If the distance to the magnet is lower than 50 mm, pacemakers can be affected.
-
Page 42
Operation Operating instructions VS12D /C /-R /-V /- Setting possibilities In order to obtain a depositing pattern (see picture) the number of slices has to be increased accordingly. Circular pattern depositing of rectangular products is only possible by using the round platter. -
Page 43: Troubleshooting
Switch off machine immediately if untypical noises are heard or if there is a suspected risk of injury. Call the responsible Customer Service if you are unable to rectify the fault yourself. Please provide your Bizerba customer service point with the following details: – Machine type (see rating plate), –…
-
Page 44
Troubleshooting Operating instructions VS12D /C /-R /-V /- 7 — 2 6.083.98.5.10.10 en… -
Page 45: Maintenance
Operating instructions VS12D /C /-R /-V /- Maintenance Maintenance Preparation for cleaning Clean thoroughly: – Before putting into operation, – Depending on use and application frequency, – If extremely soiled, several times a day, – After sharpening, – after longer down times.
-
Page 46: Removing Components
Maintenance Operating instructions VS12D /C /-R /-V /- Removing components WARNING The round platter is equipped with magnets to ensure a fast and easy mounting. For fast and easy installation, the remnant holder is fixed to the guiding shaft by means of a magnet lock.
-
Page 47
Operating instructions VS12D /C /-R /-V /- Maintenance Round platter (optional) Lift round platter out of guide shaft and remove in upward direction For quick and easy handling, the remnant holder is attached to the pusher guard by a magnet lock. -
Page 48
Maintenance Operating instructions VS12D /C /-R /-V /- Guide cam Loosen the clamp handle on the frame and remove guide cam from between the transport chains. Fig. 31: Guide cam Remnant holder plate VS12D Using the handle, move product holder away from blade and tilt it up. -
Page 49
Operating instructions VS12D /C /-R /-V /- Maintenance Support plate VS12D Loosen star knob on guide element. Remove support plate in an upward di- rection. Place the product holder on the car- riage. Fig. 34: Support plate VS12D Product support VS12D-V Loosen star knob on guide element. -
Page 50
Maintenance Operating instructions VS12D /C /-R /-V /- Carriage Turn out knob on carriage foot. Tilt the carriage to the outside. Fig. 37: Tilt the carriage to the outside, VS12D Fig. 38: Tilt the carriage to the outside, VS12D-V Blade cover Hold blade cover on handle with your right hand. -
Page 51: Cleaning
Operating instructions VS12D /C /-R /-V /- Maintenance Deflector Remove deflector from magnet lock and move away in arrow direction. Fig. 40: Deflector Now the machine is ready for cleaning. Cleaning CAUTION Splash water! If water gets into the machine it can damage electric components.
-
Page 52
Maintenance Operating instructions VS12D /C /-R /-V /- Blade cleaning Press a wet disposable cleaning cloth against the blade surface and slowly wipe away from the center. Clean the back of the blade in the same manner. After this process, repeat using a dry disposable cleaning cloth. -
Page 53
Operating instructions VS12D /C /-R /-V /- Maintenance Wipe gauge plate away from blade. Never wipe towards the blade. Fig. 45: Gauge plate Wipe carriage. Leave surfaces dry in the air. Fig. 46: Carriage VS12D-V Clean gap with a brush. -
Page 54: Cleaning Plan For Slicing Machines
Maintenance Operating instructions VS12D /C /-R /-V /- Cleaning plan for slicing machines Work steps Recommen- Procedure Cleaning devices Notes ded cleaning agents Preparatory Close slice thick- measures ness, switch off machine, pull out power plug Disassemble in accordance all removable…
-
Page 55
Operating instructions VS12D /C /-R /-V /- Maintenance Work steps Recommen- Procedure Cleaning devices Notes ded cleaning agents Rinse Drinking water Max. 50°C tem- Disposable other machine perature depend. cleaning cloth on when grease Water pipe removed parts can be easily re-… -
Page 56: Preparing The Machine For Operation
Maintenance Operating instructions VS12D /C /-R /-V /- The cleaning agent can be acquired from the BIZERBA customer services: Description Order No. Packaging unit P3-steril 50003250000 5 liters P3-riksan 50003270000 5 liters P3-alcodes 50003260000 5 liters Clean Station 50003280000 H1-Service-Oil…
-
Page 57
Operating instructions VS12D /C /-R /-V /- Maintenance Carriage Tilt carriage. Using the handle screw into place on the carriage foot. Fig. 50: Tilting carriage, VS12D Fig. 51: Tilting carriage, VS12D-V Support plate VS12D Insert support plate from top, screw it to guide piece with star knob screw. -
Page 58
Maintenance Operating instructions VS12D /C /-R /-V /- Product fixation device VS12D On the operator side, place product holder fixation device horizontally on to the guide shaft and move on guide shaft. Fig. 53: Product fixation device VS12D Remnant holder plate VS12D… -
Page 59
Operating instructions VS12D /C /-R /-V /- Maintenance Product support VS12D-V Push product support onto guide piece, tighten both star knob screws firmly. Fig. 56: Product support VS12D-V Guide cam Install guide cam between the transport chains and tighten with locking handle. -
Page 60
Maintenance Operating instructions VS12D /C /-R /-V /- Depositing arm Push depositing arm onto carriage shaft and turn until the hub catches the groove. Fasten with three-square knob. Fig. 59: Depositing arm Depositing table Pull table guide towards you. From the… -
Page 61: Blade Sharpening
Operating instructions VS12D /C /-R /-V /- Maintenance WARNING Missing components! The operator can only be protected from injuries and the machine protected against damage if all the components of the machine are assembled properly. – Check if the machine is complete before it is re-started.
-
Page 62: Attaching The Sharpener
Maintenance Operating instructions VS12D /C /-R /-V /- 8.6.3 Attaching the sharpener WARNING Unprotected blade! Coming in contact with the sharp blade can lead to serious inju- ries. – Wear cut-proof gloves when cleaning and sharpening. – Do not clean the blades when operating the machine.
-
Page 63: Sharpening
Operating instructions VS12D /C /-R /-V /- Maintenance 8.6.4 Sharpening Wear eye protection! Hearing protection is recommended. Switch on machine. Set handwheel marking to «1». The sharpening stone is engaged. Sharpen until right blade edge shows a burr. Set handwheel marking to «0».
-
Page 64: Removing Sharpener
Maintenance Operating instructions VS12D /C /-R /-V /- 8.6.6 Removing sharpener Pull sharpener back after loosening the star grip screw and remove to the top. Set slice thickness immediately to «0». 8.6.7 Removing sharpening dust – Slice thickness to «0»…
-
Page 65: Care Of Machine, Servicing, Maintenance
WARNING Changing the blade! Severe injuries and damage to property. – For safety reasons, the blade may only be changed by Bizerba customer service. – Wear cut-proof gloves and shoes with toe caps. 6.083.98.5.10.10 en 8 — 21…
-
Page 66
Maintenance Operating instructions VS12D /C /-R /-V /- 8 — 22 6.083.98.5.10.10 en… -
Page 67: Technical Data
Operating instructions VS12D /C /-R /-V /- Technical data Technical data Dimensions VS12D Fig. 69: VS12D, example The machine is available in different versions. The figure shows an example: Outer dimensions: = 620 mm = 24.4″ Length = 795 mm = 31.3″…
-
Page 68: Dimensions Vs12D-V
Technical data Operating instructions VS12D /C /-R /-V /- Product size, diameter = min./max. 50/183 mm = 2″/7.2″ with product depositing = 224 mm = 8.9″ w/o product depositing Max. product height = min./max. 50 x 50/183 x 240 mm = 2″…
-
Page 69: Supply Voltage
Operating instructions VS12D /C /-R /-V /- Technical data Installation surface: = 510 mm = 20.1″ Length = 430 mm = 16.9″ Width Work area: = 800 mm = 31.5″ Length = 1,000 mm = 39.4″ Width Weight = approx. 73 kg = 73.03 kg Blade diameter = 330 mm = 13″…
-
Page 70: Ambient Conditions
Technical data Operating instructions VS12D /C /-R /-V /- Ambient conditions – Surrounding temperature for operation and storage: -10 to +40°C (+14 to +104 degF) – Humidity Protection type IP 33. High air humidity and condensation can result in damage to the machine.
-
Page 71: Appendix
Operating instructions VS12D /C /-R /-V /- Appendix Appendix Declaration of conformity Declaration of conformity for plastic materials with direct food contact 6.083.98.5.10.10 en…
-
Page 72
Appendix Operating instructions VS12D /C /-R /-V /- 6.083.98.5.10.10 en… -
Page 73: Declaration Of Conformity
The basis for the declaration of conformity is the contract documents (Bizerba pur- chase order documents). In the event of a modification to a machine of the above description that is not coor- dinated with Bizerba or not carried out by Bizerba, this declaration looses its validi- Date: 28 Mar 2013 Signature of manufacturer: ppa.
-
Page 74: Declaration Of Conformity For Plastic Materials With Direct Food Con
Information on suppliers or preliminary suppliers can be provided on request. Date: 22 Jul 2011 Signature of manufacturer: ppa. Title of signatory: Andreas W. Kraut Chairman of the Executive Board Chief Executive Officer (CEO) & Shareholder Bizerba GmbH & Co. KG 6.083.98.5.10.10 en…
-
Page 1
Slicer A400 / A400FB Instruction manual 6.054.98.5.10.06 en… -
Page 2
All rights reserved Tous droits réservés Reservados todos los derechos Tutti i diritti riservati © 05/2014 Bizerba GmbH & Co. KG, 72336 Balingen P.O. Box 10 01 64 72301 Balingen, Germany Telephone (+49 7433) 12-0, Fax (+49 7433) 12-2696 Email: marketing@bizerba.com… -
Page 3
Chapter index About these instructions About this machine Safety instructions Installation Machine and operating elements Operation Troubleshooting Maintenance Technical data Appendix 6.054.98.5.10.06 en… -
Page 4
6.054.98.5.10.06 en… -
Page 5: Table Of Contents
Machine description ……… . 2 — 2.2.1 Descriptions of components A400 ……2.2.2 Descriptions of components A400FB .
-
Page 6
Contents Instruction manual A400 / A400FB Option A400FB openWorld ……..4 — 4.5.1… -
Page 7
Instruction manual A400 / A400FB Contents Blade sharpening ………. -
Page 8
Contents Instruction manual A400 / A400FB 0 — 4 6.054.98.5.10.06 en… -
Page 9: About These Instructions
The machine may only be operated by trained personnel over the age of 14. This means that the operator has to be familiar with the contents of these operating instructions. Installation, maintenance and repair must be performed by Bizerba authorized specialists only.
-
Page 10: Warnings
About these instructions Instruction manual A400 / A400FB Warnings Warnings are divided into danger levels by the signal word above the warning symbol. Structure of warnings and meaning of signal words are described in these instructions as follows. DANGER Source of danger with high risk of imminent danger to persons!
-
Page 11: About This Machine
This Bizerba slicer is technical work equipment intended for commercial use only. It may only be operated by instructed personnel over the age of 14. The A400 / A400FB is a slicer that automatically feeds, slices and delivers according to the respective program that is set.
-
Page 12: Machine Description
About this machine Instruction manual A400 / A400FB Machine description Type designations or versions A402 = Depositing table version with 200 mm carriage A404 = Depositing table version with 400 mm carriage A406 = Depositing table version with 600 mm carriage…
-
Page 13: Descriptions Of Components A400
The total vibration of the items, which get into contact with hand and arm is below 2.5 m/s and therefore below the required limited value. 2.2.1 Descriptions of components A400 Fig. 1: Descriptions of components A400 The machine is available in different versions. The figure shows an example: Blade guard ring Blade…
-
Page 14
About this machine Instruction manual A400 / A400FB Drive housing Rating plate Depositing table Gauge plate Rear wall Depositing arm Feed roller with cam Chain frame Main switch Operating and display panel on motor tower (optional on drive housing) 2 — 4… -
Page 15: Descriptions Of Components A400Fb
Instruction manual A400 / A400FB About this machine 2.2.2 Descriptions of components A400FB Fig. 2: Descriptions of components A400FB The machine is available in different versions. The figure shows an example: Blade guard ring Blade Blade cover product support Product holder complete with remnant holder…
-
Page 16: Accessories
Feed roller with cam Chain frame Main switch Operating and display panel on motor tower (optional on drive housing) 2.2.3 Accessories Only use the original Bizerba spare parts and accessories in order to ensure safe and trouble-free operations. standard – Instruction manual –…
-
Page 17: Disposal Of The Machine / Environmental Protection
To ensure that the machine is recycled environmentally friendly, return the machine to the manufacturer or the dealer after intended use has expired. Naturally, Bizerba and its dealers will take back free of charge old machines no longer in operation.
-
Page 18
About this machine Instruction manual A400 / A400FB 2 — 8 6.054.98.5.10.06 en… -
Page 19: Safety Instructions
Protective devices may not be removed, modified or bypassed. DANGER Open the electrical installation area! Risk of life from electric current. – The electrical installation area may only be opened by Bizerba Service. – Pull power plug before moving the machine. WARNING Unauthorized persons! Serious injuries to fingers and hands and damage to health.
-
Page 20: Safety Instructions For Transport And Installation
Safety instructions Instruction manual A400 / A400FB Safety instructions for transport and installation CAUTION Carriage might move due to its unladen weight. Risk of hand injuries due to crushing! – Be careful when unpacking. Safety instructions during operation, slicing WARNING Rotating blade! Cut-injuries.
-
Page 21: Protective And Safety Equipment
Check if the machine is complete before it is re-started. – Check if components are positioned correctly and firmly. – Only use original Bizerba spare parts and accessories. Protective and safety equipment – Blade guard ring, stationary, cannot be removed –…
-
Page 22: Plates On Machine
Safety instructions Instruction manual A400 / A400FB Plates on machine Beware of hazardous electric charge Fig. 3: Warning sign: Flash sign Beware of magnetic field Fig. 4: Warning sign: Magnetic field Only use and service after the instruc- tion manual has been read Fig.
-
Page 23: Installation
Installation and assembly Installation, start-up, as well as instructions on how to operate, clean, maintain and service the device are provided for the first time by the relevant Bizerba customer services or the Bizerba trade consultant. Only lift the machine at the lifting straps. The drawing «Packing/unpacking the machine» is included.
-
Page 24: Electrical Connection
Installation Instruction manual A400 / A400FB The installation surface needs to: – provide sufficient space, Dimensions, see chapter 9.1 – be horizontal and flat – be slip-proof and tilt-proof – be stable and rigid, Machine weight, see chapter 9.1 The recommended table height is approx. 800 mm.
-
Page 25: Start-Up
Bizerba machines Start-up Initial start-up as well as instructions on how to operate, clean, maintain and service the machine are initially provided by the responsible Bizerba service department or by a Bizer- ba specialist. 4.3.1 Switching the slicer on Press the green key <I>.
-
Page 26: Option A400Fb Openworld
Installation Instruction manual A400 / A400FB Option A400FB openWorld Option openWorld allows easy connection of A400FB slicers to automatic packaging ma- chines, film or tray dispensers via configurable communication interfaces. You may choose from the following conveyor belts: 2-lane conveyor belt, 2 x 115 mm Fig.
-
Page 27: Installation Of Conveying Belts And Light Sensor
Instruction manual A400 / A400FB Installation Selectable are: – Light sensor – Insertion plate set and remnant holder – External switch off option 4.5.1 Installation of conveying belts and light sensor For a detailed description, please see chapter 8.5 Use both hands to hold the conveyor belt on its sides.
-
Page 28
Installation Instruction manual A400 / A400FB Adjustment of conveyor belt to the packages running in parallel Turn stop latches at side of conveyor belt. A bracing of max. 35 mm with 2-track conveyor belt and 2x 25°mm with 3-track conveyor belt in total are possible to ad- just the tracks to the packages running in parallel. -
Page 29: Installation Of Insertion Plate Set And Remnant Holder
Instruction manual A400 / A400FB Installation 4.5.2 Installation of insertion plate set and remnant holder Insertion plate set The plates are variable in their use and can be adjusted to different product and packaging sizes. Place the insertion plate with the threa- ded bolt into the required aperture of the basset.
-
Page 30: Switch Off Optional, External
Check if the machine is complete before it is re-started. – Check if components are positioned correctly and firmly. – Only use original Bizerba spare parts and accessories. 4.5.3 Switch off optional, external This option allows disconnecting specified slicer drives from the drive electronics by means of a contactor.
-
Page 31: I/O Interface
Instruction manual A400 / A400FB Installation 4.5.4 I/O interface Connect the slicer to a packaging machine, foil or tray dispenser: Remove the catch of the interface on the left side of the slicer. Insert synchronization plug into inter- face. Fig. 19: Communication interface…
-
Page 32
Installation Instruction manual A400 / A400FB The signal deriving from the light barrier or sensor will be transmitted to the synchroniza- tion plug. 4 — 10 6.054.98.5.10.06 en… -
Page 33: Machine And Operating Elements
Instruction manual A400 / A400FB Machine and operating elements Machine and operating elements Operating and display panel Operating of machine is done via function keys. Fig. 20: Operating and display panel Function keys <ON switch> (green) Lamp lights (white) when the machine is switched on <OFF switch>…
-
Page 34
Machine and operating elements Instruction manual A400 / A400FB <Clean> key The slice thickness is automatically set to smaller -1 mm. The cleaning station appears in the display, The carriage can only be tilted in this setting <Grind> key The slice thickness is automatically set to higher +15 mm. -
Page 35: Icons On Display
Instruction manual A400 / A400FB Machine and operating elements Program key <Save> Save new PLU to memory or overwrite or delete existing PLU. The PLU station appears in the display. Icons on display Slice thickness Fanning space lengthwise or crossways…
-
Page 36: Workstation
Machine and operating elements Instruction manual A400 / A400FB Fan longitudinally Fan transversely Fan lengthwise multi-layer (only for table- mounted machines) Fan transversely multi-layer (only for table-mounted machines) Shaving (special depositing arm is required) Equal distribution of sliced product on delivery device…
-
Page 37: Depositing Station
Instruction manual A400 / A400FB Machine and operating elements Fig. 21: Workstation <F1> Reduce slice thickness <F2> Reduce fanning space <F3> Reduce number of slices <F4> Number of carriage strokes <F5> To depositing station <F6> To measuring station <F7> Increase slice thickness <F8>…
-
Page 38: Measuring Station
Machine and operating elements Instruction manual A400 / A400FB Fig. 22: Depositing station <F1> Stacking <F2> Fan longitudinally <F3> Fan lengthwise multi-layer <F4> Shaving <F5> Reduce distance between rows <F6> Distributed depositing <F7> Double stacking <F8> Fan transversely <F9> Fan transversely, multi-layer <F11>…
-
Page 39: Plu Station
Instruction manual A400 / A400FB Machine and operating elements Fig. 23: Measuring station <F1> Product length <F2> Product height <F3> Product width <F7> Product length <F8> Product height <F9> Product width <F10> Reset to standard values <F11> In-between sizes <F12> Back to workstation…
-
Page 40: Information Station
Machine and operating elements Instruction manual A400 / A400FB Fig. 24: PLU station <F1> Page backward <F2> PLU5 <F3> PLU6 <F4> PLU7 <F5> PLU8 <F6> Page forward <F8> PLU5 <F9> PLU6 <F10> PLU7 <F11> PLU8 <F12> Back to workstation Data records PLU 1 to PLU 8 are predefined programs to ensure that they cannot be overwritten.
-
Page 41: Grinding Station
Instruction manual A400 / A400FB Machine and operating elements Fig. 25: Information station <F1> Contrast of display <F2> Set day counter to zero <F4> Activate / deactivate password <F5> To service station <F7> Contrast of display <F12> Back to workstation…
-
Page 42: Cleaning Station
Machine and operating elements Instruction manual A400 / A400FB Fig. 26: Grinding station <F7> Blade on <F9> Blade off Comment: Exit the grinding station by pushing on <Clean>. 5.10 Cleaning station This display appears after pushing on <Clean>. Comment: Do not switch off machine yet. Table, sliced product feed, slice thickness and depositing arm run in the cleaning setting.
-
Page 43: Paper Holder
Instruction manual A400 / A400FB Machine and operating elements Fig. 27: Cleaning station 5.11 Paper holder The paper holder is used when the sliced product has to be delivered straight on to paper or foil. Positioning of several sheets of paper or film:…
-
Page 44: Product Support
Machine and operating elements Instruction manual A400 / A400FB 5.12 Product support The correctly positioned product support prevents unstable or short product from deflecting or tipping over during slicing. Position the support; the sliced product is in the feed carriage: Loosen the handle on the carriage.
-
Page 45: Operation
Instruction manual A400 / A400FB Operation Operation Inserting and slicing product The machine may not be operated without a table or conveyor belt. The machine is switched on, all functioning parts are in or move into their basic setting. Carriage 200/400 mm with product holder, product feeding carriage and product clamp Move carriage towards operator.
-
Page 46
Operation Instruction manual A400 / A400FB Pull the lever towards the operator while at the same time pushing the guide manually up to the stop plate. Position the Sliced products support Fig. 33: Unlocking product feed Carriage 600 mm with Sliced product holder:… -
Page 47
Instruction manual A400 / A400FB Operation To safely slice leftover pieces the end of the sliced product has to be cut off. 6.054.98.5.10.06 en 6 — 3… -
Page 48
Operation Instruction manual A400 / A400FB 6 — 4 6.054.98.5.10.06 en… -
Page 49: Troubleshooting
Switch off machine immediately if untypical noises are heard or if there is a suspected risk of injury. Call the responsible Customer Service if you are unable to rectify the fault yourself. Please provide your Bizerba customer service point with the following details: – Machine type (see rating plate), –…
-
Page 50
Troubleshooting Instruction manual A400 / A400FB 7 — 2 6.054.98.5.10.06 en… -
Page 51: Maintenance
Instruction manual A400 / A400FB Maintenance Maintenance Preparation for cleaning Clean thoroughly: – before putting into operation – depending on use and application frequency – if extremely soiled, several times a day – after sharpening – after a longer down time…
-
Page 52: Removing Components
Maintenance Instruction manual A400 / A400FB Removing components CAUTION Chain, driver and gripper hooks, scraper edge! Stab and cut wounds. Twisted guide cogs or chain hooks can cause malfunctions. – Always wear cut-proof gloves when cleaning. – Avoid touching the chain hooks.
-
Page 53
Instruction manual A400 / A400FB Maintenance Conveyor belt A400FB Pull the light barrier upwards out of the holder and hang in to the holder of the machine. Fig. 37: Light sensor Tilt the lock on the belt support back- wards in the direction of the arrow. -
Page 54
Maintenance Instruction manual A400 / A400FB Use both hands to hold on to the sides of the center of the conveyor belt and tilt it towards you and then lift it up. Place the belt carefully on to an even surface. -
Page 55
Instruction manual A400 / A400FB Maintenance Guide cam Loosen the clamp handle on the frame and remove guide cam from between the transport chains. Fig. 43: Guide cam Product holder 200/400 mm carriage Loosen star knob. Lift out the holder casing in upwards di- rection. -
Page 56
Maintenance Instruction manual A400 / A400FB Product holder 600 mm carriage Loosen the star-grip handle on the car- riage. Lift out the holder casing in upwards di- rection. Fig. 46: Product holder product support Loosen star knob on guide element. -
Page 57: Cleaning
Instruction manual A400 / A400FB Maintenance Deflector Loosen deflector from magnet lock and move upwards. Fig. 49: Deflector Now the machine is ready for cleaning. Cleaning CAUTION Splash water! If water gets into the machine it can damage electric components.
-
Page 58
Maintenance Instruction manual A400 / A400FB Blade cleaning Press a wet disposable cleaning cloth against the blade surface and slowly wipe away from the center. Clean the back of the blade in the same manner. After this process, repeat using a dry disposable cleaning cloth. -
Page 59
Instruction manual A400 / A400FB Maintenance Wipe gauge plate away from blade. Never wipe towards the blade. Fig. 54: Gauge plate Wipe carriage. Leave surfaces dry in the air. Fig. 55: Carriage 6.054.98.5.10.06 en 8 — 9… -
Page 60: Cleaning Plan For Slicing Machines
Maintenance Instruction manual A400 / A400FB Cleaning plan for slicing machines Work steps Recommen- Procedure Cleaning devices Notes ded cleaning agents Preparatory Close slice thick- measures ness, switch off machine, pull out power plug Disassemble in accordance all removable with instruction…
-
Page 61
Instruction manual A400 / A400FB Maintenance Work steps Recommen- Procedure Cleaning devices Notes ded cleaning agents Rinse Drinking water Max. 50°C tem- Disposable other machine perature depend. cleaning cloth on when grease Water pipe removed parts can be easily re-… -
Page 62: Preparing The Machine For Operation
Maintenance Instruction manual A400 / A400FB The cleaning agent can be acquired from the BIZERBA customer services: Description Order No. Packaging unit P3-steril 50003250000 5 liters P3-riksan 50003270000 5 liters P3-alcodes 50003260000 5 liters Clean Station 50003280000 H1-Service-Oil 94008900022 400 ml…
-
Page 63
Instruction manual A400 / A400FB Maintenance Carriage Tilt the carriage in the direction of the ar- row. Using the handle screw into place on the carriage foot. Fig. 58: Tilting carriage Feeding carriage 200/400 mm carriage Insert the carriage plate into the channel along the sliced product holder guide and screw tight with the star grip screw. -
Page 64
Maintenance Instruction manual A400 / A400FB Product holder 600 mm carriage Insert the holder casing into the groove. Screw tight with the star grip screw. Fig. 61: Product holder product support Push product support onto guide ele- ment, tighten star knob. -
Page 65
Instruction manual A400 / A400FB Maintenance Chain frame Install chain frame with swiveled in feed roller from the top in the holding fixtures and drive shaft. Fig. 64: Chain frame Depositing arm Push depositing arm onto carriage shaft and turn until the hub catches the groove. -
Page 66
Maintenance Instruction manual A400 / A400FB Conveyor belt A400FB Use both hands to hold the conveyor belt on its sides. Put the belt bearing down onto the take- up pin, keeping it in a slight tilted posi- tion. Fig. 67: Insert conveyor belt… -
Page 67: Blade Sharpening
– Check if components are positioned correctly and firmly. – Only use original Bizerba spare parts and accessories. Blade sharpening Re-sharpening is necessary if the slicing result is unsatisfactory. The time intervals are dependent on the wear and tear of the blade and/or its operating usage as also the properties and conditions of the product.
-
Page 68: Preparation For Sharpening
Maintenance Instruction manual A400 / A400FB If sharpening stones are worn, replace stones. Replacement parts are supplied by Bizerba customer services. When replacing, do not confuse sharpening and honing stones. 8.6.2 Preparation for sharpening On the operating panel press <Clean> , see chapter 5.10.
-
Page 69: Sharpening
Instruction manual A400 / A400FB Maintenance Hold on to the sharpener in this position and use the star grip screw to clamp it to the gauge plate. Fig. 72: Clamping the sharpener 8.6.3 Sharpening Wear eye protection! Hearing protection is recommended.
-
Page 70: Honing
Maintenance Instruction manual A400 / A400FB 8.6.4 Honing Start the blade motor with the key <F7>. Set handwheel marking to «2». The honing stone is engaged. Hone until right-hand blade edge shows a honing bevel of approx. 0.5 — 1 mm which is (after approx.
-
Page 71: Removing Sharpening Dust
Instruction manual A400 / A400FB Maintenance 8.6.6 Removing sharpening dust – Slice thickness to «0» – Power plug is pulled – Wear cut-resistant gloves – Blade cover removed Press dry disposable cleaning towel to blade surface and slowly clean from center to outside.
-
Page 72: Care Of Machine, Servicing, Maintenance
Check if the machine is complete before it is re-started. – Check if components are positioned correctly and firmly. – Only use original Bizerba spare parts and accessories. Care of machine, servicing, maintenance The entire machine must be thoroughly cleaned based on usage, but at least twice a day.
-
Page 73
WARNING Changing the blade! Severe injuries and damage to property. – For safety reasons, the blade may only be changed by Bizerba customer service. – Wear cut-proof gloves and shoes with toe caps. 6.054.98.5.10.06 en 8 — 23… -
Page 74
Maintenance Instruction manual A400 / A400FB 8 — 24 6.054.98.5.10.06 en… -
Page 75: Technical Data
Instruction manual A400 / A400FB Technical data Technical data Dimensions A402 A404 A406 Outer dimensions 850 x 800 mm 1050 x 800 mm = 41.4″ x 1255 x 800 mm 31.5″ Work area 1010 x 850 mm 1210 x 850 mm = 47.7″ x 1280 x 850 mm 33.5″…
-
Page 76: Voltage Supply
Technical data Instruction manual A400 / A400FB A402FB A404FB A406FB Outer dimensions 850 x 1,710 mm 1050 x 1,710 mm = 1255 x 1,710 mm = 41.4″ x 67.4″ 49.4″ x 67.4″ Height on stand (dis- 1,535 mm 1,535 mm = 60.5″…
-
Page 77: Ambient Conditions
Instruction manual A400 / A400FB Technical data Ambient conditions – Surrounding temperature for operation and storage: -10 to +40°C (+14 to +104 degF) – Humidity Protection type IP 33. High air humidity and condensation can result in damage to the machine.
-
Page 78
Technical data Instruction manual A400 / A400FB 9 — 4 6.054.98.5.10.06 en… -
Page 79: Set Programs
Instruction manual A400 / A400FB Appendix Appendix Set programs Declaration of conformity Declaration of conformity for plastic materials with direct food contact 6.054.98.5.10.06 en…
-
Page 80
Appendix Instruction manual A400 / A400FB Set programs Slicer A400 (table depositing) Slicer A400FB (depositing on conveyor belt) 6.054.98.5.10.06 en… -
Page 81
The basis for the declaration of conformity is the contract documents (Bizerba pur- chase order documents). In the event of a modification to a machine of the above description that is not coor- dinated with Bizerba or not carried out by Bizerba, this declaration looses its validi- Date: 4/22/2014 Signature of manufacturer: i. -
Page 82
Functional barriers made of plastic are not used in the specified machine. Information on suppliers or preliminary suppliers can be provided on request. Date: 22 Jul 2013 Signature of manufacturer: i. V. Title of signatory: Ralf Steinhilber Director Food Processing Technology (FPT) Bizerba GmbH & Co. KG 6.054.98.5.10.06 en…