- Manuals
- Brands
- Arkray Manuals
- Measuring Instruments
- SPOTCHEM EZ SP-4430
- Operating manual
-
Contents
-
Table of Contents
-
Troubleshooting
-
Bookmarks
Quick Links
SPOTCHEM EZ
SP — 4430
Operating Manual
b
Related Manuals for Arkray SPOTCHEM EZ SP-4430
Summary of Contents for Arkray SPOTCHEM EZ SP-4430
-
Page 1
SPOTCHEM EZ SP — 4430 Operating Manual… -
Page 2
This manual contains important information on the functions of the SPOTCHEM EZ SP-4430. supplied by : ARKRAY, Inc. This manual is issued by: ARKRAY, Inc. Read carefully prior to starting up the unit. It is recommended to retain this manual for future use. -
Page 3
Introduction The SP-4430 is an automated biochemical analyzer using a dry chemistry system. This manual contains outlines, instructions for the operation, maintenance and troubleshooting for the SPOTCHEM SP-4430. Before operating the SP-4430, read this manual carefully. It is recommended to retain this manual for future use. WARNING Always be careful when handling blood samples or waste reagent ●… -
Page 4
Caution Marks Pay careful attention to these caution marks in this Operating Manual. ■Regarding accident resulting in injury or death. To prevent infection of yourself or others from WARNING pathogenic microbes, follow the instructions given herein. To prevent injuries to yourself or others, or material CAUTION damages, follow the instructions described. -
Page 5
Caution Labels Caution Stickers are adhered to the SP-4430 to prevent accidents as below. The descriptions are given on the following pages. Biohazard cautions. Wear protective gloves to prevent exposure to pathogenic microbes. The centrifuge turn round at high speed. Keep your hands off when mesurement is in process. Biohazard cautions. -
Page 6: Table Of Contents
Contents Automated biochemical analyzer, SP-4430 Premise …………………………………………………………………………………… Introduction …………………………………………………………………………… Caution Marks ……………………………………………………………………… Caution Labels …………………………………………………………………… Contents ……………………………………………………………………………… 1-1 Outline Chapter 1 …………………………………………………………………………… 1-02 1-1-1 Features INTRODUCTION ………………………………………………………………… 1-02 1-1-2 Measurement principles ………………………………………… 1-03 1-1-3 Specifications ……………………………………………………… 1-04 1-2 Shipping Carton ……………………………………………………………
-
Page 7
2-5 Calibration …………………………………………………………………… 2-28 2-5-1 Overview of calibration ………………………………………… 2-28 2-5-2 Calibration by magnetic card ………………………………… 2-29 2-5-3 Calibration by calibrator kit ………………………………… 2-31 2-6 Interpreting measurement results ……………………… 2-39 2-6-1 Printing normal measurement results …………………… 2-39 2-6-2 Printing calibration results ……………………………………… -
Page 8
07 ● SP — 4430… -
Page 10: Outline
Chapter 1 INTRODUCTION The SP-4430 is an automated biochemical analyzer using a dry chemistry system. This chapter contains the information on the functions and measurement principles of the SP-4430. 1-1 Outline 1-1-1 Features 1-1-2 Measurement principles 1-1-3 Specifications 1-2 Shipping Carton 1-2-1 Analyzer 1-2-2 Accessories 1-3 Parts Description and Function…
-
Page 11
1-1 Outline Chapter 1 INTRODUCTION 1-1-1 Features The footprint of the SP-4430 is as small as that of a ■Compact and lightweight notebook computer. It weighs only 5 kg and can be design easily carried by one person. The small unit contains various components such as a display, printer, 1- sample centrifuge and automatic tip disposal mechanism. -
Page 12
SP — 4430の概要 Chapter 1 INTRODUCTION 1-1-2 Measurement principles The light emitted from LED becomes monochromatic light of a certain wavelength after passing through an optical fiber (Five different types of optical filters are provided, and the optimum wavelength is selected for each test item). Monochromatic light is separated and transmitted to the photometry section of each channel by ten optical fibers. -
Page 13
SP — 4430の概要 Chapter 1 INTRODUCTION 1-1-3 Specifications Sample Serum, Plasma, Whole blood (Only Hb) Measurement item General biochemical measurement items, 22 items Measurement wavelength 5 wavelengths (405, 550, 575, 610 and 820 nm) Measurement principle Optical measurement of reflection intensity of reagent color reaction Measurement Range Set for sach measurement item… -
Page 14
Shipping Carton Chapter 1 INTRODUCTION 1-2-1 Analyzer Open the package and confirm that all items are included. 1・Analyzer (S-4430) 2・Power cord 3・AC adapter 4・Accessory case 5・Operating 6・Warranty card with case, manual Delivery label Item Description Qty. SP-4430 Analyzer Power cord AC adapter Accessory case Operating manual… -
Page 15
梱包品の確認 Chapter 1 INTRODUCTION 1-2-2 Accessories Open the package and confirm that all items are included. 1・Tip 2・Cleaning wire 3・Cleaner set 4・Nozzle set 5・Wrench set for nozzle replacement 6・Centrifuge tube 7・Tip waste case 8・Protective cover 9・Thermal printer paper Item Description Qty. -
Page 16
Parts Description and Function Chapter 1 INTRODUCTION 1-3-1 Front of the analyzer 12・Built-in printer 11・Magnetic card reader 10・Display 9・Operator panel 7・Black & white plates 13・Maintenance cover 1・Reagent table 3・Port 5・Tip hole 6・Tip waste case 4・Centrifuge 14・Protective cover 8・Table cover 2・Centrifuge-equipped Multi Rack Function Item Reagent table… -
Page 17
各部の名称とはたらき Chapter 1 INTRODUCTION 1-3-2 Operator panel Item Function START Starts measurement. Select Yes from the Yes/No option. STOP Stops measurement. Select No from the Yes/No option. Cancels entry. FEED Feeds the built-in printer with paper while pressed. MENU Switches the page on each menu display. 0~9 (ten key) Selects the menu number. -
Page 18
SP — 4430の概要 Chapter 1 INTRODUCTION 1-3-3 Rear of the analyzer 1・Power switch 3・Cooling Fan 5・B.C.R. 7・Paper holder 2・Power input terminal 4・COM. 6・CONT. Item Function Power switch For turning on and off the power supply to the analyzer. Power input terminal For the supplied AC adapter. Cooling Fan For Ventilating heated air in the unit to prevent overheating. -
Page 19
1-4 Setting up the Analyzer Chapter 1 INTRODUCTION 1-4-1 Cautions CAUTION 10cm or more AC100-120V 50 / 60Hz Before setting up the analyzer, read the following notes and always take proper AC220-240V safety precautions. Allow a space of 10 cm or more between Operate the analyzer with power of the ●… -
Page 20
SP — 4430の概要 Chapter 1 INTRODUCTION CAUTION Before setting up the analyzer, read the following notes and always take proper safety precautions. Do NOT set up the analyzer where Avoid exposing the analyzer to direct ● ● chemicals are stored nearby, or where sunlight, condensation and wind. -
Page 21
装置の設置 Chapter 1 INTRODUCTION 1-4-2 Setting up the analyzer The parts in the analyzer are secured firmly in order to prevent scratches and/or damage due to transportation. Remove the fixing tapes before setting up the analyzer. Read 1-4-1 “Cautions on installation” carefully before setting up the analyzer. -
Page 22
SP — 4430の概要 Chapter 1 INTRODUCTION 1-4-3 First operation after setting up This section explains the way to load thermal printer paper, and set data and time after turning on the power switch. Turn on the power. Turn on the power switch on the rear ●… -
Page 23: Notes At Transportation
装置の設置 Chapter 1 INTRODUCTION 1-4-4 Notes at transportation Remove the tape fixing the ● protective cover. Set the maintenance cover and the ● tip waste case. Press [STOP] to close the table ● C o v e r i s c l o s i n g . /…
-
Page 24
装置の設置 Chapter 1 INTRODUCTION 1-4-4 Notes at transportation When carrying the analyzer in cars, use an exclusive carrying case. The carrying case is optional. Follow the following procedures to prevent exposure to pathogenic microbes and damage to the analyzer. Wear protective gloves to prevent exposure to pathogenic microbes. WARNING Inspect the inside of the analyzer. -
Page 25
1 — 16 ● SP — 4430… -
Page 27
Chapter 2 MEASUREMENT The normal measurement and two types of calibration can be done with the SP-4430. This chapter describes the outline and operating procedures of each measurement. 2-1 Outline of Measurement 2-1-1 SPOTCHEMⅡ Reagent Strips 2-1-2 Normal measurement 2-1-3 Calibration 2-2 Cautions 2-2-1 Cautions 2-2-2 Handling samples… -
Page 28: Outline Of Measurement
2-1 Outline of Measurement Chapter 2 MEASUREMENT 2-1-1 SPOTCHEMⅡ Reagent Strips SPOTCHEMⅡ Reagent Strips (optional) must be used with this analyzer. There are two types of SPOTCHEM Reagent Strips. Use the correct type of strips for the measurement purpose. Multi Reagent Strip ●…
-
Page 29: Normal Measurement
測定を始める前に Chapter 2 MEASUREMENT 2-1-2 Normal measurement In normal measurement, more than one item can be measured at a time for one sample. The Reagent Strip Table can hold three Single Reagent Strips and one Multi Reagent Strip, so that simultaneous measurement of up to nine items is available.
-
Page 30: Calibration
装置の設置 Chapter 2 MEASUREMENT 2-1-3 Calibration This analyzer provides two types of calibration: Calibration by magnetic card (Reagent Card) and Calibration by Calibrator. Calibration must be performed for all fields of Reagent Strips (see “2-5-1 Outline of calibration” for details). For calibration by Calibrator, the following two types of Calibrator Kit and Magnetic Card (Calibration Card) are used.
-
Page 31
装置の設置 Chapter 2 MEASUREMENT 2-1-4 校正について The flowchart of calibration. SP — 4430 ● 2 — 05… -
Page 32: Cautions
2-2 Cautions Chapter 2 MEASUREMENT 2-2-1 Cautions temperature:20 〜 25℃ :30 〜 60% humidity Before turning ON the power, reconfirm The analyzer has a temperature control If there is anything wrong with the ● ● ● “1-4-1 Cautions” so that the analyzer is function in order to yield correct analyzer, or in case of odor or smoke, always…
-
Page 33: Handling Samples
装置の設置 Chapter 2 MEASUREMENT 2-2-2 Handling samples Wear protective gloves Blood is used as a measurement sample Handling samples slightly differs ● ● with this analyzer. Be aware that blood may depending on test items. Follow the be contaminated with pathogenic microbes instructions on the package insert of that may cause infectious disease.
-
Page 34: Handling Magnetic Cards
測定時の注意 Chapter 2 MEASUREMENT 2-2-4 Handling magnetic cards Do NOT place a magnetic card close Do NOT scratch the magnetic surface (supplied Do NOT use a magnetic card ● ● ● to a magnetic object (magnet, TV set, (stripe). Information on the magnetic with Reagent Strips or Calibrator) etc.) Information on the magnetic card card may become unreadable.
-
Page 35: Handling Centrifuges
装置の設置 Chapter 2 MEASUREMENT 2-2-6 Handling centrifuges Uncap the tube Samples with extremely high hematocrit levels Heparin is contained as an anticoagulant. Samples with extremely high hematocrit Pipette 250 μL to 270 μL of whole blood ● ● ● Close the cap tightly after setting a levels may yield incorrect measurement into the centrifuge tube.
-
Page 36: Preparation For Measurement
2-3 Preparation for Measurement Chapter 2 MEASUREMENT 2-3-1 Preparation Prepare necessary instruments as described in the following table before starting Normal Measurement, Calibration by Magnetic Card or Calibration by Calibrator. IMPORTANT Take the Reagent Strips out of the refrigerator and leave them at room temperature (10〜 Single Reagent Strips 30℃) for 20 minutes.
-
Page 37: Startup
装置の設置 Chapter 2 MEASUREMENT 2-3-2 Startup The operating procedures from turning ON the power to the MAIN MENU are described below. NOTE Before turning ON the power, make sure that the maintenance cover is in position. If light enters into the analyzer during initialization, an error will occur.
-
Page 38: Checks Before Measurement
測定の準備 Chapter 2 MEASUREMENT 2-3-3 Checks before measurement Check each part before performing Normal Measurement or Calibration. WARNING Wear protective gloves to prevent exposure to pathogenic microbes. CAUTION Discard used samples, tips and protective gloves separately from general waste according to the local regulations on biohazardous waste. Thermal printer paper.
-
Page 39: Preparation Of Samples
装置の設置 Chapter 2 MEASUREMENT 2-3-4 Preparation of samples Prepare samples as described below except for Hb and HDL-C, which require different procedures (see pages 2-16 and 2-17 for sample preparation for Hb and HDL-C). Test items may be added or changed in the future.
-
Page 40
測定の準備 Chapter 2 MEASUREMENT 2-3-3 測定前の確認 Even if the sample stays at the Inverting a sample to mix bottom after being inverted, heparin is well mixed with the Gently invert a sample tube. 1・ sample. Do NOT shake the tube vigorously. In 3 seconds, invert the sample 2・… -
Page 41
Chapter 2 MEASUREMENT Using a centrifuge Prepare a centrifuge. ● A Centrifuge tube has 1 line Uncap the tube and pipette 250 μL of ● marked on it for 250μL. heparinized whole blood or plain blood into the centrifuge tube. The centrifuge tube includes Heparin as an ●… -
Page 42
Chapter 2 MEASUREMENT Measuring the Hb When measuring Hb, dilute whole blood Orange cap samples 6 times with distilled water. Prepare a Whole blood Sample Tube (orange ● Whole blood sample tube cap). Uncap the tube and pipette the whole blood ●… -
Page 43
Chapter 2 MEASUREMENT If HDL-C reagent(direct method) Using HDL-C Kits is used for measurement, this procedure is unnecessary. Prepare a Serum Sample Tube (blue cap). ● Serum or plasma (100 ) Pipette 100μL of serum or plasma. ● Gently pipette 100 μL of HDL Separation ●… -
Page 44: Measurement
2-4 Measurement Chapter 2 MEASUREMENT 2-4-1 Normal measurement This section describes the operating procedure of Normal Measurement. In Normal Measurement, simultaneous measurement of up to nine items is possible for one sample, using Single and Multi Reagent Strips. Before measurement, make necessary preparation as instructed in “2-3 Preparation for Measurement”.
-
Page 45
測定操作 Chapter 2 MEASUREMENT 2-4-1 通常測定 Check the lot number of Reagent Strips. Press [2] key on the Standby screen. ● 【 Sー01:G G T 】 ( 1/30 ) 【 X X X X X X C A R D 】 The Confirm screen is displayed, ●… -
Page 46
測定結果 Chapter 2 MEASUREMENT 2-4-1 通常測定 The number of the previous Set measurement No. or ID (if necessary). measurement No + 1 is displayed ID of up to 13 characters can be set for each measurement. If ID setting is not as the initial number. -
Page 47
測定結果 Chapter 2 MEASUREMENT 2-4-1 通常測定 No set-up is available where Set the sample type (when necessary). sample type is not registered. Sample type can be set for each measurement. When sample type is not The registration can be made on the Parameter Menu. -
Page 48
装置の設置 Chapter 2 MEASUREMENT 2-3-4 検体の準備 Set the samples. Measurement of uncentrifuged whole blood. ■ Open the protective cover and place ● the uncapped centrifuge tube in position. Close the cover. ● Make sure the sample tubes are NOTE uncapped, otherwise it may cause breakage of centrifuge tube and the Nozzle. -
Page 49
測定結果 Chapter 2 MEASUREMENT 2-4-1 通常測定 ■ Remeasurement (or additional measurement) with a centrifuge. When measuring the once-measured sample with a centrifuge, such measurement can be done at a reduced centrifugal time. IMPORTANT When performing remeasurement or additional measurement , sample quantity may be short. -
Page 50
装置の設置 Chapter 2 MEASUREMENT 2-3-4 検体の準備 Remove a Reagent Strip from the ● aluminum foil package without touching the reagent field with the fingers. reagent field Place the Reagent Strips on the ● Reagent Table by holding the right side of the strip. Be sure to insert the end of a IMPORTANT Reagent Strip into the groove of the… -
Page 51
測定結果 Chapter 2 MEASUREMENT 2-4-1 通常測定 Remove the Reagent Strip from the ● package without touching the reagent field with fingers. reagent field Insert Reagent Strips on the ● Reagent Table as shown at right. Be sure to insert the end of a IMPORTANT Reagent Strip into the groove of the Reagent Table so that the Reagent… -
Page 52
装置の設置 Chapter 2 MEASUREMENT 2-3-4 検体の準備 As the measurement proceeds, the ● M e a s u r i n g ・・・ 01:23 display of approximate remaining S t o p( S T O P ) time changes to the ordinary time indication. -
Page 53
測定結果 Chapter 2 MEASUREMENT 2-4-1 通常測定 Remove any used Reagent Strips ● and discard them. When the message “DISCARD TIPS” is displayed, remove the Tip Waste Case and discard used tips. Reattach the Tip Waste Case. ● To discontinue measurement, press ●… -
Page 54: Calibration
2-5 Calibration Chapter 2 MEASUREMENT 2-5-1 Overview of calibration Calibration is necessary to maintain measurement accuracy. Calibration reduces unfavorable effects of reagent pack that changes with time, eliminates gaps among lots or facilities, and maintains measurement accuracy to a certain level. Basically, calibration should be performed using the SPOTCHEM Calibrator Kit for each type of Reagent Strips, but it requires a lot of time to do so for all types of Reagent Strips.
-
Page 55: Calibration By Magnetic Card
装置の設置 Chapter 2 MEASUREMENT 2-5-2 Calibration by magnetic card By inserting “Reagent Card” attached to Single Reagent Strips or another one attached to Multi Reagent Strips into a magnetic-card reader, differences among lots and changes with time of reagent pack are automatically calibrated.
-
Page 56
校正 Chapter 2 MEASUREMENT 2-5-1 校正の概要 When the stripe is inserted, the ● I n s e r t a c a r d . screen shown at the right is T h e s a m e s t r i p e displayed. -
Page 57: Calibration By Calibrator Kit
装置の設置 Chapter 2 MEASUREMENT 2-5-3 Calibration by calibrator kit Use the SPOTCHEM Calibrator Kit for calibration. For Hb items, use the SPOTCHEM Calibrator Hb Kit. WARNING Wear protective gloves to prevent exposure to pathogenic microbes. CAUTION Discard used samples, tips and protective gloves separately from general waste according to local regulations on biohazardous waste.
-
Page 58
校正 Chapter 2 MEASUREMENT 2-5-1 校正の概要 To check the calibration mode and the ● 【 Sー01:G G T 】 number of calibration times, press [3] ( 1/30 ) 【 L & H N=3 】 key on the CALIBRATION MENU to display the Calibration information checking screen. -
Page 59
校正 Chapter 2 MEASUREMENT 2-5-1 校正の概要 Insert calibration card. Press [2] key on the CALIBRATION To stop calibration, press ● I n s e r t a c a r d . [STOP] key. MENU. T h e s a m e s t r i p e The Magnetic card entry screen is displayed. -
Page 60
装置の設置 Chapter 2 MEASUREMENT 2-5-3 キャリブレータ校正 When performing 1-point Set the Tip. calibration (High), proceed to Set the tips in the tip hole of the procedure 9. ● Centrifuge-equipped Multi Rack using tweezers. Do NOT touch the end of the Tip IMPORTANT with bear hands. -
Page 61
校正 Chapter 2 MEASUREMENT 2-5-1 校正の概要 Insert the Reagent Strips with the ● same items, starting from the S1 channel on the Reagent Table. If the number of calibration is set as more than 3 for 2-point calibration, calibration should be sperately performed twice. -
Page 62
装置の設置 Chapter 2 MEASUREMENT 2-5-3 キャリブレータ校正 Start measurement of the “Low” calibrator. ● Press [START] key. The Reagent Table Press [STOP] key to stop the M e a s u r i n g ・・・ and Centrifuge equipped Multi Rack calibration, the Calibration S t o p(… -
Page 63
校正 Chapter 2 MEASUREMENT 2-5-1 校正の概要 When performing 1-point Set the tip. calibration for «Low» only, proceed to procedure 13. Set the tip by following procedure 5. ● Set the “High” Calibrator. Press [STOP] key to stop Set the “High” Calibrator by following procedure 6. ●… -
Page 64
校正 Chapter 2 MEASUREMENT 2-5-1 校正の概要 When a message, “Remove used ● tips.” is displayed, remove the Tip Waste Case and discard used tips. Set the Tip Waste Case again. ● R e m o v e u s e d t i p s . O K(… -
Page 65: Interpreting Measurement Results
2-6 Interpreting measurement results Chapter 2 MEASUREMENT 2-6-1 Printing normal measurement results To print out the measurement results, Normal printing and Survey Mode printing are available. The Survey Mode has the following additional items to the print out of the Normal mode.
-
Page 66
測定結果のみかた Chapter 2 MEASUREMENT 2-6-1 通常測定結果 Normal printing ( 1 ) ( Man ) When “Printing of measurement Version. 1・ results” is performed on the Measurement date and time : Date and time when [START] key is pressed. 2・ Sub Menu, the results are Measurement number : The number is counted starting from 0001 (When the power is on.) 3・… -
Page 67
装置の設置 Chapter 2 MEASUREMENT 2-5-3 キャリブレータ校正 Survey Mode printing (for 1 item) ( 2 ) Measurement value which temperature conversion, unit conversion or correlation 1・ correction is not applied. Temperature. Printed out as ….. for the items other than enzyme items. 2・… -
Page 68: Printing Calibration Results
測定結果のみかた Chapter 2 MEASUREMENT 2-6-2 Printing calibration results The calibration results are printed when calibration by calibrator kit is completed. The formats of the Single Reagent Strips and the Multi Reagent Strips are slightly different. Even when calibration errors (E 30 : Abnormal data) occur during the calibration the calibration results are printed.
-
Page 69
測定結果のみかた Chapter 2 MEASUREMENT 2-6-2 キャリブレータ校正結果 Calibration Result of Multi Reagent Strip ( 2 ) From the left, name of Multi Reagent Strip, item symbol, lot number and expiry date . 1・ From the left, item name and item symbol. 2・… -
Page 70
2 — 44 ● SP — 4430… -
Page 72: Overview Of Sub Menu
Chapter 3 SUB MENU With the SUB MENU, auxiliary operations other than normal measurement and calibration can be performed. This chapter describes the SUB MENU functions and operating procedure. 3-1 Overview of SUB MENU 3-1-1 Composition of SUB MENU 3-2 Measurement Results Menu 3-2-1 Print measurement results 3-2-2 Transmit measurement results 3-2-3 Delete measurement results…
-
Page 73: Overview Of Sub Menu
3-1 Overview of SUB MENU Chapter 3 SUB MENU 3-1-1 Composition of SUB MENU ■ MAIN MENU After the power is ON and warm-up is completed, the MAIN MENU is displayed. In the MAIN MENU, normal measurement, calibration, and the SUB MENU are available.
-
Page 74
装置の設置 Chapter 3 SUB MENU 1-4-3 設設置後の始動と終了 SP — 4430 ● 3 — 03… -
Page 75: Measurement Results Menu
3-2 Measurement Results Menu Chapter 3 SUB MENU 3-2-1 Print measurement results If [STOP] key is pressed during Print measurement results stored in the memory (Max. 100 measurements). operation, the previous screen The following three options for printing are available. is restored.
-
Page 76
装置の設置 Chapter 3 SUB MENU 2-3-4 測定の準備 Enter search condition. If designation of the range of Enter the dates of starting and ● D a t e <99ー01ー01>Y MD measurement dates (the dates finishing measurements by sliding of starting and finishing t o <00ー12ー31>… -
Page 77: Transmit Measurement Results
測定結果メニュー Chapter 3 SUB MENU 3-2-2 Transmit measurement results If [STOP] key is pressed during Transmit measurement results (Max. 100 measurements) stored in the operation, the previous screen memory. is restored. The following three types for transmission are available. In case of retransmission, 1.
-
Page 78
装置の設置 Chapter 3 SUB MENU 2-3-4 測定の準備 Enter searching condition. If designation of the range of Enter the dates of starting and ● D a t e <99ー01ー01>Y MD measurement dates (the dates finishing measurements by sliding of starting and finishing t o <00ー12ー31>… -
Page 79: Delete Measurement Results
測定結果メニュー Chapter 3 SUB MENU 3-2-3 Delete measurement results Delete all the measurement results stored in memory. Display setting screen. Press [2] key on the MAIN MENU. ● 1 . M e a s u r e 2 . S u b m e n u SUB MENU1/2 is displayed.
-
Page 80
測定結果メニュー Chapter 3 SUB MENU 3-2-2 測定結果の送信 Wildcards ■ Wildcards can be used for ID search. Wildcards have two types of characters, “? ” and “*”, indicating a single or any number of characters. “ ? ” indicates a single character. ●… -
Page 81: Parameter Menu
3-3 Parameter Menu Chapter 3 SUB MENU 3-3-1 Print parameters Print the present parameter settings by each measurement item for checking. Display setting screen. Press [2] key on the MAIN MENU. ● 1 . M e a s u r e 2 . S u b m e n u SUB MENU 1/2 is displayed.
-
Page 82
測定結果のみかた Chapter 3 SUB MENU Parameters can be printed by executing “Printing parameters”. The formats are slightly different between Single Reagent Strips and Multi Reagent Strips. (1) Printing of single parameters Version. 1・ Printed date and time: The date and time when “printing of parameters” is executed. 2・… -
Page 83
測定結果のみかた Chapter 3 SUB MENU 2-6-2 キャリブレータ校正結果 (2) Printing of multi parameters From the left, name of Multi Reagent Strip, item symbol, lot number and expiry 1・ date. Calibration type 2・ CARD means calibration by magnetic card and Cal. means calibration by calibrator kit. -
Page 84: Enter Parameters
装置の設置 Chapter 3 SUB MENU 3-3-2 Enter parameters If [STOP] key is pressed during Set parameters (measurement conditions) for temperature, coefficient entry, the entry is canceled and the cursor returns to the of correlation correction, normal value range, and calibration previous “[ ]”…
-
Page 85
パラメータメニュー Chapter 3 SUB MENU 3-3-1 パラメータ設定内容の印字 Select measurement items. Besides [hyphen (-)] key, [0], [2], Select measurement items for ● [ Sー01:G G T ] [4], [5], [6], and [8] keys can be parameters by pressing [hyphen (-)] used in selecting items. (… -
Page 86
装置の設置 Chapter 3 SUB MENU 3-3-2 パラメータ設定 Press [ENTER] key. ● C a l . T y p e[ C A R D ] The cursor moves to the entry Sー01 <2> position for the number of times of calibration. Any number from 2 to 6 (times) can be entered. -
Page 87
装置の設置 Chapter 3 SUB MENU 3-3-2 パラメータ設定 Store all the parameter settings. Press [START] or [STOP]. ● W r i t i n g ・・・ / If [START] key is pressed, the parameter settings are saved and the Measurement item selecting screen is restored. -
Page 88: Initialize Parameters
パラメータメニュー Chapter 3 SUB MENU 3-3-3 Initialize parameters Initialize parameter settings to the factory setting values. Display setting screen. Press [2] key on the MAIN MENU. ● 1 . M e a s u r e 2 . S u b m e n u SUB MENU 1/2 is displayed.
-
Page 89
装置の設置 Chapter 3 SUB MENU 3-3-2 パラメータ設定 End Initialization. If the initialization is finished, press ● 1 . M e a s u r e 2 . S u b m e n u [STOP] key three times to return to 3… -
Page 90: Enter Sample Type
パラメータメニュー Chapter 3 SUB MENU 3-3-4 Enter sample type Enter sample types to measure. The entered types are printed out with the measurement results. Maximum 5 different types can be set. Display the screen. Press [2] key on the MAIN MENU. ●…
-
Page 91
パラメータメニュー Chapter 3 SUB MENU 3-3-4 Input of identifiers for sample classifications Setting the sample type to use on the basic setting. In the end, set the sample type to ● REF value base type use on the basic setting. <Man… -
Page 92: Copy Standard Range Setting
パラメータメニュー Chapter 3 SUB MENU 3-3-5 Copy standard range setting The standard range setting for a certain sample type can be copied in all items to one for another sample type. Copy is available only when two or more sample types are input. Display setting screen.
-
Page 93
パラメータメニュー Chapter 3 SUB MENU 3-3-4 Input of identifiers for sample classifications Selecting the standard range of the duplicate screen. Press [-] key to select sample type ● PRES SPC>>Next SPC on the duplicate screen for which [ Man ] [… -
Page 94: Maintenance
3-4 Maintenance Chapter 3 SUB MENU 3-3-3 パラメータの初期化 Proper maintenance is required to maintain the accuracy of the analyzer. Select “Maintenance” on the SUB MENU to perform either daily maintenance or periodical maintenance. Preparation for the maintenance. Press [2] key on the MAIN MENU. ●…
-
Page 95: Mode Menu
3-5 Mode Menu Chapter 3 SUB MENU 3-3-3 パラメータの初期化 The Survey Mode is canceled Switch to the Survey Mode. When measurement is performed in the automatically when the power is Survey Mode, raw data as well as normal measurement results can be turned off.
-
Page 96: Built-In Clock Adjustment
3-6 Built-in Clock Adjustment Chapter 3 SUB MENU 3-3-2 パラメータ設定 Set the Date and time of the built-in clock. Once the date and time are set, resetting is not necessary. However, resetting may be necessary in a long time of use. Display setting screen.
-
Page 97
3 — 26 ● SP — 4430… -
Page 99: Outline Of Maintenance
Chapter 4 MAINTENANCE Proper maintenance is required to maintain satisfactory measurement. This chapter describes maintenance and replacement of consumables. 4-1 Outline of Maintenance 4-1-1 Frequency of Maintenance 4-2 Daily Maintenance 4-2-1 Cleaning the Reagent Table 4-2-2 Cleaning the Tip Waste Case and Protective Cover 4-3 Periodic Maintenance 4-3-1 Replacement of Thermal Printer Paper 4-3-2 Cleaning the Optical Window…
-
Page 100: Outline Of Maintenance
4-1 Outline of Maintenance Chapter 4 MAINTENANCE 4-1-1 Frequency of Maintenance The following table shows the parts requiring maintenance and the frequency of maintenance. Perform daily or periodical maintenance according to the table. Cleaning part Frequency Page ★ Cleaning of Reagent Table Daily 4-03 Cleaning of Tip Waste Case…
-
Page 101: Daily Maintenance
4-2 Daily Maintenance Chapter 4 MAINTENANCE 4-2-1 Cleaning the Reagent Table With numerous measurements, residue of sample and Reagent Strips stay on the Reagent Table. When they are adhered to a new Reagent Strip, correct measurement results may not be obtained or Reagent Strips may be jammed inside.
-
Page 102
お手入れの概要 Chapter 4 MAINTENANCE 4-1-1 お手入れの目安 Moisten a cotton swab with distilled ● water and wipe out stains or dust adhered to the Reagent Table. Clean the groove well carefully, not to break the lugs on the tip of the groove. -
Page 103
毎日のお手入れ Chapter 4 MAINTENANCE Moisten a cotton swab with distilled ● water and wipe out stains or dust adhered to the Rubber Plate. If the Rubber Plate is wet, use a dry ● cotton swab. Attach the top cover by sliding to ●… -
Page 104: Cleaning The Tip Waste Case And Protective Cover
毎日のお手入れ Chapter 4 MAINTENANCE 4-2-2 Cleaning the Tip Waste Case and Protective Cover The Tip Waste Case holds used tips. (※) Its capacity is for 5 measurements .Discard used tips and wash the Tip Waste Case. Clean the Protective Cover if necessary. A message suggesting the disposal of used tips is displayed every 5 (※)…
-
Page 105
お手入れの概要 Chapter 4 MAINTENANCE 4-1-1 お手入れの目安 Disinfect and wash the Tip Waste Case. Disinfect the Tip Waste Case with ● alcohol and wash it with tap water. Wipe it dry with a cloth. ● Reattach the Tip Waste Case. Put the Tip Waste Case into the ●… -
Page 106: Periodic Maintenance
4-3 Periodic Maintenance Chapter 4 MAINTENANCE 4-3-1 Replacement of Thermal Printer Paper When the printer paper runs out, a red line appears on both sides of the printer paper. If the line is seen, replace it with a new roll. Approximately 500 measurements can be printed out on one roll of paper.
-
Page 107
お手入れの概要 Chapter 4 MAINTENANCE 4-1-1 お手入れの目安 Prepare new printer paper. Cut off a single turn of the paper of ● new roll. Cut the top end straight to avoid a paper jam. Set new printer paper. Place a new roll of paper in the ●… -
Page 108: Cleaning The Optical Window
定期的なお手入れ Chapter 4 MAINTENANCE 4-3-2 Cleaning the Optical Window If dust is adhered to the Optical Window, correct measurement result may not be obtained due to improper detection of reflect on light caused by fluctuation of wavelength. Clean the Optical Window once every 2,000 measurements.
-
Page 109
お手入れの概要 Chapter 4 MAINTENANCE 4-1-1 お手入れの目安 Turn over the analyzer carefully so ● that the right side (to which small legs are attached) faces down. Do NOT hold the Table Cover while turning the analyzer. Do NOT damage the connecting NOTE part of the Table Cover. -
Page 110
定期的なお手入れ Chapter 4 MAINTENANCE 4-3-2 測光窓の清掃 Restore the analyzer. Reattach the rubber caps firmly to ● the bottom of the analyzer. Carefully turn over the analyzer to ● the original position, without holding the Table Cover. NOTE Do NOT damage the connecting part of the Table Cover. -
Page 111: Cleaning The Nozzle
お手入れの概要 Chapter 4 MAINTENANCE 4-3-3 Cleaning the Nozzle With numerous measurements, sample blood residue may stay inside the Nozzle and cause clogging. Clean the Nozzle once every 10,000 measurements or once a year. Nozzle cleaning wire, Tweezers, Requirements Tissue paper and Protective gloves WARNING Wear protective gloves to prevent exposure to pathogenic microbes.
-
Page 112
定期的なお手入れ Chapter 4 MAINTENANCE 4-3-2 測光窓の清掃 Remove the side cover. ● Remove the Nozzle Tube. Remove the Nozzle Tube from the ● Nozzle using tweezers. NOTE Do NOT scratch or damage the Nozzle Tube. Clean the Nozzle. Insert the nozzle cleaning wire into ●… -
Page 113
お手入れの概要 Chapter 4 MAINTENANCE 4-3-3 ノズルの清掃 Insert the Nozzle Tube. Remove the nozzle cleaning wire ● from the Nozzle. Pinch the Nozzle Tube with tweezers ● and insert it into the tube joint. Reattach the covers. Put the side cover to the analyzer. ●… -
Page 114: Replacement Of Nozzle
定期的なお手入れ Chapter 4 MAINTENANCE 4-3-4 Replacement of Nozzle With numerous measurements, the O-ring attached to the Nozzle becomes deteriorated. Requirements Nozzle, Nozzle replacement tool and Protective gloves WARNING Wear protective gloves to prevent exposure to pathogenic microbes. CAUTION Discard used samples, tips and protective gloves separately from general waste according to local regulations on biohazardous waste.
-
Page 115
お手入れの概要 Chapter 4 MAINTENANCE 4-3-3 ノズルの清掃 Remove the side cover. ● Remove the Tip Waste Case. Loosen the fixing screws and ● remove the tip ejector. Remove the Tip Waste Case. ● Replace the Nozzle. Fasten the upper part using the ●… -
Page 116
定期的なお手入れ Chapter 4 MAINTENANCE 4-3-4 ノズルの交換 Reattach the Tip Waste Case. Put the Tip Waste Case by tightening ● the screws. Reattach the covers. Put the side cover to the analyzer. ● Put the top cover to the analyzer by ●… -
Page 118
Chapter 5 TROUBLESHOOTING When there is a failure in operation or a problem with the analyzer, an error or trouble occurs. This chapter describes, the kinds of errors / troubles, causes and remedy. 5-1 Error Messages 5-2 Trouble Messages 5-3 After sales service SP — 4430 ● 5 — 01… -
Page 119: Error Messages
Error Messages Chapter 5 TROUBLESHOOTING 4-1-1 お手入れの目安 When an error occurs, an alarm sounds and the error message appears ●The following errors are not on the screen. printed when the magnetic The error message is automatically printed in order to preserve the card is inserted.
-
Page 120
毎日のお手入れ Chapter 5 TROUBLESHOOTING 4-2-1 試験片テーブルの清掃 Description and error message Conditions and causes Remedy When calibrating by calibrator kit, a Set the Reagent Strip correctly. ● ● many Reagent Strip is set. Return to the menu because the ● The bar code was not correctly read changing item is not allowed during ●… -
Page 121
毎日のお手入れ Chapter 5 TROUBLESHOOTING 4-2-1 試験片テーブルのお手入れ Description and error message Conditions and causes Remedy A sample vessel is misplaced. Set the sample correctly. ● ● There is no sample or an insufficient Confirm the amount of the sample. ● ● amount of sample. -
Page 122
お手入れの概要 Chapter 5 TROUBLESHOOTING 4-1-1 お手入れの目安 Description and error message Conditions and causes Remedy The clock is not correctly adjusted. Readjust the date and time. ● ● The power was not connected for a long (see “3-6 Built-in Clock Adjustment”) ●… -
Page 123
毎日のお手入れ Chapter 5 TROUBLESHOOTING 4-2-2 チップ廃却ケースの清掃 Description and error message Conditions and causes Remedy When sampling, air bubbles or fibrin Remove air bubbles or fibrin. ● ● was aspirated. Confirm the sample amount. ● When sampling, the sample amount ● E37 Sampling error… -
Page 124: Trouble Messages
5-2 Trouble Messages Chapter 5 TROUBLESHOOTING 4-1-1 お手入れの目安 When a trouble occurs, an alarm sounds, and a trouble message is displayed. The trouble message is automatically printed in order to preserve the trouble record. When a trouble occurs during measurement, perform the measurement again. It may IMPORTANT have influenced the result obtained before the trouble occurred.
-
Page 125
トラブルメッセージ Chapter 5 TROUBLESHOOTING 4-2-2 チップ廃却ケースの清掃 Description and trouble message Conditions and causes Remedy Trouble occurred in the pump-driving Turn on the power again. ● ● mechanism. If the same trouble occurs, contact ● your distributor. T09 Pump ■■■■■■■■■■■■OK (ENTER) The optimal gain could not be set. Turn on the power again. -
Page 126
お手入れの概要 Chapter 5 TROUBLESHOOTING 4-1-1 お手入れの目安 Description and trouble message Conditions and causes Remedy Failure to discard tip. Turn off the power, and remove the ● ● tip from the nozzle. T21 Tip ejecting ■■■■■■■■■■■■OK (ENTER) White plate or black plate is dirty. Clean the white plate or black plate. -
Page 127
トラブルメッセージ Chapter 5 TROUBLESHOOTING 4-2-2 チップ廃却ケースの清掃 Description and trouble message Conditions and causes Remedy Trouble with parameter memory storage. If the same trouble occurs, contact ● ● Power was cut while writing in memory your distributor. ● or deleting. T93 Memory:parameter (S-03■■■■■■)■OK(ENTER)… -
Page 128: After Sales Service
5-3 After sales service Chapter 5 TROUBLESHOOTING 4-1-1 お手入れの目安 A warranty is included in this packaging box. This warranty is necessary when the analyzer ■Warranty : requires repair. After filling in the necessary items and confirming the described contents, keep the warranty in a safe place. ■Repairs : When the analyzer does not function Contact your distributor.
-
Page 129
Chapter 5 TROUBLESHOOTING 5-12 ● SP — 4430… -
Page 131
Chapter 6 APPENDIX 6-1 Transmission Specifications 6-1-1 Protocol 6-1-2 Format 6-1-3 Format for measurement result (format 1) 6-1-4 Format for measurement result (format 2) SP — 4430 ● 6 — 01… -
Page 132: Transmission Specifications
6-1 Transmission Specifications Chapter 6 APPENDIX 6-1-1 Protocol Transmission format Start-stop system (asynchronous) unidirectional transmission by serial transmission format (in compliance with JIS X5101). Data format One character consists of the following 11 bits. Start bit: 1 bit Data bit: 7 bits (ASCII code) Parity bit: 1 bit (even) Stop bit: 2 bits Baud rate…
-
Page 133: Format
毎日のお手入れ Chapter 6 APPENDIX 6-1-2 Format Block structure is regular. One block consists of start, data and end. This is illustrated below in the following descriptions. Start Data Start (S) ● Start of each block is < STX >. Start of block is expressed as S in the following illustrations. Data ●…
-
Page 134: Format For Measurement Results (Format 1)
Chapter 6 APPENDIX 6-1-3 Format for measurement results (format 1) The measurement result (format 1) is the same as the “regular format” in SP-4410 or SP-4420. The receiving program designed to receive the measurement results of SP-4420 (regular format) can normally receive the measurement results (format 1) of SP-4430.
-
Page 135
お手入れの概要 Chapter 6 APPENDIX 4-1-1 お手入れの目安 ● Format of Multi Reagent Strip measurement results M U L T I : ■ ■ ■ ■ ■ ■ ■ ■ ■ ■ ■ ■ ■ ■ ■ ■ ■ ■ ■ ■ ■… -
Page 136
毎日のお手入れ Chapter 6 APPENDIX ● Format of Single Reagent Strip measurement results ■ ■ ■ ■ ■ ■ ■ ■ ■ ■ ■ ■ ■ ■ ■ ■ ■ ■ ■ ■ ■ ■ ■ ■ ■ ■ ■ ■ ■… -
Page 137
お手入れの概要 Chapter 6 APPENDIX 4-1-1 お手入れの目安 ● Data errors In the Multi Reagent Strip and Single Reagent Strip measurement results, data parts for each item (22 bytes including end CR/LF) are output as follows when measurement errors occur. ●Error in range or prozone (OVER) 028 029 036 037 ■… -
Page 138
Chapter 6 APPENDIX 6-1-4 Format of measurement results (format 2) The measurement result (format 2) is the same as the “extended format” in SP-4410 or SP-4420. The receiving program designed to receive the measurement results of SP-4420 (extended format) can normally receive the measurement results of SP-4430 (format 2). ■… -
Page 139
83-00139F…
Описание
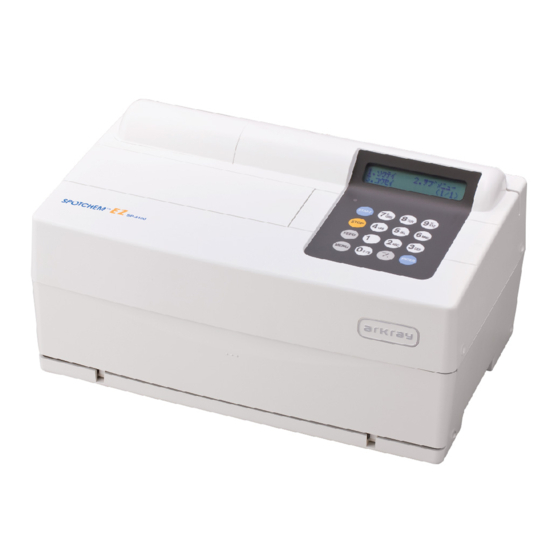
Автоматический биохимический анализатор SpotChem EZ (SP-4430)
Биохимический анализатор Spotchem EZ работает по технологии сухая химия и отлично зарекомендовал себя в дежурных и передвижных лабораториях, а также в реанимациях. Благодаря высокой производительности и скорости анализатора получаются быстрые результаты различных биохимических исследований.
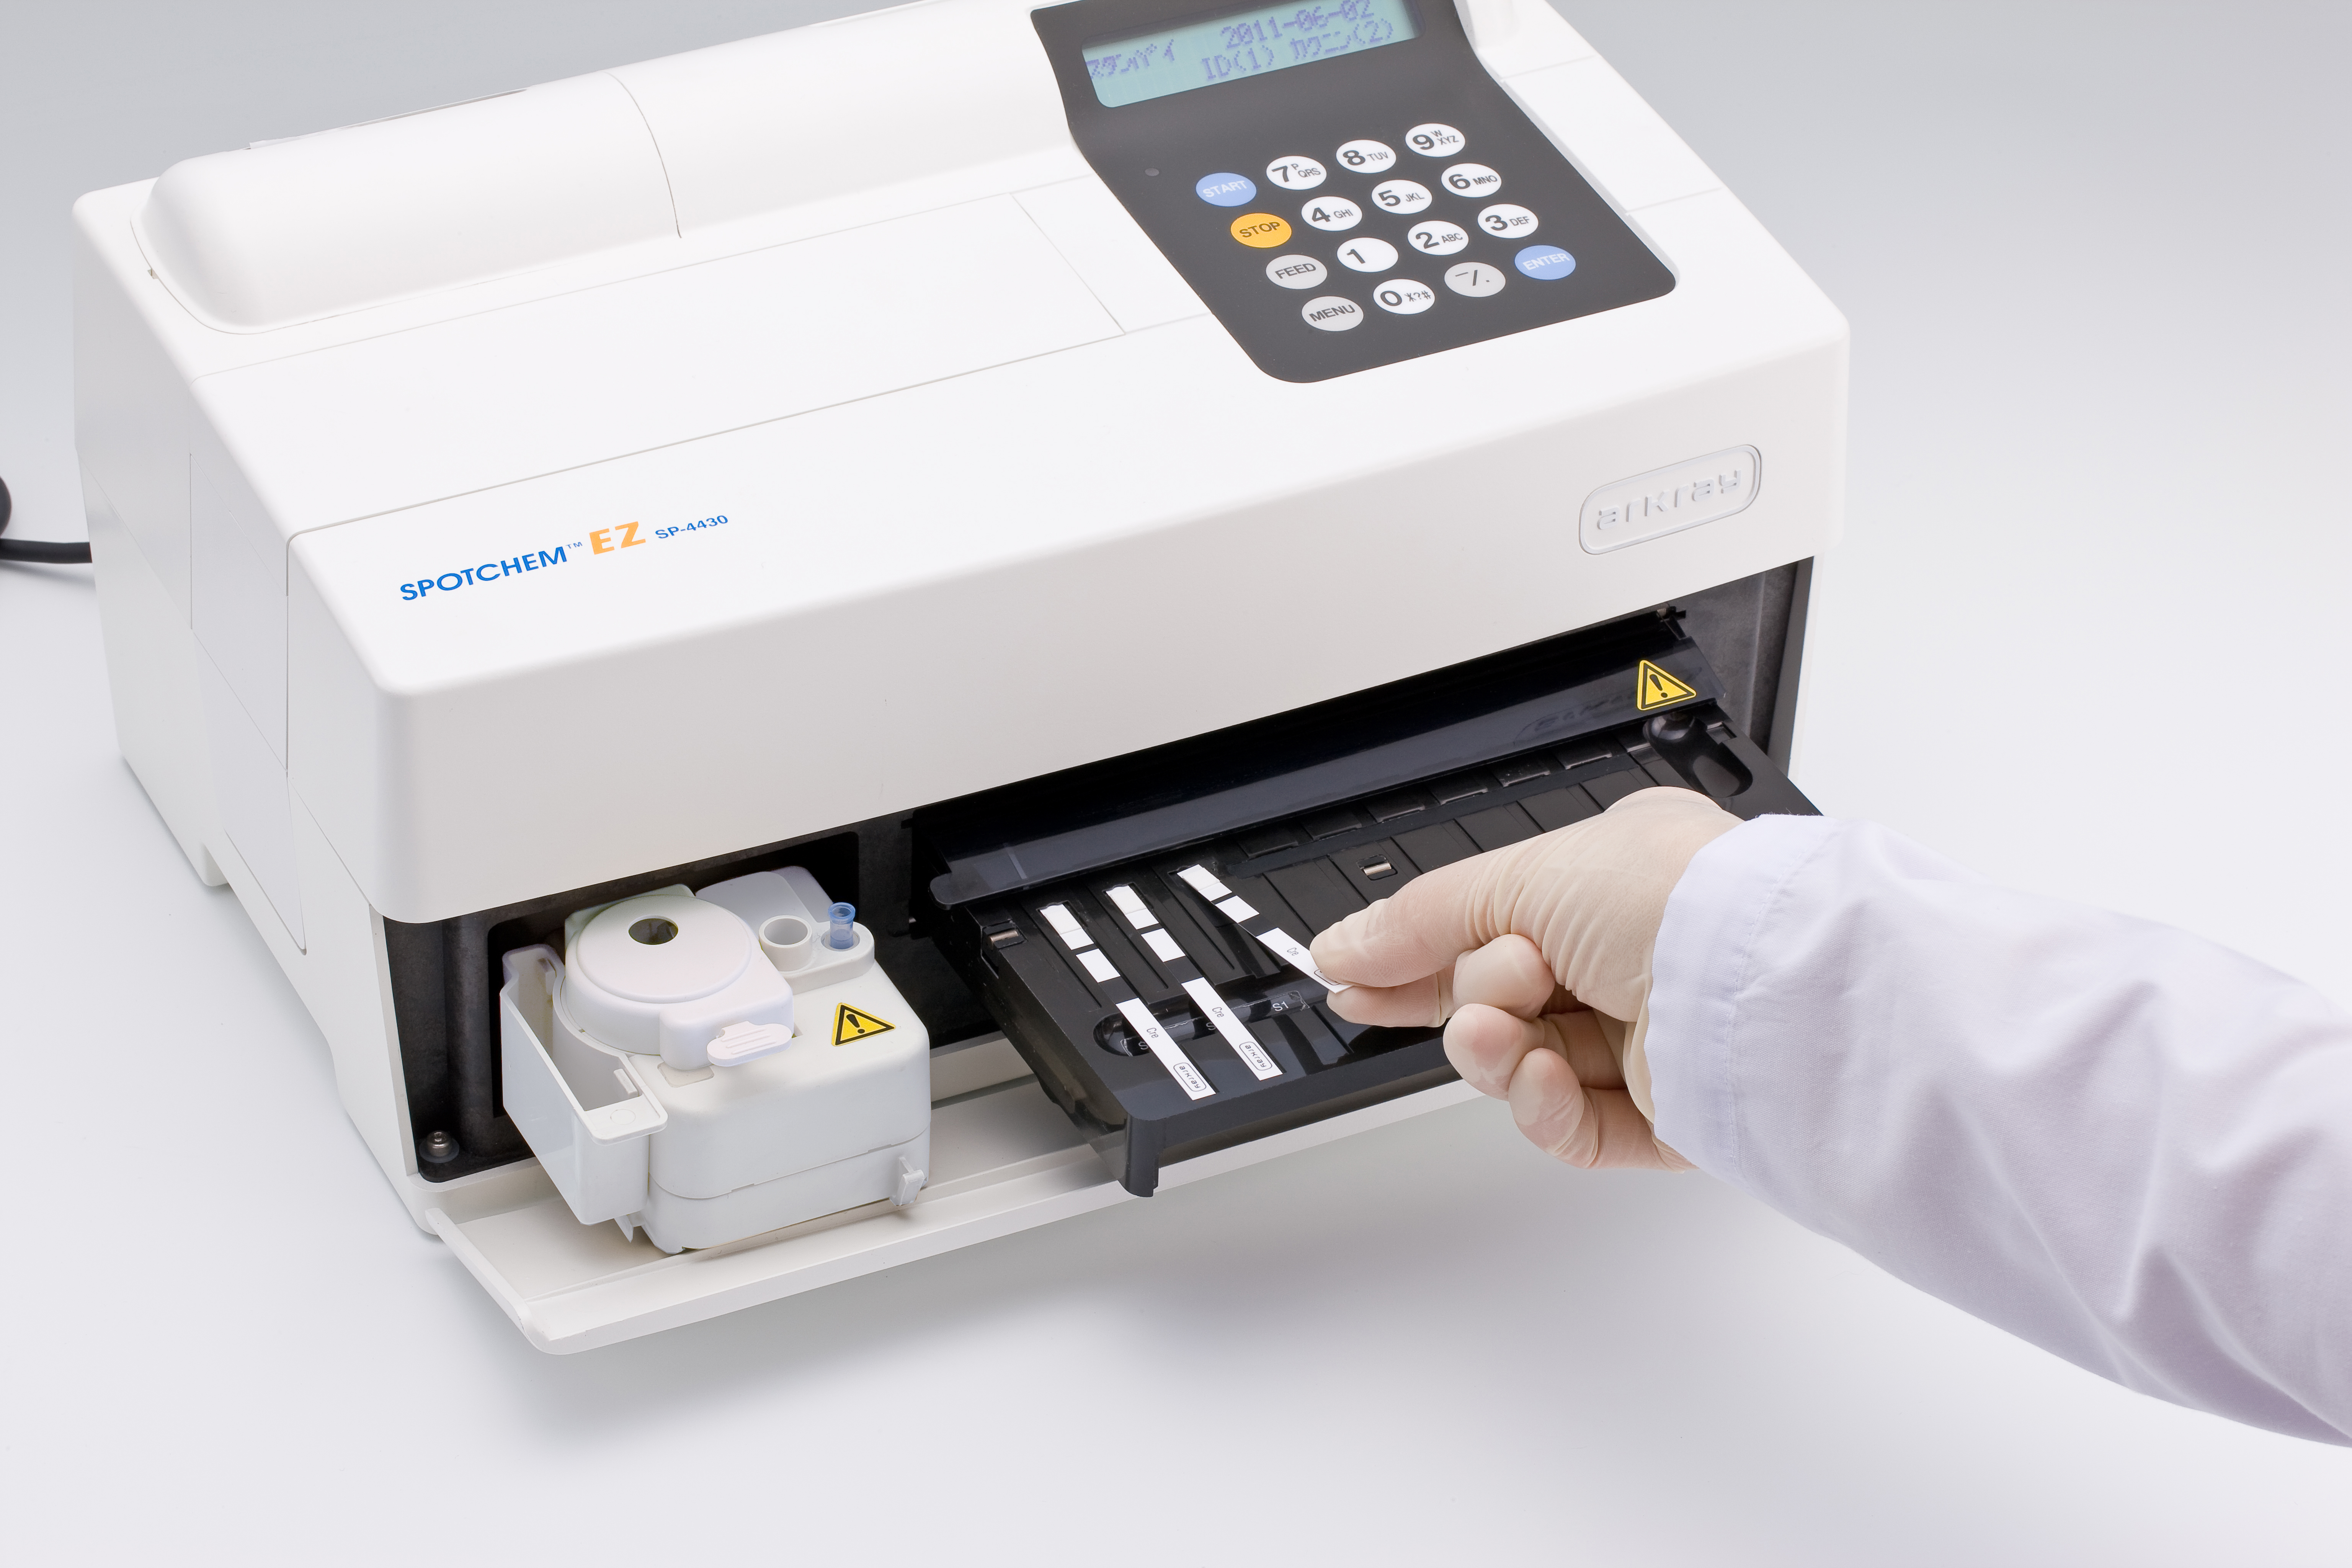
Анализатор состоит из нескольких ключевых частей: блока измерения, дисплея, микроцентрифуги, встроенного штатива на девять полосок, считывателя магнитной карты, термопринтера и клавиатуры.

Ключевые особенности
- В прибор встроена микроцентрифуга при объеме образца в 250 мкл (кровь, все тесты) или 4-6 мкл для одного анализа
- Состоит из блока измерения, двухстрочного дисплея, клавиатуры, термопринтера, микроцентрифуги, встроенного штатива для 9 полосок, считывателя магнитной карты.
- Калибровка происходит с магнитной карты. При активации карты происходит автоматическое внесение всех данных, таким образом Spotchem EZ может сразу использовать откалиброванные полоски
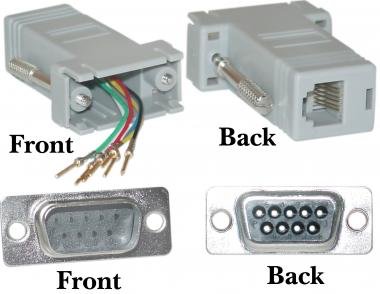
- Подключение к компьютеру с помощью стандартного RS-232С, память в приборе на сто исследований. Возможна активация функции чтения штрих-кодов (идет опционально)
- Производительность анализатора 63 теста в час, при этом возможно измерение от одного до девяти параметров одновременно
- Память на 100 измерений
- Тип образца: цельная кровь для гемоглобина, для остальных биохимических параметров сыворотка или плазма
- Spotchem EZ может провести все этапы исследования в автоматическом режиме, в том числе подготовку образцов, калибровку (технология электронной калибровки, упрощающая пользование анализатором) и измерение биохимических тестов. От включения до загрузки первого анализа проходит не более десяти секунд
- Spotchem EZ очень понятно сконструирован, таким образом от оператора не требуется обладать какими-то особенными знаниями для управления прибором: стандартного инструктажа и внимательности вполне достаточно для уверенной работы
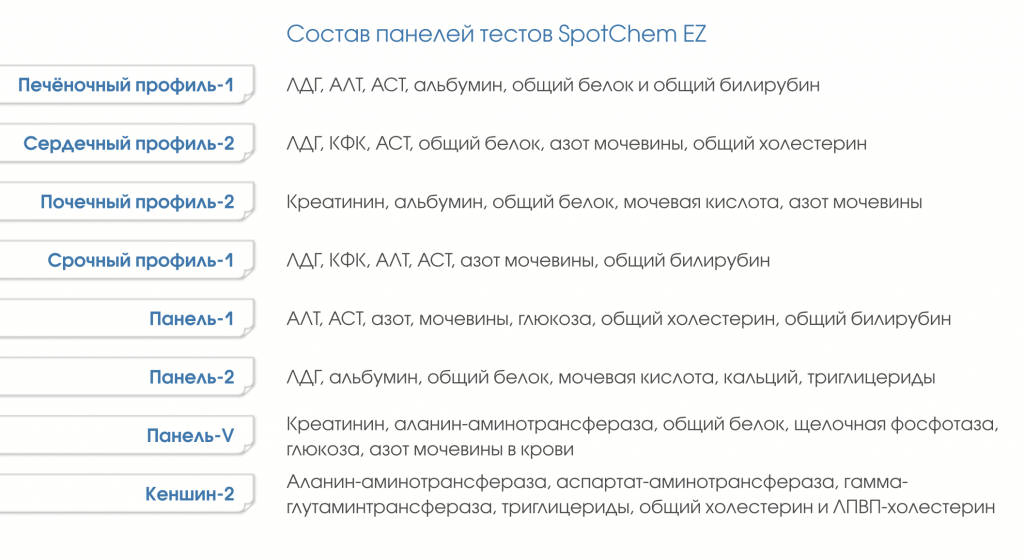
- Производитель Arkray выпускает не только тест-полоски однокомпонентного типа, но и многофункциональные полоски разных биохимических профилей, позволяющие исследовать состояние печени, почек и сердца
Анализируемые параметры, точность измерения
|
Анализируемые параметры |
Нормальная концентрация CV |
Повышенная концентрация CV |
| Глюкоза | 2.3 | 4.6 |
| Мочевая кислота | 1.7 | 3.7 |
| Холестерин | 3.4 | 1.7 |
| Триглицериды | 1.9 | 1.7 |
| Мочевина | 3.1 | 3.6 |
| Общ билирубин | 3.5 | 2.3 |
| Кальций | 3.3 | 3.3 |
| Общ. белок | 3.1 | 5.0 |
| Альбумин | 2.9 | 2.2 |
| АЛТ | 5.1 | 2.1 |
| АСТ | 4.6 | 1.6 |
| ЛДГ | 2.4 | 2.0 |
| Креатинкиназа | 3.0 | 1.4 |
| Амилаза | 3.0 | 2.8 |
| ГГТП | 2.0 | 3.2 |
| Щелочная ф-за | 5.1 | 2.8 |
| Креатинин | 3.6 | 2.9 |
| Липиды выс. плотности | 3.6 | 3.0 |
| Фруктоза | 3.0 | 3.1 |
| Фосфор | 2.0 | 1.9 |
| Магний | 3.6 | 3.0 |
Расходные материалы
| Артикул | Тип | Наименование |
Количество в упаковке |
| 77182 | Набор тестов | Печеночный (Spotchem Liver-1) | 25 |
| 77183 | Набор тестов | Срочный (Spotchem Stat-1) | 25 |
| 77184 | Набор тестов | Панель-1 (Spotchem Panel-1) | 25 |
| 77185 | Реагент для определения набора тестов | Панель-2 (Spotchem Panel-2) | 25 |
| 77186 | Набор тестов | Cердечный-2 (Spotchem Heart-2) | 25 |
| 77187 | Набор тестов | Почечный-2 (Spotchem Kidney-2) | 25 |
| 77189 | Набор тестов | Панель-V, Spotchem II Panel V | 25 |
| 77043 | Калибратор | Spotchem Calibrator Check | 4 |
| 10191 | Пробирки образца с голубой крышкой | Serum Sample Tube | 500 |
| 10712 | Пробирки для центрифуги | Centrifuge Tube | 100 |
| 10743 | Наконечники для пипетки | Tip set (EZ) | 500 |
| 77160– 77180 | Реагенты |
Реагенты Spotchem для определения: глюкозы, мочевой кислоты, общего холестерина, триглицеридов, мочевины, общего билирубина, кальция, общего белка, альбумина, ГОТ/АСТ, ГПТ/АЛТ, ЛДГ, креатинкиназы, амилазы, ГГТ, щелочной фосфатазы, креатинина, фруктозамина, фосфора, магния, холестерина высокой плотности) |
25 |


Характеристики
|
Измеряемые параметры |
моно-полоски глюкоза, мочевая кислота, холестирин, триглицериды, мочевина, билирубин, Ca, Mg, общий белок, альбумин, АСТ, АЛТ, ЛДГ, креатинкиназа, Hgb (цельная кровь), амилаза, ГГТ, щелочная фосфатаза, креатинин, липиды высокой плотности, фруктозамин, фосфор. |
|
Особенность |
поддержка мульти-полосок |
Портативный автоматический биохимический экспресс-анализатор, работающий по технологии «сухой химии».
Подробнее
- Описание
- Характеристики
- Реагенты
- Заявки на ремонт
- Заказ
реагентов - Файлы и видео
-
Spotchem SP-4430 легко выполняет биохимические измерения методом сухой химии с использованием твердофазного реагента (тест-полоски).
Встроенная компактная центрифуга уменьшает предварительную обработку образцов перед измерением.- Компактный и легкий – достаточно пространства с площадью А4
- Малый объем пробы
- Простая и быстрая операция измерения, с возможностью непрерывного измерения одновременно до 9 образцов
- Легкая калибровка с магнитной картой
- Многотипные тест-полоски (c 5 или 6 параметрами) для исследований заболеваний
- Доступно управление штрихкодом
- Возможность использования непосредственно у койки пациента
Аналиты
Glu • UA • T-Cho • TG • BUN • T-Bil • Ca • TP • Alb • GOT • GPT • LDH • CPK • Amy • GGT • ALP • Cre • HDL-C • FRA • IP • Mg
Одновременное измерение- 9 аналитов
- 3 моно-полоски и 1 мульти-полоска
-
Измеряемые аналиты
общая биохимия • 22 аналитаДлины волн
5 длин волн (405, 660, 575, 610, 820 нм)Диапазон измерений
для каждого аналита свой диапазонВремя преднагрева до 25°С
10 минутОбъём образца
6 × количествово тестов + 38 мкл сывороткиРасход образца
4 ~ 6 мкл на тестПробирки • цельная кровь
пробирки с оранжевой крышкой и пробирки для центрифугиПробирки • сыворотка
пробирки с синей крышкойТемпература реакции
37°СМетод калибровки
калибровочная магнитная карта, калибровочный наборЖидкокристаллический дисплей
20 знаков × 2 строкиИнтерфейс
RS-232CСчитыватель штрихкода
внешний, подключаемый через RS-232CТемпература окружающей среды
10 – 30 °СОтносительная влажность
20 – 80 %Электрическое питание
100-120 В или 220-240 В / 50/60 ГцПотребляемая мощность
100 ВтГабариты
336 × 206 × 167 ммКоличество проголосовавших
13Сумма оценок
40Рейтинг
3.1Тип анализатора
АвтоматДля экспресс-лаборатории
Для экспресс-лабораторииПроизводительность (тестов/час)
63?
ионоселективный модуль
Наличие ISE
нетПринцип измерения
измерение интенсивности отражённого светаМинимальный объем пробы (мкл.)
6Источник света
Интерференционные фильтры, СветодиодТип образца
Сыворотка, Цельная кровьПамять результатов
100Принтер
встроенныйПодключение к ПК
естьВес
5,4Реагенты
Тест-полоски для анализатора Spotchem - Тест-полоски для анализатора Spotchem
Заявка на ремонт
Заказ оборудования/реагентов
|
Анализатор биохимический Spotchem EZ SP-4430 (сухая химия) |
||||||
|
||||||
|
||||||
|
||||||
|
||||||
|
||||||
|
||||||
|
||||||
|
||||||
|
||||||
|
||||||
|
||||||
|
||||||
|
||||||
|
||||||
|
||||||
|
||||||
|
||||||
|
||||||
|
||||||
|
||||||
|
||||||
|
||||||
|
||||||
|
||||||
|
||||||
|
||||||
|
||||||
|
||||||
|
||||||
|
||||||
|
||||||
|
||||||
|
||||||
|
||||||
|
||||||
|
||||||
|
||||||
|
||||||
|
||||||
|


 значит подобное продается и у нас, можно приобресть, прозвонить, скорее всего вряд ли они стоят дорого. На всякий случай, в хранилище есть сервисная инструкция и пользовательская


Александр Виноградов
Менеджер по продукту
Задать вопрос менеджеру
8(495)748-43-50 доб.1404
- Описание подробно
- Файлы для скачивания
- Технические хХарактеристики
Биохимический анализатор, предназначенный для проведения анализов (в том числе срочных) в больничных учреждениях любого профиля, в условиях санаторных здавпунктов, в передвижных лабораториях. Идеально подходит для работы в реанимации и в дежурной лаборатории.
- Встроенная микроцентрифуга
- Калибровка с магнитной карты
- Компактный эргономичный дизайн
- Подключение к компьютеру (RS-232С)
- Опция: подключение считывателя штрих-кодов
- Память — 100 измерений
- Производительность: 63 теста в час
- Индивидуально упакованные тест-полоски
- Количество тестов — 21, панелей тестов — 8
- Одновременное измерение от 1 до 9 параметров (n)
- Объем образца: 4-6 мкл х n+ 38 мкл (сыворотка); 250мкл (кровь)
Анализируемые параметры, точность измерения
|
Анализируемые параметры |
CV |
Анализируемые параметры |
CV |
||
|
Нормальная концентрация |
Повышенная концентрация |
Нормальная концентрация |
Повышенная концентрация |
||
|
Глюкоза |
2.3 |
4.6 |
ЛДГ |
2.4 |
2.0 |
|
Мочевая кислота |
1.7 |
3.7 |
Креатинкиназа |
3.0 |
1.4 |
|
Холестерин |
3.4 |
1.7 |
Амилаза |
3.0 |
2.8 |
|
Триглицериды |
1.9 |
1.7 |
ГГТП |
2.0 |
3.2 |
|
Мочевина |
3.1 |
3.6 |
Щелочная ф-за |
5.1 |
2.8 |
|
Общ. билирубин |
3.5 |
2.3 |
Креатинин |
3.6 |
2.9 |
|
Кальций |
3.3 |
3.3 |
Липиды выс. плотности |
3.6 |
3.0 |
|
Общ. белок |
3.1 |
5.0 |
Фруктоза |
3.0 |
3.1 |
|
Альбумин |
2.9 |
2.2 |
Фосфор |
2.0 |
1.9 |
|
АЛТ |
5.1 |
2.1 |
Магний |
3.6 |
3.0 |
|
АСТ |
4.6 |
1.6 |
Панели тестов
Печеночный профиль-1
Сердечный профиль-2
Почечный профиль-2
Срочный профиль-1
Панель-1, Панель-2
Панель-V, Кеншин-2
-
Состоит из блока измерения, двухстрочного дисплея, клавиатуры, термопринтера, микроцентрифуги, встроенного штатива для 9 полосок, считывателя магнитной карты.
-
Встроенная микроцентрифуга — объем образца 250 мкл.
-
Объем образца для одного анализа — 4-6 мкл.
-
Одновременное измерение от одного до девяти параметров.
-
Измеряемые аналиты: глюкоза, мочевая кислота, холестерин, триглицериды, мочевина, общий билирубин, кальций, общий белок, альбумин, АСТ, АЛТ, ЛДГ, креатинкиназа, амилаза, ГГТ, щелочная фосфатаза, креатинин, липопротеиды высокой плотности, фруктозамин, фосфор, магний.
-
Мульти-стрипы: Печеночный профиль-1 (ЛДГ, альбумин, АСТ, АЛТ, общий белок, билирубин общий), Срочный профиль-1 (ЛДГ, КФК, АСТ, АЛТ, мочевина, билирубин общий), Панель-1 (АСТ, АЛТ, мочевина, глюкоза, холестерин, билирубин общий), Панель-2 (ЛДГ, альбумин, общий белок, мочевая кислота, кальций, триглицериды), Сердечный профиль-2 (ЛДГ, КФК, АСТ, общий белок, мочевина, холестерин), Почечный профиль-2 (креатинин, альбумин, общий белок, мочевая кислота, мочевина).
-
Вся калибровочная информация хранится на магнитной карте, которая поставляется вместе с каждым лотом реагентов. При считывании карты все данные автоматически заносятся в память анализатора и он сразу готов к использованию прокалиброванных тест-полосок.
-
Тип образца: цельная кровь сыворотка или плазма.
-
Производительность: 60 тестов в час.
-
Память: 100 измерений.