Spring Web MVC is the original web framework built on the Servlet API and has been included
in the Spring Framework from the very beginning. The formal name, «Spring Web MVC,»
comes from the name of its source module
(spring-webmvc),
but it is more commonly known as «Spring MVC».
Parallel to Spring Web MVC, Spring Framework 5.0 introduced a reactive-stack web framework
whose name, «Spring WebFlux,» is also based on its source module
(spring-webflux).
This chapter covers Spring Web MVC. The next chapter
covers Spring WebFlux.
For baseline information and compatibility with Servlet container and Jakarta EE version
ranges, see the Spring Framework
Wiki.
1.1. DispatcherServlet
Spring MVC, as many other web frameworks, is designed around the front controller
pattern where a central Servlet, the DispatcherServlet, provides a shared algorithm
for request processing, while actual work is performed by configurable delegate components.
This model is flexible and supports diverse workflows.
The DispatcherServlet, as any Servlet, needs to be declared and mapped according
to the Servlet specification by using Java configuration or in web.xml.
In turn, the DispatcherServlet uses Spring configuration to discover
the delegate components it needs for request mapping, view resolution, exception
handling, and more.
The following example of the Java configuration registers and initializes
the DispatcherServlet, which is auto-detected by the Servlet container
(see Servlet Config):
Java
public class MyWebApplicationInitializer implements WebApplicationInitializer {

    @Override
    public void onStartup(ServletContext servletContext) {

        // Load Spring web application configuration
        AnnotationConfigWebApplicationContext context = new AnnotationConfigWebApplicationContext();
        context.register(AppConfig.class);

        // Create and register the DispatcherServlet
        DispatcherServlet servlet = new DispatcherServlet(context);
        ServletRegistration.Dynamic registration = servletContext.addServlet("app", servlet);
        registration.setLoadOnStartup(1);
        registration.addMapping("/app/*");
    }
}
Kotlin
class MyWebApplicationInitializer : WebApplicationInitializer {

    override fun onStartup(servletContext: ServletContext) {

        // Load Spring web application configuration
        val context = AnnotationConfigWebApplicationContext()
        context.register(AppConfig::class.java)

        // Create and register the DispatcherServlet
        val servlet = DispatcherServlet(context)
        val registration = servletContext.addServlet("app", servlet)
        registration.setLoadOnStartup(1)
        registration.addMapping("/app/*")
    }
}
In addition to using the ServletContext API directly, you can also extendAbstractAnnotationConfigDispatcherServletInitializer and override specific methods(see the example under Context Hierarchy). |
For programmatic use cases, a GenericWebApplicationContext can be used as analternative to AnnotationConfigWebApplicationContext. See theGenericWebApplicationContextjavadoc for details. |
The following example of web.xml configuration registers and initializes the DispatcherServlet:
<web-app>

    <listener>
        <listener-class>org.springframework.web.context.ContextLoaderListener</listener-class>
    </listener>

    <context-param>
        <param-name>contextConfigLocation</param-name>
        <param-value>/WEB-INF/app-context.xml</param-value>
    </context-param>

    <servlet>
        <servlet-name>app</servlet-name>
        <servlet-class>org.springframework.web.servlet.DispatcherServlet</servlet-class>
        <init-param>
            <param-name>contextConfigLocation</param-name>
            <param-value></param-value>
        </init-param>
        <load-on-startup>1</load-on-startup>
    </servlet>

    <servlet-mapping>
        <servlet-name>app</servlet-name>
        <url-pattern>/app/*</url-pattern>
    </servlet-mapping>

</web-app>|
Spring Boot follows a different initialization sequence. Rather than hooking into the lifecycle of the Servlet container, Spring Boot uses Spring configuration to bootstrap itself and the embedded Servlet container. Filter and Servlet declarationsare detected in Spring configuration and registered with the Servlet container. For more details, see the Spring Boot documentation. |
1.1.1. Context Hierarchy
DispatcherServlet expects a WebApplicationContext (an extension of a plain
ApplicationContext) for its own configuration. WebApplicationContext has a link to the
ServletContext and the Servlet with which it is associated. It is also bound to the ServletContext
such that applications can use static methods on RequestContextUtils to look up the
WebApplicationContext if they need access to it.
For many applications, having a single WebApplicationContext is simple and suffices.
It is also possible to have a context hierarchy where one root WebApplicationContext
is shared across multiple DispatcherServlet (or other Servlet) instances, each with
its own child WebApplicationContext configuration.
See Additional Capabilities of the ApplicationContext
for more on the context hierarchy feature.
The root WebApplicationContext typically contains infrastructure beans, such as data repositories and
business services that need to be shared across multiple Servlet instances. Those beans
are effectively inherited and can be overridden (that is, re-declared) in the Servlet-specific
child WebApplicationContext, which typically contains beans local to the given Servlet.
The following image shows this relationship:

The following example configures a WebApplicationContext hierarchy:
Java
public class MyWebAppInitializer extends AbstractAnnotationConfigDispatcherServletInitializer {

    @Override
    protected Class<?>[] getRootConfigClasses() {
        return new Class<?>[] { RootConfig.class };
    }

    @Override
    protected Class<?>[] getServletConfigClasses() {
        return new Class<?>[] { App1Config.class };
    }

    @Override
    protected String[] getServletMappings() {
        return new String[] { "/app1/*" };
    }
}
Kotlin
class MyWebAppInitializer : AbstractAnnotationConfigDispatcherServletInitializer() {

    override fun getRootConfigClasses(): Array<Class<*>> {
        return arrayOf(RootConfig::class.java)
    }

    override fun getServletConfigClasses(): Array<Class<*>> {
        return arrayOf(App1Config::class.java)
    }

    override fun getServletMappings(): Array<String> {
        return arrayOf("/app1/*")
    }
}
|
If an application context hierarchy is not required, applications can return all configuration through getRootConfigClasses() and null from getServletConfigClasses().
|
The following example shows the web.xml equivalent:
<web-app>

    <listener>
        <listener-class>org.springframework.web.context.ContextLoaderListener</listener-class>
    </listener>

    <context-param>
        <param-name>contextConfigLocation</param-name>
        <param-value>/WEB-INF/root-context.xml</param-value>
    </context-param>

    <servlet>
        <servlet-name>app1</servlet-name>
        <servlet-class>org.springframework.web.servlet.DispatcherServlet</servlet-class>
        <init-param>
            <param-name>contextConfigLocation</param-name>
            <param-value>/WEB-INF/app1-context.xml</param-value>
        </init-param>
        <load-on-startup>1</load-on-startup>
    </servlet>

    <servlet-mapping>
        <servlet-name>app1</servlet-name>
        <url-pattern>/app1/*</url-pattern>
    </servlet-mapping>

</web-app>|
If an application context hierarchy is not required, applications may configure a “root” context only and leave the contextConfigLocation Servlet parameter empty.
|
1.1.2. Special Bean Types
The DispatcherServlet delegates to special beans to process requests and render the
appropriate responses. By “special beans” we mean Spring-managed Object instances that
implement framework contracts. Those usually come with built-in contracts, but
you can customize their properties and extend or replace them.
The following table lists the special beans detected by the DispatcherServlet:
| Bean type | Explanation |
|---|---|
|
|
Map a request to a handler along with a list of The two main |
|
|
Help the |
|
|
Strategy to resolve exceptions, possibly mapping them to handlers, to HTML error |
|
|
Resolve logical |
|
|
Resolve the |
|
|
Resolve themes your web application can use — for example, to offer personalized layouts. |
|
|
Abstraction for parsing a multi-part request (for example, browser form file upload) with |
|
|
Store and retrieve the “input” and the “output” |
1.1.3. Web MVC Config
Applications can declare the infrastructure beans listed in Special Bean Types
that are required to process requests. The DispatcherServlet checks the
WebApplicationContext for each special bean. If there are no matching bean types,
it falls back on the default types listed in
DispatcherServlet.properties.
In most cases, the MVC Config is the best starting point. It declares the required
beans in either Java or XML and provides a higher-level configuration callback API to
customize it.
|
Spring Boot relies on the MVC Java configuration to configure Spring MVC and provides many extra convenient options. |
1.1.4. Servlet Config
In a Servlet environment, you have the option of configuring the Servlet container
programmatically as an alternative or in combination with a web.xml file.
The following example registers a DispatcherServlet:
Java
import org.springframework.web.WebApplicationInitializer;

public class MyWebApplicationInitializer implements WebApplicationInitializer {

    @Override
    public void onStartup(ServletContext container) {
        XmlWebApplicationContext appContext = new XmlWebApplicationContext();
        appContext.setConfigLocation("/WEB-INF/spring/dispatcher-config.xml");

        ServletRegistration.Dynamic registration = container.addServlet("dispatcher", new DispatcherServlet(appContext));
        registration.setLoadOnStartup(1);
        registration.addMapping("/");
    }
}
Kotlin
import org.springframework.web.WebApplicationInitializer

class MyWebApplicationInitializer : WebApplicationInitializer {

    override fun onStartup(container: ServletContext) {
        val appContext = XmlWebApplicationContext()
        appContext.setConfigLocation("/WEB-INF/spring/dispatcher-config.xml")

        val registration = container.addServlet("dispatcher", DispatcherServlet(appContext))
        registration.setLoadOnStartup(1)
        registration.addMapping("/")
    }
}
WebApplicationInitializer is an interface provided by Spring MVC that ensures your
implementation is detected and automatically used to initialize any Servlet 3 container.
An abstract base class implementation of WebApplicationInitializer named
AbstractDispatcherServletInitializer makes it even easier to register the
DispatcherServlet by overriding methods to specify the servlet mapping and the
location of the DispatcherServlet configuration.
This is recommended for applications that use Java-based Spring configuration, as the
following example shows:
Java
public class MyWebAppInitializer extends AbstractAnnotationConfigDispatcherServletInitializer {

    @Override
    protected Class<?>[] getRootConfigClasses() {
        return null;
    }

    @Override
    protected Class<?>[] getServletConfigClasses() {
        return new Class<?>[] { MyWebConfig.class };
    }

    @Override
    protected String[] getServletMappings() {
        return new String[] { "/" };
    }
}
Kotlin
class MyWebAppInitializer : AbstractAnnotationConfigDispatcherServletInitializer() {

    override fun getRootConfigClasses(): Array<Class<*>>? {
        return null
    }

    override fun getServletConfigClasses(): Array<Class<*>>? {
        return arrayOf(MyWebConfig::class.java)
    }

    override fun getServletMappings(): Array<String> {
        return arrayOf("/")
    }
}
If you use XML-based Spring configuration, you should extend directly from
AbstractDispatcherServletInitializer, as the following example shows:
Java
public class MyWebAppInitializer extends AbstractDispatcherServletInitializer {

    @Override
    protected WebApplicationContext createRootApplicationContext() {
        return null;
    }

    @Override
    protected WebApplicationContext createServletApplicationContext() {
        XmlWebApplicationContext cxt = new XmlWebApplicationContext();
        cxt.setConfigLocation("/WEB-INF/spring/dispatcher-config.xml");
        return cxt;
    }

    @Override
    protected String[] getServletMappings() {
        return new String[] { "/" };
    }
}
Kotlin
class MyWebAppInitializer : AbstractDispatcherServletInitializer() {

    override fun createRootApplicationContext(): WebApplicationContext? {
        return null
    }

    override fun createServletApplicationContext(): WebApplicationContext {
        return XmlWebApplicationContext().apply {
            setConfigLocation("/WEB-INF/spring/dispatcher-config.xml")
        }
    }

    override fun getServletMappings(): Array<String> {
        return arrayOf("/")
    }
}
AbstractDispatcherServletInitializer also provides a convenient way to add Filter
instances and have them be automatically mapped to the DispatcherServlet, as the
following example shows:
Java
public class MyWebAppInitializer extends AbstractDispatcherServletInitializer {

    // ...

    @Override
    protected Filter[] getServletFilters() {
        return new Filter[] {
            new HiddenHttpMethodFilter(), new CharacterEncodingFilter() };
    }
}
Kotlin
class MyWebAppInitializer : AbstractDispatcherServletInitializer() {

    // ...

    override fun getServletFilters(): Array<Filter> {
        return arrayOf(HiddenHttpMethodFilter(), CharacterEncodingFilter())
    }
}
Each filter is added with a default name based on its concrete type and automatically
mapped to the DispatcherServlet.
The isAsyncSupported protected method of AbstractDispatcherServletInitializer
provides a single place to enable async support on the DispatcherServlet and all
filters mapped to it. By default, this flag is set to true.
Finally, if you need to further customize the DispatcherServlet itself, you can
override the createDispatcherServlet method.
1.1.5. Processing
The DispatcherServlet processes requests as follows:
-
The
WebApplicationContextis searched for and bound in the request as an attribute
that the controller and other elements in the process can use. It is bound by default
under theDispatcherServlet.WEB_APPLICATION_CONTEXT_ATTRIBUTEkey. -
The locale resolver is bound to the request to let elements in the process
resolve the locale to use when processing the request (rendering the view, preparing
data, and so on). If you do not need locale resolving, you do not need the locale resolver. -
The theme resolver is bound to the request to let elements such as views determine
which theme to use. If you do not use themes, you can ignore it. -
If you specify a multipart file resolver, the request is inspected for multiparts. If
multiparts are found, the request is wrapped in aMultipartHttpServletRequestfor
further processing by other elements in the process. See Multipart Resolver for further
information about multipart handling. -
An appropriate handler is searched for. If a handler is found, the execution chain
associated with the handler (preprocessors, postprocessors, and controllers) is
run to prepare a model for rendering. Alternatively, for annotated
controllers, the response can be rendered (within theHandlerAdapter) instead of
returning a view. -
If a model is returned, the view is rendered. If no model is returned (maybe due to
a preprocessor or postprocessor intercepting the request, perhaps for security
reasons), no view is rendered, because the request could already have been fulfilled.
The HandlerExceptionResolver beans declared in the WebApplicationContext are used to
resolve exceptions thrown during request processing. Those exception resolvers allow
customizing the logic to address exceptions. See Exceptions for more details.
For HTTP caching support, handlers can use the checkNotModified methods of WebRequest,
along with further options for annotated controllers as described in
HTTP Caching for Controllers.
You can customize individual DispatcherServlet instances by adding Servlet
initialization parameters (init-param elements) to the Servlet declaration in the
web.xml file. The following table lists the supported parameters:
| Parameter | Explanation |
|---|---|
|
|
Class that implements |
|
|
String that is passed to the context instance (specified by |
|
|
Namespace of the |
|
|
Whether to throw a By default, this is set to Note that, if default servlet handling is |
1.1.6. Path Matching
The Servlet API exposes the full request path as requestURI and further sub-divides it
into contextPath, servletPath, and pathInfo whose values vary depending on how a
Servlet is mapped. From these inputs, Spring MVC needs to determine the lookup path to
use for mapping handlers, which should exclude the contextPath and any servletMapping
prefix, if applicable.
The servletPath and pathInfo are decoded and that makes them impossible to compare
directly to the full requestURI in order to derive the lookupPath and that makes it
necessary to decode the requestURI. However this introduces its own issues because the
path may contain encoded reserved characters such as "/" or ";" that can in turn
alter the structure of the path after they are decoded which can also lead to security
issues. In addition, Servlet containers may normalize the servletPath to varying
degrees which makes it further impossible to perform startsWith comparisons against
the requestURI.
This is why it is best to avoid reliance on the servletPath which comes with the
prefix-based servletPath mapping type. If the DispatcherServlet is mapped as the
default Servlet with "/" or otherwise without a prefix with "/*" and the Servlet
container is 4.0+ then Spring MVC is able to detect the Servlet mapping type and avoid
use of the servletPath and pathInfo altogether. On a 3.1 Servlet container,
assuming the same Servlet mapping types, the equivalent can be achieved by providing
a UrlPathHelper with alwaysUseFullPath=true via Path Matching in
the MVC config.
Fortunately the default Servlet mapping "/" is a good choice. However, there is still
an issue in that the requestURI needs to be decoded to make it possible to compare to
controller mappings. This is again undesirable because of the potential to decode
reserved characters that alter the path structure. If such characters are not expected,
then you can reject them (like the Spring Security HTTP firewall), or you can configure
UrlPathHelper with urlDecode=false but controller mappings will need to match to the
encoded path which may not always work well. Furthermore, sometimes the
DispatcherServlet needs to share the URL space with another Servlet and may need to
be mapped by prefix.
The above issues are addressed when using PathPatternParser and parsed patterns, as
an alternative to String path matching with AntPathMatcher. The PathPatternParser has
been available for use in Spring MVC from version 5.3, and is enabled by default from
version 6.0. Unlike AntPathMatcher which needs either the lookup path decoded or the
controller mapping encoded, a parsed PathPattern matches to a parsed representation
of the path called RequestPath, one path segment at a time. This allows decoding and
sanitizing path segment values individually without the risk of altering the structure
of the path. Parsed PathPattern also supports the use of servletPath prefix mapping
as long as a Servlet path mapping is used and the prefix is kept simple, i.e. it has no
encoded characters. For pattern syntax details and comparison, see
Pattern Comparison.
1.1.7. Interception
All HandlerMapping implementations support handler interceptors that are useful when
you want to apply specific functionality to certain requests — for example, checking for
a principal. Interceptors must implement HandlerInterceptor from the
org.springframework.web.servlet package with three methods that should provide enough
flexibility to do all kinds of pre-processing and post-processing:
-
preHandle(..): Before the actual handler is run -
postHandle(..): After the handler is run -
afterCompletion(..): After the complete request has finished
The preHandle(..) method returns a boolean value. You can use this method to break or
continue the processing of the execution chain. When this method returns true, the
handler execution chain continues. When it returns false, the DispatcherServlet
assumes the interceptor itself has taken care of requests (and, for example, rendered an
appropriate view) and does not continue executing the other interceptors and the actual
handler in the execution chain.
See Interceptors in the section on MVC configuration for examples of how to
configure interceptors. You can also register them directly by using setters on individual
HandlerMapping implementations.
postHandle method is less useful with @ResponseBody and ResponseEntity methods for
which the response is written and committed within the HandlerAdapter and before
postHandle. That means it is too late to make any changes to the response, such as adding
an extra header. For such scenarios, you can implement ResponseBodyAdvice and either
declare it as an Controller Advice bean or configure it directly on
RequestMappingHandlerAdapter.
1.1.8. Exceptions
If an exception occurs during request mapping or is thrown from a request handler (such as
a @Controller), the DispatcherServlet delegates to a chain of HandlerExceptionResolver
beans to resolve the exception and provide alternative handling, which is typically an
error response.
The following table lists the available HandlerExceptionResolver implementations:
HandlerExceptionResolver |
Description |
|---|---|
|
|
A mapping between exception class names and error view names. Useful for rendering |
|
|
Resolves exceptions raised by Spring MVC and maps them to HTTP status codes. |
|
|
Resolves exceptions with the |
|
|
Resolves exceptions by invoking an |
Chain of Resolvers
You can form an exception resolver chain by declaring multiple HandlerExceptionResolver
beans in your Spring configuration and setting their order properties as needed.
The higher the order property, the later the exception resolver is positioned.
The contract of HandlerExceptionResolver specifies that it can return:
-
a
ModelAndViewthat points to an error view. -
An empty
ModelAndViewif the exception was handled within the resolver. -
nullif the exception remains unresolved, for subsequent resolvers to try, and, if the
exception remains at the end, it is allowed to bubble up to the Servlet container.
The MVC Config automatically declares built-in resolvers for default Spring MVC
exceptions, for @ResponseStatus annotated exceptions, and for support of
@ExceptionHandler methods. You can customize that list or replace it.
Container Error Page
If an exception remains unresolved by any HandlerExceptionResolver and is, therefore,
left to propagate or if the response status is set to an error status (that is, 4xx, 5xx),
Servlet containers can render a default error page in HTML. To customize the default
error page of the container, you can declare an error page mapping in web.xml.
The following example shows how to do so:
<error-page>
    <location>/error</location>
</error-page>
Given the preceding example, when an exception bubbles up or the response has an error status, the
Servlet container makes an ERROR dispatch within the container to the configured URL
(for example, /error). This is then processed by the DispatcherServlet, possibly mapping it
to a @Controller, which could be implemented to return an error view name with a model
or to render a JSON response, as the following example shows:
Java
@RestController
public class ErrorController {

    @RequestMapping(path = "/error")
    public Map<String, Object> handle(HttpServletRequest request) {
        Map<String, Object> map = new HashMap<>();
        map.put("status", request.getAttribute("jakarta.servlet.error.status_code"));
        map.put("reason", request.getAttribute("jakarta.servlet.error.message"));
        return map;
    }
}
Kotlin
@RestController
class ErrorController {

    @RequestMapping(path = ["/error"])
    fun handle(request: HttpServletRequest): Map<String, Any> {
        val map = HashMap<String, Any>()
        map["status"] = request.getAttribute("jakarta.servlet.error.status_code")
        map["reason"] = request.getAttribute("jakarta.servlet.error.message")
        return map
    }
}
|
The Servlet API does not provide a way to create error page mappings in Java. You can, however, use both a WebApplicationInitializer and a minimal web.xml.
|
1.1.9. View Resolution
Spring MVC defines the ViewResolver and View interfaces that let you render
models in a browser without tying you to a specific view technology. ViewResolver
provides a mapping between view names and actual views. View addresses the preparation
of data before handing over to a specific view technology.
The following table provides more details on the ViewResolver hierarchy:
| ViewResolver | Description |
|---|---|
|
|
Subclasses of |
|
|
Simple implementation of the |
|
|
Convenient subclass of |
|
|
Convenient subclass of |
|
|
Implementation of the |
|
|
Implementation of the |
Handling
You can chain view resolvers by declaring more than one resolver bean and, if necessary, by
setting the order property to specify ordering. Remember, the higher the order property,
the later the view resolver is positioned in the chain.
The contract of a ViewResolver specifies that it can return null to indicate that the
view could not be found. However, in the case of JSPs and InternalResourceViewResolver,
the only way to figure out if a JSP exists is to perform a dispatch through
RequestDispatcher. Therefore, you must always configure an InternalResourceViewResolver
to be last in the overall order of view resolvers.
Configuring view resolution is as simple as adding ViewResolver beans to your Spring
configuration. The MVC Config provides a dedicated configuration API for
View Resolvers and for adding logic-less
View Controllers which are useful for HTML template
rendering without controller logic.
Redirecting
The special redirect: prefix in a view name lets you perform a redirect. The
UrlBasedViewResolver (and its subclasses) recognize this as an instruction that a
redirect is needed. The rest of the view name is the redirect URL.
The net effect is the same as if the controller had returned a RedirectView, but now
the controller itself can operate in terms of logical view names. A logical view
name (such as redirect:/myapp/some/resource) redirects relative to the current
Servlet context, while a name such as redirect:https://myhost.com/some/arbitrary/path
redirects to an absolute URL.
Note that, if a controller method is annotated with the @ResponseStatus, the annotation
value takes precedence over the response status set by RedirectView.
Forwarding
You can also use a special forward: prefix for view names that are
ultimately resolved by UrlBasedViewResolver and subclasses. This creates an
InternalResourceView, which does a RequestDispatcher.forward().
Therefore, this prefix is not useful with InternalResourceViewResolver and
InternalResourceView (for JSPs), but it can be helpful if you use another view
technology but still want to force a forward of a resource to be handled by the
Servlet/JSP engine. Note that you may also chain multiple view resolvers, instead.
Content Negotiation
ContentNegotiatingViewResolver
does not resolve views itself but rather delegates
to other view resolvers and selects the view that resembles the representation requested
by the client. The representation can be determined from the Accept header or from a
query parameter (for example, "/path?format=pdf").
The ContentNegotiatingViewResolver selects an appropriate View to handle the request
by comparing the request media types with the media type (also known as
Content-Type) supported by the View associated with each of its ViewResolvers. The
first View in the list that has a compatible Content-Type returns the representation
to the client. If a compatible view cannot be supplied by the ViewResolver chain,
the list of views specified through the DefaultViews property is consulted. This
latter option is appropriate for singleton Views that can render an appropriate
representation of the current resource regardless of the logical view name. The Accept
header can include wildcards (for example text/*), in which case a View whose
Content-Type is text/xml is a compatible match.
See View Resolvers under MVC Config for configuration details.
1.1.10. Locale
Most parts of Spring’s architecture support internationalization, as the Spring web
MVC framework does. DispatcherServlet lets you automatically resolve messages
by using the client’s locale. This is done with LocaleResolver objects.
When a request comes in, the DispatcherServlet looks for a locale resolver and, if it
finds one, it tries to use it to set the locale. By using the RequestContext.getLocale()
method, you can always retrieve the locale that was resolved by the locale resolver.
In addition to automatic locale resolution, you can also attach an interceptor to the
handler mapping (see Interception for more information on handler
mapping interceptors) to change the locale under specific circumstances (for example,
based on a parameter in the request).
Locale resolvers and interceptors are defined in the
org.springframework.web.servlet.i18n package and are configured in your application
context in the normal way. The following selection of locale resolvers is included in
Spring.
-
Time Zone
-
Header Resolver
-
Cookie Resolver
-
Session Resolver
-
Locale Interceptor
Time Zone
In addition to obtaining the client’s locale, it is often useful to know its time zone.
The LocaleContextResolver interface offers an extension to LocaleResolver that lets
resolvers provide a richer LocaleContext, which may include time zone information.
When available, the user’s TimeZone can be obtained by using the
RequestContext.getTimeZone() method. Time zone information is automatically used
by any Date/Time Converter and Formatter objects that are registered with Spring’s
ConversionService.
This locale resolver inspects the accept-language header in the request that was sent
by the client (for example, a web browser). Usually, this header field contains the locale of
the client’s operating system. Note that this resolver does not support time zone
information.
Cookie Resolver
This locale resolver inspects a Cookie that might exist on the client to see if a
Locale or TimeZone is specified. If so, it uses the specified details. By using the
properties of this locale resolver, you can specify the name of the cookie as well as the
maximum age. The following example defines a CookieLocaleResolver:
<bean id="localeResolver" class="org.springframework.web.servlet.i18n.CookieLocaleResolver">

    <property name="cookieName" value="clientlanguage"/>

    <!-- in seconds. If set to -1, the cookie is not persisted (deleted when browser shuts down) -->
    <property name="cookieMaxAge" value="100000"/>

</bean>
The following table describes the properties CookieLocaleResolver:
| Property | Default | Description |
|---|---|---|
|
|
class name + LOCALE |
The name of the cookie |
|
|
Servlet container default |
The maximum time a cookie persists on the client. If |
|
|
/ |
Limits the visibility of the cookie to a certain part of your site. When |
Session Resolver
The SessionLocaleResolver lets you retrieve Locale and TimeZone from the
session that might be associated with the user’s request. In contrast to
CookieLocaleResolver, this strategy stores locally chosen locale settings in the
Servlet container’s HttpSession. As a consequence, those settings are temporary
for each session and are, therefore, lost when each session ends.
Note that there is no direct relationship with external session management mechanisms,
such as the Spring Session project. This SessionLocaleResolver evaluates and
modifies the corresponding HttpSession attributes against the current HttpServletRequest.
Locale Interceptor
You can enable changing of locales by adding the LocaleChangeInterceptor to one of the
HandlerMapping definitions. It detects a parameter in the request and changes the locale
accordingly, calling the setLocale method on the LocaleResolver in the dispatcher’s
application context. The next example shows that calls to all *.view resources
that contain a parameter named siteLanguage now changes the locale. So, for example,
a request for the URL, https://www.sf.net/home.view?siteLanguage=nl, changes the site
language to Dutch. The following example shows how to intercept the locale:
<bean id="localeChangeInterceptor"
        class="org.springframework.web.servlet.i18n.LocaleChangeInterceptor">
    <property name="paramName" value="siteLanguage"/>
</bean>

<bean id="localeResolver"
        class="org.springframework.web.servlet.i18n.CookieLocaleResolver"/>

<bean id="urlMapping"
        class="org.springframework.web.servlet.handler.SimpleUrlHandlerMapping">
    <property name="interceptors">
        <list>
            <ref bean="localeChangeInterceptor"/>
        </list>
    </property>
    <property name="mappings">
        <value>/**/*.view=someController</value>
    </property>
</bean>
1.1.11. Themes
You can apply Spring Web MVC framework themes to set the overall look-and-feel of your
application, thereby enhancing user experience. A theme is a collection of static
resources, typically style sheets and images, that affect the visual style of the
application.
|
as of 6.0 support for themes has been deprecated theme in favor of using CSS, and without any special support on the server side. |
Defining a theme
To use themes in your web application, you must set up an implementation of the
org.springframework.ui.context.ThemeSource interface. The WebApplicationContext
interface extends ThemeSource but delegates its responsibilities to a dedicated
implementation. By default, the delegate is an
org.springframework.ui.context.support.ResourceBundleThemeSource implementation that
loads properties files from the root of the classpath. To use a custom ThemeSource
implementation or to configure the base name prefix of the ResourceBundleThemeSource,
you can register a bean in the application context with the reserved name, themeSource.
The web application context automatically detects a bean with that name and uses it.
When you use the ResourceBundleThemeSource, a theme is defined in a simple properties
file. The properties file lists the resources that make up the theme, as the following example shows:
styleSheet=/themes/cool/style.css
background=/themes/cool/img/coolBg.jpg
The keys of the properties are the names that refer to the themed elements from view
code. For a JSP, you typically do this using the spring:theme custom tag, which is
very similar to the spring:message tag. The following JSP fragment uses the theme
defined in the previous example to customize the look and feel:
<%@ taglib prefix="spring" uri="http://www.springframework.org/tags"%>
<html>
    <head>
        <link rel="stylesheet" href="<spring:theme code='styleSheet'/>" type="text/css"/>
    </head>
    <body style="background=<spring:theme code='background'/>">
        ...
    </body>
</html>
By default, the ResourceBundleThemeSource uses an empty base name prefix. As a result,
the properties files are loaded from the root of the classpath. Thus, you would put the
cool.properties theme definition in a directory at the root of the classpath (for
example, in /WEB-INF/classes). The ResourceBundleThemeSource uses the standard Java
resource bundle loading mechanism, allowing for full internationalization of themes. For
example, we could have a /WEB-INF/classes/cool_nl.properties that references a special
background image with Dutch text on it.
Resolving Themes
After you define themes, as described in the preceding section,
you decide which theme to use. The DispatcherServlet looks for a bean named themeResolver
to find out which ThemeResolver implementation to use. A theme resolver works in much the same
way as a LocaleResolver. It detects the theme to use for a particular request and can also
alter the request’s theme. The following table describes the theme resolvers provided by Spring:
| Class | Description |
|---|---|
|
|
Selects a fixed theme, set by using the |
|
|
The theme is maintained in the user’s HTTP session. It needs to be set only once for |
|
|
The selected theme is stored in a cookie on the client. |
Spring also provides a ThemeChangeInterceptor that lets theme changes on every
request with a simple request parameter.
1.1.12. Multipart Resolver
MultipartResolver from the org.springframework.web.multipart package is a strategy
for parsing multipart requests including file uploads. There is a container-based
StandardServletMultipartResolver implementation for Servlet multipart request parsing.
Note that the outdated CommonsMultipartResolver based on Apache Commons FileUpload is
not available anymore, as of Spring Framework 6.0 with its new Servlet 5.0+ baseline.
To enable multipart handling, you need to declare a MultipartResolver bean in your
DispatcherServlet Spring configuration with a name of multipartResolver.
The DispatcherServlet detects it and applies it to the incoming request. When a POST
with a content type of multipart/form-data is received, the resolver parses the
content wraps the current HttpServletRequest as a MultipartHttpServletRequest to
provide access to resolved files in addition to exposing parts as request parameters.
Servlet Multipart Parsing
Servlet multipart parsing needs to be enabled through Servlet container configuration.
To do so:
-
In Java, set a
MultipartConfigElementon the Servlet registration. -
In
web.xml, add a"<multipart-config>"section to the servlet declaration.
The following example shows how to set a MultipartConfigElement on the Servlet registration:
Java
public class AppInitializer extends AbstractAnnotationConfigDispatcherServletInitializer {

    // ...

    @Override
    protected void customizeRegistration(ServletRegistration.Dynamic registration) {

        // Optionally also set maxFileSize, maxRequestSize, fileSizeThreshold
        registration.setMultipartConfig(new MultipartConfigElement("/tmp"));
    }

}
Kotlin
class AppInitializer : AbstractAnnotationConfigDispatcherServletInitializer() {

    // ...

    override fun customizeRegistration(registration: ServletRegistration.Dynamic) {

        // Optionally also set maxFileSize, maxRequestSize, fileSizeThreshold
        registration.setMultipartConfig(MultipartConfigElement("/tmp"))
    }

}
Once the Servlet multipart configuration is in place, you can add a bean of type
StandardServletMultipartResolver with a name of multipartResolver.
|
This resolver variant uses your Servlet container’s multipart parser as-is, |
1.1.13. Logging
DEBUG-level logging in Spring MVC is designed to be compact, minimal, and
human-friendly. It focuses on high-value bits of information that are useful over and
over again versus others that are useful only when debugging a specific issue.
TRACE-level logging generally follows the same principles as DEBUG (and, for example, also
should not be a fire hose) but can be used for debugging any issue. In addition, some log
messages may show a different level of detail at TRACE versus DEBUG.
Good logging comes from the experience of using the logs. If you spot anything that does
not meet the stated goals, please let us know.
Sensitive Data
DEBUG and TRACE logging may log sensitive information. This is why request parameters and
headers are masked by default and their logging in full must be enabled explicitly
through the enableLoggingRequestDetails property on DispatcherServlet.
The following example shows how to do so by using Java configuration:
Java
public class MyInitializer
        extends AbstractAnnotationConfigDispatcherServletInitializer {

    @Override
    protected Class<?>[] getRootConfigClasses() {
        return ... ;
    }

    @Override
    protected Class<?>[] getServletConfigClasses() {
        return ... ;
    }

    @Override
    protected String[] getServletMappings() {
        return ... ;
    }

    @Override
    protected void customizeRegistration(ServletRegistration.Dynamic registration) {
        registration.setInitParameter("enableLoggingRequestDetails", "true");
    }

}
Kotlin
class MyInitializer : AbstractAnnotationConfigDispatcherServletInitializer() {

    override fun getRootConfigClasses(): Array<Class<*>>? {
        return ...
    }

    override fun getServletConfigClasses(): Array<Class<*>>? {
        return ...
    }

    override fun getServletMappings(): Array<String> {
        return ...
    }

    override fun customizeRegistration(registration: ServletRegistration.Dynamic) {
        registration.setInitParameter("enableLoggingRequestDetails", "true")
    }
}
1.2. Filters
The spring-web module provides some useful filters:
-
Form Data
-
Forwarded Headers
-
Shallow ETag
-
CORS
1.2.1. Form Data
Browsers can submit form data only through HTTP GET or HTTP POST but non-browser clients can also
use HTTP PUT, PATCH, and DELETE. The Servlet API requires ServletRequest.getParameter*()
methods to support form field access only for HTTP POST.
The spring-web module provides FormContentFilter to intercept HTTP PUT, PATCH, and DELETE
requests with a content type of application/x-www-form-urlencoded, read the form data from
the body of the request, and wrap the ServletRequest to make the form data
available through the ServletRequest.getParameter*() family of methods.
As a request goes through proxies (such as load balancers) the host, port, and
scheme may change, and that makes it a challenge to create links that point to the correct
host, port, and scheme from a client perspective.
RFC 7239 defines the Forwarded HTTP header
that proxies can use to provide information about the original request. There are other
non-standard headers, too, including X-Forwarded-Host, X-Forwarded-Port,
X-Forwarded-Proto, X-Forwarded-Ssl, and X-Forwarded-Prefix.
ForwardedHeaderFilter is a Servlet filter that modifies the request in order to
a) change the host, port, and scheme based on Forwarded headers, and b) to remove those
headers to eliminate further impact. The filter relies on wrapping the request, and
therefore it must be ordered ahead of other filters, such as RequestContextFilter, that
should work with the modified and not the original request.
There are security considerations for forwarded headers since an application cannot know
if the headers were added by a proxy, as intended, or by a malicious client. This is why
a proxy at the boundary of trust should be configured to remove untrusted Forwarded
headers that come from the outside. You can also configure the ForwardedHeaderFilter
with removeOnly=true, in which case it removes but does not use the headers.
In order to support asynchronous requests and error dispatches this
filter should be mapped with DispatcherType.ASYNC and also DispatcherType.ERROR.
If using Spring Framework’s AbstractAnnotationConfigDispatcherServletInitializer
(see Servlet Config) all filters are automatically registered for all dispatch
types. However if registering the filter via web.xml or in Spring Boot via a
FilterRegistrationBean be sure to include DispatcherType.ASYNC and
DispatcherType.ERROR in addition to DispatcherType.REQUEST.
1.2.3. Shallow ETag
The ShallowEtagHeaderFilter filter creates a “shallow” ETag by caching the content
written to the response and computing an MD5 hash from it. The next time a client sends,
it does the same, but it also compares the computed value against the If-None-Match
request header and, if the two are equal, returns a 304 (NOT_MODIFIED).
This strategy saves network bandwidth but not CPU, as the full response must be computed
for each request. Other strategies at the controller level, described earlier, can avoid
the computation. See HTTP Caching.
This filter has a writeWeakETag parameter that configures the filter to write weak ETags
similar to the following: W/"02a2d595e6ed9a0b24f027f2b63b134d6" (as defined in
RFC 7232 Section 2.3).
In order to support asynchronous requests this filter must be mapped
with DispatcherType.ASYNC so that the filter can delay and successfully generate an
ETag to the end of the last async dispatch. If using Spring Framework’s
AbstractAnnotationConfigDispatcherServletInitializer (see Servlet Config)
all filters are automatically registered for all dispatch types. However if registering
the filter via web.xml or in Spring Boot via a FilterRegistrationBean be sure to include
DispatcherType.ASYNC.
1.2.4. CORS
Spring MVC provides fine-grained support for CORS configuration through annotations on
controllers. However, when used with Spring Security, we advise relying on the built-in
CorsFilter that must be ordered ahead of Spring Security’s chain of filters.
See the sections on CORS and the CORS Filter for more details.
1.3. Annotated Controllers
Spring MVC provides an annotation-based programming model where @Controller and
@RestController components use annotations to express request mappings, request input,
exception handling, and more. Annotated controllers have flexible method signatures and
do not have to extend base classes nor implement specific interfaces.
The following example shows a controller defined by annotations:
Java
@Controller
public class HelloController {

    @GetMapping("/hello")
    public String handle(Model model) {
        model.addAttribute("message", "Hello World!");
        return "index";
    }
}
Kotlin
import org.springframework.ui.set

@Controller
class HelloController {

    @GetMapping("/hello")
    fun handle(model: Model): String {
        model["message"] = "Hello World!"
        return "index"
    }
}
In the preceding example, the method accepts a Model and returns a view name as a String,
but many other options exist and are explained later in this chapter.
|
Guides and tutorials on spring.io use the annotation-based programming model described in this section. |
1.3.1. Declaration
You can define controller beans by using a standard Spring bean definition in the
Servlet’s WebApplicationContext. The @Controller stereotype allows for auto-detection,
aligned with Spring general support for detecting @Component classes in the classpath
and auto-registering bean definitions for them. It also acts as a stereotype for the
annotated class, indicating its role as a web component.
To enable auto-detection of such @Controller beans, you can add component scanning to
your Java configuration, as the following example shows:
Java
@Configuration
@ComponentScan("org.example.web")
public class WebConfig {

    // ...
}
Kotlin
@Configuration
@ComponentScan("org.example.web")
class WebConfig {

    // ...
}
The following example shows the XML configuration equivalent of the preceding example:
<?xml version="1.0" encoding="UTF-8"?>
<beans xmlns="http://www.springframework.org/schema/beans"
    xmlns:xsi="http://www.w3.org/2001/XMLSchema-instance"
    xmlns:p="http://www.springframework.org/schema/p"
    xmlns:context="http://www.springframework.org/schema/context"
    xsi:schemaLocation="
        http://www.springframework.org/schema/beans
        https://www.springframework.org/schema/beans/spring-beans.xsd
        http://www.springframework.org/schema/context
        https://www.springframework.org/schema/context/spring-context.xsd">

    <context:component-scan base-package="org.example.web"/>

    <!-- ... -->

</beans>
@RestController is a composed annotation that is
itself meta-annotated with @Controller and @ResponseBody to indicate a controller whose
every method inherits the type-level @ResponseBody annotation and, therefore, writes
directly to the response body versus view resolution and rendering with an HTML template.
AOP Proxies
In some cases, you may need to decorate a controller with an AOP proxy at runtime.
One example is if you choose to have @Transactional annotations directly on the
controller. When this is the case, for controllers specifically, we recommend
using class-based proxying. This is automatically the case with such annotations
directly on the controller.
If the controller implements an interface, and needs AOP proxying, you may need to
explicitly configure class-based proxying. For example, with @EnableTransactionManagement
you can change to @EnableTransactionManagement(proxyTargetClass = true), and with
<tx:annotation-driven/> you can change to <tx:annotation-driven proxy-target-class="true"/>.
|
Keep in mind that as of 6.0, with interface proxying, Spring MVC no longer detects controllers based solely on a type-level @RequestMapping annotation on the interface.Please, enable class based proxying, or otherwise the interface must also have an @Controller annotation.
|
1.3.2. Request Mapping
You can use the @RequestMapping annotation to map requests to controllers methods. It has
various attributes to match by URL, HTTP method, request parameters, headers, and media
types. You can use it at the class level to express shared mappings or at the method level
to narrow down to a specific endpoint mapping.
There are also HTTP method specific shortcut variants of @RequestMapping:
-
@GetMapping -
@PostMapping -
@PutMapping -
@DeleteMapping -
@PatchMapping
The shortcuts are Custom Annotations that are provided because,
arguably, most controller methods should be mapped to a specific HTTP method versus
using @RequestMapping, which, by default, matches to all HTTP methods.
A @RequestMapping is still needed at the class level to express shared mappings.
The following example has type and method level mappings:
Java
@RestController
@RequestMapping("/persons")
class PersonController {

    @GetMapping("/{id}")
    public Person getPerson(@PathVariable Long id) {
        // ...
    }

    @PostMapping
    @ResponseStatus(HttpStatus.CREATED)
    public void add(@RequestBody Person person) {
        // ...
    }
}
Kotlin
@RestController
@RequestMapping("/persons")
class PersonController {

    @GetMapping("/{id}")
    fun getPerson(@PathVariable id: Long): Person {
        // ...
    }

    @PostMapping
    @ResponseStatus(HttpStatus.CREATED)
    fun add(@RequestBody person: Person) {
        // ...
    }
}
URI patterns
@RequestMapping methods can be mapped using URL patterns. There are two alternatives:
-
PathPattern— a pre-parsed pattern matched against the URL path also pre-parsed as
PathContainer. Designed for web use, this solution deals effectively with encoding and
path parameters, and matches efficiently. -
AntPathMatcher— match String patterns against a String path. This is the original
solution also used in Spring configuration to select resources on the classpath, on the
filesystem, and other locations. It is less efficient and the String path input is a
challenge for dealing effectively with encoding and other issues with URLs.
PathPattern is the recommended solution for web applications and it is the only choice in
Spring WebFlux. It was enabled for use in Spring MVC from version 5.3 and is enabled by
default from version 6.0. See MVC config for
customizations of path matching options.
PathPattern supports the same pattern syntax as AntPathMatcher. In addition, it also
supports the capturing pattern, e.g. {*spring}, for matching 0 or more path segments
at the end of a path. PathPattern also restricts the use of ** for matching multiple
path segments such that it’s only allowed at the end of a pattern. This eliminates many
cases of ambiguity when choosing the best matching pattern for a given request.
For full pattern syntax please refer to
PathPattern and
AntPathMatcher.
Some example patterns:
-
"/resources/ima?e.png"— match one character in a path segment -
"/resources/*.png"— match zero or more characters in a path segment -
"/resources/**"— match multiple path segments -
"/projects/{project}/versions"— match a path segment and capture it as a variable -
"/projects/{project:[a-z]+}/versions"— match and capture a variable with a regex
Captured URI variables can be accessed with @PathVariable. For example:
Java
@GetMapping("/owners/{ownerId}/pets/{petId}")
public Pet findPet(@PathVariable Long ownerId, @PathVariable Long petId) {
    // ...
}
Kotlin
@GetMapping("/owners/{ownerId}/pets/{petId}")
fun findPet(@PathVariable ownerId: Long, @PathVariable petId: Long): Pet {
    // ...
}
You can declare URI variables at the class and method levels, as the following example shows:
Java
@Controller
@RequestMapping("/owners/{ownerId}")
public class OwnerController {

    @GetMapping("/pets/{petId}")
    public Pet findPet(@PathVariable Long ownerId, @PathVariable Long petId) {
        // ...
    }
}
Kotlin
@Controller
@RequestMapping("/owners/{ownerId}")
class OwnerController {

    @GetMapping("/pets/{petId}")
    fun findPet(@PathVariable ownerId: Long, @PathVariable petId: Long): Pet {
        // ...
    }
}
URI variables are automatically converted to the appropriate type, or TypeMismatchException
is raised. Simple types (int, long, Date, and so on) are supported by default and you can
register support for any other data type.
See Type Conversion and DataBinder.
You can explicitly name URI variables (for example, @PathVariable("customId")), but you can
leave that detail out if the names are the same and your code is compiled with the -parameters
compiler flag.
The syntax {varName:regex} declares a URI variable with a regular expression that has
syntax of {varName:regex}. For example, given URL "/spring-web-3.0.5.jar", the following method
extracts the name, version, and file extension:
Java
@GetMapping("/{name:[a-z-]+}-{version:\d\.\d\.\d}{ext:\.[a-z]+}")
public void handle(@PathVariable String name, @PathVariable String version, @PathVariable String ext) {
    // ...
}
Kotlin
@GetMapping("/{name:[a-z-]+}-{version:\d\.\d\.\d}{ext:\.[a-z]+}")
fun handle(@PathVariable name: String, @PathVariable version: String, @PathVariable ext: String) {
    // ...
}
URI path patterns can also have embedded ${…} placeholders that are resolved on startup
by using PropertySourcesPlaceholderConfigurer against local, system, environment, and
other property sources. You can use this, for example, to parameterize a base URL based on
some external configuration.
Pattern Comparison
When multiple patterns match a URL, the best match must be selected. This is done with
one of the following depending on whether use of parsed PathPattern is enabled for use or not:
-
PathPattern.SPECIFICITY_COMPARATOR -
AntPathMatcher.getPatternComparator(String path)
Both help to sort patterns with more specific ones on top. A pattern is less specific if
it has a lower count of URI variables (counted as 1), single wildcards (counted as 1),
and double wildcards (counted as 2). Given an equal score, the longer pattern is chosen.
Given the same score and length, the pattern with more URI variables than wildcards is
chosen.
The default mapping pattern (/**) is excluded from scoring and always
sorted last. Also, prefix patterns (such as /public/**) are considered less
specific than other pattern that do not have double wildcards.
For the full details, follow the above links to the pattern Comparators.
Suffix Match
Starting in 5.3, by default Spring MVC no longer performs .* suffix pattern
matching where a controller mapped to /person is also implicitly mapped to
/person.*. As a consequence path extensions are no longer used to interpret
the requested content type for the response — for example, /person.pdf, /person.xml,
and so on.
Using file extensions in this way was necessary when browsers used to send Accept headers
that were hard to interpret consistently. At present, that is no longer a necessity and
using the Accept header should be the preferred choice.
Over time, the use of file name extensions has proven problematic in a variety of ways.
It can cause ambiguity when overlain with the use of URI variables, path parameters, and
URI encoding. Reasoning about URL-based authorization
and security (see next section for more details) also becomes more difficult.
To completely disable the use of path extensions in versions prior to 5.3, set the following:
-
useSuffixPatternMatching(false), see PathMatchConfigurer -
favorPathExtension(false), see ContentNegotiationConfigurer
Having a way to request content types other than through the "Accept" header can still
be useful, e.g. when typing a URL in a browser. A safe alternative to path extensions is
to use the query parameter strategy. If you must use file extensions, consider restricting
them to a list of explicitly registered extensions through the mediaTypes property of
ContentNegotiationConfigurer.
Suffix Match and RFD
A reflected file download (RFD) attack is similar to XSS in that it relies on request input
(for example, a query parameter and a URI variable) being reflected in the response. However, instead of
inserting JavaScript into HTML, an RFD attack relies on the browser switching to perform a
download and treating the response as an executable script when double-clicked later.
In Spring MVC, @ResponseBody and ResponseEntity methods are at risk, because
they can render different content types, which clients can request through URL path extensions.
Disabling suffix pattern matching and using path extensions for content negotiation
lower the risk but are not sufficient to prevent RFD attacks.
To prevent RFD attacks, prior to rendering the response body, Spring MVC adds a
Content-Disposition:inline;filename=f.txt header to suggest a fixed and safe download
file. This is done only if the URL path contains a file extension that is neither
allowed as safe nor explicitly registered for content negotiation. However, it can
potentially have side effects when URLs are typed directly into a browser.
Many common path extensions are allowed as safe by default. Applications with custom
HttpMessageConverter implementations can explicitly register file extensions for content
negotiation to avoid having a Content-Disposition header added for those extensions.
See Content Types.
See CVE-2015-5211 for additional
recommendations related to RFD.
Consumable Media Types
You can narrow the request mapping based on the Content-Type of the request,
as the following example shows:
Java
@PostMapping(path = "/pets", consumes = "application/json") (1)
public void addPet(@RequestBody Pet pet) {
    // ...
}
| 1 | Using a consumes attribute to narrow the mapping by the content type. |
Kotlin
@PostMapping("/pets", consumes = ["application/json"]) (1)
fun addPet(@RequestBody pet: Pet) {
    // ...
}
| 1 | Using a consumes attribute to narrow the mapping by the content type. |
The consumes attribute also supports negation expressions — for example, !text/plain means any
content type other than text/plain.
You can declare a shared consumes attribute at the class level. Unlike most other
request-mapping attributes, however, when used at the class level, a method-level consumes attribute
overrides rather than extends the class-level declaration.
MediaType provides constants for commonly used media types, such asAPPLICATION_JSON_VALUE and APPLICATION_XML_VALUE.
|
Producible Media Types
You can narrow the request mapping based on the Accept request header and the list of
content types that a controller method produces, as the following example shows:
Java
@GetMapping(path = "/pets/{petId}", produces = "application/json") (1)
@ResponseBody
public Pet getPet(@PathVariable String petId) {
    // ...
}
| 1 | Using a produces attribute to narrow the mapping by the content type. |
Kotlin
@GetMapping("/pets/{petId}", produces = ["application/json"]) (1)
@ResponseBody
fun getPet(@PathVariable petId: String): Pet {
    // ...
}
| 1 | Using a produces attribute to narrow the mapping by the content type. |
The media type can specify a character set. Negated expressions are supported — for example,
!text/plain means any content type other than «text/plain».
You can declare a shared produces attribute at the class level. Unlike most other
request-mapping attributes, however, when used at the class level, a method-level produces attribute
overrides rather than extends the class-level declaration.
MediaType provides constants for commonly used media types, such asAPPLICATION_JSON_VALUE and APPLICATION_XML_VALUE.
|
Parameters, headers
You can narrow request mappings based on request parameter conditions. You can test for the
presence of a request parameter (myParam), for the absence of one (!myParam), or for a
specific value (myParam=myValue). The following example shows how to test for a specific value:
Java
@GetMapping(path = "/pets/{petId}", params = "myParam=myValue") (1)
public void findPet(@PathVariable String petId) {
    // ...
}
| 1 | Testing whether myParam equals myValue. |
Kotlin
@GetMapping("/pets/{petId}", params = ["myParam=myValue"]) (1)
fun findPet(@PathVariable petId: String) {
    // ...
}
| 1 | Testing whether myParam equals myValue. |
You can also use the same with request header conditions, as the following example shows:
Java
@GetMapping(path = "/pets/{petId}", headers = "myHeader=myValue") (1)
public void findPet(@PathVariable String petId) {
    // ...
}
| 1 | Testing whether myHeader equals myValue. |
Kotlin
@GetMapping("/pets/{petId}", headers = ["myHeader=myValue"]) (1)
fun findPet(@PathVariable petId: String) {
    // ...
}
| 1 | Testing whether myHeader equals myValue. |
You can match Content-Type and Accept with the headers condition, but it is better to useconsumes and produces instead. |
HTTP HEAD, OPTIONS
@GetMapping (and @RequestMapping(method=HttpMethod.GET)) support HTTP HEAD
transparently for request mapping. Controller methods do not need to change.
A response wrapper, applied in jakarta.servlet.http.HttpServlet, ensures a Content-Length
header is set to the number of bytes written (without actually writing to the response).
@GetMapping (and @RequestMapping(method=HttpMethod.GET)) are implicitly mapped to
and support HTTP HEAD. An HTTP HEAD request is processed as if it were HTTP GET except
that, instead of writing the body, the number of bytes are counted and the Content-Length
header is set.
By default, HTTP OPTIONS is handled by setting the Allow response header to the list of HTTP
methods listed in all @RequestMapping methods that have matching URL patterns.
For a @RequestMapping without HTTP method declarations, the Allow header is set to
GET,HEAD,POST,PUT,PATCH,DELETE,OPTIONS. Controller methods should always declare the
supported HTTP methods (for example, by using the HTTP method specific variants:
@GetMapping, @PostMapping, and others).
You can explicitly map the @RequestMapping method to HTTP HEAD and HTTP OPTIONS, but that
is not necessary in the common case.
Custom Annotations
Spring MVC supports the use of composed annotations
for request mapping. Those are annotations that are themselves meta-annotated with
@RequestMapping and composed to redeclare a subset (or all) of the @RequestMapping
attributes with a narrower, more specific purpose.
@GetMapping, @PostMapping, @PutMapping, @DeleteMapping, and @PatchMapping are
examples of composed annotations. They are provided because, arguably, most
controller methods should be mapped to a specific HTTP method versus using @RequestMapping,
which, by default, matches to all HTTP methods. If you need an example of composed
annotations, look at how those are declared.
Spring MVC also supports custom request-mapping attributes with custom request-matching
logic. This is a more advanced option that requires subclassing
RequestMappingHandlerMapping and overriding the getCustomMethodCondition method, where
you can check the custom attribute and return your own RequestCondition.
Explicit Registrations
You can programmatically register handler methods, which you can use for dynamic
registrations or for advanced cases, such as different instances of the same handler
under different URLs. The following example registers a handler method:
Java
@Configuration
public class MyConfig {

    @Autowired
    public void setHandlerMapping(RequestMappingHandlerMapping mapping, UserHandler handler) (1)
            throws NoSuchMethodException {

        RequestMappingInfo info = RequestMappingInfo
                .paths("/user/{id}").methods(RequestMethod.GET).build(); (2)

        Method method = UserHandler.class.getMethod("getUser", Long.class); (3)

        mapping.registerMapping(info, handler, method); (4)
    }
}
| 1 | Inject the target handler and the handler mapping for controllers. |
| 2 | Prepare the request mapping meta data. |
| 3 | Get the handler method. |
| 4 | Add the registration. |
Kotlin
@Configuration
class MyConfig {

    @Autowired
    fun setHandlerMapping(mapping: RequestMappingHandlerMapping, handler: UserHandler) { (1)
        val info = RequestMappingInfo.paths("/user/{id}").methods(RequestMethod.GET).build() (2)
        val method = UserHandler::class.java.getMethod("getUser", Long::class.java) (3)
        mapping.registerMapping(info, handler, method) (4)
    }
}
| 1 | Inject the target handler and the handler mapping for controllers. |
| 2 | Prepare the request mapping meta data. |
| 3 | Get the handler method. |
| 4 | Add the registration. |
1.3.3. Handler Methods
@RequestMapping handler methods have a flexible signature and can choose from a range of
supported controller method arguments and return values.
Method Arguments
The next table describes the supported controller method arguments. Reactive types are not supported
for any arguments.
JDK 8’s java.util.Optional is supported as a method argument in combination with
annotations that have a required attribute (for example, @RequestParam, @RequestHeader,
and others) and is equivalent to required=false.
| Controller method argument | Description |
|---|---|
|
|
Generic access to request parameters and request and session attributes, without direct |
|
|
Choose any specific request or response type — for example, |
|
|
Enforces the presence of a session. As a consequence, such an argument is never |
|
|
Servlet 4.0 push builder API for programmatic HTTP/2 resource pushes. |
|
|
Currently authenticated user — possibly a specific Note that this argument is not resolved eagerly, if it is annotated in order to allow a custom resolver to resolve it |
|
|
The HTTP method of the request. |
|
|
The current request locale, determined by the most specific |
|
|
The time zone associated with the current request, as determined by a |
|
|
For access to the raw request body as exposed by the Servlet API. |
|
|
For access to the raw response body as exposed by the Servlet API. |
|
|
For access to URI template variables. See URI patterns. |
|
|
For access to name-value pairs in URI path segments. See Matrix Variables. |
|
|
For access to the Servlet request parameters, including multipart files. Parameter values Note that use of |
|
|
For access to request headers. Header values are converted to the declared method argument |
|
|
For access to cookies. Cookies values are converted to the declared method argument |
|
|
For access to the HTTP request body. Body content is converted to the declared method |
|
|
For access to request headers and body. The body is converted with an |
|
|
For access to a part in a |
|
|
For access to the model that is used in HTML controllers and exposed to templates as |
|
|
Specify attributes to use in case of a redirect (that is, to be appended to the query |
|
|
For access to an existing attribute in the model (instantiated if not present) with Note that use of |
|
|
For access to errors from validation and data binding for a command object |
|
|
For marking form processing complete, which triggers cleanup of session attributes |
|
|
For preparing a URL relative to the current request’s host, port, scheme, context path, and |
|
|
For access to any session attribute, in contrast to model attributes stored in the session |
|
|
For access to request attributes. See |
|
Any other argument |
If a method argument is not matched to any of the earlier values in this table and it is |
Return Values
The next table describes the supported controller method return values. Reactive types are
supported for all return values.
| Controller method return value | Description |
|---|---|
|
|
The return value is converted through |
|
|
The return value that specifies the full response (including HTTP headers and body) is to be converted |
|
|
For returning a response with headers and no body. |
|
|
To render an RFC 7807 error response with details in the body, |
|
|
To render an RFC 7807 error response with details in the body, |
|
|
A view name to be resolved with |
|
|
A |
|
|
Attributes to be added to the implicit model, with the view name implicitly determined |
|
|
An attribute to be added to the model, with the view name implicitly determined through Note that |
|
|
The view and model attributes to use and, optionally, a response status. |
|
|
A method with a If none of the above is true, a |
|
|
Produce any of the preceding return values asynchronously from any thread — for example, as a |
|
|
Produce any of the above return values asynchronously in a Spring MVC-managed thread. |
|
|
Alternative to |
|
|
Emit a stream of objects asynchronously to be written to the response with |
|
|
Write to the response |
|
Reactor and other reactive types registered via |
A single value type, e.g. |
|
Other return values |
If a return value remains unresolved in any other way, it is treated as a model |
Type Conversion
Some annotated controller method arguments that represent String-based request input (such as
@RequestParam, @RequestHeader, @PathVariable, @MatrixVariable, and @CookieValue)
can require type conversion if the argument is declared as something other than String.
For such cases, type conversion is automatically applied based on the configured converters.
By default, simple types (int, long, Date, and others) are supported. You can customize
type conversion through a WebDataBinder (see DataBinder) or by registering
Formatters with the FormattingConversionService.
See Spring Field Formatting.
A practical issue in type conversion is the treatment of an empty String source value.
Such a value is treated as missing if it becomes null as a result of type conversion.
This can be the case for Long, UUID, and other target types. If you want to allow null
to be injected, either use the required flag on the argument annotation, or declare the
argument as @Nullable.
|
As of 5.3, non-null arguments will be enforced even after type conversion. If your handler Alternatively, you may specifically handle e.g. the resulting |
Matrix Variables
RFC 3986 discusses name-value pairs in
path segments. In Spring MVC, we refer to those as “matrix variables” based on an
“old post” by Tim Berners-Lee, but they
can be also be referred to as URI path parameters.
Matrix variables can appear in any path segment, with each variable separated by a semicolon and
multiple values separated by comma (for example, /cars;color=red,green;year=2012). Multiple
values can also be specified through repeated variable names (for example,
color=red;color=green;color=blue).
If a URL is expected to contain matrix variables, the request mapping for a controller
method must use a URI variable to mask that variable content and ensure the request can
be matched successfully independent of matrix variable order and presence.
The following example uses a matrix variable:
Java
// GET /pets/42;q=11;r=22

@GetMapping("/pets/{petId}")
public void findPet(@PathVariable String petId, @MatrixVariable int q) {

    // petId == 42
    // q == 11
}
Kotlin
// GET /pets/42;q=11;r=22

@GetMapping("/pets/{petId}")
fun findPet(@PathVariable petId: String, @MatrixVariable q: Int) {

    // petId == 42
    // q == 11
}
Given that all path segments may contain matrix variables, you may sometimes need to
disambiguate which path variable the matrix variable is expected to be in.
The following example shows how to do so:
Java
// GET /owners/42;q=11/pets/21;q=22

@GetMapping("/owners/{ownerId}/pets/{petId}")
public void findPet(
        @MatrixVariable(name="q", pathVar="ownerId") int q1,
        @MatrixVariable(name="q", pathVar="petId") int q2) {

    // q1 == 11
    // q2 == 22
}
Kotlin
// GET /owners/42;q=11/pets/21;q=22

@GetMapping("/owners/{ownerId}/pets/{petId}")
fun findPet(
        @MatrixVariable(name = "q", pathVar = "ownerId") q1: Int,
        @MatrixVariable(name = "q", pathVar = "petId") q2: Int) {

    // q1 == 11
    // q2 == 22
}
A matrix variable may be defined as optional and a default value specified, as the
following example shows:
Java
// GET /pets/42

@GetMapping("/pets/{petId}")
public void findPet(@MatrixVariable(required=false, defaultValue="1") int q) {

    // q == 1
}
Kotlin
// GET /pets/42

@GetMapping("/pets/{petId}")
fun findPet(@MatrixVariable(required = false, defaultValue = "1") q: Int) {

    // q == 1
}
To get all matrix variables, you can use a MultiValueMap, as the following example shows:
Java
// GET /owners/42;q=11;r=12/pets/21;q=22;s=23

@GetMapping("/owners/{ownerId}/pets/{petId}")
public void findPet(
        @MatrixVariable MultiValueMap<String, String> matrixVars,
        @MatrixVariable(pathVar="petId") MultiValueMap<String, String> petMatrixVars) {

    // matrixVars: ["q" : [11,22], "r" : 12, "s" : 23]
    // petMatrixVars: ["q" : 22, "s" : 23]
}
Kotlin
// GET /owners/42;q=11;r=12/pets/21;q=22;s=23

@GetMapping("/owners/{ownerId}/pets/{petId}")
fun findPet(
        @MatrixVariable matrixVars: MultiValueMap<String, String>,
        @MatrixVariable(pathVar="petId") petMatrixVars: MultiValueMap<String, String>) {

    // matrixVars: ["q" : [11,22], "r" : 12, "s" : 23]
    // petMatrixVars: ["q" : 22, "s" : 23]
}
Note that you need to enable the use of matrix variables. In the MVC Java configuration,
you need to set a UrlPathHelper with removeSemicolonContent=false through
Path Matching. In the MVC XML namespace, you can set
<mvc:annotation-driven enable-matrix-variables="true"/>.
@RequestParam
You can use the @RequestParam annotation to bind Servlet request parameters (that is,
query parameters or form data) to a method argument in a controller.
The following example shows how to do so:
Java
@Controller
@RequestMapping("/pets")
public class EditPetForm {

    // ...

    @GetMapping
    public String setupForm(@RequestParam("petId") int petId, Model model) { (1)
        Pet pet = this.clinic.loadPet(petId);
        model.addAttribute("pet", pet);
        return "petForm";
    }

    // ...

}
| 1 | Using @RequestParam to bind petId. |
Kotlin
import org.springframework.ui.set

@Controller
@RequestMapping("/pets")
class EditPetForm {

    // ...

    @GetMapping
    fun setupForm(@RequestParam("petId") petId: Int, model: Model): String { (1)
        val pet = this.clinic.loadPet(petId);
        model["pet"] = pet
        return "petForm"
    }

    // ...

}
| 1 | Using @RequestParam to bind petId. |
By default, method parameters that use this annotation are required, but you can specify that
a method parameter is optional by setting the @RequestParam annotation’s required flag to
false or by declaring the argument with an java.util.Optional wrapper.
Type conversion is automatically applied if the target method parameter type is not
String. See Type Conversion.
Declaring the argument type as an array or list allows for resolving multiple parameter
values for the same parameter name.
When an @RequestParam annotation is declared as a Map<String, String> or
MultiValueMap<String, String>, without a parameter name specified in the annotation,
then the map is populated with the request parameter values for each given parameter name.
Note that use of @RequestParam is optional (for example, to set its attributes).
By default, any argument that is a simple value type (as determined by
BeanUtils#isSimpleProperty)
and is not resolved by any other argument resolver, is treated as if it were annotated
with @RequestParam.
You can use the @RequestHeader annotation to bind a request header to a method argument in a
controller.
Consider the following request, with headers:
Host                    localhost:8080
Accept                  text/html,application/xhtml+xml,application/xml;q=0.9
Accept-Language         fr,en-gb;q=0.7,en;q=0.3
Accept-Encoding         gzip,deflate
Accept-Charset          ISO-8859-1,utf-8;q=0.7,*;q=0.7
Keep-Alive              300
The following example gets the value of the Accept-Encoding and Keep-Alive headers:
Java
@GetMapping("/demo")
public void handle(
        @RequestHeader("Accept-Encoding") String encoding, (1)
        @RequestHeader("Keep-Alive") long keepAlive) { (2)
    //...
}
| 1 | Get the value of the Accept-Encoding header. |
| 2 | Get the value of the Keep-Alive header. |
Kotlin
@GetMapping("/demo")
fun handle(
        @RequestHeader("Accept-Encoding") encoding: String, (1)
        @RequestHeader("Keep-Alive") keepAlive: Long) { (2)
    //...
}
| 1 | Get the value of the Accept-Encoding header. |
| 2 | Get the value of the Keep-Alive header. |
If the target method parameter type is not
String, type conversion is automatically applied. See Type Conversion.
When an @RequestHeader annotation is used on a Map<String, String>,
MultiValueMap<String, String>, or HttpHeaders argument, the map is populated
with all header values.
|
Built-in support is available for converting a comma-separated string into an array or collection of strings or other types known to the type conversion system. For example, a method parameter annotated with @RequestHeader("Accept") can be of typeString but also String[] or List<String>.
|
@CookieValue
You can use the @CookieValue annotation to bind the value of an HTTP cookie to a method argument
in a controller.
Consider a request with the following cookie:
JSESSIONID=415A4AC178C59DACE0B2C9CA727CDD84
The following example shows how to get the cookie value:
Java
@GetMapping("/demo")
public void handle(@CookieValue("JSESSIONID") String cookie) { (1)
    //...
}
| 1 | Get the value of the JSESSIONID cookie. |
Kotlin
@GetMapping("/demo")
fun handle(@CookieValue("JSESSIONID") cookie: String) { (1)
    //...
}
| 1 | Get the value of the JSESSIONID cookie. |
If the target method parameter type is not String, type conversion is applied automatically.
See Type Conversion.
@ModelAttribute
You can use the @ModelAttribute annotation on a method argument to access an attribute from
the model or have it be instantiated if not present. The model attribute is also overlain with
values from HTTP Servlet request parameters whose names match to field names. This is referred
to as data binding, and it saves you from having to deal with parsing and converting individual
query parameters and form fields. The following example shows how to do so:
Java
@PostMapping("/owners/{ownerId}/pets/{petId}/edit")
public String processSubmit(@ModelAttribute Pet pet) { (1)
    // method logic...
}
| 1 | Bind an instance of Pet. |
Kotlin
@PostMapping("/owners/{ownerId}/pets/{petId}/edit")
fun processSubmit(@ModelAttribute pet: Pet): String { (1)
    // method logic...
}
| 1 | Bind an instance of Pet. |
The Pet instance above is sourced in one of the following ways:
-
Retrieved from the model where it may have been added by a
@ModelAttribute method. -
Retrieved from the HTTP session if the model attribute was listed in
the class-level@SessionAttributesannotation. -
Obtained through a
Converterwhere the model attribute name matches the name of a
request value such as a path variable or a request parameter (see next example). -
Instantiated using its default constructor.
-
Instantiated through a “primary constructor” with arguments that match to Servlet
request parameters. Argument names are determined through JavaBeans
@ConstructorPropertiesor through runtime-retained parameter names in the bytecode.
One alternative to using a @ModelAttribute method to
supply it or relying on the framework to create the model attribute, is to have a
Converter<String, T> to provide the instance. This is applied when the model attribute
name matches to the name of a request value such as a path variable or a request
parameter, and there is a Converter from String to the model attribute type.
In the following example, the model attribute name is account which matches the URI
path variable account, and there is a registered Converter<String, Account> which
could load the Account from a data store:
Java
@PutMapping("/accounts/{account}")
public String save(@ModelAttribute("account") Account account) { (1)
    // ...
}
| 1 | Bind an instance of Account using an explicit attribute name. |
Kotlin
@PutMapping("/accounts/{account}")
fun save(@ModelAttribute("account") account: Account): String { (1)
    // ...
}
| 1 | Bind an instance of Account using an explicit attribute name. |
After the model attribute instance is obtained, data binding is applied. The
WebDataBinder class matches Servlet request parameter names (query parameters and form
fields) to field names on the target Object. Matching fields are populated after type
conversion is applied, where necessary. For more on data binding (and validation), see
Validation. For more on customizing data binding, see
DataBinder.
Data binding can result in errors. By default, a BindException is raised. However, to check
for such errors in the controller method, you can add a BindingResult argument immediately next
to the @ModelAttribute, as the following example shows:
Java
@PostMapping("/owners/{ownerId}/pets/{petId}/edit")
public String processSubmit(@ModelAttribute("pet") Pet pet, BindingResult result) { (1)
    if (result.hasErrors()) {
        return "petForm";
    }
    // ...
}
| 1 | Adding a BindingResult next to the @ModelAttribute. |
Kotlin
@PostMapping("/owners/{ownerId}/pets/{petId}/edit")
fun processSubmit(@ModelAttribute("pet") pet: Pet, result: BindingResult): String { (1)
    if (result.hasErrors()) {
        return "petForm"
    }
    // ...
}
| 1 | Adding a BindingResult next to the @ModelAttribute. |
In some cases, you may want access to a model attribute without data binding. For such
cases, you can inject the Model into the controller and access it directly or,
alternatively, set @ModelAttribute(binding=false), as the following example shows:
Java
@ModelAttribute
public AccountForm setUpForm() {
    return new AccountForm();
}

@ModelAttribute
public Account findAccount(@PathVariable String accountId) {
    return accountRepository.findOne(accountId);
}

@PostMapping("update")
public String update(@Valid AccountForm form, BindingResult result,
        @ModelAttribute(binding=false) Account account) { (1)
    // ...
}
| 1 | Setting @ModelAttribute(binding=false). |
Kotlin
@ModelAttribute
fun setUpForm(): AccountForm {
    return AccountForm()
}

@ModelAttribute
fun findAccount(@PathVariable accountId: String): Account {
    return accountRepository.findOne(accountId)
}

@PostMapping("update")
fun update(@Valid form: AccountForm, result: BindingResult,
           @ModelAttribute(binding = false) account: Account): String { (1)
    // ...
}
| 1 | Setting @ModelAttribute(binding=false). |
You can automatically apply validation after data binding by adding the
jakarta.validation.Valid annotation or Spring’s @Validated annotation
(Bean Validation and
Spring validation). The following example shows how to do so:
Java
@PostMapping("/owners/{ownerId}/pets/{petId}/edit")
public String processSubmit(@Valid @ModelAttribute("pet") Pet pet, BindingResult result) { (1)
    if (result.hasErrors()) {
        return "petForm";
    }
    // ...
}
| 1 | Validate the Pet instance. |
Kotlin
@PostMapping("/owners/{ownerId}/pets/{petId}/edit")
fun processSubmit(@Valid @ModelAttribute("pet") pet: Pet, result: BindingResult): String { (1)
    if (result.hasErrors()) {
        return "petForm"
    }
    // ...
}
| 1 | Validate the Pet instance. |
Note that using @ModelAttribute is optional (for example, to set its attributes).
By default, any argument that is not a simple value type (as determined by
BeanUtils#isSimpleProperty)
and is not resolved by any other argument resolver is treated as if it were annotated
with @ModelAttribute.
@SessionAttributes
@SessionAttributes is used to store model attributes in the HTTP Servlet session between
requests. It is a type-level annotation that declares the session attributes used by a
specific controller. This typically lists the names of model attributes or types of
model attributes that should be transparently stored in the session for subsequent
requests to access.
The following example uses the @SessionAttributes annotation:
Java
@Controller
@SessionAttributes("pet") (1)
public class EditPetForm {
    // ...
}
| 1 | Using the @SessionAttributes annotation. |
Kotlin
@Controller
@SessionAttributes("pet") (1)
class EditPetForm {
    // ...
}
| 1 | Using the @SessionAttributes annotation. |
On the first request, when a model attribute with the name, pet, is added to the model,
it is automatically promoted to and saved in the HTTP Servlet session. It remains there
until another controller method uses a SessionStatus method argument to clear the
storage, as the following example shows:
Java
@Controller
@SessionAttributes("pet") (1)
public class EditPetForm {

    // ...

    @PostMapping("/pets/{id}")
    public String handle(Pet pet, BindingResult errors, SessionStatus status) {
        if (errors.hasErrors) {
            // ...
        }
        status.setComplete(); (2)
        // ...
    }
}
| 1 | Storing the Pet value in the Servlet session. |
| 2 | Clearing the Pet value from the Servlet session. |
Kotlin
@Controller
@SessionAttributes("pet") (1)
class EditPetForm {

    // ...

    @PostMapping("/pets/{id}")
    fun handle(pet: Pet, errors: BindingResult, status: SessionStatus): String {
        if (errors.hasErrors()) {
            // ...
        }
        status.setComplete() (2)
        // ...
    }
}
| 1 | Storing the Pet value in the Servlet session. |
| 2 | Clearing the Pet value from the Servlet session. |
@SessionAttribute
If you need access to pre-existing session attributes that are managed globally
(that is, outside the controller — for example, by a filter) and may or may not be present,
you can use the @SessionAttribute annotation on a method parameter,
as the following example shows:
Java
@RequestMapping("/")
public String handle(@SessionAttribute User user) { (1)
    // ...
}
| 1 | Using a @SessionAttribute annotation. |
Kotlin
@RequestMapping("/")
fun handle(@SessionAttribute user: User): String { (1)
    // ...
}
| 1 | Using a @SessionAttribute annotation. |
For use cases that require adding or removing session attributes, consider injecting
org.springframework.web.context.request.WebRequest or
jakarta.servlet.http.HttpSession into the controller method.
For temporary storage of model attributes in the session as part of a controller
workflow, consider using @SessionAttributes as described in
@SessionAttributes.
@RequestAttribute
Similar to @SessionAttribute, you can use the @RequestAttribute annotations to
access pre-existing request attributes created earlier (for example, by a Servlet Filter
or HandlerInterceptor):
Java
@GetMapping("/")
public String handle(@RequestAttribute Client client) { (1)
    // ...
}
| 1 | Using the @RequestAttribute annotation. |
Kotlin
@GetMapping("/")
fun handle(@RequestAttribute client: Client): String { (1)
    // ...
}
| 1 | Using the @RequestAttribute annotation. |
Redirect Attributes
By default, all model attributes are considered to be exposed as URI template variables in
the redirect URL. Of the remaining attributes, those that are primitive types or
collections or arrays of primitive types are automatically appended as query parameters.
Appending primitive type attributes as query parameters can be the desired result if a
model instance was prepared specifically for the redirect. However, in annotated
controllers, the model can contain additional attributes added for rendering purposes (for example,
drop-down field values). To avoid the possibility of having such attributes appear in the
URL, a @RequestMapping method can declare an argument of type RedirectAttributes and
use it to specify the exact attributes to make available to RedirectView. If the method
does redirect, the content of RedirectAttributes is used. Otherwise, the content of the
model is used.
The RequestMappingHandlerAdapter provides a flag called
ignoreDefaultModelOnRedirect, which you can use to indicate that the content of the default
Model should never be used if a controller method redirects. Instead, the controller
method should declare an attribute of type RedirectAttributes or, if it does not do so,
no attributes should be passed on to RedirectView. Both the MVC namespace and the MVC
Java configuration keep this flag set to false, to maintain backwards compatibility.
However, for new applications, we recommend setting it to true.
Note that URI template variables from the present request are automatically made
available when expanding a redirect URL, and you don’t need to explicitly add them
through Model or RedirectAttributes. The following example shows how to define a redirect:
Java
@PostMapping("/files/{path}")
public String upload(...) {
    // ...
    return "redirect:files/{path}";
}
Kotlin
@PostMapping("/files/{path}")
fun upload(...): String {
    // ...
    return "redirect:files/{path}"
}
Another way of passing data to the redirect target is by using flash attributes. Unlike
other redirect attributes, flash attributes are saved in the HTTP session (and, hence, do
not appear in the URL). See Flash Attributes for more information.
Flash Attributes
Flash attributes provide a way for one request to store attributes that are intended for use in
another. This is most commonly needed when redirecting — for example, the
Post-Redirect-Get pattern. Flash attributes are saved temporarily before the
redirect (typically in the session) to be made available to the request after the
redirect and are removed immediately.
Spring MVC has two main abstractions in support of flash attributes. FlashMap is used
to hold flash attributes, while FlashMapManager is used to store, retrieve, and manage
FlashMap instances.
Flash attribute support is always “on” and does not need to be enabled explicitly.
However, if not used, it never causes HTTP session creation. On each request, there is an
“input” FlashMap with attributes passed from a previous request (if any) and an
“output” FlashMap with attributes to save for a subsequent request. Both FlashMap
instances are accessible from anywhere in Spring MVC through static methods in
RequestContextUtils.
Annotated controllers typically do not need to work with FlashMap directly. Instead, a
@RequestMapping method can accept an argument of type RedirectAttributes and use it
to add flash attributes for a redirect scenario. Flash attributes added through
RedirectAttributes are automatically propagated to the “output” FlashMap. Similarly,
after the redirect, attributes from the “input” FlashMap are automatically added to the
Model of the controller that serves the target URL.
Multipart
After a MultipartResolver has been enabled, the content of POST
requests with multipart/form-data is parsed and accessible as regular request
parameters. The following example accesses one regular form field and one uploaded
file:
Java
@Controller
public class FileUploadController {

    @PostMapping("/form")
    public String handleFormUpload(@RequestParam("name") String name,
            @RequestParam("file") MultipartFile file) {

        if (!file.isEmpty()) {
            byte[] bytes = file.getBytes();
            // store the bytes somewhere
            return "redirect:uploadSuccess";
        }
        return "redirect:uploadFailure";
    }
}
Kotlin
@Controller
class FileUploadController {

    @PostMapping("/form")
    fun handleFormUpload(@RequestParam("name") name: String,
                        @RequestParam("file") file: MultipartFile): String {

        if (!file.isEmpty) {
            val bytes = file.bytes
            // store the bytes somewhere
            return "redirect:uploadSuccess"
        }
        return "redirect:uploadFailure"
    }
}
Declaring the argument type as a List<MultipartFile> allows for resolving multiple
files for the same parameter name.
When the @RequestParam annotation is declared as a Map<String, MultipartFile> or
MultiValueMap<String, MultipartFile>, without a parameter name specified in the annotation,
then the map is populated with the multipart files for each given parameter name.
With Servlet multipart parsing, you may also declare jakarta.servlet.http.Partinstead of Spring’s MultipartFile, as a method argument or collection value type.
|
You can also use multipart content as part of data binding to a
command object. For example, the form field
and file from the preceding example could be fields on a form object,
as the following example shows:
Java
class MyForm {

    private String name;

    private MultipartFile file;

    // ...
}

@Controller
public class FileUploadController {

    @PostMapping("/form")
    public String handleFormUpload(MyForm form, BindingResult errors) {
        if (!form.getFile().isEmpty()) {
            byte[] bytes = form.getFile().getBytes();
            // store the bytes somewhere
            return "redirect:uploadSuccess";
        }
        return "redirect:uploadFailure";
    }
}
Kotlin
class MyForm(val name: String, val file: MultipartFile, ...)

@Controller
class FileUploadController {

    @PostMapping("/form")
    fun handleFormUpload(form: MyForm, errors: BindingResult): String {
        if (!form.file.isEmpty) {
            val bytes = form.file.bytes
            // store the bytes somewhere
            return "redirect:uploadSuccess"
        }
        return "redirect:uploadFailure"
    }
}
Multipart requests can also be submitted from non-browser clients in a RESTful service
scenario. The following example shows a file with JSON:
POST /someUrl
Content-Type: multipart/mixed

--edt7Tfrdusa7r3lNQc79vXuhIIMlatb7PQg7Vp
Content-Disposition: form-data; name="meta-data"
Content-Type: application/json; charset=UTF-8
Content-Transfer-Encoding: 8bit

{
    "name": "value"
}
--edt7Tfrdusa7r3lNQc79vXuhIIMlatb7PQg7Vp
Content-Disposition: form-data; name="file-data"; filename="file.properties"
Content-Type: text/xml
Content-Transfer-Encoding: 8bit
... File Data ...
You can access the «meta-data» part with @RequestParam as a String but you’ll
probably want it deserialized from JSON (similar to @RequestBody). Use the
@RequestPart annotation to access a multipart after converting it with an
HttpMessageConverter:
Java
@PostMapping("/")
public String handle(@RequestPart("meta-data") MetaData metadata,
        @RequestPart("file-data") MultipartFile file) {
    // ...
}
Kotlin
@PostMapping("/")
fun handle(@RequestPart("meta-data") metadata: MetaData,
        @RequestPart("file-data") file: MultipartFile): String {
    // ...
}
You can use @RequestPart in combination with jakarta.validation.Valid or use Spring’s
@Validated annotation, both of which cause Standard Bean Validation to be applied.
By default, validation errors cause a MethodArgumentNotValidException, which is turned
into a 400 (BAD_REQUEST) response. Alternatively, you can handle validation errors locally
within the controller through an Errors or BindingResult argument,
as the following example shows:
Java
@PostMapping("/")
public String handle(@Valid @RequestPart("meta-data") MetaData metadata,
        BindingResult result) {
    // ...
}
Kotlin
@PostMapping("/")
fun handle(@Valid @RequestPart("meta-data") metadata: MetaData,
        result: BindingResult): String {
    // ...
}
@RequestBody
You can use the @RequestBody annotation to have the request body read and deserialized into an
Object through an HttpMessageConverter.
The following example uses a @RequestBody argument:
Java
@PostMapping("/accounts")
public void handle(@RequestBody Account account) {
    // ...
}
Kotlin
@PostMapping("/accounts")
fun handle(@RequestBody account: Account) {
    // ...
}
You can use the Message Converters option of the MVC Config to
configure or customize message conversion.
You can use @RequestBody in combination with jakarta.validation.Valid or Spring’s
@Validated annotation, both of which cause Standard Bean Validation to be applied.
By default, validation errors cause a MethodArgumentNotValidException, which is turned
into a 400 (BAD_REQUEST) response. Alternatively, you can handle validation errors locally
within the controller through an Errors or BindingResult argument,
as the following example shows:
Java
@PostMapping("/accounts")
public void handle(@Valid @RequestBody Account account, BindingResult result) {
    // ...
}
Kotlin
@PostMapping("/accounts")
fun handle(@Valid @RequestBody account: Account, result: BindingResult) {
    // ...
}
HttpEntity
HttpEntity is more or less identical to using @RequestBody but is based on a
container object that exposes request headers and body. The following listing shows an example:
Java
@PostMapping("/accounts")
public void handle(HttpEntity<Account> entity) {
    // ...
}
Kotlin
@PostMapping("/accounts")
fun handle(entity: HttpEntity<Account>) {
    // ...
}
@ResponseBody
You can use the @ResponseBody annotation on a method to have the return serialized
to the response body through an
HttpMessageConverter.
The following listing shows an example:
Java
@GetMapping("/accounts/{id}")
@ResponseBody
public Account handle() {
    // ...
}
Kotlin
@GetMapping("/accounts/{id}")
@ResponseBody
fun handle(): Account {
    // ...
}
@ResponseBody is also supported at the class level, in which case it is inherited by
all controller methods. This is the effect of @RestController, which is nothing more
than a meta-annotation marked with @Controller and @ResponseBody.
You can use @ResponseBody with reactive types.
See Asynchronous Requests and Reactive Types for more details.
You can use the Message Converters option of the MVC Config to
configure or customize message conversion.
You can combine @ResponseBody methods with JSON serialization views.
See Jackson JSON for details.
ResponseEntity
ResponseEntity is like @ResponseBody but with status and headers. For example:
Java
@GetMapping("/something")
public ResponseEntity<String> handle() {
    String body = ... ;
    String etag = ... ;
    return ResponseEntity.ok().eTag(etag).body(body);
}
Kotlin
@GetMapping("/something")
fun handle(): ResponseEntity<String> {
    val body = ...
    val etag = ...
    return ResponseEntity.ok().eTag(etag).build(body)
}
Spring MVC supports using a single value reactive type
to produce the ResponseEntity asynchronously, and/or single and multi-value reactive
types for the body. This allows the following types of async responses:
-
ResponseEntity<Mono<T>>orResponseEntity<Flux<T>>make the response status and
headers known immediately while the body is provided asynchronously at a later point.
UseMonoif the body consists of 0..1 values orFluxif it can produce multiple values. -
Mono<ResponseEntity<T>>provides all three — response status, headers, and body,
asynchronously at a later point. This allows the response status and headers to vary
depending on the outcome of asynchronous request handling.
Jackson JSON
Spring offers support for the Jackson JSON library.
JSON Views
Spring MVC provides built-in support for
Jackson’s Serialization Views,
which allow rendering only a subset of all fields in an Object. To use it with
@ResponseBody or ResponseEntity controller methods, you can use Jackson’s
@JsonView annotation to activate a serialization view class, as the following example shows:
Java
@RestController
public class UserController {

    @GetMapping("/user")
    @JsonView(User.WithoutPasswordView.class)
    public User getUser() {
        return new User("eric", "7!jd#h23");
    }
}

public class User {

    public interface WithoutPasswordView {};
    public interface WithPasswordView extends WithoutPasswordView {};

    private String username;
    private String password;

    public User() {
    }

    public User(String username, String password) {
        this.username = username;
        this.password = password;
    }

    @JsonView(WithoutPasswordView.class)
    public String getUsername() {
        return this.username;
    }

    @JsonView(WithPasswordView.class)
    public String getPassword() {
        return this.password;
    }
}
Kotlin
@RestController
class UserController {

    @GetMapping("/user")
    @JsonView(User.WithoutPasswordView::class)
    fun getUser() = User("eric", "7!jd#h23")
}

class User(
        @JsonView(WithoutPasswordView::class) val username: String,
        @JsonView(WithPasswordView::class) val password: String) {

    interface WithoutPasswordView
    interface WithPasswordView : WithoutPasswordView
}
@JsonView allows an array of view classes, but you can specify only one percontroller method. If you need to activate multiple views, you can use a composite interface. |
If you want to do the above programmatically, instead of declaring an @JsonView annotation,
wrap the return value with MappingJacksonValue and use it to supply the serialization view:
Java
@RestController
public class UserController {

    @GetMapping("/user")
    public MappingJacksonValue getUser() {
        User user = new User("eric", "7!jd#h23");
        MappingJacksonValue value = new MappingJacksonValue(user);
        value.setSerializationView(User.WithoutPasswordView.class);
        return value;
    }
}
Kotlin
@RestController
class UserController {

    @GetMapping("/user")
    fun getUser(): MappingJacksonValue {
        val value = MappingJacksonValue(User("eric", "7!jd#h23"))
        value.serializationView = User.WithoutPasswordView::class.java
        return value
    }
}
For controllers that rely on view resolution, you can add the serialization view class
to the model, as the following example shows:
Java
@Controller
public class UserController extends AbstractController {

    @GetMapping("/user")
    public String getUser(Model model) {
        model.addAttribute("user", new User("eric", "7!jd#h23"));
        model.addAttribute(JsonView.class.getName(), User.WithoutPasswordView.class);
        return "userView";
    }
}
Kotlin
@Controller
class UserController : AbstractController() {

    @GetMapping("/user")
    fun getUser(model: Model): String {
        model["user"] = User("eric", "7!jd#h23")
        model[JsonView::class.qualifiedName] = User.WithoutPasswordView::class.java
        return "userView"
    }
}
1.3.4. Model
You can use the @ModelAttribute annotation:
-
On a method argument in
@RequestMappingmethods
to create or access anObjectfrom the model and to bind it to the request through a
WebDataBinder. -
As a method-level annotation in
@Controlleror@ControllerAdviceclasses that help
to initialize the model prior to any@RequestMappingmethod invocation. -
On a
@RequestMappingmethod to mark its return value is a model attribute.
This section discusses @ModelAttribute methods — the second item in the preceding list.
A controller can have any number of @ModelAttribute methods. All such methods are
invoked before @RequestMapping methods in the same controller. A @ModelAttribute
method can also be shared across controllers through @ControllerAdvice. See the section on
Controller Advice for more details.
@ModelAttribute methods have flexible method signatures. They support many of the same
arguments as @RequestMapping methods, except for @ModelAttribute itself or anything
related to the request body.
The following example shows a @ModelAttribute method:
Java
@ModelAttribute
public void populateModel(@RequestParam String number, Model model) {
    model.addAttribute(accountRepository.findAccount(number));
    // add more ...
}
Kotlin
@ModelAttribute
fun populateModel(@RequestParam number: String, model: Model) {
    model.addAttribute(accountRepository.findAccount(number))
    // add more ...
}
The following example adds only one attribute:
Java
@ModelAttribute
public Account addAccount(@RequestParam String number) {
    return accountRepository.findAccount(number);
}
Kotlin
@ModelAttribute
fun addAccount(@RequestParam number: String): Account {
    return accountRepository.findAccount(number)
}
When a name is not explicitly specified, a default name is chosen based on the Objecttype, as explained in the javadoc for Conventions.You can always assign an explicit name by using the overloaded addAttribute method orthrough the name attribute on @ModelAttribute (for a return value).
|
You can also use @ModelAttribute as a method-level annotation on @RequestMapping methods,
in which case the return value of the @RequestMapping method is interpreted as a model
attribute. This is typically not required, as it is the default behavior in HTML controllers,
unless the return value is a String that would otherwise be interpreted as a view name.
@ModelAttribute can also customize the model attribute name, as the following example shows:
Java
@GetMapping("/accounts/{id}")
@ModelAttribute("myAccount")
public Account handle() {
    // ...
    return account;
}
Kotlin
@GetMapping("/accounts/{id}")
@ModelAttribute("myAccount")
fun handle(): Account {
    // ...
    return account
}
1.3.5. DataBinder
@Controller or @ControllerAdvice classes can have @InitBinder methods that
initialize instances of WebDataBinder, and those, in turn, can:
-
Bind request parameters (that is, form or query data) to a model object.
-
Convert String-based request values (such as request parameters, path variables,
headers, cookies, and others) to the target type of controller method arguments. -
Format model object values as
Stringvalues when rendering HTML forms.
@InitBinder methods can register controller-specific java.beans.PropertyEditor or
Spring Converter and Formatter components. In addition, you can use the
MVC config to register Converter and Formatter
types in a globally shared FormattingConversionService.
@InitBinder methods support many of the same arguments that @RequestMapping methods
do, except for @ModelAttribute (command object) arguments. Typically, they are declared
with a WebDataBinder argument (for registrations) and a void return value.
The following listing shows an example:
Java
@Controller
public class FormController {

    @InitBinder (1)
    public void initBinder(WebDataBinder binder) {
        SimpleDateFormat dateFormat = new SimpleDateFormat("yyyy-MM-dd");
        dateFormat.setLenient(false);
        binder.registerCustomEditor(Date.class, new CustomDateEditor(dateFormat, false));
    }

    // ...
}
| 1 | Defining an @InitBinder method. |
Kotlin
@Controller
class FormController {

    @InitBinder (1)
    fun initBinder(binder: WebDataBinder) {
        val dateFormat = SimpleDateFormat("yyyy-MM-dd")
        dateFormat.isLenient = false
        binder.registerCustomEditor(Date::class.java, CustomDateEditor(dateFormat, false))
    }

    // ...
}
| 1 | Defining an @InitBinder method. |
Alternatively, when you use a Formatter-based setup through a shared
FormattingConversionService, you can re-use the same approach and register
controller-specific Formatter implementations, as the following example shows:
Java
@Controller
public class FormController {

    @InitBinder (1)
    protected void initBinder(WebDataBinder binder) {
        binder.addCustomFormatter(new DateFormatter("yyyy-MM-dd"));
    }

    // ...
}
| 1 | Defining an @InitBinder method on a custom formatter. |
Kotlin
@Controller
class FormController {

    @InitBinder (1)
    protected fun initBinder(binder: WebDataBinder) {
        binder.addCustomFormatter(DateFormatter("yyyy-MM-dd"))
    }

    // ...
}
| 1 | Defining an @InitBinder method on a custom formatter. |
Model Design
In the context of web applications, data binding involves the binding of HTTP request
parameters (that is, form data or query parameters) to properties in a model object and
its nested objects.
Only public properties following the
JavaBeans naming conventions
are exposed for data binding — for example, public String getFirstName() and
public void setFirstName(String) methods for a firstName property.
|
The model object, and its nested object graph, is also sometimes referred to as a command object, form-backing object, or POJO (Plain Old Java Object). |
By default, Spring permits binding to all public properties in the model object graph.
This means you need to carefully consider what public properties the model has, since a
client could target any public property path, even some that are not expected to be
targeted for a given use case.
For example, given an HTTP form data endpoint, a malicious client could supply values for
properties that exist in the model object graph but are not part of the HTML form
presented in the browser. This could lead to data being set on the model object and any
of its nested objects, that is not expected to be updated.
The recommended approach is to use a dedicated model object that exposes only
properties that are relevant for the form submission. For example, on a form for changing
a user’s email address, the model object should declare a minimum set of properties such
as in the following ChangeEmailForm.
public class ChangeEmailForm {

    private String oldEmailAddress;
    private String newEmailAddress;

    public void setOldEmailAddress(String oldEmailAddress) {
        this.oldEmailAddress = oldEmailAddress;
    }

    public String getOldEmailAddress() {
        return this.oldEmailAddress;
    }

    public void setNewEmailAddress(String newEmailAddress) {
        this.newEmailAddress = newEmailAddress;
    }

    public String getNewEmailAddress() {
        return this.newEmailAddress;
    }

}
If you cannot or do not want to use a dedicated model object for each data
binding use case, you must limit the properties that are allowed for data binding.
Ideally, you can achieve this by registering allowed field patterns via the
setAllowedFields() method on WebDataBinder.
For example, to register allowed field patterns in your application, you can implement an
@InitBinder method in a @Controller or @ControllerAdvice component as shown below:
@Controller
public class ChangeEmailController {

    @InitBinder
    void initBinder(WebDataBinder binder) {
        binder.setAllowedFields("oldEmailAddress", "newEmailAddress");
    }

    // @RequestMapping methods, etc.

}
In addition to registering allowed patterns, it is also possible to register disallowed
field patterns via the setDisallowedFields() method in DataBinder and its subclasses.
Please note, however, that an «allow list» is safer than a «deny list». Consequently,
setAllowedFields() should be favored over setDisallowedFields().
Note that matching against allowed field patterns is case-sensitive; whereas, matching
against disallowed field patterns is case-insensitive. In addition, a field matching a
disallowed pattern will not be accepted even if it also happens to match a pattern in the
allowed list.
|
It is extremely important to properly configure allowed and disallowed field patterns Furthermore, it is strongly recommended that you do not use types from your domain |
1.3.6. Exceptions
@Controller and @ControllerAdvice classes can have
@ExceptionHandler methods to handle exceptions from controller methods, as the following example shows:
Java
@Controller
public class SimpleController {

    // ...

    @ExceptionHandler
    public ResponseEntity<String> handle(IOException ex) {
        // ...
    }
}
Kotlin
@Controller
class SimpleController {

    // ...

    @ExceptionHandler
    fun handle(ex: IOException): ResponseEntity<String> {
        // ...
    }
}
The exception may match against a top-level exception being propagated (e.g. a direct
IOException being thrown) or against a nested cause within a wrapper exception (e.g.
an IOException wrapped inside an IllegalStateException). As of 5.3, this can match
at arbitrary cause levels, whereas previously only an immediate cause was considered.
For matching exception types, preferably declare the target exception as a method argument,
as the preceding example shows. When multiple exception methods match, a root exception match is
generally preferred to a cause exception match. More specifically, the ExceptionDepthComparator
is used to sort exceptions based on their depth from the thrown exception type.
Alternatively, the annotation declaration may narrow the exception types to match,
as the following example shows:
Java
@ExceptionHandler({FileSystemException.class, RemoteException.class})
public ResponseEntity<String> handle(IOException ex) {
    // ...
}
Kotlin
@ExceptionHandler(FileSystemException::class, RemoteException::class)
fun handle(ex: IOException): ResponseEntity<String> {
    // ...
}
You can even use a list of specific exception types with a very generic argument signature,
as the following example shows:
Java
@ExceptionHandler({FileSystemException.class, RemoteException.class})
public ResponseEntity<String> handle(Exception ex) {
    // ...
}
Kotlin
@ExceptionHandler(FileSystemException::class, RemoteException::class)
fun handle(ex: Exception): ResponseEntity<String> {
    // ...
}
|
The distinction between root and cause exception matching can be surprising. In the The behavior is even simpler in the |
We generally recommend that you be as specific as possible in the argument signature,
reducing the potential for mismatches between root and cause exception types.
Consider breaking a multi-matching method into individual @ExceptionHandler
methods, each matching a single specific exception type through its signature.
In a multi-@ControllerAdvice arrangement, we recommend declaring your primary root exception
mappings on a @ControllerAdvice prioritized with a corresponding order. While a root
exception match is preferred to a cause, this is defined among the methods of a given
controller or @ControllerAdvice class. This means a cause match on a higher-priority
@ControllerAdvice bean is preferred to any match (for example, root) on a lower-priority
@ControllerAdvice bean.
Last but not least, an @ExceptionHandler method implementation can choose to back
out of dealing with a given exception instance by rethrowing it in its original form.
This is useful in scenarios where you are interested only in root-level matches or in
matches within a specific context that cannot be statically determined. A rethrown
exception is propagated through the remaining resolution chain, as though
the given @ExceptionHandler method would not have matched in the first place.
Support for @ExceptionHandler methods in Spring MVC is built on the DispatcherServlet
level, HandlerExceptionResolver mechanism.
Method Arguments
@ExceptionHandler methods support the following arguments:
| Method argument | Description |
|---|---|
|
Exception type |
For access to the raised exception. |
|
|
For access to the controller method that raised the exception. |
|
|
Generic access to request parameters and request and session attributes without direct |
|
|
Choose any specific request or response type (for example, |
|
|
Enforces the presence of a session. As a consequence, such an argument is never |
|
|
Currently authenticated user — possibly a specific |
|
|
The HTTP method of the request. |
|
|
The current request locale, determined by the most specific |
|
|
The time zone associated with the current request, as determined by a |
|
|
For access to the raw response body, as exposed by the Servlet API. |
|
|
For access to the model for an error response. Always empty. |
|
|
Specify attributes to use in case of a redirect — (that is to be appended to the query |
|
|
For access to any session attribute, in contrast to model attributes stored in the |
|
|
For access to request attributes. See |
Return Values
@ExceptionHandler methods support the following return values:
| Return value | Description |
|---|---|
|
|
The return value is converted through |
|
|
The return value specifies that the full response (including the HTTP headers and the body) |
|
|
To render an RFC 7807 error response with details in the body, |
|
|
To render an RFC 7807 error response with details in the body, |
|
|
A view name to be resolved with |
|
|
A |
|
|
Attributes to be added to the implicit model with the view name implicitly determined |
|
|
An attribute to be added to the model with the view name implicitly determined through Note that |
|
|
The view and model attributes to use and, optionally, a response status. |
|
|
A method with a If none of the above is true, a |
|
Any other return value |
If a return value is not matched to any of the above and is not a simple type (as determined by |
1.3.7. Controller Advice
@ExceptionHandler, @InitBinder, and @ModelAttribute methods apply only to the
@Controller class, or class hierarchy, in which they are declared. If, instead, they
are declared in an @ControllerAdvice or @RestControllerAdvice class, then they apply
to any controller. Moreover, as of 5.3, @ExceptionHandler methods in @ControllerAdvice
can be used to handle exceptions from any @Controller or any other handler.
@ControllerAdvice is meta-annotated with @Component and therefore can be registered as
a Spring bean through component scanning. @RestControllerAdvice is meta-annotated with @ControllerAdvice
and @ResponseBody, and that means @ExceptionHandler methods will have their return
value rendered via response body message conversion, rather than via HTML views.
On startup, RequestMappingHandlerMapping and ExceptionHandlerExceptionResolver detect
controller advice beans and apply them at runtime. Global @ExceptionHandler methods,
from an @ControllerAdvice, are applied after local ones, from the @Controller.
By contrast, global @ModelAttribute and @InitBinder methods are applied before local ones.
The @ControllerAdvice annotation has attributes that let you narrow the set of controllers
and handlers that they apply to. For example:
Java
// Target all Controllers annotated with @RestController
@ControllerAdvice(annotations = RestController.class)
public class ExampleAdvice1 {}

// Target all Controllers within specific packages
@ControllerAdvice("org.example.controllers")
public class ExampleAdvice2 {}

// Target all Controllers assignable to specific classes
@ControllerAdvice(assignableTypes = {ControllerInterface.class, AbstractController.class})
public class ExampleAdvice3 {}
Kotlin
// Target all Controllers annotated with @RestController
@ControllerAdvice(annotations = [RestController::class])
class ExampleAdvice1

// Target all Controllers within specific packages
@ControllerAdvice("org.example.controllers")
class ExampleAdvice2

// Target all Controllers assignable to specific classes
@ControllerAdvice(assignableTypes = [ControllerInterface::class, AbstractController::class])
class ExampleAdvice3
The selectors in the preceding example are evaluated at runtime and may negatively impact
performance if used extensively. See the
@ControllerAdvice
javadoc for more details.
1.4. Functional Endpoints
Spring Web MVC includes WebMvc.fn, a lightweight functional programming model in which functions
are used to route and handle requests and contracts are designed for immutability.
It is an alternative to the annotation-based programming model but otherwise runs on
the same DispatcherServlet.
1.4.1. Overview
In WebMvc.fn, an HTTP request is handled with a HandlerFunction: a function that takes
ServerRequest and returns a ServerResponse.
Both the request and the response object have immutable contracts that offer JDK 8-friendly
access to the HTTP request and response.
HandlerFunction is the equivalent of the body of a @RequestMapping method in the
annotation-based programming model.
Incoming requests are routed to a handler function with a RouterFunction: a function that
takes ServerRequest and returns an optional HandlerFunction (i.e. Optional<HandlerFunction>).
When the router function matches, a handler function is returned; otherwise an empty Optional.
RouterFunction is the equivalent of a @RequestMapping annotation, but with the major
difference that router functions provide not just data, but also behavior.
RouterFunctions.route() provides a router builder that facilitates the creation of routers,
as the following example shows:
Java
import static org.springframework.http.MediaType.APPLICATION_JSON;
import static org.springframework.web.servlet.function.RequestPredicates.*;
import static org.springframework.web.servlet.function.RouterFunctions.route;

PersonRepository repository = ...
PersonHandler handler = new PersonHandler(repository);

RouterFunction<ServerResponse> route = route() (1)
    .GET("/person/{id}", accept(APPLICATION_JSON), handler::getPerson)
    .GET("/person", accept(APPLICATION_JSON), handler::listPeople)
    .POST("/person", handler::createPerson)
    .build();


public class PersonHandler {

    // ...

    public ServerResponse listPeople(ServerRequest request) {
        // ...
    }

    public ServerResponse createPerson(ServerRequest request) {
        // ...
    }

    public ServerResponse getPerson(ServerRequest request) {
        // ...
    }
}
| 1 | Create router using route(). |
Kotlin
import org.springframework.web.servlet.function.router

val repository: PersonRepository = ...
val handler = PersonHandler(repository)

val route = router { (1)
    accept(APPLICATION_JSON).nest {
        GET("/person/{id}", handler::getPerson)
        GET("/person", handler::listPeople)
    }
    POST("/person", handler::createPerson)
}


class PersonHandler(private val repository: PersonRepository) {

    // ...

    fun listPeople(request: ServerRequest): ServerResponse {
        // ...
    }

    fun createPerson(request: ServerRequest): ServerResponse {
        // ...
    }

    fun getPerson(request: ServerRequest): ServerResponse {
        // ...
    }
}
| 1 | Create router using the router DSL. |
If you register the RouterFunction as a bean, for instance by exposing it in a
@Configuration class, it will be auto-detected by the servlet, as explained in Running a Server.
1.4.2. HandlerFunction
ServerRequest and ServerResponse are immutable interfaces that offer JDK 8-friendly
access to the HTTP request and response, including headers, body, method, and status code.
ServerRequest
ServerRequest provides access to the HTTP method, URI, headers, and query parameters,
while access to the body is provided through the body methods.
The following example extracts the request body to a String:
Java
String string = request.body(String.class);
Kotlin
val string = request.body<String>()
The following example extracts the body to a List<Person>,
where Person objects are decoded from a serialized form, such as JSON or XML:
Java
List<Person> people = request.body(new ParameterizedTypeReference<List<Person>>() {});
Kotlin
val people = request.body<Person>()
The following example shows how to access parameters:
Java
MultiValueMap<String, String> params = request.params();
Kotlin
val map = request.params()
ServerResponse
ServerResponse provides access to the HTTP response and, since it is immutable, you can use
a build method to create it. You can use the builder to set the response status, to add response
headers, or to provide a body. The following example creates a 200 (OK) response with JSON
content:
Java
Person person = ...
ServerResponse.ok().contentType(MediaType.APPLICATION_JSON).body(person);
Kotlin
val person: Person = ...
ServerResponse.ok().contentType(MediaType.APPLICATION_JSON).body(person)
The following example shows how to build a 201 (CREATED) response with a Location header and no body:
Java
URI location = ...
ServerResponse.created(location).build();
Kotlin
val location: URI = ...
ServerResponse.created(location).build()
You can also use an asynchronous result as the body, in the form of a CompletableFuture,
Publisher, or any other type supported by the ReactiveAdapterRegistry. For instance:
Java
Mono<Person> person = webClient.get().retrieve().bodyToMono(Person.class);
ServerResponse.ok().contentType(MediaType.APPLICATION_JSON).body(person);
Kotlin
val person = webClient.get().retrieve().awaitBody<Person>()
ServerResponse.ok().contentType(MediaType.APPLICATION_JSON).body(person)
If not just the body, but also the status or headers are based on an asynchronous type,
you can use the static async method on ServerResponse, which
accepts CompletableFuture<ServerResponse>, Publisher<ServerResponse>, or
any other asynchronous type supported by the ReactiveAdapterRegistry. For instance:
Java
Mono<ServerResponse> asyncResponse = webClient.get().retrieve().bodyToMono(Person.class)
  .map(p -> ServerResponse.ok().header("Name", p.name()).body(p));
ServerResponse.async(asyncResponse);
Server-Sent Events can be provided via the
static sse method on ServerResponse. The builder provided by that method
allows you to send Strings, or other objects as JSON. For example:
Java
public RouterFunction<ServerResponse> sse() {
    return route(GET("/sse"), request -> ServerResponse.sse(sseBuilder -> {
                // Save the sseBuilder object somewhere..
            }));
}

// In some other thread, sending a String
sseBuilder.send("Hello world");

// Or an object, which will be transformed into JSON
Person person = ...
sseBuilder.send(person);

// Customize the event by using the other methods
sseBuilder.id("42")
        .event("sse event")
        .data(person);

// and done at some point
sseBuilder.complete();
Kotlin
fun sse(): RouterFunction<ServerResponse> = router {
    GET("/sse") { request -> ServerResponse.sse { sseBuilder ->
        // Save the sseBuilder object somewhere..
    }
}

// In some other thread, sending a String
sseBuilder.send("Hello world")

// Or an object, which will be transformed into JSON
val person = ...
sseBuilder.send(person)

// Customize the event by using the other methods
sseBuilder.id("42")
        .event("sse event")
        .data(person)

// and done at some point
sseBuilder.complete()
Handler Classes
We can write a handler function as a lambda, as the following example shows:
Java
HandlerFunction<ServerResponse> helloWorld =
  request -> ServerResponse.ok().body("Hello World");
Kotlin
val helloWorld: (ServerRequest) -> ServerResponse =
  { ServerResponse.ok().body("Hello World") }
That is convenient, but in an application we need multiple functions, and multiple inline
lambda’s can get messy.
Therefore, it is useful to group related handler functions together into a handler class, which
has a similar role as @Controller in an annotation-based application.
For example, the following class exposes a reactive Person repository:
Java
import static org.springframework.http.MediaType.APPLICATION_JSON;
import static org.springframework.web.reactive.function.server.ServerResponse.ok;

public class PersonHandler {

    private final PersonRepository repository;

    public PersonHandler(PersonRepository repository) {
        this.repository = repository;
    }

    public ServerResponse listPeople(ServerRequest request) { (1)
        List<Person> people = repository.allPeople();
        return ok().contentType(APPLICATION_JSON).body(people);
    }

    public ServerResponse createPerson(ServerRequest request) throws Exception { (2)
        Person person = request.body(Person.class);
        repository.savePerson(person);
        return ok().build();
    }

    public ServerResponse getPerson(ServerRequest request) { (3)
        int personId = Integer.parseInt(request.pathVariable("id"));
        Person person = repository.getPerson(personId);
        if (person != null) {
            return ok().contentType(APPLICATION_JSON).body(person);
        }
        else {
            return ServerResponse.notFound().build();
        }
    }

}
| 1 | listPeople is a handler function that returns all Person objects found in the repository asJSON. |
| 2 | createPerson is a handler function that stores a new Person contained in the request body. |
| 3 | getPerson is a handler function that returns a single person, identified by the id pathvariable. We retrieve that Person from the repository and create a JSON response, if it isfound. If it is not found, we return a 404 Not Found response. |
Kotlin
class PersonHandler(private val repository: PersonRepository) {

    fun listPeople(request: ServerRequest): ServerResponse { (1)
        val people: List<Person> = repository.allPeople()
        return ok().contentType(APPLICATION_JSON).body(people);
    }

    fun createPerson(request: ServerRequest): ServerResponse { (2)
        val person = request.body<Person>()
        repository.savePerson(person)
        return ok().build()
    }

    fun getPerson(request: ServerRequest): ServerResponse { (3)
        val personId = request.pathVariable("id").toInt()
        return repository.getPerson(personId)?.let { ok().contentType(APPLICATION_JSON).body(it) }
                ?: ServerResponse.notFound().build()

    }
}
| 1 | listPeople is a handler function that returns all Person objects found in the repository asJSON. |
| 2 | createPerson is a handler function that stores a new Person contained in the request body. |
| 3 | getPerson is a handler function that returns a single person, identified by the id pathvariable. We retrieve that Person from the repository and create a JSON response, if it isfound. If it is not found, we return a 404 Not Found response. |
Validation
A functional endpoint can use Spring’s validation facilities to
apply validation to the request body. For example, given a custom Spring
Validator implementation for a Person:
Java
public class PersonHandler {

    private final Validator validator = new PersonValidator(); (1)

    // ...

    public ServerResponse createPerson(ServerRequest request) {
        Person person = request.body(Person.class);
        validate(person); (2)
        repository.savePerson(person);
        return ok().build();
    }

    private void validate(Person person) {
        Errors errors = new BeanPropertyBindingResult(person, "person");
        validator.validate(person, errors);
        if (errors.hasErrors()) {
            throw new ServerWebInputException(errors.toString()); (3)
        }
    }
}
| 1 | Create Validator instance. |
| 2 | Apply validation. |
| 3 | Raise exception for a 400 response. |
Kotlin
class PersonHandler(private val repository: PersonRepository) {

    private val validator = PersonValidator() (1)

    // ...

    fun createPerson(request: ServerRequest): ServerResponse {
        val person = request.body<Person>()
        validate(person) (2)
        repository.savePerson(person)
        return ok().build()
    }

    private fun validate(person: Person) {
        val errors: Errors = BeanPropertyBindingResult(person, "person")
        validator.validate(person, errors)
        if (errors.hasErrors()) {
            throw ServerWebInputException(errors.toString()) (3)
        }
    }
}
| 1 | Create Validator instance. |
| 2 | Apply validation. |
| 3 | Raise exception for a 400 response. |
Handlers can also use the standard bean validation API (JSR-303) by creating and injecting
a global Validator instance based on LocalValidatorFactoryBean.
See Spring Validation.
1.4.3. RouterFunction
Router functions are used to route the requests to the corresponding HandlerFunction.
Typically, you do not write router functions yourself, but rather use a method on the
RouterFunctions utility class to create one.
RouterFunctions.route() (no parameters) provides you with a fluent builder for creating a router
function, whereas RouterFunctions.route(RequestPredicate, HandlerFunction) offers a direct way
to create a router.
Generally, it is recommended to use the route() builder, as it provides
convenient short-cuts for typical mapping scenarios without requiring hard-to-discover
static imports.
For instance, the router function builder offers the method GET(String, HandlerFunction) to create a mapping for GET requests; and POST(String, HandlerFunction) for POSTs.
Besides HTTP method-based mapping, the route builder offers a way to introduce additional
predicates when mapping to requests.
For each HTTP method there is an overloaded variant that takes a RequestPredicate as a
parameter, through which additional constraints can be expressed.
Predicates
You can write your own RequestPredicate, but the RequestPredicates utility class
offers commonly used implementations, based on the request path, HTTP method, content-type,
and so on.
The following example uses a request predicate to create a constraint based on the Accept
header:
Java
RouterFunction<ServerResponse> route = RouterFunctions.route()
    .GET("/hello-world", accept(MediaType.TEXT_PLAIN),
        request -> ServerResponse.ok().body("Hello World")).build();
Kotlin
import org.springframework.web.servlet.function.router

val route = router {
    GET("/hello-world", accept(TEXT_PLAIN)) {
        ServerResponse.ok().body("Hello World")
    }
}
You can compose multiple request predicates together by using:
-
RequestPredicate.and(RequestPredicate)— both must match. -
RequestPredicate.or(RequestPredicate)— either can match.
Many of the predicates from RequestPredicates are composed.
For example, RequestPredicates.GET(String) is composed from RequestPredicates.method(HttpMethod)
and RequestPredicates.path(String).
The example shown above also uses two request predicates, as the builder uses
RequestPredicates.GET internally, and composes that with the accept predicate.
Routes
Router functions are evaluated in order: if the first route does not match, the
second is evaluated, and so on.
Therefore, it makes sense to declare more specific routes before general ones.
This is also important when registering router functions as Spring beans, as will
be described later.
Note that this behavior is different from the annotation-based programming model, where the
«most specific» controller method is picked automatically.
When using the router function builder, all defined routes are composed into one
RouterFunction that is returned from build().
There are also other ways to compose multiple router functions together:
-
add(RouterFunction)on theRouterFunctions.route()builder -
RouterFunction.and(RouterFunction) -
RouterFunction.andRoute(RequestPredicate, HandlerFunction)— shortcut for
RouterFunction.and()with nestedRouterFunctions.route().
The following example shows the composition of four routes:
Java
import static org.springframework.http.MediaType.APPLICATION_JSON;
import static org.springframework.web.servlet.function.RequestPredicates.*;

PersonRepository repository = ...
PersonHandler handler = new PersonHandler(repository);

RouterFunction<ServerResponse> otherRoute = ...

RouterFunction<ServerResponse> route = route()
    .GET("/person/{id}", accept(APPLICATION_JSON), handler::getPerson) (1)
    .GET("/person", accept(APPLICATION_JSON), handler::listPeople) (2)
    .POST("/person", handler::createPerson) (3)
    .add(otherRoute) (4)
    .build();
| 1 | GET /person/{id} with an Accept header that matches JSON is routed toPersonHandler.getPerson |
| 2 | GET /person with an Accept header that matches JSON is routed toPersonHandler.listPeople |
| 3 | POST /person with no additional predicates is mapped toPersonHandler.createPerson, and |
| 4 | otherRoute is a router function that is created elsewhere, and added to the route built. |
Kotlin
import org.springframework.http.MediaType.APPLICATION_JSON
import org.springframework.web.servlet.function.router

val repository: PersonRepository = ...
val handler = PersonHandler(repository);

val otherRoute = router {  }

val route = router {
    GET("/person/{id}", accept(APPLICATION_JSON), handler::getPerson) (1)
    GET("/person", accept(APPLICATION_JSON), handler::listPeople) (2)
    POST("/person", handler::createPerson) (3)
}.and(otherRoute) (4)
| 1 | GET /person/{id} with an Accept header that matches JSON is routed toPersonHandler.getPerson |
| 2 | GET /person with an Accept header that matches JSON is routed toPersonHandler.listPeople |
| 3 | POST /person with no additional predicates is mapped toPersonHandler.createPerson, and |
| 4 | otherRoute is a router function that is created elsewhere, and added to the route built. |
Nested Routes
It is common for a group of router functions to have a shared predicate, for instance a shared
path.
In the example above, the shared predicate would be a path predicate that matches /person,
used by three of the routes.
When using annotations, you would remove this duplication by using a type-level @RequestMapping
annotation that maps to /person.
In WebMvc.fn, path predicates can be shared through the path method on the router function builder.
For instance, the last few lines of the example above can be improved in the following way by using nested routes:
Java
RouterFunction<ServerResponse> route = route()
    .path("/person", builder -> builder (1)
        .GET("/{id}", accept(APPLICATION_JSON), handler::getPerson)
        .GET(accept(APPLICATION_JSON), handler::listPeople)
        .POST(handler::createPerson))
    .build();
| 1 | Note that second parameter of path is a consumer that takes the router builder. |
Kotlin
import org.springframework.web.servlet.function.router

val route = router {
    "/person".nest { (1)
        GET("/{id}", accept(APPLICATION_JSON), handler::getPerson)
        GET(accept(APPLICATION_JSON), handler::listPeople)
        POST(handler::createPerson)
    }
}
Though path-based nesting is the most common, you can nest on any kind of predicate by using
the nest method on the builder.
The above still contains some duplication in the form of the shared Accept-header predicate.
We can further improve by using the nest method together with accept:
Java
RouterFunction<ServerResponse> route = route()
    .path("/person", b1 -> b1
        .nest(accept(APPLICATION_JSON), b2 -> b2
            .GET("/{id}", handler::getPerson)
            .GET(handler::listPeople))
        .POST(handler::createPerson))
    .build();
Kotlin
import org.springframework.web.servlet.function.router

val route = router {
    "/person".nest {
        accept(APPLICATION_JSON).nest {
            GET("/{id}", handler::getPerson)
            GET("", handler::listPeople)
            POST(handler::createPerson)
        }
    }
}
1.4.4. Running a Server
You typically run router functions in a DispatcherHandler-based setup through the
MVC Config, which uses Spring configuration to declare the
components required to process requests. The MVC Java configuration declares the following
infrastructure components to support functional endpoints:
-
RouterFunctionMapping: Detects one or moreRouterFunction<?>beans in the Spring
configuration, orders them, combines them through
RouterFunction.andOther, and routes requests to the resulting composedRouterFunction. -
HandlerFunctionAdapter: Simple adapter that letsDispatcherHandlerinvoke
aHandlerFunctionthat was mapped to a request.
The preceding components let functional endpoints fit within the DispatcherServlet request
processing lifecycle and also (potentially) run side by side with annotated controllers, if
any are declared. It is also how functional endpoints are enabled by the Spring Boot Web
starter.
The following example shows a WebFlux Java configuration:
Java
@Configuration
@EnableMvc
public class WebConfig implements WebMvcConfigurer {

    @Bean
    public RouterFunction<?> routerFunctionA() {
        // ...
    }

    @Bean
    public RouterFunction<?> routerFunctionB() {
        // ...
    }

    // ...

    @Override
    public void configureMessageConverters(List<HttpMessageConverter<?>> converters) {
        // configure message conversion...
    }

    @Override
    public void addCorsMappings(CorsRegistry registry) {
        // configure CORS...
    }

    @Override
    public void configureViewResolvers(ViewResolverRegistry registry) {
        // configure view resolution for HTML rendering...
    }
}
Kotlin
@Configuration
@EnableMvc
class WebConfig : WebMvcConfigurer {

    @Bean
    fun routerFunctionA(): RouterFunction<*> {
        // ...
    }

    @Bean
    fun routerFunctionB(): RouterFunction<*> {
        // ...
    }

    // ...

    override fun configureMessageConverters(converters: List<HttpMessageConverter<*>>) {
        // configure message conversion...
    }

    override fun addCorsMappings(registry: CorsRegistry) {
        // configure CORS...
    }

    override fun configureViewResolvers(registry: ViewResolverRegistry) {
        // configure view resolution for HTML rendering...
    }
}
1.4.5. Filtering Handler Functions
You can filter handler functions by using the before, after, or filter methods on the routing
function builder.
With annotations, you can achieve similar functionality by using @ControllerAdvice, a ServletFilter, or both.
The filter will apply to all routes that are built by the builder.
This means that filters defined in nested routes do not apply to «top-level» routes.
For instance, consider the following example:
Java
RouterFunction<ServerResponse> route = route()
    .path("/person", b1 -> b1
        .nest(accept(APPLICATION_JSON), b2 -> b2
            .GET("/{id}", handler::getPerson)
            .GET(handler::listPeople)
            .before(request -> ServerRequest.from(request) (1)
                .header("X-RequestHeader", "Value")
                .build()))
        .POST(handler::createPerson))
    .after((request, response) -> logResponse(response)) (2)
    .build();
| 1 | The before filter that adds a custom request header is only applied to the two GET routes. |
| 2 | The after filter that logs the response is applied to all routes, including the nested ones. |
Kotlin
import org.springframework.web.servlet.function.router

val route = router {
    "/person".nest {
        GET("/{id}", handler::getPerson)
        GET(handler::listPeople)
        before { (1)
            ServerRequest.from(it)
                    .header("X-RequestHeader", "Value").build()
        }
    }
    POST(handler::createPerson)
    after { _, response -> (2)
        logResponse(response)
    }
}
| 1 | The before filter that adds a custom request header is only applied to the two GET routes. |
| 2 | The after filter that logs the response is applied to all routes, including the nested ones. |
The filter method on the router builder takes a HandlerFilterFunction: a
function that takes a ServerRequest and HandlerFunction and returns a ServerResponse.
The handler function parameter represents the next element in the chain.
This is typically the handler that is routed to, but it can also be another
filter if multiple are applied.
Now we can add a simple security filter to our route, assuming that we have a SecurityManager that
can determine whether a particular path is allowed.
The following example shows how to do so:
Java
SecurityManager securityManager = ...

RouterFunction<ServerResponse> route = route()
    .path("/person", b1 -> b1
        .nest(accept(APPLICATION_JSON), b2 -> b2
            .GET("/{id}", handler::getPerson)
            .GET(handler::listPeople))
        .POST(handler::createPerson))
    .filter((request, next) -> {
        if (securityManager.allowAccessTo(request.path())) {
            return next.handle(request);
        }
        else {
            return ServerResponse.status(UNAUTHORIZED).build();
        }
    })
    .build();
Kotlin
import org.springframework.web.servlet.function.router

val securityManager: SecurityManager = ...

val route = router {
    ("/person" and accept(APPLICATION_JSON)).nest {
        GET("/{id}", handler::getPerson)
        GET("", handler::listPeople)
        POST(handler::createPerson)
        filter { request, next ->
            if (securityManager.allowAccessTo(request.path())) {
                next(request)
            }
            else {
                status(UNAUTHORIZED).build();
            }
        }
    }
}
The preceding example demonstrates that invoking the next.handle(ServerRequest) is optional.
We only let the handler function be run when access is allowed.
Besides using the filter method on the router function builder, it is possible to apply a
filter to an existing router function via RouterFunction.filter(HandlerFilterFunction).
CORS support for functional endpoints is provided through a dedicatedCorsFilter.
|
1.5. URI Links
This section describes various options available in the Spring Framework to work with URI’s.
1.5.1. UriComponents
Spring MVC and Spring WebFlux
UriComponentsBuilder helps to build URI’s from URI templates with variables, as the following example shows:
Java
UriComponents uriComponents = UriComponentsBuilder
        .fromUriString("https://example.com/hotels/{hotel}") (1)
        .queryParam("q", "{q}") (2)
        .encode() (3)
        .build(); (4)

URI uri = uriComponents.expand("Westin", "123").toUri(); (5)
| 1 | Static factory method with a URI template. |
| 2 | Add or replace URI components. |
| 3 | Request to have the URI template and URI variables encoded. |
| 4 | Build a UriComponents. |
| 5 | Expand variables and obtain the URI. |
Kotlin
val uriComponents = UriComponentsBuilder
        .fromUriString("https://example.com/hotels/{hotel}") (1)
        .queryParam("q", "{q}") (2)
        .encode() (3)
        .build() (4)

val uri = uriComponents.expand("Westin", "123").toUri() (5)
| 1 | Static factory method with a URI template. |
| 2 | Add or replace URI components. |
| 3 | Request to have the URI template and URI variables encoded. |
| 4 | Build a UriComponents. |
| 5 | Expand variables and obtain the URI. |
The preceding example can be consolidated into one chain and shortened with buildAndExpand,
as the following example shows:
Java
URI uri = UriComponentsBuilder
        .fromUriString("https://example.com/hotels/{hotel}")
        .queryParam("q", "{q}")
        .encode()
        .buildAndExpand("Westin", "123")
        .toUri();
Kotlin
val uri = UriComponentsBuilder
        .fromUriString("https://example.com/hotels/{hotel}")
        .queryParam("q", "{q}")
        .encode()
        .buildAndExpand("Westin", "123")
        .toUri()
You can shorten it further by going directly to a URI (which implies encoding),
as the following example shows:
Java
URI uri = UriComponentsBuilder
        .fromUriString("https://example.com/hotels/{hotel}")
        .queryParam("q", "{q}")
        .build("Westin", "123");
Kotlin
val uri = UriComponentsBuilder
        .fromUriString("https://example.com/hotels/{hotel}")
        .queryParam("q", "{q}")
        .build("Westin", "123")
You can shorten it further still with a full URI template, as the following example shows:
Java
URI uri = UriComponentsBuilder
        .fromUriString("https://example.com/hotels/{hotel}?q={q}")
        .build("Westin", "123");
Kotlin
val uri = UriComponentsBuilder
        .fromUriString("https://example.com/hotels/{hotel}?q={q}")
        .build("Westin", "123")
1.5.2. UriBuilder
Spring MVC and Spring WebFlux
UriComponentsBuilder implements UriBuilder. You can create a
UriBuilder, in turn, with a UriBuilderFactory. Together, UriBuilderFactory and
UriBuilder provide a pluggable mechanism to build URIs from URI templates, based on
shared configuration, such as a base URL, encoding preferences, and other details.
You can configure RestTemplate and WebClient with a UriBuilderFactory
to customize the preparation of URIs. DefaultUriBuilderFactory is a default
implementation of UriBuilderFactory that uses UriComponentsBuilder internally and
exposes shared configuration options.
The following example shows how to configure a RestTemplate:
Java
// import org.springframework.web.util.DefaultUriBuilderFactory.EncodingMode;

String baseUrl = "https://example.org";
DefaultUriBuilderFactory factory = new DefaultUriBuilderFactory(baseUrl);
factory.setEncodingMode(EncodingMode.TEMPLATE_AND_VALUES);

RestTemplate restTemplate = new RestTemplate();
restTemplate.setUriTemplateHandler(factory);
Kotlin
// import org.springframework.web.util.DefaultUriBuilderFactory.EncodingMode

val baseUrl = "https://example.org"
val factory = DefaultUriBuilderFactory(baseUrl)
factory.encodingMode = EncodingMode.TEMPLATE_AND_VALUES

val restTemplate = RestTemplate()
restTemplate.uriTemplateHandler = factory
The following example configures a WebClient:
Java
// import org.springframework.web.util.DefaultUriBuilderFactory.EncodingMode;

String baseUrl = "https://example.org";
DefaultUriBuilderFactory factory = new DefaultUriBuilderFactory(baseUrl);
factory.setEncodingMode(EncodingMode.TEMPLATE_AND_VALUES);

WebClient client = WebClient.builder().uriBuilderFactory(factory).build();
Kotlin
// import org.springframework.web.util.DefaultUriBuilderFactory.EncodingMode

val baseUrl = "https://example.org"
val factory = DefaultUriBuilderFactory(baseUrl)
factory.encodingMode = EncodingMode.TEMPLATE_AND_VALUES

val client = WebClient.builder().uriBuilderFactory(factory).build()
In addition, you can also use DefaultUriBuilderFactory directly. It is similar to using
UriComponentsBuilder but, instead of static factory methods, it is an actual instance
that holds configuration and preferences, as the following example shows:
Java
String baseUrl = "https://example.com";
DefaultUriBuilderFactory uriBuilderFactory = new DefaultUriBuilderFactory(baseUrl);

URI uri = uriBuilderFactory.uriString("/hotels/{hotel}")
        .queryParam("q", "{q}")
        .build("Westin", "123");
Kotlin
val baseUrl = "https://example.com"
val uriBuilderFactory = DefaultUriBuilderFactory(baseUrl)

val uri = uriBuilderFactory.uriString("/hotels/{hotel}")
        .queryParam("q", "{q}")
        .build("Westin", "123")
1.5.3. URI Encoding
Spring MVC and Spring WebFlux
UriComponentsBuilder exposes encoding options at two levels:
-
UriComponentsBuilder#encode():
Pre-encodes the URI template first and then strictly encodes URI variables when expanded. -
UriComponents#encode():
Encodes URI components after URI variables are expanded.
Both options replace non-ASCII and illegal characters with escaped octets. However, the first option
also replaces characters with reserved meaning that appear in URI variables.
|
Consider «;», which is legal in a path but has reserved meaning. The first option replaces «;» with «%3B» in URI variables but not in the URI template. By contrast, the second option never replaces «;», since it is a legal character in a path. |
For most cases, the first option is likely to give the expected result, because it treats URI
variables as opaque data to be fully encoded, while the second option is useful if URI
variables do intentionally contain reserved characters. The second option is also useful
when not expanding URI variables at all since that will also encode anything that
incidentally looks like a URI variable.
The following example uses the first option:
Java
URI uri = UriComponentsBuilder.fromPath("/hotel list/{city}")
        .queryParam("q", "{q}")
        .encode()
        .buildAndExpand("New York", "foo+bar")
        .toUri();

// Result is "/hotel%20list/New%20York?q=foo%2Bbar"
Kotlin
val uri = UriComponentsBuilder.fromPath("/hotel list/{city}")
        .queryParam("q", "{q}")
        .encode()
        .buildAndExpand("New York", "foo+bar")
        .toUri()

// Result is "/hotel%20list/New%20York?q=foo%2Bbar"
You can shorten the preceding example by going directly to the URI (which implies encoding),
as the following example shows:
Java
URI uri = UriComponentsBuilder.fromPath("/hotel list/{city}")
        .queryParam("q", "{q}")
        .build("New York", "foo+bar");
Kotlin
val uri = UriComponentsBuilder.fromPath("/hotel list/{city}")
        .queryParam("q", "{q}")
        .build("New York", "foo+bar")
You can shorten it further still with a full URI template, as the following example shows:
Java
URI uri = UriComponentsBuilder.fromUriString("/hotel list/{city}?q={q}")
        .build("New York", "foo+bar");
Kotlin
val uri = UriComponentsBuilder.fromUriString("/hotel list/{city}?q={q}")
        .build("New York", "foo+bar")
The WebClient and the RestTemplate expand and encode URI templates internally through
the UriBuilderFactory strategy. Both can be configured with a custom strategy,
as the following example shows:
Java
String baseUrl = "https://example.com";
DefaultUriBuilderFactory factory = new DefaultUriBuilderFactory(baseUrl)
factory.setEncodingMode(EncodingMode.TEMPLATE_AND_VALUES);

// Customize the RestTemplate..
RestTemplate restTemplate = new RestTemplate();
restTemplate.setUriTemplateHandler(factory);

// Customize the WebClient..
WebClient client = WebClient.builder().uriBuilderFactory(factory).build();
Kotlin
val baseUrl = "https://example.com"
val factory = DefaultUriBuilderFactory(baseUrl).apply {
    encodingMode = EncodingMode.TEMPLATE_AND_VALUES
}

// Customize the RestTemplate..
val restTemplate = RestTemplate().apply {
    uriTemplateHandler = factory
}

// Customize the WebClient..
val client = WebClient.builder().uriBuilderFactory(factory).build()
The DefaultUriBuilderFactory implementation uses UriComponentsBuilder internally to
expand and encode URI templates. As a factory, it provides a single place to configure
the approach to encoding, based on one of the below encoding modes:
-
TEMPLATE_AND_VALUES: UsesUriComponentsBuilder#encode(), corresponding to
the first option in the earlier list, to pre-encode the URI template and strictly encode URI variables when
expanded. -
VALUES_ONLY: Does not encode the URI template and, instead, applies strict encoding
to URI variables throughUriUtils#encodeUriVariablesprior to expanding them into the
template. -
URI_COMPONENT: UsesUriComponents#encode(), corresponding to the second option in the earlier list, to
encode URI component value after URI variables are expanded. -
NONE: No encoding is applied.
The RestTemplate is set to EncodingMode.URI_COMPONENT for historic
reasons and for backwards compatibility. The WebClient relies on the default value
in DefaultUriBuilderFactory, which was changed from EncodingMode.URI_COMPONENT in
5.0.x to EncodingMode.TEMPLATE_AND_VALUES in 5.1.
1.5.4. Relative Servlet Requests
You can use ServletUriComponentsBuilder to create URIs relative to the current request,
as the following example shows:
Java
HttpServletRequest request = ...

// Re-uses scheme, host, port, path, and query string...

URI uri = ServletUriComponentsBuilder.fromRequest(request)
        .replaceQueryParam("accountId", "{id}")
        .build("123");
Kotlin
val request: HttpServletRequest = ...

// Re-uses scheme, host, port, path, and query string...

val uri = ServletUriComponentsBuilder.fromRequest(request)
        .replaceQueryParam("accountId", "{id}")
        .build("123")
You can create URIs relative to the context path, as the following example shows:
Java
HttpServletRequest request = ...

// Re-uses scheme, host, port, and context path...

URI uri = ServletUriComponentsBuilder.fromContextPath(request)
        .path("/accounts")
        .build()
        .toUri();
Kotlin
val request: HttpServletRequest = ...

// Re-uses scheme, host, port, and context path...

val uri = ServletUriComponentsBuilder.fromContextPath(request)
        .path("/accounts")
        .build()
        .toUri()
You can create URIs relative to a Servlet (for example, /main/*),
as the following example shows:
Java
HttpServletRequest request = ...

// Re-uses scheme, host, port, context path, and Servlet mapping prefix...

URI uri = ServletUriComponentsBuilder.fromServletMapping(request)
        .path("/accounts")
        .build()
        .toUri();
Kotlin
val request: HttpServletRequest = ...

// Re-uses scheme, host, port, context path, and Servlet mapping prefix...

val uri = ServletUriComponentsBuilder.fromServletMapping(request)
        .path("/accounts")
        .build()
        .toUri()
As of 5.1, ServletUriComponentsBuilder ignores information from the Forwarded andX-Forwarded-* headers, which specify the client-originated address. Consider using theForwardedHeaderFilter to extract and use or to discardsuch headers. |
1.5.5. Links to Controllers
Spring MVC provides a mechanism to prepare links to controller methods. For example,
the following MVC controller allows for link creation:
Java
@Controller
@RequestMapping("/hotels/{hotel}")
public class BookingController {

    @GetMapping("/bookings/{booking}")
    public ModelAndView getBooking(@PathVariable Long booking) {
        // ...
    }
}
Kotlin
@Controller
@RequestMapping("/hotels/{hotel}")
class BookingController {

    @GetMapping("/bookings/{booking}")
    fun getBooking(@PathVariable booking: Long): ModelAndView {
        // ...
    }
}
You can prepare a link by referring to the method by name, as the following example shows:
Java
UriComponents uriComponents = MvcUriComponentsBuilder
    .fromMethodName(BookingController.class, "getBooking", 21).buildAndExpand(42);

URI uri = uriComponents.encode().toUri();
Kotlin
val uriComponents = MvcUriComponentsBuilder
    .fromMethodName(BookingController::class.java, "getBooking", 21).buildAndExpand(42)

val uri = uriComponents.encode().toUri()
In the preceding example, we provide actual method argument values (in this case, the long value: 21)
to be used as a path variable and inserted into the URL. Furthermore, we provide the
value, 42, to fill in any remaining URI variables, such as the hotel variable inherited
from the type-level request mapping. If the method had more arguments, we could supply null for
arguments not needed for the URL. In general, only @PathVariable and @RequestParam arguments
are relevant for constructing the URL.
There are additional ways to use MvcUriComponentsBuilder. For example, you can use a technique
akin to mock testing through proxies to avoid referring to the controller method by name, as the following example shows
(the example assumes static import of MvcUriComponentsBuilder.on):
Java
UriComponents uriComponents = MvcUriComponentsBuilder
    .fromMethodCall(on(BookingController.class).getBooking(21)).buildAndExpand(42);

URI uri = uriComponents.encode().toUri();
Kotlin
val uriComponents = MvcUriComponentsBuilder
    .fromMethodCall(on(BookingController::class.java).getBooking(21)).buildAndExpand(42)

val uri = uriComponents.encode().toUri()
|
Controller method signatures are limited in their design when they are supposed to be usable for link creation with fromMethodCall. Aside from needing a proper parameter signature,there is a technical limitation on the return type (namely, generating a runtime proxy for link builder invocations), so the return type must not be final. In particular,the common String return type for view names does not work here. You should use ModelAndViewor even plain Object (with a String return value) instead.
|
The earlier examples use static methods in MvcUriComponentsBuilder. Internally, they rely
on ServletUriComponentsBuilder to prepare a base URL from the scheme, host, port,
context path, and servlet path of the current request. This works well in most cases.
However, sometimes, it can be insufficient. For example, you may be outside the context of
a request (such as a batch process that prepares links) or perhaps you need to insert a path
prefix (such as a locale prefix that was removed from the request path and needs to be
re-inserted into links).
For such cases, you can use the static fromXxx overloaded methods that accept a
UriComponentsBuilder to use a base URL. Alternatively, you can create an instance of MvcUriComponentsBuilder
with a base URL and then use the instance-based withXxx methods. For example, the
following listing uses withMethodCall:
Java
UriComponentsBuilder base = ServletUriComponentsBuilder.fromCurrentContextPath().path("/en");
MvcUriComponentsBuilder builder = MvcUriComponentsBuilder.relativeTo(base);
builder.withMethodCall(on(BookingController.class).getBooking(21)).buildAndExpand(42);

URI uri = uriComponents.encode().toUri();
Kotlin
val base = ServletUriComponentsBuilder.fromCurrentContextPath().path("/en")
val builder = MvcUriComponentsBuilder.relativeTo(base)
builder.withMethodCall(on(BookingController::class.java).getBooking(21)).buildAndExpand(42)

val uri = uriComponents.encode().toUri()
As of 5.1, MvcUriComponentsBuilder ignores information from the Forwarded andX-Forwarded-* headers, which specify the client-originated address. Consider using theForwardedHeaderFilter to extract and use or to discard such headers. |
1.5.6. Links in Views
In views such as Thymeleaf, FreeMarker, or JSP, you can build links to annotated controllers
by referring to the implicitly or explicitly assigned name for each request mapping.
Consider the following example:
Java
@RequestMapping("/people/{id}/addresses")
public class PersonAddressController {

    @RequestMapping("/{country}")
    public HttpEntity<PersonAddress> getAddress(@PathVariable String country) { ... }
}
Kotlin
@RequestMapping("/people/{id}/addresses")
class PersonAddressController {

    @RequestMapping("/{country}")
    fun getAddress(@PathVariable country: String): HttpEntity<PersonAddress> { ... }
}
Given the preceding controller, you can prepare a link from a JSP, as follows:
<%@ taglib uri="http://www.springframework.org/tags" prefix="s" %>
...
<a href="${s:mvcUrl('PAC#getAddress').arg(0,'US').buildAndExpand('123')}">Get Address</a>
The preceding example relies on the mvcUrl function declared in the Spring tag library
(that is, META-INF/spring.tld), but it is easy to define your own function or prepare a
similar one for other templating technologies.
Here is how this works. On startup, every @RequestMapping is assigned a default name
through HandlerMethodMappingNamingStrategy, whose default implementation uses the
capital letters of the class and the method name (for example, the getThing method in
ThingController becomes «TC#getThing»). If there is a name clash, you can use
@RequestMapping(name="..") to assign an explicit name or implement your own
HandlerMethodMappingNamingStrategy.
1.6. Asynchronous Requests
Spring MVC has an extensive integration with Servlet asynchronous request
processing:
-
DeferredResultandCallable
return values in controller methods provide basic support for a single asynchronous
return value. -
Controllers can stream multiple values, including
SSE and raw data. -
Controllers can use reactive clients and return
reactive types for response handling.
For an overview of how this differs from Spring WebFlux, see the Async Spring MVC compared to WebFlux section below.
1.6.1. DeferredResult
Once the asynchronous request processing feature is enabled
in the Servlet container, controller methods can wrap any supported controller method
return value with DeferredResult, as the following example shows:
Java
@GetMapping("/quotes")
@ResponseBody
public DeferredResult<String> quotes() {
    DeferredResult<String> deferredResult = new DeferredResult<>();
    // Save the deferredResult somewhere..
    return deferredResult;
}

// From some other thread...
deferredResult.setResult(result);
Kotlin
@GetMapping("/quotes")
@ResponseBody
fun quotes(): DeferredResult<String> {
    val deferredResult = DeferredResult<String>()
    // Save the deferredResult somewhere..
    return deferredResult
}

// From some other thread...
deferredResult.setResult(result)
The controller can produce the return value asynchronously, from a different thread — for
example, in response to an external event (JMS message), a scheduled task, or other event.
1.6.2. Callable
A controller can wrap any supported return value with java.util.concurrent.Callable,
as the following example shows:
Java
@PostMapping
public Callable<String> processUpload(final MultipartFile file) {
return () -> "someView";
}
Kotlin
@PostMapping
fun processUpload(file: MultipartFile) = Callable<String> {
// ...
"someView"
}
The return value can then be obtained by running the given task through the
configured TaskExecutor.
1.6.3. Processing
Here is a very concise overview of Servlet asynchronous request processing:
-
A
ServletRequestcan be put in asynchronous mode by callingrequest.startAsync().
The main effect of doing so is that the Servlet (as well as any filters) can exit, but
the response remains open to let processing complete later. -
The call to
request.startAsync()returnsAsyncContext, which you can use for
further control over asynchronous processing. For example, it provides thedispatchmethod,
which is similar to a forward from the Servlet API, except that it lets an
application resume request processing on a Servlet container thread. -
The
ServletRequestprovides access to the currentDispatcherType, which you can
use to distinguish between processing the initial request, an asynchronous
dispatch, a forward, and other dispatcher types.
DeferredResult processing works as follows:
-
The controller returns a
DeferredResultand saves it in some in-memory
queue or list where it can be accessed. -
Spring MVC calls
request.startAsync(). -
Meanwhile, the
DispatcherServletand all configured filters exit the request
processing thread, but the response remains open. -
The application sets the
DeferredResultfrom some thread, and Spring MVC
dispatches the request back to the Servlet container. -
The
DispatcherServletis invoked again, and processing resumes with the
asynchronously produced return value.
Callable processing works as follows:
-
The controller returns a
Callable. -
Spring MVC calls
request.startAsync()and submits theCallableto
aTaskExecutorfor processing in a separate thread. -
Meanwhile, the
DispatcherServletand all filters exit the Servlet container thread,
but the response remains open. -
Eventually the
Callableproduces a result, and Spring MVC dispatches the request back
to the Servlet container to complete processing. -
The
DispatcherServletis invoked again, and processing resumes with the
asynchronously produced return value from theCallable.
For further background and context, you can also read
the
blog posts that introduced asynchronous request processing support in Spring MVC 3.2.
Exception Handling
When you use a DeferredResult, you can choose whether to call setResult or
setErrorResult with an exception. In both cases, Spring MVC dispatches the request back
to the Servlet container to complete processing. It is then treated either as if the
controller method returned the given value or as if it produced the given exception.
The exception then goes through the regular exception handling mechanism (for example, invoking
@ExceptionHandler methods).
When you use Callable, similar processing logic occurs, the main difference being that
the result is returned from the Callable or an exception is raised by it.
Interception
HandlerInterceptor instances can be of type AsyncHandlerInterceptor, to receive the
afterConcurrentHandlingStarted callback on the initial request that starts asynchronous
processing (instead of postHandle and afterCompletion).
HandlerInterceptor implementations can also register a CallableProcessingInterceptor
or a DeferredResultProcessingInterceptor, to integrate more deeply with the
lifecycle of an asynchronous request (for example, to handle a timeout event). See
AsyncHandlerInterceptor
for more details.
DeferredResult provides onTimeout(Runnable) and onCompletion(Runnable) callbacks.
See the javadoc of DeferredResult
for more details. Callable can be substituted for WebAsyncTask that exposes additional
methods for timeout and completion callbacks.
Async Spring MVC compared to WebFlux
The Servlet API was originally built for making a single pass through the Filter-Servlet
chain. Asynchronous request processing lets applications exit the Filter-Servlet chain
but leave the response open for further processing. The Spring MVC asynchronous support
is built around that mechanism. When a controller returns a DeferredResult, the
Filter-Servlet chain is exited, and the Servlet container thread is released. Later, when
the DeferredResult is set, an ASYNC dispatch (to the same URL) is made, during which the
controller is mapped again but, rather than invoking it, the DeferredResult value is used
(as if the controller returned it) to resume processing.
By contrast, Spring WebFlux is neither built on the Servlet API, nor does it need such an
asynchronous request processing feature, because it is asynchronous by design. Asynchronous
handling is built into all framework contracts and is intrinsically supported through all
stages of request processing.
From a programming model perspective, both Spring MVC and Spring WebFlux support
asynchronous and Reactive Types as return values in controller methods.
Spring MVC even supports streaming, including reactive back pressure. However, individual
writes to the response remain blocking (and are performed on a separate thread), unlike WebFlux,
which relies on non-blocking I/O and does not need an extra thread for each write.
Another fundamental difference is that Spring MVC does not support asynchronous or reactive
types in controller method arguments (for example, @RequestBody, @RequestPart, and others),
nor does it have any explicit support for asynchronous and reactive types as model attributes.
Spring WebFlux does support all that.
Finally, from a configuration perspective the asynchronous request processing feature must be
enabled at the Servlet container level.
1.6.4. HTTP Streaming
You can use DeferredResult and Callable for a single asynchronous return value.
What if you want to produce multiple asynchronous values and have those written to the
response? This section describes how to do so.
Objects
You can use the ResponseBodyEmitter return value to produce a stream of objects, where
each object is serialized with an
HttpMessageConverter and written to the
response, as the following example shows:
Java
@GetMapping("/events")
public ResponseBodyEmitter handle() {
ResponseBodyEmitter emitter = new ResponseBodyEmitter();
// Save the emitter somewhere..
return emitter;
}
// In some other thread
emitter.send("Hello once");
// and again later on
emitter.send("Hello again");
// and done at some point
emitter.complete();
Kotlin
@GetMapping("/events")
fun handle() = ResponseBodyEmitter().apply {
// Save the emitter somewhere..
}
// In some other thread
emitter.send("Hello once")
// and again later on
emitter.send("Hello again")
// and done at some point
emitter.complete()
You can also use ResponseBodyEmitter as the body in a ResponseEntity, letting you
customize the status and headers of the response.
When an emitter throws an IOException (for example, if the remote client went away), applications
are not responsible for cleaning up the connection and should not invoke emitter.complete
or emitter.completeWithError. Instead, the servlet container automatically initiates an
AsyncListener error notification, in which Spring MVC makes a completeWithError call.
This call, in turn, performs one final ASYNC dispatch to the application, during which Spring MVC
invokes the configured exception resolvers and completes the request.
SSE
SseEmitter (a subclass of ResponseBodyEmitter) provides support for
Server-Sent Events, where events sent from the server
are formatted according to the W3C SSE specification. To produce an SSE
stream from a controller, return SseEmitter, as the following example shows:
Java
@GetMapping(path="/events", produces=MediaType.TEXT_EVENT_STREAM_VALUE)
public SseEmitter handle() {
SseEmitter emitter = new SseEmitter();
// Save the emitter somewhere..
return emitter;
}
// In some other thread
emitter.send("Hello once");
// and again later on
emitter.send("Hello again");
// and done at some point
emitter.complete();
Kotlin
@GetMapping("/events", produces = [MediaType.TEXT_EVENT_STREAM_VALUE])
fun handle() = SseEmitter().apply {
// Save the emitter somewhere..
}
// In some other thread
emitter.send("Hello once")
// and again later on
emitter.send("Hello again")
// and done at some point
emitter.complete()
While SSE is the main option for streaming into browsers, note that Internet Explorer
does not support Server-Sent Events. Consider using Spring’s
WebSocket messaging with
SockJS fallback transports (including SSE) that target
a wide range of browsers.
See also previous section for notes on exception handling.
Raw Data
Sometimes, it is useful to bypass message conversion and stream directly to the response
OutputStream (for example, for a file download). You can use the StreamingResponseBody
return value type to do so, as the following example shows:
Java
@GetMapping("/download")
public StreamingResponseBody handle() {
return new StreamingResponseBody() {
@Override
public void writeTo(OutputStream outputStream) throws IOException {
// write...
}
};
}
Kotlin
@GetMapping("/download")
fun handle() = StreamingResponseBody {
// write...
}
You can use StreamingResponseBody as the body in a ResponseEntity to
customize the status and headers of the response.
1.6.5. Reactive Types
Spring MVC supports use of reactive client libraries in a controller (also read
Reactive Libraries in the WebFlux section).
This includes the WebClient from spring-webflux and others, such as Spring Data
reactive data repositories. In such scenarios, it is convenient to be able to return
reactive types from the controller method.
Reactive return values are handled as follows:
-
A single-value promise is adapted to, similar to using
DeferredResult. Examples
includeMono(Reactor) orSingle(RxJava). -
A multi-value stream with a streaming media type (such as
application/x-ndjson
ortext/event-stream) is adapted to, similar to usingResponseBodyEmitteror
SseEmitter. Examples includeFlux(Reactor) orObservable(RxJava).
Applications can also returnFlux<ServerSentEvent>orObservable<ServerSentEvent>. -
A multi-value stream with any other media type (such as
application/json) is adapted
to, similar to usingDeferredResult<List<?>>.
Spring MVC supports Reactor and RxJava through theReactiveAdapterRegistry fromspring-core, which lets it adapt from multiple reactive libraries.
|
For streaming to the response, reactive back pressure is supported, but writes to the
response are still blocking and are run on a separate thread through the
configured TaskExecutor, to avoid
blocking the upstream source (such as a Flux returned from WebClient).
By default, SimpleAsyncTaskExecutor is used for the blocking writes, but that is not
suitable under load. If you plan to stream with a reactive type, you should use the
MVC configuration to configure a task executor.
1.6.6. Context Propagation
It is common to propagate context via java.lang.ThreadLocal. This works transparently
for handling on the same thread, but requires additional work for asynchronous handling
across multiple threads. The Micrometer
Context Propagation
library simplifies context propagation across threads, and across context mechanisms such
as ThreadLocal values,
Reactor context,
GraphQL Java context,
and others.
If Micrometer Context Propagation is present on the classpath, when a controller method
returns a reactive type such as Flux or Mono, all
ThreadLocal values, for which there is a registered io.micrometer.ThreadLocalAccessor,
are written to the Reactor Context as key-value pairs, using the key assigned by the
ThreadLocalAccessor.
For other asynchronous handling scenarios, you can use the Context Propagation library
directly. For example:
Java
// Capture ThreadLocal values from the main thread ...
ContextSnapshot snapshot = ContextSnapshot.captureAll();
// On a different thread: restore ThreadLocal values
try (ContextSnapshot.Scope scope = snapshot.setThreadLocals()) {
// ...
}
For more details, see the
documentation of the Micrometer Context
Propagation library.
1.6.7. Disconnects
The Servlet API does not provide any notification when a remote client goes away.
Therefore, while streaming to the response, whether through SseEmitter
or reactive types, it is important to send data periodically,
since the write fails if the client has disconnected. The send could take the form of an
empty (comment-only) SSE event or any other data that the other side would have to interpret
as a heartbeat and ignore.
Alternatively, consider using web messaging solutions (such as
STOMP over WebSocket or WebSocket with SockJS)
that have a built-in heartbeat mechanism.
1.6.8. Configuration
The asynchronous request processing feature must be enabled at the Servlet container level.
The MVC configuration also exposes several options for asynchronous requests.
Servlet Container
Filter and Servlet declarations have an asyncSupported flag that needs to be set to true
to enable asynchronous request processing. In addition, Filter mappings should be
declared to handle the ASYNC jakarta.servlet.DispatchType.
In Java configuration, when you use AbstractAnnotationConfigDispatcherServletInitializer
to initialize the Servlet container, this is done automatically.
In web.xml configuration, you can add <async-supported>true</async-supported> to the
DispatcherServlet and to Filter declarations and add
<dispatcher>ASYNC</dispatcher> to filter mappings.
Spring MVC
The MVC configuration exposes the following options related to asynchronous request processing:
-
Java configuration: Use the
configureAsyncSupportcallback onWebMvcConfigurer. -
XML namespace: Use the
<async-support>element under<mvc:annotation-driven>.
You can configure the following:
-
Default timeout value for async requests, which if not set, depends
on the underlying Servlet container. -
AsyncTaskExecutorto use for blocking writes when streaming with
Reactive Types and for executingCallableinstances returned from
controller methods. We highly recommended configuring this property if you
stream with reactive types or have controller methods that returnCallable, since
by default, it is aSimpleAsyncTaskExecutor. -
DeferredResultProcessingInterceptorimplementations andCallableProcessingInterceptorimplementations.
Note that you can also set the default timeout value on a DeferredResult,
a ResponseBodyEmitter, and an SseEmitter. For a Callable, you can use
WebAsyncTask to provide a timeout value.
1.7. CORS
Spring MVC lets you handle CORS (Cross-Origin Resource Sharing). This section
describes how to do so.
1.7.1. Introduction
For security reasons, browsers prohibit AJAX calls to resources outside the current origin.
For example, you could have your bank account in one tab and evil.com in another. Scripts
from evil.com should not be able to make AJAX requests to your bank API with your
credentials — for example withdrawing money from your account!
Cross-Origin Resource Sharing (CORS) is a W3C specification
implemented by most browsers that lets you specify
what kind of cross-domain requests are authorized, rather than using less secure and less
powerful workarounds based on IFRAME or JSONP.
1.7.2. Processing
The CORS specification distinguishes between preflight, simple, and actual requests.
To learn how CORS works, you can read
this article, among
many others, or see the specification for more details.
Spring MVC HandlerMapping implementations provide built-in support for CORS. After successfully
mapping a request to a handler, HandlerMapping implementations check the CORS configuration for the
given request and handler and take further actions. Preflight requests are handled
directly, while simple and actual CORS requests are intercepted, validated, and have
required CORS response headers set.
In order to enable cross-origin requests (that is, the Origin header is present and
differs from the host of the request), you need to have some explicitly declared CORS
configuration. If no matching CORS configuration is found, preflight requests are
rejected. No CORS headers are added to the responses of simple and actual CORS requests
and, consequently, browsers reject them.
Each HandlerMapping can be
configured
individually with URL pattern-based CorsConfiguration mappings. In most cases, applications
use the MVC Java configuration or the XML namespace to declare such mappings, which results
in a single global map being passed to all HandlerMapping instances.
You can combine global CORS configuration at the HandlerMapping level with more
fine-grained, handler-level CORS configuration. For example, annotated controllers can use
class- or method-level @CrossOrigin annotations (other handlers can implement
CorsConfigurationSource).
The rules for combining global and local configuration are generally additive — for example,
all global and all local origins. For those attributes where only a single value can be
accepted, e.g. allowCredentials and maxAge, the local overrides the global value. See
CorsConfiguration#combine(CorsConfiguration)
for more details.
|
To learn more from the source or make advanced customizations, check the code behind:
|
1.7.3. @CrossOrigin
The @CrossOrigin
annotation enables cross-origin requests on annotated controller methods,
as the following example shows:
Java
@RestController
@RequestMapping("/account")
public class AccountController {
@CrossOrigin
@GetMapping("/{id}")
public Account retrieve(@PathVariable Long id) {
// ...
}
@DeleteMapping("/{id}")
public void remove(@PathVariable Long id) {
// ...
}
}
Kotlin
@RestController
@RequestMapping("/account")
class AccountController {
@CrossOrigin
@GetMapping("/{id}")
fun retrieve(@PathVariable id: Long): Account {
// ...
}
@DeleteMapping("/{id}")
fun remove(@PathVariable id: Long) {
// ...
}
}
By default, @CrossOrigin allows:
-
All origins.
-
All headers.
-
All HTTP methods to which the controller method is mapped.
allowCredentials is not enabled by default, since that establishes a trust level
that exposes sensitive user-specific information (such as cookies and CSRF tokens) and
should only be used where appropriate. When it is enabled either allowOrigins must be
set to one or more specific domain (but not the special value "*") or alternatively
the allowOriginPatterns property may be used to match to a dynamic set of origins.
maxAge is set to 30 minutes.
@CrossOrigin is supported at the class level, too, and is inherited by all methods,
as the following example shows:
Java
@CrossOrigin(origins = "https://domain2.com", maxAge = 3600)
@RestController
@RequestMapping("/account")
public class AccountController {
@GetMapping("/{id}")
public Account retrieve(@PathVariable Long id) {
// ...
}
@DeleteMapping("/{id}")
public void remove(@PathVariable Long id) {
// ...
}
}
Kotlin
@CrossOrigin(origins = ["https://domain2.com"], maxAge = 3600)
@RestController
@RequestMapping("/account")
class AccountController {
@GetMapping("/{id}")
fun retrieve(@PathVariable id: Long): Account {
// ...
}
@DeleteMapping("/{id}")
fun remove(@PathVariable id: Long) {
// ...
}
You can use @CrossOrigin at both the class level and the method level,
as the following example shows:
Java
@CrossOrigin(maxAge = 3600)
@RestController
@RequestMapping("/account")
public class AccountController {
@CrossOrigin("https://domain2.com")
@GetMapping("/{id}")
public Account retrieve(@PathVariable Long id) {
// ...
}
@DeleteMapping("/{id}")
public void remove(@PathVariable Long id) {
// ...
}
}
Kotlin
@CrossOrigin(maxAge = 3600)
@RestController
@RequestMapping("/account")
class AccountController {
@CrossOrigin("https://domain2.com")
@GetMapping("/{id}")
fun retrieve(@PathVariable id: Long): Account {
// ...
}
@DeleteMapping("/{id}")
fun remove(@PathVariable id: Long) {
// ...
}
}
1.7.4. Global Configuration
In addition to fine-grained, controller method level configuration, you probably want to
define some global CORS configuration, too. You can set URL-based CorsConfiguration
mappings individually on any HandlerMapping. Most applications, however, use the
MVC Java configuration or the MVC XML namespace to do that.
By default, global configuration enables the following:
-
All origins.
-
All headers.
-
GET,HEAD, andPOSTmethods.
allowCredentials is not enabled by default, since that establishes a trust level
that exposes sensitive user-specific information (such as cookies and CSRF tokens) and
should only be used where appropriate. When it is enabled either allowOrigins must be
set to one or more specific domain (but not the special value "*") or alternatively
the allowOriginPatterns property may be used to match to a dynamic set of origins.
maxAge is set to 30 minutes.
Java Configuration
To enable CORS in the MVC Java config, you can use the CorsRegistry callback,
as the following example shows:
Java
@Configuration
@EnableWebMvc
public class WebConfig implements WebMvcConfigurer {
@Override
public void addCorsMappings(CorsRegistry registry) {
registry.addMapping("/api/**")
.allowedOrigins("https://domain2.com")
.allowedMethods("PUT", "DELETE")
.allowedHeaders("header1", "header2", "header3")
.exposedHeaders("header1", "header2")
.allowCredentials(true).maxAge(3600);
// Add more mappings...
}
}
Kotlin
@Configuration
@EnableWebMvc
class WebConfig : WebMvcConfigurer {
override fun addCorsMappings(registry: CorsRegistry) {
registry.addMapping("/api/**")
.allowedOrigins("https://domain2.com")
.allowedMethods("PUT", "DELETE")
.allowedHeaders("header1", "header2", "header3")
.exposedHeaders("header1", "header2")
.allowCredentials(true).maxAge(3600)
// Add more mappings...
}
}
XML Configuration
To enable CORS in the XML namespace, you can use the <mvc:cors> element,
as the following example shows:
<mvc:cors>
<mvc:mapping path="/api/**"
allowed-origins="https://domain1.com, https://domain2.com"
allowed-methods="GET, PUT"
allowed-headers="header1, header2, header3"
exposed-headers="header1, header2" allow-credentials="true"
max-age="123" />
<mvc:mapping path="/resources/**"
allowed-origins="https://domain1.com" />
</mvc:cors>1.7.5. CORS Filter
You can apply CORS support through the built-in
CorsFilter.
If you try to use the CorsFilter with Spring Security, keep in mind that SpringSecurity has built-in support for CORS. |
To configure the filter, pass a CorsConfigurationSource to its constructor, as the
following example shows:
Java
CorsConfiguration config = new CorsConfiguration();
// Possibly...
// config.applyPermitDefaultValues()
config.setAllowCredentials(true);
config.addAllowedOrigin("https://domain1.com");
config.addAllowedHeader("*");
config.addAllowedMethod("*");
UrlBasedCorsConfigurationSource source = new UrlBasedCorsConfigurationSource();
source.registerCorsConfiguration("/**", config);
CorsFilter filter = new CorsFilter(source);
Kotlin
val config = CorsConfiguration()
// Possibly...
// config.applyPermitDefaultValues()
config.allowCredentials = true
config.addAllowedOrigin("https://domain1.com")
config.addAllowedHeader("*")
config.addAllowedMethod("*")
val source = UrlBasedCorsConfigurationSource()
source.registerCorsConfiguration("/**", config)
val filter = CorsFilter(source)
1.8. Error Responses
A common requirement for REST services is to include details in the body of error
responses. The Spring Framework supports the «Problem Details for HTTP APIs»
specification, RFC 7807.
The following are the main abstractions for this support:
-
ProblemDetail— representation for an RFC 7807 problem detail; a simple container
for both standard fields defined in the spec, and for non-standard ones. -
ErrorResponse— contract to expose HTTP error response details including HTTP
status, response headers, and a body in the format of RFC 7807; this allows exceptions to
encapsulate and expose the details of how they map to an HTTP response. All Spring MVC
exceptions implement this. -
ErrorResponseException— basicErrorResponseimplementation that others
can use as a convenient base class. -
ResponseEntityExceptionHandler— convenient base class for an
@ControllerAdvice that handles all Spring MVC exceptions,
and anyErrorResponseException, and renders an error response with a body.
1.8.1. Render
You can return ProblemDetail or ErrorResponse from any @ExceptionHandler or from
any @RequestMapping method to render an RFC 7807 response. This is processed as follows:
-
The
statusproperty ofProblemDetaildetermines the HTTP status. -
The
instanceproperty ofProblemDetailis set from the current URL path, if not
already set. -
For content negotiation, the Jackson
HttpMessageConverterprefers
«application/problem+json» over «application/json» when rendering aProblemDetail,
and also falls back on it if no compatible media type is found.
To enable RFC 7807 responses for Spring WebFlux exceptions and for any
ErrorResponseException, extend ResponseEntityExceptionHandler and declare it as an
@ControllerAdvice in Spring configuration. The handler
has an @ExceptionHandler method that handles any ErrorResponse exception, which
includes all built-in web exceptions. You can add more exception handling methods, and
use a protected method to map any exception to a ProblemDetail.
1.8.2. Non-Standard Fields
You can extend an RFC 7807 response with non-standard fields in one of two ways.
One, insert into the «properties» Map of ProblemDetail. When using the Jackson
library, the Spring Framework registers ProblemDetailJacksonMixin that ensures this
«properties» Map is unwrapped and rendered as top level JSON properties in the
response, and likewise any unknown property during deserialization is inserted into
this Map.
You can also extend ProblemDetail to add dedicated non-standard properties.
The copy constructor in ProblemDetail allows a subclass to make it easy to be created
from an existing ProblemDetail. This could be done centrally, e.g. from an
@ControllerAdvice such as ResponseEntityExceptionHandler that re-creates the
ProblemDetail of an exception into a subclass with the additional non-standard fields.
1.8.3. Internationalization
It is a common requirement to internationalize error response details, and good practice
to customize the problem details for Spring MVC exceptions. This is supported as follows:
-
Each
ErrorResponseexposes a message code and arguments to resolve the «detail» field
through a MessageSource.
The actual message code value is parameterized with placeholders, e.g.
"HTTP method {0} not supported"to be expanded from the arguments. -
Each
ErrorResponsealso exposes a message code to resolve the «title» field. -
ResponseEntityExceptionHandleruses the message code and arguments to resolve the
«detail» and the «title» fields.
By default, the message code for the «detail» field is «problemDetail.» + the fully
qualified exception class name. Some exceptions may expose additional message codes in
which case a suffix is added to the default message code. The table below lists message
arguments and codes for Spring MVC exceptions:
| Exception | Message Code | Message Code Arguments |
|---|---|---|
|
|
(default) |
|
|
|
(default) |
|
|
|
(default) |
|
|
|
(default) + «.parseError» |
|
|
|
(default) |
|
|
|
(default) + «.parseError» |
|
|
|
(default) |
|
|
|
(default) |
|
|
|
(default) |
|
|
|
(default) |
|
|
|
(default) |
|
|
|
(default) |
|
|
|
(default) |
|
|
|
(default) |
|
|
|
(default) |
|
|
|
(default) |
|
|
|
(default) |
|
|
|
(default) |
|
|
|
(default) |
|
By default, the message code for the «title» field is «problemDetail.title.» + the fully
qualified exception class name.
1.8.4. Client Handling
A client application can catch WebClientResponseException, when using the WebClient,
or RestClientResponseException when using the RestTemplate, and use their
getResponseBodyAs methods to decode the error response body to any target type such as
ProblemDetail, or a subclass of ProblemDetail.
1.10. HTTP Caching
HTTP caching can significantly improve the performance of a web application. HTTP caching
revolves around the Cache-Control response header and, subsequently, conditional request
headers (such as Last-Modified and ETag). Cache-Control advises private (for example, browser)
and public (for example, proxy) caches on how to cache and re-use responses. An ETag header is used
to make a conditional request that may result in a 304 (NOT_MODIFIED) without a body,
if the content has not changed. ETag can be seen as a more sophisticated successor to
the Last-Modified header.
This section describes the HTTP caching-related options that are available in Spring Web MVC.
1.10.1. CacheControl
CacheControl provides support for
configuring settings related to the Cache-Control header and is accepted as an argument
in a number of places:
-
WebContentInterceptor -
WebContentGenerator -
Controllers
-
Static Resources
While RFC 7234 describes all possible
directives for the Cache-Control response header, the CacheControl type takes a
use case-oriented approach that focuses on the common scenarios:
Java
// Cache for an hour - "Cache-Control: max-age=3600"
CacheControl ccCacheOneHour = CacheControl.maxAge(1, TimeUnit.HOURS);
// Prevent caching - "Cache-Control: no-store"
CacheControl ccNoStore = CacheControl.noStore();
// Cache for ten days in public and private caches,
// public caches should not transform the response
// "Cache-Control: max-age=864000, public, no-transform"
CacheControl ccCustom = CacheControl.maxAge(10, TimeUnit.DAYS).noTransform().cachePublic();
Kotlin
// Cache for an hour - "Cache-Control: max-age=3600"
val ccCacheOneHour = CacheControl.maxAge(1, TimeUnit.HOURS)
// Prevent caching - "Cache-Control: no-store"
val ccNoStore = CacheControl.noStore()
// Cache for ten days in public and private caches,
// public caches should not transform the response
// "Cache-Control: max-age=864000, public, no-transform"
val ccCustom = CacheControl.maxAge(10, TimeUnit.DAYS).noTransform().cachePublic()
WebContentGenerator also accepts a simpler cachePeriod property (defined in seconds) that
works as follows:
-
A
-1value does not generate aCache-Controlresponse header. -
A
0value prevents caching by using the'Cache-Control: no-store'directive. -
An
n > 0value caches the given response fornseconds by using the
'Cache-Control: max-age=n'directive.
1.10.2. Controllers
Controllers can add explicit support for HTTP caching. We recommended doing so, since the
lastModified or ETag value for a resource needs to be calculated before it can be compared
against conditional request headers. A controller can add an ETag header and Cache-Control
settings to a ResponseEntity, as the following example shows:
Java
@GetMapping("/book/{id}")
public ResponseEntity<Book> showBook(@PathVariable Long id) {
Book book = findBook(id);
String version = book.getVersion();
return ResponseEntity
.ok()
.cacheControl(CacheControl.maxAge(30, TimeUnit.DAYS))
.eTag(version) // lastModified is also available
.body(book);
}
Kotlin
@GetMapping("/book/{id}")
fun showBook(@PathVariable id: Long): ResponseEntity<Book> {
val book = findBook(id);
val version = book.getVersion()
return ResponseEntity
.ok()
.cacheControl(CacheControl.maxAge(30, TimeUnit.DAYS))
.eTag(version) // lastModified is also available
.body(book)
}
The preceding example sends a 304 (NOT_MODIFIED) response with an empty body if the comparison
to the conditional request headers indicates that the content has not changed. Otherwise, the
ETag and Cache-Control headers are added to the response.
You can also make the check against conditional request headers in the controller,
as the following example shows:
Java
@RequestMapping
public String myHandleMethod(WebRequest request, Model model) {
long eTag = ... (1)
if (request.checkNotModified(eTag)) {
return null; (2)
}
model.addAttribute(...); (3)
return "myViewName";
}
| 1 | Application-specific calculation. |
| 2 | The response has been set to 304 (NOT_MODIFIED) — no further processing. |
| 3 | Continue with the request processing. |
Kotlin
@RequestMapping
fun myHandleMethod(request: WebRequest, model: Model): String? {
val eTag: Long = ... (1)
if (request.checkNotModified(eTag)) {
return null (2)
}
model[...] = ... (3)
return "myViewName"
}
| 1 | Application-specific calculation. |
| 2 | The response has been set to 304 (NOT_MODIFIED) — no further processing. |
| 3 | Continue with the request processing. |
There are three variants for checking conditional requests against eTag values, lastModified
values, or both. For conditional GET and HEAD requests, you can set the response to
304 (NOT_MODIFIED). For conditional POST, PUT, and DELETE, you can instead set the response
to 412 (PRECONDITION_FAILED), to prevent concurrent modification.
1.10.3. Static Resources
You should serve static resources with a Cache-Control and conditional response headers
for optimal performance. See the section on configuring Static Resources.
1.10.4. ETag Filter
You can use the ShallowEtagHeaderFilter to add “shallow” eTag values that are computed from the
response content and, thus, save bandwidth but not CPU time. See Shallow ETag.
1.11. View Technologies
The use of view technologies in Spring MVC is pluggable. Whether you decide to use
Thymeleaf, Groovy Markup Templates, JSPs, or other technologies is primarily a matter of
a configuration change. This chapter covers view technologies integrated with Spring MVC.
We assume you are already familiar with View Resolution.
|
The views of a Spring MVC application live within the internal trust boundaries of that application. Views have access to all the beans of your application context. As such, it is not recommended to use Spring MVC’s template support in applications where the templates are editable by external sources, since this can have security implications. |
1.11.1. Thymeleaf
Thymeleaf is a modern server-side Java template engine that emphasizes natural HTML
templates that can be previewed in a browser by double-clicking, which is very helpful
for independent work on UI templates (for example, by a designer) without the need for
a running server. If you want to replace JSPs, Thymeleaf offers one of the most
extensive sets of features to make such a transition easier. Thymeleaf is actively
developed and maintained. For a more complete introduction, see the
Thymeleaf project home page.
The Thymeleaf integration with Spring MVC is managed by the Thymeleaf project.
The configuration involves a few bean declarations, such as
ServletContextTemplateResolver, SpringTemplateEngine, and ThymeleafViewResolver.
See Thymeleaf+Spring for more details.
1.11.2. FreeMarker
Apache FreeMarker is a template engine for generating any
kind of text output from HTML to email and others. The Spring Framework has built-in
integration for using Spring MVC with FreeMarker templates.
View Configuration
The following example shows how to configure FreeMarker as a view technology:
Java
@Configuration
@EnableWebMvc
public class WebConfig implements WebMvcConfigurer {
@Override
public void configureViewResolvers(ViewResolverRegistry registry) {
registry.freeMarker();
}
// Configure FreeMarker...
@Bean
public FreeMarkerConfigurer freeMarkerConfigurer() {
FreeMarkerConfigurer configurer = new FreeMarkerConfigurer();
configurer.setTemplateLoaderPath("/WEB-INF/freemarker");
return configurer;
}
}
Kotlin
@Configuration
@EnableWebMvc
class WebConfig : WebMvcConfigurer {
override fun configureViewResolvers(registry: ViewResolverRegistry) {
registry.freeMarker()
}
// Configure FreeMarker...
@Bean
fun freeMarkerConfigurer() = FreeMarkerConfigurer().apply {
setTemplateLoaderPath("/WEB-INF/freemarker")
}
}
The following example shows how to configure the same in XML:
<mvc:annotation-driven/>
<mvc:view-resolvers>
<mvc:freemarker/>
</mvc:view-resolvers>
<!-- Configure FreeMarker... -->
<mvc:freemarker-configurer>
<mvc:template-loader-path location="/WEB-INF/freemarker"/>
</mvc:freemarker-configurer>Alternatively, you can also declare the FreeMarkerConfigurer bean for full control over all
properties, as the following example shows:
<bean id="freemarkerConfig" class="org.springframework.web.servlet.view.freemarker.FreeMarkerConfigurer">
<property name="templateLoaderPath" value="/WEB-INF/freemarker/"/>
</bean>Your templates need to be stored in the directory specified by the FreeMarkerConfigurer
shown in the preceding example. Given the preceding configuration, if your controller
returns a view name of welcome, the resolver looks for the
/WEB-INF/freemarker/welcome.ftl template.
FreeMarker Configuration
You can pass FreeMarker ‘Settings’ and ‘SharedVariables’ directly to the FreeMarker
Configuration object (which is managed by Spring) by setting the appropriate bean
properties on the FreeMarkerConfigurer bean. The freemarkerSettings property requires
a java.util.Properties object, and the freemarkerVariables property requires a
java.util.Map. The following example shows how to use a FreeMarkerConfigurer:
<bean id="freemarkerConfig" class="org.springframework.web.servlet.view.freemarker.FreeMarkerConfigurer">
<property name="templateLoaderPath" value="/WEB-INF/freemarker/"/>
<property name="freemarkerVariables">
<map>
<entry key="xml_escape" value-ref="fmXmlEscape"/>
</map>
</property>
</bean>
<bean id="fmXmlEscape" class="freemarker.template.utility.XmlEscape"/>See the FreeMarker documentation for details of settings and variables as they apply to
the Configuration object.
Form Handling
Spring provides a tag library for use in JSPs that contains, among others, a
<spring:bind/> element. This element primarily lets forms display values from
form-backing objects and show the results of failed validations from a Validator in the
web or business tier. Spring also has support for the same functionality in FreeMarker,
with additional convenience macros for generating form input elements themselves.
The Bind Macros
A standard set of macros are maintained within the spring-webmvc.jar file for
FreeMarker, so they are always available to a suitably configured application.
Some of the macros defined in the Spring templating libraries are considered internal
(private), but no such scoping exists in the macro definitions, making all macros visible
to calling code and user templates. The following sections concentrate only on the macros
you need to directly call from within your templates. If you wish to view the macro code
directly, the file is called spring.ftl and is in the
org.springframework.web.servlet.view.freemarker package.
Simple Binding
In your HTML forms based on FreeMarker templates that act as a form view for a Spring MVC
controller, you can use code similar to the next example to bind to field values and
display error messages for each input field in similar fashion to the JSP equivalent. The
following example shows a personForm view:
<!-- FreeMarker macros have to be imported into a namespace.
We strongly recommend sticking to 'spring'. -->
<#import "/spring.ftl" as spring/>
<html>
...
<form action="" method="POST">
Name:
<@spring.bind "personForm.name"/>
<input type="text"
name="${spring.status.expression}"
value="${spring.status.value?html}"/><br />
<#list spring.status.errorMessages as error> <b>${error}</b> <br /> </#list>
<br />
...
<input type="submit" value="submit"/>
</form>
...
</html><@spring.bind> requires a ‘path’ argument, which consists of the name of your command
object (it is ‘command’, unless you changed it in your controller configuration) followed
by a period and the name of the field on the command object to which you wish to bind. You
can also use nested fields, such as command.address.street. The bind macro assumes the
default HTML escaping behavior specified by the ServletContext parameter
defaultHtmlEscape in web.xml.
An alternative form of the macro called <@spring.bindEscaped> takes a second argument
that explicitly specifies whether HTML escaping should be used in the status error
messages or values. You can set it to true or false as required. Additional form
handling macros simplify the use of HTML escaping, and you should use these macros
wherever possible. They are explained in the next section.
Input Macros
Additional convenience macros for FreeMarker simplify both binding and form generation
(including validation error display). It is never necessary to use these macros to
generate form input fields, and you can mix and match them with simple HTML or direct
calls to the Spring bind macros that we highlighted previously.
The following table of available macros shows the FreeMarker Template (FTL) definitions
and the parameter list that each takes:
| macro | FTL definition |
|---|---|
|
|
<@spring.message code/> |
|
|
<@spring.messageText code, text/> |
|
|
<@spring.url relativeUrl/> |
|
|
<@spring.formInput path, attributes, fieldType/> |
|
|
<@spring.formHiddenInput path, attributes/> |
|
|
<@spring.formPasswordInput path, attributes/> |
|
|
<@spring.formTextarea path, attributes/> |
|
|
<@spring.formSingleSelect path, options, attributes/> |
|
|
<@spring.formMultiSelect path, options, attributes/> |
|
|
<@spring.formRadioButtons path, options separator, attributes/> |
|
|
<@spring.formCheckboxes path, options, separator, attributes/> |
|
|
<@spring.formCheckbox path, attributes/> |
|
|
<@spring.showErrors separator, classOrStyle/> |
In FreeMarker templates, formHiddenInput and formPasswordInput are not actuallyrequired, as you can use the normal formInput macro, specifying hidden or passwordas the value for the fieldType parameter.
|
The parameters to any of the above macros have consistent meanings:
-
path: The name of the field to bind to (for example, «command.name») -
options: AMapof all the available values that can be selected from in the input
field. The keys to the map represent the values that are POSTed back from the form
and bound to the command object. Map objects stored against the keys are the labels
displayed on the form to the user and may be different from the corresponding values
posted back by the form. Usually, such a map is supplied as reference data by the
controller. You can use anyMapimplementation, depending on required behavior.
For strictly sorted maps, you can use aSortedMap(such as aTreeMap) with a
suitableComparatorand, for arbitrary Maps that should return values in insertion
order, use aLinkedHashMapor aLinkedMapfromcommons-collections. -
separator: Where multiple options are available as discreet elements (radio buttons
or checkboxes), the sequence of characters used to separate each one in the list
(such as<br>). -
attributes: An additional string of arbitrary tags or text to be included within
the HTML tag itself. This string is echoed literally by the macro. For example, in a
textareafield, you may supply attributes (such as ‘rows=»5″ cols=»60″‘), or you
could pass style information such as ‘style=»border:1px solid silver»‘. -
classOrStyle: For theshowErrorsmacro, the name of the CSS class that thespan
element that wraps each error uses. If no information is supplied (or the value is
empty), the errors are wrapped in<b></b>tags.
The following sections outline examples of the macros.
The formInput macro takes the path parameter (command.name) and an additional attributes
parameter (which is empty in the upcoming example). The macro, along with all other form
generation macros, performs an implicit Spring bind on the path parameter. The binding
remains valid until a new bind occurs, so the showErrors macro does not need to pass the
path parameter again — it operates on the field for which a binding was last created.
The showErrors macro takes a separator parameter (the characters that are used to
separate multiple errors on a given field) and also accepts a second parameter — this
time, a class name or style attribute. Note that FreeMarker can specify default
values for the attributes parameter. The following example shows how to use the formInput
and showErrors macros:
<@spring.formInput "command.name"/>
<@spring.showErrors "<br>"/>The next example shows the output of the form fragment, generating the name field and displaying a
validation error after the form was submitted with no value in the field. Validation
occurs through Spring’s Validation framework.
The generated HTML resembles the following example:
Name:
<input type="text" name="name" value="">
<br>
<b>required</b>
<br>
<br>The formTextarea macro works the same way as the formInput macro and accepts the same
parameter list. Commonly, the second parameter (attributes) is used to pass style
information or rows and cols attributes for the textarea.
You can use four selection field macros to generate common UI value selection inputs in
your HTML forms:
-
formSingleSelect -
formMultiSelect -
formRadioButtons -
formCheckboxes
Each of the four macros accepts a Map of options that contains the value for the form
field and the label that corresponds to that value. The value and the label can be the
same.
The next example is for radio buttons in FTL. The form-backing object specifies a default
value of ‘London’ for this field, so no validation is necessary. When the form is
rendered, the entire list of cities to choose from is supplied as reference data in the
model under the name ‘cityMap’. The following listing shows the example:
...
Town:
<@spring.formRadioButtons "command.address.town", cityMap, ""/><br><br>The preceding listing renders a line of radio buttons, one for each value in cityMap, and uses a
separator of "". No additional attributes are supplied (the last parameter to the macro is
missing). The cityMap uses the same String for each key-value pair in the map. The map’s
keys are what the form actually submits as POST request parameters. The map values are the
labels that the user sees. In the preceding example, given a list of three well known cities
and a default value in the form backing object, the HTML resembles the following:
Town:
<input type="radio" name="address.town" value="London">London</input>
<input type="radio" name="address.town" value="Paris" checked="checked">Paris</input>
<input type="radio" name="address.town" value="New York">New York</input>If your application expects to handle cities by internal codes (for example), you can create the map of
codes with suitable keys, as the following example shows:
Java
protected Map<String, ?> referenceData(HttpServletRequest request) throws Exception {
Map<String, String> cityMap = new LinkedHashMap<>();
cityMap.put("LDN", "London");
cityMap.put("PRS", "Paris");
cityMap.put("NYC", "New York");
Map<String, Object> model = new HashMap<>();
model.put("cityMap", cityMap);
return model;
}
Kotlin
protected fun referenceData(request: HttpServletRequest): Map<String, *> {
val cityMap = linkedMapOf(
"LDN" to "London",
"PRS" to "Paris",
"NYC" to "New York"
)
return hashMapOf("cityMap" to cityMap)
}
The code now produces output where the radio values are the relevant codes, but the
user still sees the more user-friendly city names, as follows:
Town:
<input type="radio" name="address.town" value="LDN">London</input>
<input type="radio" name="address.town" value="PRS" checked="checked">Paris</input>
<input type="radio" name="address.town" value="NYC">New York</input>HTML Escaping
Default usage of the form macros described earlier results in HTML elements that are HTML 4.01
compliant and that use the default value for HTML escaping defined in your web.xml file, as
used by Spring’s bind support. To make the elements be XHTML compliant or to override
the default HTML escaping value, you can specify two variables in your template (or in
your model, where they are visible to your templates). The advantage of specifying
them in the templates is that they can be changed to different values later in the
template processing to provide different behavior for different fields in your form.
To switch to XHTML compliance for your tags, specify a value of true for a
model or context variable named xhtmlCompliant, as the following example shows:
<#-- for FreeMarker -->
<#assign xhtmlCompliant = true>After processing this directive, any elements generated by the Spring macros are now XHTML
compliant.
In similar fashion, you can specify HTML escaping per field, as the following example shows:
<#-- until this point, default HTML escaping is used -->
<#assign htmlEscape = true>
<#-- next field will use HTML escaping -->
<@spring.formInput "command.name"/>
<#assign htmlEscape = false in spring>
<#-- all future fields will be bound with HTML escaping off -->1.11.3. Groovy Markup
The Groovy Markup Template Engine
is primarily aimed at generating XML-like markup (XML, XHTML, HTML5, and others), but you can
use it to generate any text-based content. The Spring Framework has a built-in
integration for using Spring MVC with Groovy Markup.
| The Groovy Markup Template engine requires Groovy 2.3.1+. |
Configuration
The following example shows how to configure the Groovy Markup Template Engine:
Java
@Configuration
@EnableWebMvc
public class WebConfig implements WebMvcConfigurer {
@Override
public void configureViewResolvers(ViewResolverRegistry registry) {
registry.groovy();
}
// Configure the Groovy Markup Template Engine...
@Bean
public GroovyMarkupConfigurer groovyMarkupConfigurer() {
GroovyMarkupConfigurer configurer = new GroovyMarkupConfigurer();
configurer.setResourceLoaderPath("/WEB-INF/");
return configurer;
}
}
Kotlin
@Configuration
@EnableWebMvc
class WebConfig : WebMvcConfigurer {
override fun configureViewResolvers(registry: ViewResolverRegistry) {
registry.groovy()
}
// Configure the Groovy Markup Template Engine...
@Bean
fun groovyMarkupConfigurer() = GroovyMarkupConfigurer().apply {
resourceLoaderPath = "/WEB-INF/"
}
}
The following example shows how to configure the same in XML:
<mvc:annotation-driven/>
<mvc:view-resolvers>
<mvc:groovy/>
</mvc:view-resolvers>
<!-- Configure the Groovy Markup Template Engine... -->
<mvc:groovy-configurer resource-loader-path="/WEB-INF/"/>Example
Unlike traditional template engines, Groovy Markup relies on a DSL that uses a builder
syntax. The following example shows a sample template for an HTML page:
yieldUnescaped '<!DOCTYPE html>'
html(lang:'en') {
head {
meta('http-equiv':'"Content-Type" content="text/html; charset=utf-8"')
title('My page')
}
body {
p('This is an example of HTML contents')
}
}
1.11.4. Script Views
The Spring Framework has a built-in integration for using Spring MVC with any
templating library that can run on top of the
JSR-223 Java scripting engine. We have tested the following
templating libraries on different script engines:
| Scripting Library | Scripting Engine |
|---|---|
|
Handlebars |
Nashorn |
|
Mustache |
Nashorn |
|
React |
Nashorn |
|
EJS |
Nashorn |
|
ERB |
JRuby |
|
String templates |
Jython |
|
Kotlin Script templating |
Kotlin |
The basic rule for integrating any other script engine is that it must implement theScriptEngine and Invocable interfaces.
|
Requirements
You need to have the script engine on your classpath, the details of which vary by script engine:
-
The Nashorn JavaScript engine is provided with
Java 8+. Using the latest update release available is highly recommended. -
JRuby should be added as a dependency for Ruby support.
-
Jython should be added as a dependency for Python support.
-
org.jetbrains.kotlin:kotlin-script-utildependency and aMETA-INF/services/javax.script.ScriptEngineFactory
file containing aorg.jetbrains.kotlin.script.jsr223.KotlinJsr223JvmLocalScriptEngineFactory
line should be added for Kotlin script support. See
this example for more details.
You need to have the script templating library. One way to do that for JavaScript is
through WebJars.
Script Templates
You can declare a ScriptTemplateConfigurer bean to specify the script engine to use,
the script files to load, what function to call to render templates, and so on.
The following example uses Mustache templates and the Nashorn JavaScript engine:
Java
@Configuration
@EnableWebMvc
public class WebConfig implements WebMvcConfigurer {
@Override
public void configureViewResolvers(ViewResolverRegistry registry) {
registry.scriptTemplate();
}
@Bean
public ScriptTemplateConfigurer configurer() {
ScriptTemplateConfigurer configurer = new ScriptTemplateConfigurer();
configurer.setEngineName("nashorn");
configurer.setScripts("mustache.js");
configurer.setRenderObject("Mustache");
configurer.setRenderFunction("render");
return configurer;
}
}
Kotlin
@Configuration
@EnableWebMvc
class WebConfig : WebMvcConfigurer {
override fun configureViewResolvers(registry: ViewResolverRegistry) {
registry.scriptTemplate()
}
@Bean
fun configurer() = ScriptTemplateConfigurer().apply {
engineName = "nashorn"
setScripts("mustache.js")
renderObject = "Mustache"
renderFunction = "render"
}
}
The following example shows the same arrangement in XML:
<mvc:annotation-driven/>
<mvc:view-resolvers>
<mvc:script-template/>
</mvc:view-resolvers>
<mvc:script-template-configurer engine-name="nashorn" render-object="Mustache" render-function="render">
<mvc:script location="mustache.js"/>
</mvc:script-template-configurer>The controller would look no different for the Java and XML configurations, as the following example shows:
Java
@Controller
public class SampleController {
@GetMapping("/sample")
public String test(Model model) {
model.addAttribute("title", "Sample title");
model.addAttribute("body", "Sample body");
return "template";
}
}
Kotlin
@Controller
class SampleController {
@GetMapping("/sample")
fun test(model: Model): String {
model["title"] = "Sample title"
model["body"] = "Sample body"
return "template"
}
}
The following example shows the Mustache template:
<html>
<head>
<title>{{title}}</title>
</head>
<body>
<p>{{body}}</p>
</body>
</html>The render function is called with the following parameters:
-
String template: The template content -
Map model: The view model -
RenderingContext renderingContext: The
RenderingContext
that gives access to the application context, the locale, the template loader, and the
URL (since 5.0)
Mustache.render() is natively compatible with this signature, so you can call it directly.
If your templating technology requires some customization, you can provide a script that
implements a custom render function. For example, Handlerbars
needs to compile templates before using them and requires a
polyfill to emulate some
browser facilities that are not available in the server-side script engine.
The following example shows how to do so:
Java
@Configuration
@EnableWebMvc
public class WebConfig implements WebMvcConfigurer {
@Override
public void configureViewResolvers(ViewResolverRegistry registry) {
registry.scriptTemplate();
}
@Bean
public ScriptTemplateConfigurer configurer() {
ScriptTemplateConfigurer configurer = new ScriptTemplateConfigurer();
configurer.setEngineName("nashorn");
configurer.setScripts("polyfill.js", "handlebars.js", "render.js");
configurer.setRenderFunction("render");
configurer.setSharedEngine(false);
return configurer;
}
}
Kotlin
@Configuration
@EnableWebMvc
class WebConfig : WebMvcConfigurer {
override fun configureViewResolvers(registry: ViewResolverRegistry) {
registry.scriptTemplate()
}
@Bean
fun configurer() = ScriptTemplateConfigurer().apply {
engineName = "nashorn"
setScripts("polyfill.js", "handlebars.js", "render.js")
renderFunction = "render"
isSharedEngine = false
}
}
Setting the sharedEngine property to false is required when using non-thread-safescript engines with templating libraries not designed for concurrency, such as Handlebars or React running on Nashorn. In that case, Java SE 8 update 60 is required, due to this bug, but it is generally recommended to use a recent Java SE patch release in any case. |
polyfill.js defines only the window object needed by Handlebars to run properly, as follows:
This basic render.js implementation compiles the template before using it. A production-ready
implementation should also store any reused cached templates or pre-compiled templates.
You can do so on the script side (and handle any customization you need — managing
template engine configuration, for example). The following example shows how to do so:
function render(template, model) {
var compiledTemplate = Handlebars.compile(template);
return compiledTemplate(model);
}Check out the Spring Framework unit tests,
Java, and
resources,
for more configuration examples.
1.11.5. JSP and JSTL
The Spring Framework has a built-in integration for using Spring MVC with JSP and JSTL.
View Resolvers
When developing with JSPs, you typically declare an InternalResourceViewResolver bean.
InternalResourceViewResolver can be used for dispatching to any Servlet resource but in
particular for JSPs. As a best practice, we strongly encourage placing your JSP files in
a directory under the 'WEB-INF' directory so there can be no direct access by clients.
<bean id="viewResolver" class="org.springframework.web.servlet.view.InternalResourceViewResolver">
<property name="viewClass" value="org.springframework.web.servlet.view.JstlView"/>
<property name="prefix" value="/WEB-INF/jsp/"/>
<property name="suffix" value=".jsp"/>
</bean>JSPs versus JSTL
When using the JSP Standard Tag Library (JSTL) you must use a special view class, the
JstlView, as JSTL needs some preparation before things such as the I18N features can
work.
Spring’s JSP Tag Library
Spring provides data binding of request parameters to command objects, as described in
earlier chapters. To facilitate the development of JSP pages in combination with those
data binding features, Spring provides a few tags that make things even easier. All
Spring tags have HTML escaping features to enable or disable escaping of characters.
The spring.tld tag library descriptor (TLD) is included in the spring-webmvc.jar.
For a comprehensive reference on individual tags, browse the
API reference
or see the tag library description.
Spring’s form tag library
As of version 2.0, Spring provides a comprehensive set of data binding-aware tags for
handling form elements when using JSP and Spring Web MVC. Each tag provides support for
the set of attributes of its corresponding HTML tag counterpart, making the tags
familiar and intuitive to use. The tag-generated HTML is HTML 4.01/XHTML 1.0 compliant.
Unlike other form/input tag libraries, Spring’s form tag library is integrated with
Spring Web MVC, giving the tags access to the command object and reference data your
controller deals with. As we show in the following examples, the form tags make
JSPs easier to develop, read, and maintain.
We go through the form tags and look at an example of how each tag is used. We have
included generated HTML snippets where certain tags require further commentary.
Configuration
The form tag library comes bundled in spring-webmvc.jar. The library descriptor is
called spring-form.tld.
To use the tags from this library, add the following directive to the top of your JSP
page:
<%@ taglib prefix="form" uri="http://www.springframework.org/tags/form" %>where form is the tag name prefix you want to use for the tags from this library.
The Form Tag
This tag renders an HTML ‘form’ element and exposes a binding path to inner tags for
binding. It puts the command object in the PageContext so that the command object can
be accessed by inner tags. All the other tags in this library are nested tags of the
form tag.
Assume that we have a domain object called User. It is a JavaBean with properties
such as firstName and lastName. We can use it as the form-backing object of our
form controller, which returns form.jsp. The following example shows what form.jsp could
look like:
<form:form>
<table>
<tr>
<td>First Name:</td>
<td><form:input path="firstName"/></td>
</tr>
<tr>
<td>Last Name:</td>
<td><form:input path="lastName"/></td>
</tr>
<tr>
<td colspan="2">
<input type="submit" value="Save Changes"/>
</td>
</tr>
</table>
</form:form>The firstName and lastName values are retrieved from the command object placed in
the PageContext by the page controller. Keep reading to see more complex examples of
how inner tags are used with the form tag.
The following listing shows the generated HTML, which looks like a standard form:
<form method="POST">
<table>
<tr>
<td>First Name:</td>
<td><input name="firstName" type="text" value="Harry"/></td>
</tr>
<tr>
<td>Last Name:</td>
<td><input name="lastName" type="text" value="Potter"/></td>
</tr>
<tr>
<td colspan="2">
<input type="submit" value="Save Changes"/>
</td>
</tr>
</table>
</form>The preceding JSP assumes that the variable name of the form-backing object is
command. If you have put the form-backing object into the model under another name
(definitely a best practice), you can bind the form to the named variable, as the
following example shows:
<form:form modelAttribute="user">
<table>
<tr>
<td>First Name:</td>
<td><form:input path="firstName"/></td>
</tr>
<tr>
<td>Last Name:</td>
<td><form:input path="lastName"/></td>
</tr>
<tr>
<td colspan="2">
<input type="submit" value="Save Changes"/>
</td>
</tr>
</table>
</form:form>The input Tag
This tag renders an HTML input element with the bound value and type='text' by default.
For an example of this tag, see The Form Tag. You can also use
HTML5-specific types, such as email, tel, date, and others.
The checkbox Tag
This tag renders an HTML input tag with the type set to checkbox.
Assume that our User has preferences such as newsletter subscription and a list of
hobbies. The following example shows the Preferences class:
Java
public class Preferences {
private boolean receiveNewsletter;
private String[] interests;
private String favouriteWord;
public boolean isReceiveNewsletter() {
return receiveNewsletter;
}
public void setReceiveNewsletter(boolean receiveNewsletter) {
this.receiveNewsletter = receiveNewsletter;
}
public String[] getInterests() {
return interests;
}
public void setInterests(String[] interests) {
this.interests = interests;
}
public String getFavouriteWord() {
return favouriteWord;
}
public void setFavouriteWord(String favouriteWord) {
this.favouriteWord = favouriteWord;
}
}
Kotlin
class Preferences(
var receiveNewsletter: Boolean,
var interests: StringArray,
var favouriteWord: String
)
The corresponding form.jsp could then resemble the following:
<form:form>
<table>
<tr>
<td>Subscribe to newsletter?:</td>
<%-- Approach 1: Property is of type java.lang.Boolean --%>
<td><form:checkbox path="preferences.receiveNewsletter"/></td>
</tr>
<tr>
<td>Interests:</td>
<%-- Approach 2: Property is of an array or of type java.util.Collection --%>
<td>
Quidditch: <form:checkbox path="preferences.interests" value="Quidditch"/>
Herbology: <form:checkbox path="preferences.interests" value="Herbology"/>
Defence Against the Dark Arts: <form:checkbox path="preferences.interests" value="Defence Against the Dark Arts"/>
</td>
</tr>
<tr>
<td>Favourite Word:</td>
<%-- Approach 3: Property is of type java.lang.Object --%>
<td>
Magic: <form:checkbox path="preferences.favouriteWord" value="Magic"/>
</td>
</tr>
</table>
</form:form>There are three approaches to the checkbox tag, which should meet all your checkbox needs.
-
Approach One: When the bound value is of type
java.lang.Boolean, the
input(checkbox)is marked ascheckedif the bound value istrue. Thevalue
attribute corresponds to the resolved value of thesetValue(Object)value property. -
Approach Two: When the bound value is of type
arrayorjava.util.Collection, the
input(checkbox)is marked ascheckedif the configuredsetValue(Object)value is
present in the boundCollection. -
Approach Three: For any other bound value type, the
input(checkbox)is marked as
checkedif the configuredsetValue(Object)is equal to the bound value.
Note that, regardless of the approach, the same HTML structure is generated. The following
HTML snippet defines some checkboxes:
<tr>
<td>Interests:</td>
<td>
Quidditch: <input name="preferences.interests" type="checkbox" value="Quidditch"/>
<input type="hidden" value="1" name="_preferences.interests"/>
Herbology: <input name="preferences.interests" type="checkbox" value="Herbology"/>
<input type="hidden" value="1" name="_preferences.interests"/>
Defence Against the Dark Arts: <input name="preferences.interests" type="checkbox" value="Defence Against the Dark Arts"/>
<input type="hidden" value="1" name="_preferences.interests"/>
</td>
</tr>You might not expect to see the additional hidden field after each checkbox.
When a checkbox in an HTML page is not checked, its value is not sent to the
server as part of the HTTP request parameters once the form is submitted, so we need a
workaround for this quirk in HTML for Spring form data binding to work. The
checkbox tag follows the existing Spring convention of including a hidden parameter
prefixed by an underscore (_) for each checkbox. By doing this, you are effectively
telling Spring that “the checkbox was visible in the form, and I want my object to
which the form data binds to reflect the state of the checkbox, no matter what.”
The checkboxes Tag
This tag renders multiple HTML input tags with the type set to checkbox.
This section build on the example from the previous checkbox tag section. Sometimes, you prefer
not to have to list all the possible hobbies in your JSP page. You would rather provide
a list at runtime of the available options and pass that in to the tag. That is the
purpose of the checkboxes tag. You can pass in an Array, a List, or a Map that contains
the available options in the items property. Typically, the bound property is a
collection so that it can hold multiple values selected by the user. The following example
shows a JSP that uses this tag:
<form:form>
<table>
<tr>
<td>Interests:</td>
<td>
<%-- Property is of an array or of type java.util.Collection --%>
<form:checkboxes path="preferences.interests" items="${interestList}"/>
</td>
</tr>
</table>
</form:form>This example assumes that the interestList is a List available as a model attribute
that contains strings of the values to be selected from. If you use a Map,
the map entry key is used as the value, and the map entry’s value is used as
the label to be displayed. You can also use a custom object where you can provide the
property names for the value by using itemValue and the label by using itemLabel.
The radiobutton Tag
This tag renders an HTML input element with the type set to radio.
A typical usage pattern involves multiple tag instances bound to the same property
but with different values, as the following example shows:
<tr>
<td>Sex:</td>
<td>
Male: <form:radiobutton path="sex" value="M"/> <br/>
Female: <form:radiobutton path="sex" value="F"/>
</td>
</tr>The radiobuttons Tag
This tag renders multiple HTML input elements with the type set to radio.
As with the checkboxes tag, you might want to
pass in the available options as a runtime variable. For this usage, you can use the
radiobuttons tag. You pass in an Array, a List, or a Map that contains the
available options in the items property. If you use a Map, the map entry key is
used as the value and the map entry’s value are used as the label to be displayed.
You can also use a custom object where you can provide the property names for the value
by using itemValue and the label by using itemLabel, as the following example shows:
<tr>
<td>Sex:</td>
<td><form:radiobuttons path="sex" items="${sexOptions}"/></td>
</tr>The password Tag
This tag renders an HTML input tag with the type set to password with the bound value.
<tr>
<td>Password:</td>
<td>
<form:password path="password"/>
</td>
</tr>Note that, by default, the password value is not shown. If you do want the
password value to be shown, you can set the value of the showPassword attribute to
true, as the following example shows:
<tr>
<td>Password:</td>
<td>
<form:password path="password" value="^76525bvHGq" showPassword="true"/>
</td>
</tr>The select Tag
This tag renders an HTML ‘select’ element. It supports data binding to the selected
option as well as the use of nested option and options tags.
Assume that a User has a list of skills. The corresponding HTML could be as follows:
<tr>
<td>Skills:</td>
<td><form:select path="skills" items="${skills}"/></td>
</tr>If the User’s skill are in Herbology, the HTML source of the ‘Skills’ row could be
as follows:
<tr>
<td>Skills:</td>
<td>
<select name="skills" multiple="true">
<option value="Potions">Potions</option>
<option value="Herbology" selected="selected">Herbology</option>
<option value="Quidditch">Quidditch</option>
</select>
</td>
</tr>The option Tag
This tag renders an HTML option element. It sets selected, based on the bound
value. The following HTML shows typical output for it:
<tr>
<td>House:</td>
<td>
<form:select path="house">
<form:option value="Gryffindor"/>
<form:option value="Hufflepuff"/>
<form:option value="Ravenclaw"/>
<form:option value="Slytherin"/>
</form:select>
</td>
</tr>If the User’s house was in Gryffindor, the HTML source of the ‘House’ row would be
as follows:
<tr>
<td>House:</td>
<td>
<select name="house">
<option value="Gryffindor" selected="selected">Gryffindor</option> (1)
<option value="Hufflepuff">Hufflepuff</option>
<option value="Ravenclaw">Ravenclaw</option>
<option value="Slytherin">Slytherin</option>
</select>
</td>
</tr>| 1 | Note the addition of a selected attribute. |
The options Tag
This tag renders a list of HTML option elements. It sets the selected attribute,
based on the bound value. The following HTML shows typical output for it:
<tr>
<td>Country:</td>
<td>
<form:select path="country">
<form:option value="-" label="--Please Select"/>
<form:options items="${countryList}" itemValue="code" itemLabel="name"/>
</form:select>
</td>
</tr>If the User lived in the UK, the HTML source of the ‘Country’ row would be as follows:
<tr>
<td>Country:</td>
<td>
<select name="country">
<option value="-">--Please Select</option>
<option value="AT">Austria</option>
<option value="UK" selected="selected">United Kingdom</option> (1)
<option value="US">United States</option>
</select>
</td>
</tr>| 1 | Note the addition of a selected attribute. |
As the preceding example shows, the combined usage of an option tag with the options tag
generates the same standard HTML but lets you explicitly specify a value in the
JSP that is for display only (where it belongs), such as the default string in the
example: «— Please Select».
The items attribute is typically populated with a collection or array of item objects.
itemValue and itemLabel refer to bean properties of those item objects, if
specified. Otherwise, the item objects themselves are turned into strings. Alternatively,
you can specify a Map of items, in which case the map keys are interpreted as option
values and the map values correspond to option labels. If itemValue or itemLabel (or both)
happen to be specified as well, the item value property applies to the map key, and
the item label property applies to the map value.
The textarea Tag
This tag renders an HTML textarea element. The following HTML shows typical output for it:
<tr>
<td>Notes:</td>
<td><form:textarea path="notes" rows="3" cols="20"/></td>
<td><form:errors path="notes"/></td>
</tr>The hidden Tag
This tag renders an HTML input tag with the type set to hidden with the bound value. To submit
an unbound hidden value, use the HTML input tag with the type set to hidden.
The following HTML shows typical output for it:
<form:hidden path="house"/>If we choose to submit the house value as a hidden one, the HTML would be as follows:
<input name="house" type="hidden" value="Gryffindor"/>The errors Tag
This tag renders field errors in an HTML span element. It provides access to the errors
created in your controller or those that were created by any validators associated with
your controller.
Assume that we want to display all error messages for the firstName and lastName
fields once we submit the form. We have a validator for instances of the User class
called UserValidator, as the following example shows:
Java
public class UserValidator implements Validator {
public boolean supports(Class candidate) {
return User.class.isAssignableFrom(candidate);
}
public void validate(Object obj, Errors errors) {
ValidationUtils.rejectIfEmptyOrWhitespace(errors, "firstName", "required", "Field is required.");
ValidationUtils.rejectIfEmptyOrWhitespace(errors, "lastName", "required", "Field is required.");
}
}
Kotlin
class UserValidator : Validator {
override fun supports(candidate: Class<*>): Boolean {
return User::class.java.isAssignableFrom(candidate)
}
override fun validate(obj: Any, errors: Errors) {
ValidationUtils.rejectIfEmptyOrWhitespace(errors, "firstName", "required", "Field is required.")
ValidationUtils.rejectIfEmptyOrWhitespace(errors, "lastName", "required", "Field is required.")
}
}
The form.jsp could be as follows:
<form:form>
<table>
<tr>
<td>First Name:</td>
<td><form:input path="firstName"/></td>
<%-- Show errors for firstName field --%>
<td><form:errors path="firstName"/></td>
</tr>
<tr>
<td>Last Name:</td>
<td><form:input path="lastName"/></td>
<%-- Show errors for lastName field --%>
<td><form:errors path="lastName"/></td>
</tr>
<tr>
<td colspan="3">
<input type="submit" value="Save Changes"/>
</td>
</tr>
</table>
</form:form>If we submit a form with empty values in the firstName and lastName fields,
the HTML would be as follows:
<form method="POST">
<table>
<tr>
<td>First Name:</td>
<td><input name="firstName" type="text" value=""/></td>
<%-- Associated errors to firstName field displayed --%>
<td><span name="firstName.errors">Field is required.</span></td>
</tr>
<tr>
<td>Last Name:</td>
<td><input name="lastName" type="text" value=""/></td>
<%-- Associated errors to lastName field displayed --%>
<td><span name="lastName.errors">Field is required.</span></td>
</tr>
<tr>
<td colspan="3">
<input type="submit" value="Save Changes"/>
</td>
</tr>
</table>
</form>What if we want to display the entire list of errors for a given page? The next example
shows that the errors tag also supports some basic wildcarding functionality.
-
path="*": Displays all errors. -
path="lastName": Displays all errors associated with thelastNamefield. -
If
pathis omitted, only object errors are displayed.
The following example displays a list of errors at the top of the page, followed by
field-specific errors next to the fields:
<form:form>
<form:errors path="*" cssClass="errorBox"/>
<table>
<tr>
<td>First Name:</td>
<td><form:input path="firstName"/></td>
<td><form:errors path="firstName"/></td>
</tr>
<tr>
<td>Last Name:</td>
<td><form:input path="lastName"/></td>
<td><form:errors path="lastName"/></td>
</tr>
<tr>
<td colspan="3">
<input type="submit" value="Save Changes"/>
</td>
</tr>
</table>
</form:form>The HTML would be as follows:
<form method="POST">
<span name="*.errors" class="errorBox">Field is required.<br/>Field is required.</span>
<table>
<tr>
<td>First Name:</td>
<td><input name="firstName" type="text" value=""/></td>
<td><span name="firstName.errors">Field is required.</span></td>
</tr>
<tr>
<td>Last Name:</td>
<td><input name="lastName" type="text" value=""/></td>
<td><span name="lastName.errors">Field is required.</span></td>
</tr>
<tr>
<td colspan="3">
<input type="submit" value="Save Changes"/>
</td>
</tr>
</table>
</form>The spring-form.tld tag library descriptor (TLD) is included in the spring-webmvc.jar.
For a comprehensive reference on individual tags, browse the
API reference
or see the tag library description.
HTTP Method Conversion
A key principle of REST is the use of the “Uniform Interface”. This means that all
resources (URLs) can be manipulated by using the same four HTTP methods: GET, PUT, POST,
and DELETE. For each method, the HTTP specification defines the exact semantics. For
instance, a GET should always be a safe operation, meaning that it has no side effects,
and a PUT or DELETE should be idempotent, meaning that you can repeat these operations
over and over again, but the end result should be the same. While HTTP defines these
four methods, HTML only supports two: GET and POST. Fortunately, there are two possible
workarounds: you can either use JavaScript to do your PUT or DELETE, or you can do a POST
with the “real” method as an additional parameter (modeled as a hidden input field in an
HTML form). Spring’s HiddenHttpMethodFilter uses this latter trick. This
filter is a plain Servlet filter and, therefore, it can be used in combination with any
web framework (not just Spring MVC). Add this filter to your web.xml, and a POST
with a hidden method parameter is converted into the corresponding HTTP method
request.
To support HTTP method conversion, the Spring MVC form tag was updated to support setting
the HTTP method. For example, the following snippet comes from the Pet Clinic sample:
<form:form method="delete">
<p class="submit"><input type="submit" value="Delete Pet"/></p>
</form:form>The preceding example performs an HTTP POST, with the “real” DELETE method hidden behind
a request parameter. It is picked up by the HiddenHttpMethodFilter, which is defined in
web.xml, as the following example shows:
<filter>
<filter-name>httpMethodFilter</filter-name>
<filter-class>org.springframework.web.filter.HiddenHttpMethodFilter</filter-class>
</filter>
<filter-mapping>
<filter-name>httpMethodFilter</filter-name>
<servlet-name>petclinic</servlet-name>
</filter-mapping>The following example shows the corresponding @Controller method:
Java
@RequestMapping(method = RequestMethod.DELETE)
public String deletePet(@PathVariable int ownerId, @PathVariable int petId) {
this.clinic.deletePet(petId);
return "redirect:/owners/" + ownerId;
}
Kotlin
@RequestMapping(method = [RequestMethod.DELETE])
fun deletePet(@PathVariable ownerId: Int, @PathVariable petId: Int): String {
clinic.deletePet(petId)
return "redirect:/owners/$ownerId"
}
HTML5 Tags
The Spring form tag library allows entering dynamic attributes, which means you can
enter any HTML5 specific attributes.
The form input tag supports entering a type attribute other than text. This is
intended to allow rendering new HTML5 specific input types, such as email, date,
range, and others. Note that entering type='text' is not required, since text
is the default type.
1.11.6. RSS and Atom
Both AbstractAtomFeedView and AbstractRssFeedView inherit from the
AbstractFeedView base class and are used to provide Atom and RSS Feed views, respectively. They
are based on ROME project and are located in the
package org.springframework.web.servlet.view.feed.
AbstractAtomFeedView requires you to implement the buildFeedEntries() method and
optionally override the buildFeedMetadata() method (the default implementation is
empty). The following example shows how to do so:
Java
public class SampleContentAtomView extends AbstractAtomFeedView {
@Override
protected void buildFeedMetadata(Map<String, Object> model,
Feed feed, HttpServletRequest request) {
// implementation omitted
}
@Override
protected List<Entry> buildFeedEntries(Map<String, Object> model,
HttpServletRequest request, HttpServletResponse response) throws Exception {
// implementation omitted
}
}
Kotlin
class SampleContentAtomView : AbstractAtomFeedView() {
override fun buildFeedMetadata(model: Map<String, Any>,
feed: Feed, request: HttpServletRequest) {
// implementation omitted
}
override fun buildFeedEntries(model: Map<String, Any>,
request: HttpServletRequest, response: HttpServletResponse): List<Entry> {
// implementation omitted
}
}
Similar requirements apply for implementing AbstractRssFeedView, as the following example shows:
Java
public class SampleContentRssView extends AbstractRssFeedView {
@Override
protected void buildFeedMetadata(Map<String, Object> model,
Channel feed, HttpServletRequest request) {
// implementation omitted
}
@Override
protected List<Item> buildFeedItems(Map<String, Object> model,
HttpServletRequest request, HttpServletResponse response) throws Exception {
// implementation omitted
}
}
Kotlin
class SampleContentRssView : AbstractRssFeedView() {
override fun buildFeedMetadata(model: Map<String, Any>,
feed: Channel, request: HttpServletRequest) {
// implementation omitted
}
override fun buildFeedItems(model: Map<String, Any>,
request: HttpServletRequest, response: HttpServletResponse): List<Item> {
// implementation omitted
}
}
The buildFeedItems() and buildFeedEntries() methods pass in the HTTP request, in case
you need to access the Locale. The HTTP response is passed in only for the setting of
cookies or other HTTP headers. The feed is automatically written to the response
object after the method returns.
For an example of creating an Atom view, see Alef Arendsen’s Spring Team Blog
entry.
1.11.7. PDF and Excel
Spring offers ways to return output other than HTML, including PDF and Excel spreadsheets.
This section describes how to use those features.
Introduction to Document Views
An HTML page is not always the best way for the user to view the model output,
and Spring makes it simple to generate a PDF document or an Excel spreadsheet
dynamically from the model data. The document is the view and is streamed from the
server with the correct content type, to (hopefully) enable the client PC to run their
spreadsheet or PDF viewer application in response.
In order to use Excel views, you need to add the Apache POI library to your classpath.
For PDF generation, you need to add (preferably) the OpenPDF library.
|
You should use the latest versions of the underlying document-generation libraries, if possible. In particular, we strongly recommend OpenPDF (for example, OpenPDF 1.2.12) instead of the outdated original iText 2.1.7, since OpenPDF is actively maintained and fixes an important vulnerability for untrusted PDF content. |
PDF Views
A simple PDF view for a word list could extend
org.springframework.web.servlet.view.document.AbstractPdfView and implement the
buildPdfDocument() method, as the following example shows:
Java
public class PdfWordList extends AbstractPdfView {
protected void buildPdfDocument(Map<String, Object> model, Document doc, PdfWriter writer,
HttpServletRequest request, HttpServletResponse response) throws Exception {
List<String> words = (List<String>) model.get("wordList");
for (String word : words) {
doc.add(new Paragraph(word));
}
}
}
Kotlin
class PdfWordList : AbstractPdfView() {
override fun buildPdfDocument(model: Map<String, Any>, doc: Document, writer: PdfWriter,
request: HttpServletRequest, response: HttpServletResponse) {
val words = model["wordList"] as List<String>
for (word in words) {
doc.add(Paragraph(word))
}
}
}
A controller can return such a view either from an external view definition
(referencing it by name) or as a View instance from the handler method.
Excel Views
Since Spring Framework 4.2,
org.springframework.web.servlet.view.document.AbstractXlsView is provided as a base
class for Excel views. It is based on Apache POI, with specialized subclasses (AbstractXlsxView
and AbstractXlsxStreamingView) that supersede the outdated AbstractExcelView class.
The programming model is similar to AbstractPdfView, with buildExcelDocument()
as the central template method and controllers being able to return such a view from
an external definition (by name) or as a View instance from the handler method.
1.11.8. Jackson
Spring offers support for the Jackson JSON library.
Jackson-based JSON MVC Views
The MappingJackson2JsonView uses the Jackson library’s ObjectMapper to render the response
content as JSON. By default, the entire contents of the model map (with the exception of
framework-specific classes) are encoded as JSON. For cases where the contents of the
map need to be filtered, you can specify a specific set of model attributes to encode
by using the modelKeys property. You can also use the extractValueFromSingleKeyModel
property to have the value in single-key models extracted and serialized directly rather
than as a map of model attributes.
You can customize JSON mapping as needed by using Jackson’s provided
annotations. When you need further control, you can inject a custom ObjectMapper
through the ObjectMapper property, for cases where you need to provide custom JSON
serializers and deserializers for specific types.
Jackson-based XML Views
MappingJackson2XmlView uses the
Jackson XML extension’s XmlMapper
to render the response content as XML. If the model contains multiple entries, you should
explicitly set the object to be serialized by using the modelKey bean property. If the
model contains a single entry, it is serialized automatically.
You can customized XML mapping as needed by using JAXB or Jackson’s provided
annotations. When you need further control, you can inject a custom XmlMapper
through the ObjectMapper property, for cases where custom XML
you need to provide serializers and deserializers for specific types.
1.11.9. XML Marshalling
The MarshallingView uses an XML Marshaller (defined in the org.springframework.oxm
package) to render the response content as XML. You can explicitly set the object to be
marshalled by using a MarshallingView instance’s modelKey bean property. Alternatively,
the view iterates over all model properties and marshals the first type that is supported
by the Marshaller. For more information on the functionality in the
org.springframework.oxm package, see Marshalling XML using O/X Mappers.
1.11.10. XSLT Views
XSLT is a transformation language for XML and is popular as a view technology within web
applications. XSLT can be a good choice as a view technology if your application
naturally deals with XML or if your model can easily be converted to XML. The following
section shows how to produce an XML document as model data and have it transformed with
XSLT in a Spring Web MVC application.
This example is a trivial Spring application that creates a list of words in the
Controller and adds them to the model map. The map is returned, along with the view
name of our XSLT view. See Annotated Controllers for details of Spring Web MVC’s
Controller interface. The XSLT controller turns the list of words into a simple XML
document ready for transformation.
Beans
Configuration is standard for a simple Spring web application: The MVC configuration
has to define an XsltViewResolver bean and regular MVC annotation configuration.
The following example shows how to do so:
Java
@EnableWebMvc
@ComponentScan
@Configuration
public class WebConfig implements WebMvcConfigurer {
@Bean
public XsltViewResolver xsltViewResolver() {
XsltViewResolver viewResolver = new XsltViewResolver();
viewResolver.setPrefix("/WEB-INF/xsl/");
viewResolver.setSuffix(".xslt");
return viewResolver;
}
}
Kotlin
@EnableWebMvc
@ComponentScan
@Configuration
class WebConfig : WebMvcConfigurer {
@Bean
fun xsltViewResolver() = XsltViewResolver().apply {
setPrefix("/WEB-INF/xsl/")
setSuffix(".xslt")
}
}
Controller
We also need a Controller that encapsulates our word-generation logic.
The controller logic is encapsulated in a @Controller class, with the
handler method being defined as follows:
Java
@Controller
public class XsltController {
@RequestMapping("/")
public String home(Model model) throws Exception {
Document document = DocumentBuilderFactory.newInstance().newDocumentBuilder().newDocument();
Element root = document.createElement("wordList");
List<String> words = Arrays.asList("Hello", "Spring", "Framework");
for (String word : words) {
Element wordNode = document.createElement("word");
Text textNode = document.createTextNode(word);
wordNode.appendChild(textNode);
root.appendChild(wordNode);
}
model.addAttribute("wordList", root);
return "home";
}
}
Kotlin
import org.springframework.ui.set
@Controller
class XsltController {
@RequestMapping("/")
fun home(model: Model): String {
val document = DocumentBuilderFactory.newInstance().newDocumentBuilder().newDocument()
val root = document.createElement("wordList")
val words = listOf("Hello", "Spring", "Framework")
for (word in words) {
val wordNode = document.createElement("word")
val textNode = document.createTextNode(word)
wordNode.appendChild(textNode)
root.appendChild(wordNode)
}
model["wordList"] = root
return "home"
}
}
So far, we have only created a DOM document and added it to the Model map. Note that you
can also load an XML file as a Resource and use it instead of a custom DOM document.
There are software packages available that automatically ‘domify’
an object graph, but, within Spring, you have complete flexibility to create the DOM
from your model in any way you choose. This prevents the transformation of XML playing
too great a part in the structure of your model data, which is a danger when using tools
to manage the DOMification process.
Transformation
Finally, the XsltViewResolver resolves the “home” XSLT template file and merges the
DOM document into it to generate our view. As shown in the XsltViewResolver
configuration, XSLT templates live in the war file in the WEB-INF/xsl directory
and end with an xslt file extension.
The following example shows an XSLT transform:
<?xml version="1.0" encoding="utf-8"?>
<xsl:stylesheet version="1.0" xmlns:xsl="http://www.w3.org/1999/XSL/Transform">
<xsl:output method="html" omit-xml-declaration="yes"/>
<xsl:template match="/">
<html>
<head><title>Hello!</title></head>
<body>
<h1>My First Words</h1>
<ul>
<xsl:apply-templates/>
</ul>
</body>
</html>
</xsl:template>
<xsl:template match="word">
<li><xsl:value-of select="."/></li>
</xsl:template>
</xsl:stylesheet>The preceding transform is rendered as the following HTML:
<html>
<head>
<META http-equiv="Content-Type" content="text/html; charset=UTF-8">
<title>Hello!</title>
</head>
<body>
<h1>My First Words</h1>
<ul>
<li>Hello</li>
<li>Spring</li>
<li>Framework</li>
</ul>
</body>
</html>1.12. MVC Config
The MVC Java configuration and the MVC XML namespace provide default configuration
suitable for most applications and a configuration API to customize it.
For more advanced customizations, which are not available in the configuration API,
see Advanced Java Config and Advanced XML Config.
You do not need to understand the underlying beans created by the MVC Java configuration
and the MVC namespace. If you want to learn more, see Special Bean Types
and Web MVC Config.
1.12.1. Enable MVC Configuration
In Java configuration, you can use the @EnableWebMvc annotation to enable MVC
configuration, as the following example shows:
Java
@Configuration
@EnableWebMvc
public class WebConfig {
}
Kotlin
@Configuration
@EnableWebMvc
class WebConfig
In XML configuration, you can use the <mvc:annotation-driven> element to enable MVC
configuration, as the following example shows:
<?xml version="1.0" encoding="UTF-8"?>
<beans xmlns="http://www.springframework.org/schema/beans"
xmlns:mvc="http://www.springframework.org/schema/mvc"
xmlns:xsi="http://www.w3.org/2001/XMLSchema-instance"
xsi:schemaLocation="
http://www.springframework.org/schema/beans
https://www.springframework.org/schema/beans/spring-beans.xsd
http://www.springframework.org/schema/mvc
https://www.springframework.org/schema/mvc/spring-mvc.xsd">
<mvc:annotation-driven/>
</beans>The preceding example registers a number of Spring MVC
infrastructure beans and adapts to dependencies
available on the classpath (for example, payload converters for JSON, XML, and others).
1.12.2. MVC Config API
In Java configuration, you can implement the WebMvcConfigurer interface, as the
following example shows:
Java
@Configuration
@EnableWebMvc
public class WebConfig implements WebMvcConfigurer {
// Implement configuration methods...
}
Kotlin
@Configuration
@EnableWebMvc
class WebConfig : WebMvcConfigurer {
// Implement configuration methods...
}
In XML, you can check attributes and sub-elements of <mvc:annotation-driven/>. You can
view the Spring MVC XML schema or use
the code completion feature of your IDE to discover what attributes and
sub-elements are available.
1.12.3. Type Conversion
By default, formatters for various number and date types are installed, along with support
for customization via @NumberFormat and @DateTimeFormat on fields.
To register custom formatters and converters in Java config, use the following:
Java
@Configuration
@EnableWebMvc
public class WebConfig implements WebMvcConfigurer {
@Override
public void addFormatters(FormatterRegistry registry) {
// ...
}
}
Kotlin
@Configuration
@EnableWebMvc
class WebConfig : WebMvcConfigurer {
override fun addFormatters(registry: FormatterRegistry) {
// ...
}
}
To do the same in XML config, use the following:
<?xml version="1.0" encoding="UTF-8"?>
<beans xmlns="http://www.springframework.org/schema/beans"
xmlns:mvc="http://www.springframework.org/schema/mvc"
xmlns:xsi="http://www.w3.org/2001/XMLSchema-instance"
xsi:schemaLocation="
http://www.springframework.org/schema/beans
https://www.springframework.org/schema/beans/spring-beans.xsd
http://www.springframework.org/schema/mvc
https://www.springframework.org/schema/mvc/spring-mvc.xsd">
<mvc:annotation-driven conversion-service="conversionService"/>
<bean id="conversionService"
class="org.springframework.format.support.FormattingConversionServiceFactoryBean">
<property name="converters">
<set>
<bean class="org.example.MyConverter"/>
</set>
</property>
<property name="formatters">
<set>
<bean class="org.example.MyFormatter"/>
<bean class="org.example.MyAnnotationFormatterFactory"/>
</set>
</property>
<property name="formatterRegistrars">
<set>
<bean class="org.example.MyFormatterRegistrar"/>
</set>
</property>
</bean>
</beans>By default Spring MVC considers the request Locale when parsing and formatting date
values. This works for forms where dates are represented as Strings with «input» form
fields. For «date» and «time» form fields, however, browsers use a fixed format defined
in the HTML spec. For such cases date and time formatting can be customized as follows:
Java
@Configuration
@EnableWebMvc
public class WebConfig implements WebMvcConfigurer {
@Override
public void addFormatters(FormatterRegistry registry) {
DateTimeFormatterRegistrar registrar = new DateTimeFormatterRegistrar();
registrar.setUseIsoFormat(true);
registrar.registerFormatters(registry);
}
}
Kotlin
@Configuration
@EnableWebMvc
class WebConfig : WebMvcConfigurer {
override fun addFormatters(registry: FormatterRegistry) {
val registrar = DateTimeFormatterRegistrar()
registrar.setUseIsoFormat(true)
registrar.registerFormatters(registry)
}
}
See the FormatterRegistrar SPIand the FormattingConversionServiceFactoryBean for more information on when to useFormatterRegistrar implementations. |
1.12.4. Validation
By default, if Bean Validation is present
on the classpath (for example, Hibernate Validator), the LocalValidatorFactoryBean is
registered as a global Validator for use with @Valid and
Validated on controller method arguments.
In Java configuration, you can customize the global Validator instance, as the
following example shows:
Java
@Configuration
@EnableWebMvc
public class WebConfig implements WebMvcConfigurer {
@Override
public Validator getValidator() {
// ...
}
}
Kotlin
@Configuration
@EnableWebMvc
class WebConfig : WebMvcConfigurer {
override fun getValidator(): Validator {
// ...
}
}
The following example shows how to achieve the same configuration in XML:
<?xml version="1.0" encoding="UTF-8"?>
<beans xmlns="http://www.springframework.org/schema/beans"
xmlns:mvc="http://www.springframework.org/schema/mvc"
xmlns:xsi="http://www.w3.org/2001/XMLSchema-instance"
xsi:schemaLocation="
http://www.springframework.org/schema/beans
https://www.springframework.org/schema/beans/spring-beans.xsd
http://www.springframework.org/schema/mvc
https://www.springframework.org/schema/mvc/spring-mvc.xsd">
<mvc:annotation-driven validator="globalValidator"/>
</beans>Note that you can also register Validator implementations locally, as the following
example shows:
Java
@Controller
public class MyController {
@InitBinder
protected void initBinder(WebDataBinder binder) {
binder.addValidators(new FooValidator());
}
}
Kotlin
@Controller
class MyController {
@InitBinder
protected fun initBinder(binder: WebDataBinder) {
binder.addValidators(FooValidator())
}
}
If you need to have a LocalValidatorFactoryBean injected somewhere, create a bean andmark it with @Primary in order to avoid conflict with the one declared in the MVC configuration.
|
1.12.5. Interceptors
In Java configuration, you can register interceptors to apply to incoming requests, as
the following example shows:
Java
@Configuration
@EnableWebMvc
public class WebConfig implements WebMvcConfigurer {
@Override
public void addInterceptors(InterceptorRegistry registry) {
registry.addInterceptor(new LocaleChangeInterceptor());
registry.addInterceptor(new ThemeChangeInterceptor()).addPathPatterns("/**").excludePathPatterns("/admin/**");
}
}
Kotlin
@Configuration
@EnableWebMvc
class WebConfig : WebMvcConfigurer {
override fun addInterceptors(registry: InterceptorRegistry) {
registry.addInterceptor(LocaleChangeInterceptor())
registry.addInterceptor(ThemeChangeInterceptor()).addPathPatterns("/**").excludePathPatterns("/admin/**")
}
}
The following example shows how to achieve the same configuration in XML:
<mvc:interceptors>
<bean class="org.springframework.web.servlet.i18n.LocaleChangeInterceptor"/>
<mvc:interceptor>
<mvc:mapping path="/**"/>
<mvc:exclude-mapping path="/admin/**"/>
<bean class="org.springframework.web.servlet.theme.ThemeChangeInterceptor"/>
</mvc:interceptor>
</mvc:interceptors>|
Mapped interceptors are not ideally suited as a security layer due to the potential for a mismatch with annotated controller path matching, which can also match trailing slashes and path extensions transparently, along with other path matching options. Many of these options have been deprecated but the potential for a mismatch remains. Generally, we recommend using Spring Security which includes a dedicated MvcRequestMatcher to align with Spring MVC path matching and also has a security firewall that blocks many unwanted characters in URL paths. |
1.12.6. Content Types
You can configure how Spring MVC determines the requested media types from the request
(for example, Accept header, URL path extension, query parameter, and others).
By default, only the Accept header is checked.
If you must use URL-based content type resolution, consider using the query parameter
strategy over path extensions. See
Suffix Match and Suffix Match and RFD for
more details.
In Java configuration, you can customize requested content type resolution, as the
following example shows:
Java
@Configuration
@EnableWebMvc
public class WebConfig implements WebMvcConfigurer {
@Override
public void configureContentNegotiation(ContentNegotiationConfigurer configurer) {
configurer.mediaType("json", MediaType.APPLICATION_JSON);
configurer.mediaType("xml", MediaType.APPLICATION_XML);
}
}
Kotlin
@Configuration
@EnableWebMvc
class WebConfig : WebMvcConfigurer {
override fun configureContentNegotiation(configurer: ContentNegotiationConfigurer) {
configurer.mediaType("json", MediaType.APPLICATION_JSON)
configurer.mediaType("xml", MediaType.APPLICATION_XML)
}
}
The following example shows how to achieve the same configuration in XML:
<mvc:annotation-driven content-negotiation-manager="contentNegotiationManager"/>
<bean id="contentNegotiationManager" class="org.springframework.web.accept.ContentNegotiationManagerFactoryBean">
<property name="mediaTypes">
<value>
json=application/json
xml=application/xml
</value>
</property>
</bean>1.12.7. Message Converters
You can customize HttpMessageConverter in Java configuration by overriding
configureMessageConverters()
(to replace the default converters created by Spring MVC) or by overriding
extendMessageConverters()
(to customize the default converters or add additional converters to the default ones).
The following example adds XML and Jackson JSON converters with a customized
ObjectMapper instead of the default ones:
Java
@Configuration
@EnableWebMvc
public class WebConfiguration implements WebMvcConfigurer {
@Override
public void configureMessageConverters(List<HttpMessageConverter<?>> converters) {
Jackson2ObjectMapperBuilder builder = new Jackson2ObjectMapperBuilder()
.indentOutput(true)
.dateFormat(new SimpleDateFormat("yyyy-MM-dd"))
.modulesToInstall(new ParameterNamesModule());
converters.add(new MappingJackson2HttpMessageConverter(builder.build()));
converters.add(new MappingJackson2XmlHttpMessageConverter(builder.createXmlMapper(true).build()));
}
}
Kotlin
@Configuration
@EnableWebMvc
class WebConfiguration : WebMvcConfigurer {
override fun configureMessageConverters(converters: MutableList<HttpMessageConverter<*>>) {
val builder = Jackson2ObjectMapperBuilder()
.indentOutput(true)
.dateFormat(SimpleDateFormat("yyyy-MM-dd"))
.modulesToInstall(ParameterNamesModule())
converters.add(MappingJackson2HttpMessageConverter(builder.build()))
converters.add(MappingJackson2XmlHttpMessageConverter(builder.createXmlMapper(true).build()))
In the preceding example,
Jackson2ObjectMapperBuilder
is used to create a common configuration for both MappingJackson2HttpMessageConverter and
MappingJackson2XmlHttpMessageConverter with indentation enabled, a customized date format,
and the registration of
jackson-module-parameter-names,
Which adds support for accessing parameter names (a feature added in Java 8).
This builder customizes Jackson’s default properties as follows:
-
DeserializationFeature.FAIL_ON_UNKNOWN_PROPERTIESis disabled. -
MapperFeature.DEFAULT_VIEW_INCLUSIONis disabled.
It also automatically registers the following well-known modules if they are detected on the classpath:
-
jackson-datatype-joda: Support for Joda-Time types.
-
jackson-datatype-jsr310: Support for Java 8 Date and Time API types.
-
jackson-datatype-jdk8: Support for other Java 8 types, such as
Optional. -
jackson-module-kotlin: Support for Kotlin classes and data classes.
Other interesting Jackson modules are available:
-
jackson-datatype-money: Support for
javax.moneytypes (unofficial module). -
jackson-datatype-hibernate: Support for Hibernate-specific types and properties (including lazy-loading aspects).
The following example shows how to achieve the same configuration in XML:
<mvc:annotation-driven>
<mvc:message-converters>
<bean class="org.springframework.http.converter.json.MappingJackson2HttpMessageConverter">
<property name="objectMapper" ref="objectMapper"/>
</bean>
<bean class="org.springframework.http.converter.xml.MappingJackson2XmlHttpMessageConverter">
<property name="objectMapper" ref="xmlMapper"/>
</bean>
</mvc:message-converters>
</mvc:annotation-driven>
<bean id="objectMapper" class="org.springframework.http.converter.json.Jackson2ObjectMapperFactoryBean"
p:indentOutput="true"
p:simpleDateFormat="yyyy-MM-dd"
p:modulesToInstall="com.fasterxml.jackson.module.paramnames.ParameterNamesModule"/>
<bean id="xmlMapper" parent="objectMapper" p:createXmlMapper="true"/>1.12.8. View Controllers
This is a shortcut for defining a ParameterizableViewController that immediately
forwards to a view when invoked. You can use it in static cases when there is no Java controller
logic to run before the view generates the response.
The following example of Java configuration forwards a request for / to a view called home:
Java
@Configuration
@EnableWebMvc
public class WebConfig implements WebMvcConfigurer {
@Override
public void addViewControllers(ViewControllerRegistry registry) {
registry.addViewController("/").setViewName("home");
}
}
Kotlin
@Configuration
@EnableWebMvc
class WebConfig : WebMvcConfigurer {
override fun addViewControllers(registry: ViewControllerRegistry) {
registry.addViewController("/").setViewName("home")
}
}
The following example achieves the same thing as the preceding example, but with XML, by
using the <mvc:view-controller> element:
<mvc:view-controller path="/" view-name="home"/>If an @RequestMapping method is mapped to a URL for any HTTP method then a view
controller cannot be used to handle the same URL. This is because a match by URL to an
annotated controller is considered a strong enough indication of endpoint ownership so
that a 405 (METHOD_NOT_ALLOWED), a 415 (UNSUPPORTED_MEDIA_TYPE), or similar response can
be sent to the client to help with debugging. For this reason it is recommended to avoid
splitting URL handling across an annotated controller and a view controller.
1.12.9. View Resolvers
The MVC configuration simplifies the registration of view resolvers.
The following Java configuration example configures content negotiation view
resolution by using JSP and Jackson as a default View for JSON rendering:
Java
@Configuration
@EnableWebMvc
public class WebConfig implements WebMvcConfigurer {
@Override
public void configureViewResolvers(ViewResolverRegistry registry) {
registry.enableContentNegotiation(new MappingJackson2JsonView());
registry.jsp();
}
}
Kotlin
@Configuration
@EnableWebMvc
class WebConfig : WebMvcConfigurer {
override fun configureViewResolvers(registry: ViewResolverRegistry) {
registry.enableContentNegotiation(MappingJackson2JsonView())
registry.jsp()
}
}
The following example shows how to achieve the same configuration in XML:
<mvc:view-resolvers>
<mvc:content-negotiation>
<mvc:default-views>
<bean class="org.springframework.web.servlet.view.json.MappingJackson2JsonView"/>
</mvc:default-views>
</mvc:content-negotiation>
<mvc:jsp/>
</mvc:view-resolvers>Note, however, that FreeMarker, Groovy Markup, and script templates also require
configuration of the underlying view technology.
The MVC namespace provides dedicated elements. The following example works with FreeMarker:
<mvc:view-resolvers>
<mvc:content-negotiation>
<mvc:default-views>
<bean class="org.springframework.web.servlet.view.json.MappingJackson2JsonView"/>
</mvc:default-views>
</mvc:content-negotiation>
<mvc:freemarker cache="false"/>
</mvc:view-resolvers>
<mvc:freemarker-configurer>
<mvc:template-loader-path location="/freemarker"/>
</mvc:freemarker-configurer>In Java configuration, you can add the respective Configurer bean,
as the following example shows:
Java
@Configuration
@EnableWebMvc
public class WebConfig implements WebMvcConfigurer {
@Override
public void configureViewResolvers(ViewResolverRegistry registry) {
registry.enableContentNegotiation(new MappingJackson2JsonView());
registry.freeMarker().cache(false);
}
@Bean
public FreeMarkerConfigurer freeMarkerConfigurer() {
FreeMarkerConfigurer configurer = new FreeMarkerConfigurer();
configurer.setTemplateLoaderPath("/freemarker");
return configurer;
}
}
Kotlin
@Configuration
@EnableWebMvc
class WebConfig : WebMvcConfigurer {
override fun configureViewResolvers(registry: ViewResolverRegistry) {
registry.enableContentNegotiation(MappingJackson2JsonView())
registry.freeMarker().cache(false)
}
@Bean
fun freeMarkerConfigurer() = FreeMarkerConfigurer().apply {
setTemplateLoaderPath("/freemarker")
}
}
1.12.10. Static Resources
This option provides a convenient way to serve static resources from a list of
Resource-based locations.
In the next example, given a request that starts with /resources, the relative path is
used to find and serve static resources relative to /public under the web application
root or on the classpath under /static. The resources are served with a one-year future
expiration to ensure maximum use of the browser cache and a reduction in HTTP requests
made by the browser. The Last-Modified information is deduced from Resource#lastModified
so that HTTP conditional requests are supported with "Last-Modified" headers.
The following listing shows how to do so with Java configuration:
Java
@Configuration
@EnableWebMvc
public class WebConfig implements WebMvcConfigurer {
@Override
public void addResourceHandlers(ResourceHandlerRegistry registry) {
registry.addResourceHandler("/resources/**")
.addResourceLocations("/public", "classpath:/static/")
.setCacheControl(CacheControl.maxAge(Duration.ofDays(365)));
}
}
Kotlin
@Configuration
@EnableWebMvc
class WebConfig : WebMvcConfigurer {
override fun addResourceHandlers(registry: ResourceHandlerRegistry) {
registry.addResourceHandler("/resources/**")
.addResourceLocations("/public", "classpath:/static/")
.setCacheControl(CacheControl.maxAge(Duration.ofDays(365)))
}
}
The following example shows how to achieve the same configuration in XML:
<mvc:resources mapping="/resources/**"
location="/public, classpath:/static/"
cache-period="31556926" />See also
HTTP caching support for static resources.
The resource handler also supports a chain of
ResourceResolver implementations and
ResourceTransformer implementations,
which you can use to create a toolchain for working with optimized resources.
You can use the VersionResourceResolver for versioned resource URLs based on an MD5 hash
computed from the content, a fixed application version, or other. A
ContentVersionStrategy (MD5 hash) is a good choice — with some notable exceptions, such as
JavaScript resources used with a module loader.
The following example shows how to use VersionResourceResolver in Java configuration:
Java
@Configuration
@EnableWebMvc
public class WebConfig implements WebMvcConfigurer {
@Override
public void addResourceHandlers(ResourceHandlerRegistry registry) {
registry.addResourceHandler("/resources/**")
.addResourceLocations("/public/")
.resourceChain(true)
.addResolver(new VersionResourceResolver().addContentVersionStrategy("/**"));
}
}
Kotlin
@Configuration
@EnableWebMvc
class WebConfig : WebMvcConfigurer {
override fun addResourceHandlers(registry: ResourceHandlerRegistry) {
registry.addResourceHandler("/resources/**")
.addResourceLocations("/public/")
.resourceChain(true)
.addResolver(VersionResourceResolver().addContentVersionStrategy("/**"))
}
}
The following example shows how to achieve the same configuration in XML:
<mvc:resources mapping="/resources/**" location="/public/">
<mvc:resource-chain resource-cache="true">
<mvc:resolvers>
<mvc:version-resolver>
<mvc:content-version-strategy patterns="/**"/>
</mvc:version-resolver>
</mvc:resolvers>
</mvc:resource-chain>
</mvc:resources>You can then use ResourceUrlProvider to rewrite URLs and apply the full chain of resolvers and
transformers — for example, to insert versions. The MVC configuration provides a ResourceUrlProvider
bean so that it can be injected into others. You can also make the rewrite transparent with the
ResourceUrlEncodingFilter for Thymeleaf, JSPs, FreeMarker, and others with URL tags that
rely on HttpServletResponse#encodeURL.
Note that, when using both EncodedResourceResolver (for example, for serving gzipped or
brotli-encoded resources) and VersionResourceResolver, you must register them in this order.
That ensures content-based versions are always computed reliably, based on the unencoded file.
For WebJars, versioned URLs like
/webjars/jquery/1.2.0/jquery.min.js are the recommended and most efficient way to use them.
The related resource location is configured out of the box with Spring Boot (or can be configured
manually via ResourceHandlerRegistry) and does not require to add the
org.webjars:webjars-locator-core dependency.
Version-less URLs like /webjars/jquery/jquery.min.js are supported through the
WebJarsResourceResolver which is automatically registered when the
org.webjars:webjars-locator-core library is present on the classpath, at the cost of a
classpath scanning that could slow down application startup. The resolver can re-write URLs to
include the version of the jar and can also match against incoming URLs without versions — for example, from /webjars/jquery/jquery.min.js to /webjars/jquery/1.2.0/jquery.min.js.
The Java configuration based on ResourceHandlerRegistry provides further optionsfor fine-grained control, e.g. last-modified behavior and optimized resource resolution. |
1.12.11. Default Servlet
Spring MVC allows for mapping the DispatcherServlet to / (thus overriding the mapping
of the container’s default Servlet), while still allowing static resource requests to be
handled by the container’s default Servlet. It configures a
DefaultServletHttpRequestHandler with a URL mapping of /** and the lowest priority
relative to other URL mappings.
This handler forwards all requests to the default Servlet. Therefore, it must
remain last in the order of all other URL HandlerMappings. That is the
case if you use <mvc:annotation-driven>. Alternatively, if you set up your
own customized HandlerMapping instance, be sure to set its order property to a value
lower than that of the DefaultServletHttpRequestHandler, which is Integer.MAX_VALUE.
The following example shows how to enable the feature by using the default setup:
Java
@Configuration
@EnableWebMvc
public class WebConfig implements WebMvcConfigurer {
@Override
public void configureDefaultServletHandling(DefaultServletHandlerConfigurer configurer) {
configurer.enable();
}
}
Kotlin
@Configuration
@EnableWebMvc
class WebConfig : WebMvcConfigurer {
override fun configureDefaultServletHandling(configurer: DefaultServletHandlerConfigurer) {
configurer.enable()
}
}
The following example shows how to achieve the same configuration in XML:
<mvc:default-servlet-handler/>The caveat to overriding the / Servlet mapping is that the RequestDispatcher for the
default Servlet must be retrieved by name rather than by path. The
DefaultServletHttpRequestHandler tries to auto-detect the default Servlet for
the container at startup time, using a list of known names for most of the major Servlet
containers (including Tomcat, Jetty, GlassFish, JBoss, Resin, WebLogic, and WebSphere).
If the default Servlet has been custom-configured with a different name, or if a
different Servlet container is being used where the default Servlet name is unknown,
then you must explicitly provide the default Servlet’s name, as the following example shows:
Java
@Configuration
@EnableWebMvc
public class WebConfig implements WebMvcConfigurer {
@Override
public void configureDefaultServletHandling(DefaultServletHandlerConfigurer configurer) {
configurer.enable("myCustomDefaultServlet");
}
}
Kotlin
@Configuration
@EnableWebMvc
class WebConfig : WebMvcConfigurer {
override fun configureDefaultServletHandling(configurer: DefaultServletHandlerConfigurer) {
configurer.enable("myCustomDefaultServlet")
}
}
The following example shows how to achieve the same configuration in XML:
<mvc:default-servlet-handler default-servlet-name="myCustomDefaultServlet"/>1.12.12. Path Matching
You can customize options related to path matching and treatment of the URL.
For details on the individual options, see the
PathMatchConfigurer javadoc.
The following example shows how to customize path matching in Java configuration:
Java
@Configuration
@EnableWebMvc
public class WebConfig implements WebMvcConfigurer {
@Override
public void configurePathMatch(PathMatchConfigurer configurer) {
configurer.addPathPrefix("/api", HandlerTypePredicate.forAnnotation(RestController.class));
}
private PathPatternParser patternParser() {
// ...
}
}
Kotlin
@Configuration
@EnableWebMvc
class WebConfig : WebMvcConfigurer {
override fun configurePathMatch(configurer: PathMatchConfigurer) {
configurer.addPathPrefix("/api", HandlerTypePredicate.forAnnotation(RestController::class.java))
}
fun patternParser(): PathPatternParser {
//...
}
}
The following example shows how to customize path matching in XML configuration:
<mvc:annotation-driven>
<mvc:path-matching
path-helper="pathHelper"
path-matcher="pathMatcher"/>
</mvc:annotation-driven>
<bean id="pathHelper" class="org.example.app.MyPathHelper"/>
<bean id="pathMatcher" class="org.example.app.MyPathMatcher"/>1.12.13. Advanced Java Config
@EnableWebMvc imports DelegatingWebMvcConfiguration, which:
-
Provides default Spring configuration for Spring MVC applications
-
Detects and delegates to
WebMvcConfigurerimplementations to customize that configuration.
For advanced mode, you can remove @EnableWebMvc and extend directly from
DelegatingWebMvcConfiguration instead of implementing WebMvcConfigurer,
as the following example shows:
Java
@Configuration
public class WebConfig extends DelegatingWebMvcConfiguration {
// ...
}
Kotlin
@Configuration
class WebConfig : DelegatingWebMvcConfiguration() {
// ...
}
You can keep existing methods in WebConfig, but you can now also override bean declarations
from the base class, and you can still have any number of other WebMvcConfigurer implementations on
the classpath.
1.12.14. Advanced XML Config
The MVC namespace does not have an advanced mode. If you need to customize a property on
a bean that you cannot change otherwise, you can use the BeanPostProcessor lifecycle
hook of the Spring ApplicationContext, as the following example shows:
Java
@Component
public class MyPostProcessor implements BeanPostProcessor {
public Object postProcessBeforeInitialization(Object bean, String name) throws BeansException {
// ...
}
}
Kotlin
@Component
class MyPostProcessor : BeanPostProcessor {
override fun postProcessBeforeInitialization(bean: Any, name: String): Any {
// ...
}
}
Note that you need to declare MyPostProcessor as a bean, either explicitly in XML or
by letting it be detected through a <component-scan/> declaration.
1.13. HTTP/2
Servlet 4 containers are required to support HTTP/2, and Spring Framework 5 is compatible
with Servlet API 4. From a programming model perspective, there is nothing specific that
applications need to do. However, there are considerations related to server configuration.
For more details, see the
HTTP/2 wiki page.
The Servlet API does expose one construct related to HTTP/2. You can use the
jakarta.servlet.http.PushBuilder to proactively push resources to clients, and it
is supported as a method argument to @RequestMapping methods.
Время на прочтение
34 мин
Количество просмотров 96K
Вы можете использовать эту статью, чтобы понять, как использовать Spring MVC для создания веб-сайтов или RESTful сервисов. А также получить обзор часто задаваемых вопросов, охватывающих наиболее распространенные задачи Spring MVC.
Примечание: Статья ~ 7500 слов, вероятно, не стоит читать ее на мобильном устройстве. Добавьте ее в закладки и вернитесь позже.
Содержание
- Введение
- HttpServlets 101
- DispatcherServlet
- Контроллеры — создание HTML
- REST контроллеры — создание XML / JSON
- Часто задаваемые вопросы
- Заключение
- Благодарности
Введение
Что такое Spring MVC?
Spring MVC — это веб-фреймворк Spring. Он позволяет создавать веб-сайты или RESTful сервисы (например, JSON/XML) и хорошо интегрируется в экосистему Spring, например, он поддерживает контроллеры и REST контроллеры в ваших Spring Boot приложениях.
Это не очень помогло, не так ли?
К счастью, есть и более длинный ответ: остальная часть этого документа.
(Если вы не уверены, что знаете что такое Spring или Spring Boot, вы можете сначала прочитать, Что такое Spring Framework?)
HttpServlets 101
При написании веб-приложений на Java с использованием Spring или без него (MVC/Boot) вы в основном имеете в виду написание приложений, которые возвращают два разных формата данных:
- HTML → Ваше веб-приложение создает HTML-страницы, которые можно просматривать в браузере.
- JSON/XML → Ваше веб-приложение предоставляет сервисы RESTful, которые генерируют JSON или XML. Сайты с большим количеством Javascript или даже другие веб-сервисы могут затем использовать данные, которые предоставляют эти сервисы.
- Да, есть и другие форматы данных и варианты использования, но пока мы их игнорируем.
Как бы вы написали такие приложения без каких-либо фреймворков? Только на простой Java?
На самом низком уровне каждое веб-приложение Java состоит из одного или нескольких HttpServlets. Они генерируют ваш HTML, JSON или XML. Фактически, каждый отдельный фреймворк из 1 миллиона доступных веб-фреймворков на Java (Spring MVC, Wicket, Struts) построена на основе HttpServlets.
(Примечание для придир: это может быть сделано без HttpServlets, но мы пока проигнорируем это.)
Создание HTML-страниц с помощью HttpServlets
Давайте посмотрим на супер простой HttpServlet, который возвращает очень простую статическую HTML-страницу.
package com.marcobehler.springmvcarticle;
import javax.servlet.http.HttpServlet;
import javax.servlet.http.HttpServletRequest;
import javax.servlet.http.HttpServletResponse;
import java.io.IOException;
public class MyServletV1 extends HttpServlet {
@Override
protected void doGet(HttpServletRequest req, HttpServletResponse resp) throws IOException {
if (req.getRequestURI().equals("/")) {
resp.setContentType("text/html");
resp.getWriter().print("<html><head></head><body><h1>Welcome!</h1><p>This is a very cool page!</p></body></html>");
}
else {
throw new IllegalStateException("Help, I don't know what to do with this url");
}
}
}Давайте разберемся с этим кодом.
public class MyServletV1 extends HttpServlet {Ваш сервлет расширяет класс Java HttpServlet.
@Override
protected void doGet(HttpServletRequest req, HttpServletResponse resp) throws IOException {Чтобы обработать (любой) запрос GET, вам необходимо переопределить метод doGet () из суперкласса. Для запросов POST вы должны переопределить doPost (). Аналогично для всех других HTTP методов.
if (req.getRequestURI().equals("/")) {Ваш сервлет должен убедиться, что входящий URL-адрес является запросом, который он знает как обрабатывать. Пока сервлет обрабатывает только «/», то есть он обрабатывает www.marcobehler.com, но НЕ www.marcobehler.com/hello.
resp.setContentType("text/html");Вам нужно установить правильный тип контента в ServletResponse, чтобы браузер знал, какой контент вы отправляете. В данном случае это HTML.
resp.getWriter().print("<html><head></head><body><h1>Welcome!</h1><p>This is a very cool page!</p></body></html>");Помните: веб-сайты — это просто строки HTML! Поэтому вам нужно сгенерировать HTML-строку любым удобным вам способом и отправить ее обратно с помощью ServletResponse. Один из способов сделать это с помощью response writer.
После написания вашего сервлета вы должны зарегистрировать его в контейнере сервлетов, таком как Tomcat или Jetty. Если вы используете встроенную версию любого контейнера сервлета, весь код, необходимый для запуска вашего сервлета, будет выглядеть следующим образом:
package com.marcobehler.springmvcarticle;
import org.apache.catalina.Context;
import org.apache.catalina.LifecycleException;
import org.apache.catalina.Wrapper;
import org.apache.catalina.startup.Tomcat;
public class TomcatApplicationLauncher {
public static void main(String[] args) throws LifecycleException {
Tomcat tomcat = new Tomcat();
tomcat.setPort(8080);
tomcat.getConnector();
Context ctx = tomcat.addContext("", null);
Wrapper servlet = Tomcat.addServlet(ctx, "myServlet", new MyServletV2());
servlet.setLoadOnStartup(1);
servlet.addMapping("/*");
tomcat.start();
}
}Давайте разберемся с этим кодом.
Tomcat tomcat = new Tomcat();
tomcat.setPort(8080);
tomcat.getConnector();Вы настраиваете новый сервер Tomcat, который будет слушать порт 8080.
Context ctx = tomcat.addContext("", null);
Wrapper servlet = Tomcat.addServlet(ctx, "myServlet", new MyServletV2());Так вы регистрируете свой сервлет в Tomcat. Это первая часть, где вы просто сообщаете Tomcat о своем сервлете.
servlet.addMapping("/*");Вторая часть сообщает Tomcat, за какие запросы отвечает сервлет, то есть за отображение. Отображение /* означает, что оно отвечает за любой входящий запрос (/users, /register, /checkout).
tomcat.start();Вот и все. Теперь вы запускаете метод main(), переходите на порт 8080 в своем любимом веб-браузере (http://localhost:8080 /), и вы увидите красивую страницу HTML.
Таким образом, по сути, пока вы продолжаете расширять методы doGet () и doPost (), все ваше веб-приложение может состоять только из одного сервлета. Давайте попробуем это.
Создание JSON с помощью HttpServlets
Представьте себе, что помимо вашей (довольно пустой) HTML-страницы индекса вы теперь также хотите предложить REST API для вашего готовящегося к разработке внешнего интерфейса. Так что ваш интерфейс React или AngularJS будет вызывать URL-адрес примерно так:
/api/users/{userId}Эта конечная точка должна возвращать данные в формате JSON для пользователя с заданным userId. Как мы могли бы доработать наш MyServlet для этого, опять же, без каких-либо фреймворков?
package com.marcobehler.springmvcarticle;
import javax.servlet.http.HttpServlet;
import javax.servlet.http.HttpServletRequest;
import javax.servlet.http.HttpServletResponse;
import java.io.IOException;
public class MyServletV2 extends HttpServlet {
@Override
protected void doGet(HttpServletRequest req, HttpServletResponse resp) throws IOException {
if (req.getRequestURI().equals("/")) {
resp.setContentType("text/html");
resp.getWriter().print("<html><head></head><body><h1>Welcome!</h1><p>This is a very cool page!</p></body></html>");
} else if (req.getRequestURI().startsWith("/api/users/")) {
Integer prettyFragileUserId = Integer.valueOf(req.getRequestURI().lastIndexOf("/") + 1);
resp.setContentType("application/json");
// User user = dao.findUser(prettyFragileUserId)
// actually: jsonLibrary.toString(user)
resp.getWriter().print("{n" +
" "id":" + prettyFragileUserId + ",n" +
" "age": 55,n" +
" "name" : "John Doe"n" +
"}");
} else {
throw new IllegalStateException("Help, I don't know what to do with this url");
}
}
}
Давайте разберемся с этим кодом.
} else if (req.getRequestURI().startsWith("/api/users/")) {Мы добавляем еще один if в наш метод doGet для обработки вызовов /api/users/.
Integer prettyFragileUserId = Integer.valueOf(req.getRequestURI().lastIndexOf("/") + 1);Мы делаем очень слабый разбор URL. Последняя часть URL — это идентификатор пользователя userID, например, 5 для /api/users/5. Здесь мы просто предполагаем, что пользователь всегда передает действительный int, что нам в действительности нужно проверить!
resp.setContentType("application/json");Запись JSON в браузер означает установку правильного типа контента.
// User user = dao.findUser(prettyFragileUserId)
// actually: jsonLibrary.toString(user)
resp.getWriter().print("{n" +
" "id":" + prettyFragileUserId + ",n" +
" "age": 55,n" +
" "name" : "John Doe"n" +
"}");Опять же, JSON — это просто текст, поэтому мы можем записать его непосредственно в HTTPServletResponse. Возможно, мы бы использовали библиотеку JSON для преобразования нашего пользовательского Java-объекта в эту строку, но для простоты я не буду показывать это здесь.
Проблема с нашим подходом «один сервлет для всего»
Хотя наш сервлет выше работает, на горизонте вас ожидает немало проблем:
- Ваш сервлет должен выполнить множество ручных HTTP-специфических операций, проверять URI запроса, перебирать строки и т.д. Другими словами: ему нужно знать ЧТО хотят пользователи.
- Затем он также должен найти данные для всего, что вы хотите отобразить. Другими словами: это должно знать, КАК. В нашем примере выше это будет поиск пользователя в базе данных, которую мы для простоты закомментировали.
- Затем необходимо также преобразовать эти данные в JSON или HTML и установить соответствующие типы ответов.
Довольно много разных обязанностей, не так ли? Разве не было бы лучше, если бы вам не приходилось заботиться обо всем этом стандартом коде? Больше нет парсинга URI запроса и параметров, нет больше преобразований JSON, больше нет ответов сервлета?
Именно здесь на помощь приходит Spring MVC.
DispatcherServlet
Мы расскажем о Spring MVC немного нетрадиционно и не будем подробно останавливаться на том, что означает Model-View-Controller. Вместо этого немного раздразним вас.
Что если я скажу вам, что Spring MVC — это всего лишь один сервлет, как наш выше супер-сервлет?
Встречайте DispatcherServlet.
(О да, в этом, конечно, немного обмана)
Что делает Spring MVC DispatcherServlet?
Как уже упоминалось выше, почти все веб-фреймворки Java основаны на сервлетах, поэтому Spring MVC также нужен сервлет, который обрабатывает каждый входящий HTTP-запрос (поэтому DispatcherServlet также называется фронт-контроллером).
Что же в точности означает обрабатывать HTTP-запрос, точно? Представьте себе «рабочий процесс регистрации пользователя», при котором пользователь заполняет форму и отправляет ее на сервер и в ответ получает небольшую HTML страницу об успешной регистрации.
В этом случае ваш DispatcherServlet должен выполнить следующие действия:
- Необходимо просмотреть URI входящего запроса HTTP и любые параметры запроса. Например: POST /register?name=john&age33.
- Он должен потенциально преобразовывать входящие данные (параметры/тело запроса) в симпатичные маленькие объекты Java и перенаправить их в класс контроллер или REST контроллер,, который вы написали.
- Ваш контроллер сохраняет нового пользователя в базе данных, возможно отправляет электронное письмо и т.д. Он, скорее всего, делегирует это другому сервисному классу, но давайте предположим, что пока это происходит внутри контроллера.
- Он должен взять любой вывод из вашего контроллера и преобразовать его обратно в HTML/JSON/XML.
Весь процесс выглядит следующим образом, пренебрежем для простоты большим количеством промежуточных классов, потому что DispatcherServlet не выполняет всю работу сам.

До сих пор изложение было немного расплывчато в отношении некоторых частей этого процесса. Что такое ModelAndView на рисунке выше? Как именно DispatcherServlet преобразует данные?
Как выглядит реальный процесс Let’s-write-HTML? Об этом узнаем в следующем разделе.
Контроллеры — создание HTML
Всякий раз, когда вы хотите написать HTML на клиенте, таком как браузер с Spring MVC (включая Spring Boot), вы захотите написать класс контроллера. Давайте сделаем это сейчас.
Как написать контроллер в Spring
Для нашего рабочего процесса регистрации пользователей выше (POST/register?name=john&age33) мы бы написали следующий класс.
package com.marcobehler.springmvcarticle;
import org.springframework.stereotype.Controller;
import org.springframework.ui.Model;
import org.springframework.web.bind.annotation.PostMapping;
import org.springframework.web.bind.annotation.RequestParam;
@Controller
public class RegistrationController {
@PostMapping("/register")
public String registerUser(@RequestParam(required = false) Integer age, @RequestParam String name, Model model) {
User user = new User(name, age);
// TODO save user to database
// userDao.save(user);
// TODO send out registration email
// mailService.sendRegistrationEmail(user);
model.addAttribute("user", user);
return "registration-success";
}
}Давайте разберемся с этим кодом.
@Controller
public class RegistrationController {Класс контроллера в Spring просто аннотируется аннотацией Controller, ему не нужно реализовывать определенный интерфейс или расширяться из другого класса.
@PostMapping("/register")Эта строка сообщает нашему DispatcherServlet, что всякий раз, когда приходит запрос POST для пути /register, включая любые параметры запроса (например, ?Username=), он должен отправлять запрос именно этому методу контроллера.
public String registerUser(@RequestParam(required = false) Integer age, @RequestParam String name, Model model) {Примечание Наименование нашего метода на самом деле не имеет значения, его можно назвать как угодно.
Однако мы указываем, что каждый запрос должен включать два параметра запроса, которые могут быть либо частью URL (?age=10&name=Joe), либо находиться в теле запроса POST. Кроме того, требуется только параметр name (параметр age является необязательным)
И параметр age, если пользователь предоставил его, автоматически преобразуется в Integer (исключение выдается, если предоставленное значение не является допустимым Integer)
Наконец, что не менее важно, Spring MVC автоматически внедряет параметр model в наш метод контроллера. Эта модель представляет собой простую карту, на которой вам нужно поместить все данные, которые вы хотите отобразить на вашей окончательной HTML-странице, но об этом чуть позже.
User user = new User(name, age);
// TODO save user to database
// userDao.save(user);
// TODO send out registration email
// mailService.sendRegistrationEmail(user);Вы делаете все, что вам нужно сделать с данными входящего запроса. Создать пользователя, сохранить его в базе данных, отправить по электронной почте. Это ваша бизнес-логика.
model.addAttribute("user", user);Вы добавляете своего пользователя в модель с ключом «user». Это означает, что вы сможете ссылаться на него в своем HTML-шаблоне позже, например, «${user.name}». Подробнее об этом через секунду.
return "registration-success";Ваш метод возвращает простую строку со значением registration-success. Это не просто строка, это ссылка на ваше представление, т.е. шаблон HTML, который вы хотите, чтобы Spring отображал.
Views (представления)
Давайте пока проигнорируем, как (или, скорее, где) Spring MVC попытается найти это представление, т.е. ваш шаблон, вместо этого давайте посмотрим, как должен выглядеть ваш шаблон registration-success.html.
<!DOCTYPE html>
<html lang="en">
<head>
<meta charset="UTF-8">
<title>Title</title>
</head>
<body>
<p th:text="'Hello ' + ${user.name} + '!'"></p>
</body>
</html>Это простая HTML-страница, которая содержит одну строку шаблона. Он печатает имя пользователя, который только что зарегистрировался.
<p th:text="'Hello ' + ${user.name} + '!'"></p>Вопрос в том, что означает синтаксис th:text=? Он специфический для Spring? Или это что-то еще?
И ответ таков: Spring MVC ничего не знает о шаблонах HTML. Для работы с HTML-шаблонами требуется сторонняя библиотека шаблонов, и не нужно заботиться о том, какую библиотеку вы выберете.
В приведенном выше примере вы видите шаблон Thymeleaf, который очень популярен при работе над проектами Spring MVC.
Spring MVC и библиотеки шаблонов
Существует несколько различных библиотек шаблонов, которые хорошо интегрируются с Spring MVC, из которых вы можете выбрать: Thymeleaf, Velocity, Freemarker, Mustache и даже JSP (хотя это не библиотека шаблонов).
Фактически, вы должны явно выбрать библиотеку шаблонов, потому что если у вас нет такой библиотеки шаблонов, добавленной в ваш проект и настроенной правильно, то ваш метод контроллера не будет отображать вашу HTML-страницу — потому что он не знает, как это сделать.
Это также означает, что вы должны изучить и понять синтаксис конкретной библиотеки шаблонов в зависимости от проекта, в котором вы работаете, потому что все они немного отличаются друг от друга. Весело, правда?
Что такое ViewResolver?
На секунду давайте подумаем, где Spring на самом деле попытается найти ваши HTML-шаблоны, которые возвращает ваш контроллер.
Класс, который пытается найти ваш шаблон, называется ViewResolver. Поэтому всякий раз, когда запрос поступает в ваш контроллер, Spring проверяет настроенные ViewResolvers и запрашивает их, чтобы найти шаблон с заданным именем. Если у вас нет настроенных ViewResolvers, это не сработает.
Представьте, что вы хотите интегрироваться с Thymeleaf. Следовательно, вам нужен ThymeleafViewResolver.
package com.marcobehler.springmvcarticle;
import org.springframework.context.annotation.Bean;
import org.thymeleaf.spring5.SpringTemplateEngine;
import org.thymeleaf.spring5.templateresolver.SpringResourceTemplateResolver;
import org.thymeleaf.spring5.view.ThymeleafViewResolver;
public class ThymeleafConfig {
@Bean
public ThymeleafViewResolver viewResolver() {
ThymeleafViewResolver viewResolver = new ThymeleafViewResolver();
SpringResourceTemplateResolver templateResolver = new SpringResourceTemplateResolver();
templateResolver.setPrefix("classpath:/templates");
templateResolver.setSuffix(".html");
// some other lines neglected...
SpringTemplateEngine templateEngine = new SpringTemplateEngine();
templateEngine.setTemplateResolver(templateResolver);
// some other lines neglected...
viewResolver.setTemplateEngine(templateEngine);
return viewResolver;
}
}Давайте разберемся с этим кодом.
@Bean
public ThymeleafViewResolver viewResolver() {
ThymeleafViewResolver viewResolver = new ThymeleafViewResolver();В конце концов, ThymeleafViewResolver просто реализует интерфейс Spring ViewResolver. Учитывая имя шаблона (помните: registration-success), ViewResolvers может найти фактический шаблон.
SpringResourceTemplateResolver templateResolver = new SpringResourceTemplateResolver();Для правильной работы ThymeleafViewResolver требуется несколько других специфичных для Thymeleaf классов. Одним из этих классов является SpringResourceTemplateResolver. Это делает фактическую работу по поиску вашего шаблона.
Примечание SpringResourceTemplateResolver является классом Thymeleaf
templateResolver.setPrefix("classpath:/templates");
templateResolver.setSuffix(".html");По существу, вы говорите (с помощью синтаксиса Spring Resources): «Все мои шаблоны находятся по пути classpath, в папке /templates». И по умолчанию все они заканчиваются на .html. Это означает:
Всякий раз, когда наш контроллер возвращает String, подобный registration-success, ThymeleafViewResolver будет искать шаблон: classpath:/templates/registration-success.html.
Заметка на полях: Spring Boot
Вы можете подумать: Марко, мне никогда не приходилось настраивать такой ViewResolver, работая над проектами Spring Boot. И это правильно. Потому что Spring Boot автоматически настраивает его для вас каждый раз, когда вы добавляете в свой проект зависимость, такую как spring-boot-starter-thymeleaf.
Он также настраивает ViewResolver так, чтобы он по умолчанию просматривал ваш каталог src/main/resources/template.
Итак, Spring Boot действительно предварительно настраивает Spring MVC для вас. Запомните.
Резюме: Model-View-Controller
Посмотрев полный пример Controller & ViewResolver, становится намного проще говорить о концепции Spring Model-View-Controller.
- С помощью нескольких аннотаций (Controller, @PostMapping, @RequestParam) вы можете написать контроллер, который будет заботиться о получении данных запроса и обрабатывать их соответствующим образом.
- Ваша модель содержит все данные (и только данные), которые вы хотите отобразить в своем представлении. Это ваша работа, чтобы заполнить эту карту модели.
- Ваше представление — это просто шаблон HTML. Неважно, откуда вы взяли данные (модели). Или каков текущий HTTP-запрос. Или даже если у вас есть активный HTTP-сеанс или нет.
Это все о разделении ответственностей.
На первый взгляд, немного перегруженный аннотациями, наш класс Spring контроллера читается намного лучше, с гораздо меньшим количеством подключений HTTP, чем наш супер-сервлет с самого начала.
Подробнее о контроллерах
Мы уже видели небольшое удобство, которое предоставляет нам Spring MVC при обработке входов HTTP.
- Вам не нужно возиться с requestURI, вместо этого вы можете использовать аннотацию.
- Вам не нужно возиться с преобразованиями типов параметров запроса или, разбираться является ли параметр необязательным или обязательным, вы можете использовать аннотацию вместо этого.
Давайте рассмотрим наиболее распространенные аннотации, которые помогут вам обрабатывать входящие HTTP-запросы.
@GetMapping и @RequestMappping
Вы уже видели аннотацию @GetMapping выше. Она эквивалентна аннотации *@RequestMapping*. Давайте рассмотрим пример:
@GetMapping("/books")
public void book() {
//
}
/* these two mappings are identical */
@RequestMapping(value = "/books", method = RequestMethod.GET)
public void book2() {
}@GetMapping, @[Post|Put|Delete|Patch]Mapping эквивалентно @RequestMapping(method=XXX). Это просто более новый способ (Spring 4.3+) для определения мапинга (связывания) с URL, поэтому вы найдете, что аннотация @RequestMapping часто используется в более старых, унаследованных проектах Spring.
@RequestParam
Для параметров HTTP-запроса, будь то в вашем URL (?Key=value) или в отправленном теле запроса формы, можно прочитать с помощью аннотации @RequestParam.
Вы уже видели, что он выполняет базовое преобразование типов (например, из параметра HTTP String в int), а также проверяет обязательные или дополнительные параметры.
@PostMapping("/users") /* First Param is optional */
public User createUser(@RequestParam(required = false) Integer age, @RequestParam String name) {
// does not matter
}Если вы забудете указать в запросе обязательный параметр, вы получите код ответа 400 Bad Request и, при использовании Spring Boot, объект ошибки по умолчанию, который выглядит следующим образом:
{"timestamp":"2020-04-26T08:34:34.441+0000","status":400,"error":"Bad Request","message":"Required Integer parameter 'age' is not present","path":"/users"}Если вы хотите еще большего удобства, вы можете позволить Spring напрямую преобразовывать все @RequestParams в объект без каких-либо необходимых аннотаций. Просто укажите ваш объект как «параметр метода«.
Вам просто нужно убедиться, что у вашего класса есть соответствующие методы getter/setter.
@PostMapping("/users") /* Spring преобразует это автоматически, если у вас есть getters and setters */
public User createUser(UserDto userDto) {
//
}@PathVariable
Помимо параметров запроса, другим популярным способом указания переменных является непосредственное задание их в URI запроса, как @PathVariable. Поэтому, чтобы получить профиль пользователя с userId=123, вы должны вызвать следующий URL: GET / users/123
- Вам просто нужно убедиться, что значение вашего параметра соответствует значению между {} в аннотации сопоставления вашего запроса.
Кроме того, PathVariables также может быть обязательным или необязательным.
@GetMapping("/users/{userId}")
public User getUser(@PathVariable(required = false) String userId) {
// ...
return user;
}И PathVariables, конечно, может быть напрямую преобразованы в Java-объект (при условии, что у объекта есть соответствующие методы getter/setter).
@GetMapping("/users/{userId}")
public User getUser(UserDto userDto) {
// ...
return user;
}Резюме: Контроллеры
Короче говоря, при написании HTML-страниц с помощью Spring MVC вам придется сделать всего несколько вещей:
- Напишите свои контроллеры, «присыпанные» несколькими аннотациями. Spring позаботится о том, чтобы представить вам запрос ввода (параметры запроса, переменные пути) удобным способом.
- Выполните любую логику, необходимую для заполнения вашей модели. Вы можете удобно ввести модель в любой метод контроллера.
- Сообщите вашему контроллеру, какой шаблон HTML вы хотите отобразить, и верните имя шаблона в виде строки.
- Всякий раз, когда поступает запрос, Spring обязательно вызовет ваш метод контроллера и примет полученную модель и представление, отобразит его в HTML-строку и вернет его обратно в браузер.
- При условии, конечно, вы настроили соответствующую библиотеку шаблонов, что Spring Boot автоматически сделает для вас, если вы добавите необходимые зависимости в ваш проект.
Вот и все.
REST контроллеры — создание XML/JSON
Когда вы разрабатываете RESTFul сервисы, все немного по-другому. Ваш клиент, будь то браузер или другой веб-сервис, будет (обычно) создавать запросы JSON или XML. Клиент отправляет, скажем, запрос JSON, вы обрабатываете его, а затем отправитель ожидает возврата JSON.
Таким образом, отправитель может отправить вам этот фрагмент JSON как часть тела HTTP-запроса.
POST http://localhost:8080/users
###
{"email": "angela@merkel.de"}Но на стороне Java (в вашей программе Spring MVC) вы не хотите иметь дело с JSON строками. Ни при получении запросов, как указано выше, ни при отправке ответов обратно клиенту. Вместо этого вы хотели бы просто иметь объекты Java, в которые Spring автоматически конвертирует JSON.
public class UserDto {
private String email;
//...
}Это также означает, что вам не нужна вся эта обработка модели и представления, которые вам приходилось делать при рендеринге HTML в ваших контроллерах. Для RESTful сервисов у вас нет библиотеки шаблонов, читающей шаблон HTML и заполняющей его данными модели, чтобы сгенерировать для вас ответ JSON.
Вместо этого вы хотите перейти непосредственно из HTTP запрос → Java объект и из Java объект → HTTP ответ.
Как вы уже догадались, это именно то, что Spring MVC обеспечивает при написании REST контроллера.
Как написать REST контроллер
Первое, что вам нужно сделать для вывода XML/JSON, это написать аннотацию @RestController вместо Controller. (Хотя @RestController является Controller, см. FAQ для точной разницы).
Если бы мы написали REST-контроллер для банка, который возвращает список транзакций пользователя, он мог бы выглядеть примерно так:
package com.marcobehler.springmvcarticle;
import org.springframework.web.bind.annotation.GetMapping;
import org.springframework.web.bind.annotation.RestController;
import java.util.Collections;
import java.util.List;
@RestController
public class BankController {
@GetMapping("/transactions/{userId}")
public List<Transaction> transactions(String userId) {
// find transaction by user
// List<Transaction> = dao.findByUserId(userId);
List<Transaction> transactions = Collections.emptyList();
return transactions;
}
}Давайте разберемся с этим кодом.
@RestController
public class BankController {Вы снабдили класс BankController аннотацией @RestController, которая сообщает Spring, что вы не хотите писать HTML-страницы через обычный процесс ModelAndView. Вместо этого вы хотите записать XML/JSON (или какой-либо другой формат) непосредственно в тело ответа HTTP.
public List<Transaction> transactions(String userId) {Ваш контроллер больше не возвращает String (представление). Вместо этого он возвращает List, который Spring необходимо преобразовать в соответствующую структуру JSON или XML. По сути, вы хотите, чтобы ваши Java объекты Transaction стали такими (кто-то жаждал фаст-фуд очень рано утром):
[
{
"occurred": "28.04.2020 03:18",
"description": "McDonalds - Binging",
"id": 1,
"amount": 10
},
{
"occurred": "28.04.2020 06:18",
"description": "Burger King - Never enough",
"id": 2,
"amount": 15
}
]Но как Spring MVC узнает, что ваш список транзакций должен быть преобразован в JSON? Почему не XML? Или YAML? Как ваш метод REST контроллер знает, каким должен быть предполагаемый формат ответа?
Для этого у Spring есть концепция согласования контента.
Короче говоря, согласование контента означает, что клиент должен сообщить вашему серверу, какой формат ответа он хочет получить от вашего REST контроллера.
Как? Указав заголовок Accept в HTTP-запросе.
GET http://localhost:8080/transactions/{userid}
Accept: application/jsonSpring MVC разберет этот заголовок Accept и узнает: клиент хочет вернуть JSON (application/json), поэтому мне нужно преобразовать мой List в JSON. (Краткое примечание. Существуют и другие способы согласования содержимого, но заголовок Accept используется по умолчанию.)
Давайте назовем это согласование содержимого ответа, поскольку речь идет о формате данных ответа HTTP, который вы отправляете обратно своему клиенту.
Но согласование контента также работает для входящих запросов. Посмотрим как.
Согласование контента запроса — Content-Type Header (заголовок типа контента)
При создании RESTful API очень высока вероятность того, что ваши клиенты также смогут отправлять запросы в формате JSON или XML. Давайте снова возьмем пример из начала главы, где вы предлагаете конечную точку REST для регистрации новых пользователей:
POST http://localhost:8080/users
###
{"email": "angela@merkel.de"}Как Spring узнает, что тело запроса выше содержит JSON, а не XML или YAML? Возможно, вы догадались, вам нужно добавить еще один заголовок, на этот раз это заголовок Content-Type.
POST ...
Content-Type: application/json; charset=UTF-8
###
...Как будет выглядеть соответствующий REST контроллер для этого запроса?
package com.marcobehler.springmvcarticle;
import org.springframework.web.bind.annotation.PostMapping;
import org.springframework.web.bind.annotation.RequestBody;
import org.springframework.web.bind.annotation.RestController;
@RestController
public class BookingController {
@PostMapping("/transactions")
public Transaction transaction(@RequestBody TransactionDto dto) {
// do something with the dto..create the booking..convert it to a transaction
Transaction transaction = null;
return transaction;
}
}Давайте разберемся с этим кодом.
public Transaction transaction(@RequestBody TransactionDto dto) {Подобно @RequestParam или @Pathvariable, вам понадобится другая аннотация, называемая @RequestBody.
@RequestBody в сочетании с правильным Content-Type будет сигнализировать Spring о том, что ему необходимо просмотреть тело HTTP-запроса и преобразовать его в любой Content-Type, указанный пользователем: JSON в нашем случае.
// do something with the dto..create the booking..convert it to a transaction
Transaction transaction = null;
return transaction;
}Тогда вашему методу больше не нужно заботиться об необработанной строке JSON, он может просто работать с TransactionDTO, сохранять его в базе данных, преобразовывать в объект Transaction, что угодно. В этом сила Spring MVC.
Сам Spring не может конвертировать форматы данных
Есть только одна небольшая проблема: Spring знает о заголовках Accept и Content-Type, но не знает, как конвертировать между объектами Java и JSON. Или XML. Или ЯМЛ.
Для этой грязной работы требуется соответствующая сторонняя библиотека (также называемая маршалинг / демаршаллинг или сериализация / десериализация.)
А классы, которые интегрируются между Spring MVC и этими сторонними библиотеками, называются HttpMessageConverters.
Что такое HttpMessageConverter?
HttpMessageConverter — это интерфейс с четырьмя методами (обратите внимание, я немного упростил интерфейс для более простого объяснения, так как он выглядит немного более продвинутым в реальной жизни).
- canRead (MediaType) → Может ли этот конвертер читать (JSON | XML | YAML | и т. д.)? Переданный здесь MediaType обычно является значением из заголовка запроса Content-Type.
- canWrite (MediaType) → Может ли этот преобразователь писать (JSON | XML | YAML | и т. д.)? Тип MediaType, переданный здесь, обычно является значением из заголовка запроса Accept.
- read(Object, InputStream, MediaType) → Читать мой Java-объект из (JSON | XML | YAML | и т. д.) InputStream
- write(Object, OutputStream, MediaType) → Записать мой Java-объект в OutputStream как (JSON | XML | YAML | и т. д.)
Короче говоря, MessageConverter должен знать, какие MediaTypes он поддерживает (например, application/json), а затем должен реализовать два метода для фактического чтения / записи в этом формате данных.
Какие есть HttpMessageConverters?
К счастью, вам не нужно писать эти конвертеры сообщений самостоятельно. Spring MVC поставляется с классом, который автоматически регистрирует пару стандартных HTTPMessageConverters для вас — если у вас есть соответствующие сторонние библиотеки в пути к классам.
Если вы не знаете об этом, это будет выглядеть как магия. В любом случае, взгляните на Spring AllEncompassingFormHttpMessageConverter (мне нравится это имя).
static {
ClassLoader classLoader = AllEncompassingFormHttpMessageConverter.class.getClassLoader();
jaxb2Present = ClassUtils.isPresent("javax.xml.bind.Binder", classLoader);
jackson2Present = ClassUtils.isPresent("com.fasterxml.jackson.databind.ObjectMapper", classLoader) &&
ClassUtils.isPresent("com.fasterxml.jackson.core.JsonGenerator", classLoader);
jackson2XmlPresent = ClassUtils.isPresent("com.fasterxml.jackson.dataformat.xml.XmlMapper", classLoader);
jackson2SmilePresent = ClassUtils.isPresent("com.fasterxml.jackson.dataformat.smile.SmileFactory", classLoader);
gsonPresent = ClassUtils.isPresent("com.google.gson.Gson", classLoader);
jsonbPresent = ClassUtils.isPresent("javax.json.bind.Jsonb", classLoader);
}Давайте разберемся с этим кодом.
jaxb2Present = ClassUtils.isPresent("javax.xml.bind.Binder", classLoader);Spring MVC проверяет наличие класса javax.xml.bind.Binder и, если он есть, предполагает, что вы добавили в свой проект необходимую библиотеку для выполнения преобразований JAXB.
jackson2Present = ClassUtils.isPresent("com.fasterxml.jackson.databind.ObjectMapper", classLoader) &&
ClassUtils.isPresent("com.fasterxml.jackson.core.JsonGenerator", classLoader);Spring MVC проверяет наличие двух классов ..jackson..ObjectMapper и ..jackson..JsonGenerator и, если это так, предполагает, что вы добавили библиотеку Jackson в свой проект для выполнения преобразований JSON.
jackson2XmlPresent = ClassUtils.isPresent("com.fasterxml.jackson.dataformat.xml.XmlMapper", classLoader);Spring MVC проверяет наличие класса ..jackson..XmlMapper и, если это так, предполагает, что вы добавили поддержку XML библиотеки Jackson s в свой проект для выполнения преобразований XML.
И так далее. И через пару строк Spring просто добавляет HttpMessageConverter для каждой библиотеки, которую он «обнаружил».
if (jaxb2Present && !jackson2XmlPresent) {
addPartConverter(new Jaxb2RootElementHttpMessageConverter());
}
if (jackson2Present) {
addPartConverter(new MappingJackson2HttpMessageConverter());
}
else if (gsonPresent) {
addPartConverter(new GsonHttpMessageConverter());
}Заметка на полях: Spring Boot
При создании проектов Spring Boot вы автоматически будете использовать Spring MVC под капотом. Но Spring Boot также вызывает Jackson по умолчанию.
Вот почему вы можете сразу написать конечные точки JSON с помощью Spring Boot, потому что необходимые HttpMessageConverts будут добавлены автоматически для вас.
Резюме: REST контроллеры
По сравнению с HTML использование JSON / XML немного проще, так как вам не нужен рендеринг Model и View.
Вместо этого ваши контроллеры напрямую возвращают объекты Java, которые Spring MVC будет удобно сериализовать в JSON / XML или любой другой формат, который пользователь запросил с помощью HttpMessageConverters.
Однако вы должны убедиться в двух вещах, однако:
- Имеются соответствующие сторонние библиотеки на пути к классам.
- Отправлены правильные заголовки Accept или Content-Type с каждым запросом.
Часто задаваемые вопросы
Вы где-нибудь публиковали исходный код этой статьи?
Вы можете найти рабочий исходный код для большей части этой статьи в следующем репозитории GitHub:
https://github.com/marcobehler/spring-mvc-article
Просто клонируйте проект и запустите класс SpringMvcArticleApplication, чтобы запустить веб-приложение.
В чем разница между Spring MVC и Spring Boot?
Вкратце: нет никакой разницы, Spring Boot использует и строит приложение поверх Spring MVC.
Для более подробного объяснения вам нужно сначала прочитать статью Что такое Spring Framework?.
Какой самый быстрый способ создать новое приложение Spring MVC?
Если вы хотите упростить использование Spring MVC, самым быстрым способом будет создание нового Spring Boot проекта.
- Перейдите на сайт: https://start.spring.io/.
- Обязательно выберите Spring Web в качестве зависимости для вашего нового проекта.
Это позволит вам создавать веб / RESTful-приложения с помощью Spring MVC.
Какой тип ввода HTTP-запроса понимает Spring MVC?
Spring MVC понимает практически все, что предлагает HTTP — с помощью сторонних библиотек.
Это означает, что вы можете добавить в него тела запросов JSON, XML или HTTP (Multipart) Fileuploads, и Spring будет удобно конвертировать этот ввод в объекты Java.
Какие HTTP-ответы может создавать Spring MVC?
Spring MVC может записывать все что угодно в HttpServletResponse — с помощью сторонних библиотек.
Будь то HTML, JSON, XML или даже тела ответов WebSocket. Более того, он берет ваши объекты Java и генерирует эти тела ответов для вас.
В чем разница между контроллером и REST контроллером
- Контроллер по умолчанию возвращают HTML пользователям с помощью библиотеки шаблонов, если вы не добавите аннотацию @ResponseBody к определенным методам, которые также позволяют возвращать XML / JSON.
- Исходный код REST контроллера показывает, что на самом деле это контроллер с добавленной аннотацией @ResponseBody. Что эквивалентно написанию контроллера с аннотацией @ResponseBody для каждого метода.
@Controller
@ResponseBody
public @interface RestController {- Поэтому REST контроллеры по умолчанию возвращает XML / JSON вместо HTML.
Примечание. XML и JSON — это просто самые популярные форматы данных, которые вы будете использовать в приложении Spring MVC. Однако ваши контроллеры / REST контроллеры могут возвращать что-либо еще, например, YAML. Вам нужно только убедиться, что правильный HttpMessageConverter зарегистрирован в вашем ApplicationContext.
Какую библиотеку шаблонов мне выбрать?
На протяжении многих лет я лично работал почти со всеми библиотеками шаблонов, и, хотя есть определенное стимулирование к использованию Thymeleaf в проектах Spring, у меня нет сильных предпочтений. Итак, либо воспользуйтесь Thymeleaf (если у вас нет опыта работы с другими системами), либо выберите тот, который вам наиболее удобен.
Почему мой контроллер выводит 404? Все мапинги верны.
Относительно распространенной ошибкой является то, что контроллер возвращает объекты, которые вы хотите преобразовать в JSON или XML, но вам не хватает аннотации @ResponseBody.
Spring возвратит довольно бессмысленное исключение 404 Not Found в этом случае.
package com.marcobehler.springmvcarticle;
import org.springframework.stereotype.Controller;
import org.springframework.web.bind.annotation.GetMapping;
import org.springframework.web.bind.annotation.PathVariable;
import org.springframework.web.bind.annotation.ResponseBody;
@Controller
public class _404WithMissingResponseBodyController {
@GetMapping("/users/{id}") /* This won't work and lead to a 404 */
public User getUser_404(@PathVariable String id) {
return new User("Everyone's name is John", id);
}
@GetMapping("/users2/{id}")
@ResponseBody /* This will work */
public User getUser_200(@PathVariable String id) {
return new User("Everyone's name is John", id);
}
}Исправление: добавьте @ResponseBody или превратите ваш контроллер в REST контроллер.
Что произойдет, если вы определите один и тот же мапинг запросов для двух разных методов?
Если эти два метода имеют разные HTTP методы, это не будет проблемой.
/* это сработает */
@PostMapping("/users")
public void method1() {
}
@GetMapping("/users")
publi void method(2) {
}Однако если вы сопоставите однотипные HTTP методы с одним и тем же путем, у вас возникнет проблема.
/* это не сработает */
@PostMapping("/users")
public void method1() {
}
@PostMapping("/users")
publi void method(2) {
}При запуске приложения это приведет к исключению IllegalStateException, что намекает на ваше неоднозначное отображение.
Caused by: java.lang.IllegalStateException: Ambiguous mapping. Cannot map 'howToPassAndRetrieveRequestParametersController' method
com.marcobehler.springmvcarticle.HowToPassAndRetrieveRequestParametersController#createUser(User)
to {POST /users3}: There is already 'howToPassAndRetrieveRequestParametersController' bean methodНужно ли в URL кодировать @RequestParams?
Да, потому что Spring автоматически декодирует их из URL. Распространенная ошибка:
Представьте, что ваше приложение отправляет электронные письма с подтверждением всякий раз, когда новый пользователь регистрируется, и пользователь указывает знак «+» на своем адресе электронной почты, например, marco+wantsnospam@marcobehler.com.
@GetMapping("/confirm")
public void confirm(@RequestParam String email, @RequestParam String token){
// confirm user...
}Если вы забыли правильно закодировать знак ‘+’ в URL в своем письме-подтверждении и отправляете строку как есть на свой контроллер, какое значение будет содержать электронная почта @RequestParam?
Это будет «marco[space]wantnospam@marcobehler.com», так как Spring заменит + пробелом, что является правильной обработкой RFC3986.
Исправление: Убедитесь, что URL-адреса, которые вы вводите в свое приложение, правильно закодированы: marco%2Bwantsnospam@marcobehler.com, так как Spring будет автоматически их декодировать.
Как получить доступ к текущей HttpSession пользователя?
В Spring MVC контроллере или REST контроллере вы можете просто указать HttpSession в качестве аргумента метода, и Spring автоматически вставит его (создав его, если он еще не существует).
@RestController
public class HttpSessionController {
@GetMapping("/session")
public String getSession(HttpSession httpSession) {
System.out.println("httpSession = " + httpSession);
return httpSession.getId();
}
}Вы не можете сделать это со произвольными компонентами или сервисами, но вы все равно можете внедрить HttpSession в них.
@Service
class SomeOtherService {
@Autowired
private HttpSession httpSession;
public HttpSession getHttpSession() {
return httpSession;
}
}Как получить доступ к HttpServletRequest?
В вашем Spring MVC контроллере или REST контроллере вы можете просто указать HttpServletRequest в качестве аргумента метода, и Spring автоматически вставит его (создавая, если он еще не существует)
@RestController
public class HttpServletRequestController {
@Autowired
private SomeRequestService someRequestService;
@GetMapping("/request")
public String getRequest(HttpServletRequest request) {
System.out.println("request = " + request);
return request.toString();
}
}Вы не можете сделать это с произвольными компонентами или сервисами, но вы все еще можете внедрить HttpServletRequest в них.
@Service
class SomeRequestService {
@Autowired
private HttpServletRequest httpServletRequest;
public HttpServletRequest getRequest() {
return httpServletRequest;
}
}Как читать HTTP заголовки?
Существует множество способов получить доступ к заголовкам запросов, в зависимости от того, хотите ли вы только один или карту со всеми из них. В любом случае вам нужно аннотировать их с помощью @RequestHeader.
Какую бы версию вы ни выбрали, постарайтесь быть последовательным с вашим выбором.
package com.marcobehler.springmvcarticle;
import org.springframework.http.HttpHeaders;
import org.springframework.stereotype.Controller;
import org.springframework.web.bind.annotation.GetMapping;
import org.springframework.web.bind.annotation.RequestHeader;
import java.util.Map;
@Controller
public class HttpHeaderController {
@GetMapping("/headers1")
public void singleHeader(@RequestHeader("x-forwarded-for") String xForwardedFor) {
// ...
}
@GetMapping("/headers2")
public void headersAsMap(@RequestHeader Map<String,String> headers) { // or MultiValueMap<String,String>
// ...
}
@GetMapping("/headers3")
public void headersAsObject(HttpHeaders headers) {
// ...
}
}Как читать и писать cookie?
Для чтения файлов cookie вы можете использовать аннотацию @CookieValue в своих контроллерах. Вы должны будете писать cookie прямо в HttpServletResponse.
package com.marcobehler.springmvcarticle;
import org.springframework.stereotype.Controller;
import org.springframework.web.bind.annotation.CookieValue;
import org.springframework.web.bind.annotation.GetMapping;
import javax.servlet.http.Cookie;
import javax.servlet.http.HttpServletResponse;
@Controller
public class CookieController {
@GetMapping("/cookie")
public void handle(@CookieValue("JSESSIONID") String cookie, HttpServletResponse response) {
response.addCookie(new Cookie("SOME_COOKIE_NAME", "This is a crazy new cookie!"));
//...
}
}Как получить IP-адрес пользователя?
Это вопрос с подвохом. Существует метод с именем httpServletRequest.getRemoteAddr(), который, однако, возвращает только IP-адрес пользователя или последнего прокси-сервера, отправившего запрос, в 99,99% случаев это ваш Nginx или Apache.
Следовательно, вам нужно проанализировать заголовок X-Forwarded-For для получения правильного IP-адреса. Но что произойдет, если ваше приложение, кроме того, будет работать за CDN, например CloudFront? Тогда ваш X-Forwarded-For будет выглядеть так:
X-Forwarded-For: MaybeSomeSpoofedIp, realIp, cloudFrontIpПроблема в том, что вы не можете прочитать заголовок слева направо, поскольку пользователи могут предоставить и, следовательно, подделать свой собственный заголовок X-Forwarded-For. Вам всегда нужно идти справа налево и исключать все известные IP-адреса. В случае CloudFront это означает, что вам необходимо знать диапазоны IP-адресов CloudFront и удалить их из заголовка. Ага!
Это приводит к довольно сложному коду, разрешающему IP. Угадайте, сколько проектов сделали это неправильно!
package com.marcobehler.springmvcarticle;
import org.springframework.web.bind.annotation.GetMapping;
import org.springframework.web.bind.annotation.RestController;
import javax.servlet.http.HttpServletRequest;
@RestController
public class IpController {
private static final String[] HEADERS_TO_TRY = {
"X-Forwarded-For",
"Proxy-Client-IP",
"WL-Proxy-Client-IP",
"HTTP_X_FORWARDED_FOR",
"HTTP_X_FORWARDED",
"HTTP_X_CLUSTER_CLIENT_IP",
"HTTP_CLIENT_IP",
"HTTP_FORWARDED_FOR",
"HTTP_FORWARDED",
"HTTP_VIA",
"REMOTE_ADDR"};
@GetMapping("/ip")
public String getClientIpAddress(HttpServletRequest request) {
for (String header : HEADERS_TO_TRY) {
String ip = request.getHeader(header);
if (ip != null && ip.length() != 0 && !"unknown".equalsIgnoreCase(ip)) {
return getRealClientIpAddress(ip);
}
}
return request.getRemoteAddr();
}
/**
* Goes through the supplied ip string (could be one or multiple). Traverses it through the right side...
* and removes any known ip address ranges
*
* @param ipString
* @return
*/
public String getRealClientIpAddress(String ipString) {
String[] manyPossibleIps = ipString.split(",");
for (int i = manyPossibleIps.length - 1; i >= 0; i--) {
String rightMostIp = manyPossibleIps[i].trim();
if (isKnownAddress(rightMostIp)) {
continue; // skip this ip as it is trusted
} else {
return rightMostIp;
}
}
return ipString;
}
private boolean isKnownAddress(String rightMostIp) {
// do your check here..for cloudfront you'd need to download their ip address ranges
// from e.g. http://d7uri8nf7uskq.cloudfront.net/tools/list-cloudfront-ips
// and compare the current ip against them
return false;
}
}Как вы можете управлять загрузкой файлов в приложении Spring MVC?
Предположим, что у вас есть правильная форма загрузки HTML-файла, которая выглядит примерно так:
<form method="POST" enctype="multipart/form-data" action="/upload">
File to upload:<input type="file" name="file" />
<input type="submit" value="Upload" />
</form>Вам просто нужен контроллер с аннотацией @PostMapping и соответствующим параметром MultiPartFile, который содержит ваши данные для загрузки и удобные методы для сохранения файла на вашем диске.
package com.marcobehler.springmvcarticle;
import org.springframework.stereotype.Controller;
import org.springframework.web.bind.annotation.PostMapping;
import org.springframework.web.bind.annotation.RequestParam;
import org.springframework.web.multipart.MultipartFile;
import java.io.IOException;
import java.nio.file.Path;
import java.nio.file.Paths;
@Controller
public class FileUploadController {
@PostMapping("/upload")
public String handleFileUpload(@RequestParam MultipartFile file) throws IOException {
// don't generate upload files like this in a real project.
// give them random names and save their uploaded name as metadata in a database or similar
final Path uploadDestination = Paths.get("C:\uploads").resolve(file.getName());
file.transferTo(uploadDestination);
return "redirect:/";
}
}Как обрабатывать загрузку бинарных файлов (xls, pdf, csv, jpg, zip) с помощью Spring контроллеров?
Есть множество способов заставить это работать, от записи непосредственно в HttpServletResponse или возвращения массива byte[] в результате.
Тем не менее, самая Spring-и и гибкая версия заключается в возврате ‘ResponseEntity ‘. В зависимости от того, где вы сохранили файл, вы будете использовать различные ресурсы.
- На диске → FileSystemResource
- На пути к классам вашего проекта → ClassPathResource
- Потоковая передача из «где-то» → InputStreamResource
- Сделали его доступным как массив byte[] в памяти → ByteArrayResource
Все, что осталось сделать, это установить соответствующие HTTP-заголовки ответа (имя файла, тип контента и т.д.).
package com.marcobehler.springmvcarticle;
import org.springframework.core.io.ClassPathResource;
import org.springframework.core.io.Resource;
import org.springframework.http.HttpHeaders;
import org.springframework.http.HttpStatus;
import org.springframework.http.MediaType;
import org.springframework.http.ResponseEntity;
import org.springframework.stereotype.Controller;
import org.springframework.web.bind.annotation.PathVariable;
import org.springframework.web.bind.annotation.RequestMapping;
import org.springframework.web.bind.annotation.RequestMethod;
import org.springframework.web.server.ResponseStatusException;
import java.io.IOException;
@Controller
public class FileDownloadController {
@RequestMapping(value = "/download/{jpgName}", method = RequestMethod.GET)
public ResponseEntity<Resource> downloadJpg(
@PathVariable String jpgName) throws IOException {
// Resource downloadResource = new InputStreamResource(soimeinputStream)
// Resource downloadResource = new ByteArrayResource(someByteArray)
// Resource downloadResource = new FileSystemResource(someFile)
final ClassPathResource downloadResource = new ClassPathResource(jpgName);
if (!downloadResource.exists()) {
throw new ResponseStatusException(HttpStatus.BAD_REQUEST);
}
HttpHeaders headers = new HttpHeaders();
// 1. set the correct content type
headers.setContentType(MediaType.IMAGE_JPEG);
// 2. set the correct content length, maybe stored in a db table
headers.setContentLength(downloadResource.contentLength());
// 3. if you want to force downloads, otherwise attachments might be displayed directly in the brwoser
headers.setContentDispositionFormData("attachment", jpgName);
return new ResponseEntity<>(downloadResource, headers, HttpStatus.OK);
}
}Как я могу глобально обрабатывать исключения в моих контроллерах?
В Spring MVC есть несколько способов обработки исключений, если вы не хотите обрабатывать их непосредственно в своих контроллерах, а в одном центральном месте.
Создайте класс ControllerAdvice или RestControllerAdvice в сочетании с аннотациями @ResponseStatus и @ExceptionHandler. Несолько замечаний:
- Вы можете догадаться о разнице между этими двумя классами, понимая разницу между контроллером и REST контроллером.
- @ResponseStatus позволяет вам определить код статуса HTTP, который должен быть возвращен клиенту после обработки вашего исключения.
- @ExceptionHandler указывает исключение, которое должно вызывать ваш метод-обработчик.
- Кроме этого, это все похоже на написание обычного контроллера или REST контроллера.
package com.marcobehler.springmvcarticle;
import org.springframework.http.HttpStatus;
import org.springframework.ui.Model;
import org.springframework.web.bind.annotation.ControllerAdvice;
import org.springframework.web.bind.annotation.ExceptionHandler;
import org.springframework.web.bind.annotation.ResponseStatus;
@ControllerAdvice
public class GlobalControllerExceptionHandler {
@ResponseStatus(HttpStatus.CONFLICT) // 409
@ExceptionHandler(SomeConflictException.class)
public String handleConflict(SomeConflictException e, Model model) {
// do something
model.addAttribute("message", e.getMessage());
return "new-template";
}
@ResponseStatus(HttpStatus.NOT_IMPLEMENTED) // 409
@ExceptionHandler(NotYetImplementedExceptoin.class)
public void handleBandwithLimitExceeded(NotYetImplementedExceptoin e) {
// do nothing;
}
}Как вернуть любой код состояния (400, 404 и т.д.) из ваших контроллеров?
Создайте исключение ResponseStatusException с соответствующим кодом состояния и, возможно, причиной.
Альтернативой будет возвращение объекта ResponseEntity, но в большинстве случаев исключение лучше.
package com.marcobehler.springmvcarticle;
import org.springframework.http.HttpStatus;
import org.springframework.stereotype.Controller;
import org.springframework.web.bind.annotation.GetMapping;
import org.springframework.web.server.ResponseStatusException;
@Controller
public class HttpStatusCodeController {
@GetMapping("/somePath")
public void alwaysThrowsException() {
//throw new ResponseStatusException(HttpStatus.NOT_FOUND, "Meeepp, not found.");
throw new ResponseStatusException(HttpStatus.BAD_REQUEST, "Well, that just wasn't right!");
}
}Как насчет концепции XYZ в Spring MVC?
Официальная документация Spring MVC буквально содержит сотни страниц, описывающих, как работает веб-фреймворк.
Поэтому, если вы хотите узнать больше о моделях, представлениях, ViewHandlers, InitBinders, RootContexts, фильтрах, кэшировании и т.д., я предлагаю вам прочитать документацию Spring MVC. Это просто выходит за рамки данного руководства, невозможно охватить это все.
Заключение
Это была хорошая прогулка. Наконец я надеюсь, что вы узнали множество вещей из этой статьи:
- Spring MVC — это старый добрый MVC-фреймворк, который позволяет довольно легко писать веб-сайты HTML или JSON/XML веб-службы.
- Он прекрасно интегрируется со множеством шаблонных библиотек и библиотек преобразования данных, а также с остальной частью экосистемы Spring, такой как Spring Boot.
- Главным образом он позволяет вам сосредоточиться на написании своей бизнес-логики, не беспокоясь о стандартом коде сервлета, разборе HTTP-запросов / ответов и преобразовании данных.
Вот и все на сегодня. Спасибо за чтение.
Благодарности
Большое спасибо Patricio «Pato» Moschcovich, который не только выполнил корректуру этой статьи, но и дал бесценный отзыв!
Spring – Обзор MVC Framework
Среда Spring Web MVC предоставляет архитектуру модель-представление-контроллер и готовые компоненты, которые можно использовать для разработки гибких и слабо связанных веб-приложений. Шаблон MVC приводит к разделению различных аспектов приложения (логика ввода, бизнес-логика и логика пользовательского интерфейса), обеспечивая при этом слабую связь между этими элементами.
-
Модель инкапсулирует данные приложения и, как правило, они состоят из POJO .
-
Представление отвечает за визуализацию данных модели и, в общем, генерирует вывод HTML, который может интерпретировать браузер клиента.
-
Контроллер отвечает за обработку пользовательских запросов и построение соответствующей модели и передает ее в представление для визуализации.
Модель инкапсулирует данные приложения и, как правило, они состоят из POJO .
Представление отвечает за визуализацию данных модели и, в общем, генерирует вывод HTML, который может интерпретировать браузер клиента.
Контроллер отвечает за обработку пользовательских запросов и построение соответствующей модели и передает ее в представление для визуализации.
ДиспетчерСервлет
Среда Spring Web Model-View-Controller (MVC) разработана на основе DispatcherServlet, который обрабатывает все HTTP-запросы и ответы. Рабочий процесс обработки запросов Spring Web MVC DispatcherServlet показан на следующем рисунке.

Ниже приведена последовательность событий, соответствующая входящему HTTP-запросу в DispatcherServlet.
-
После получения HTTP-запроса DispatcherServlet обращается к HandlerMapping для вызова соответствующего контроллера.
-
Контроллер принимает запрос и вызывает соответствующие методы обслуживания на основе используемого метода GET или POST . Сервисный метод устанавливает данные модели на основе определенной бизнес-логики и возвращает имя представления в DispatcherServlet.
-
DispatcherServlet примет помощь от ViewResolver, чтобы подобрать определенное представление для запроса.
-
После того, как представление завершено, DispatcherServlet передает данные модели представлению, которое, наконец, отображается, в браузерах.
После получения HTTP-запроса DispatcherServlet обращается к HandlerMapping для вызова соответствующего контроллера.
Контроллер принимает запрос и вызывает соответствующие методы обслуживания на основе используемого метода GET или POST . Сервисный метод устанавливает данные модели на основе определенной бизнес-логики и возвращает имя представления в DispatcherServlet.
DispatcherServlet примет помощь от ViewResolver, чтобы подобрать определенное представление для запроса.
После того, как представление завершено, DispatcherServlet передает данные модели представлению, которое, наконец, отображается, в браузерах.
Все вышеупомянутые компоненты, то есть HandlerMapping, Controller и ViewResolver, являются частями WebApplicationContext , который является расширением простого ApplicationContext с некоторыми дополнительными функциями, необходимыми для веб-приложений.
Требуемая конфигурация
Нам нужно отобразить запросы, которые вы хотите обработать DispatcherServlet, используя сопоставление URL-адресов в файле web.xml . Ниже приведен пример демонстрации объявления и сопоставления для HelloWeb DispatcherServlet.
<web-app id = "WebApp_ID" version = "2.4" xmlns = "http://java.sun.com/xml/ns/j2ee" xmlns:xsi = "http://www.w3.org/2001/XMLSchema-instance" xsi:schemaLocation = "http://java.sun.com/xml/ns/j2ee http://java.sun.com/xml/ns/j2ee/web-app_2_4.xsd"> <display-name>Spring MVC Application</display-name> <servlet> <servlet-name>HelloWeb</servlet-name> <servlet-class> org.springframework.web.servlet.DispatcherServlet </servlet-class> <load-on-startup>1</load-on-startup> </servlet> <servlet-mapping> <servlet-name>HelloWeb</servlet-name> <url-pattern>*.jsp</url-pattern> </servlet-mapping> </web-app>
Файл web.xml будет храниться в каталоге WebContent / WEB-INF вашего веб-приложения. После инициализации HelloWeb DispatcherServlet платформа попытается загрузить контекст приложения из файла с именем [servlet-name] -servlet.xml, расположенного в каталоге приложения WebContent / WEB-INF. В этом случае наш файл будет HelloWeb-servlet.xml .
Затем тег <servlet-mapping> указывает, какие URL будут обрабатываться каким DispatcherServlet. Здесь все HTTP-запросы, заканчивающиеся на .jsp, будут обрабатываться HelloWeb DispatcherServlet.
Если вы не хотите использовать имя файла по умолчанию как [servlet-name] -servlet.xml и расположение по умолчанию как WebContent / WEB-INF, вы можете настроить это имя файла и местоположение, добавив прослушиватель сервлета ContextLoaderListener в свой файл web.xml. файл следующим образом –
<web-app...> <!-------- DispatcherServlet definition goes here-----> .... <context-param> <param-name>contextConfigLocation</param-name> <param-value>/WEB-INF/HelloWeb-servlet.xml</param-value> </context-param> <listener> <listener-class> org.springframework.web.context.ContextLoaderListener </listener-class> </listener> </web-app>
Теперь давайте проверим необходимую конфигурацию файла HelloWeb-servlet.xml , который находится в каталоге WebContent / WEB-INF вашего веб-приложения.
<beans xmlns = "http://www.springframework.org/schema/beans" xmlns:context = "http://www.springframework.org/schema/context" xmlns:xsi = "http://www.w3.org/2001/XMLSchema-instance" xsi:schemaLocation = " http://www.springframework.org/schema/beans http://www.springframework.org/schema/beans/spring-beans-3.0.xsd http://www.springframework.org/schema/context http://www.springframework.org/schema/context/spring-context-3.0.xsd"> <context:component-scan base-package = "com.tutorialspoint" /> <bean class = "org.springframework.web.servlet.view.InternalResourceViewResolver"> <property name = "prefix" value = "/WEB-INF/jsp/" /> <property name = "suffix" value = ".jsp" /> </bean> </beans>
Ниже приведены некоторые важные моменты, касающиеся файла HelloWeb-servlet.xml.
-
Файл [servlet-name] -servlet.xml будет использоваться для создания определенных bean-компонентов, переопределяя определения любых bean-компонентов, определенных с таким же именем в глобальной области видимости.
-
Тег <context: component-scan …> будет использоваться для активации возможности сканирования аннотаций Spring MVC, которая позволяет использовать аннотации, такие как @Controller, @RequestMapping и т. Д.
-
InternalResourceViewResolver будет иметь правила, определенные для разрешения имен представлений. В соответствии с определенным выше правилом логическое представление с именем hello делегируется реализации представления, расположенной в /WEB-INF/jsp/hello.jsp .
Файл [servlet-name] -servlet.xml будет использоваться для создания определенных bean-компонентов, переопределяя определения любых bean-компонентов, определенных с таким же именем в глобальной области видимости.
Тег <context: component-scan …> будет использоваться для активации возможности сканирования аннотаций Spring MVC, которая позволяет использовать аннотации, такие как @Controller, @RequestMapping и т. Д.
InternalResourceViewResolver будет иметь правила, определенные для разрешения имен представлений. В соответствии с определенным выше правилом логическое представление с именем hello делегируется реализации представления, расположенной в /WEB-INF/jsp/hello.jsp .
Давайте теперь поймем, как создавать фактические компоненты, т.е. Контроллер, Модель и Представление.
Определение контроллера
DispatcherServlet делегирует запрос контроллерам для выполнения специфической для него функциональности. Аннотация @Controller указывает, что определенный класс выполняет роль контроллера. Аннотация @RequestMapping используется для сопоставления URL либо с целым классом, либо с конкретным методом-обработчиком.
@Controller @RequestMapping("/hello") public class HelloController{ @RequestMapping(method = RequestMethod.GET) public String printHello(ModelMap model) { model.addAttribute("message", "Hello Spring MVC Framework!"); return "hello"; } }
Аннотация @Controller определяет класс как контроллер Spring MVC. Здесь первое использование @RequestMapping указывает, что все методы обработки на этом контроллере относятся к пути / hello .
Следующая аннотация @RequestMapping (method = RequestMethod.GET) используется для объявления метода printHello () в качестве метода службы контроллера по умолчанию для обработки HTTP-запроса GET. Мы можем определить другой метод для обработки любого запроса POST по тому же URL.
Мы также можем написать приведенный выше контроллер в другой форме, где мы можем добавить дополнительные атрибуты в @RequestMapping следующим образом:
@Controller public class HelloController{ @RequestMapping(value = "/hello", method = RequestMethod.GET) public String printHello(ModelMap model) { model.addAttribute("message", "Hello Spring MVC Framework!"); return "hello"; } }
Атрибут value указывает URL-адрес, с которым сопоставляется метод обработчика, а атрибут метода определяет метод службы для обработки запроса HTTP GET.
Ниже приведены некоторые важные моменты, касающиеся контроллера, определенного выше:
-
Вы определите необходимую бизнес-логику внутри метода службы. Вы можете вызвать другой метод внутри этого метода согласно требованию.
-
На основе определенной бизнес-логики вы создадите модель в этом методе. Вы можете установить различные атрибуты модели, и эти атрибуты будут доступны представлению для представления результата. В этом примере создается модель с атрибутом «сообщение».
-
Определенный метод службы может возвращать строку, которая содержит имя представления, которое будет использоваться для визуализации модели. В этом примере возвращается «привет» в качестве имени логического представления.
Вы определите необходимую бизнес-логику внутри метода службы. Вы можете вызвать другой метод внутри этого метода согласно требованию.
На основе определенной бизнес-логики вы создадите модель в этом методе. Вы можете установить различные атрибуты модели, и эти атрибуты будут доступны представлению для представления результата. В этом примере создается модель с атрибутом «сообщение».
Определенный метод службы может возвращать строку, которая содержит имя представления, которое будет использоваться для визуализации модели. В этом примере возвращается «привет» в качестве имени логического представления.
Создание JSP-видов
Spring MVC поддерживает много типов представлений для различных технологий представления. К ним относятся – JSP, HTML, PDF, рабочие листы Excel, XML, шаблоны скорости, XSLT, JSON, Atom и RSS- каналы, JasperReports и т. Д. Однако наиболее распространенными являются шаблоны JSP, написанные с использованием JSTL. Итак, давайте напишем простое приветствие в /WEB-INF/hello/hello.jsp –
<html> <head> <title>Hello Spring MVC</title> </head> <body> <h2>${message}</h2> </body> </html>
Здесь $ {message} Вот атрибут, который мы настроили внутри Контроллера. Вы можете иметь несколько атрибутов для отображения внутри вашего представления.
Spring MVC – настройка среды
В этой главе мы узнаем, как подготовить среду разработки, чтобы начать работу с Spring Framework. В этой главе также будет рассказано, как настроить JDK, Tomcat и Eclipse на вашем компьютере перед установкой Spring Framework.
Шаг 1 – Настройка Java Development Kit (JDK)
Вы можете скачать последнюю версию с сайта Oracle на Java – Java SE Downloads . В загруженных файлах вы найдете инструкции по установке JDK, следуйте инструкциям по установке и настройке. После завершения настройки установите переменные среды PATH и JAVA_HOME, чтобы они ссылались на каталог, содержащий java и javac , обычно java_install_dir / bin и java_install_dir соответственно.
Если вы работаете в Windows и установили JDK в C: jdk1.6.0_15 , вам придется поместить следующую строку в ваш файл C: autoexec.bat .
set PATH = C:jdk1.6.0_15bin;%PATH% set JAVA_HOME = C:jdk1.6.0_15
Кроме того, в Windows NT / 2000 / XP вы также можете щелкнуть правой кнопкой мыши Мой компьютер → выбрать Свойства → Дополнительно → Переменные среды. Затем вы обновите значение PATH и нажмете кнопку ОК.
В UNIX (Solaris, Linux и т. Д.), Если SDK установлен в /usr/local/jdk1.6.0_15 и вы используете оболочку C, вам следует ввести следующую команду в свой файл .cshrc .
setenv PATH /usr/local/jdk1.6.0_15/bin:$PATH setenv JAVA_HOME /usr/local/jdk1.6.0_15
В качестве альтернативы, если вы используете интегрированную среду разработки (IDE), такую как Borland JBuilder, Eclipse, IntelliJ IDEA или Sun ONE Studio , то скомпилируйте и запустите простую программу, чтобы подтвердить, что IDE знает, где установлена Java, в противном случае выполните правильную настройку, как указано в документы IDE.
Шаг 2 – Установите Apache Common Logging API
Вы можете загрузить последнюю версию API регистрации Apache Commons с https://commons.apache.org/logging/ . После загрузки установки распакуйте бинарный дистрибутив в удобное место.
Например – C: commons-logging-1.1.1 в Windows или /usr/local/commons-logging1.1.1 в Linux / Unix. В этом каталоге будут находиться следующие jar-файлы, другие сопроводительные документы и т. Д.

Убедитесь, что вы правильно установили переменную CLASSPATH в этом каталоге, иначе вы столкнетесь с проблемой при запуске приложения.
Шаг 3 – Настройка Eclipse IDE
Все примеры в этом руководстве были написаны с использованием Eclipse IDE. Поэтому рекомендуется, чтобы на машине была установлена последняя версия Eclipse.
Чтобы установить Eclipse IDE, загрузите последние версии Eclipse по следующей ссылке https://www.eclipse.org/downloads/ . После загрузки установки распакуйте бинарный дистрибутив в удобное место.
Например, в – C: eclipse для Windows или / usr / local / eclipse в Linux / Unix и, наконец, установите переменную PATH соответствующим образом.
Eclipse можно запустить, выполнив следующие команды на компьютере с Windows, или мы можем просто дважды щелкнуть файл eclipse.exe.
%C:eclipseeclipse.exe
Eclipse можно запустить, выполнив следующие команды на компьютере с UNIX (Solaris, Linux и т. Д.):
$/usr/local/eclipse/eclipse
После успешного запуска, если все хорошо, то должен отобразиться следующий экран.
Шаг 4 – Настройка библиотек Spring Framework
Теперь, если все хорошо, тогда мы можем приступить к настройке Spring Framework. Ниже приведены шаги для загрузки и установки фреймворка на компьютере.
-
Выберите, хотите ли вы установить Spring в Windows или UNIX, а затем перейдите к следующему шагу, чтобы загрузить ZIP-файл для Windows и TZ- файл для Unix.
-
Загрузите последнюю версию бинарных файлов среды Spring с https://repo.spring.io/release/org/springframework/spring .
-
Мы загрузили spring-framework-4.3.1.RELEASE-dist.zip на Windows Machine, и когда мы разархивируем загруженный файл, он выдаст структуру каталогов внутри – E: spring следующим образом.
Выберите, хотите ли вы установить Spring в Windows или UNIX, а затем перейдите к следующему шагу, чтобы загрузить ZIP-файл для Windows и TZ- файл для Unix.
Загрузите последнюю версию бинарных файлов среды Spring с https://repo.spring.io/release/org/springframework/spring .
Мы загрузили spring-framework-4.3.1.RELEASE-dist.zip на Windows Machine, и когда мы разархивируем загруженный файл, он выдаст структуру каталогов внутри – E: spring следующим образом.
Вы найдете все библиотеки Spring в каталоге E: spring libs . Убедитесь, что вы правильно установили переменную CLASSPATH в этом каталоге; в противном случае мы столкнемся с проблемой при запуске приложения. Если мы используем Eclipse, то не нужно устанавливать CLASSPATH, потому что все настройки будут выполнены через Eclipse.
Как только вы закончите с этим последним шагом, вы будете готовы приступить к первому весеннему примеру, который вы увидите в следующей главе.
Spring MVC – пример Hello World
В следующем примере показано, как написать простое веб-приложение Hello World с использованием Spring MVC Framework. Начнем с того, что у нас будет рабочая Eclipse IDE, а затем выполните следующие шаги для разработки динамического веб-приложения с использованием Spring Web Framework.
| шаг | Описание |
|---|---|
| 1 | Создайте динамический веб-проект с именем HelloWeb и создайте пакет com.tutorialspoint в папке src в созданном проекте. |
| 2 | Перетащите следующие Spring и другие библиотеки в папку WebContent / WEB-INF / lib . , |
| 3 | Создайте класс Java HelloController в пакете com.tutorialspoint. |
| 4 | Создайте файлы конфигурации Spring web.xml и HelloWeb-servlet.xml в папке WebContent / WEB-INF. |
| 5 | Создайте подпапку с именем jsp в папке WebContent / WEB-INF. Создайте файл представления hello.jsp в этой подпапке . |
| 6 | Последний шаг – создание содержимого исходного файла и файлов конфигурации и экспорт приложения, как описано ниже. |
HelloController.java
package com.tutorialspoint; import org.springframework.stereotype.Controller; import org.springframework.web.bind.annotation.RequestMapping; import org.springframework.web.bind.annotation.RequestMethod; import org.springframework.ui.ModelMap; @Controller @RequestMapping("/hello") public class HelloController{ @RequestMapping(method = RequestMethod.GET) public String printHello(ModelMap model) { model.addAttribute("message", "Hello Spring MVC Framework!"); return "hello"; } }
web.xml
<web-app id = "WebApp_ID" version = "2.4"
xmlns = "http://java.sun.com/xml/ns/j2ee"
xmlns:xsi = "http://www.w3.org/2001/XMLSchema-instance"
xsi:schemaLocation = "http://java.sun.com/xml/ns/j2ee
http://java.sun.com/xml/ns/j2ee/web-app_2_4.xsd">
<display-name>Spring MVC Application</display-name>
<servlet>
<servlet-name>HelloWeb</servlet-name>
<servlet-class>
org.springframework.web.servlet.DispatcherServlet
</servlet-class>
<load-on-startup>1</load-on-startup>
</servlet>
<servlet-mapping>
<servlet-name>HelloWeb</servlet-name>
<url-pattern>/</url-pattern>
</servlet-mapping>
</web-app>
HelloWeb-servlet.xml
<beans xmlns = "http://www.springframework.org/schema/beans"
xmlns:context = "http://www.springframework.org/schema/context"
xmlns:xsi = "http://www.w3.org/2001/XMLSchema-instance"
xsi:schemaLocation = "
http://www.springframework.org/schema/beans
http://www.springframework.org/schema/beans/spring-beans-3.0.xsd
http://www.springframework.org/schema/context
http://www.springframework.org/schema/context/spring-context-3.0.xsd">
<context:component-scan base-package = "com.tutorialspoint" />
<bean class = "org.springframework.web.servlet.view.InternalResourceViewResolver">
<property name = "prefix" value = "/WEB-INF/jsp/" />
<property name = "suffix" value = ".jsp" />
</bean>
</beans>
hello.jsp
<%@ page contentType = "text/html; charset = UTF-8" %>
<html>
<head>
<title>Hello World</title>
</head>
<body>
<h2>${message}</h2>
</body>
</html>
Ниже приведен список Spring и других библиотек, которые будут включены в веб-приложение. Мы можем просто перетащить эти файлы и поместить их в папку – WebContent / WEB-INF / lib .
-
сервлет-апи-xyzjar
-
Обще-каротаж xyzjar
-
весна-АОП-xyzjar
-
весна-бобы-xyzjar
-
пружинный контекстно-xyzjar
-
весна-ядро-xyzjar
-
весна-выражение-xyzjar
-
весна-webmvc-xyzjar
-
весна-веб-xyzjar
сервлет-апи-xyzjar
Обще-каротаж xyzjar
весна-АОП-xyzjar
весна-бобы-xyzjar
пружинный контекстно-xyzjar
весна-ядро-xyzjar
весна-выражение-xyzjar
весна-webmvc-xyzjar
весна-веб-xyzjar
Когда вы закончите создавать исходные файлы и файлы конфигурации, экспортируйте ваше приложение. Щелкните правой кнопкой мыши свое приложение, выберите « Экспорт» → «Файл WAR» и сохраните файл HelloWeb.war в папке веб-приложений Tomcat.
Теперь запустите сервер Tomcat и убедитесь, что вы можете получить доступ к другим веб-страницам из папки webapps с помощью стандартного браузера. Теперь попробуйте получить доступ к URL – http: // localhost: 8080 / HelloWeb / hello . Если с Spring Web Application все в порядке, мы увидим следующий экран.

Следует отметить, что в указанном URL-адресе HelloWeb – это имя приложения, а hello – это виртуальная подпапка, о которой мы упоминали в нашем контроллере с помощью @RequestMapping (“/ hello”). Вы можете использовать прямой root при отображении вашего URL с помощью @RequestMapping (“/”) , в этом случае вы можете получить доступ к той же странице, используя короткий URL http: // localhost: 8080 / HelloWeb / , но рекомендуется иметь разные функции в разные папки.
Spring MVC – пример обработки форм
В следующем примере показано, как написать простое веб-приложение Hello World с использованием Spring MVC Framework. Начнем с того, что у нас будет рабочая Eclipse IDE, а затем выполните следующие шаги для разработки динамического веб-приложения с использованием Spring Web Framework.
| шаг | Описание |
|---|---|
| 1 | Создайте проект с именем HelloWeb в пакете com.tutorialspoint, как описано в главе Spring MVC – Hello World. |
| 2 | Создайте классы Java Student, StudentController в пакете com.tutorialspoint. |
| 3 | Создайте файлы представлений student.jsp, result.jsp в подпапке jsp. |
| 4 | Последний шаг – создание содержимого исходного файла и файлов конфигурации и экспорт приложения, как описано ниже. |
Student.java
package com.tutorialspoint;
public class Student {
private Integer age;
private String name;
private Integer id;
public void setAge(Integer age) {
this.age = age;
}
public Integer getAge() {
return age;
}
public void setName(String name) {
this.name = name;
}
public String getName() {
return name;
}
public void setId(Integer id) {
this.id = id;
}
public Integer getId() {
return id;
}
}
StudentController.java
package com.tutorialspoint;
import org.springframework.stereotype.Controller;
import org.springframework.web.bind.annotation.ModelAttribute;
import org.springframework.web.bind.annotation.RequestMapping;
import org.springframework.web.bind.annotation.RequestMethod;
import org.springframework.web.servlet.ModelAndView;
import org.springframework.ui.ModelMap;
@Controller
public class StudentController {
@RequestMapping(value = "/student", method = RequestMethod.GET)
public ModelAndView student() {
return new ModelAndView("student", "command", new Student());
}
@RequestMapping(value = "/addStudent", method = RequestMethod.POST)
public String addStudent(@ModelAttribute("SpringWeb")Student student,
ModelMap model) {
model.addAttribute("name", student.getName());
model.addAttribute("age", student.getAge());
model.addAttribute("id", student.getId());
return "result";
}
}
Здесь, первый сервисный метод student () , мы передали пустой объект Studentobject в объект ModelAndView с именем «команда». Это сделано потому, что среда Spring ожидает объект с именем «команда», если мы используем теги <form: form> в файле JSP. Таким образом, когда вызывается метод student (), он возвращает представление student.jsp.
Второй сервисный метод addStudent () будет вызываться для метода POST по URL-адресу HelloWeb / addStudent. Вы подготовите свой модельный объект на основе предоставленной информации. Наконец, из метода сервиса будет возвращено представление «result», что приведет к отображению result.jsp.
student.jsp
<%@taglib uri="http://www.springframework.org/tags/form" prefix = "form"%>
<html>
<head>
<title>Spring MVC Form Handling</title>
</head>
<body>
<h2>Student Information</h2>
<form:form method = "POST" action = "/HelloWeb/addStudent">
<table>
<tr>
<td><form:label path = "name">Name</form:label></td>
<td><form:input path = "name" /></td>
</tr>
<tr>
<td><form:label path = "age">Age</form:label></td>
<td><form:input path = "age" /></td>
</tr>
<tr>
<td><form:label path = "id">id</form:label></td>
<td><form:input path = "id" /></td>
</tr>
<tr>
<td colspan = "2">
<input type = "submit" value = "Submit"/>
</td>
</tr>
</table>
</form:form>
</body>
</html>
result.jsp
<%@taglib uri = "http://www.springframework.org/tags/form" prefix = "form"%>
<html>
<head>
<title>Spring MVC Form Handling</title>
</head>
<body>
<h2>Submitted Student Information</h2>
<table>
<tr>
<td>Name</td>
<td>${name}</td>
</tr>
<tr>
<td>Age</td>
<td>${age}</td>
</tr>
<tr>
<td>ID</td>
<td>${id}</td>
</tr>
</table>
</body>
</html>
Как только мы закончим с созданием исходных файлов и файлов конфигурации, экспортируйте ваше приложение. Щелкните правой кнопкой мыши свое приложение, выберите «Экспорт» → «Файл WAR» и сохраните файл SpringWeb.war в папке веб-приложений Tomcat.
Теперь запустите сервер Tomcat и убедитесь, что вы можете получить доступ к другим веб-страницам из папки веб-приложений с помощью стандартного браузера. Теперь попробуйте URL-адрес – http: // localhost: 8080 / SpringWeb / student, и вы должны увидеть следующий экран, если все в порядке с веб-приложением Spring.

После отправки необходимой информации, нажмите на кнопку отправки, чтобы отправить форму. Вы должны увидеть следующий экран, если все в порядке с вашим веб-приложением Spring.

Spring MVC – Пример перенаправления страницы
В следующем примере показано, как написать простое веб-приложение, которое использует перенаправление для передачи http-запроса на другую страницу. Для начала давайте наладим работающую среду Eclipse IDE и рассмотрим следующие шаги для разработки веб-приложения на основе динамических форм с использованием Spring Web Framework:
| шаг | Описание |
|---|---|
| 1 | Создайте проект с именем HelloWeb в пакете com.tutorialspoint, как описано в главе Spring MVC – Hello World. |
| 2 | Создайте WebController класса Java в пакете com.tutorialspoint. |
| 3 | Создайте файлы представлений index.jsp, final.jsp в подпапке jsp. |
| 4 | Последний шаг – создание содержимого исходного файла и файлов конфигурации и экспорт приложения, как описано ниже. |
WebController.java
package com.tutorialspoint;
import org.springframework.stereotype.Controller;
import org.springframework.web.bind.annotation.RequestMapping;
import org.springframework.web.bind.annotation.RequestMethod;
@Controller
public class WebController {
@RequestMapping(value = "/index", method = RequestMethod.GET)
public String index() {
return "index";
}
@RequestMapping(value = "/redirect", method = RequestMethod.GET)
public String redirect() {
return "redirect:finalPage";
}
@RequestMapping(value = "/finalPage", method = RequestMethod.GET)
public String finalPage() {
return "final";
}
}
Ниже приводится содержимое файла представления Spring index.jsp . Это будет целевая страница, эта страница отправит запрос методу доступа-перенаправления, который перенаправит этот запрос другому методу службы, и, наконец, будет отображена страница final.jsp .
index.jsp
<%@taglib uri = "http://www.springframework.org/tags/form" prefix = "form"%>
<html>
<head>
<title>Spring Page Redirection</title>
</head>
<body>
<h2>Spring Page Redirection</h2>
<p>Click below button to redirect the result to new page</p>
<form:form method = "GET" action = "/HelloWeb/redirect">
<table>
<tr>
<td>
<input type = "submit" value = "Redirect Page"/>
</td>
</tr>
</table>
</form:form>
</body>
</html>
final.jsp
<%@taglib uri = "http://www.springframework.org/tags/form" prefix = "form"%>
<html>
<head>
<title>Spring Page Redirection</title>
</head>
<body>
<h2>Redirected Page</h2>
</body>
</html>
Когда вы закончите создавать исходные файлы и файлы конфигурации, экспортируйте ваше приложение. Щелкните правой кнопкой мыши свое приложение, выберите «Экспорт» → «Файл WAR» и сохраните файл HelloWeb.war в папке веб-приложений Tomcat.
Теперь запустите сервер Tomcat и убедитесь, что вы можете получить доступ к другим веб-страницам из папки webapps с помощью стандартного браузера. Попробуйте ввести URL-адрес – http: // localhost: 8080 / HelloWeb / index, и вы должны увидеть следующий экран, если все в порядке с веб-приложением Spring.
Теперь нажмите кнопку «Страница перенаправления», чтобы отправить форму и перейти к последней перенаправленной странице. Мы должны увидеть следующий экран, если с нашим веб-приложением Spring все в порядке –
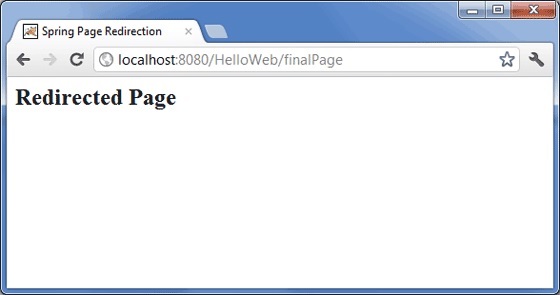
Spring MVC – пример статических страниц
В следующем примере показано, как написать простое веб-приложение с использованием Spring MVC Framework, которое может получать доступ к статическим страницам и динамическим страницам с помощью тега <mvc: resources> .
Для начала давайте предоставим рабочую среду Eclipse IDE и придерживаемся следующих шагов для разработки веб-приложения на основе динамических форм с использованием Spring Web Framework.
| шаг | Описание |
|---|---|
| 1 | Создайте проект с именем HelloWeb в пакете com.tutorialspoint, как описано в главе Spring MVC – Hello World. |
| 2 | Создайте WebController класса Java в пакете com.tutorialspoint. |
| 3 | Создайте статический файл final.htm в подпапке jsp. |
| 4 | Обновите файл конфигурации Spring HelloWeb-servlet.xml в папке WebContent / WEB-INF, как показано ниже. |
| 5 | Последний шаг – создание содержимого исходного файла и файлов конфигурации и экспорт приложения, что объясняется ниже. |
WebController.java
package com.tutorialspoint;
import org.springframework.stereotype.Controller;
import org.springframework.web.bind.annotation.RequestMapping;
import org.springframework.web.bind.annotation.RequestMethod;
@Controller
public class WebController {
@RequestMapping(value = "/index", method = RequestMethod.GET)
public String index() {
return "index";
}
@RequestMapping(value = "/staticPage", method = RequestMethod.GET)
public String redirect() {
return "redirect:/pages/final.htm";
}
}
HelloWeb-servlet.xml
<?xml version = "1.0" encoding = "UTF-8"?>
<beans xmlns = "http://www.springframework.org/schema/beans"
xmlns:xsi = " http://www.w3.org/2001/XMLSchema-instance"
xmlns:context = "http://www.springframework.org/schema/context"
xmlns:mvc = "http://www.springframework.org/schema/mvc"
xsi:schemaLocation = "http://www.springframework.org/schema/beans
http://www.springframework.org/schema/beans/spring-beans-2.5.xsd
http://www.springframework.org/schema/mvc
http://www.springframework.org/schema/mvc/spring-mvc-3.0.xsd
http://www.springframework.org/schema/context
http://www.springframework.org/schema/context/spring-context-3.0.xsd">
<context:component-scan base-package = "com.tutorialspoint" />
<bean id = "viewResolver" class = "org.springframework.web.servlet.view.InternalResourceViewResolver">
<property name = "prefix" value = "/WEB-INF/jsp/" />
<property name = "suffix" value = ".jsp" />
</bean>
<mvc:resources mapping = "/pages/**" location = "/WEB-INF/pages/" />
<mvc:annotation-driven/>
</beans>
Здесь тег <mvc: resources …. /> используется для отображения статических страниц. Атрибут сопоставления должен быть шаблоном Ant, который задает шаблон URL-адресов HTTP-запросов. Атрибут location должен указывать одно или несколько допустимых местоположений каталога ресурсов, имеющих статические страницы, включая изображения, таблицы стилей, JavaScript и другое статическое содержимое. Несколько местоположений ресурсов могут быть указаны с использованием списка значений через запятую.
Ниже приводится содержимое файла представления Spring WEB-INF / jsp / index.jsp . Это будет целевая страница; эта страница отправит запрос на доступ к методу сервиса staticPage , который перенаправит этот запрос на статическую страницу, доступную в папке WEB-INF / pages.
index.jsp
<%@taglib uri = "http://www.springframework.org/tags/form" prefix = "form"%>
<html>
<head>
<title>Spring Landing Page</title>
</head>
<body>
<h2>Spring Landing Pag</h2>
<p>Click below button to get a simple HTML page</p>
<form:form method = "GET" action = "/HelloWeb/staticPage">
<table>
<tr>
<td>
<input type = "submit" value = "Get HTML Page"/>
</td>
</tr>
</table>
</form:form>
</body>
</html>
final.htm
<html>
<head>
<title>Spring Static Page</title>
</head>
<body>
<h2>A simple HTML page</h2>
</body>
</html>
Когда вы закончите создавать исходные файлы и файлы конфигурации, экспортируйте ваше приложение. Щелкните правой кнопкой мыши свое приложение, выберите «Экспорт» → «Файл WAR» и сохраните файл HelloWeb.war в папке веб-приложений Tomcat.
Теперь запустите сервер Tomcat и убедитесь, что вы можете получить доступ к другим веб-страницам из папки webapps с помощью стандартного браузера. Теперь попробуйте получить доступ к URL – http: // localhost: 8080 / HelloWeb / index. Если с Spring Web Application все в порядке, мы увидим следующий экран.

Нажмите кнопку «Получить страницу HTML», чтобы получить доступ к статической странице, упомянутой в методе сервиса staticPage. Если с вашим Spring Web Application все в порядке, мы увидим следующий экран.

Spring MVC – Пример текстового поля
В следующем примере показано, как использовать текстовые поля в формах с использованием среды Spring Web MVC. Для начала давайте наладим работающую Eclipse IDE и перейдем к следующим шагам для разработки веб-приложения на основе динамических форм с использованием Spring Web Framework –
| шаг | Описание |
|---|---|
| 1 | Создайте проект с именем HelloWeb в пакете com.tutorialspoint, как описано в главе Spring MVC – Hello World Example. |
| 2 | Создайте классы Java Student, StudentController в пакете com.tutorialspoint. |
| 3 | Создайте файлы представления student.jsp, result.jsp в подпапке jsp. |
| 4 | Последний шаг – создание содержимого исходного файла и файлов конфигурации и экспорт приложения, как описано ниже. |
Student.java
package com.tutorialspoint;
public class Student {
private Integer age;
private String name;
private Integer id;
public void setAge(Integer age) {
this.age = age;
}
public Integer getAge() {
return age;
}
public void setName(String name) {
this.name = name;
}
public String getName() {
return name;
}
public void setId(Integer id) {
this.id = id;
}
public Integer getId() {
return id;
}
}
StudentController.java
package com.tutorialspoint;
import org.springframework.stereotype.Controller;
import org.springframework.web.bind.annotation.ModelAttribute;
import org.springframework.web.bind.annotation.RequestMapping;
import org.springframework.web.bind.annotation.RequestMethod;
import org.springframework.web.servlet.ModelAndView;
import org.springframework.ui.ModelMap;
@Controller
public class StudentController {
@RequestMapping(value = "/student", method = RequestMethod.GET)
public ModelAndView student() {
return new ModelAndView("student", "command", new Student());
}
@RequestMapping(value = "/addStudent", method = RequestMethod.POST)
public String addStudent(@ModelAttribute("SpringWeb")Student student,
ModelMap model) {
model.addAttribute("name", student.getName());
model.addAttribute("age", student.getAge());
model.addAttribute("id", student.getId());
return "result";
}
}
Здесь, первый сервисный метод student () , мы передали пустой объект Studentobject в объекте ModelAndView с именем «command», потому что среда Spring ожидает объект с именем «command», если вы используете теги <form: form> в ваш файл JSP. Таким образом, когда вызывается метод student (), он возвращает представление student.jsp .
Второй сервисный метод addStudent () будет вызываться для метода POST по URL-адресу HelloWeb / addStudent . Вы подготовите свой модельный объект на основе предоставленной информации. Наконец, из метода сервиса будет возвращено представление «result», что приведет к отображению result.jsp
student.jsp
<%@taglib uri = "http://www.springframework.org/tags/form" prefix = "form"%>
<html>
<head>
<title>Spring MVC Form Handling</title>
</head>
<body>
<h2>Student Information</h2>
<form:form method = "POST" action = "/HelloWeb/addStudent">
<table>
<tr>
<td><form:label path = "name">Name</form:label></td>
<td><form:input path = "name" /></td>
</tr>
<tr>
<td><form:label path = "age">Age</form:label></td>
<td><form:input path = "age" /></td>
</tr>
<tr>
<td><form:label path = "id">id</form:label></td>
<td><form:input path = "id" /></td>
</tr>
<tr>
<td colspan = "2">
<input type = "submit" value = "Submit"/>
</td>
</tr>
</table>
</form:form>
</body>
</html>
Здесь мы используем тег <form: input /> для визуализации текстового поля HTML. Например –
<form:input path = "name" />
Он будет отображать следующий HTML-контент.
<input id = "name" name = "name" type = "text" value = ""/>
result.jsp
<%@taglib uri = "http://www.springframework.org/tags/form" prefix = "form"%>
<html>
<head>
<title>Spring MVC Form Handling</title>
</head>
<body>
<h2>Submitted Student Information</h2>
<table>
<tr>
<td>Name</td>
<td>${name}</td>
</tr>
<tr>
<td>Age</td>
<td>${age}</td>
</tr>
<tr>
<td>ID</td>
<td>${id}</td>
</tr>
</table>
</body>
</html>
Как только мы закончим с созданием исходных файлов и файлов конфигурации, экспортируйте ваше приложение. Щелкните правой кнопкой мыши свое приложение, выберите « Экспорт» → «Файл WAR» и сохраните файл HelloWeb.war в папке веб-приложений Tomcat.
Теперь запустите сервер Tomcat и убедитесь, что вы можете получить доступ к другим веб-страницам из папки веб-приложений с помощью стандартного браузера. Попробуйте URL – http: // localhost: 8080 / HelloWeb / student, и мы увидим следующий экран, если все в порядке с веб-приложением Spring.

После отправки необходимой информации, нажмите на кнопку отправки, чтобы отправить форму. Мы должны увидеть следующий экран, если все в порядке с веб-приложением Spring.

Spring MVC – Пример пароля
В следующем примере описывается использование пароля в формах с использованием среды Spring Web MVC. Начнем с того, что нам нужно иметь работающую Eclipse IDE и придерживаться следующих шагов для разработки веб-приложения на основе динамических форм с использованием Spring Web Framework.
| шаг | Описание |
|---|---|
| 1 | Создайте проект с именем HelloWeb в пакете com.tutorialspoint, как описано в главе Spring MVC – Hello World. |
| 2 | Создайте Java классы User, UserController в com.tutorialspointpackage. |
| 3 | Создайте файлы представлений user.jsp, users.jsp в подпапке jsp. |
| 4 | Последний шаг – создание содержимого исходного файла и файлов конфигурации и экспорт приложения, как описано ниже. |
User.java
package com.tutorialspoint;
public class User {
private String username;
private String password;
public String getUsername() {
return username;
}
public void setUsername(String username) {
this.username = username;
}
public String getPassword() {
return password;
}
public void setPassword(String password) {
this.password = password;
}
}
UserController.java
package com.tutorialspoint;
import org.springframework.stereotype.Controller;
import org.springframework.web.bind.annotation.ModelAttribute;
import org.springframework.web.bind.annotation.RequestMapping;
import org.springframework.web.bind.annotation.RequestMethod;
import org.springframework.web.servlet.ModelAndView;
import org.springframework.ui.ModelMap;
@Controller
public class UserController {
@RequestMapping(value = "/user", method = RequestMethod.GET)
public ModelAndView user() {
return new ModelAndView("user", "command", new User());
}
@RequestMapping(value = "/addUser", method = RequestMethod.POST)
public String addUser(@ModelAttribute("SpringWeb")User user,
ModelMap model) {
model.addAttribute("username", user.getUsername());
model.addAttribute("password", user.getPassword());
return "users";
}
}
Здесь, первый метод сервиса user () , мы передали пустой объект User в объекте ModelAndView с именем «command», потому что среда Spring ожидает объект с именем «command», если вы используете теги <form: form> в вашем файле JSP. Таким образом, когда вызывается метод user (), он возвращает представление user.jsp.
Второй сервисный метод addUser () будет вызываться для метода POST по URL-адресу HelloWeb / addUser. Вы подготовите свой модельный объект на основе предоставленной информации. Наконец, представление «пользователи» будет возвращено из метода сервиса, что приведет к отображению users.jsp.
user.jsp
<%@taglib uri = "http://www.springframework.org/tags/form" prefix = "form"%>
<html>
<head>
<title>Spring MVC Form Handling</title>
</head>
<body>
<h2>User Information</h2>
<form:form method = "POST" action = "/HelloWeb/addUser">
<table>
<tr>
<td><form:label path = "username">User Name</form:label></td>
<td><form:input path = "username" /></td>
</tr>
<tr>
<td><form:label path = "password">Age</form:label></td>
<td><form:password path = "password" /></td>
</tr>
<tr>
<td colspan = "2">
<input type = "submit" value = "Submit"/>
</td>
</tr>
</table>
</form:form>
</body>
</html>
Здесь мы используем тег <form: password /> для отображения поля пароля HTML. Например –
<form:password path = "password" />
Будет отображено следующее содержимое HTML.
<input id = "password" name = "password" type = "password" value = ""/>
users.jsp
<%@taglib uri = "http://www.springframework.org/tags/form" prefix = "form"%>
<html>
<head>
<title>Spring MVC Form Handling</title>
</head>
<body>
<h2>Submitted User Information</h2>
<table>
<tr>
<td>Username</td>
<td>${username}</td>
</tr>
<tr>
<td>Password</td>
<td>${password}</td>
</tr>
</table>
</body>
</html>
Как только мы закончим с созданием исходных файлов и файлов конфигурации, экспортируйте приложение. Щелкните правой кнопкой мыши свое приложение, выберите «Экспорт» → «Файл WAR» и сохраните файл HelloWeb.war в папке веб-приложений Tomcat.
Теперь запустите сервер Tomcat и убедитесь, что вы можете получить доступ к другим веб-страницам из папки веб-приложений с помощью стандартного браузера. Попробуйте ввести URL-адрес – http://hosthost: 8080 / HelloWeb / user, и мы увидим следующий экран, если все в порядке с веб-приложением Spring.
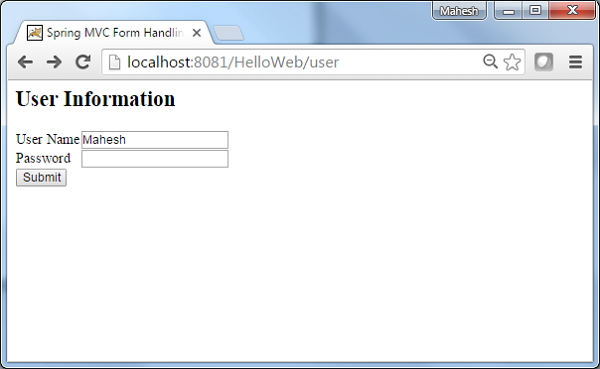
После отправки необходимой информации, нажмите на кнопку отправки, чтобы отправить форму. Мы увидим следующий экран, если все в порядке с веб-приложением Spring.
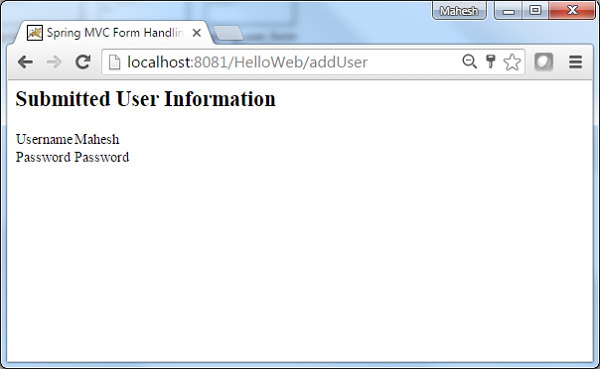
Spring MVC – пример TextArea
В следующем примере объясняется, как использовать TextArea в формах с использованием среды Spring Web MVC. Для начала давайте предоставим рабочую среду Eclipse и выполним последующие шаги для разработки веб-приложения на основе динамических форм с использованием Spring Web Framework.
| шаг | Описание |
|---|---|
| 1 | Создайте проект с именем HelloWeb в пакете com.tutorialspoint, как описано в главе Spring MVC – Hello World. |
| 2 | Создайте Java классы User, UserController в com.tutorialspointpackage. |
| 3 | Создайте файлы представлений user.jsp, users.jsp в подпапке jsp. |
| 4 | Последний шаг – создание содержимого исходного файла и файлов конфигурации и экспорт приложения, как описано ниже. |
User.java
package com.tutorialspoint;
public class User {
private String username;
private String password;
private String address;
public String getUsername() {
return username;
}
public void setUsername(String username) {
this.username = username;
}
public String getPassword() {
return password;
}
public void setPassword(String password) {
this.password = password;
}
public String getAddress() {
return address;
}
public void setAddress(String address) {
this.address = address;
}
}
UserController.java
package com.tutorialspoint;
import org.springframework.stereotype.Controller;
import org.springframework.web.bind.annotation.ModelAttribute;
import org.springframework.web.bind.annotation.RequestMapping;
import org.springframework.web.bind.annotation.RequestMethod;
import org.springframework.web.servlet.ModelAndView;
import org.springframework.ui.ModelMap;
@Controller
public class UserController {
@RequestMapping(value = "/user", method = RequestMethod.GET)
public ModelAndView user() {
return new ModelAndView("user", "command", new User());
}
@RequestMapping(value = "/addUser", method = RequestMethod.POST)
public String addUser(@ModelAttribute("SpringWeb")User user,
ModelMap model) {
model.addAttribute("username", user.getUsername());
model.addAttribute("password", user.getPassword());
model.addAttribute("address", user.getAddress());
return "users";
}
}
Здесь для первого метода обслуживания user () мы передали пустой объект User в объекте ModelAndView с именем «command», потому что среда Spring ожидает объект с именем «command», если вы используете <form: form> теги в вашем файле JSP. Таким образом, когда вызывается метод user (), он возвращает представление user.jsp.
Второй сервисный метод addUser () будет вызываться для метода POST в URL-адресе HelloWeb / addUser. Вы подготовите свой модельный объект на основе предоставленной информации. Наконец, представление «пользователи» будет возвращено из метода сервиса, что приведет к отображению users.jsp.
user.jsp
<%@taglib uri = "http://www.springframework.org/tags/form" prefix = "form"%>
<html>
<head>
<title>Spring MVC Form Handling</title>
</head>
<body>
<h2>User Information</h2>
<form:form method = "POST" action = "/HelloWeb/addUser">
<table>
<tr>
<td><form:label path = "username">User Name</form:label></td>
<td><form:input path = "username" /></td>
</tr>
<tr>
<td><form:label path = "password">Age</form:label></td>
<td><form:password path = "password" /></td>
</tr>
<tr>
<td><form:label path = "address">Address</form:label></td>
<td><form:textarea path = "address" rows = "5" cols = "30" /></td>
</tr>
<tr>
<td colspan = "2">
<input type = "submit" value = "Submit"/>
</td>
</tr>
</table>
</form:form>
</body>
</html>
Здесь мы используем тег <form: textarea /> для визуализации HTML-блока textarea. Например –
<form:textarea path = "address" rows = "5" cols = "30" />
Будет отображено следующее содержимое HTML.
<textarea id = "address" name = "address" rows = "5" cols = "30"></textarea>
users.jsp
<%@taglib uri = "http://www.springframework.org/tags/form" prefix = "form"%>
<html>
<head>
<title>Spring MVC Form Handling</title>
</head>
<body>
<h2>Submitted User Information</h2>
<table>
<tr>
<td>Username</td>
<td>${username}</td>
</tr>
<tr>
<td>Password</td>
<td>${password}</td>
</tr>
<tr>
<td>Address</td>
<td>${address}</td>
</tr>
</table>
</body>
</html>
Когда вы закончите создавать исходные файлы и файлы конфигурации, экспортируйте ваше приложение. Щелкните правой кнопкой мыши свое приложение, выберите «Экспорт» → «Файл WAR» и сохраните файл HelloWeb.war в папке веб-приложений Tomcat.
Теперь запустите сервер Tomcat и убедитесь, что вы можете получить доступ к другим веб-страницам из папки webapps с помощью стандартного браузера. Попробуйте ввести URL-адрес – http://hosthost: 8080 / HelloWeb / user, и мы увидим следующий экран, если все в порядке с веб-приложением Spring.
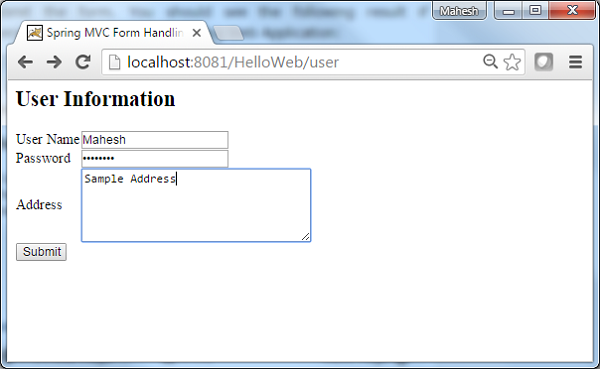
После отправки необходимой информации, нажмите на кнопку отправки, чтобы отправить форму. Мы увидим следующий экран, если все в порядке с веб-приложением Spring.

Spring MVC – Пример флажка
В следующем примере описывается использование единого флажка в формах с использованием среды Spring Web MVC. Для начала давайте создадим рабочую среду Eclipse и рассмотрим следующие шаги для разработки веб-приложения на основе динамических форм с использованием Spring Web Framework.
| шаг | Описание |
|---|---|
| 1 | Создайте проект с именем HelloWeb в пакете com.tutorialspoint, как описано в главе Spring MVC – Hello World Example. |
| 2 | Создайте Java классы User, UserController в com.tutorialspointpackage. |
| 3 | Создайте файлы представления user.jsp, users.jsp в подпапке jsp. |
| 4 | Последний шаг – создание содержимого исходного файла и файлов конфигурации и экспорт приложения, как описано ниже. |
User.java
package com.tutorialspoint;
public class User {
private String username;
private String password;
private String address;
private boolean receivePaper;
public String getUsername() {
return username;
}
public void setUsername(String username) {
this.username = username;
}
public String getPassword() {
return password;
}
public void setPassword(String password) {
this.password = password;
}
public String getAddress() {
return address;
}
public void setAddress(String address) {
this.address = address;
}
public boolean isReceivePaper() {
return receivePaper;
}
public void setReceivePaper(boolean receivePaper) {
this.receivePaper = receivePaper;
}
}
UserController.java
package com.tutorialspoint;
import org.springframework.stereotype.Controller;
import org.springframework.web.bind.annotation.ModelAttribute;
import org.springframework.web.bind.annotation.RequestMapping;
import org.springframework.web.bind.annotation.RequestMethod;
import org.springframework.web.servlet.ModelAndView;
import org.springframework.ui.ModelMap;
@Controller
public class UserController {
@RequestMapping(value = "/user", method = RequestMethod.GET)
public ModelAndView user() {
return new ModelAndView("user", "command", new User());
}
@RequestMapping(value = "/addUser", method = RequestMethod.POST)
public String addUser(@ModelAttribute("SpringWeb")User user,
ModelMap model) {
model.addAttribute("username", user.getUsername());
model.addAttribute("password", user.getPassword());
model.addAttribute("address", user.getAddress());
model.addAttribute("receivePaper", user.isReceivePaper());
return "users";
}
}
Здесь для первого метода обслуживания user () мы передали пустой объект User в объекте ModelAndView с именем «command», потому что среда Spring ожидает объект с именем «command», если вы используете <form: form> теги в вашем файле JSP. Поэтому, когда вызывается метод user (), он возвращает представление user.jsp.
Второй сервисный метод addUser () будет вызываться для метода POST в URL-адресе HelloWeb / addUser. Вы подготовите свой модельный объект на основе предоставленной информации. Наконец, представление «пользователи» будет возвращено из метода сервиса, что приведет к отображению users.jsp.
user.jsp
<%@taglib uri = "http://www.springframework.org/tags/form" prefix = "form"%>
<html>
<head>
<title>Spring MVC Form Handling</title>
</head>
<body>
<h2>User Information</h2>
<form:form method = "POST" action = "/HelloWeb/addUser">
<table>
<tr>
<td><form:label path = "username">User Name</form:label></td>
<td><form:input path = "username" /></td>
</tr>
<tr>
<td><form:label path = "password">Age</form:label></td>
<td><form:password path = "password" /></td>
</tr>
<tr>
<td><form:label path = "address">Address</form:label></td>
<td><form:textarea path = "address" rows = "5" cols = "30" /></td>
</tr>
<tr>
<td><form:label path = "receivePaper">Subscribe Newsletter</form:label></td>
<td><form:checkbox path = "receivePaper" /></td>
</tr>
<tr>
<td colspan = "2">
<input type = "submit" value = "Submit"/>
</td>
</tr>
</table>
</form:form>
</body>
</html>
Здесь мы используем тег <form: checkboxes /> для отображения флажка HTML.
Например –
<form:checkbox path="receivePaper" />
Он будет отображать следующий HTML-контент.
<input id="receivePaper1" name = "receivePaper" type = "checkbox" value = "true"/> <input type = "hidden" name = "_receivePaper" value = "on"/>
users.jsp
<%@taglib uri = "http://www.springframework.org/tags/form" prefix = "form"%>
<html>
<head>
<title>Spring MVC Form Handling</title>
</head>
<body>
<h2>Submitted User Information</h2>
<table>
<tr>
<td>Username</td>
<td>${username}</td>
</tr>
<tr>
<td>Password</td>
<td>${password}</td>
</tr>
<tr>
<td>Address</td>
<td>${address}</td>
</tr>
<tr>
<td>Subscribed to Newsletter</td>
<td>${receivePaper}</td>
</tr>
</table>
</body>
</html>
Когда вы закончите создавать исходные файлы и файлы конфигурации, экспортируйте ваше приложение. Щелкните правой кнопкой мыши свое приложение, выберите «Экспорт» → «Файл WAR» и сохраните файл HelloWeb.war в папке веб-приложений Tomcat.
Теперь запустите сервер Tomcat и убедитесь, что вы можете получить доступ к другим веб-страницам из папки webapps с помощью стандартного браузера. Попробуйте URL – http: // localhost: 8080 / HelloWeb / user, и мы увидим следующий экран, если все в порядке с веб-приложением Spring.

После отправки необходимой информации, нажмите на кнопку отправки, чтобы отправить форму. Мы увидим следующий экран, если все в порядке с веб-приложением Spring.
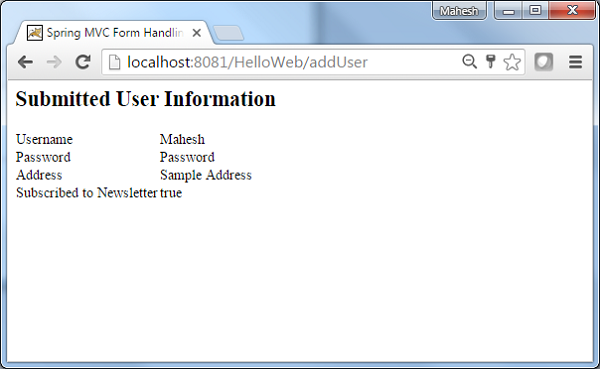
Spring MVC – Пример флажков
В следующем примере объясняется, как использовать множественные флажки в формах с использованием среды Spring Web MVC. Начнем с того, что нам нужно иметь работающую Eclipse IDE и придерживаться следующих шагов для разработки веб-приложения на основе динамических форм с использованием Spring Web Framework.
| шаг | Описание |
|---|---|
| 1 | Создайте проект с именем HelloWeb в пакете com.tutorialspoint, как описано в главе Spring MVC – Hello World. |
| 2 | Создайте Java классы User, UserController в com.tutorialspointpackage. |
| 3 | Создайте файлы представлений user.jsp, users.jsp в подпапке jsp. |
| 4 | Последний шаг – создание содержимого исходного файла и файлов конфигурации и экспорт приложения, как описано ниже. |
User.java
package com.tutorialspoint;
public class User {
private String username;
private String password;
private String address;
private boolean receivePaper;
private String [] favoriteFrameworks;
public String getUsername() {
return username;
}
public void setUsername(String username) {
this.username = username;
}
public String getPassword() {
return password;
}
public void setPassword(String password) {
this.password = password;
}
public String getAddress() {
return address;
}
public void setAddress(String address) {
this.address = address;
}
public boolean isReceivePaper() {
return receivePaper;
}
public void setReceivePaper(boolean receivePaper) {
this.receivePaper = receivePaper;
}
public String[] getFavoriteFrameworks() {
return favoriteFrameworks;
}
public void setFavoriteFrameworks(String[] favoriteFrameworks) {
this.favoriteFrameworks = favoriteFrameworks;
}
}
UserController.java
package com.tutorialspoint;
import java.util.ArrayList;
import java.util.List;
import org.springframework.stereotype.Controller;
import org.springframework.web.bind.annotation.ModelAttribute;
import org.springframework.web.bind.annotation.RequestMapping;
import org.springframework.web.bind.annotation.RequestMethod;
import org.springframework.web.servlet.ModelAndView;
import org.springframework.ui.ModelMap;
@Controller
public class UserController {
@RequestMapping(value = "/user", method = RequestMethod.GET)
public ModelAndView user() {
User user = new User();
user.setFavoriteFrameworks((new String []{"Spring MVC","Struts 2"}));
ModelAndView modelAndView = new ModelAndView("user", "command", user);
return modelAndView;
}
@RequestMapping(value = "/addUser", method = RequestMethod.POST)
public String addUser(@ModelAttribute("SpringWeb")User user,
ModelMap model) {
model.addAttribute("username", user.getUsername());
model.addAttribute("password", user.getPassword());
model.addAttribute("address", user.getAddress());
model.addAttribute("receivePaper", user.isReceivePaper());
model.addAttribute("favoriteFrameworks", user.getFavoriteFrameworks());
return "users";
}
@ModelAttribute("webFrameworkList")
public List<String> getWebFrameworkList() {
List<String> webFrameworkList = new ArrayList<String>();
webFrameworkList.add("Spring MVC");
webFrameworkList.add("Struts 1");
webFrameworkList.add("Struts 2");
webFrameworkList.add("Apache Wicket");
return webFrameworkList;
}
}
Здесь для первого метода обслуживания user () мы передали пустой объект User в объекте ModelAndView с именем «command», потому что среда Spring ожидает объект с именем «command», если вы используете <form: form> теги в вашем файле JSP. Таким образом, когда вызывается метод user () , он возвращает представление user.jsp .
Второй сервисный метод addUser () будет вызываться для метода POST в URL- адресе HelloWeb / addUser . Вы подготовите свой модельный объект на основе предоставленной информации. Наконец, представление «пользователи» будет возвращено из метода сервиса, что приведет к отображению users.jsp
user.jsp
<%@taglib uri = "http://www.springframework.org/tags/form" prefix = "form"%>
<html>
<head>
<title>Spring MVC Form Handling</title>
</head>
<body>
<h2>User Information</h2>
<form:form method = "POST" action = "/HelloWeb/addUser">
<table>
<tr>
<td><form:label path = "username">User Name</form:label></td>
<td><form:input path = "username" /></td>
</tr>
<tr>
<td><form:label path = "password">Age</form:label></td>
<td><form:password path = "password" /></td>
</tr>
<tr>
<td><form:label path = "address">Address</form:label></td>
<td><form:textarea path = "address" rows = "5" cols = "30" /></td>
</tr>
<tr>
<td><form:label path = "receivePaper">Subscribe Newsletter</form:label></td>
<td><form:checkbox path = "receivePaper" /></td>
</tr>
<tr>
<td><form:label path = "favoriteFrameworks">Favorite Web Frameworks</form:label></td>
<td><form:checkboxes items = "${webFrameworkList}" path = "favoriteFrameworks" /></td>
</tr>
<tr>
<td colspan = "2">
<input type = "submit" value = "Submit"/>
</td>
</tr>
</table>
</form:form>
</body>
</html>
Здесь мы используем тег <form: checkboxes /> для отображения HTML-флажков.
<form:checkboxes items = "${webFrameworkList}" path = "favoriteFrameworks" />
Он будет отображать следующий HTML-контент.
<span> <input id = "favoriteFrameworks1" name = "favoriteFrameworks" type = "checkbox" value = "Spring MVC" checked = "checked"/> <label for = "favoriteFrameworks1">Spring MVC</label> </span> <span> <input id = "favoriteFrameworks2" name = "favoriteFrameworks" type = "checkbox" value = "Struts 1"/> <label for = "favoriteFrameworks2">Struts 1</label> </span> <span> <input id = "favoriteFrameworks3" name = "favoriteFrameworks" type = "checkbox" value = "Struts 2" checked = "checked"/> <label for = "favoriteFrameworks3">Struts 2</label> </span> <span> <input id = "favoriteFrameworks4" name = "favoriteFrameworks" type = "checkbox" value = "Apache Wicket"/> <label for = "favoriteFrameworks4">Apache Wicket</label> </span> <input type = "hidden" name = "_favoriteFrameworks" value = "on"/>
users.jsp
<%@taglib uri = "http://www.springframework.org/tags/form" prefix = "form"%>
<html>
<head>
<title>Spring MVC Form Handling</title>
</head>
<body>
<h2>Submitted User Information</h2>
<table>
<tr>
<td>Username</td>
<td>${username}</td>
</tr>
<tr>
<td>Password</td>
<td>${password}</td>
</tr>
<tr>
<td>Address</td>
<td>${address}</td>
</tr>
<tr>
<td>Subscribed to Newsletter</td>
<td>${receivePaper}</td>
</tr>
<tr>
<td>Favorite Web Frameworks</td>
<td> <% String[] favoriteFrameworks = (String[])request.getAttribute("favoriteFrameworks");
for(String framework: favoriteFrameworks) {
out.println(framework);
}
%></td>
</tr>
</table>
</body>
</html>
Когда вы закончите создавать исходные файлы и файлы конфигурации, экспортируйте ваше приложение. Щелкните правой кнопкой мыши свое приложение, выберите « Экспорт» → «Файл WAR» и сохраните файл HelloWeb.war в папке веб-приложений Tomcat.
Теперь запустите сервер Tomcat и убедитесь, что вы можете получить доступ к другим веб-страницам из папки webapps с помощью стандартного браузера. Попробуйте URL-адрес http: // localhost: 8080 / HelloWeb / user, и мы увидим следующий экран, если все в порядке с веб-приложением Spring.

После отправки необходимой информации, нажмите на кнопку отправки, чтобы отправить форму. Мы увидим следующий экран, если все в порядке с вашим веб-приложением Spring.
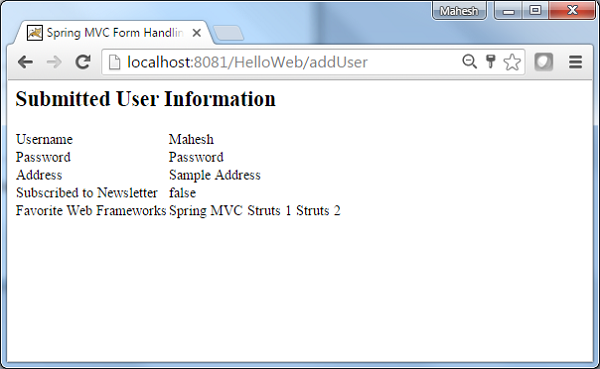
Spring MVC – Пример RadioButton
В следующем примере показано, как использовать RadioButton в формах с использованием среды Spring Web MVC. Чтобы начать с этого, давайте создадим рабочую среду Eclipse и перейдем к следующим шагам для разработки веб-приложения на основе динамических форм с использованием Spring Web Framework –
| шаг | Описание |
|---|---|
| 1 | Создайте проект с именем HelloWeb в пакете com.tutorialspoint, как описано в главе Spring MVC – Hello World. |
| 2 | Создайте Java классы User, UserController в com.tutorialspointpackage. |
| 3 | Создайте файлы представлений user.jsp, users.jsp в подпапке jsp. |
| 4 | Последний шаг – создание содержимого исходного файла и файлов конфигурации и экспорт приложения, как описано ниже. |
User.java
package com.tutorialspoint;
public class User {
private String username;
private String password;
private String address;
private boolean receivePaper;
private String [] favoriteFrameworks;
private String gender;
public String getUsername() {
return username;
}
public void setUsername(String username) {
this.username = username;
}
public String getPassword() {
return password;
}
public void setPassword(String password) {
this.password = password;
}
public String getAddress() {
return address;
}
public void setAddress(String address) {
this.address = address;
}
public boolean isReceivePaper() {
return receivePaper;
}
public void setReceivePaper(boolean receivePaper) {
this.receivePaper = receivePaper;
}
public String[] getFavoriteFrameworks() {
return favoriteFrameworks;
}
public void setFavoriteFrameworks(String[] favoriteFrameworks) {
this.favoriteFrameworks = favoriteFrameworks;
}
public String getGender() {
return gender;
}
public void setGender(String gender) {
this.gender = gender;
}
}
UserController.java
package com.tutorialspoint;
import java.util.ArrayList;
import java.util.List;
import org.springframework.stereotype.Controller;
import org.springframework.web.bind.annotation.ModelAttribute;
import org.springframework.web.bind.annotation.RequestMapping;
import org.springframework.web.bind.annotation.RequestMethod;
import org.springframework.web.servlet.ModelAndView;
import org.springframework.ui.ModelMap;
@Controller
public class UserController {
@RequestMapping(value = "/user", method = RequestMethod.GET)
public ModelAndView user() {
User user = new User();
user.setFavoriteFrameworks((new String []{"Spring MVC","Struts 2"}));
user.setGender("M");
ModelAndView modelAndView = new ModelAndView("user", "command", user);
return modelAndView;
}
@RequestMapping(value = "/addUser", method = RequestMethod.POST)
public String addUser(@ModelAttribute("SpringWeb")User user,
ModelMap model) {
model.addAttribute("username", user.getUsername());
model.addAttribute("password", user.getPassword());
model.addAttribute("address", user.getAddress());
model.addAttribute("receivePaper", user.isReceivePaper());
model.addAttribute("favoriteFrameworks", user.getFavoriteFrameworks());
model.addAttribute("gender", user.getGender());
return "users";
}
@ModelAttribute("webFrameworkList")
public List<String> getWebFrameworkList() {
List<String> webFrameworkList = new ArrayList<String>();
webFrameworkList.add("Spring MVC");
webFrameworkList.add("Struts 1");
webFrameworkList.add("Struts 2");
webFrameworkList.add("Apache Wicket");
return webFrameworkList;
}
}
Здесь, первый метод сервиса user () , мы передали пустой объект User в объекте ModelAndView с именем «command», потому что среда Spring ожидает объект с именем «command», если вы используете теги <form: form> в вашем файле JSP. Таким образом, когда вызывается метод user () , он возвращает представление user.jsp .
Второй сервисный метод addUser () будет вызываться для метода POST в URL- адресе HelloWeb / addUser . Вы подготовите свой модельный объект на основе предоставленной информации. Наконец, представление «пользователи» будет возвращено из метода сервиса, что приведет к отображению users.jsp.
user.jsp
<%@taglib uri = "http://www.springframework.org/tags/form" prefix = "form"%>
<html>
<head>
<title>Spring MVC Form Handling</title>
</head>
<body>
<h2>User Information</h2>
<form:form method = "POST" action = "/HelloWeb/addUser">
<table>
<tr>
<td><form:label path = "username">User Name</form:label></td>
<td><form:input path = "username" /></td>
</tr>
<tr>
<td><form:label path = "password">Age</form:label></td>
<td><form:password path = "password" /></td>
</tr>
<tr>
<td><form:label path = "address">Address</form:label></td>
<td><form:textarea path = "address" rows = "5" cols = "30" /></td>
</tr>
<tr>
<td><form:label path = "receivePaper">Subscribe Newsletter</form:label></td>
<td><form:checkbox path = "receivePaper" /></td>
</tr>
<tr>
<td><form:label path = "favoriteFrameworks">Favorite Web Frameworks</form:label></td>
<td><form:checkboxes items = "${webFrameworkList}" path = "favoriteFrameworks" /></td>
</tr>
<tr>
<td><form:label path = "gender">Gender</form:label></td>
<td>
<form:radiobutton path = "gender" value = "M" label = "Male" />
<form:radiobutton path = "gender" value = "F" label = "Female" />
</td>
</tr>
<tr>
<td colspan = "2">
<input type = "submit" value = "Submit"/>
</td>
</tr>
</table>
</form:form>
</body>
</html>
Здесь мы используем тег <form: radiobutton /> для визуализации HTML-кнопки.
<form:radiobutton path = "gender" value = "M" label = "Male" /> <form:radiobutton path = "gender" value = "F" label = "Female" />
Он будет отображать следующий HTML-контент.
<input id = "gender1" name = "gender" type = "radio" value = "M" checked = "checked"/><label for = "gender1">Male</label> <input id = "gender2" name = "gender" type = "radio" value = "F"/><label for = "gender2">Female</label>
users.jsp
<%@taglib uri="http://www.springframework.org/tags/form" prefix="form"%>
<html>
<head>
<title>Spring MVC Form Handling</title>
</head>
<body>
<h2>Submitted User Information</h2>
<table>
<tr>
<td>Username</td>
<td>${username}</td>
</tr>
<tr>
<td>Password</td>
<td>${password}</td>
</tr>
<tr>
<td>Address</td>
<td>${address}</td>
</tr>
<tr>
<td>Subscribed to Newsletter</td>
<td>${receivePaper}</td>
</tr>
<tr>
<td>Favorite Web Frameworks</td>
<td> <% String[] favoriteFrameworks = (String[])request.getAttribute("favoriteFrameworks");
for(String framework: favoriteFrameworks) {
out.println(framework);
}
%></td>
</tr>
<tr>
<td>Gender</td>
<td>${(gender=="M"? "Male" : "Female")}</td>
</tr>
</table>
</body>
</html>
Когда вы закончите создавать исходные файлы и файлы конфигурации, экспортируйте ваше приложение. Щелкните правой кнопкой мыши свое приложение, выберите « Экспорт» → «Файл WAR» и сохраните файл HelloWeb.war в папке веб-приложений Tomcat.
Теперь запустите сервер Tomcat и убедитесь, что вы можете получить доступ к другим веб-страницам из папки webapps с помощью стандартного браузера. Попробуйте URL-адрес – http: // localhost: 8080 / HelloWeb / user, и мы увидим следующий экран, если все в порядке с вашим веб-приложением Spring.

После отправки необходимой информации, нажмите на кнопку отправки, чтобы отправить форму. Мы увидим следующий экран, если все в порядке с веб-приложением Spring.

Spring MVC – Пример RadioButtons
В следующем примере объясняется, как использовать RadioButton в формах с использованием среды Spring Web MVC. Для начала давайте предоставим рабочую среду Eclipse и выполним последующие шаги для разработки веб-приложения на основе динамических форм с использованием Spring Web Framework.
| шаг | Описание |
|---|---|
| 1 | Создайте проект с именем HelloWeb в пакете com.tutorialspoint, как описано в главе Spring MVC – Hello World. |
| 2 | Создайте Java классы User, UserController в com.tutorialspointpackage. |
| 3 | Создайте файлы представлений user.jsp, users.jsp в подпапке jsp. |
| 4 | Последний шаг – создание содержимого исходного файла и файлов конфигурации и экспорт приложения, как описано ниже. |
User.java
package com.tutorialspoint;
public class User {
private String username;
private String password;
private String address;
private boolean receivePaper;
private String [] favoriteFrameworks;
private String gender;
private String favoriteNumber;
public String getUsername() {
return username;
}
public void setUsername(String username) {
this.username = username;
}
public String getPassword() {
return password;
}
public void setPassword(String password) {
this.password = password;
}
public String getAddress() {
return address;
}
public void setAddress(String address) {
this.address = address;
}
public boolean isReceivePaper() {
return receivePaper;
}
public void setReceivePaper(boolean receivePaper) {
this.receivePaper = receivePaper;
}
public String[] getFavoriteFrameworks() {
return favoriteFrameworks;
}
public void setFavoriteFrameworks(String[] favoriteFrameworks) {
this.favoriteFrameworks = favoriteFrameworks;
}
public String getGender() {
return gender;
}
public void setGender(String gender) {
this.gender = gender;
}
public String getFavoriteNumber() {
return favoriteNumber;
}
public void setFavoriteNumber(String favoriteNumber) {
this.favoriteNumber = favoriteNumber;
}
}
UserController.java
package com.tutorialspoint;
import java.util.ArrayList;
import java.util.List;
import org.springframework.stereotype.Controller;
import org.springframework.web.bind.annotation.ModelAttribute;
import org.springframework.web.bind.annotation.RequestMapping;
import org.springframework.web.bind.annotation.RequestMethod;
import org.springframework.web.servlet.ModelAndView;
import org.springframework.ui.ModelMap;
@Controller
public class UserController {
@RequestMapping(value = "/user", method = RequestMethod.GET)
public ModelAndView user() {
User user = new User();
user.setFavoriteFrameworks((new String []{"Spring MVC","Struts 2"}));
user.setGender("M");
ModelAndView modelAndView = new ModelAndView("user", "command", user);
return modelAndView;
}
@RequestMapping(value = "/addUser", method = RequestMethod.POST)
public String addUser(@ModelAttribute("SpringWeb")User user,
ModelMap model) {
model.addAttribute("username", user.getUsername());
model.addAttribute("password", user.getPassword());
model.addAttribute("address", user.getAddress());
model.addAttribute("receivePaper", user.isReceivePaper());
model.addAttribute("favoriteFrameworks", user.getFavoriteFrameworks());
model.addAttribute("gender", user.getGender());
model.addAttribute("favoriteNumber", user.getFavoriteNumber());
return "users";
}
@ModelAttribute("webFrameworkList")
public List<String> getWebFrameworkList() {
List<String> webFrameworkList = new ArrayList<String>();
webFrameworkList.add("Spring MVC");
webFrameworkList.add("Struts 1");
webFrameworkList.add("Struts 2");
webFrameworkList.add("Apache Wicket");
return webFrameworkList;
}
@ModelAttribute("numbersList")
public List<String> getNumbersList() {
List<String> numbersList = new ArrayList<String>();
numbersList.add("1");
numbersList.add("2");
numbersList.add("3");
numbersList.add("4");
return numbersList;
}
}
Здесь для первого метода обслуживания user () мы передали пустой объект User в объекте ModelAndView с именем «command», потому что среда Spring ожидает объект с именем «command», если вы используете <form: form> теги в вашем файле JSP. Итак, когда вызывается метод user (), он возвращает представление user.jsp.
Второй сервисный метод addUser () будет вызываться для метода POST в URL- адресе HelloWeb / addUser . Вы подготовите свой модельный объект на основе предоставленной информации. Наконец, представление «пользователи» будет возвращено из метода сервиса, что приведет к отображению users.jsp.
user.jsp
<%@taglib uri = "http://www.springframework.org/tags/form" prefix = "form"%>
<html>
<head>
<title>Spring MVC Form Handling</title>
</head>
<body>
<h2>User Information</h2>
<form:form method = "POST" action = "/HelloWeb/addUser">
<table>
<tr>
<td><form:label path = "username">User Name</form:label></td>
<td><form:input path = "username" /></td>
</tr>
<tr>
<td><form:label path = "password">Age</form:label></td>
<td><form:password path = "password" /></td>
</tr>
<tr>
<td><form:label path = "address">Address</form:label></td>
<td><form:textarea path = "address" rows = "5" cols = "30" /></td>
</tr>
<tr>
<td><form:label path = "receivePaper">Subscribe Newsletter</form:label></td>
<td><form:checkbox path = "receivePaper" /></td>
</tr>
<tr>
<td><form:label path = "favoriteFrameworks">Favorite Web Frameworks</form:label></td>
<td><form:checkboxes items = "${webFrameworkList}" path = "favoriteFrameworks" /></td>
</tr>
<tr>
<td><form:label path = "gender">Gender</form:label></td>
<td>
<form:radiobutton path = "gender" value = "M" label = "Male" />
<form:radiobutton path = "gender" value = "F" label = "Female" />
</td>
</tr>
<tr>
<td><form:label path = "favoriteNumber">Favorite Number</form:label></td>
<td>
<form:radiobuttons path = "favoriteNumber" items = "${numbersList}" />
</td>
</tr>
<tr>
<td colspan = "2">
<input type = "submit" value = "Submit"/>
</td>
</tr>
</table>
</form:form>
</body>
</html>
Здесь мы используем тег <form: radiobuttons /> для рендеринга радиокнопок HTML. Например –
<form:radiobuttons path = "favoriteNumber" items="${numbersList}" />
Будет отображено следующее содержимое HTML.
<span> <input id = "favoriteNumber1" name = "favoriteNumber" type = "radio" value = "1"/> <label for = "favoriteNumber1">1</label> </span> <span> <input id = "favoriteNumber2" name = "favoriteNumber" type = "radio" value = "2"/> <label for = "favoriteNumber2">2</label> </span> <span> <input id = "favoriteNumber3" name = "favoriteNumber" type = "radio" value = "3"/> <label for = "favoriteNumber3">3</label> </span> <span> <input id = "favoriteNumber4" name = "favoriteNumber" type = "radio" value = "4"/> <label for = "favoriteNumber4">4</label> </span>
users.jsp
<%@taglib uri = "http://www.springframework.org/tags/form" prefix = "form"%>
<html>
<head>
<title>Spring MVC Form Handling</title>
</head>
<body>
<h2>Submitted User Information</h2>
<table>
<tr>
<td>Username</td>
<td>${username}</td>
</tr>
<tr>
<td>Password</td>
<td>${password}</td>
</tr>
<tr>
<td>Address</td>
<td>${address}</td>
</tr>
<tr>
<td>Subscribed to Newsletter</td>
<td>${receivePaper}</td>
</tr>
<tr>
<td>Favorite Web Frameworks</td>
<td> <% String[] favoriteFrameworks = (String[])request.getAttribute("favoriteFrameworks");
for(String framework: favoriteFrameworks) {
out.println(framework);
}
%></td>
</tr>
<tr>
<td>Gender</td>
<td>${(gender=="M"? "Male" : "Female")}</td>
</tr>
<tr>
<td>Favourite Number</td>
<td>${favoriteNumber}</td>
</tr>
</table>
</body>
</html>
Когда вы закончите создавать исходные файлы и файлы конфигурации, экспортируйте ваше приложение. Щелкните правой кнопкой мыши свое приложение, выберите « Экспорт» → «Файл WAR» и сохраните файл HelloWeb.war в папке веб-приложений Tomcat.
Теперь запустите сервер Tomcat и убедитесь, что вы можете получить доступ к другим веб-страницам из папки веб-приложений с помощью стандартного браузера. Попробуйте следующий URL – http: // localhost: 8080 / HelloWeb / user, и мы увидим следующий экран, если все в порядке с веб-приложением Spring.

После отправки необходимой информации, нажмите на кнопку отправки, чтобы отправить форму. Мы увидим следующий экран, если все в порядке с вашим веб-приложением Spring.

Spring MVC – раскрывающийся пример
В следующем примере описано, как использовать Dropdown в формах с использованием среды Spring Web MVC. Начнем с того, что нам нужно иметь работающую Eclipse IDE и придерживаться следующих шагов для разработки веб-приложения на основе динамических форм с использованием Spring Web Framework.
| шаг | Описание |
|---|---|
| 1 | Создайте проект с именем HelloWeb в пакете com.tutorialspoint, как описано в главе Spring MVC – Hello World. |
| 2 | Создайте Java классы User, UserController в com.tutorialspointpackage. |
| 3 | Создайте файлы представлений user.jsp, users.jsp в подпапке jsp. |
| 4 | Последний шаг – создание содержимого исходного файла и файлов конфигурации и экспорт приложения, как описано ниже. |
User.java
package com.tutorialspoint;
public class User {
private String username;
private String password;
private String address;
private boolean receivePaper;
private String [] favoriteFrameworks;
private String gender;
private String favoriteNumber;
private String country;
public String getUsername() {
return username;
}
public void setUsername(String username) {
this.username = username;
}
public String getPassword() {
return password;
}
public void setPassword(String password) {
this.password = password;
}
public String getAddress() {
return address;
}
public void setAddress(String address) {
this.address = address;
}
public boolean isReceivePaper() {
return receivePaper;
}
public void setReceivePaper(boolean receivePaper) {
this.receivePaper = receivePaper;
}
public String[] getFavoriteFrameworks() {
return favoriteFrameworks;
}
public void setFavoriteFrameworks(String[] favoriteFrameworks) {
this.favoriteFrameworks = favoriteFrameworks;
}
public String getGender() {
return gender;
}
public void setGender(String gender) {
this.gender = gender;
}
public String getFavoriteNumber() {
return favoriteNumber;
}
public void setFavoriteNumber(String favoriteNumber) {
this.favoriteNumber = favoriteNumber;
}
public String getCountry() {
return country;
}
public void setCountry(String country) {
this.country = country;
}
}
UserController.java
package com.tutorialspoint;
import java.util.ArrayList;
import java.util.HashMap;
import java.util.List;
import java.util.Map;
import org.springframework.stereotype.Controller;
import org.springframework.web.bind.annotation.ModelAttribute;
import org.springframework.web.bind.annotation.RequestMapping;
import org.springframework.web.bind.annotation.RequestMethod;
import org.springframework.web.servlet.ModelAndView;
import org.springframework.ui.ModelMap;
@Controller
public class UserController {
@RequestMapping(value = "/user", method = RequestMethod.GET)
public ModelAndView user() {
User user = new User();
user.setFavoriteFrameworks((new String []{"Spring MVC","Struts 2"}));
user.setGender("M");
ModelAndView modelAndView = new ModelAndView("user", "command", user);
return modelAndView;
}
@RequestMapping(value = "/addUser", method = RequestMethod.POST)
public String addUser(@ModelAttribute("SpringWeb")User user,
ModelMap model) {
model.addAttribute("username", user.getUsername());
model.addAttribute("password", user.getPassword());
model.addAttribute("address", user.getAddress());
model.addAttribute("receivePaper", user.isReceivePaper());
model.addAttribute("favoriteFrameworks", user.getFavoriteFrameworks());
model.addAttribute("gender", user.getGender());
model.addAttribute("favoriteNumber", user.getFavoriteNumber());
model.addAttribute("country", user.getCountry());
return "users";
}
@ModelAttribute("webFrameworkList")
public List<String> getWebFrameworkList() {
List<String> webFrameworkList = new ArrayList<String>();
webFrameworkList.add("Spring MVC");
webFrameworkList.add("Struts 1");
webFrameworkList.add("Struts 2");
webFrameworkList.add("Apache Wicket");
return webFrameworkList;
}
@ModelAttribute("numbersList")
public List<String> getNumbersList() {
List<String> numbersList = new ArrayList<String>();
numbersList.add("1");
numbersList.add("2");
numbersList.add("3");
numbersList.add("4");
return numbersList;
}
@ModelAttribute("countryList")
public Map<String, String> getCountryList() {
Map<String, String> countryList = new HashMap<String, String>();
countryList.put("US", "United States");
countryList.put("CH", "China");
countryList.put("SG", "Singapore");
countryList.put("MY", "Malaysia");
return countryList;
}
}
Здесь для первого метода обслуживания user () мы передали пустой объект User в объекте ModelAndView с именем «command», потому что среда Spring ожидает объект с именем «command», если вы используете <form: form> теги в вашем файле JSP. Поэтому, когда вызывается метод user () , он возвращает представление user.jsp .
Второй сервисный метод addUser () будет вызываться для метода POST в URL- адресе HelloWeb / addUser . Вы подготовите свой модельный объект на основе предоставленной информации. Наконец, представление «пользователи» будет возвращено из метода сервиса, что приведет к отображению users.jsp.
user.jsp
<%@taglib uri = "http://www.springframework.org/tags/form" prefix = "form"%>
<html>
<head>
<title>Spring MVC Form Handling</title>
</head>
<body>
<h2>User Information</h2>
<form:form method = "POST" action = "/HelloWeb/addUser">
<table>
<tr>
<td><form:label path = "username">User Name</form:label></td>
<td><form:input path = "username" /></td>
</tr>
<tr>
<td><form:label path = "password">Age</form:label></td>
<td><form:password path = "password" /></td>
</tr>
<tr>
<td><form:label path = "address">Address</form:label></td>
<td><form:textarea path = "address" rows = "5" cols = "30" /></td>
</tr>
<tr>
<td><form:label path = "receivePaper">Subscribe Newsletter</form:label></td>
<td><form:checkbox path = "receivePaper" /></td>
</tr>
<tr>
<td><form:label path = "favoriteFrameworks">Favorite Web Frameworks</form:label></td>
<td><form:checkboxes items = "${webFrameworkList}" path = "favoriteFrameworks" /></td>
</tr>
<tr>
<td><form:label path = "gender">Gender</form:label></td>
<td>
<form:radiobutton path = "gender" value = "M" label = "Male" />
<form:radiobutton path = "gender" value = "F" label = "Female" />
</td>
</tr>
<tr>
<td><form:label path = "favoriteNumber">Favorite Number</form:label></td>
<td>
<form:radiobuttons path = "favoriteNumber" items = "${numbersList}" />
</td>
</tr>
<tr>
<td><form:label path = "country">Country</form:label></td>
<td>
<form:select path = "country">
<form:option value = "NONE" label = "Select"/>
<form:options items = "${countryList}" />
</form:select>
</td>
</tr>
<tr>
<td colspan = "2">
<input type = "submit" value = "Submit"/>
</td>
</tr>
</table>
</form:form>
</body>
</html>
Здесь мы используем теги <form: select />, <form: option /> и <form: options /> для визуализации выбора HTML. Например –
<form:select path = "country">
<form:option value = "NONE" label = "Select"/>
<form:options items = "${countryList}" />
</form:select>
Он будет отображать следующий HTML-контент.
<select id = "country" name = "country"> <option value = "NONE">Select</option> <option value = "US">United States</option> <option value = "CH">China</option> <option value = "MY">Malaysia</option> <option value = "SG">Singapore</option> </select>
users.jsp
<%@taglib uri = "http://www.springframework.org/tags/form" prefix = "form"%>
<html>
<head>
<title>Spring MVC Form Handling</title>
</head>
<body>
<h2>Submitted User Information</h2>
<table>
<tr>
<td>Username</td>
<td>${username}</td>
</tr>
<tr>
<td>Password</td>
<td>${password}</td>
</tr>
<tr>
<td>Address</td>
<td>${address}</td>
</tr>
<tr>
<td>Subscribed to Newsletter</td>
<td>${receivePaper}</td>
</tr>
<tr>
<td>Favorite Web Frameworks</td>
<td> <% String[] favoriteFrameworks = (String[])request.getAttribute("favoriteFrameworks");
for(String framework: favoriteFrameworks) {
out.println(framework);
}
%></td>
</tr>
<tr>
<td>Gender</td>
<td>${(gender=="M"? "Male" : "Female")}</td>
</tr>
<tr>
<td>Favourite Number</td>
<td>${favoriteNumber}</td>
</tr>
<tr>
<td>Country</td>
<td>${country}</td>
</tr>
</table>
</body>
</html>
Когда вы закончите создавать исходные файлы и файлы конфигурации, экспортируйте ваше приложение. Щелкните правой кнопкой мыши свое приложение, используйте опцию « Экспорт» → «Файл WAR» и сохраните файл HelloWeb.war в папке веб-приложений Tomcat.
Теперь запустите сервер Tomcat и убедитесь, что вы можете получить доступ к другим веб-страницам из папки webapps с помощью стандартного браузера. Попробуйте URL-адрес – http: // localhost: 8080 / HelloWeb / user, и мы увидим следующий экран, если все в порядке с веб-приложением Spring.

После отправки необходимой информации, нажмите на кнопку отправки, чтобы отправить форму. Вы должны увидеть следующий экран, если все в порядке с вашим веб-приложением Spring.

Spring MVC – Пример списка
В следующем примере показано, как использовать Listbox в формах с использованием среды Spring Web MVC. Для начала давайте предоставим рабочую среду Eclipse и выполним последующие шаги для разработки веб-приложения на основе динамических форм с использованием Spring Web Framework.
| шаг | Описание |
|---|---|
| 1 | Создайте проект с именем HelloWeb в пакете com.tutorialspoint, как описано в главе Spring MVC – Hello World. |
| 2 | Создайте Java классы User, UserController в com.tutorialspointpackage. |
| 3 | Создайте файлы представлений user.jsp, users.jsp в подпапке jsp. |
| 4 | Последний шаг – создание содержимого исходного файла и файлов конфигурации и экспорт приложения, как описано ниже. |
User.java
package com.tutorialspoint;
public class User {
private String username;
private String password;
private String address;
private boolean receivePaper;
private String [] favoriteFrameworks;
private String gender;
private String favoriteNumber;
private String country;
private String [] skills;
public String getUsername() {
return username;
}
public void setUsername(String username) {
this.username = username;
}
public String getPassword() {
return password;
}
public void setPassword(String password) {
this.password = password;
}
public String getAddress() {
return address;
}
public void setAddress(String address) {
this.address = address;
}
public boolean isReceivePaper() {
return receivePaper;
}
public void setReceivePaper(boolean receivePaper) {
this.receivePaper = receivePaper;
}
public String[] getFavoriteFrameworks() {
return favoriteFrameworks;
}
public void setFavoriteFrameworks(String[] favoriteFrameworks) {
this.favoriteFrameworks = favoriteFrameworks;
}
public String getGender() {
return gender;
}
public void setGender(String gender) {
this.gender = gender;
}
public String getFavoriteNumber() {
return favoriteNumber;
}
public void setFavoriteNumber(String favoriteNumber) {
this.favoriteNumber = favoriteNumber;
}
public String getCountry() {
return country;
}
public void setCountry(String country) {
this.country = country;
}
public String[] getSkills() {
return skills;
}
public void setSkills(String[] skills) {
this.skills = skills;
}
}
UserController.java
package com.tutorialspoint;
import java.util.ArrayList;
import java.util.HashMap;
import java.util.List;
import java.util.Map;
import org.springframework.stereotype.Controller;
import org.springframework.web.bind.annotation.ModelAttribute;
import org.springframework.web.bind.annotation.RequestMapping;
import org.springframework.web.bind.annotation.RequestMethod;
import org.springframework.web.servlet.ModelAndView;
import org.springframework.ui.ModelMap;
@Controller
public class UserController {
@RequestMapping(value = "/user", method = RequestMethod.GET)
public ModelAndView user() {
User user = new User();
user.setFavoriteFrameworks((new String []{"Spring MVC","Struts 2"}));
user.setGender("M");
ModelAndView modelAndView = new ModelAndView("user", "command", user);
return modelAndView;
}
@RequestMapping(value = "/addUser", method = RequestMethod.POST)
public String addUser(@ModelAttribute("SpringWeb")User user,
ModelMap model) {
model.addAttribute("username", user.getUsername());
model.addAttribute("password", user.getPassword());
model.addAttribute("address", user.getAddress());
model.addAttribute("receivePaper", user.isReceivePaper());
model.addAttribute("favoriteFrameworks", user.getFavoriteFrameworks());
model.addAttribute("gender", user.getGender());
model.addAttribute("favoriteNumber", user.getFavoriteNumber());
model.addAttribute("country", user.getCountry());
model.addAttribute("skills", user.getSkills());
return "users";
}
@ModelAttribute("webFrameworkList")
public List<String> getWebFrameworkList() {
List<String> webFrameworkList = new ArrayList<String>();
webFrameworkList.add("Spring MVC");
webFrameworkList.add("Struts 1");
webFrameworkList.add("Struts 2");
webFrameworkList.add("Apache Wicket");
return webFrameworkList;
}
@ModelAttribute("numbersList")
public List<String> getNumbersList() {
List<String> numbersList = new ArrayList<String>();
numbersList.add("1");
numbersList.add("2");
numbersList.add("3");
numbersList.add("4");
return numbersList;
}
@ModelAttribute("countryList")
public Map<String, String> getCountryList() {
Map<String, String> countryList = new HashMap<String, String>();
countryList.put("US", "United States");
countryList.put("CH", "China");
countryList.put("SG", "Singapore");
countryList.put("MY", "Malaysia");
return countryList;
}
@ModelAttribute("skillsList")
public Map<String, String> getSkillsList() {
Map<String, String> skillList = new HashMap<String, String>();
skillList.put("Hibernate", "Hibernate");
skillList.put("Spring", "Spring");
skillList.put("Apache Wicket", "Apache Wicket");
skillList.put("Struts", "Struts");
return skillList;
}
}
Здесь для первого метода обслуживания user () мы передали пустой объект User в объекте ModelAndView с именем «command», потому что среда Spring ожидает объект с именем «command», если вы используете <form: form> теги в вашем файле JSP. Таким образом, когда вызывается метод user () , он возвращает представление user.jsp .
Второй сервисный метод addUser () будет вызываться для метода POST в URL- адресе HelloWeb / addUser . Вы подготовите свой модельный объект на основе предоставленной информации. Наконец, представление «пользователи» будет возвращено из метода сервиса, что приведет к отображению users.jsp.
user.jsp
<%@taglib uri = "http://www.springframework.org/tags/form" prefix = "form"%>
<html>
<head>
<title>Spring MVC Form Handling</title>
</head>
<body>
<h2>User Information</h2>
<form:form method = "POST" action = "/HelloWeb/addUser">
<table>
<tr>
<td><form:label path = "username">User Name</form:label></td>
<td><form:input path = "username" /></td>
</tr>
<tr>
<td><form:label path = "password">Age</form:label></td>
<td><form:password path = "password" /></td>
</tr>
<tr>
<td><form:label path = "address">Address</form:label></td>
<td><form:textarea path = "address" rows = "5" cols = "30" /></td>
</tr>
<tr>
<td><form:label path = "receivePaper">Subscribe Newsletter</form:label></td>
<td><form:checkbox path = "receivePaper" /></td>
</tr>
<tr>
<td><form:label path = "favoriteFrameworks">Favorite Web Frameworks</form:label></td>
<td><form:checkboxes items = "${webFrameworkList}" path = "favoriteFrameworks" /></td>
</tr>
<tr>
<td><form:label path = "gender">Gender</form:label></td>
<td>
<form:radiobutton path = "gender" value = "M" label = "Male" />
<form:radiobutton path = "gender" value = "F" label = "Female" />
</td>
</tr>
<tr>
<td><form:label path = "favoriteNumber">Favorite Number</form:label></td>
<td>
<form:radiobuttons path = "favoriteNumber" items = "${numbersList}" />
</td>
</tr>
<tr>
<td><form:label path = "country">Country</form:label></td>
<td>
<form:select path = "country">
<form:option value = "NONE" label = "Select"/>
<form:options items = "${countryList}" />
</form:select>
</td>
</tr>
<tr>
<td><form:label path = "skills">Skills</form:label></td>
<td>
<form:select path = "skills" items = "${skillsList}"
multiple = "true" />
</td>
</tr>
<tr>
<td colspan = "2">
<input type = "submit" value = "Submit"/>
</td>
</tr>
</table>
</form:form>
</body>
</html>
Здесь мы используем тэг <form: select /> с атрибутом multiple = true для отображения списка HTML. Например –
<form:select path = "skills" items = "${skillsList}" multiple = "true" />
Он будет отображать следующий HTML-контент.
<select id = "skills" name = "skills" multiple = "multiple"> <option value = "Struts">Struts</option> <option value = "Hibernate">Hibernate</option> <option value = "Apache Wicket">Apache Wicket</option> <option value = "Spring">Spring</option> </select> <input type = "hidden" name = "_skills" value = "1"/>
users.jsp
<%@taglib uri = "http://www.springframework.org/tags/form" prefix = "form"%>
<html>
<head>
<title>Spring MVC Form Handling</title>
</head>
<body>
<h2>Submitted User Information</h2>
<table>
<tr>
<td>Username</td>
<td>${username}</td>
</tr>
<tr>
<td>Password</td>
<td>${password}</td>
</tr>
<tr>
<td>Address</td>
<td>${address}</td>
</tr>
<tr>
<td>Subscribed to Newsletter</td>
<td>${receivePaper}</td>
</tr>
<tr>
<td>Favorite Web Frameworks</td>
<td> <% String[] favoriteFrameworks = (String[])request.getAttribute("favoriteFrameworks");
for(String framework: favoriteFrameworks) {
out.println(framework);
}
%></td>
</tr>
<tr>
<td>Gender</td>
<td>${(gender=="M"? "Male" : "Female")}</td>
</tr>
<tr>
<td>Favourite Number</td>
<td>${favoriteNumber}</td>
</tr>
<tr>
<td>Country</td>
<td>${country}</td>
</tr>
<tr>
<td>Skills</td>
<td> <% String[] skills = (String[])request.getAttribute("skills");
for(String skill: skills) {
out.println(skill);
}
%></td>
</tr>
</table>
</body>
</html>
Когда вы закончите создавать исходные файлы и файлы конфигурации, экспортируйте ваше приложение. Щелкните правой кнопкой мыши свое приложение, выберите « Экспорт» → «Файл WAR» и сохраните файл HelloWeb.war в папке веб-приложений Tomcat.
Теперь запустите сервер Tomcat и убедитесь, что вы можете получить доступ к другим веб-страницам из папки веб-приложений с помощью стандартного браузера. Попробуйте URL-адрес – http: // localhost: 8080 / HelloWeb / user, и мы увидим следующий экран, если все в порядке с веб-приложением Spring.

После отправки необходимой информации, нажмите на кнопку отправки, чтобы отправить форму. Вы должны увидеть следующий экран, если все в порядке с вашим веб-приложением Spring.
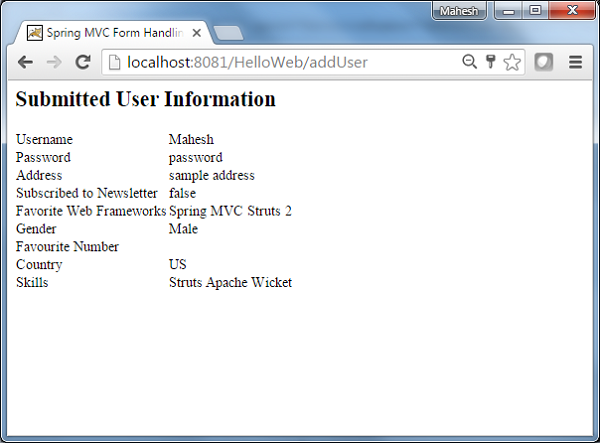
Spring MVC – пример скрытого поля
В следующем примере описывается использование скрытого поля в формах с использованием среды Spring Web MVC. Для начала давайте наладим работающую среду Eclipse IDE и рассмотрим следующие шаги для разработки веб-приложения на основе динамических форм с использованием Spring Web Framework.
| шаг | Описание |
|---|---|
| 1 | Создайте проект с именем HelloWeb в пакете com.tutorialspoint, как описано в главе Spring MVC – Hello World. |
| 2 | Создайте классы Java Student, StudentController в пакете com.tutorialspoint. |
| 3 | Создайте файлы представлений student.jsp, result.jsp в подпапке jsp. |
| 4 | Последний шаг – создание содержимого исходного файла и файлов конфигурации и экспорт приложения, как описано ниже. |
Student.java
package com.tutorialspoint;
public class Student {
private Integer age;
private String name;
private Integer id;
public void setAge(Integer age) {
this.age = age;
}
public Integer getAge() {
return age;
}
public void setName(String name) {
this.name = name;
}
public String getName() {
return name;
}
public void setId(Integer id) {
this.id = id;
}
public Integer getId() {
return id;
}
}
StudentController.java
package com.tutorialspoint;
import org.springframework.stereotype.Controller;
import org.springframework.web.bind.annotation.ModelAttribute;
import org.springframework.web.bind.annotation.RequestMapping;
import org.springframework.web.bind.annotation.RequestMethod;
import org.springframework.web.servlet.ModelAndView;
import org.springframework.ui.ModelMap;
@Controller
public class StudentController {
@RequestMapping(value = "/student", method = RequestMethod.GET)
public ModelAndView student() {
return new ModelAndView("student", "command", new Student());
}
@RequestMapping(value = "/addStudent", method = RequestMethod.POST)
public String addStudent(@ModelAttribute("SpringWeb")Student student,
ModelMap model) {
model.addAttribute("name", student.getName());
model.addAttribute("age", student.getAge());
model.addAttribute("id", student.getId());
return "result";
}
}
Здесь для первого сервисного метода student () мы передали пустой объект Studentobject в объекте ModelAndView с именем «command», потому что среда Spring ожидает объект с именем «command», если вы используете <form: form > теги в вашем файле JSP. Таким образом, когда вызывается метод student () , он возвращает представление student.jsp .
Второй сервисный метод addStudent () будет вызываться для метода POST по URL-адресу HelloWeb / addStudent . Вы подготовите свой модельный объект на основе предоставленной информации. Наконец, из метода сервиса будет возвращено представление «result», что приведет к отображению result.jsp
student.jsp
<%@taglib uri = "http://www.springframework.org/tags/form" prefix = "form"%>
<html>
<head>
<title>Spring MVC Form Handling</title>
</head>
<body>
<h2>Student Information</h2>
<form:form method = "POST" action = "/HelloWeb/addStudent">
<table>
<tr>
<td><form:label path = "name">Name</form:label></td>
<td><form:input path = "name" /></td>
</tr>
<tr>
<td><form:label path = "age">Age</form:label></td>
<td><form:input path = "age" /></td>
</tr>
<tr>
<td>< </td>
<td><form:hidden path = "id" value = "1" /></td>
</tr>
<tr>
<td colspan = "2">
<input type = "submit" value = "Submit"/>
</td>
</tr>
</table>
</form:form>
</body>
</html>
Здесь мы используем тег <form: hidden /> для визуализации скрытого HTML-поля.
Например –
<form:hidden path = "id" value = "1"/>
Он будет отображать следующий HTML-контент.
<input id = "id" name = "id" type = "hidden" value = "1"/>
result.jsp
<%@taglib uri = "http://www.springframework.org/tags/form" prefix = "form"%>
<html>
<head>
<title>Spring MVC Form Handling</title>
</head>
<body>
<h2>Submitted Student Information</h2>
<table>
<tr>
<td>Name</td>
<td>${name}</td>
</tr>
<tr>
<td>Age</td>
<td>${age}</td>
</tr>
<tr>
<td>ID</td>
<td>${id}</td>
</tr>
</table>
</body>
</html>
Когда вы закончите создавать исходные файлы и файлы конфигурации, экспортируйте ваше приложение. Щелкните правой кнопкой мыши свое приложение и используйте опцию Экспорт → Файл WAR и сохраните файл HelloWeb.war в папке веб-приложений Tomcat.
Теперь запустите сервер Tomcat и убедитесь, что вы можете получить доступ к другим веб-страницам из папки webapps с помощью стандартного браузера. Попробуйте URL – http: // localhost: 8080 / HelloWeb / student, и мы увидим следующий экран, если все в порядке с веб-приложением Spring.

После отправки необходимой информации, нажмите на кнопку отправки, чтобы отправить форму. Мы увидим следующий экран, если все в порядке с вашим веб-приложением Spring.

Spring MVC – пример обработки ошибок
В следующем примере показано, как использовать обработку ошибок и валидаторы в формах с использованием Spring Web MVC Framework. Для начала давайте создадим рабочую среду Eclipse и рассмотрим следующие шаги для разработки веб-приложения на основе динамических форм с использованием Spring Web Framework.
| шаг | Описание |
|---|---|
| 1 | Создайте проект с именем HelloWeb в пакете com.tutorialspoint, как описано в главе Spring MVC – Hello World. |
| 2 | Создайте Java-классы Student, StudentController и StudentValidator в пакете com.tutorialspoint. |
| 3 | Создайте файлы представлений addStudent.jsp, result.jsp в подпапке jsp. |
| 4 | Последний шаг – создание содержимого исходного файла и файлов конфигурации и экспорт приложения, как описано ниже. |
Student.java
package com.tutorialspoint;
public class Student {
private Integer age;
private String name;
private Integer id;
public void setAge(Integer age) {
this.age = age;
}
public Integer getAge() {
return age;
}
public void setName(String name) {
this.name = name;
}
public String getName() {
return name;
}
public void setId(Integer id) {
this.id = id;
}
public Integer getId() {
return id;
}
}
StudentValidator.java
package com.tutorialspoint;
import org.springframework.validation.Errors;
import org.springframework.validation.ValidationUtils;
import org.springframework.validation.Validator;
public class StudentValidator implements Validator {
@Override
public boolean supports(Class<?> clazz) {
return Student.class.isAssignableFrom(clazz);
}
@Override
public void validate(Object target, Errors errors) {
ValidationUtils.rejectIfEmptyOrWhitespace(errors,
"name", "required.name","Field name is required.");
}
}
StudentController.java
package com.tutorialspoint;
import org.springframework.beans.factory.annotation.Autowired;
import org.springframework.beans.factory.annotation.Qualifier;
import org.springframework.stereotype.Controller;
import org.springframework.ui.Model;
import org.springframework.validation.BindingResult;
import org.springframework.validation.Validator;
import org.springframework.validation.annotation.Validated;
import org.springframework.web.bind.WebDataBinder;
import org.springframework.web.bind.annotation.InitBinder;
import org.springframework.web.bind.annotation.ModelAttribute;
import org.springframework.web.bind.annotation.RequestMapping;
import org.springframework.web.bind.annotation.RequestMethod;
import org.springframework.web.servlet.ModelAndView;
@Controller
public class StudentController {
@Autowired
@Qualifier("studentValidator")
private Validator validator;
@InitBinder
private void initBinder(WebDataBinder binder) {
binder.setValidator(validator);
}
@RequestMapping(value = "/addStudent", method = RequestMethod.GET)
public ModelAndView student() {
return new ModelAndView("addStudent", "command", new Student());
}
@ModelAttribute("student")
public Student createStudentModel() {
return new Student();
}
@RequestMapping(value = "/addStudent", method = RequestMethod.POST)
public String addStudent(@ModelAttribute("student") @Validated Student student,
BindingResult bindingResult, Model model) {
if (bindingResult.hasErrors()) {
return "addStudent";
}
model.addAttribute("name", student.getName());
model.addAttribute("age", student.getAge());
model.addAttribute("id", student.getId());
return "result";
}
}
HelloWeb-servlet.xml
<beans xmlns = "http://www.springframework.org/schema/beans"
xmlns:context = "http://www.springframework.org/schema/context"
xmlns:xsi = "http://www.w3.org/2001/XMLSchema-instance"
xsi:schemaLocation = "
http://www.springframework.org/schema/beans
http://www.springframework.org/schema/beans/spring-beans-3.0.xsd
http://www.springframework.org/schema/context
http://www.springframework.org/schema/context/spring-context-3.0.xsd">
<context:component-scan base-package = "com.tutorialspoint" />
<bean class = "org.springframework.web.servlet.view.InternalResourceViewResolver">
<property name = "prefix" value = "/WEB-INF/jsp/" />
<property name = "suffix" value = ".jsp" />
</bean>
<bean id = "studentValidator" class = "com.tutorialspoint.StudentValidator" />
</beans>
Здесь для первого сервисного метода student () мы передали пустой объект Studentobject в объекте ModelAndView с именем «command», потому что среда Spring ожидает объект с именем «command», если вы используете теги <form: form> в вашем файле JSP. Таким образом, когда вызывается метод student (), он возвращает представление addStudent.jsp .
Второй сервисный метод addStudent () будет вызываться для метода POST по URL-адресу HelloWeb / addStudent . Вы подготовите свой модельный объект на основе предоставленной информации. Наконец, из метода сервиса будет возвращено представление «result», что приведет к визуализации result.jsp. Если при использовании валидатора возникают ошибки, то возвращается то же представление «addStudent», Spring автоматически внедряет сообщения об ошибках из представления BindingResult .
addStudent.jsp
<%@taglib uri = "http://www.springframework.org/tags/form" prefix = "form"%>
<html>
<head>
<title>Spring MVC Form Handling</title>
</head>
<style>
.error {
color: #ff0000;
}
.errorblock {
color: #000;
background-color: #ffEEEE;
border: 3px solid #ff0000;
padding: 8px;
margin: 16px;
}
</style>
<body>
<h2>Student Information</h2>
<form:form method = "POST" action = "/HelloWeb/addStudent" commandName = "student">
<form:errors path = "*" cssClass = "errorblock" element = "div" />
<table>
<tr>
<td><form:label path = "name">Name</form:label></td>
<td><form:input path = "name" /></td>
<td><form:errors path = "name" cssClass = "error" /></td>
</tr>
<tr>
<td><form:label path = "age">Age</form:label></td>
<td><form:input path = "age" /></td>
</tr>
<tr>
<td><form:label path = "id">id</form:label></td>
<td><form:input path = "id" /></td>
</tr>
<tr>
<td colspan = "2">
<input type = "submit" value = "Submit"/>
</td>
</tr>
</table>
</form:form>
</body>
</html>
Здесь мы используем тег <form: errors /> with path = “*” для отображения сообщений об ошибках. Например
<form:errors path = "*" cssClass = "errorblock" element = "div" />
Он будет отображать сообщения об ошибках для всех проверок ввода.
Мы используем тег <form: errors /> with path = “name” для отображения сообщения об ошибке для поля имени. Например
<form:errors path = "name" cssClass = "error" />
Он будет отображать сообщения об ошибках для проверки полей имени.
result.jsp
<% @ taglib uri = "http://www.springframework.org/tags/form" prefix = "form"%> <HTML> <Голова> <title> Spring MVC Form Handling </ title> </ HEAD> <Тело> <h2> Отправленная информация об ученике </ h2> <Таблица> <TR> <TD> Имя </ TD> <TD> $ {имя} </ TD> </ TR> <TR> <TD> Возраст </ TD> <TD> $ {возраст} </ TD> </ TR> <TR> <TD> ID </ TD> <TD> $ {ID} </ TD> </ TR> </ Table> </ Body> </ Html>
Когда вы закончите создавать исходные файлы и файлы конфигурации, экспортируйте ваше приложение. Щелкните правой кнопкой мыши свое приложение, выберите « Экспорт» → «Файл WAR» и сохраните файл HelloWeb.war в папке веб-приложений Tomcat.
Теперь запустите сервер Tomcat и убедитесь, что вы можете получить доступ к другим веб-страницам из папки webapps с помощью стандартного браузера. Попробуйте URL – http: // localhost: 8080 / HelloWeb / addStudent, и мы увидим следующий экран, если все в порядке с веб-приложением Spring.
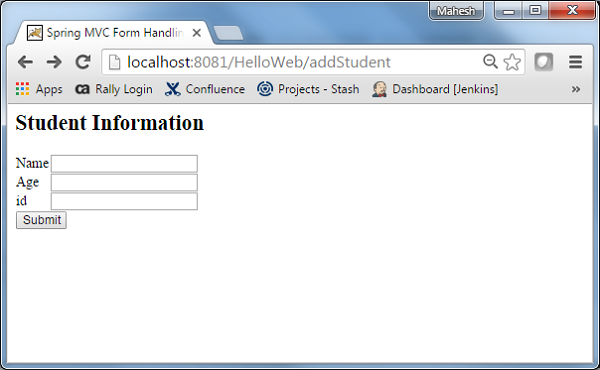
После отправки необходимой информации, нажмите на кнопку отправки, чтобы отправить форму. Вы должны увидеть следующий экран, если все в порядке с веб-приложением Spring.

Spring MVC – Пример загрузки файла
В следующем примере показано, как использовать элемент управления загрузкой файлов в формах с использованием среды Spring Web MVC. Начнем с того, что нам нужно иметь работающую Eclipse IDE и придерживаться следующих шагов для разработки веб-приложения на основе динамических форм с использованием Spring Web Framework.
| шаг | Описание |
|---|---|
| 1 | Создайте проект с именем HelloWeb в пакете com.tutorialspoint, как описано в главе Spring MVC – Hello World. |
| 2 | Создайте классы Java FileModel, FileUploadController в пакете com.tutorialspoint. |
| 3 | Создайте файлы представлений fileUpload.jsp, success.jsp в подпапке jsp. |
| 4 | Создайте временную папку в подпапке WebContent. |
| 5 | Загрузите библиотеку Apache Commons FileUpload commons-fileupload.jar и библиотеку Apache Commons IO commons-io.jar . Поместите их в свой CLASSPATH. |
| 6 | Последний шаг – создание содержимого исходного файла и файлов конфигурации и экспорт приложения, как описано ниже. |
FileModel.java
package com.tutorialspoint;
import org.springframework.web.multipart.MultipartFile;
public class FileModel {
private MultipartFile file;
public MultipartFile getFile() {
return file;
}
public void setFile(MultipartFile file) {
this.file = file;
}
}
FileUploadController.java
package com.tutorialspoint;
import java.io.File;
import java.io.IOException;
import javax.servlet.ServletContext;
import org.springframework.beans.factory.annotation.Autowired;
import org.springframework.stereotype.Controller;
import org.springframework.ui.ModelMap;
import org.springframework.util.FileCopyUtils;
import org.springframework.validation.BindingResult;
import org.springframework.validation.annotation.Validated;
import org.springframework.web.bind.annotation.RequestMapping;
import org.springframework.web.bind.annotation.RequestMethod;
import org.springframework.web.multipart.MultipartFile;
import org.springframework.web.servlet.ModelAndView;
@Controller
public class FileUploadController {
@Autowired
ServletContext context;
@RequestMapping(value = "/fileUploadPage", method = RequestMethod.GET)
public ModelAndView fileUploadPage() {
FileModel file = new FileModel();
ModelAndView modelAndView = new ModelAndView("fileUpload", "command", file);
return modelAndView;
}
@RequestMapping(value="/fileUploadPage", method = RequestMethod.POST)
public String fileUpload(@Validated FileModel file, BindingResult result, ModelMap model) throws IOException {
if (result.hasErrors()) {
System.out.println("validation errors");
return "fileUploadPage";
} else {
System.out.println("Fetching file");
MultipartFile multipartFile = file.getFile();
String uploadPath = context.getRealPath("") + File.separator + "temp" + File.separator;
//Now do something with file...
FileCopyUtils.copy(file.getFile().getBytes(), new File(uploadPath+file.getFile().getOriginalFilename()));
String fileName = multipartFile.getOriginalFilename();
model.addAttribute("fileName", fileName);
return "success";
}
}
}
HelloWeb-servlet.xml
<beans xmlns = "http://www.springframework.org/schema/beans"
xmlns:context = "http://www.springframework.org/schema/context"
xmlns:xsi = "http://www.w3.org/2001/XMLSchema-instance"
xsi:schemaLocation = "
http://www.springframework.org/schema/beans
http://www.springframework.org/schema/beans/spring-beans-3.0.xsd
http://www.springframework.org/schema/context
http://www.springframework.org/schema/context/spring-context-3.0.xsd">
<context:component-scan base-package = "com.tutorialspoint" />
<bean class = "org.springframework.web.servlet.view.InternalResourceViewResolver">
<property name = "prefix" value = "/WEB-INF/jsp/" />
<property name = "suffix" value = ".jsp" />
</bean>
<bean id = "multipartResolver"
class = "org.springframework.web.multipart.commons.CommonsMultipartResolver" />
</beans>
Здесь для первого метода сервиса fileUploadPage () мы передали пустой объект FileModel в объект ModelAndView с именем «command», потому что среда Spring ожидает объект с именем «command», если вы используете <form: form> теги в вашем файле JSP. Поэтому, когда вызывается метод fileUploadPage () , он возвращает представление fileUpload.jsp .
Второй сервисный метод fileUpload () будет вызываться для метода POST по URL-адресу HelloWeb / fileUploadPage . Вы подготовите файл для загрузки на основе предоставленной информации. Наконец, из метода службы будет возвращено представление «success», что приведет к визуализации success.jsp.
fileUpload.jsp
<%@ page contentType="text/html; charset = UTF-8" %>
<%@ taglib prefix = "form" uri = "http://www.springframework.org/tags/form"%>
<html>
<head>
<title>File Upload Example</title>
</head>
<body>
<form:form method = "POST" modelAttribute = "fileUpload"
enctype = "multipart/form-data">
Please select a file to upload :
<input type = "file" name = "file" />
<input type = "submit" value = "upload" />
</form:form>
</body>
</html>
Здесь мы используем атрибут modelAttribute со значением = “fileUpload” для сопоставления элемента управления загрузки файла с моделью сервера.
success.jsp
<%@ page contentType = "text/html; charset = UTF-8" %>
<html>
<head>
<title>File Upload Example</title>
</head>
<body>
FileName :
lt;b> ${fileName} </b> - Uploaded Successfully.
</body>
</html>
Когда вы закончите создавать исходные файлы и файлы конфигурации, экспортируйте ваше приложение. Щелкните правой кнопкой мыши свое приложение, выберите « Экспорт» → «Файл WAR» и сохраните файл HelloWeb.war в папке веб-приложений Tomcat.
Теперь запустите сервер Tomcat и убедитесь, что вы можете получить доступ к другим веб-страницам из папки веб-приложений с помощью стандартного браузера. Попробуйте URL – http: // localhost: 8080 / HelloWeb / fileUploadPage, и мы увидим следующий экран, если все в порядке с веб-приложением Spring.

После отправки необходимой информации, нажмите на кнопку отправки, чтобы отправить форму. Вы должны увидеть следующий экран, если все в порядке с веб-приложением Spring.

Spring MVC – Пример отображения обработчика URL-адреса имени компонента
В следующем примере показано, как использовать сопоставление обработчика URL-адреса имени компонента с помощью Spring Web MVC Framework. Класс BeanNameUrlHandlerMapping является классом отображения обработчика по умолчанию, который сопоставляет запрос (-ы) URL-адреса с именем bean-компонентов, упомянутых в конфигурации.
<beans>
<bean class = "org.springframework.web.servlet.view.InternalResourceViewResolver">
<property name = "prefix" value = "/WEB-INF/jsp/"/>
<property name = "suffix" value = ".jsp"/>
</bean>
<bean class = "org.springframework.web.servlet.handler.BeanNameUrlHandlerMapping"/>
<bean name = "/helloWorld.htm"
class = "com.tutorialspoint.HelloController" />
<bean name = "/hello*"
class = "com.tutorialspoint.HelloController" />
<bean name = "/welcome.htm"
class = "com.tutorialspoint.WelcomeController"/>
</beans>
Например, используя вышеуказанную конфигурацию, если URI
-
/helloWorld.htm или / hello {любая буква} .htm запрашивается, DispatcherServlet перенаправляет запрос в HelloController .
-
/welcome.htm запрашивается, DispatcherServlet перенаправляет запрос в WelcomeController .
-
Запрашивается /welcome1.htm, DispatcherServlet не найдет ни одного контроллера, и сервер выдаст ошибку состояния 404.
/helloWorld.htm или / hello {любая буква} .htm запрашивается, DispatcherServlet перенаправляет запрос в HelloController .
/welcome.htm запрашивается, DispatcherServlet перенаправляет запрос в WelcomeController .
Запрашивается /welcome1.htm, DispatcherServlet не найдет ни одного контроллера, и сервер выдаст ошибку состояния 404.
Для начала давайте создадим рабочую среду Eclipse и рассмотрим следующие шаги для разработки веб-приложения на основе динамических форм с использованием Spring Web Framework.
| шаг | Описание |
|---|---|
| 1 | Создайте проект с именем TestWeb в пакете com.tutorialspoint, как описано в главе Spring MVC – Hello World. |
| 2 | Создайте классы Java HelloController, WelcomeController в пакете com.tutorialspoint. |
| 3 | Создайте файлы представлений hello.jsp, welcome.jsp в подпапке jsp. |
| 4 | Последний шаг – создать содержимое всех исходных файлов и файлов конфигурации и экспортировать приложение, как описано ниже. |
HelloController.java
package com.tutorialspoint;
import javax.servlet.http.HttpServletRequest;
import javax.servlet.http.HttpServletResponse;
import org.springframework.web.servlet.ModelAndView;
import org.springframework.web.servlet.mvc.AbstractController;
public class HelloController extends AbstractController{
@Override
protected ModelAndView handleRequestInternal(HttpServletRequest request,
HttpServletResponse response) throws Exception {
ModelAndView model = new ModelAndView("hello");
model.addObject("message", "Hello World!");
return model;
}
}
WelcomeController.java
package com.tutorialspoint;
import javax.servlet.http.HttpServletRequest;
import javax.servlet.http.HttpServletResponse;
import org.springframework.web.servlet.ModelAndView;
import org.springframework.web.servlet.mvc.AbstractController;
public class WelcomeController extends AbstractController{
@Override
protected ModelAndView handleRequestInternal(HttpServletRequest request,
HttpServletResponse response) throws Exception {
ModelAndView model = new ModelAndView("welcome");
model.addObject("message", "Welcome!");
return model;
}
}
TestWeb-servlet.xml
<beans xmlns = "http://www.springframework.org/schema/beans"
xmlns:context = "http://www.springframework.org/schema/context"
xmlns:xsi = "http://www.w3.org/2001/XMLSchema-instance"
xsi:schemaLocation = "
http://www.springframework.org/schema/beans
http://www.springframework.org/schema/beans/spring-beans-3.0.xsd
http://www.springframework.org/schema/context
http://www.springframework.org/schema/context/spring-context-3.0.xsd">
<bean class = "org.springframework.web.servlet.view.InternalResourceViewResolver">
<property name = "prefix" value = "/WEB-INF/jsp/"/>
<property name = "suffix" value = ".jsp"/>
</bean>
<bean class = "org.springframework.web.servlet.handler.BeanNameUrlHandlerMapping"/>
<bean name = "/helloWorld.htm"
class = "com.tutorialspoint.HelloController" />
<bean name = "/hello*"
class = "com.tutorialspoint.HelloController" />
<bean name = "/welcome.htm"
class = "com.tutorialspoint.WelcomeController"/>
</beans>
hello.jsp
<%@ page contentType = "text/html; charset = UTF-8" %>
<html>
<head>
<title>Hello World</title>
</head>
<body>
<h2>${message}</h2>
</body>
</html>
welcome.jsp
<%@ page contentType = "text/html; charset = UTF-8" %>
<html>
<head>
<title>Welcome</title>
</head>
<body>
<h2>${message}</h2>
</body>
</html>
Когда вы закончите создавать исходные файлы и файлы конфигурации, экспортируйте ваше приложение. Щелкните правой кнопкой мыши свое приложение, выберите « Экспорт» → «Файл WAR» и сохраните файл TestWeb.war в папке веб-приложений Tomcat.
Теперь запустите сервер Tomcat и убедитесь, что вы можете получить доступ к другим веб-страницам из папки веб-приложений с помощью стандартного браузера. Попробуйте URL – http: // localhost: 8080 / TestWeb / helloWorld.htm, и мы увидим следующий экран, если все в порядке с веб-приложением Spring.
Попробуйте URL – http: // localhost: 8080 / TestWeb / hello.htm, и мы увидим следующий экран, если все в порядке с веб-приложением Spring.
Попробуйте URL-адрес http: // localhost: 8080 / TestWeb / welcome.htm, и мы увидим следующий экран, если все в порядке с веб-приложением Spring.

Попробуйте URL-адрес http: // localhost: 8080 / TestWeb / welcome1.htm, и мы увидим следующий экран, если все в порядке с веб-приложением Spring.
Spring MVC – Пример отображения обработчика имени класса контроллера
В следующем примере показано, как использовать сопоставление обработчиков имен классов контроллеров с помощью среды Spring Web MVC. Класс ControllerClassNameHandlerMapping – это класс сопоставления обработчиков, основанный на соглашении, который отображает URL-запросы на имена контроллеров, упомянутых в конфигурации. Этот класс принимает имена контроллеров и преобразует их в нижний регистр с лидирующей “/”.
Например – HelloController сопоставляется с URL-адресом “/ hello *”.
<beans>
<bean class="org.springframework.web.servlet.view.InternalResourceViewResolver">
<property name = "prefix" value = "/WEB-INF/jsp/"/>
<property name = "suffix" value = ".jsp"/>
</bean>
<bean class = "org.springframework.web.servlet.mvc.support.ControllerClassNameHandlerMapping"/>
<bean class = "com.tutorialspoint.HelloController" />
<bean class = "com.tutorialspoint.WelcomeController"/>
</beans>
Например, используя вышеуказанную конфигурацию, если URI
-
/helloWorld.htm или / hello {любая буква} .htm запрашивается, DispatcherServlet перенаправляет запрос в HelloController .
-
/welcome.htm запрашивается, DispatcherServlet перенаправляет запрос в WelcomeController .
-
/Welcome.htm запрашивается, если W – прописная буква, DispatcherServlet не найдет ни одного контроллера и сервер выдаст ошибку состояния 404.
/helloWorld.htm или / hello {любая буква} .htm запрашивается, DispatcherServlet перенаправляет запрос в HelloController .
/welcome.htm запрашивается, DispatcherServlet перенаправляет запрос в WelcomeController .
/Welcome.htm запрашивается, если W – прописная буква, DispatcherServlet не найдет ни одного контроллера и сервер выдаст ошибку состояния 404.
Чтобы начать с этого, давайте создадим рабочую среду Eclipse и выполним последующие шаги для разработки веб-приложения на основе динамических форм с использованием Spring Web Framework.
| шаг | Описание |
|---|---|
| 1 | Создайте проект с именем TestWeb в пакете com.tutorialspoint, как описано в главе Spring MVC – Hello World. |
| 2 | Создайте классы Java HelloController и WelcomeController в пакете com.tutorialspoint. |
| 3 | Создайте файлы представлений hello.jsp, welcome.jsp в подпапке jsp. |
| 4 | Последний шаг – создание содержимого исходного файла и файлов конфигурации и экспорт приложения, как описано ниже. |
HelloController.java
package com.tutorialspoint;
import javax.servlet.http.HttpServletRequest;
import javax.servlet.http.HttpServletResponse;
import org.springframework.web.servlet.ModelAndView;
import org.springframework.web.servlet.mvc.AbstractController;
public class HelloController extends AbstractController{
@Override
protected ModelAndView handleRequestInternal(HttpServletRequest request,
HttpServletResponse response) throws Exception {
ModelAndView model = new ModelAndView("hello");
model.addObject("message", "Hello World!");
return model;
}
}
WelcomeController.java
package com.tutorialspoint;
import javax.servlet.http.HttpServletRequest;
import javax.servlet.http.HttpServletResponse;
import org.springframework.web.servlet.ModelAndView;
import org.springframework.web.servlet.mvc.AbstractController;
public class WelcomeController extends AbstractController{
@Override
protected ModelAndView handleRequestInternal(HttpServletRequest request,
HttpServletResponse response) throws Exception {
ModelAndView model = new ModelAndView("welcome");
model.addObject("message", "Welcome!");
return model;
}
}
TestWeb-servlet.xml
<beans xmlns = "http://www.springframework.org/schema/beans"
xmlns:context = "http://www.springframework.org/schema/context"
xmlns:xsi = "http://www.w3.org/2001/XMLSchema-instance"
xsi:schemaLocation = "
http://www.springframework.org/schema/beans
http://www.springframework.org/schema/beans/spring-beans-3.0.xsd
http://www.springframework.org/schema/context
http://www.springframework.org/schema/context/spring-context-3.0.xsd">
<bean class = "org.springframework.web.servlet.view.InternalResourceViewResolver">
<property name = "prefix" value = "/WEB-INF/jsp/"/>
<property name = "suffix" value = ".jsp"/>
</bean>
<bean class = "org.springframework.web.servlet.mvc.support.ControllerClassNameHandlerMapping"/>
<bean class = "com.tutorialspoint.HelloController" />
<bean class = "com.tutorialspoint.WelcomeController"/>
</beans>
hello.jsp
<%@ page contentType="text/html; charset = UTF-8" %>
<html>
<head>
<title>Hello World</title>
</head>
<body>
<h2>${message}</h2>
</body>
</html>
welcome.jsp
<%@ page contentType = "text/html; charset=UTF-8" %>
<html>
<head>
<title>Welcome</title>
</head>
<body>
<h2>${message}</h2>
</body>
</html>
Когда вы закончите создавать исходные файлы и файлы конфигурации, экспортируйте ваше приложение. Щелкните правой кнопкой мыши приложение, используйте опцию « Экспорт» → «Файл WAR» и сохраните файл TestWeb.war в папке веб-приложений Tomcat.
Теперь запустите сервер Tomcat и убедитесь, что вы можете получить доступ к другим веб-страницам из папки веб-приложений с помощью стандартного браузера. Попробуйте URL – http: // localhost: 8080 / TestWeb / helloWorld.htm, и мы увидим следующий экран, если все в порядке с веб-приложением Spring.

Попробуйте URL-адрес http: // localhost: 8080 / TestWeb / hello.htm, и мы увидим следующий экран, если все в порядке с веб-приложением Spring.

Попробуйте URL-адрес http: // localhost: 8080 / TestWeb / welcome.htm, и мы увидим следующий экран, если все в порядке с веб-приложением Spring.
Попробуйте URL-адрес http: // localhost: 8080 / TestWeb / Welcome.htm, и мы увидим следующий экран, если все в порядке с веб-приложением Spring.
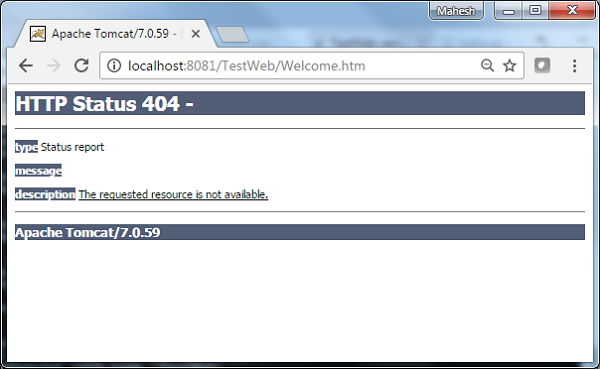
Spring MVC – Пример отображения простого обработчика URL
В следующем примере показано, как использовать простое сопоставление обработчиков URL-адресов с помощью среды Spring Web MVC. Класс SimpleUrlHandlerMapping помогает явно отображать URL-адреса с их контроллерами соответственно.
<beans>
<bean class = "org.springframework.web.servlet.view.InternalResourceViewResolver">
<property name = "prefix" value = "/WEB-INF/jsp/"/>
<property name = "suffix" value = ".jsp"/>
</bean>
<bean class = "org.springframework.web.servlet.handler.SimpleUrlHandlerMapping">
<property name = "mappings">
<props>
<prop key = "/welcome.htm">welcomeController</prop>
<prop key = "/helloWorld.htm">helloController</prop>
</props>
</property>
</bean>
<bean id = "helloController" class = "com.tutorialspoint.HelloController" />
<bean id = "welcomeController" class = "com.tutorialspoint.WelcomeController"/>
</beans>
Например, используя вышеуказанную конфигурацию, если URI
-
/helloWorld.htm запрашивается, DispatcherServlet перенаправляет запрос в HelloController .
-
/welcome.htm запрашивается, DispatcherServlet перенаправляет запрос в WelcomeController .
/helloWorld.htm запрашивается, DispatcherServlet перенаправляет запрос в HelloController .
/welcome.htm запрашивается, DispatcherServlet перенаправляет запрос в WelcomeController .
Для начала давайте создадим рабочую среду Eclipse и рассмотрим следующие шаги для разработки веб-приложения на основе динамических форм с использованием Spring Web Framework.
| шаг | Описание |
|---|---|
| 1 | Создайте проект с именем TestWeb в пакете com.tutorialspoint, как описано в главе Spring MVC – Hello World. |
| 2 | Создайте классы Java HelloController и WelcomeController в пакете com.tutorialspoint. |
| 3 | Создайте файлы представлений hello.jsp и welcome.jsp в подпапке jsp. |
| 4 | Последний шаг – создание содержимого исходного файла и файлов конфигурации и экспорт приложения, как описано ниже. |
HelloController.java
package com.tutorialspoint;
import javax.servlet.http.HttpServletRequest;
import javax.servlet.http.HttpServletResponse;
import org.springframework.web.servlet.ModelAndView;
import org.springframework.web.servlet.mvc.AbstractController;
public class HelloController extends AbstractController{
@Override
protected ModelAndView handleRequestInternal(HttpServletRequest request,
HttpServletResponse response) throws Exception {
ModelAndView model = new ModelAndView("hello");
model.addObject("message", "Hello World!");
return model;
}
}
WelcomeController.java
package com.tutorialspoint;
import javax.servlet.http.HttpServletRequest;
import javax.servlet.http.HttpServletResponse;
import org.springframework.web.servlet.ModelAndView;
import org.springframework.web.servlet.mvc.AbstractController;
public class WelcomeController extends AbstractController{
@Override
protected ModelAndView handleRequestInternal(HttpServletRequest request,
HttpServletResponse response) throws Exception {
ModelAndView model = new ModelAndView("welcome");
model.addObject("message", "Welcome!");
return model;
}
}
TestWeb-servlet.xml
<beans xmlns = "http://www.springframework.org/schema/beans"
xmlns:context = "http://www.springframework.org/schema/context"
xmlns:xsi = "http://www.w3.org/2001/XMLSchema-instance"
xsi:schemaLocation = "
http://www.springframework.org/schema/beans
http://www.springframework.org/schema/beans/spring-beans-3.0.xsd
http://www.springframework.org/schema/context
http://www.springframework.org/schema/context/spring-context-3.0.xsd">
<bean class = "org.springframework.web.servlet.view.InternalResourceViewResolver">
<property name = "prefix" value = "/WEB-INF/jsp/"/>
<property name = "suffix" value = ".jsp"/>
</bean>
<bean class = "org.springframework.web.servlet.handler.SimpleUrlHandlerMapping">
<property name = "mappings">
<props>
<prop key = "/welcome.htm">welcomeController</prop>
<prop key = "/helloWorld.htm">helloController</prop>
</props>
</property>
</bean>
<bean id = "helloController" class = "com.tutorialspoint.HelloController" />
<bean id = "welcomeController" class = "com.tutorialspoint.WelcomeController"/>
</beans>
hello.jsp
<%@ page contentType = "text/html; charset = UTF-8" %>
<html>
<head>
<title>Hello World</title>
</head>
<body>
<h2>${message}</h2>
</body>
</html>
welcome.jsp
<%@ page contentType = "text/html; charset = UTF-8" %>
<html>
<head>
<title>Welcome</title>
</head>
<body>
<h2>${message}</h2>
</body>
</html>
Когда вы закончите создавать исходные файлы и файлы конфигурации, экспортируйте ваше приложение. Щелкните правой кнопкой мыши свое приложение, используйте опцию « Экспорт» → «Файл WAR» и сохраните файл TestWeb.war в папке веб-приложений Tomcat.
Теперь запустите сервер Tomcat и убедитесь, что вы можете получить доступ к другим веб-страницам из папки веб-приложений с помощью стандартного браузера. Попробуйте URL – http: // localhost: 8080 / TestWeb / helloWorld.htm, и мы увидим следующий экран, если все в порядке с веб-приложением Spring.

Попробуйте URL-адрес http: // localhost: 8080 / TestWeb / welcome.htm, и вы увидите следующий результат, если все в порядке с вашим веб-приложением Spring.

Spring MVC – Пример контроллера мультидействия
В следующем примере показано, как использовать Multi Action Controller с использованием среды Spring Web MVC. Класс MultiActionController помогает сопоставить несколько URL-адресов с их методами в одном контроллере соответственно.
package com.tutorialspoint;
import javax.servlet.http.HttpServletRequest;
import javax.servlet.http.HttpServletResponse;
import org.springframework.web.servlet.ModelAndView;
import org.springframework.web.servlet.mvc.multiaction.MultiActionController;
public class UserController extends MultiActionController{
public ModelAndView home(HttpServletRequest request,
HttpServletResponse response) throws Exception {
ModelAndView model = new ModelAndView("home");
model.addObject("message", "Home");
return model;
}
public ModelAndView add(HttpServletRequest request,
HttpServletResponse response) throws Exception {
ModelAndView model = new ModelAndView("user");
model.addObject("message", "Add");
return model;
}
public ModelAndView remove(HttpServletRequest request,
HttpServletResponse response) throws Exception {
ModelAndView model = new ModelAndView("user");
model.addObject("message", "Remove");
return model;
}
}
<bean class = "org.springframework.web.servlet.handler.BeanNameUrlHandlerMapping"/> <bean name = "/home.htm" class = "com.tutorialspoint.UserController" /> <bean name = "/user/*.htm" class = "com.tutorialspoint.UserController" />
Например, используя вышеуказанную конфигурацию, если URI –
-
/home.htm запрашивается, DispatcherServlet перенаправляет запрос методу homeController home () .
-
user / add.htm запрашивается, DispatcherServlet перенаправляет запрос в метод UserController add () .
-
Запрашивается user / remove.htm, DispatcherServlet перенаправляет запрос в метод UserController remove () .
/home.htm запрашивается, DispatcherServlet перенаправляет запрос методу homeController home () .
user / add.htm запрашивается, DispatcherServlet перенаправляет запрос в метод UserController add () .
Запрашивается user / remove.htm, DispatcherServlet перенаправляет запрос в метод UserController remove () .
Для начала давайте предоставим рабочую среду Eclipse и перейдем к следующим шагам для разработки веб-приложения на основе динамических форм с использованием Spring Web Framework.
| шаг | Описание |
|---|---|
| 1 | Создайте проект с именем TestWeb в пакете com.tutorialspoint, как описано в главе Spring MVC – Hello World. |
| 2 | Создайте Java-класс UserController в пакете com.tutorialspoint. |
| 3 | Создайте файлы представлений home.jsp и user.jsp в подпапке jsp. |
| 4 | Последний шаг – создание содержимого исходного файла и файлов конфигурации и экспорт приложения, как описано ниже. |
UserController.java
package com.tutorialspoint;
import javax.servlet.http.HttpServletRequest;
import javax.servlet.http.HttpServletResponse;
import org.springframework.web.servlet.ModelAndView;
import org.springframework.web.servlet.mvc.multiaction.MultiActionController;
public class UserController extends MultiActionController{
public ModelAndView home(HttpServletRequest request,
HttpServletResponse response) throws Exception {
ModelAndView model = new ModelAndView("home");
model.addObject("message", "Home");
return model;
}
public ModelAndView add(HttpServletRequest request,
HttpServletResponse response) throws Exception {
ModelAndView model = new ModelAndView("user");
model.addObject("message", "Add");
return model;
}
public ModelAndView remove(HttpServletRequest request,
HttpServletResponse response) throws Exception {
ModelAndView model = new ModelAndView("user");
model.addObject("message", "Remove");
return model;
}
}
TestWeb-servlet.xml
<beans xmlns = "http://www.springframework.org/schema/beans"
xmlns:context = "http://www.springframework.org/schema/context"
xmlns:xsi = "http://www.w3.org/2001/XMLSchema-instance"
xsi:schemaLocation = "
http://www.springframework.org/schema/beans
http://www.springframework.org/schema/beans/spring-beans-3.0.xsd
http://www.springframework.org/schema/context
http://www.springframework.org/schema/context/spring-context-3.0.xsd">
<bean class = "org.springframework.web.servlet.view.InternalResourceViewResolver">
<property name = "prefix" value = "/WEB-INF/jsp/"/>
<property name = "suffix" value = ".jsp"/>
</bean>
<bean class = "org.springframework.web.servlet.handler.BeanNameUrlHandlerMapping"/>
<bean name = "/home.htm"
class = "com.tutorialspoint.UserController" />
<bean name = "/user/*.htm"
class = "com.tutorialspoint.UserController" />
</beans>
home.jsp
<%@ page contentType = "text/html; charset = UTF-8" %>
<html>
<head>
<meta http-equiv = "Content-Type" content = "text/html; charset = ISO-8859-1">
<title>Home</title>
</head>
<body>
<a href = "user/add.htm" >Add</a> <br>
<a href = "user/remove.htm" >Remove</a>
</body>
</html>
user.jsp
<%@ page contentType = "text/html; charset = UTF-8" %>
<html>
<head>
<title>Hello World</title>
</head>
<body>
<h2>${message}</h2>
</body>
</html>
Когда вы закончите создавать исходные файлы и файлы конфигурации, экспортируйте ваше приложение. Щелкните правой кнопкой мыши свое приложение, выберите « Экспорт» → «Файл WAR» и сохраните файл TestWeb.war в папке веб-приложений Tomcat.
Теперь запустите сервер Tomcat и убедитесь, что вы можете получить доступ к другим веб-страницам из папки webapps с помощью стандартного браузера. Теперь попробуйте URL – http: // localhost: 8080 / TestWeb / home.htm, и мы увидим следующий экран, если все в порядке с веб-приложением Spring.

Попробуйте URL-адрес http: // localhost: 8080 / TestWeb / user / add.htm, и мы увидим следующий экран, если все в порядке с веб-приложением Spring.

Spring MVC – Свойства Имя метода Resolver Пример
В следующем примере показано, как использовать метод Resolver Name Method Properties для Multi Action Controller с использованием среды Spring Web MVC. Класс MultiActionController помогает сопоставить несколько URL-адресов с их методами в одном контроллере соответственно.
package com.tutorialspoint;
import javax.servlet.http.HttpServletRequest;
import javax.servlet.http.HttpServletResponse;
import org.springframework.web.servlet.ModelAndView;
import org.springframework.web.servlet.mvc.multiaction.MultiActionController;
public class UserController extends MultiActionController{
public ModelAndView home(HttpServletRequest request,
HttpServletResponse response) throws Exception {
ModelAndView model = new ModelAndView("user");
model.addObject("message", "Home");
return model;
}
public ModelAndView add(HttpServletRequest request,
HttpServletResponse response) throws Exception {
ModelAndView model = new ModelAndView("user");
model.addObject("message", "Add");
return model;
}
public ModelAndView remove(HttpServletRequest request,
HttpServletResponse response) throws Exception {
ModelAndView model = new ModelAndView("user");
model.addObject("message", "Remove");
return model;
}
}
<bean class = "com.tutorialspoint.UserController">
<property name = "methodNameResolver">
<bean class = "org.springframework.web.servlet.mvc.multiaction.PropertiesMethodNameResolver">
<property name = "mappings">
<props>
<prop key = "/user/home.htm">home</prop>
<prop key = "/user/add.htm">add</prop>
<prop key = "/user/remove.htm">update</prop>
</props>
</property>
</bean>
</property>
</bean>
Например, используя вышеуказанную конфигурацию, если URI –
-
/user/home.htm запрашивается, DispatcherServlet перенаправляет запрос методу homeController home () .
-
/user/add.htm запрашивается, DispatcherServlet перенаправляет запрос в метод UserController add () .
-
/user/remove.htm запрашивается, DispatcherServlet перенаправляет запрос в метод UserController remove () .
/user/home.htm запрашивается, DispatcherServlet перенаправляет запрос методу homeController home () .
/user/add.htm запрашивается, DispatcherServlet перенаправляет запрос в метод UserController add () .
/user/remove.htm запрашивается, DispatcherServlet перенаправляет запрос в метод UserController remove () .
Чтобы начать с него, давайте создадим рабочую среду Eclipse и рассмотрим следующие шаги для разработки веб-приложения на основе динамических форм с использованием Spring Web Framework.
| шаг | Описание |
|---|---|
| 1 | Создайте проект с именем TestWeb в пакете com.tutorialspoint, как описано в главе Spring MVC – Hello World. |
| 2 | Создайте Java-класс UserController в пакете com.tutorialspoint. |
| 3 | Создайте файл представления user.jsp в подпапке jsp. |
| 4 | Последний шаг – создание содержимого исходного файла и файлов конфигурации и экспорт приложения, как описано ниже. |
UserController.java
package com.tutorialspoint;
import javax.servlet.http.HttpServletRequest;
import javax.servlet.http.HttpServletResponse;
import org.springframework.web.servlet.ModelAndView;
import org.springframework.web.servlet.mvc.multiaction.MultiActionController;
public class UserController extends MultiActionController{
public ModelAndView home(HttpServletRequest request,
HttpServletResponse response) throws Exception {
ModelAndView model = new ModelAndView("user");
model.addObject("message", "Home");
return model;
}
public ModelAndView add(HttpServletRequest request,
HttpServletResponse response) throws Exception {
ModelAndView model = new ModelAndView("user");
model.addObject("message", "Add");
return model;
}
public ModelAndView remove(HttpServletRequest request,
HttpServletResponse response) throws Exception {
ModelAndView model = new ModelAndView("user");
model.addObject("message", "Remove");
return model;
}
}
TestWeb-servlet.xml
<beans xmlns = "http://www.springframework.org/schema/beans"
xmlns:context = "http://www.springframework.org/schema/context"
xmlns:xsi = "http://www.w3.org/2001/XMLSchema-instance"
xsi:schemaLocation = "
http://www.springframework.org/schema/beans
http://www.springframework.org/schema/beans/spring-beans-3.0.xsd
http://www.springframework.org/schema/context
http://www.springframework.org/schema/context/spring-context-3.0.xsd">
<bean class = "org.springframework.web.servlet.view.InternalResourceViewResolver">
<property name = "prefix" value = "/WEB-INF/jsp/"/>
<property name = "suffix" value = ".jsp"/>
</bean>
<bean class = "org.springframework.web.servlet.mvc.support.ControllerClassNameHandlerMapping">
<property name = "caseSensitive" value = "true" />
</bean>
<bean class = "com.tutorialspoint.UserController">
<property name = "methodNameResolver">
<bean class = "org.springframework.web.servlet.mvc.multiaction.PropertiesMethodNameResolver">
<property name = "mappings">
<props>
<prop key = "/user/home.htm">home</prop>
<prop key = "/user/add.htm">add</prop>
<prop key = "/user/remove.htm">update</prop>
</props>
</property>
</bean>
</property>
</bean>
</beans>
user.jsp
<%@ page contentType = "text/html; charset = UTF-8" %>
<html>
<head>
<title>Hello World</title>
</head>
<body>
<h2>${message}</h2>
</body>
</html>
Когда вы закончите создавать исходные файлы и файлы конфигурации, экспортируйте ваше приложение. Щелкните правой кнопкой мыши свое приложение, выберите « Экспорт» → «Файл WAR» и сохраните файл TestWeb.war в папке веб-приложений Tomcat.
Теперь запустите сервер Tomcat и убедитесь, что вы можете получить доступ к другим веб-страницам из папки веб-приложений с помощью стандартного браузера. Теперь попробуйте URL-адрес – http: // localhost: 8080 / TestWeb / user / add.htm, и мы увидим следующий экран, если все в порядке с веб-приложением Spring.

Spring MVC – Пример метода определения имени параметра
В следующем примере показано, как использовать преобразователь имен методов параметров контроллера много действий с использованием среды Spring Web MVC. Класс MultiActionController помогает сопоставить несколько URL-адресов с их методами в одном контроллере соответственно.
package com.tutorialspoint;
import javax.servlet.http.HttpServletRequest;
import javax.servlet.http.HttpServletResponse;
import org.springframework.web.servlet.ModelAndView;
import org.springframework.web.servlet.mvc.multiaction.MultiActionController;
public class UserController extends MultiActionController{
public ModelAndView home(HttpServletRequest request,
HttpServletResponse response) throws Exception {
ModelAndView model = new ModelAndView("user");
model.addObject("message", "Home");
return model;
}
public ModelAndView add(HttpServletRequest request,
HttpServletResponse response) throws Exception {
ModelAndView model = new ModelAndView("user");
model.addObject("message", "Add");
return model;
}
public ModelAndView remove(HttpServletRequest request,
HttpServletResponse response) throws Exception {
ModelAndView model = new ModelAndView("user");
model.addObject("message", "Remove");
return model;
}
}
<bean class = "com.tutorialspoint.UserController">
<property name = "methodNameResolver">
<bean class = "org.springframework.web.servlet.mvc.multiaction.ParameterMethodNameResolver">
<property name = "paramName" value = "action"/>
</bean>
</property>
</bean>
Например, используя вышеуказанную конфигурацию, если URI –
-
/user/*.htm?action=home запрошен, DispatcherServlet перенаправит запрос методу homeController home () .
-
/user/*.htm?action=add запрашивается, DispatcherServlet перенаправляет запрос в метод add () UserController.
-
/user/*.htm?action=remove запрашивается, DispatcherServlet перенаправляет запрос в метод UserController remove () .
/user/*.htm?action=home запрошен, DispatcherServlet перенаправит запрос методу homeController home () .
/user/*.htm?action=add запрашивается, DispatcherServlet перенаправляет запрос в метод add () UserController.
/user/*.htm?action=remove запрашивается, DispatcherServlet перенаправляет запрос в метод UserController remove () .
Начнем с того, что нам нужно иметь работающую Eclipse IDE и придерживаться следующих шагов для разработки веб-приложения на основе динамических форм с использованием Spring Web Framework.
| шаг | Описание |
|---|---|
| 1 | Создайте проект с именем TestWeb в пакете com.tutorialspoint, как описано в главе Spring MVC – Hello World. |
| 2 | Создайте Java-класс UserController в пакете com.tutorialspoint. |
| 3 | Создайте файл представления user.jsp в подпапке jsp. |
| 4 | Последний шаг – создание содержимого исходного файла и файлов конфигурации и экспорт приложения, как описано ниже. |
UserController.java
package com.tutorialspoint;
import javax.servlet.http.HttpServletRequest;
import javax.servlet.http.HttpServletResponse;
import org.springframework.web.servlet.ModelAndView;
import org.springframework.web.servlet.mvc.multiaction.MultiActionController;
public class UserController extends MultiActionController{
public ModelAndView home(HttpServletRequest request,
HttpServletResponse response) throws Exception {
ModelAndView model = new ModelAndView("user");
model.addObject("message", "Home");
return model;
}
public ModelAndView add(HttpServletRequest request,
HttpServletResponse response) throws Exception {
ModelAndView model = new ModelAndView("user");
model.addObject("message", "Add");
return model;
}
public ModelAndView remove(HttpServletRequest request,
HttpServletResponse response) throws Exception {
ModelAndView model = new ModelAndView("user");
model.addObject("message", "Remove");
return model;
}
}
TestWeb-servlet.xml
<beans xmlns = "http://www.springframework.org/schema/beans"
xmlns:context = "http://www.springframework.org/schema/context"
xmlns:xsi = "http://www.w3.org/2001/XMLSchema-instance"
xsi:schemaLocation = "
http://www.springframework.org/schema/beans
http://www.springframework.org/schema/beans/spring-beans-3.0.xsd
http://www.springframework.org/schema/context
http://www.springframework.org/schema/context/spring-context-3.0.xsd">
<bean class = "org.springframework.web.servlet.view.InternalResourceViewResolver">
<property name = "prefix" value = "/WEB-INF/jsp/"/>
<property name = "suffix" value = ".jsp"/>
</bean>
<bean class = "org.springframework.web.servlet.mvc.support.ControllerClassNameHandlerMapping">
<property name = "caseSensitive" value = "true" />
</bean>
<bean class = "com.tutorialspoint.UserController">
<property name = "methodNameResolver">
<bean class = "org.springframework.web.servlet.mvc.multiaction.ParameterMethodNameResolver">
<property name = "paramName" value = "action"/>
</bean>
</property>
</bean>
</beans>
user.jsp
<%@ page contentType="text/html; charset=UTF-8" %>
<html>
<head>
<title>Hello World</title>
</head>
<body>
<h2>${message}</h2>
</body>
</html>
Когда вы закончите создавать исходные файлы и файлы конфигурации, экспортируйте ваше приложение. Щелкните правой кнопкой мыши свое приложение, выберите « Экспорт» → «Файл WAR» и сохраните файл TestWeb.war в папке веб-приложений Tomcat.
Теперь запустите сервер Tomcat и убедитесь, что вы можете получить доступ к другим веб-страницам из папки веб-приложений с помощью стандартного браузера. Теперь попробуйте URL-адрес – http: // localhost: 8080 / TestWeb / user / test.htm? Action = home, и мы увидим следующий экран, если все в порядке с веб-приложением Spring.

Spring MVC – Parameterizable View Controller Пример
В следующем примере показано, как использовать метод Parameterizable View Controller для Multi Action Controller с использованием среды Spring Web MVC. Параметрируемое представление позволяет отображать веб-страницу с запросом.
package com.tutorialspoint;
import javax.servlet.http.HttpServletRequest;
import javax.servlet.http.HttpServletResponse;
import org.springframework.web.servlet.ModelAndView;
import org.springframework.web.servlet.mvc.multiaction.MultiActionController;
public class UserController extends MultiActionController{
public ModelAndView home(HttpServletRequest request,
HttpServletResponse response) throws Exception {
ModelAndView model = new ModelAndView("user");
model.addObject("message", "Home");
return model;
}
}
<bean class="org.springframework.web.servlet.handler.SimpleUrlHandlerMapping">
<property name="mappings">
<value>
index.htm=userController
</value>
</property>
</bean>
<bean id="userController" class="org.springframework.web.servlet.mvc.ParameterizableViewController">
<property name="viewName" value="user"/>
</bean>
Например, используя вышеуказанную конфигурацию, если URI.
-
/index.htm запрашивается, DispatcherServlet перенаправляет запрос в контроллер UserController с viewName, установленным как user.jsp.
/index.htm запрашивается, DispatcherServlet перенаправляет запрос в контроллер UserController с viewName, установленным как user.jsp.
Чтобы начать с этого, давайте создадим рабочую среду Eclipse и перейдем к следующим шагам для разработки веб-приложения на основе динамических форм с использованием Spring Web Framework.
| шаг | Описание |
|---|---|
| 1 | Создайте проект с именем TestWeb в пакете com.tutorialspoint, как описано в главе Spring MVC – Hello World. |
| 2 | Создайте Java-класс UserController в пакете com.tutorialspoint. |
| 3 | Создайте файл представления user.jsp в подпапке jsp. |
| 4 | Последний шаг – создание содержимого исходного файла и файлов конфигурации и экспорт приложения, как описано ниже. |
UserController.java
package com.tutorialspoint;
import javax.servlet.http.HttpServletRequest;
import javax.servlet.http.HttpServletResponse;
import org.springframework.web.servlet.ModelAndView;
import org.springframework.web.servlet.mvc.multiaction.MultiActionController;
public class UserController extends MultiActionController{
public ModelAndView home(HttpServletRequest request,
HttpServletResponse response) throws Exception {
ModelAndView model = new ModelAndView("user");
model.addObject("message", "Home");
return model;
}
}
TestWeb-servlet.xml
<beans xmlns = "http://www.springframework.org/schema/beans"
xmlns:context = "http://www.springframework.org/schema/context"
xmlns:xsi = "http://www.w3.org/2001/XMLSchema-instance"
xsi:schemaLocation = "
http://www.springframework.org/schema/beans
http://www.springframework.org/schema/beans/spring-beans-3.0.xsd
http://www.springframework.org/schema/context
http://www.springframework.org/schema/context/spring-context-3.0.xsd">
<bean class = "org.springframework.web.servlet.view.InternalResourceViewResolver">
<property name = "prefix" value = "/WEB-INF/jsp/"/>
<property name = "suffix" value = ".jsp"/>
</bean>
<bean class = "org.springframework.web.servlet.handler.SimpleUrlHandlerMapping">
<property name = "mappings">
<value>
index.htm = userController
</value>
</property>
</bean>
<bean id = "userController" class = "org.springframework.web.servlet.mvc.ParameterizableViewController">
<property name = "viewName" value="user"/>
</bean>
</beans>
user.jsp
<%@ page contentType="text/html; charset=UTF-8" %>
<html>
<head>
<title>Hello World</title>
</head>
<body>
<h2>Hello World</h2>
</body>
</html>
Когда вы закончите создавать исходные файлы и файлы конфигурации, экспортируйте ваше приложение. Щелкните правой кнопкой мыши свое приложение, выберите « Экспорт» → «Файл WAR» и сохраните файл TestWeb.war в папке веб-приложений Tomcat.
Теперь запустите сервер Tomcat и убедитесь, что вы можете получить доступ к другим веб-страницам из папки webapps с помощью стандартного браузера. Теперь попробуйте URL – http: // localhost: 8080 / TestWeb / index.htm, и вы увидите следующий экран, если все в порядке с веб-приложением Spring.

Spring MVC – Пример Resolver для просмотра внутренних ресурсов
InternalResourceViewResolver используется для разрешения предоставленного URI в фактический URI. В следующем примере показано, как использовать InternalResourceViewResolver с помощью Spring Web MVC Framework. InternalResourceViewResolver позволяет отображать веб-страницы с запросами.
package com.tutorialspoint;
import org.springframework.stereotype.Controller;
import org.springframework.web.bind.annotation.RequestMapping;
import org.springframework.web.bind.annotation.RequestMethod;
import org.springframework.ui.ModelMap;
@Controller
@RequestMapping("/hello")
public class HelloController{
@RequestMapping(method = RequestMethod.GET)
public String printHello(ModelMap model) {
model.addAttribute("message", "Hello Spring MVC Framework!");
return "hello";
}
}
<bean class = "org.springframework.web.servlet.view.InternalResourceViewResolver"> <property name = "prefix" value = "/WEB-INF/jsp/"/> <property name = "suffix" value = ".jsp"/> </bean>
Например, используя вышеуказанную конфигурацию, если URI
-
/ hello запрашивается, DispatcherServlet перенаправляет запрос на префикс + viewname + суффикс = /WEB-INF/jsp/hello.jsp.
/ hello запрашивается, DispatcherServlet перенаправляет запрос на префикс + viewname + суффикс = /WEB-INF/jsp/hello.jsp.
Для начала давайте наладим работающую среду Eclipse IDE, а затем рассмотрим следующие шаги для разработки веб-приложения на основе динамических форм с использованием Spring Web Framework.
| шаг | Описание |
|---|---|
| 1 | Создайте проект с именем TestWeb в пакете com.tutorialspoint, как описано в главе Spring MVC – Hello World Example. |
| 2 | Создайте классы Java HelloController в com.tutorialspointpackage. |
| 3 | Создайте файл представления hello.jsp в подпапке jsp. |
| 4 | Последний шаг – создание содержимого исходного файла и файлов конфигурации и экспорт приложения, как описано ниже. |
HelloController.java
package com.tutorialspoint;
import org.springframework.stereotype.Controller;
import org.springframework.web.bind.annotation.RequestMapping;
import org.springframework.web.bind.annotation.RequestMethod;
import org.springframework.ui.ModelMap;
@Controller
@RequestMapping("/hello")
public class HelloController{
@RequestMapping(method = RequestMethod.GET)
public String printHello(ModelMap model) {
model.addAttribute("message", "Hello Spring MVC Framework!");
return "hello";
}
}
TestWeb-servlet.xml
<beans xmlns = "http://www.springframework.org/schema/beans"
xmlns:context = "http://www.springframework.org/schema/context"
xmlns:xsi = "http://www.w3.org/2001/XMLSchema-instance"
xsi:schemaLocation = "
http://www.springframework.org/schema/beans
http://www.springframework.org/schema/beans/spring-beans-3.0.xsd
http://www.springframework.org/schema/context
http://www.springframework.org/schema/context/spring-context-3.0.xsd">
<context:component-scan base-package = "com.tutorialspoint" />
<bean class = "org.springframework.web.servlet.view.InternalResourceViewResolver">
<property name = "prefix" value = "/WEB-INF/jsp/" />
<property name = "suffix" value = ".jsp" />
</bean>
</beans>
hello.jsp
<%@ page contentType = "text/html; charset = UTF-8" %>
<html>
<head>
<title>Hello World</title>
</head>
<body>
<h2>${message}</h2>
</body>
</html>
Когда вы закончите создавать исходные файлы и файлы конфигурации, экспортируйте ваше приложение. Щелкните правой кнопкой мыши свое приложение, выберите « Экспорт» → «Файл WAR» и сохраните файл TestWeb.war в папке веб-приложений Tomcat.
Теперь запустите сервер Tomcat и убедитесь, что вы можете получить доступ к другим веб-страницам из папки веб-приложений с помощью стандартного браузера. Попробуйте получить доступ к URL-адресу – http: // localhost: 8080 / TestWeb / hello, и если с веб-приложением Spring все в порядке, мы увидим следующий экран.

Spring MVC – пример разрешения для Xml View
XmlViewResolver используется для разрешения имен представлений с использованием компонентов представления, определенных в файле XML. В следующем примере показано, как использовать XmlViewResolver с использованием среды Spring Web MVC.
TestWeb-servlet.xml
<bean class = "org.springframework.web.servlet.view.XmlViewResolver">
<property name = "location">
<value>/WEB-INF/views.xml</value>
</property>
</bean>
views.xml
<bean id = "hello" class = "org.springframework.web.servlet.view.JstlView"> <property name = "url" value = "/WEB-INF/jsp/hello.jsp" /> </bean>
Например, используя вышеуказанную конфигурацию, если URI –
-
/ hello запрашивается, DispatcherServlet перенаправляет запрос в hello.jsp, определенный bean hello в view.xml.
/ hello запрашивается, DispatcherServlet перенаправляет запрос в hello.jsp, определенный bean hello в view.xml.
Начнем с того, что нам нужно иметь работающую Eclipse IDE и придерживаться следующих шагов для разработки веб-приложения на основе динамических форм с использованием Spring Web Framework.
| шаг | Описание |
|---|---|
| 1 | Создайте проект с именем TestWeb в пакете com.tutorialspoint, как описано в главе Spring MVC – Hello World. |
| 2 | Создайте Java-класс HelloController в com.tutorialspointpackage. |
| 3 | Создайте файл представления hello.jsp в подпапке jsp. |
| 4 | Загрузите библиотеку JSTL jstl.jar . Поместите это в свой CLASSPATH. |
| 5 | Последний шаг – создание содержимого исходного файла и файлов конфигурации и экспорт приложения, как описано ниже. |
HelloController.java
package com.tutorialspoint;
import org.springframework.stereotype.Controller;
import org.springframework.web.bind.annotation.RequestMapping;
import org.springframework.web.bind.annotation.RequestMethod;
import org.springframework.ui.ModelMap;
@Controller
@RequestMapping("/hello")
public class HelloController{
@RequestMapping(method = RequestMethod.GET)
public String printHello(ModelMap model) {
model.addAttribute("message", "Hello Spring MVC Framework!");
return "hello";
}
}
TestWeb-servlet.xml
<beans xmlns = "http://www.springframework.org/schema/beans"
xmlns:context = "http://www.springframework.org/schema/context"
xmlns:xsi = "http://www.w3.org/2001/XMLSchema-instance"
xsi:schemaLocation = "
http://www.springframework.org/schema/beans
http://www.springframework.org/schema/beans/spring-beans-3.0.xsd
http://www.springframework.org/schema/context
http://www.springframework.org/schema/context/spring-context-3.0.xsd">
<context:component-scan base-package = "com.tutorialspoint" />
<bean class = "org.springframework.web.servlet.view.XmlViewResolver">
<property name = "location">
<value>/WEB-INF/views.xml</value>
</property>
</bean>
</beans>
views.xml
<beans xmlns = "http://www.springframework.org/schema/beans"
xmlns:context = "http://www.springframework.org/schema/context"
xmlns:xsi = "http://www.w3.org/2001/XMLSchema-instance"
xsi:schemaLocation = "
http://www.springframework.org/schema/beans
http://www.springframework.org/schema/beans/spring-beans-3.0.xsd
http://www.springframework.org/schema/context
http://www.springframework.org/schema/context/spring-context-3.0.xsd">
<bean id = "hello"
class = "org.springframework.web.servlet.view.JstlView">
<property name = "url" value = "/WEB-INF/jsp/hello.jsp" />
</bean>
</beans>
hello.jsp
<%@ page contentType = "text/html; charset = UTF-8" %>
<html>
<head>
<title>Hello World</title>
</head>
<body>
<h2>${message}</h2>
</body>
</html>
Когда вы закончите создавать исходные файлы и файлы конфигурации, экспортируйте ваше приложение. Щелкните правой кнопкой мыши свое приложение, выберите « Экспорт» → «Файл WAR» и сохраните файл HelloWeb.war в папке веб-приложений Tomcat.
Теперь запустите сервер Tomcat и убедитесь, что вы можете получить доступ к другим веб-страницам из папки веб-приложений с помощью стандартного браузера. Попробуйте получить доступ к URL-адресу – http: // localhost: 8080 / HelloWeb / hello, и если с веб-приложением Spring все в порядке, мы увидим следующий экран.

Spring MVC – пример резольвера Resource Bundle View
ResourceBundleViewResolver используется для разрешения имен представлений с использованием компонентов представления, определенных в файле свойств. В следующем примере показано, как использовать ResourceBundleViewResolver с помощью Spring Web MVC Framework.
TestWeb-servlet.xml
<bean class = "org.springframework.web.servlet.view.ResourceBundleViewResolver"> <property name = "basename" value = "views" /> </bean>
Здесь базовое имя относится к имени пакета ресурсов, который содержит представления. Имя пакета ресурсов по умолчанию – views.properties , которое можно переопределить с помощью свойства basename.
views.properties
hello.(class) = org.springframework.web.servlet.view.JstlView hello.url = /WEB-INF/jsp/hello.jsp
Например, используя вышеуказанную конфигурацию, если URI –
-
/ hello запрашивается, DispatcherServlet перенаправляет запрос в hello.jsp, определенный bean hello в views.properties.
-
Здесь «привет» – это имя представления, которое должно быть сопоставлено. Принимая во внимание, что класс относится к типу представления, а URL – к местоположению представления.
/ hello запрашивается, DispatcherServlet перенаправляет запрос в hello.jsp, определенный bean hello в views.properties.
Здесь «привет» – это имя представления, которое должно быть сопоставлено. Принимая во внимание, что класс относится к типу представления, а URL – к местоположению представления.
Для начала давайте наладим работающую среду Eclipse IDE и рассмотрим следующие шаги для разработки веб-приложения на основе динамических форм с использованием Spring Web Framework.
| шаг | Описание |
|---|---|
| 1 | Создайте проект с именем TestWeb в пакете com.tutorialspoint, как описано в главе Spring MVC – Hello World. |
| 2 | Создайте Java-класс HelloController в com.tutorialspointpackage. |
| 3 | Создайте файл представления hello.jsp в подпапке jsp. |
| 4 | Создайте файл свойств views.properties в папке src. |
| 5 | Загрузите библиотеку JSTL jstl.jar . Поместите это в свой CLASSPATH. |
| 6 | Последний шаг – создание содержимого исходного файла и файлов конфигурации и экспорт приложения, как описано ниже. |
HelloController.java
package com.tutorialspoint;
import org.springframework.stereotype.Controller;
import org.springframework.web.bind.annotation.RequestMapping;
import org.springframework.web.bind.annotation.RequestMethod;
import org.springframework.ui.ModelMap;
@Controller
@RequestMapping("/hello")
public class HelloController{
@RequestMapping(method = RequestMethod.GET)
public String printHello(ModelMap model) {
model.addAttribute("message", "Hello Spring MVC Framework!");
return "hello";
}
}
TestWeb-servlet.xml
<beans xmlns = "http://www.springframework.org/schema/beans"
xmlns:context = "http://www.springframework.org/schema/context"
xmlns:xsi = "http://www.w3.org/2001/XMLSchema-instance"
xsi:schemaLocation = "
http://www.springframework.org/schema/beans
http://www.springframework.org/schema/beans/spring-beans-3.0.xsd
http://www.springframework.org/schema/context
http://www.springframework.org/schema/context/spring-context-3.0.xsd">
<context:component-scan base-package = "com.tutorialspoint" />
<bean class = "org.springframework.web.servlet.view.ResourceBundleViewResolver">
<property name = "basename" value = "views" />
</bean>
</beans>
views.properties
hello.(class) = org.springframework.web.servlet.view.JstlView hello.url = /WEB-INF/jsp/hello.jsp
hello.jsp
<%@ page contentType="text/html; charset=UTF-8" %>
<html>
<head>
<title>Hello World</title>
</head>
<body>
<h2>${message}</h2>
</body>
</html>
Когда вы закончите создавать исходные файлы и файлы конфигурации, экспортируйте ваше приложение. Щелкните правой кнопкой мыши свое приложение, выберите « Экспорт» → «Файл WAR» и сохраните файл HelloWeb.war в папке веб-приложений Tomcat.
Теперь запустите сервер Tomcat и убедитесь, что вы можете получить доступ к другим веб-страницам из папки веб-приложений с помощью стандартного браузера. Попробуйте получить доступ к URL-адресу – http: // localhost: 8080 / HelloWeb / hello, и если с веб-приложением Spring все в порядке, мы увидим следующий экран.

Spring MVC – пример отображения нескольких резольверов
Если вы хотите использовать Multiple View Resolver в приложении Spring MVC, порядок приоритетов можно установить с помощью свойства order. В следующем примере показано, как использовать ResourceBundleViewResolver и InternalResourceViewResolver в Spring Web MVC Framework.
TestWeb-servlet.xml
<bean class = "org.springframework.web.servlet.view.ResourceBundleViewResolver"> <property name = "basename" value = "views" /> <property name = "order" value = "0" /> </bean> <bean class = "org.springframework.web.servlet.view.InternalResourceViewResolver"> <property name = "prefix" value = "/WEB-INF/jsp/" /> <property name = "suffix" value = ".jsp" /> <property name = "order" value = "1" /> </bean>
Здесь свойство order определяет ранжирование распознавателя представления. В этом случае 0 – это первый распознаватель, а 1 – следующий, и так далее.
views.properties
hello.(class) = org.springframework.web.servlet.view.JstlView hello.url = /WEB-INF/jsp/hello.jsp
Например, используя вышеуказанную конфигурацию, если URI –
-
/ hello запрашивается, DispatcherServlet перенаправляет запрос в hello.jsp, определенный bean hello в views.properties.
/ hello запрашивается, DispatcherServlet перенаправляет запрос в hello.jsp, определенный bean hello в views.properties.
Для начала давайте создадим рабочую среду Eclipse и рассмотрим следующие шаги для разработки веб-приложения на основе динамических форм с использованием Spring Web Framework.
| шаг | Описание |
|---|---|
| 1 | Создайте проект с именем TestWeb в пакете com.tutorialspoint, как описано в главе Spring MVC – Hello World. |
| 2 | Создайте Java-класс HelloController в com.tutorialspointpackage. |
| 3 | Создайте файл представления hello.jsp в подпапке jsp. |
| 4 | Создайте файл свойств views.properties в папке SRC. |
| 5 | Загрузите библиотеку JSTL jstl.jar . Поместите это в свой CLASSPATH. |
| 6 | Последний шаг – создание содержимого исходного файла и файлов конфигурации и экспорт приложения, как описано ниже. |
HelloController.java
package com.tutorialspoint;
import org.springframework.stereotype.Controller;
import org.springframework.web.bind.annotation.RequestMapping;
import org.springframework.web.bind.annotation.RequestMethod;
import org.springframework.ui.ModelMap;
@Controller
@RequestMapping("/hello")
public class HelloController{
@RequestMapping(method = RequestMethod.GET)
public String printHello(ModelMap model) {
model.addAttribute("message", "Hello Spring MVC Framework!");
return "hello";
}
}
TestWeb-servlet.xml
<beans xmlns = "http://www.springframework.org/schema/beans"
xmlns:context = "http://www.springframework.org/schema/context"
xmlns:xsi = "http://www.w3.org/2001/XMLSchema-instance"
xsi:schemaLocation = "
http://www.springframework.org/schema/beans
http://www.springframework.org/schema/beans/spring-beans-3.0.xsd
http://www.springframework.org/schema/context
http://www.springframework.org/schema/context/spring-context-3.0.xsd">
<context:component-scan base-package = "com.tutorialspoint" />
<bean class = "org.springframework.web.servlet.view.ResourceBundleViewResolver">
<property name = "basename" value = "views" />
<property name = "order" value = "0" />
</bean>
<bean class = "org.springframework.web.servlet.view.InternalResourceViewResolver">
<property name = "prefix" value = "/WEB-INF/jsp/" />
<property name = "suffix" value = ".jsp" />
<property name = "order" value = "1" />
</bean>
</beans>
views.properties
hello.(class) = org.springframework.web.servlet.view.JstlView hello.url = /WEB-INF/jsp/hello.jsp
hello.jsp
<%@ page contentType = "text/html; charset = UTF-8" %>
<html>
<head>
<title>Hello World</title>
</head>
<body>
<h2>${message}</h2>
</body>
</html>
Когда вы закончите создавать исходные файлы и файлы конфигурации, экспортируйте ваше приложение. Щелкните правой кнопкой мыши свое приложение, выберите « Экспорт» → «Файл WAR» и сохраните файл HelloWeb.war в папке веб-приложений Tomcat.
Теперь запустите сервер Tomcat и убедитесь, что вы можете получить доступ к другим веб-страницам из папки веб-приложений с помощью стандартного браузера. Попробуйте получить доступ к URL – http: // localhost: 8080 / HelloWeb / hello , если с веб-приложением Spring все в порядке, мы увидим следующий экран.

Spring MVC – пример средства проверки гибернации
В следующем примере показано, как использовать обработку ошибок и валидаторы в формах с использованием среды Spring Web MVC. Для начала давайте предоставим рабочую среду Eclipse IDE и придерживаемся следующих шагов для разработки веб-приложения на основе динамических форм с использованием Spring Web Framework.
| шаг | Описание |
|---|---|
| 1 | Создайте проект с именем TestWeb в пакете com.tutorialspoint, как описано в главе Spring MVC – Hello World. |
| 2 | Создайте Java-классы Student, StudentController и StudentValidator в пакете com.tutorialspoint. |
| 3 | Создайте файлы представлений addStudent.jsp и result.jsp в подпапке jsp. |
| 4 | Загрузить библиотеку Hibernate Validator . Извлеките hibernate-validator-5.3.4.Final.jar и необходимые зависимости, присутствующие в требуемой папке загруженного zip-файла. Поместите их в свой CLASSPATH. |
| 5 | Создайте файл свойств messages.properties в папке SRC. |
| 6 | Последний шаг – создание содержимого исходного файла и файлов конфигурации и экспорт приложения, как описано ниже. |
Student.java
package com.tutorialspoint;
import org.hibernate.validator.constraints.NotEmpty;
import org.hibernate.validator.constraints.Range;
public class Student {
@Range(min = 1, max = 150)
private Integer age;
@NotEmpty
private String name;
private Integer id;
public void setAge(Integer age) {
this.age = age;
}
public Integer getAge() {
return age;
}
public void setName(String name) {
this.name = name;
}
public String getName() {
return name;
}
public void setId(Integer id) {
this.id = id;
}
public Integer getId() {
return id;
}
}
StudentController.java
package com.tutorialspoint;
import org.springframework.stereotype.Controller;
import org.springframework.ui.Model;
import org.springframework.validation.BindingResult;
import org.springframework.validation.annotation.Validated;
import org.springframework.web.bind.annotation.ModelAttribute;
import org.springframework.web.bind.annotation.RequestMapping;
import org.springframework.web.bind.annotation.RequestMethod;
import org.springframework.web.servlet.ModelAndView;
@Controller
public class StudentController {
@RequestMapping(value = "/addStudent", method = RequestMethod.GET)
public ModelAndView student() {
return new ModelAndView("addStudent", "command", new Student());
}
@ModelAttribute("student")
public Student createStudentModel() {
return new Student();
}
@RequestMapping(value = "/addStudent", method = RequestMethod.POST)
public String addStudent(@ModelAttribute("student") @Validated Student student,
BindingResult bindingResult, Model model) {
if (bindingResult.hasErrors()) {
return "addStudent";
}
model.addAttribute("name", student.getName());
model.addAttribute("age", student.getAge());
model.addAttribute("id", student.getId());
return "result";
}
}
messages.properties
NotEmpty.student.name = Name is required! Range.student.age = Age value must be between 1 and 150!
Здесь ключом является <Аннотация>. <Имя-объекта>. <Атрибут>. Значение – это сообщение для отображения.
TestWeb-servlet.xml
<beans xmlns = "http://www.springframework.org/schema/beans"
xmlns:context = "http://www.springframework.org/schema/context"
xmlns:mvc = "http://www.springframework.org/schema/mvc"
xmlns:xsi = "http://www.w3.org/2001/XMLSchema-instance"
xsi:schemaLocation = "
http://www.springframework.org/schema/beans
http://www.springframework.org/schema/beans/spring-beans-3.0.xsd
http://www.springframework.org/schema/context
http://www.springframework.org/schema/context/spring-context-3.0.xsd
http://www.springframework.org/schema/mvc
http://www.springframework.org/schema/mvc/spring-mvc-3.0.xsd">
<context:component-scan base-package = "com.tutorialspoint" />
<mvc:annotation-driven />
<bean class = "org.springframework.context.support.ResourceBundleMessageSource"
id = "messageSource">
<property name = "basename" value = "messages" />
</bean>
<bean class = "org.springframework.web.servlet.view.InternalResourceViewResolver">
<property name = "prefix" value = "/WEB-INF/jsp/" />
<property name = "suffix" value = ".jsp" />
</bean>
</beans>
Здесь, для первого метода обслуживания student () , мы передали пустой объект Studentobject > в объект ModelAndView с именем «command», потому что среда Spring ожидает объект с именем «command», если вы используете <form: form> теги в вашем файле JSP. Таким образом, когда вызывается метод student () , он возвращает представление addStudent.jsp .
Второй сервисный метод addStudent () будет вызываться для метода POST по URL-адресу HelloWeb / addStudent . Вы подготовите свой модельный объект на основе предоставленной информации. Наконец, из метода сервиса будет возвращено представление «result», что приведет к визуализации result.jsp. Если при использовании валидатора возникают ошибки, то возвращается то же представление «addStudent», Spring автоматически внедряет сообщения об ошибках из представления BindingResult .
addStudent.jsp
<%@taglib uri = "http://www.springframework.org/tags/form" prefix = "form"%>
<html>
<head>
<title>Spring MVC Form Handling</title>
</head>
<style>
.error {
color: #ff0000;
}
.errorblock {
color: #000;
background-color: #ffEEEE;
border: 3px solid #ff0000;
padding: 8px;
margin: 16px;
}
</style>
<body>
<h2>Student Information</h2>
<form:form method = "POST" action = "/TestWeb/addStudent" commandName = "student">
<form:errors path = "*" cssClass = "errorblock" element = "div" />
<table>
<tr>
<td><form:label path = "name">Name</form:label></td>
<td><form:input path = "name" /></td>
<td><form:errors path = "name" cssClass = "error" /></td>
</tr>
<tr>
<td><form:label path = "age">Age</form:label></td>
<td><form:input path = "age" /></td>
<td><form:errors path = "age" cssClass = "error" /></td>
</tr>
<tr>
<td><form:label path = "id">id</form:label></td>
<td><form:input path = "id" /></td>
</tr>
<tr>
<td colspan = "2">
<input type = "submit" value = "Submit"/>
</td>
</tr>
</table>
</form:form>
</body>
</html>
Здесь мы используем тег <form: errors /> с path = “*” для отображения сообщений об ошибках. Например –
<form:errors path = "*" cssClass = "errorblock" element = "div" />
Он будет отображать сообщения об ошибках для всех проверок ввода. Мы используем тег <form: errors /> with path = “name” для отображения сообщения об ошибке для поля имени.
Например –
<form:errors path = "name" cssClass = "error" /> <form:errors path = "age" cssClass = "error" />
Он будет отображать сообщения об ошибках для проверки поля имени и возраста.
result.jsp
<%@taglib uri = "http://www.springframework.org/tags/form" prefix = "form"%>
<html>
<head>
<title>Spring MVC Form Handling</title>
</head>
<body>
<h2>Submitted Student Information</h2>
<table>
<tr>
<td>Name</td>
<td>${name}</td>
</tr>
<tr>
<td>Age</td>
<td>${age}</td>
</tr>
<tr>
<td>ID</td>
<td>${id}</td>
</tr>
</table>
</body>
</html>
Когда вы закончите создавать исходные файлы и файлы конфигурации, экспортируйте ваше приложение. Щелкните правой кнопкой мыши свое приложение, выберите « Экспорт» → «Файл WAR» и сохраните файл HelloWeb.war в папке веб-приложений Tomcat.
Теперь запустите сервер Tomcat и убедитесь, что вы можете получить доступ к другим веб-страницам из папки веб-приложений с помощью стандартного браузера. Попробуйте URL – http: // localhost: 8080 / TestWeb / addStudent, и мы увидим следующий экран, если вы ввели неверные значения.
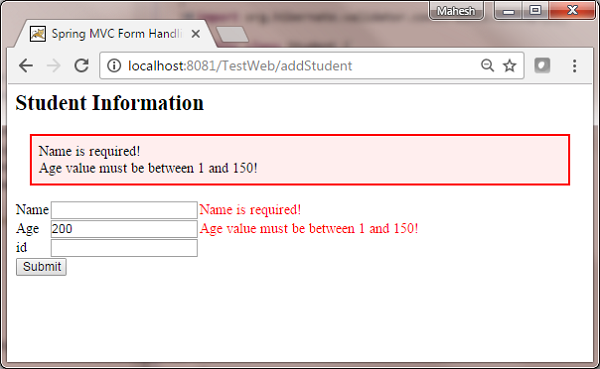
Spring MVC – Пример создания RSS-канала
В следующем примере показано, как создать RSS-канал с помощью Spring Web MVC Framework. Для начала давайте наладим работающую среду Eclipse IDE, а затем рассмотрим следующие шаги для разработки веб-приложения на основе динамических форм с использованием Spring Web Framework.
| шаг | Описание |
|---|---|
| 1 | Создайте проект с именем TestWeb в пакете com.tutorialspoint, как описано в главе Spring MVC – Hello World. |
| 2 | Создайте Java-классы RSSMessage, RSSFeedViewer и RSSController в пакете com.tutorialspoint. |
| 3 | Загрузите римскую библиотеку Rome и ее зависимости rome-utils, jdom и slf4j с той же страницы репозитория maven. Поместите их в свой CLASSPATH. |
| 4 | Создайте файл свойств messages.properties в папке SRC. |
| 5 | Последний шаг – создание содержимого исходного файла и файлов конфигурации и экспорт приложения, как описано ниже. |
RSSMessage.java
package com.tutorialspoint;
import java.util.Date;
public class RSSMessage {
String title;
String url;
String summary;
Date createdDate;
public String getTitle() {
return title;
}
public void setTitle(String title) {
this.title = title;
}
public String getUrl() {
return url;
}
public void setUrl(String url) {
this.url = url;
}
public String getSummary() {
return summary;
}
public void setSummary(String summary) {
this.summary = summary;
}
public Date getCreatedDate() {
return createdDate;
}
public void setCreatedDate(Date createdDate) {
this.createdDate = createdDate;
}
}
RSSFeedViewer.java
package com.tutorialspoint;
import java.util.ArrayList;
import java.util.List;
import java.util.Map;
import javax.servlet.http.HttpServletRequest;
import javax.servlet.http.HttpServletResponse;
import org.springframework.web.servlet.view.feed.AbstractRssFeedView;
import com.rometools.rome.feed.rss.Channel;
import com.rometools.rome.feed.rss.Content;
import com.rometools.rome.feed.rss.Item;
public class RSSFeedViewer extends AbstractRssFeedView {
@Override
protected void buildFeedMetadata(Map<String, Object> model, Channel feed,
HttpServletRequest request) {
feed.setTitle("TutorialsPoint Dot Com");
feed.setDescription("Java Tutorials and Examples");
feed.setLink("http://www.tutorialspoint.com");
super.buildFeedMetadata(model, feed, request);
}
@Override
protected List<Item> buildFeedItems(Map<String, Object> model,
HttpServletRequest request, HttpServletResponse response) throws Exception {
List<RSSMessage> listContent = (List<RSSMessage>) model.get("feedContent");
List<Item> items = new ArrayList<Item>(listContent.size());
for(RSSMessage tempContent : listContent ){
Item item = new Item();
Content content = new Content();
content.setValue(tempContent.getSummary());
item.setContent(content);
item.setTitle(tempContent.getTitle());
item.setLink(tempContent.getUrl());
item.setPubDate(tempContent.getCreatedDate());
items.add(item);
}
return items;
}
}
RSSController.java
package com.tutorialspoint;
import java.util.ArrayList;
import java.util.Date;
import java.util.List;
import org.springframework.stereotype.Controller;
import org.springframework.web.bind.annotation.RequestMapping;
import org.springframework.web.bind.annotation.RequestMethod;
import org.springframework.web.servlet.ModelAndView;
@Controller
public class RSSController {
@RequestMapping(value="/rssfeed", method = RequestMethod.GET)
public ModelAndView getFeedInRss() {
List<RSSMessage> items = new ArrayList<RSSMessage>();
RSSMessage content = new RSSMessage();
content.setTitle("Spring Tutorial");
content.setUrl("http://www.tutorialspoint/spring");
content.setSummary("Spring tutorial summary...");
content.setCreatedDate(new Date());
items.add(content);
RSSMessage content2 = new RSSMessage();
content2.setTitle("Spring MVC");
content2.setUrl("http://www.tutorialspoint/springmvc");
content2.setSummary("Spring MVC tutorial summary...");
content2.setCreatedDate(new Date());
items.add(content2);
ModelAndView mav = new ModelAndView();
mav.setViewName("rssViewer");
mav.addObject("feedContent", items);
return mav;
}
}
TestWeb-servlet.xml
<beans xmlns = "http://www.springframework.org/schema/beans" xmlns:context = "http://www.springframework.org/schema/context" xmlns:xsi = "http://www.w3.org/2001/XMLSchema-instance" xsi:schemaLocation = " http://www.springframework.org/schema/beans http://www.springframework.org/schema/beans/spring-beans-3.0.xsd http://www.springframework.org/schema/context http://www.springframework.org/schema/context/spring-context-3.0.xsd"> <context:component-scan base-package = "com.tutorialspoint" /> <bean class = "org.springframework.web.servlet.view.BeanNameViewResolver" /> <bean id = "rssViewer" class = "com.tutorialspoint.RSSFeedViewer" /> </beans>
Здесь мы создали канал RSS POJO RSSMessage и средство просмотра сообщений RSS, которое расширяет AbstractRssFeedView и переопределяет его метод. В RSSController мы создали образец RSS-канала.
Когда вы закончите создавать исходные файлы и файлы конфигурации, экспортируйте ваше приложение. Щелкните правой кнопкой мыши свое приложение, выберите « Экспорт» → «Файл WAR» и сохраните файл TestWeb.war в папке веб-приложений Tomcat.
Теперь запустите сервер Tomcat и убедитесь, что вы можете получить доступ к другим веб-страницам из папки веб-приложений с помощью стандартного браузера. Попробуйте URL – http: // localhost: 8080 / TestWeb / rssfeed, и мы увидим следующий экран.

Spring MVC – Пример создания XML
В следующем примере показано, как сгенерировать XML с помощью Spring Web MVC Framework. Для начала давайте предоставим рабочую среду Eclipse и перейдем к следующим шагам для разработки веб-приложения на основе динамических форм с использованием Spring Web Framework.
| шаг | Описание |
|---|---|
| 1 | Создайте проект с именем TestWeb в пакете com.tutorialspoint, как описано в главе Spring MVC – Hello World. |
| 2 | Создайте классы Java User и UserController в com.tutorialspointpackage. |
| 3 | Последний шаг – создание содержимого исходного файла и файлов конфигурации и экспорт приложения, как описано ниже. |
User.java
package com.tutorialspoint;
import javax.xml.bind.annotation.XmlElement;
import javax.xml.bind.annotation.XmlRootElement;
@XmlRootElement(name = "user")
public class User {
private String name;
private int id;
public String getName() {
return name;
}
@XmlElement
public void setName(String name) {
this.name = name;
}
public int getId() {
return id;
}
@XmlElement
public void setId(int id) {
this.id = id;
}
}
UserController.java
package com.tutorialspoint;
import org.springframework.stereotype.Controller;
import org.springframework.web.bind.annotation.PathVariable;
import org.springframework.web.bind.annotation.RequestMapping;
import org.springframework.web.bind.annotation.RequestMethod;
import org.springframework.web.bind.annotation.ResponseBody;
@Controller
@RequestMapping("/user")
public class UserController {
@RequestMapping(value="{name}", method = RequestMethod.GET)
public @ResponseBody User getUser(@PathVariable String name) {
User user = new User();
user.setName(name);
user.setId(1);
return user;
}
}
TestWeb-servlet.xml
<beans xmlns = "http://www.springframework.org/schema/beans" xmlns:context = "http://www.springframework.org/schema/context" xmlns:xsi = "http://www.w3.org/2001/XMLSchema-instance" xmlns:mvc = "http://www.springframework.org/schema/mvc" xsi:schemaLocation = " http://www.springframework.org/schema/beans http://www.springframework.org/schema/beans/spring-beans-3.0.xsd http://www.springframework.org/schema/context http://www.springframework.org/schema/context/spring-context-3.0.xsd http://www.springframework.org/schema/mvc http://www.springframework.org/schema/mvc/spring-mvc-3.0.xsd"> <context:component-scan base-package = "com.tutorialspoint" /> <mvc:annotation-driven /> </beans>
Здесь мы создали пользователя POJO с отображением XML и в UserController мы вернули пользователя. Spring автоматически обрабатывает преобразование XML на основе RequestMapping .
Когда вы закончите создавать исходные файлы и файлы конфигурации, экспортируйте ваше приложение. Щелкните правой кнопкой мыши свое приложение, выберите « Экспорт» → «Файл WAR» и сохраните файл TestWeb.war в папке веб-приложений Tomcat.
Теперь запустите сервер Tomcat и убедитесь, что вы можете получить доступ к другим веб-страницам из папки веб-приложений с помощью стандартного браузера. Попробуйте URL – http: // localhost: 8080 / TestWeb / mahesh, и мы увидим следующий экран.

Spring MVC – Создать пример JSON
В следующем примере показано, как сгенерировать JSON с помощью Spring Web MVC Framework. Для начала давайте создадим рабочую среду Eclipse и рассмотрим следующие шаги для разработки веб-приложения на основе динамических форм с использованием Spring Web Framework:
| шаг | Описание |
|---|---|
| 1 | Создайте проект с именем TestWeb в пакете com.tutorialspoint, как описано в главе Spring MVC – Hello World. |
| 2 | Создайте пользовательские классы Java UserController в пакете com.tutorialspoint . |
| 3 | Загрузите библиотеки Jackson Core, Jackson Databind и Jackson Annotations со страницы репозитория maven. Поместите их в свой CLASSPATH. |
| 4 | Последний шаг – создать содержимое всех исходных файлов и файлов конфигурации и экспортировать приложение, как описано ниже. |
User.java
package com.tutorialspoint;
public class User {
private String name;
private int id;
public String getName() {
return name;
}
public void setName(String name) {
this.name = name;
}
public int getId() {
return id;
}
public void setId(int id) {
this.id = id;
}
}
UserController.java
package com.tutorialspoint;
import org.springframework.stereotype.Controller;
import org.springframework.web.bind.annotation.PathVariable;
import org.springframework.web.bind.annotation.RequestMapping;
import org.springframework.web.bind.annotation.RequestMethod;
import org.springframework.web.bind.annotation.ResponseBody;
@Controller
@RequestMapping("/user")
public class UserController {
@RequestMapping(value="{name}", method = RequestMethod.GET)
public @ResponseBody User getUser(@PathVariable String name) {
User user = new User();
user.setName(name);
user.setId(1);
return user;
}
}
TestWeb-servlet.xml
<beans xmlns = http://www.springframework.org/schema/beans" xmlns:context = http://www.springframework.org/schema/context" xmlns:xsi = http://www.w3.org/2001/XMLSchema-instance" xmlns:mvc = http://www.springframework.org/schema/mvc" xsi:schemaLocation = http://www.springframework.org/schema/beans http://www.springframework.org/schema/beans/spring-beans-3.0.xsd http://www.springframework.org/schema/context http://www.springframework.org/schema/context/spring-context-3.0.xsd http://www.springframework.org/schema/mvc http://www.springframework.org/schema/mvc/spring-mvc-3.0.xsd"> <context:component-scan base-package = com.tutorialspoint" /> <mvc:annotation-driven /> </beans>
Здесь мы создали простого пользователя POJO и в UserController мы вернули пользователя. Spring автоматически обрабатывает преобразование JSON на основе RequestMapping и jar Джексона, присутствующих в пути к классам.
Когда вы закончите создавать исходные файлы и файлы конфигурации, экспортируйте ваше приложение. Щелкните правой кнопкой мыши свое приложение, выберите « Экспорт» → «Файл WAR» и сохраните файл TestWeb.war в папке веб-приложений Tomcat.
Теперь запустите сервер Tomcat и убедитесь, что вы можете получить доступ к другим веб-страницам из папки веб-приложений с помощью стандартного браузера. Попробуйте URL – http: // localhost: 8080 / TestWeb / mahesh, и мы увидим следующий экран.
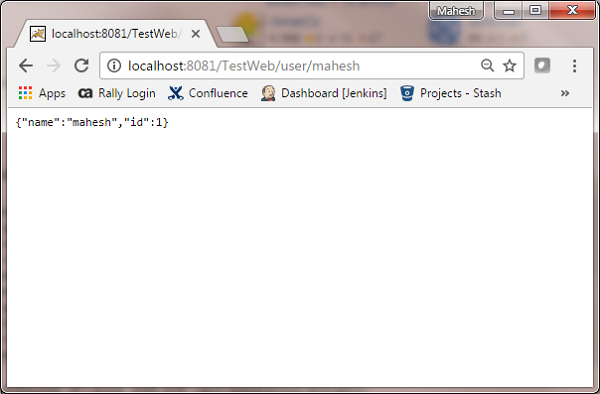
Spring MVC – Создать пример Excel
В следующем примере показано, как создать Excel с помощью Spring Web MVC Framework. Для начала давайте предоставим рабочую среду Eclipse и перейдем к следующим шагам для разработки веб-приложения на основе динамических форм с использованием Spring Web Framework.
| шаг | Описание |
|---|---|
| 1 | Создайте проект с именем TestWeb в пакете com.tutorialspoint, как описано в главе Spring MVC – Hello World. |
| 2 | Создайте классы Java UserExcelView и ExcelController в пакете com.tutorialspoint. |
| 3 | Загрузите библиотеку Apache POI Apache POI со страницы репозитория maven. Поместите это в свой CLASSPATH. |
| 4 | Последний шаг – создание содержимого исходного файла и файлов конфигурации и экспорт приложения, как описано ниже. |
ExcelController.java
package com.tutorialspoint;
import java.util.HashMap;
import java.util.Map;
import javax.servlet.http.HttpServletRequest;
import javax.servlet.http.HttpServletResponse;
import org.springframework.web.servlet.ModelAndView;
import org.springframework.web.servlet.mvc.AbstractController;
public class ExcelController extends AbstractController {
@Override
protected ModelAndView handleRequestInternal(HttpServletRequest request,
HttpServletResponse response) throws Exception {
//user data
Map<String,String> userData = new HashMap<String,String>();
userData.put("1", "Mahesh");
userData.put("2", "Suresh");
userData.put("3", "Ramesh");
userData.put("4", "Naresh");
return new ModelAndView("UserSummary","userData",userData);
}
}
UserExcelView.java
package com.tutorialspoint;
import java.util.Map;
import javax.servlet.http.HttpServletRequest;
import javax.servlet.http.HttpServletResponse;
import org.apache.poi.hssf.usermodel.HSSFRow;
import org.apache.poi.hssf.usermodel.HSSFSheet;
import org.apache.poi.hssf.usermodel.HSSFWorkbook;
import org.springframework.web.servlet.view.document.AbstractExcelView;
public class UserExcelView extends AbstractExcelView {
@Override
protected void buildExcelDocument(Map<String, Object> model,
HSSFWorkbook workbook, HttpServletRequest request, HttpServletResponse response)
throws Exception {
Map<String,String> userData = (Map<String,String>) model.get("userData");
//create a wordsheet
HSSFSheet sheet = workbook.createSheet("User Report");
HSSFRow header = sheet.createRow(0);
header.createCell(0).setCellValue("Roll No");
header.createCell(1).setCellValue("Name");
int rowNum = 1;
for (Map.Entry<String, String> entry : userData.entrySet()) {
//create the row data
HSSFRow row = sheet.createRow(rowNum++);
row.createCell(0).setCellValue(entry.getKey());
row.createCell(1).setCellValue(entry.getValue());
}
}
}
TestWeb-servlet.xml
<beans xmlns = "http://www.springframework.org/schema/beans"
xmlns:context = "http://www.springframework.org/schema/context"
xmlns:xsi = "http://www.w3.org/2001/XMLSchema-instance"
xmlns:mvc = "http://www.springframework.org/schema/mvc"
xsi:schemaLocation = "
http://www.springframework.org/schema/beans
http://www.springframework.org/schema/beans/spring-beans-3.0.xsd
http://www.springframework.org/schema/context
http://www.springframework.org/schema/context/spring-context-3.0.xsd
http://www.springframework.org/schema/mvc
http://www.springframework.org/schema/mvc/spring-mvc-3.0.xsd">
<bean class = "org.springframework.web.servlet.mvc.support.ControllerClassNameHandlerMapping" />
<bean class = "com.tutorialspoint.ExcelController" />
<bean class = "org.springframework.web.servlet.view.XmlViewResolver">
<property name = "location">
<value>/WEB-INF/views.xml</value>
</property>
</bean>
</beans>
views.xml
<beans xmlns = "http://www.springframework.org/schema/beans" xmlns:context = "http://www.springframework.org/schema/context" xmlns:xsi = "http://www.w3.org/2001/XMLSchema-instance" xsi:schemaLocation = " http://www.springframework.org/schema/beans http://www.springframework.org/schema/beans/spring-beans-3.0.xsd http://www.springframework.org/schema/context http://www.springframework.org/schema/context/spring-context-3.0.xsd"> <bean id = "UserSummary" class = "com.tutorialspoint.UserExcelView"></bean> </beans>
Здесь мы создали ExcelController и ExcelView. Библиотека Apache POI работает с форматами файлов Microsoft Office и преобразует данные в документ Excel.
Когда вы закончите создавать исходные файлы и файлы конфигурации, экспортируйте ваше приложение. Щелкните правой кнопкой мыши свое приложение, выберите « Экспорт» → «Файл WAR» и сохраните файл TestWeb.war в папке веб-приложений Tomcat.
Теперь запустите сервер Tomcat и убедитесь, что вы можете получить доступ к другим веб-страницам из папки веб-приложений с помощью стандартного браузера. Попробуйте URL – http: // localhost: 8080 / TestWeb / excel, и мы увидим следующий экран.
Spring MVC – пример создания PDF
В следующем примере показано, как создать PDF-файл с помощью Spring Web MVC Framework. Начнем с того, что нам нужно иметь работающую Eclipse IDE и придерживаться следующих шагов для разработки веб-приложения на основе динамических форм с использованием Spring Web Framework.
| шаг | Описание |
|---|---|
| 1 | Создайте проект с именем TestWeb в пакете com.tutorialspoint, как описано в главе Spring MVC – Hello World. |
| 2 | Создайте классы Java UserPDFView и PDFController в пакете com.tutorialspoint. |
| 3 | Загрузите библиотеку iText – iText со страницы репозитория maven. Поместите это в свой CLASSPATH. |
| 4 | Последний шаг – создание содержимого исходного файла и файлов конфигурации и экспорт приложения, как описано ниже. |
PDFController.java
package com.tutorialspoint;
import java.util.HashMap;
import java.util.Map;
import javax.servlet.http.HttpServletRequest;
import javax.servlet.http.HttpServletResponse;
import org.springframework.web.servlet.ModelAndView;
import org.springframework.web.servlet.mvc.AbstractController;
public class PDFController extends AbstractController {
@Override
protected ModelAndView handleRequestInternal(HttpServletRequest request,
HttpServletResponse response) throws Exception {
//user data
Map<String,String> userData = new HashMap<String,String>();
userData.put("1", "Mahesh");
userData.put("2", "Suresh");
userData.put("3", "Ramesh");
userData.put("4", "Naresh");
return new ModelAndView("UserSummary","userData",userData);
}
}
UserExcelView.java
package com.tutorialspoint;
import java.util.Map;
import javax.servlet.http.HttpServletRequest;
import javax.servlet.http.HttpServletResponse;
import org.springframework.web.servlet.view.document.AbstractPdfView;
import com.lowagie.text.Document;
import com.lowagie.text.Table;
import com.lowagie.text.pdf.PdfWriter;
public class UserPDFView extends AbstractPdfView {
protected void buildPdfDocument(Map<String, Object> model, Document document,
PdfWriter pdfWriter, HttpServletRequest request, HttpServletResponse response)
throws Exception {
Map<String,String> userData = (Map<String,String>) model.get("userData");
Table table = new Table(2);
table.addCell("Roll No");
table.addCell("Name");
for (Map.Entry<String, String> entry : userData.entrySet()) {
table.addCell(entry.getKey());
table.addCell(entry.getValue());
}
document.add(table);
}
}
TestWeb-servlet.xml
<beans xmlns = "http://www.springframework.org/schema/beans"
xmlns:context = "http://www.springframework.org/schema/context"
xmlns:xsi = "http://www.w3.org/2001/XMLSchema-instance"
xmlns:mvc = "http://www.springframework.org/schema/mvc"
xsi:schemaLocation = "
http://www.springframework.org/schema/beans
http://www.springframework.org/schema/beans/spring-beans-3.0.xsd
http://www.springframework.org/schema/context
http://www.springframework.org/schema/context/spring-context-3.0.xsd
http://www.springframework.org/schema/mvc
http://www.springframework.org/schema/mvc/spring-mvc-3.0.xsd">
<bean class = "org.springframework.web.servlet.mvc.support.ControllerClassNameHandlerMapping" />
<bean class = "com.tutorialspoint.PDFController" />
<bean class = "org.springframework.web.servlet.view.XmlViewResolver">
<property name = "location">
<value>/WEB-INF/views.xml</value>
</property>
</bean>
</beans>
views.xml
<beans xmlns = "http://www.springframework.org/schema/beans" xmlns:context = "http://www.springframework.org/schema/context" xmlns:xsi = "http://www.w3.org/2001/XMLSchema-instance" xsi:schemaLocation = " http://www.springframework.org/schema/beans http://www.springframework.org/schema/beans/spring-beans-3.0.xsd http://www.springframework.org/schema/context http://www.springframework.org/schema/context/spring-context-3.0.xsd"> <bean id = "UserSummary" class = "com.tutorialspoint.UserPDFView"></bean> </beans>
Здесь мы создали PDFController и UserPDFView. Библиотека iText работает с форматами файлов PDF и преобразует данные в документ PDF.
Когда вы закончите создавать исходные файлы и файлы конфигурации, экспортируйте ваше приложение. Щелкните правой кнопкой мыши свое приложение, выберите « Экспорт» → «Файл WAR» и сохраните файл TestWeb.war в папке веб-приложений Tomcat.
Теперь запустите сервер Tomcat и убедитесь, что вы можете получить доступ к другим веб-страницам из папки веб-приложений с помощью стандартного браузера. Мы также можем попробовать следующий URL – http: // localhost: 8080 / TestWeb / pdf и, если все пойдет по плану, мы увидим следующий экран.

Spring MVC – пример интеграции LOG4J
В следующем примере показано, как интегрировать LOG4J с помощью Spring Web MVC Framework. Начнем с того, что нам нужно иметь работающую Eclipse IDE и придерживаться следующих шагов для разработки веб-приложения на основе динамических форм с использованием Spring Web Framework.
| шаг | Описание |
|---|---|
| 1 | Создайте проект с именем TestWeb в пакете com.tutorialspoint, как описано в главе Spring MVC – Hello World. |
| 2 | Создайте Java-класс HelloController в com.tutorialspointpackage. |
| 3 | Загрузите библиотеку log4j LOG4J со страницы репозитория maven. Поместите это в свой CLASSPATH. |
| 4 | Создайте log4j.properties в папке SRC. |
| 5 | Последний шаг – создание содержимого исходного файла и файлов конфигурации и экспорт приложения, как описано ниже. |
HelloController.java
package com.tutorialspoint;
import org.apache.log4j.Logger;
import org.springframework.stereotype.Controller;
import org.springframework.web.bind.annotation.RequestMapping;
import org.springframework.web.bind.annotation.RequestMethod;
import org.springframework.ui.ModelMap;
@Controller
@RequestMapping("/hello")
public class HelloController{
private static final Logger LOGGER = Logger.getLogger(HelloController.class);
@RequestMapping(method = RequestMethod.GET)
public String printHello(ModelMap model) {
LOGGER.info("printHello started.");
//logs debug message
if(LOGGER.isDebugEnabled()){
LOGGER.debug("Inside: printHello");
}
//logs exception
LOGGER.error("Logging a sample exception", new Exception("Testing"));
model.addAttribute("message", "Hello Spring MVC Framework!");
LOGGER.info("printHello ended.");
return "hello";
}
}
log4j.properties
# Root logger option
log4j.rootLogger = DEBUG, stdout, file
# Redirect log messages to console
log4j.appender.stdout = org.apache.log4j.ConsoleAppender
log4j.appender.stdout.Target = System.out
log4j.appender.stdout.layout = org.apache.log4j.PatternLayout
log4j.appender.stdout.layout.ConversionPattern = %d{yyyy-MM-dd HH:mm:ss} %-5p %c{1}:%L - %m%n
# Redirect log messages to a log file
log4j.appender.file = org.apache.log4j.RollingFileAppender
#outputs to Tomcat home
log4j.appender.file.File = ${catalina.home}/logs/myapp.log
log4j.appender.file.MaxFileSize = 5MB
log4j.appender.file.MaxBackupIndex = 10
log4j.appender.file.layout = org.apache.log4j.PatternLayout
log4j.appender.file.layout.ConversionPattern = %d{yyyy-MM-dd HH:mm:ss} %-5p %c{1}:%L - %m%n
TestWeb-servlet.xml
<beans xmlns = "http://www.springframework.org/schema/beans"
xmlns:context = "http://www.springframework.org/schema/context"
xmlns:xsi = "http://www.w3.org/2001/XMLSchema-instance"
xmlns:mvc = "http://www.springframework.org/schema/mvc"
xsi:schemaLocation = "
http://www.springframework.org/schema/beans
http://www.springframework.org/schema/beans/spring-beans-3.0.xsd
http://www.springframework.org/schema/context
http://www.springframework.org/schema/context/spring-context-3.0.xsd
http://www.springframework.org/schema/mvc
http://www.springframework.org/schema/mvc/spring-mvc-3.0.xsd">
<context:component-scan base-package = "com.tutorialspoint" />
<bean class = "org.springframework.web.servlet.view.InternalResourceViewResolver">
<property name = "prefix" value = "/WEB-INF/jsp/" />
<property name = "suffix" value = ".jsp" />
</bean>
</beans>
hello.jsp
<%@ page contentType = "text/html; charset = UTF-8" %>
<html>
<head>
<title>Hello World</title>
</head>
<body>
<h2>${message}</h2>
</body>
</html>
Здесь мы настроили LOG4J для записи подробностей на консоли Tomcat и в файле, представленном в & t; tomcat home → регистрируется как myapp.log.
Когда вы закончите создавать исходные файлы и файлы конфигурации, экспортируйте ваше приложение. Щелкните правой кнопкой мыши свое приложение, выберите « Экспорт» → «Файл WAR» и сохраните файл TestWeb.war в папке веб-приложений Tomcat.
Теперь запустите сервер Tomcat и убедитесь, что вы можете получить доступ к другим веб-страницам из папки веб-приложений с помощью стандартного браузера. Попробуйте URL – http: // localhost: 8080 / TestWeb / hello, и мы увидим следующий экран в журнале Tomcat.
Привет, Хабр! Представляю Вашему вниманию перевод руководства «Spring MVC + Spring Data JPA + Hibernate — CRUD Example» автора Nam Ha Minh.
В этом руководстве по Java Spring вы узнаете, как настроить Spring MVC приложение для работы с Spring Data JPA, разработав простое веб-приложение, которое позволяет управлять информацией о клиентах.
По завершению этого руководства, вы сможете создать веб-приложение Java основанное на технологиях Spring MVC и Spring Data JPA, которое выглядит следующим образом:
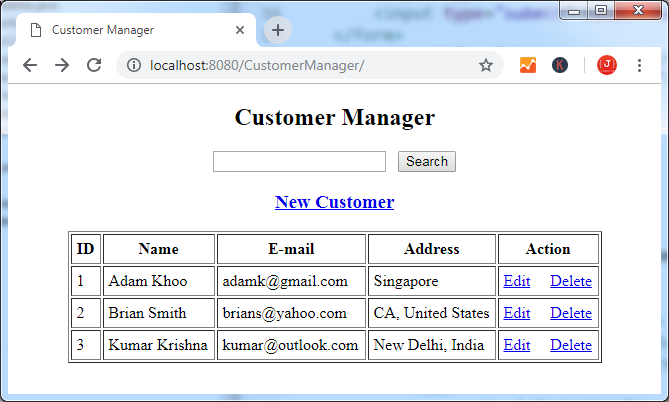
Программы и технологии используемые в этом руководстве: Java 8, Apache Tomcat 9, MySQL Server 5.7, Eclipse IDE 4.7 (Oxygen), Spring Framework 5.1, Hibernate 5.4, Spring Data JPA 2.1.5 и Servlet 3.1.
Начнём с создания базы данных.
1. Создание базы данных
Мы будем использовать MySQL. В нашем пример мы будем работать с данными в таблице customer, которая находится в схеме с именем sales. Таблица customer имеет 4 поля: id, name, email и address:
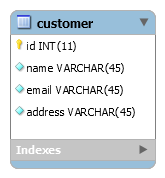
Вы можете запустить следующий MySQL скрипт для создания схемы и таблицы:
CREATE DATABASE `sales`;
CREATE TABLE `customer` (
`id` int(11) NOT NULL AUTO_INCREMENT,
`name` varchar(45) NOT NULL,
`email` varchar(45) NOT NULL,
`address` varchar(45) NOT NULL,
PRIMARY KEY (`id`)
) ENGINE=InnoDB DEFAULT CHARSET=utf8;2. Создание проекта в Eclipse
Создайте Dynamic Web Project в Eclipse, и конвертируйте его в проект Maven: для этого нажмите ПКМ по проекту, выберете Configure > Convert to Maven Project. В открывшемся диалоговом окне Create new POM введите следующую информацию:
— Group Id: net.codejava
— Artifact Id: CustomerManager
Также убедитесь, что версия JRE для проекта Java 8 или новее.
Затем, откройте pom.xml (файл Maven), чтобы настроить зависимости для этого проекта. Объявите свойства версий для Spring и Hibernate Frameworks:
<properties>
<spring.version>5.1.5.RELEASE</spring.version>
<hibernate.version>5.4.1.Final</hibernate.version>
</properties>Укажите зависимость для Spring Framework:
<dependency>
<groupId>org.springframework</groupId>
<artifactId>spring-context</artifactId>
<version>${spring.version}</version>
</dependency>Для создания веб-приложений Spring MVC:
<dependency>
<groupId>org.springframework</groupId>
<artifactId>spring-webmvc</artifactId>
<version>${spring.version}</version>
</dependency>Для использования Spring Data JPA:
<dependency>
<groupId>org.springframework</groupId>
<artifactId>spring-orm</artifactId>
<version>${spring.version}</version>
</dependency>
<dependency>
<groupId>org.springframework.data</groupId>
<artifactId>spring-data-jpa</artifactId>
<version>2.1.5.RELEASE</version>
</dependency>Мы используем Hibernate в качестве реализации JPA, поэтому добавим следующую зависимость:
<dependency>
<groupId>org.hibernate</groupId>
<artifactId>hibernate-core</artifactId>
<version>${hibernate.version}</version>
</dependency>Для того, чтобы приложение работало с MySQL, нам нужна зависимость для драйвера MySQL JDBC:
<dependency>
<groupId>mysql</groupId>
<artifactId>mysql-connector-java</artifactId>
<version>8.0.14</version>
<scope>runtime</scope>
</dependency>И теперь зависимости для Java Servlet, JSP и JSTL:
<dependency>
<groupId>javax.servlet</groupId>
<artifactId>javax.servlet-api</artifactId>
<version>3.1.0</version>
<scope>provided</scope>
</dependency>
<dependency>
<groupId>javax.servlet.jsp</groupId>
<artifactId>javax.servlet.jsp-api</artifactId>
<version>2.3.1</version>
<scope>provided</scope>
</dependency>
<dependency>
<groupId>jstl</groupId>
<artifactId>jstl</artifactId>
<version>1.2</version>
</dependency>
Создайте два Java пакета в корне проекта:
— net.codejava.config: для классов конфигурации.
— net.codejava.customer: для классов приложения.
3. Создание файла настройки JPA
Поскольку мы используем JPA, нам нужно определить свойства для подключения к базе данных в файле persistence.xml, а не в hibernate.cfg.xml. Создайте новый каталог с именем META-INF в исходной папке проекта, чтобы поместить в него файл persistence.xml:
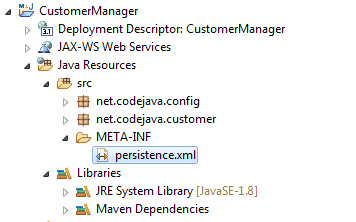
И впишите в этот файл код представленный ниже:
<?xml version="1.0" encoding="UTF-8"?>
<persistence xmlns="http://xmlns.jcp.org/xml/ns/persistence"
xmlns:xsi="http://www.w3.org/2001/XMLSchema-instance"
xsi:schemaLocation="http://xmlns.jcp.org/xml/ns/persistence
http://xmlns.jcp.org/xml/ns/persistence/persistence_2_1.xsd"
version="2.1">
<persistence-unit name="SalesDB">
<properties>
<property name="javax.persistence.jdbc.url" value="jdbc:mysql://localhost:3306/sales" />
<property name="javax.persistence.jdbc.user" value="root" />
<property name="javax.persistence.jdbc.password" value="(password)" />
<property name="javax.persistence.jdbc.driver" value="com.mysql.jdbc.Driver" />
<property name="hibernate.show_sql" value="true" />
<property name="hibernate.format_sql" value="true" />
</properties>
</persistence-unit>
</persistence>
Как вы можете видеть, мы указываем свойства для соединения с базой данных, такие как URL, user, password и класс JDBC драйвера. Так же обратите внимание, что имя SalesDB будет использоваться нами в коде конфигурации.
4. Создание Model Class
Создайте класс Customer, который сопоставляется с таблицей customer в базе данных следующим образом:
package net.codejava.customer;
import javax.persistence.Entity;
import javax.persistence.GeneratedValue;
import javax.persistence.GenerationType;
import javax.persistence.Id;
@Entity
public class Customer {
@Id
@GeneratedValue(strategy = GenerationType.IDENTITY)
private Long id;
private String name;
private String email;
private String address;
protected Customer() {
}
protected Customer(String name, String email, String address) {
this.name = name;
this.email = email;
this.address = address;
}
// геттеры и сеттеры не показаны для краткости. Создайте их с помощью средств своей IDE, или вручную.
}
Как вы могли увидеть, мы используем аннотацию @Entity для сопоставления этого класса с таблицей customer (имя класса совпадает с именем таблицы). Все имена полей класса идентичны именам полей в таблице. Поле id имеет аннотации @Id и @GeneratedValue, чтобы указать, что это поле является первичным ключом и его значение генерируется автоматически.
5. Конфигурация Spring MVC и Spring Data JPA
Далее, напишем Java код для настройки Spring MVC и Spring Data JPA. Мы будем использовать конфигурацию на основе Java, так как она проще, чем XML.
Настройка Spring Dispatcher Servlet
Для использования Spring MVC в нашем приложении, нам надо зарегистрировать Spring Dispatcher Servlet при запуске приложения, написав следующий класс:
package net.codejava.config;
import javax.servlet.ServletContext;
import javax.servlet.ServletException;
import javax.servlet.ServletRegistration;
import org.springframework.web.WebApplicationInitializer;
import org.springframework.web.context.support.AnnotationConfigWebApplicationContext;
import org.springframework.web.servlet.DispatcherServlet;
public class WebAppInitializer implements WebApplicationInitializer {
@Override
public void onStartup(ServletContext servletContext) throws ServletException {
AnnotationConfigWebApplicationContext appContext = new AnnotationConfigWebApplicationContext();
appContext.register(WebMvcConfig.class);
ServletRegistration.Dynamic dispatcher = servletContext.addServlet(
"SpringDispatcher", new DispatcherServlet(appContext));
dispatcher.setLoadOnStartup(1);
dispatcher.addMapping("/");
}
}
Метод onStartup() этого класса будет автоматически вызываться сервлетом при загрузке приложения. Spring Dispatcher Servlet обарабатывает все запросы cопоставляя URL «/» и ищет конфигурацию в классе WebMvcConfig, которй описан ниже.
Настройка Spring MVC
Создайте класс WebMvcConfig в пакете net.codejava.config, содержащий следующий код:
package net.codejava.config;
import org.springframework.context.annotation.Bean;
import org.springframework.context.annotation.ComponentScan;
import org.springframework.context.annotation.Configuration;
import org.springframework.web.servlet.view.InternalResourceViewResolver;
@Configuration
@ComponentScan("net.codejava ")
public class WebMvcConfig {
@Bean(name = "viewResolver")
public InternalResourceViewResolver getViewResolver() {
InternalResourceViewResolver viewResolver = new InternalResourceViewResolver();
viewResolver.setPrefix("/WEB-INF/views/");
viewResolver.setSuffix(".jsp");
return viewResolver;
}
}
Этот класс помечен аннотацией @Configuration, сообщающей Spring, что это файл конфигурации. Аннотация @ComponentScan говорит Spring искать классы конфигурации в пакете net.codejava.
В этом классе мы создаём bean-компонент, который распознаёт представления (View), с помощью указания префикса и суффикса для этих представлений. Поэтому создайте каталог views внутри каталога WebContent/WEB-INF для хранения JSP файлов.
Здесь вы можете добавить и другие конфигурации Spring MVC.
Настройка Spring Data JPA
Для работы с Spring Data JPA нам надо создать два beans-компонента: EntityManagerFactory и JpaTransactionManager. Поэтому создадим другой конфигурационный класс JpaConfig:
package net.codejava.config;
import javax.persistence.EntityManagerFactory;
import org.springframework.context.annotation.Bean;
import org.springframework.context.annotation.Configuration;
import org.springframework.data.jpa.repository.config.EnableJpaRepositories;
import org.springframework.orm.jpa.JpaTransactionManager;
import org.springframework.orm.jpa.LocalEntityManagerFactoryBean;
import org.springframework.transaction.annotation.EnableTransactionManagement;
@Configuration
@EnableJpaRepositories(basePackages = {"net.codejava.customer"})
@EnableTransactionManagement
public class JpaConfig {
@Bean
public LocalEntityManagerFactoryBean entityManagerFactory() {
LocalEntityManagerFactoryBean factoryBean = new LocalEntityManagerFactoryBean();
factoryBean.setPersistenceUnitName("SalesDB");
return factoryBean;
}
@Bean
public JpaTransactionManager transactionManager(EntityManagerFactory entityManagerFactory) {
JpaTransactionManager transactionManager = new JpaTransactionManager();
transactionManager.setEntityManagerFactory(entityManagerFactory);
return transactionManager;
}
}Здесь мы используем две важные аннотации:
@EnableJpaRepositories: сообщает Spring Data JPA, что нужно искать классы репозитория в указанном пакете (net.codejava) для внедрения соответсвующего кода во время выполнения.@EnableTransactionManagement: сообщает Spring Data JPA, чтобы тот генерировал код для управления транзакциями во время выполнения.
В этом классе первый метод создаёт экземпляр EntityManagerFactory для управления Persistence Unit нашей SalesDB (это имя указано выше в persistence.xml).
Последний метод создаёт экземпляр JpaTransactionManager для EntityManagerFactory, созданный методом ранее.
Это минимальная необходимая конфигурация для использования Spring Data JPA.
Создание Repository Interface
Создайте интерфейс CustomerRepository, который расширяет определенный в Spring Data JPA интерфейс CrudRepository:
package net.codejava.customer;
import java.util.List;
import org.springframework.data.repository.CrudRepository;
import org.springframework.data.repository.query.Param;
public interface CustomerRepository extends CrudRepository<Customer, Long> {
}
Это почти весь код, который нам нужен для доступа к данным. Просто, согласитесь? С Spring Data JPA нам не нужно писать DAO (Java Data Acces Object) код. Просто объявите интерфейс, расширяющий интерфейс CrudRepository, в котором определены такие методы CRUD как: save(), findAll(), findById(), deleteById() и т.д. Во время выполнения Spring Data JPA автоматически сгенерирует код.
Обратите внимание, что мы должны указать тип класса модели и тип поля первичного ключа при расширении CrudRepository: CrudRepository<Customer, Long>.
7. Создание Service Class
Затем, создайте класс CustomerService:
package net.codejava.customer;
import java.util.List;
import org.springframework.beans.factory.annotation.Autowired;
import org.springframework.stereotype.Service;
import org.springframework.transaction.annotation.Transactional;
@Service
@Transactional
public class CustomerService {
@Autowired CustomerRepository repo;
public void save(Customer customer) {
repo.save(customer);
}
public List<Customer> listAll() {
return (List<Customer>) repo.findAll();
}
public Customer get(Long id) {
return repo.findById(id).get();
}
public void delete(Long id) {
repo.deleteById(id);
}
}
Обратите внимание на аннотацию @Transactional, которой помечен наш класс. Это означает, что все методы этого класса будут перехвачены Spring Data JPA для управления транзакциями. И экземпляр интерфейса CustomerRepository будет внедрён в этот класс:
@Autowired CustomerRepository repo;Это похоже на магию, поскольку мы не пишем DAO код, но Spring Data JPA автоматически создаст реализацию во время выполнения.
Как вы можете видеть, все методы в данном классе предназначены для операций CRUD. Он просто делегирует весь вызов объекту CustomerRepository. Вам может показаться этот класс избыточным, но он необходим, для отделения уровня business/service от уровня repository/DAO.
8. Создание контроллера Spring MVC
Создайте класс CustomerContoroller для обработки всех запросов от клиентов:
package net.codejava.customer;
import org.springframework.beans.factory.annotation.Autowired;
import org.springframework.stereotype.Controller;
@Controller
public class CustomerController {
@Autowired
private CustomerService customerService;
// здесь будут методы обработки
}
Это типичный класс Spring MVC Controller, который аннотирован с помощью @Controller. Вы можете увидеть, что экземпляр CustomerService внедряется в этот объект с помощью аннотации @Autowired.
Мы напишем методы обработки в следующих секциях.
9. Добавление списка клиентов
На домашней странице нашего приложения будут отображаться все клиенты, для этого добавьте соответствующий обрабатывающий метод в наш CustomerController класс:
@RequestMapping("/")
public ModelAndView home() {
List<Customer> listCustomer = customerService.listAll();
ModelAndView mav = new ModelAndView("index");
mav.addObject("listCustomer", listCustomer);
return mav;
}
Домашняя страница просмотра (index.jsp) должна выглядеть следующим образом:
<%@ page language="java" contentType="text/html; charset=ISO-8859-1"
pageEncoding="ISO-8859-1"%>
<%@ taglib uri="http://java.sun.com/jsp/jstl/core" prefix="c" %>
<!DOCTYPE html PUBLIC "-//W3C//DTD HTML 4.01
Transitional//EN" "http://www.w3.org/TR/html4/loose.dtd">
<html>
<head>
<meta http-equiv="Content-Type" content="text/html; charset=ISO-8859-1">
<title>Customer Manager</title>
</head>
<body>
<div align="center">
<h2>Customer Manager</h2>
<form method="get" action="search">
<input type="text" name="keyword" />
<input type="submit" value="Search" />
</form>
<h3><a href="/new">New Customer</a></h3>
<table border="1" cellpadding="5">
<tr>
<th>ID</th>
<th>Name</th>
<th>E-mail</th>
<th>Address</th>
<th>Action</th>
</tr>
<c:forEach items="${listCustomer}" var="customer">
<tr>
<td>${customer.id}</td>
<td>${customer.name}</td>
<td>${customer.email}</td>
<td>${customer.address}</td>
<td>
<a href="/edit?id=${customer.id}">Edit</a>
<a href="/delete?id=${customer.id}">Delete</a>
</td>
</tr>
</c:forEach>
</table>
</div>
</body>
</html>
Теперь вы можете запустить веб-приложение. Добавьте несколько строк в таблицу customer и перейдите по адресу http://localhost:8080/CustomerManager/, и вы увидите что-то похожее:
10. Добавление нового пользователя
Для того, чтобы реализовать функцию создания нового клиента, нам нужно написать два метода-обработчика. И первый из них будет отображать новую форму для добавления клиента:
@RequestMapping("/new")
public String newCustomerForm(Map<String, Object> model) {
Customer customer = new Customer();
model.put("customer", customer);
return "new_customer";
}
Напишем саму JSP форму с именем new_customer.jsp:
<%@ page language="java" contentType="text/html; charset=ISO-8859-1"
pageEncoding="ISO-8859-1"%>
<%@ taglib prefix="form" uri="http://www.springframework.org/tags/form"%>
<!DOCTYPE html PUBLIC "-//W3C//DTD HTML 4.01 Transitional//EN"
"http://www.w3.org/TR/html4/loose.dtd">
<html>
<head>
<meta http-equiv="Content-Type" content="text/html; charset=ISO-8859-1">
<title>New Customer</title>
</head>
<body>
<div align="center">
<h2>New Customer</h2>
<form:form action="save" method="post" modelAttribute="customer">
<table border="0" cellpadding="5">
<tr>
<td>Name: </td>
<td><form:input path="name" /></td>
</tr>
<tr>
<td>Email: </td>
<td><form:input path="email" /></td>
</tr>
<tr>
<td>Address: </td>
<td><form:input path="address" /></td>
</tr>
<tr>
<td colspan="2"><input type="submit" value="Save"></td>
</tr>
</table>
</form:form>
</div>
</body>
</html>Теперь на главной странице у вас появится ссылка New Customer, при нажатии на которую вы увидите новую форму:
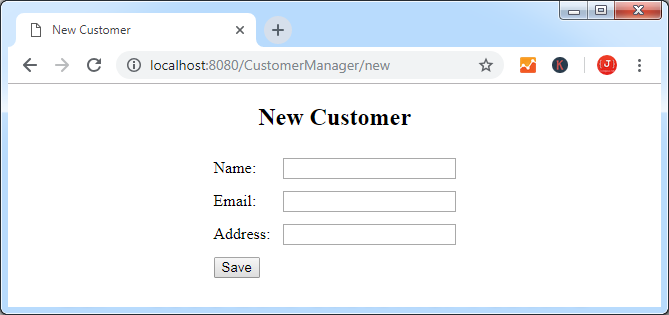
Второй метод-обработчик будет обрабатывать кнопку Save в этой форме:
@RequestMapping(value = "/save", method = RequestMethod.POST)
public String saveCustomer(@ModelAttribute("customer") Customer customer) {
customerService.save(customer);
return "redirect:/";
}Как вы можете видеть, она перенаправляет клиента на домашнюю страницу, после успешного сохранения пользователя.
11. Изменение данных пользователя
Чтобы реализовать функцию редактирования клиента, добавим следующий метод-обработчик в класс CustomerController:
@RequestMapping("/edit")
public ModelAndView editCustomerForm(@RequestParam long id) {
ModelAndView mav = new ModelAndView("edit_customer");
Customer customer = customerService.get(id);
mav.addObject("customer", customer);
return mav;
}
Напишем форму edit_customer.jsp, которая вызывается этим методом:
<%@ page language="java" contentType="text/html; charset=ISO-8859-1"
pageEncoding="ISO-8859-1"%>
<%@ taglib prefix="form" uri="http://www.springframework.org/tags/form"%>
<!DOCTYPE html PUBLIC "-//W3C//DTD HTML 4.01 Transitional//EN"
"http://www.w3.org/TR/html4/loose.dtd">
<html>
<head>
<meta http-equiv="Content-Type" content="text/html; charset=ISO-8859-1">
<title>Edit Customer</title>
</head>
<body>
<div align="center">
<h2>Edit Customer</h2>
<form:form action="save" method="post" modelAttribute="customer">
<table border="0" cellpadding="5">
<tr>
<td>ID: </td>
<td>${customer.id}
<form:hidden path="id"/>
</td>
</tr>
<tr>
<td>Name: </td>
<td><form:input path="name" /></td>
</tr>
<tr>
<td>Email: </td>
<td><form:input path="email" /></td>
</tr>
<tr>
<td>Address: </td>
<td><form:input path="address" /></td>
</tr>
<tr>
<td colspan="2"><input type="submit" value="Save"></td>
</tr>
</table>
</form:form>
</div>
</body>
</html>Нажмите на гиперссылку Edit рядом с клиентом на домашней странице, вызовется форма редактирования клиента, которая будет выглядеть примерно вот так:

Метод-обработчик по-прежнему обрабатывает кнопку Save.
12. Удаление клиента
Для реализации функции удаления, напишите следующий метод-обработчик в классе CustomerController:
@RequestMapping("/delete")
public String deleteCustomerForm(@RequestParam long id) {
customerService.delete(id);
return "redirect:/";
}Нажмите на гиперссылку Delete рядом с клиентом на главной странице. Клиент удалится, а список обновится.
13. Поиск по клиентам
Наконец, давайте реализуем функцию поиска, которая позволяет пользователю искать клиентов, вводя ключевое слово. Функция поиска ищет ключевые слова в трёх полях: имя, email и адрес, для чего нам потребуется написать собственный метод в интерфейсе CustomerRepository:
package net.codejava.customer;
import java.util.List;
import org.springframework.data.jpa.repository.Query;
import org.springframework.data.repository.CrudRepository;
import org.springframework.data.repository.query.Param;
public interface CustomerRepository extends CrudRepository<Customer, Long> {
@Query(value = "SELECT c FROM Customer c WHERE c.name LIKE '%' || :keyword || '%'"
+ " OR c.email LIKE '%' || :keyword || '%'"
+ " OR c.address LIKE '%' || :keyword || '%'")
public List<Customer> search(@Param("keyword") String keyword);
}
Метод search() — это просто абстрактный метод, аннотированный с помощью @Query. Поисковый запрос является запросом JPA.
Затем добавьте метод в класс CustomerService:
public List<Customer> search(String keyword) {
return repo.search(keyword);
}
Теперь добавьте метод-обработчик в класс CustomerController:
@RequestMapping("/search")
public ModelAndView search(@RequestParam String keyword) {
List<Customer> result = customerService.search(keyword);
ModelAndView mav = new ModelAndView("search");
mav.addObject("result", result);
return mav;
}
И создайте страницу результата поиска search.jsp:
<%@ page language="java" contentType="text/html; charset=ISO-8859-1"
pageEncoding="ISO-8859-1"%>
<%@ taglib uri="http://java.sun.com/jsp/jstl/core" prefix="c" %>
<!DOCTYPE html PUBLIC "-//W3C//DTD HTML 4.01 Transitional//EN"
"http://www.w3.org/TR/html4/loose.dtd">
<html>
<head>
<meta http-equiv="Content-Type" content="text/html; charset=ISO-8859-1">
<title>Search Result</title>
</head>
<body>
<div align="center">
<h2>Search Result</h2>
<table border="1" cellpadding="5">
<tr>
<th>ID</th>
<th>Name</th>
<th>E-mail</th>
<th>Address</th>
</tr>
<c:forEach items="${result}" var="customer">
<tr>
<td>${customer.id}</td>
<td>${customer.name}</td>
<td>${customer.email}</td>
<td>${customer.address}</td>
</tr>
</c:forEach>
</table>
</div>
</body>
</html>Для тестирования функции поиска, введите ключевое слово в поле поиска на домашней странице, и нажмите Enter. Вы увидите страницу результата поиска:
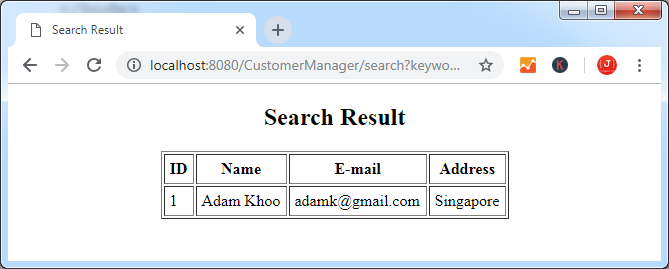
Выводы
В данном руководстве вы узнали как можно разработать веб-приложение Spring MVC, используя Spring Data JPA для доступа к данным. Как вы могли видеть, Spring Data JPA значительно уменьшает и упрощает код, который нам нужно писать.
Для сравнения, вот структура проекта в Eclipse IDE:
Благодарю за прочтение!
Spring — MVC Framework Overview
The Spring Web MVC framework provides a model-view-controller architecture and ready components that can be used to develop flexible and loosely coupled web applications. The MVC pattern results in separating the different aspects of the application (input logic, business logic, and UI logic), while providing a loose coupling between these elements.
-
The Model encapsulates the application data and in general, they will consist of POJO.
-
The View is responsible for rendering the model data and in general, it generates HTML output that the client’s browser can interpret.
-
The Controller is responsible for processing User Requests and Building Appropriate Model and passes it to the view for rendering.
The DispatcherServlet
The Spring Web model-view-controller (MVC) framework is designed around a DispatcherServlet that handles all the HTTP requests and responses. The request processing workflow of the Spring Web MVC DispatcherServlet is shown in the following illustration.
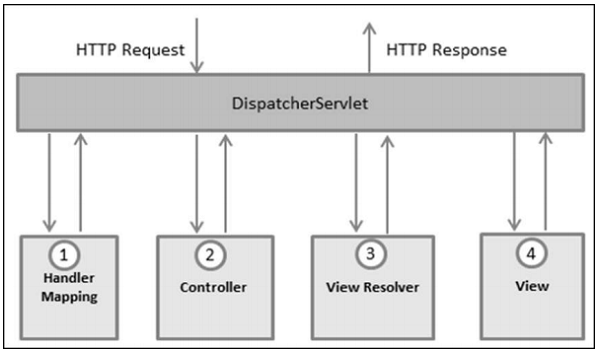
Following is the sequence of events corresponding to an incoming HTTP request to DispatcherServlet −
-
After receiving an HTTP request, DispatcherServlet consults the HandlerMapping to call the appropriate Controller.
-
The Controller takes the request and calls the appropriate service methods based on used GET or POST method. The service method will set model data based on defined business logic and returns view name to the DispatcherServlet.
-
The DispatcherServlet will take help from ViewResolver to pick up the defined view for the request.
-
Once view is finalized, The DispatcherServlet passes the model data to the view, which is finally rendered, on the browsers.
All the above-mentioned components, i.e. HandlerMapping, Controller and ViewResolver are parts of WebApplicationContext, which is an extension of the plain ApplicationContext with some extra features necessary for web applications.
Required Configuration
We need to map requests that you want the DispatcherServlet to handle, by using a URL mapping in the web.xml file. The following is an example to show declaration and mapping for HelloWeb DispatcherServlet −
<web-app id = "WebApp_ID" version = "2.4"
xmlns = "http://java.sun.com/xml/ns/j2ee"
xmlns:xsi = "http://www.w3.org/2001/XMLSchema-instance"
xsi:schemaLocation = "http://java.sun.com/xml/ns/j2ee
http://java.sun.com/xml/ns/j2ee/web-app_2_4.xsd">
<display-name>Spring MVC Application</display-name>
<servlet>
<servlet-name>HelloWeb</servlet-name>
<servlet-class>
org.springframework.web.servlet.DispatcherServlet
</servlet-class>
<load-on-startup>1</load-on-startup>
</servlet>
<servlet-mapping>
<servlet-name>HelloWeb</servlet-name>
<url-pattern>*.jsp</url-pattern>
</servlet-mapping>
</web-app>
The web.xml file will be kept in the WebContent/WEB-INF directory of your web application. Upon initialization of the HelloWeb DispatcherServlet, the framework will try to load the application context from a file named [servlet-name]-servlet.xml located in the application’s WebContent/WEB-INF directory. In this case, our file will be HelloWeb-servlet.xml.
Next, the <servlet-mapping> tag indicates which URLs will be handled by which DispatcherServlet. Here, all the HTTP requests ending with .jsp will be handled by the HelloWeb DispatcherServlet.
If you do not want to go with the default filename as [servlet-name]-servlet.xml and default location as WebContent/WEB-INF, you can customize this file name and location by adding the servlet listener ContextLoaderListener in your web.xml file as follows −
<web-app...>
<!-------- DispatcherServlet definition goes here----->
....
<context-param>
<param-name>contextConfigLocation</param-name>
<param-value>/WEB-INF/HelloWeb-servlet.xml</param-value>
</context-param>
<listener>
<listener-class>
org.springframework.web.context.ContextLoaderListener
</listener-class>
</listener>
</web-app>
Now, let us check the required configuration for HelloWeb-servlet.xml file, placed in your web application’s WebContent/WEB-INF directory.
<beans xmlns = "http://www.springframework.org/schema/beans"
xmlns:context = "http://www.springframework.org/schema/context"
xmlns:xsi = "http://www.w3.org/2001/XMLSchema-instance"
xsi:schemaLocation = "
http://www.springframework.org/schema/beans
http://www.springframework.org/schema/beans/spring-beans-3.0.xsd
http://www.springframework.org/schema/context
http://www.springframework.org/schema/context/spring-context-3.0.xsd">
<context:component-scan base-package = "com.tutorialspoint" />
<bean class = "org.springframework.web.servlet.view.InternalResourceViewResolver">
<property name = "prefix" value = "/WEB-INF/jsp/" />
<property name = "suffix" value = ".jsp" />
</bean>
</beans>
Following are some important points about HelloWeb-servlet.xml file −
-
The [servlet-name]-servlet.xml file will be used to create the beans defined, overriding the definitions of any beans defined with the same name in the global scope.
-
The <context:component-scan…> tag will be used to activate the Spring MVC annotation scanning capability, which allows to make use of annotations like @Controller and @RequestMapping, etc.
-
The InternalResourceViewResolver will have rules defined to resolve the view names. As per the above-defined rule, a logical view named hello is delegated to a view implementation located at /WEB-INF/jsp/hello.jsp.
Let us now understand how to create the actual components i.e., Controller, Model and View.
Defining a Controller
The DispatcherServlet delegates the request to the controllers to execute the functionality specific to it. The @Controller annotation indicates that a particular class serves the role of a controller. The @RequestMapping annotation is used to map a URL to either an entire class or a particular handler method.
@Controller
@RequestMapping("/hello")
public class HelloController{
@RequestMapping(method = RequestMethod.GET)
public String printHello(ModelMap model) {
model.addAttribute("message", "Hello Spring MVC Framework!");
return "hello";
}
}
The @Controller annotation defines the class as a Spring MVC controller. Here, the first usage of @RequestMapping indicates that all handling methods on this controller are relative to the /hello path.
The next annotation @RequestMapping (method = RequestMethod.GET) is used to declare the printHello() method as the controller’s default service method to handle HTTP GET request. We can define another method to handle any POST request at the same URL.
We can also write the above controller in another form, where we can add additional attributes in the @RequestMapping as follows −
@Controller
public class HelloController{
@RequestMapping(value = "/hello", method = RequestMethod.GET)
public String printHello(ModelMap model) {
model.addAttribute("message", "Hello Spring MVC Framework!");
return "hello";
}
}
The value attribute indicates the URL to which the handler method is mapped and the method attribute defines the service method to handle the HTTP GET request.
Following are some important points to be noted regarding the controller defined above −
-
You will define the required business logic inside a service method. You can call another method inside this method as per the requirement.
-
Based on the business logic defined, you will create a model within this method. You can set different model attributes and these attributes will be accessed by the view to present the result. This example creates a model with its attribute «message».
-
A defined service method can return a String, which contains the name of the view to be used to render the model. This example returns «hello» as the logical view name.
Creating JSP Views
Spring MVC supports many types of views for different presentation technologies. These include — JSPs, HTML, PDF, Excel Worksheets, XML, Velocity Templates, XSLT, JSON, Atom and RSS feeds, JasperReports, etc. However, the most common ones are the JSP templates written with JSTL. So, let us write a simple hello view in /WEB-INF/hello/hello.jsp −
<html>
<head>
<title>Hello Spring MVC</title>
</head>
<body>
<h2>${message}</h2>
</body>
</html>
Here ${message} Here is the attribute, which we have setup inside the Controller. You can have multiple attributes to be displayed inside your view.
Spring MVC — Environment Setup
This chapter will guide you on how to prepare a development environment to start your work with Spring Framework. It will also teach you how to set up JDK, Maven and Eclipse on your machine before you set up Spring Framework −
Setup Java Development Kit (JDK)
You can download the latest version of SDK from Oracle’s Java site − Java SE Downloads. You will find instructions for installing JDK in downloaded files, follow the given instructions to install and configure the setup. Finally set PATH and JAVA_HOME environment variables to refer to the directory that contains java and javac, typically java_install_dir/bin and java_install_dir respectively.
If you are running Windows and have installed the JDK in C:jdk-11.0.11, you would have to put the following line in your C:autoexec.bat file.
set PATH=C:jdk-11.0.11;%PATH% set JAVA_HOME=C:jdk-11.0.11
Alternatively, on Windows NT/2000/XP, you will have to right-click on My Computer, select Properties → Advanced → Environment Variables. Then, you will have to update the PATH value and click the OK button.
On Unix (Solaris, Linux, etc.), if the SDK is installed in /usr/local/jdk-11.0.11 and you use the C shell, you will have to put the following into your .cshrc file.
setenv PATH /usr/local/jdk-11.0.11/bin:$PATH setenv JAVA_HOME /usr/local/jdk-11.0.11
Alternatively, if you use an Integrated Development Environment (IDE) like Borland JBuilder, Eclipse, IntelliJ IDEA, or Sun ONE Studio, you will have to compile and run a simple program to confirm that the IDE knows where you have installed Java. Otherwise, you will have to carry out a proper setup as given in the document of the IDE.
Setup Eclipse IDE
All the examples in this tutorial have been written using Eclipse IDE. So we would suggest you should have the latest version of Eclipse installed on your machine.
To install Eclipse IDE, download the latest Eclipse binaries from www.eclipse.org/downloads. Once you download the installation, unpack the binary distribution into a convenient location. For example, in C:eclipse on Windows, or /usr/local/eclipse on Linux/Unix and finally set PATH variable appropriately.
Eclipse can be started by executing the following commands on Windows machine, or you can simply double-click on eclipse.exe
%C:eclipseeclipse.exe
Eclipse can be started by executing the following commands on Unix (Solaris, Linux, etc.) machine −
$/usr/local/eclipse/eclipse
After a successful startup, if everything is fine then it should display the following result −
Install Apache Common Logging API
You can download the latest version of Apache Commons Logging API from https://commons.apache.org/logging/. Once you have downloaded the installation, unpack the binary distribution into a convenient location.
For example – C:commons-logging-1.1.1 on windows, or /usr/local/commons-logging1.1.1 on Linux/Unix. This directory will have the following jar files and other supporting documents, etc.
Make sure you set your CLASSPATH variable on this directory properly, otherwise you will face problem while running your application.
Setup Spring Framework Libraries
Now if everything is fine, then we can proceed to setup the Spring Framework. Following are the steps to download and install the framework on the machine.
-
Make a choice whether you want to install Spring on Windows or UNIX and then proceed to the next step to download .zip file for windows and .tz file for Unix.
-
Download the latest version of Spring framework binaries from https://repo.spring.io/release/org/springframework/spring.
-
We have downloaded the spring-5.3.14-dist.zip on the Windows Machine and when we unzip the downloaded file, it will give out the directory structure inside – E:spring as follows.

You will find all the Spring libraries in the directory E:springlibs. Make sure you set your CLASSPATH variable on this directory properly; otherwise, we will face a problem while running the application. If we use Eclipse, then it is not required to set the CLASSPATH because all the setting will be done through Eclipse.
Once you are done with this last step, you are ready to proceed for your first Spring Example, which you will see in the next chapter.
Spring MVC — Hello World Example
The following example shows how to write a simple web based Hello World application using the Spring MVC Framework. To start with, let us have a working Eclipse IDE in place and follow the subsequent steps to develop a Dynamic Web Application using the Spring Web Framework.
| Step | Description |
|---|---|
| 1 | Create a Dynamic Web Project with a name HelloWeb and create a package com.tutorialspoint under the src folder in the created project. |
| 2 | Drag and drop the following Spring and other libraries into the folder WebContent/WEB-INF/lib.. |
| 3 | Create a Java class HelloController under the com.tutorialspoint package. |
| 4 | Create Spring configuration files web.xml and HelloWeb-servlet.xml under the WebContent/WEB-INF folder. |
| 5 | Create a sub-folder with a name jsp under the WebContent/WEB-INFfolder. Create a view file hello.jsp under this sub-folder. |
| 6 | The final step is to create the content of the source and configuration files and export the application as explained below. |
HelloController.java
package com.tutorialspoint;
import org.springframework.stereotype.Controller;
import org.springframework.web.bind.annotation.RequestMapping;
import org.springframework.web.bind.annotation.RequestMethod;
import org.springframework.ui.ModelMap;
@Controller
@RequestMapping("/hello")
public class HelloController{
@RequestMapping(method = RequestMethod.GET)
public String printHello(ModelMap model) {
model.addAttribute("message", "Hello Spring MVC Framework!");
return "hello";
}
}
web.xml
<web-app id = "WebApp_ID" version = "2.4"
xmlns = "http://java.sun.com/xml/ns/j2ee"
xmlns:xsi = "http://www.w3.org/2001/XMLSchema-instance"
xsi:schemaLocation = "http://java.sun.com/xml/ns/j2ee
http://java.sun.com/xml/ns/j2ee/web-app_2_4.xsd">
<display-name>Spring MVC Application</display-name>
<servlet>
<servlet-name>HelloWeb</servlet-name>
<servlet-class>
org.springframework.web.servlet.DispatcherServlet
</servlet-class>
<load-on-startup>1</load-on-startup>
</servlet>
<servlet-mapping>
<servlet-name>HelloWeb</servlet-name>
<url-pattern>/</url-pattern>
</servlet-mapping>
</web-app>
HelloWeb-servlet.xml
<beans xmlns = "http://www.springframework.org/schema/beans"
xmlns:context = "http://www.springframework.org/schema/context"
xmlns:xsi = "http://www.w3.org/2001/XMLSchema-instance"
xsi:schemaLocation = "
http://www.springframework.org/schema/beans
http://www.springframework.org/schema/beans/spring-beans-3.0.xsd
http://www.springframework.org/schema/context
http://www.springframework.org/schema/context/spring-context-3.0.xsd">
<context:component-scan base-package = "com.tutorialspoint" />
<bean class = "org.springframework.web.servlet.view.InternalResourceViewResolver">
<property name = "prefix" value = "/WEB-INF/jsp/" />
<property name = "suffix" value = ".jsp" />
</bean>
</beans>
hello.jsp
<%@ page contentType = "text/html; charset = UTF-8" %>
<html>
<head>
<title>Hello World</title>
</head>
<body>
<h2>${message}</h2>
</body>
</html>
Following is the list of Spring and other libraries to be included in the web application. We can just drag these files and drop them in – WebContent/WEB-INF/lib folder.
-
servlet-api-x.y.z.jar
-
commons-logging-x.y.z.jar
-
spring-aop-x.y.z.jar
-
spring-beans-x.y.z.jar
-
spring-context-x.y.z.jar
-
spring-core-x.y.z.jar
-
spring-expression-x.y.z.jar
-
spring-webmvc-x.y.z.jar
-
spring-web-x.y.z.jar
Once you are done with creating source and configuration files, export your application. Right click on your application, use Export → WAR File option and save your HelloWeb.war file in Tomcat’s webapps folder.
Now start your Tomcat server and make sure you are able to access other webpages from webapps folder using a standard browser. Now, try to access the URL − http://localhost:8080/HelloWeb/hello. If everything is fine with the Spring Web Application, we will see the following screen.
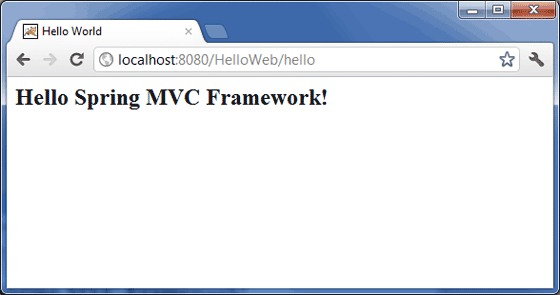
You should note that in the given URL, HelloWeb is the application name and hello is the virtual subfolder, which we have mentioned in our controller using @RequestMapping(«/hello»). You can use direct root while mapping your URL using @RequestMapping(«/»), in this case you can access the same page using short URL http://localhost:8080/HelloWeb/, but it is advised to have different functionalities under different folders.
Spring MVC — Form Handling Example
The following example shows how to write a simple web based Hello World application using the Spring MVC Framework. To start with, let us have a working Eclipse IDE in place and follow the subsequent steps to develop a Dynamic Web Application using the Spring Web Framework.
| Step | Description |
|---|---|
| 1 | Create a project with a name HelloWeb under a package com.tutorialspoint as explained in the Spring MVC — Hello World chapter. |
| 2 | Create Java classes Student, StudentController under the com.tutorialspoint package. |
| 3 | Create view files student.jsp, result.jsp under the jsp sub-folder. |
| 4 | The final step is to create the content of the source and configuration files and export the application as explained below. |
Student.java
package com.tutorialspoint;
public class Student {
private Integer age;
private String name;
private Integer id;
public void setAge(Integer age) {
this.age = age;
}
public Integer getAge() {
return age;
}
public void setName(String name) {
this.name = name;
}
public String getName() {
return name;
}
public void setId(Integer id) {
this.id = id;
}
public Integer getId() {
return id;
}
}
StudentController.java
package com.tutorialspoint;
import org.springframework.stereotype.Controller;
import org.springframework.web.bind.annotation.ModelAttribute;
import org.springframework.web.bind.annotation.RequestMapping;
import org.springframework.web.bind.annotation.RequestMethod;
import org.springframework.web.servlet.ModelAndView;
import org.springframework.ui.ModelMap;
@Controller
public class StudentController {
@RequestMapping(value = "/student", method = RequestMethod.GET)
public ModelAndView student() {
return new ModelAndView("student", "command", new Student());
}
@RequestMapping(value = "/addStudent", method = RequestMethod.POST)
public String addStudent(@ModelAttribute("SpringWeb")Student student,
ModelMap model) {
model.addAttribute("name", student.getName());
model.addAttribute("age", student.getAge());
model.addAttribute("id", student.getId());
return "result";
}
}
Here, the first service method student(), we have passed a blank Studentobject in the ModelAndView object with name «command». This is done because the spring framework expects an object with name «command», if we use <form:form> tags in the JSP file. So, when the student() method is called, it returns student.jsp view.
The second service method addStudent() will be called against a POST method on the HelloWeb/addStudent URL. You will prepare your model object based on the submitted information. Finally, a «result» view will be returned from the service method, which will result in rendering result.jsp.
student.jsp
<%@taglib uri="http://www.springframework.org/tags/form" prefix = "form"%>
<html>
<head>
<title>Spring MVC Form Handling</title>
</head>
<body>
<h2>Student Information</h2>
<form:form method = "POST" action = "/HelloWeb/addStudent">
<table>
<tr>
<td><form:label path = "name">Name</form:label></td>
<td><form:input path = "name" /></td>
</tr>
<tr>
<td><form:label path = "age">Age</form:label></td>
<td><form:input path = "age" /></td>
</tr>
<tr>
<td><form:label path = "id">id</form:label></td>
<td><form:input path = "id" /></td>
</tr>
<tr>
<td colspan = "2">
<input type = "submit" value = "Submit"/>
</td>
</tr>
</table>
</form:form>
</body>
</html>
result.jsp
<%@taglib uri = "http://www.springframework.org/tags/form" prefix = "form"%>
<html>
<head>
<title>Spring MVC Form Handling</title>
</head>
<body>
<h2>Submitted Student Information</h2>
<table>
<tr>
<td>Name</td>
<td>${name}</td>
</tr>
<tr>
<td>Age</td>
<td>${age}</td>
</tr>
<tr>
<td>ID</td>
<td>${id}</td>
</tr>
</table>
</body>
</html>
Once we are done with creating source and configuration files, export your application. Right click on your application, use Export → WAR File option and save the SpringWeb.war file in Tomcat’s webapps folder.
Now, start the Tomcat server and make sure you are able to access other webpages from the webapps folder using a standard browser. Now, try a URL– http://localhost:8080/SpringWeb/student and you should see the following screen if everything is fine with the Spring Web Application.
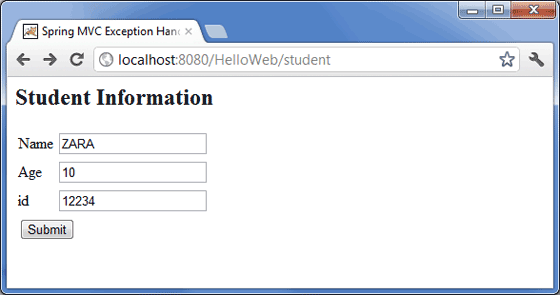
After submitting the required information, click on the submit button to submit the form. You should see the following screen, if everything is fine with your Spring Web Application.

Spring MVC — Page Redirection Example
The following example shows how to write a simple web based application, which makes use of redirect to transfer an http request to another page. To start with, let us have a working Eclipse IDE in place and consider the following steps to develop a Dynamic Form based Web Application using Spring Web Framework −
| Step | Description |
|---|---|
| 1 | Create a project with a name HelloWeb under a package com.tutorialspoint as explained in the Spring MVC — Hello World chapter. |
| 2 | Create a Java class WebController under the com.tutorialspoint package. |
| 3 | Create view files index.jsp, final.jsp under jsp sub-folder. |
| 4 | The final step is to create the content of the source and configuration files and export the application as explained below. |
WebController.java
package com.tutorialspoint;
import org.springframework.stereotype.Controller;
import org.springframework.web.bind.annotation.RequestMapping;
import org.springframework.web.bind.annotation.RequestMethod;
@Controller
public class WebController {
@RequestMapping(value = "/index", method = RequestMethod.GET)
public String index() {
return "index";
}
@RequestMapping(value = "/redirect", method = RequestMethod.GET)
public String redirect() {
return "redirect:finalPage";
}
@RequestMapping(value = "/finalPage", method = RequestMethod.GET)
public String finalPage() {
return "final";
}
}
Following is the content of Spring view file index.jsp. This will be a landing page, this page will send a request to the access-redirect service method, which will redirect this request to another service method and finally a final.jsppage will be displayed.
index.jsp
<%@taglib uri = "http://www.springframework.org/tags/form" prefix = "form"%>
<html>
<head>
<title>Spring Page Redirection</title>
</head>
<body>
<h2>Spring Page Redirection</h2>
<p>Click below button to redirect the result to new page</p>
<form:form method = "GET" action = "/HelloWeb/redirect">
<table>
<tr>
<td>
<input type = "submit" value = "Redirect Page"/>
</td>
</tr>
</table>
</form:form>
</body>
</html>
final.jsp
<%@taglib uri = "http://www.springframework.org/tags/form" prefix = "form"%>
<html>
<head>
<title>Spring Page Redirection</title>
</head>
<body>
<h2>Redirected Page</h2>
</body>
</html>
Once you are done with creating source and configuration files, export your application. Right click on your application, use Export → WAR File option and save your HelloWeb.war file in Tomcat’s webapps folder.
Now, start your Tomcat server and make sure you are able to access other webpages from webapps folder using a standard browser. Try a URL –http://localhost:8080/HelloWeb/index and you should see the following screen if everything is fine with the Spring Web Application.
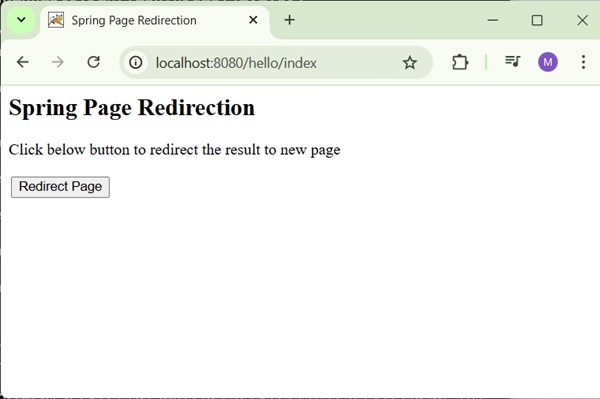
Now click on the «Redirect Page» button to submit the form and to get to the final redirected page. We should see the following screen, if everything is fine with our Spring Web Application −

Spring MVC — Static Pages Example
The following example shows how to write a simple web based application using Spring MVC Framework, which can access static pages along with dynamic pages with the help of a <mvc:resources> tag.
To begin with, let us have a working Eclipse IDE in place and adhere to the following steps to develop a Dynamic Form based Web Application using the Spring Web Framework.
| Step | Description |
|---|---|
| 1 | Create a project with a name HelloWeb under a package com.tutorialspoint as explained in the Spring MVC — Hello World chapter. |
| 2 | Create a Java class WebController under the com.tutorialspoint package. |
| 3 | Create a static file final.htm under jsp sub-folder. |
| 4 | Update the Spring configuration file HelloWeb-servlet.xml under the WebContent/WEB-INF folder as shown below. |
| 5 | The final step is to create the content of the source and configuration files and export the application, which is explained below. |
WebController.java
package com.tutorialspoint;
import org.springframework.stereotype.Controller;
import org.springframework.web.bind.annotation.RequestMapping;
import org.springframework.web.bind.annotation.RequestMethod;
@Controller
public class WebController {
@RequestMapping(value = "/index", method = RequestMethod.GET)
public String index() {
return "index";
}
@RequestMapping(value = "/staticPage", method = RequestMethod.GET)
public String redirect() {
return "redirect:/pages/final.htm";
}
}
HelloWeb-servlet.xml
<?xml version = "1.0" encoding = "UTF-8"?>
<beans xmlns = "http://www.springframework.org/schema/beans"
xmlns:xsi = " http://www.w3.org/2001/XMLSchema-instance"
xmlns:context = "http://www.springframework.org/schema/context"
xmlns:mvc = "http://www.springframework.org/schema/mvc"
xsi:schemaLocation = "http://www.springframework.org/schema/beans
http://www.springframework.org/schema/beans/spring-beans-2.5.xsd
http://www.springframework.org/schema/mvc
http://www.springframework.org/schema/mvc/spring-mvc-3.0.xsd
http://www.springframework.org/schema/context
http://www.springframework.org/schema/context/spring-context-3.0.xsd">
<context:component-scan base-package = "com.tutorialspoint" />
<bean id = "viewResolver" class = "org.springframework.web.servlet.view.InternalResourceViewResolver">
<property name = "prefix" value = "/WEB-INF/jsp/" />
<property name = "suffix" value = ".jsp" />
</bean>
<mvc:resources mapping = "/pages/**" location = "/WEB-INF/pages/" />
<mvc:annotation-driven/>
</beans>
Here, the <mvc:resources…./> tag is being used to map static pages. The mapping attribute must be an Ant pattern that specifies the URL pattern of an http requests. The location attribute must specify one or more valid resource directory locations having static pages including images, stylesheets, JavaScript, and other static content. Multiple resource locations may be specified using a comma-separated list of values.
Following is the content of Spring view file WEB-INF/jsp/index.jsp. This will be a landing page; this page will send a request to access the staticPage service method, which will redirect this request to a static page available in WEB-INF/pages folder.
index.jsp
<%@taglib uri = "http://www.springframework.org/tags/form" prefix = "form"%>
<html>
<head>
<title>Spring Landing Page</title>
</head>
<body>
<h2>Spring Landing Pag</h2>
<p>Click below button to get a simple HTML page</p>
<form:form method = "GET" action = "/HelloWeb/staticPage">
<table>
<tr>
<td>
<input type = "submit" value = "Get HTML Page"/>
</td>
</tr>
</table>
</form:form>
</body>
</html>
final.htm
<html>
<head>
<title>Spring Static Page</title>
</head>
<body>
<h2>A simple HTML page</h2>
</body>
</html>
Once you are done with creating source and configuration files, export your application. Right click on your application, use Export → WAR File option and save your HelloWeb.war file in Tomcat’s webapps folder.
Now, start your Tomcat server and make sure you are able to access other webpages from webapps folder using a standard browser. Now try to access the URL – http://localhost:8080/HelloWeb/index. If everything is fine with the Spring Web Application, we will see the following screen.
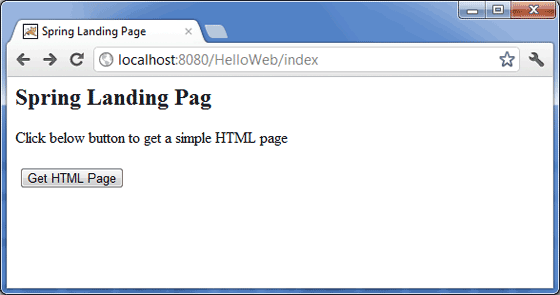
Click on «Get HTML Page» button to access a static page mentioned in the staticPage service method. If everything is fine with your Spring Web Application, we will see the following screen.
Spring MVC — Text Box Example
The following example shows how to use Text boxes in forms using the Spring Web MVC framework. To begin with, let us have a working Eclipse IDE in place and stick to the following steps to develop a Dynamic Form based Web Application using the Spring Web Framework −
| Step | Description |
|---|---|
| 1 | Create a project with a name HelloWeb under a package com.tutorialspoint as explained in the Spring MVC — Hello World Example chapter. |
| 2 | Create a Java classes Student, StudentController under the com.tutorialspoint package. |
| 3 | Create a view files student.jsp, result.jsp under jsp sub-folder. |
| 4 | The final step is to create the content of the source and configuration files and export the application as explained below. |
Student.java
package com.tutorialspoint;
public class Student {
private Integer age;
private String name;
private Integer id;
public void setAge(Integer age) {
this.age = age;
}
public Integer getAge() {
return age;
}
public void setName(String name) {
this.name = name;
}
public String getName() {
return name;
}
public void setId(Integer id) {
this.id = id;
}
public Integer getId() {
return id;
}
}
StudentController.java
package com.tutorialspoint;
import org.springframework.stereotype.Controller;
import org.springframework.web.bind.annotation.ModelAttribute;
import org.springframework.web.bind.annotation.RequestMapping;
import org.springframework.web.bind.annotation.RequestMethod;
import org.springframework.web.servlet.ModelAndView;
import org.springframework.ui.ModelMap;
@Controller
public class StudentController {
@RequestMapping(value = "/student", method = RequestMethod.GET)
public ModelAndView student() {
return new ModelAndView("student", "command", new Student());
}
@RequestMapping(value = "/addStudent", method = RequestMethod.POST)
public String addStudent(@ModelAttribute("SpringWeb")Student student,
ModelMap model) {
model.addAttribute("name", student.getName());
model.addAttribute("age", student.getAge());
model.addAttribute("id", student.getId());
return "result";
}
}
Here, the first service method student(), we have passed a blank Studentobject in the ModelAndView object with name «command», because the spring framework expects an object with name «command», if you are using <form:form> tags in your JSP file. So, when the student() method is called it returns student.jsp view.
The second service method addStudent() will be called against a POST method on the HelloWeb/addStudent URL. You will prepare your model object based on the submitted information. Finally, a «result» view will be returned from the service method, which will result in rendering result.jsp
student.jsp
<%@taglib uri = "http://www.springframework.org/tags/form" prefix = "form"%>
<html>
<head>
<title>Spring MVC Form Handling</title>
</head>
<body>
<h2>Student Information</h2>
<form:form method = "POST" action = "/HelloWeb/addStudent">
<table>
<tr>
<td><form:label path = "name">Name</form:label></td>
<td><form:input path = "name" /></td>
</tr>
<tr>
<td><form:label path = "age">Age</form:label></td>
<td><form:input path = "age" /></td>
</tr>
<tr>
<td><form:label path = "id">id</form:label></td>
<td><form:input path = "id" /></td>
</tr>
<tr>
<td colspan = "2">
<input type = "submit" value = "Submit"/>
</td>
</tr>
</table>
</form:form>
</body>
</html>
Here, we are using <form:input /> tag to render an HTML text box. For example −
<form:input path = "name" />
It will render following HTML content.
<input id = "name" name = "name" type = "text" value = ""/>
result.jsp
<%@taglib uri = "http://www.springframework.org/tags/form" prefix = "form"%>
<html>
<head>
<title>Spring MVC Form Handling</title>
</head>
<body>
<h2>Submitted Student Information</h2>
<table>
<tr>
<td>Name</td>
<td>${name}</td>
</tr>
<tr>
<td>Age</td>
<td>${age}</td>
</tr>
<tr>
<td>ID</td>
<td>${id}</td>
</tr>
</table>
</body>
</html>
Once we are done with creating source and configuration files, export your application. Right click on your application, use Export → WAR File option and save the HelloWeb.war file in Tomcat’s webapps folder.
Now, start the Tomcat server and make sure you are able to access other webpages from the webapps folder using a standard browser. Try a URL – http://localhost:8080/HelloWeb/student and we will see the following screen if everything is fine with the Spring Web Application.

After submitting the required information, click on the submit button to submit the form. We should see the following screen, if everything is fine with the Spring Web Application.
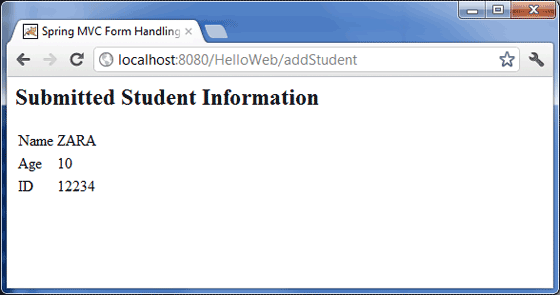
Spring MVC — Password Example
The following example describes how to use Password in forms using the Spring Web MVC framework. To start with, let us have a working Eclipse IDE in place and adhere to the following steps to develop a Dynamic Form based Web Application using the Spring Web Framework.
| Step | Description |
|---|---|
| 1 | Create a project with a name HelloWeb under a package com.tutorialspoint as explained in the Spring MVC — Hello World chapter. |
| 2 | Create Java classes User, UserController under the com.tutorialspointpackage. |
| 3 | Create view files user.jsp, users.jsp under jsp sub-folder. |
| 4 | The final step is to create the content of the source and configuration files and export the application as explained below. |
User.java
package com.tutorialspoint;
public class User {
private String username;
private String password;
public String getUsername() {
return username;
}
public void setUsername(String username) {
this.username = username;
}
public String getPassword() {
return password;
}
public void setPassword(String password) {
this.password = password;
}
}
UserController.java
package com.tutorialspoint;
import org.springframework.stereotype.Controller;
import org.springframework.web.bind.annotation.ModelAttribute;
import org.springframework.web.bind.annotation.RequestMapping;
import org.springframework.web.bind.annotation.RequestMethod;
import org.springframework.web.servlet.ModelAndView;
import org.springframework.ui.ModelMap;
@Controller
public class UserController {
@RequestMapping(value = "/user", method = RequestMethod.GET)
public ModelAndView user() {
return new ModelAndView("user", "command", new User());
}
@RequestMapping(value = "/addUser", method = RequestMethod.POST)
public String addUser(@ModelAttribute("SpringWeb")User user,
ModelMap model) {
model.addAttribute("username", user.getUsername());
model.addAttribute("password", user.getPassword());
return "users";
}
}
Here, the first service method user(), we have passed a blank User object in the ModelAndView object with name «command», because the spring framework expects an object with name «command», if you are using <form:form> tags in your JSP file. So, when the user() method is called it returns user.jsp view.
The Second service method addUser() will be called against a POST method on the HelloWeb/addUser URL. You will prepare your model object based on the submitted information. Finally, the «users» view will be returned from the service method, which will result in rendering the users.jsp.
user.jsp
<%@taglib uri = "http://www.springframework.org/tags/form" prefix = "form"%>
<html>
<head>
<title>Spring MVC Form Handling</title>
</head>
<body>
<h2>User Information</h2>
<form:form method = "POST" action = "/HelloWeb/addUser">
<table>
<tr>
<td><form:label path = "username">User Name</form:label></td>
<td><form:input path = "username" /></td>
</tr>
<tr>
<td><form:label path = "password">Age</form:label></td>
<td><form:password path = "password" /></td>
</tr>
<tr>
<td colspan = "2">
<input type = "submit" value = "Submit"/>
</td>
</tr>
</table>
</form:form>
</body>
</html>
Here, we are using the <form:password /> tag to render an HTML password box. For example −
<form:password path = "password" />
It will render the following HTML content.
<input id = "password" name = "password" type = "password" value = ""/>
users.jsp
<%@taglib uri = "http://www.springframework.org/tags/form" prefix = "form"%>
<html>
<head>
<title>Spring MVC Form Handling</title>
</head>
<body>
<h2>Submitted User Information</h2>
<table>
<tr>
<td>Username</td>
<td>${username}</td>
</tr>
<tr>
<td>Password</td>
<td>${password}</td>
</tr>
</table>
</body>
</html>
Once we are done with creating source and configuration files, export the application. Right click on your application, use Export → WAR File option and save your HelloWeb.war file in Tomcat’s webapps folder.
Now, start your Tomcat server and make sure you are able to access other webpages from the webapps folder using a standard browser. Try a URL –http://localhost:8080/HelloWeb/user and we will see the following screen if everything is fine with the Spring Web Application.

After submitting the required information, click on the submit button to submit the form. We will see the following screen, if everything is fine with the Spring Web Application.

Spring MVC — TextArea Example
The following example explains how to use TextArea in forms using the Spring Web MVC framework. To begin with, let us have a working Eclipse IDE in place and follow the subsequent steps to develop a Dynamic Form based Web Application using the Spring Web Framework.
| Step | Description |
|---|---|
| 1 | Create a project with a name HelloWeb under a package com.tutorialspoint as explained in the Spring MVC − Hello World chapter. |
| 2 | Create Java classes User, UserController under the com.tutorialspointpackage. |
| 3 | Create view files user.jsp, users.jsp under jsp sub-folder. |
| 4 | The final step is to create the content of the source and configuration files and export the application as explained below. |
User.java
package com.tutorialspoint;
public class User {
private String username;
private String password;
private String address;
public String getUsername() {
return username;
}
public void setUsername(String username) {
this.username = username;
}
public String getPassword() {
return password;
}
public void setPassword(String password) {
this.password = password;
}
public String getAddress() {
return address;
}
public void setAddress(String address) {
this.address = address;
}
}
UserController.java
package com.tutorialspoint;
import org.springframework.stereotype.Controller;
import org.springframework.web.bind.annotation.ModelAttribute;
import org.springframework.web.bind.annotation.RequestMapping;
import org.springframework.web.bind.annotation.RequestMethod;
import org.springframework.web.servlet.ModelAndView;
import org.springframework.ui.ModelMap;
@Controller
public class UserController {
@RequestMapping(value = "/user", method = RequestMethod.GET)
public ModelAndView user() {
return new ModelAndView("user", "command", new User());
}
@RequestMapping(value = "/addUser", method = RequestMethod.POST)
public String addUser(@ModelAttribute("SpringWeb")User user,
ModelMap model) {
model.addAttribute("username", user.getUsername());
model.addAttribute("password", user.getPassword());
model.addAttribute("address", user.getAddress());
return "users";
}
}
Here, for the first service method user(), we have passed a blank User object in the ModelAndView object with name «command», because the spring framework expects an object with name «command», if you are using <form:form> tags in your JSP file. So, when the user() method is called, it returns the user.jsp view.
The second service method addUser() will be called against a POST method on the HelloWeb/addUser URL. You will prepare your model object based on the submitted information. Finally, the «users» view will be returned from the service method, which will result in rendering the users.jsp.
user.jsp
<%@taglib uri = "http://www.springframework.org/tags/form" prefix = "form"%>
<html>
<head>
<title>Spring MVC Form Handling</title>
</head>
<body>
<h2>User Information</h2>
<form:form method = "POST" action = "/HelloWeb/addUser">
<table>
<tr>
<td><form:label path = "username">User Name</form:label></td>
<td><form:input path = "username" /></td>
</tr>
<tr>
<td><form:label path = "password">Age</form:label></td>
<td><form:password path = "password" /></td>
</tr>
<tr>
<td><form:label path = "address">Address</form:label></td>
<td><form:textarea path = "address" rows = "5" cols = "30" /></td>
</tr>
<tr>
<td colspan = "2">
<input type = "submit" value = "Submit"/>
</td>
</tr>
</table>
</form:form>
</body>
</html>
Here, we are using <form:textarea /> tag to render a HTML textarea box. For example −
<form:textarea path = "address" rows = "5" cols = "30" />
It will render the following HTML content.
<textarea id = "address" name = "address" rows = "5" cols = "30"></textarea>
users.jsp
<%@taglib uri = "http://www.springframework.org/tags/form" prefix = "form"%>
<html>
<head>
<title>Spring MVC Form Handling</title>
</head>
<body>
<h2>Submitted User Information</h2>
<table>
<tr>
<td>Username</td>
<td>${username}</td>
</tr>
<tr>
<td>Password</td>
<td>${password}</td>
</tr>
<tr>
<td>Address</td>
<td>${address}</td>
</tr>
</table>
</body>
</html>
Once you are done with creating source and configuration files, export your application. Right click on your application, use Export → WAR File option and save your HelloWeb.war file in Tomcat’s webapps folder.
Now, start your Tomcat server and make sure you are able to access other webpages from webapps folder using a standard browser. Try a URL –http://localhost:8080/HelloWeb/user and we will see the following screen if everything is fine with the Spring Web Application.

After submitting the required information, click on the submit button to submit the form. We will see the following screen, if everything is fine with the Spring Web Application.
Spring MVC — Checkbox Example
The following example describes how to use a Single Checkbox in forms using the Spring Web MVC framework. To start with, let us have a working Eclipse IDE in place and consider the following steps to develop a Dynamic Form based Web Application using the Spring Web Framework.
| Step | Description |
|---|---|
| 1 | Create a project with a name HelloWeb under a package com.tutorialspointas explained in the Spring MVC — Hello World Example chapter. |
| 2 | Create Java classes User, UserController under the com.tutorialspointpackage. |
| 3 | Create a view files user.jsp, users.jsp under jsp sub-folder. |
| 4 | The final step is to create the content of the source and configuration files and export the application as explained below. |
User.java
package com.tutorialspoint;
public class User {
private String username;
private String password;
private String address;
private boolean receivePaper;
public String getUsername() {
return username;
}
public void setUsername(String username) {
this.username = username;
}
public String getPassword() {
return password;
}
public void setPassword(String password) {
this.password = password;
}
public String getAddress() {
return address;
}
public void setAddress(String address) {
this.address = address;
}
public boolean isReceivePaper() {
return receivePaper;
}
public void setReceivePaper(boolean receivePaper) {
this.receivePaper = receivePaper;
}
}
UserController.java
package com.tutorialspoint;
import org.springframework.stereotype.Controller;
import org.springframework.web.bind.annotation.ModelAttribute;
import org.springframework.web.bind.annotation.RequestMapping;
import org.springframework.web.bind.annotation.RequestMethod;
import org.springframework.web.servlet.ModelAndView;
import org.springframework.ui.ModelMap;
@Controller
public class UserController {
@RequestMapping(value = "/user", method = RequestMethod.GET)
public ModelAndView user() {
return new ModelAndView("user", "command", new User());
}
@RequestMapping(value = "/addUser", method = RequestMethod.POST)
public String addUser(@ModelAttribute("SpringWeb")User user,
ModelMap model) {
model.addAttribute("username", user.getUsername());
model.addAttribute("password", user.getPassword());
model.addAttribute("address", user.getAddress());
model.addAttribute("receivePaper", user.isReceivePaper());
return "users";
}
}
Here, for the first service method user(), we have passed a blank User object in the ModelAndView object with name «command», because the spring framework expects an object with name «command», if you are using <form:form> tags in your JSP file. So, when the user() method is called it returns the user.jsp view.
The second service method addUser() will be called against a POST method on the HelloWeb/addUser URL. You will prepare your model object based on the submitted information. Finally, the «users» view will be returned from the service method, which will result in rendering the users.jsp.
user.jsp
<%@taglib uri = "http://www.springframework.org/tags/form" prefix = "form"%>
<html>
<head>
<title>Spring MVC Form Handling</title>
</head>
<body>
<h2>User Information</h2>
<form:form method = "POST" action = "/HelloWeb/addUser">
<table>
<tr>
<td><form:label path = "username">User Name</form:label></td>
<td><form:input path = "username" /></td>
</tr>
<tr>
<td><form:label path = "password">Age</form:label></td>
<td><form:password path = "password" /></td>
</tr>
<tr>
<td><form:label path = "address">Address</form:label></td>
<td><form:textarea path = "address" rows = "5" cols = "30" /></td>
</tr>
<tr>
<td><form:label path = "receivePaper">Subscribe Newsletter</form:label></td>
<td><form:checkbox path = "receivePaper" /></td>
</tr>
<tr>
<td colspan = "2">
<input type = "submit" value = "Submit"/>
</td>
</tr>
</table>
</form:form>
</body>
</html>
Here, we are using <form:checkboxes /> tag to render an HTML checkbox box.
For example −
<form:checkbox path="receivePaper" />
It will render following HTML content.
<input id="receivePaper1" name = "receivePaper" type = "checkbox" value = "true"/> <input type = "hidden" name = "_receivePaper" value = "on"/>
users.jsp
<%@taglib uri = "http://www.springframework.org/tags/form" prefix = "form"%>
<html>
<head>
<title>Spring MVC Form Handling</title>
</head>
<body>
<h2>Submitted User Information</h2>
<table>
<tr>
<td>Username</td>
<td>${username}</td>
</tr>
<tr>
<td>Password</td>
<td>${password}</td>
</tr>
<tr>
<td>Address</td>
<td>${address}</td>
</tr>
<tr>
<td>Subscribed to Newsletter</td>
<td>${receivePaper}</td>
</tr>
</table>
</body>
</html>
Once you are done with creating source and configuration files, export your application. Right click on your application, use Export → WAR File option and save your HelloWeb.war file in Tomcat’s webapps folder.
Now, start your Tomcat server and make sure you are able to access other webpages from webapps folder using a standard browser. Try a URL – http://localhost:8080/HelloWeb/user and we will see the following screen if everything is fine with the Spring Web Application.
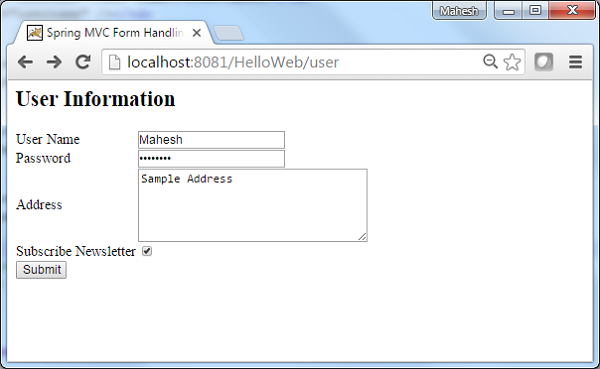
After submitting the required information, click on the submit button to submit the form. We will see the following screen if everything is fine with the Spring Web Application.

Spring MVC — Checkboxes Example
The following example explains how to use Multiple Checkboxes in forms using the Spring Web MVC framework. To start with, let us have a working Eclipse IDE in place and stick to the following steps to develop a Dynamic Form based Web Application using the Spring Web Framework.
| Step | Description |
|---|---|
| 1 | Create a project with a name HelloWeb under a package com.tutorialspoint as explained in the Spring MVC — Hello World chapter. |
| 2 | Create Java classes User, UserController under the com.tutorialspointpackage. |
| 3 | Create view files user.jsp, users.jsp under the jsp sub-folder. |
| 4 | The final step is to create the content of the source and configuration files and export the application as explained below. |
User.java
package com.tutorialspoint;
public class User {
private String username;
private String password;
private String address;
private boolean receivePaper;
private String [] favoriteFrameworks;
public String getUsername() {
return username;
}
public void setUsername(String username) {
this.username = username;
}
public String getPassword() {
return password;
}
public void setPassword(String password) {
this.password = password;
}
public String getAddress() {
return address;
}
public void setAddress(String address) {
this.address = address;
}
public boolean isReceivePaper() {
return receivePaper;
}
public void setReceivePaper(boolean receivePaper) {
this.receivePaper = receivePaper;
}
public String[] getFavoriteFrameworks() {
return favoriteFrameworks;
}
public void setFavoriteFrameworks(String[] favoriteFrameworks) {
this.favoriteFrameworks = favoriteFrameworks;
}
}
UserController.java
package com.tutorialspoint;
import java.util.ArrayList;
import java.util.List;
import org.springframework.stereotype.Controller;
import org.springframework.web.bind.annotation.ModelAttribute;
import org.springframework.web.bind.annotation.RequestMapping;
import org.springframework.web.bind.annotation.RequestMethod;
import org.springframework.web.servlet.ModelAndView;
import org.springframework.ui.ModelMap;
@Controller
public class UserController {
@RequestMapping(value = "/user", method = RequestMethod.GET)
public ModelAndView user() {
User user = new User();
user.setFavoriteFrameworks((new String []{"Spring MVC","Struts 2"}));
ModelAndView modelAndView = new ModelAndView("user", "command", user);
return modelAndView;
}
@RequestMapping(value = "/addUser", method = RequestMethod.POST)
public String addUser(@ModelAttribute("SpringWeb")User user,
ModelMap model) {
model.addAttribute("username", user.getUsername());
model.addAttribute("password", user.getPassword());
model.addAttribute("address", user.getAddress());
model.addAttribute("receivePaper", user.isReceivePaper());
model.addAttribute("favoriteFrameworks", user.getFavoriteFrameworks());
return "users";
}
@ModelAttribute("webFrameworkList")
public List<String> getWebFrameworkList() {
List<String> webFrameworkList = new ArrayList<String>();
webFrameworkList.add("Spring MVC");
webFrameworkList.add("Struts 1");
webFrameworkList.add("Struts 2");
webFrameworkList.add("Apache Wicket");
return webFrameworkList;
}
}
Here, for the first service method user(), we have passed a blank User object in the ModelAndView object with name «command», because the spring framework expects an object with name «command», if you are using <form:form> tags in your JSP file. So, when the user() method is called, it returns the user.jsp view.
The second service method addUser() will be called against a POST method on the HelloWeb/addUser URL. You will prepare your model object based on the submitted information. Finally, the «users» view will be returned from the service method, which will result in rendering the users.jsp
user.jsp
<%@taglib uri = "http://www.springframework.org/tags/form" prefix = "form"%>
<html>
<head>
<title>Spring MVC Form Handling</title>
</head>
<body>
<h2>User Information</h2>
<form:form method = "POST" action = "/HelloWeb/addUser">
<table>
<tr>
<td><form:label path = "username">User Name</form:label></td>
<td><form:input path = "username" /></td>
</tr>
<tr>
<td><form:label path = "password">Age</form:label></td>
<td><form:password path = "password" /></td>
</tr>
<tr>
<td><form:label path = "address">Address</form:label></td>
<td><form:textarea path = "address" rows = "5" cols = "30" /></td>
</tr>
<tr>
<td><form:label path = "receivePaper">Subscribe Newsletter</form:label></td>
<td><form:checkbox path = "receivePaper" /></td>
</tr>
<tr>
<td><form:label path = "favoriteFrameworks">Favorite Web Frameworks</form:label></td>
<td><form:checkboxes items = "${webFrameworkList}" path = "favoriteFrameworks" /></td>
</tr>
<tr>
<td colspan = "2">
<input type = "submit" value = "Submit"/>
</td>
</tr>
</table>
</form:form>
</body>
</html>
Here, we are using <form:checkboxes /> tag to render HTML checkboxes.
<form:checkboxes items = "${webFrameworkList}" path = "favoriteFrameworks" />
It will render following HTML content.
<span> <input id = "favoriteFrameworks1" name = "favoriteFrameworks" type = "checkbox" value = "Spring MVC" checked = "checked"/> <label for = "favoriteFrameworks1">Spring MVC</label> </span> <span> <input id = "favoriteFrameworks2" name = "favoriteFrameworks" type = "checkbox" value = "Struts 1"/> <label for = "favoriteFrameworks2">Struts 1</label> </span> <span> <input id = "favoriteFrameworks3" name = "favoriteFrameworks" type = "checkbox" value = "Struts 2" checked = "checked"/> <label for = "favoriteFrameworks3">Struts 2</label> </span> <span> <input id = "favoriteFrameworks4" name = "favoriteFrameworks" type = "checkbox" value = "Apache Wicket"/> <label for = "favoriteFrameworks4">Apache Wicket</label> </span> <input type = "hidden" name = "_favoriteFrameworks" value = "on"/>
users.jsp
<%@taglib uri = "http://www.springframework.org/tags/form" prefix = "form"%>
<html>
<head>
<title>Spring MVC Form Handling</title>
</head>
<body>
<h2>Submitted User Information</h2>
<table>
<tr>
<td>Username</td>
<td>${username}</td>
</tr>
<tr>
<td>Password</td>
<td>${password}</td>
</tr>
<tr>
<td>Address</td>
<td>${address}</td>
</tr>
<tr>
<td>Subscribed to Newsletter</td>
<td>${receivePaper}</td>
</tr>
<tr>
<td>Favorite Web Frameworks</td>
<td> <% String[] favoriteFrameworks = (String[])request.getAttribute("favoriteFrameworks");
for(String framework: favoriteFrameworks) {
out.println(framework);
}
%></td>
</tr>
</table>
</body>
</html>
Once you are done with creating source and configuration files, export your application. Right click on your application, use Export → WAR File option and save your HelloWeb.war file in Tomcat’s webapps folder.
Now, start the Tomcat server and make sure you are able to access other webpages from webapps folder using a standard browser. Try a URL http://localhost:8080/HelloWeb/user and we will see the following screen if everything is fine with the Spring Web Application.
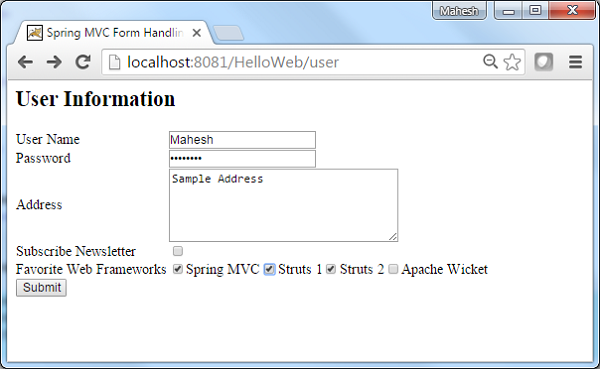
After submitting the required information, click on the submit button to submit the form. We will see the following screen, if everything is fine with your Spring Web Application.

Spring MVC — RadioButton Example
The following example show how to use RadioButton in forms using the Spring Web MVC framework. To start with it, let us have a working Eclipse IDE in place and stick to the following steps to develop a Dynamic Form based Web Application using Spring Web Framework −
| Step | Description |
|---|---|
| 1 | Create a project with a name HelloWeb under a package com.tutorialspoint as explained in the Spring MVC — Hello World chapter. |
| 2 | Create Java classes User, UserController under the com.tutorialspointpackage. |
| 3 | Create view files user.jsp, users.jsp under the jsp sub-folder. |
| 4 | The final step is to create the content of the source and configuration files and export the application as explained below. |
User.java
package com.tutorialspoint;
public class User {
private String username;
private String password;
private String address;
private boolean receivePaper;
private String [] favoriteFrameworks;
private String gender;
public String getUsername() {
return username;
}
public void setUsername(String username) {
this.username = username;
}
public String getPassword() {
return password;
}
public void setPassword(String password) {
this.password = password;
}
public String getAddress() {
return address;
}
public void setAddress(String address) {
this.address = address;
}
public boolean isReceivePaper() {
return receivePaper;
}
public void setReceivePaper(boolean receivePaper) {
this.receivePaper = receivePaper;
}
public String[] getFavoriteFrameworks() {
return favoriteFrameworks;
}
public void setFavoriteFrameworks(String[] favoriteFrameworks) {
this.favoriteFrameworks = favoriteFrameworks;
}
public String getGender() {
return gender;
}
public void setGender(String gender) {
this.gender = gender;
}
}
UserController.java
package com.tutorialspoint;
import java.util.ArrayList;
import java.util.List;
import org.springframework.stereotype.Controller;
import org.springframework.web.bind.annotation.ModelAttribute;
import org.springframework.web.bind.annotation.RequestMapping;
import org.springframework.web.bind.annotation.RequestMethod;
import org.springframework.web.servlet.ModelAndView;
import org.springframework.ui.ModelMap;
@Controller
public class UserController {
@RequestMapping(value = "/user", method = RequestMethod.GET)
public ModelAndView user() {
User user = new User();
user.setFavoriteFrameworks((new String []{"Spring MVC","Struts 2"}));
user.setGender("M");
ModelAndView modelAndView = new ModelAndView("user", "command", user);
return modelAndView;
}
@RequestMapping(value = "/addUser", method = RequestMethod.POST)
public String addUser(@ModelAttribute("SpringWeb")User user,
ModelMap model) {
model.addAttribute("username", user.getUsername());
model.addAttribute("password", user.getPassword());
model.addAttribute("address", user.getAddress());
model.addAttribute("receivePaper", user.isReceivePaper());
model.addAttribute("favoriteFrameworks", user.getFavoriteFrameworks());
model.addAttribute("gender", user.getGender());
return "users";
}
@ModelAttribute("webFrameworkList")
public List<String> getWebFrameworkList() {
List<String> webFrameworkList = new ArrayList<String>();
webFrameworkList.add("Spring MVC");
webFrameworkList.add("Struts 1");
webFrameworkList.add("Struts 2");
webFrameworkList.add("Apache Wicket");
return webFrameworkList;
}
}
Here, the first service method user(), we have passed a blank User object in the ModelAndView object with name «command», because the spring framework expects an object with name «command», if you are using <form:form> tags in your JSP file. So, when the user() method is called, it returns the user.jsp view.
The second service method addUser() will be called against a POST method on the HelloWeb/addUser URL. You will prepare your model object based on the submitted information. Finally, the «users» view will be returned from the service method, which will result in rendering the users.jsp.
user.jsp
<%@taglib uri = "http://www.springframework.org/tags/form" prefix = "form"%>
<html>
<head>
<title>Spring MVC Form Handling</title>
</head>
<body>
<h2>User Information</h2>
<form:form method = "POST" action = "/HelloWeb/addUser">
<table>
<tr>
<td><form:label path = "username">User Name</form:label></td>
<td><form:input path = "username" /></td>
</tr>
<tr>
<td><form:label path = "password">Age</form:label></td>
<td><form:password path = "password" /></td>
</tr>
<tr>
<td><form:label path = "address">Address</form:label></td>
<td><form:textarea path = "address" rows = "5" cols = "30" /></td>
</tr>
<tr>
<td><form:label path = "receivePaper">Subscribe Newsletter</form:label></td>
<td><form:checkbox path = "receivePaper" /></td>
</tr>
<tr>
<td><form:label path = "favoriteFrameworks">Favorite Web Frameworks</form:label></td>
<td><form:checkboxes items = "${webFrameworkList}" path = "favoriteFrameworks" /></td>
</tr>
<tr>
<td><form:label path = "gender">Gender</form:label></td>
<td>
<form:radiobutton path = "gender" value = "M" label = "Male" />
<form:radiobutton path = "gender" value = "F" label = "Female" />
</td>
</tr>
<tr>
<td colspan = "2">
<input type = "submit" value = "Submit"/>
</td>
</tr>
</table>
</form:form>
</body>
</html>
Here, we are using <form:radiobutton /> tag to render HTML radiobutton.
<form:radiobutton path = "gender" value = "M" label = "Male" /> <form:radiobutton path = "gender" value = "F" label = "Female" />
It will render following HTML content.
<input id = "gender1" name = "gender" type = "radio" value = "M" checked = "checked"/><label for = "gender1">Male</label> <input id = "gender2" name = "gender" type = "radio" value = "F"/><label for = "gender2">Female</label>
users.jsp
<%@taglib uri="http://www.springframework.org/tags/form" prefix="form"%>
<html>
<head>
<title>Spring MVC Form Handling</title>
</head>
<body>
<h2>Submitted User Information</h2>
<table>
<tr>
<td>Username</td>
<td>${username}</td>
</tr>
<tr>
<td>Password</td>
<td>${password}</td>
</tr>
<tr>
<td>Address</td>
<td>${address}</td>
</tr>
<tr>
<td>Subscribed to Newsletter</td>
<td>${receivePaper}</td>
</tr>
<tr>
<td>Favorite Web Frameworks</td>
<td> <% String[] favoriteFrameworks = (String[])request.getAttribute("favoriteFrameworks");
for(String framework: favoriteFrameworks) {
out.println(framework);
}
%></td>
</tr>
<tr>
<td>Gender</td>
<td>${(gender=="M"? "Male" : "Female")}</td>
</tr>
</table>
</body>
</html>
Once you are done with creating source and configuration files, export your application. Right click on your application, use Export → WAR File option and save the HelloWeb.war file in Tomcat’s webapps folder.
Now, start your Tomcat server and make sure you are able to access other webpages from webapps folder using a standard browser. Try a URL – http://localhost:8080/HelloWeb/user and we will see the following screen, if everything is fine with your Spring Web Application.

After submitting the required information, click on the submit button to submit the form. We will see the following screen, if everything is fine with the Spring Web Application.
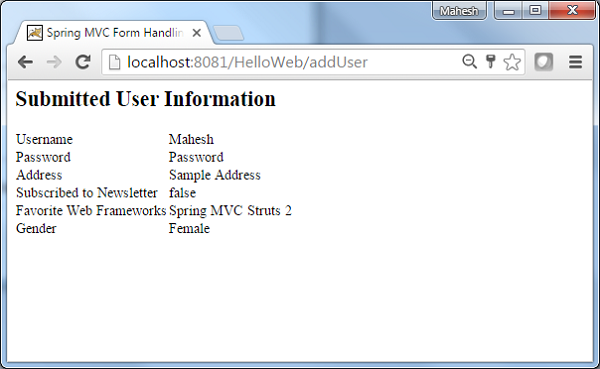
Spring MVC — RadioButtons Example
The following example explains how to use RadioButtons in forms using the Spring Web MVC framework. To begin with, let us have a working Eclipse IDE in place and follow the subsequent steps to develop a Dynamic Form based Web Application using the Spring Web Framework.
| Step | Description |
|---|---|
| 1 | Create a project with a name HelloWeb under a package com.tutorialspoint as explained in the Spring MVC — Hello World chapter. |
| 2 | Create Java classes User, UserController under the com.tutorialspointpackage. |
| 3 | Create view files user.jsp, users.jsp under the jsp sub-folder. |
| 4 | The final step is to create the content of the source and configuration files and export the application as explained below. |
User.java
package com.tutorialspoint;
public class User {
private String username;
private String password;
private String address;
private boolean receivePaper;
private String [] favoriteFrameworks;
private String gender;
private String favoriteNumber;
public String getUsername() {
return username;
}
public void setUsername(String username) {
this.username = username;
}
public String getPassword() {
return password;
}
public void setPassword(String password) {
this.password = password;
}
public String getAddress() {
return address;
}
public void setAddress(String address) {
this.address = address;
}
public boolean isReceivePaper() {
return receivePaper;
}
public void setReceivePaper(boolean receivePaper) {
this.receivePaper = receivePaper;
}
public String[] getFavoriteFrameworks() {
return favoriteFrameworks;
}
public void setFavoriteFrameworks(String[] favoriteFrameworks) {
this.favoriteFrameworks = favoriteFrameworks;
}
public String getGender() {
return gender;
}
public void setGender(String gender) {
this.gender = gender;
}
public String getFavoriteNumber() {
return favoriteNumber;
}
public void setFavoriteNumber(String favoriteNumber) {
this.favoriteNumber = favoriteNumber;
}
}
UserController.java
package com.tutorialspoint;
import java.util.ArrayList;
import java.util.List;
import org.springframework.stereotype.Controller;
import org.springframework.web.bind.annotation.ModelAttribute;
import org.springframework.web.bind.annotation.RequestMapping;
import org.springframework.web.bind.annotation.RequestMethod;
import org.springframework.web.servlet.ModelAndView;
import org.springframework.ui.ModelMap;
@Controller
public class UserController {
@RequestMapping(value = "/user", method = RequestMethod.GET)
public ModelAndView user() {
User user = new User();
user.setFavoriteFrameworks((new String []{"Spring MVC","Struts 2"}));
user.setGender("M");
ModelAndView modelAndView = new ModelAndView("user", "command", user);
return modelAndView;
}
@RequestMapping(value = "/addUser", method = RequestMethod.POST)
public String addUser(@ModelAttribute("SpringWeb")User user,
ModelMap model) {
model.addAttribute("username", user.getUsername());
model.addAttribute("password", user.getPassword());
model.addAttribute("address", user.getAddress());
model.addAttribute("receivePaper", user.isReceivePaper());
model.addAttribute("favoriteFrameworks", user.getFavoriteFrameworks());
model.addAttribute("gender", user.getGender());
model.addAttribute("favoriteNumber", user.getFavoriteNumber());
return "users";
}
@ModelAttribute("webFrameworkList")
public List<String> getWebFrameworkList() {
List<String> webFrameworkList = new ArrayList<String>();
webFrameworkList.add("Spring MVC");
webFrameworkList.add("Struts 1");
webFrameworkList.add("Struts 2");
webFrameworkList.add("Apache Wicket");
return webFrameworkList;
}
@ModelAttribute("numbersList")
public List<String> getNumbersList() {
List<String> numbersList = new ArrayList<String>();
numbersList.add("1");
numbersList.add("2");
numbersList.add("3");
numbersList.add("4");
return numbersList;
}
}
Here, for the first service method user(), we have passed a blank User object in the ModelAndView object with name «command», because the spring framework expects an object with name «command», if you are using <form:form> tags in your JSP file. So, when user() method is called, it returns the user.jsp view.
The second service method addUser() will be called against a POST method on the HelloWeb/addUser URL. You will prepare your model object based on the submitted information. Finally, the «users» view will be returned from the service method, which will result in rendering the users.jsp.
user.jsp
<%@taglib uri = "http://www.springframework.org/tags/form" prefix = "form"%>
<html>
<head>
<title>Spring MVC Form Handling</title>
</head>
<body>
<h2>User Information</h2>
<form:form method = "POST" action = "/HelloWeb/addUser">
<table>
<tr>
<td><form:label path = "username">User Name</form:label></td>
<td><form:input path = "username" /></td>
</tr>
<tr>
<td><form:label path = "password">Age</form:label></td>
<td><form:password path = "password" /></td>
</tr>
<tr>
<td><form:label path = "address">Address</form:label></td>
<td><form:textarea path = "address" rows = "5" cols = "30" /></td>
</tr>
<tr>
<td><form:label path = "receivePaper">Subscribe Newsletter</form:label></td>
<td><form:checkbox path = "receivePaper" /></td>
</tr>
<tr>
<td><form:label path = "favoriteFrameworks">Favorite Web Frameworks</form:label></td>
<td><form:checkboxes items = "${webFrameworkList}" path = "favoriteFrameworks" /></td>
</tr>
<tr>
<td><form:label path = "gender">Gender</form:label></td>
<td>
<form:radiobutton path = "gender" value = "M" label = "Male" />
<form:radiobutton path = "gender" value = "F" label = "Female" />
</td>
</tr>
<tr>
<td><form:label path = "favoriteNumber">Favorite Number</form:label></td>
<td>
<form:radiobuttons path = "favoriteNumber" items = "${numbersList}" />
</td>
</tr>
<tr>
<td colspan = "2">
<input type = "submit" value = "Submit"/>
</td>
</tr>
</table>
</form:form>
</body>
</html>
Here, we are using <form:radiobuttons />tag to render the HTML radiobuttons. For example −
<form:radiobuttons path = "favoriteNumber" items="${numbersList}" />
It will render the following HTML content.
<span> <input id = "favoriteNumber1" name = "favoriteNumber" type = "radio" value = "1"/> <label for = "favoriteNumber1">1</label> </span> <span> <input id = "favoriteNumber2" name = "favoriteNumber" type = "radio" value = "2"/> <label for = "favoriteNumber2">2</label> </span> <span> <input id = "favoriteNumber3" name = "favoriteNumber" type = "radio" value = "3"/> <label for = "favoriteNumber3">3</label> </span> <span> <input id = "favoriteNumber4" name = "favoriteNumber" type = "radio" value = "4"/> <label for = "favoriteNumber4">4</label> </span>
users.jsp
<%@taglib uri = "http://www.springframework.org/tags/form" prefix = "form"%>
<html>
<head>
<title>Spring MVC Form Handling</title>
</head>
<body>
<h2>Submitted User Information</h2>
<table>
<tr>
<td>Username</td>
<td>${username}</td>
</tr>
<tr>
<td>Password</td>
<td>${password}</td>
</tr>
<tr>
<td>Address</td>
<td>${address}</td>
</tr>
<tr>
<td>Subscribed to Newsletter</td>
<td>${receivePaper}</td>
</tr>
<tr>
<td>Favorite Web Frameworks</td>
<td> <% String[] favoriteFrameworks = (String[])request.getAttribute("favoriteFrameworks");
for(String framework: favoriteFrameworks) {
out.println(framework);
}
%></td>
</tr>
<tr>
<td>Gender</td>
<td>${(gender=="M"? "Male" : "Female")}</td>
</tr>
<tr>
<td>Favourite Number</td>
<td>${favoriteNumber}</td>
</tr>
</table>
</body>
</html>
Once you are done with creating source and configuration files, export your application. Right click on your application, use Export → WAR File option and save the HelloWeb.war file in Tomcat’s webapps folder.
Now, start the Tomcat server and make sure you are able to access other webpages from the webapps folder using a standard browser. Try the following URL – http://localhost:8080/HelloWeb/user and we will see the following screen, if everything is fine with the Spring Web Application.
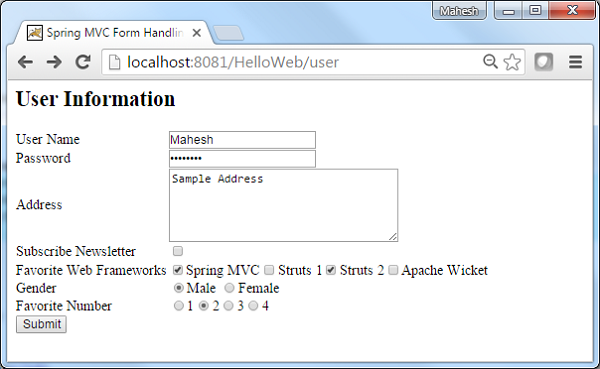
After submitting the required information, click on the submit button to submit the form. We will see the following screen, if everything is fine with your Spring Web Application.
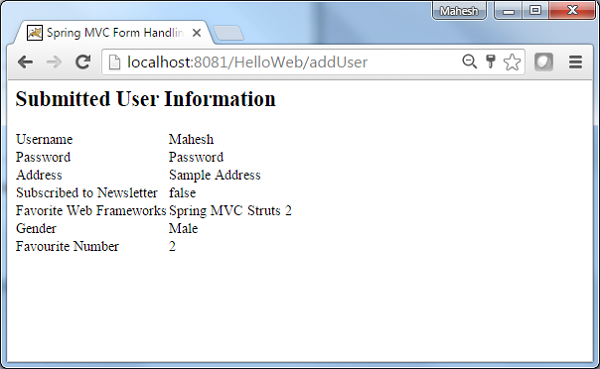
Spring MVC — Dropdown Example
The following example describes how to use Dropdown in forms using the Spring Web MVC framework. To start with, let us have a working Eclipse IDE in place and stick to the following steps to develop a Dynamic Form based Web Application using the Spring Web Framework.
| Step | Description |
|---|---|
| 1 | Create a project with a name HelloWeb under a package com.tutorialspoint as explained in the Spring MVC — Hello World chapter. |
| 2 | Create Java classes User, UserController under the com.tutorialspointpackage. |
| 3 | Create view files user.jsp, users.jsp under the jsp sub-folder. |
| 4 | The final step is to create the content of the source and configuration files and export the application as explained below. |
User.java
package com.tutorialspoint;
public class User {
private String username;
private String password;
private String address;
private boolean receivePaper;
private String [] favoriteFrameworks;
private String gender;
private String favoriteNumber;
private String country;
public String getUsername() {
return username;
}
public void setUsername(String username) {
this.username = username;
}
public String getPassword() {
return password;
}
public void setPassword(String password) {
this.password = password;
}
public String getAddress() {
return address;
}
public void setAddress(String address) {
this.address = address;
}
public boolean isReceivePaper() {
return receivePaper;
}
public void setReceivePaper(boolean receivePaper) {
this.receivePaper = receivePaper;
}
public String[] getFavoriteFrameworks() {
return favoriteFrameworks;
}
public void setFavoriteFrameworks(String[] favoriteFrameworks) {
this.favoriteFrameworks = favoriteFrameworks;
}
public String getGender() {
return gender;
}
public void setGender(String gender) {
this.gender = gender;
}
public String getFavoriteNumber() {
return favoriteNumber;
}
public void setFavoriteNumber(String favoriteNumber) {
this.favoriteNumber = favoriteNumber;
}
public String getCountry() {
return country;
}
public void setCountry(String country) {
this.country = country;
}
}
UserController.java
package com.tutorialspoint;
import java.util.ArrayList;
import java.util.HashMap;
import java.util.List;
import java.util.Map;
import org.springframework.stereotype.Controller;
import org.springframework.web.bind.annotation.ModelAttribute;
import org.springframework.web.bind.annotation.RequestMapping;
import org.springframework.web.bind.annotation.RequestMethod;
import org.springframework.web.servlet.ModelAndView;
import org.springframework.ui.ModelMap;
@Controller
public class UserController {
@RequestMapping(value = "/user", method = RequestMethod.GET)
public ModelAndView user() {
User user = new User();
user.setFavoriteFrameworks((new String []{"Spring MVC","Struts 2"}));
user.setGender("M");
ModelAndView modelAndView = new ModelAndView("user", "command", user);
return modelAndView;
}
@RequestMapping(value = "/addUser", method = RequestMethod.POST)
public String addUser(@ModelAttribute("SpringWeb")User user,
ModelMap model) {
model.addAttribute("username", user.getUsername());
model.addAttribute("password", user.getPassword());
model.addAttribute("address", user.getAddress());
model.addAttribute("receivePaper", user.isReceivePaper());
model.addAttribute("favoriteFrameworks", user.getFavoriteFrameworks());
model.addAttribute("gender", user.getGender());
model.addAttribute("favoriteNumber", user.getFavoriteNumber());
model.addAttribute("country", user.getCountry());
return "users";
}
@ModelAttribute("webFrameworkList")
public List<String> getWebFrameworkList() {
List<String> webFrameworkList = new ArrayList<String>();
webFrameworkList.add("Spring MVC");
webFrameworkList.add("Struts 1");
webFrameworkList.add("Struts 2");
webFrameworkList.add("Apache Wicket");
return webFrameworkList;
}
@ModelAttribute("numbersList")
public List<String> getNumbersList() {
List<String> numbersList = new ArrayList<String>();
numbersList.add("1");
numbersList.add("2");
numbersList.add("3");
numbersList.add("4");
return numbersList;
}
@ModelAttribute("countryList")
public Map<String, String> getCountryList() {
Map<String, String> countryList = new HashMap<String, String>();
countryList.put("US", "United States");
countryList.put("CH", "China");
countryList.put("SG", "Singapore");
countryList.put("MY", "Malaysia");
return countryList;
}
}
Here, for the first service method user(), we have passed a blank User object in the ModelAndView object with name «command», because the spring framework expects an object with name «command», if you are using <form:form> tags in your JSP file. So when the user() method is called, it returns the user.jsp view.
The second service method addUser() will be called against a POST method on the HelloWeb/addUser URL. You will prepare your model object based on the submitted information. Finally, the «users» view will be returned from the service method, which will result in rendering the users.jsp.
user.jsp
<%@taglib uri = "http://www.springframework.org/tags/form" prefix = "form"%>
<html>
<head>
<title>Spring MVC Form Handling</title>
</head>
<body>
<h2>User Information</h2>
<form:form method = "POST" action = "/HelloWeb/addUser">
<table>
<tr>
<td><form:label path = "username">User Name</form:label></td>
<td><form:input path = "username" /></td>
</tr>
<tr>
<td><form:label path = "password">Age</form:label></td>
<td><form:password path = "password" /></td>
</tr>
<tr>
<td><form:label path = "address">Address</form:label></td>
<td><form:textarea path = "address" rows = "5" cols = "30" /></td>
</tr>
<tr>
<td><form:label path = "receivePaper">Subscribe Newsletter</form:label></td>
<td><form:checkbox path = "receivePaper" /></td>
</tr>
<tr>
<td><form:label path = "favoriteFrameworks">Favorite Web Frameworks</form:label></td>
<td><form:checkboxes items = "${webFrameworkList}" path = "favoriteFrameworks" /></td>
</tr>
<tr>
<td><form:label path = "gender">Gender</form:label></td>
<td>
<form:radiobutton path = "gender" value = "M" label = "Male" />
<form:radiobutton path = "gender" value = "F" label = "Female" />
</td>
</tr>
<tr>
<td><form:label path = "favoriteNumber">Favorite Number</form:label></td>
<td>
<form:radiobuttons path = "favoriteNumber" items = "${numbersList}" />
</td>
</tr>
<tr>
<td><form:label path = "country">Country</form:label></td>
<td>
<form:select path = "country">
<form:option value = "NONE" label = "Select"/>
<form:options items = "${countryList}" />
</form:select>
</td>
</tr>
<tr>
<td colspan = "2">
<input type = "submit" value = "Submit"/>
</td>
</tr>
</table>
</form:form>
</body>
</html>
Here, we are using <form:select /> , <form:option /> and <form:options /> tags to render HTML select. For example −
<form:select path = "country">
<form:option value = "NONE" label = "Select"/>
<form:options items = "${countryList}" />
</form:select>
It will render following HTML content.
<select id = "country" name = "country"> <option value = "NONE">Select</option> <option value = "US">United States</option> <option value = "CH">China</option> <option value = "MY">Malaysia</option> <option value = "SG">Singapore</option> </select>
users.jsp
<%@taglib uri = "http://www.springframework.org/tags/form" prefix = "form"%>
<html>
<head>
<title>Spring MVC Form Handling</title>
</head>
<body>
<h2>Submitted User Information</h2>
<table>
<tr>
<td>Username</td>
<td>${username}</td>
</tr>
<tr>
<td>Password</td>
<td>${password}</td>
</tr>
<tr>
<td>Address</td>
<td>${address}</td>
</tr>
<tr>
<td>Subscribed to Newsletter</td>
<td>${receivePaper}</td>
</tr>
<tr>
<td>Favorite Web Frameworks</td>
<td> <% String[] favoriteFrameworks = (String[])request.getAttribute("favoriteFrameworks");
for(String framework: favoriteFrameworks) {
out.println(framework);
}
%></td>
</tr>
<tr>
<td>Gender</td>
<td>${(gender=="M"? "Male" : "Female")}</td>
</tr>
<tr>
<td>Favourite Number</td>
<td>${favoriteNumber}</td>
</tr>
<tr>
<td>Country</td>
<td>${country}</td>
</tr>
</table>
</body>
</html>
Once you are done with creating source and configuration files, export your application. Right click on your application, use the Export → WAR File option and save your HelloWeb.war file in Tomcat’s webapps folder.
Now, start the Tomcat server and make sure you are able to access other webpages from webapps folder using a standard browser. Try a URL – http://localhost:8080/HelloWeb/user and we will see the following screen, if everything is fine with the Spring Web Application.
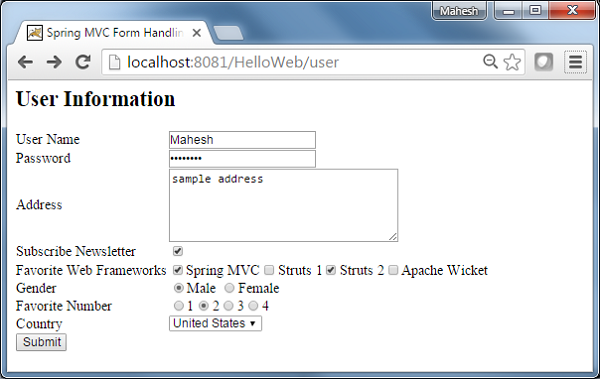
After submitting the required information, click on the submit button to submit the form. You should see the following screen, if everything is fine with your Spring Web Application.
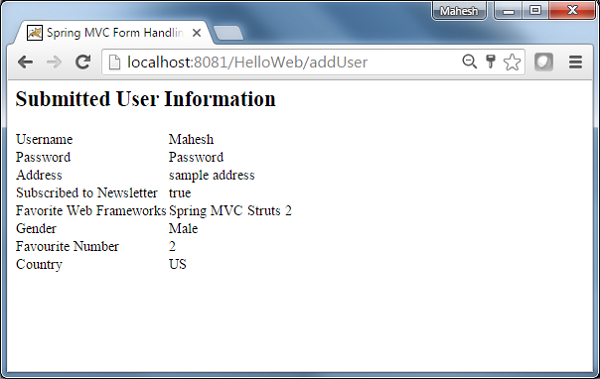
Spring MVC — Listbox Example
The following example shows how to use Listbox in forms using the Spring Web MVC framework. To begin with, let us have a working Eclipse IDE in place and follow the subsequent steps to develop a Dynamic Form based Web Application using the Spring Web Framework.
| Step | Description |
|---|---|
| 1 | Create a project with a name HelloWeb under a package com.tutorialspoint as explained in the Spring MVC — Hello World chapter. |
| 2 | Create Java classes User, UserController under the com.tutorialspointpackage. |
| 3 | Create view files user.jsp, users.jsp under the jsp sub-folder. |
| 4 | The final step is to create the content of the source and configuration files and export the application as explained below. |
User.java
package com.tutorialspoint;
public class User {
private String username;
private String password;
private String address;
private boolean receivePaper;
private String [] favoriteFrameworks;
private String gender;
private String favoriteNumber;
private String country;
private String [] skills;
public String getUsername() {
return username;
}
public void setUsername(String username) {
this.username = username;
}
public String getPassword() {
return password;
}
public void setPassword(String password) {
this.password = password;
}
public String getAddress() {
return address;
}
public void setAddress(String address) {
this.address = address;
}
public boolean isReceivePaper() {
return receivePaper;
}
public void setReceivePaper(boolean receivePaper) {
this.receivePaper = receivePaper;
}
public String[] getFavoriteFrameworks() {
return favoriteFrameworks;
}
public void setFavoriteFrameworks(String[] favoriteFrameworks) {
this.favoriteFrameworks = favoriteFrameworks;
}
public String getGender() {
return gender;
}
public void setGender(String gender) {
this.gender = gender;
}
public String getFavoriteNumber() {
return favoriteNumber;
}
public void setFavoriteNumber(String favoriteNumber) {
this.favoriteNumber = favoriteNumber;
}
public String getCountry() {
return country;
}
public void setCountry(String country) {
this.country = country;
}
public String[] getSkills() {
return skills;
}
public void setSkills(String[] skills) {
this.skills = skills;
}
}
UserController.java
package com.tutorialspoint;
import java.util.ArrayList;
import java.util.HashMap;
import java.util.List;
import java.util.Map;
import org.springframework.stereotype.Controller;
import org.springframework.web.bind.annotation.ModelAttribute;
import org.springframework.web.bind.annotation.RequestMapping;
import org.springframework.web.bind.annotation.RequestMethod;
import org.springframework.web.servlet.ModelAndView;
import org.springframework.ui.ModelMap;
@Controller
public class UserController {
@RequestMapping(value = "/user", method = RequestMethod.GET)
public ModelAndView user() {
User user = new User();
user.setFavoriteFrameworks((new String []{"Spring MVC","Struts 2"}));
user.setGender("M");
ModelAndView modelAndView = new ModelAndView("user", "command", user);
return modelAndView;
}
@RequestMapping(value = "/addUser", method = RequestMethod.POST)
public String addUser(@ModelAttribute("SpringWeb")User user,
ModelMap model) {
model.addAttribute("username", user.getUsername());
model.addAttribute("password", user.getPassword());
model.addAttribute("address", user.getAddress());
model.addAttribute("receivePaper", user.isReceivePaper());
model.addAttribute("favoriteFrameworks", user.getFavoriteFrameworks());
model.addAttribute("gender", user.getGender());
model.addAttribute("favoriteNumber", user.getFavoriteNumber());
model.addAttribute("country", user.getCountry());
model.addAttribute("skills", user.getSkills());
return "users";
}
@ModelAttribute("webFrameworkList")
public List<String> getWebFrameworkList() {
List<String> webFrameworkList = new ArrayList<String>();
webFrameworkList.add("Spring MVC");
webFrameworkList.add("Struts 1");
webFrameworkList.add("Struts 2");
webFrameworkList.add("Apache Wicket");
return webFrameworkList;
}
@ModelAttribute("numbersList")
public List<String> getNumbersList() {
List<String> numbersList = new ArrayList<String>();
numbersList.add("1");
numbersList.add("2");
numbersList.add("3");
numbersList.add("4");
return numbersList;
}
@ModelAttribute("countryList")
public Map<String, String> getCountryList() {
Map<String, String> countryList = new HashMap<String, String>();
countryList.put("US", "United States");
countryList.put("CH", "China");
countryList.put("SG", "Singapore");
countryList.put("MY", "Malaysia");
return countryList;
}
@ModelAttribute("skillsList")
public Map<String, String> getSkillsList() {
Map<String, String> skillList = new HashMap<String, String>();
skillList.put("Hibernate", "Hibernate");
skillList.put("Spring", "Spring");
skillList.put("Apache Wicket", "Apache Wicket");
skillList.put("Struts", "Struts");
return skillList;
}
}
Here, for the first service method user(), we have passed a blank User object in the ModelAndView object with name «command», because the spring framework expects an object with name «command», if you are using <form:form> tags in your JSP file. So, when the user() method is called, it returns the user.jsp view.
The second service method addUser() will be called against a POST method on the HelloWeb/addUser URL. You will prepare your model object based on the submitted information. Finally, the «users» view will be returned from the service method, which will result in rendering the users.jsp.
user.jsp
<%@taglib uri = "http://www.springframework.org/tags/form" prefix = "form"%>
<html>
<head>
<title>Spring MVC Form Handling</title>
</head>
<body>
<h2>User Information</h2>
<form:form method = "POST" action = "/HelloWeb/addUser">
<table>
<tr>
<td><form:label path = "username">User Name</form:label></td>
<td><form:input path = "username" /></td>
</tr>
<tr>
<td><form:label path = "password">Age</form:label></td>
<td><form:password path = "password" /></td>
</tr>
<tr>
<td><form:label path = "address">Address</form:label></td>
<td><form:textarea path = "address" rows = "5" cols = "30" /></td>
</tr>
<tr>
<td><form:label path = "receivePaper">Subscribe Newsletter</form:label></td>
<td><form:checkbox path = "receivePaper" /></td>
</tr>
<tr>
<td><form:label path = "favoriteFrameworks">Favorite Web Frameworks</form:label></td>
<td><form:checkboxes items = "${webFrameworkList}" path = "favoriteFrameworks" /></td>
</tr>
<tr>
<td><form:label path = "gender">Gender</form:label></td>
<td>
<form:radiobutton path = "gender" value = "M" label = "Male" />
<form:radiobutton path = "gender" value = "F" label = "Female" />
</td>
</tr>
<tr>
<td><form:label path = "favoriteNumber">Favorite Number</form:label></td>
<td>
<form:radiobuttons path = "favoriteNumber" items = "${numbersList}" />
</td>
</tr>
<tr>
<td><form:label path = "country">Country</form:label></td>
<td>
<form:select path = "country">
<form:option value = "NONE" label = "Select"/>
<form:options items = "${countryList}" />
</form:select>
</td>
</tr>
<tr>
<td><form:label path = "skills">Skills</form:label></td>
<td>
<form:select path = "skills" items = "${skillsList}"
multiple = "true" />
</td>
</tr>
<tr>
<td colspan = "2">
<input type = "submit" value = "Submit"/>
</td>
</tr>
</table>
</form:form>
</body>
</html>
Here, we are using a <form:select /> tag , with the attribute multiple=true to render an HTML listbox. For example −
<form:select path = "skills" items = "${skillsList}" multiple = "true" />
It will render following HTML content.
<select id = "skills" name = "skills" multiple = "multiple"> <option value = "Struts">Struts</option> <option value = "Hibernate">Hibernate</option> <option value = "Apache Wicket">Apache Wicket</option> <option value = "Spring">Spring</option> </select> <input type = "hidden" name = "_skills" value = "1"/>
users.jsp
<%@taglib uri = "http://www.springframework.org/tags/form" prefix = "form"%>
<html>
<head>
<title>Spring MVC Form Handling</title>
</head>
<body>
<h2>Submitted User Information</h2>
<table>
<tr>
<td>Username</td>
<td>${username}</td>
</tr>
<tr>
<td>Password</td>
<td>${password}</td>
</tr>
<tr>
<td>Address</td>
<td>${address}</td>
</tr>
<tr>
<td>Subscribed to Newsletter</td>
<td>${receivePaper}</td>
</tr>
<tr>
<td>Favorite Web Frameworks</td>
<td> <% String[] favoriteFrameworks = (String[])request.getAttribute("favoriteFrameworks");
for(String framework: favoriteFrameworks) {
out.println(framework);
}
%></td>
</tr>
<tr>
<td>Gender</td>
<td>${(gender=="M"? "Male" : "Female")}</td>
</tr>
<tr>
<td>Favourite Number</td>
<td>${favoriteNumber}</td>
</tr>
<tr>
<td>Country</td>
<td>${country}</td>
</tr>
<tr>
<td>Skills</td>
<td> <% String[] skills = (String[])request.getAttribute("skills");
for(String skill: skills) {
out.println(skill);
}
%></td>
</tr>
</table>
</body>
</html>
Once you are done with creating source and configuration files, export your application. Right click on your application, use Export → WAR File option and save the HelloWeb.war file in Tomcat’s webapps folder.
Now, start the Tomcat server and make sure you are able to access other webpages from the webapps folder using a standard browser. Try a URL − http://localhost:8080/HelloWeb/user and we will see the following screen, if everything is fine with the Spring Web Application.
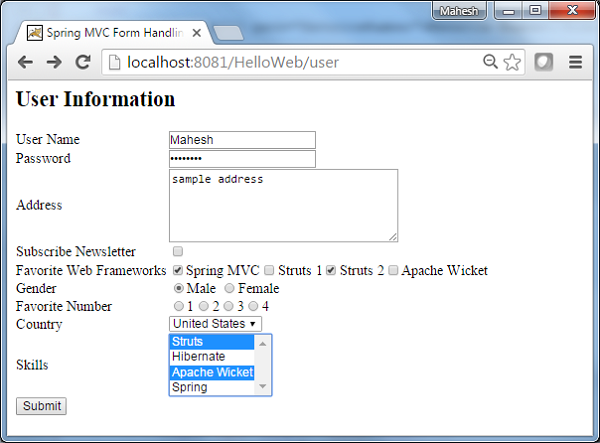
After submitting the required information, click on the submit button to submit the form. You should see the following screen, if everything is fine with your Spring Web Application.

Spring MVC — Hidden Field Example
The following example describes how to use a Hidden Field in forms using the Spring Web MVC framework. To start with, let us have a working Eclipse IDE in place and consider the following steps to develop a Dynamic Form based Web Application using Spring Web Framework.
| Step | Description |
|---|---|
| 1 | Create a project with a name HelloWeb under a package com.tutorialspoint as explained in the Spring MVC — Hello World chapter. |
| 2 | Create Java classes Student, StudentController under the com.tutorialspoint package. |
| 3 | Create view files student.jsp, result.jsp under the jsp sub-folder. |
| 4 | The final step is to create the content of the source and configuration files and export the application as explained below. |
Student.java
package com.tutorialspoint;
public class Student {
private Integer age;
private String name;
private Integer id;
public void setAge(Integer age) {
this.age = age;
}
public Integer getAge() {
return age;
}
public void setName(String name) {
this.name = name;
}
public String getName() {
return name;
}
public void setId(Integer id) {
this.id = id;
}
public Integer getId() {
return id;
}
}
StudentController.java
package com.tutorialspoint;
import org.springframework.stereotype.Controller;
import org.springframework.web.bind.annotation.ModelAttribute;
import org.springframework.web.bind.annotation.RequestMapping;
import org.springframework.web.bind.annotation.RequestMethod;
import org.springframework.web.servlet.ModelAndView;
import org.springframework.ui.ModelMap;
@Controller
public class StudentController {
@RequestMapping(value = "/student", method = RequestMethod.GET)
public ModelAndView student() {
return new ModelAndView("student", "command", new Student());
}
@RequestMapping(value = "/addStudent", method = RequestMethod.POST)
public String addStudent(@ModelAttribute("SpringWeb")Student student,
ModelMap model) {
model.addAttribute("name", student.getName());
model.addAttribute("age", student.getAge());
model.addAttribute("id", student.getId());
return "result";
}
}
Here, for the first service method student(), we have passed a blank Studentobject in the ModelAndView object with the name «command», because the spring framework expects an object with the name «command», if you are using <form:form> tags in your JSP file. So, when the student() method is called, it returns the student.jsp view.
The second service method addStudent() will be called against a POST method on the HelloWeb/addStudent URL. You will prepare your model object based on the submitted information. Finally, a «result» view will be returned from the service method, which will result in rendering result.jsp
student.jsp
<%@taglib uri = "http://www.springframework.org/tags/form" prefix = "form"%>
<html>
<head>
<title>Spring MVC Form Handling</title>
</head>
<body>
<h2>Student Information</h2>
<form:form method = "POST" action = "/HelloWeb/addStudent">
<table>
<tr>
<td><form:label path = "name">Name</form:label></td>
<td><form:input path = "name" /></td>
</tr>
<tr>
<td><form:label path = "age">Age</form:label></td>
<td><form:input path = "age" /></td>
</tr>
<tr>
<td>< </td>
<td><form:hidden path = "id" value = "1" /></td>
</tr>
<tr>
<td colspan = "2">
<input type = "submit" value = "Submit"/>
</td>
</tr>
</table>
</form:form>
</body>
</html>
Here, we are using the <form:hidden /> tag to render a HTML hidden field.
For example −
<form:hidden path = "id" value = "1"/>
It will render following HTML content.
<input id = "id" name = "id" type = "hidden" value = "1"/>
result.jsp
<%@taglib uri = "http://www.springframework.org/tags/form" prefix = "form"%>
<html>
<head>
<title>Spring MVC Form Handling</title>
</head>
<body>
<h2>Submitted Student Information</h2>
<table>
<tr>
<td>Name</td>
<td>${name}</td>
</tr>
<tr>
<td>Age</td>
<td>${age}</td>
</tr>
<tr>
<td>ID</td>
<td>${id}</td>
</tr>
</table>
</body>
</html>
Once you are done with creating source and configuration files, export your application. Right click on your application and use Export → WAR File option and save your HelloWeb.war file in Tomcat’s webapps folder.
Now start your Tomcat server and make sure you are able to access other webpages from webapps folder using a standard browser. Try a URL – http://localhost:8080/HelloWeb/student and we will see the following screen, if everything is fine with the Spring Web Application.

After submitting the required information, click on the submit button to submit the form. We will see the following screen, if everything is fine with your Spring Web Application.
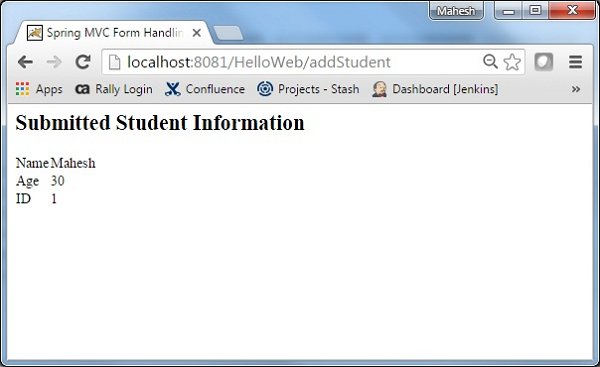
Spring MVC — Error Handling Example
The following example shows how to use Error Handling and Validators in forms using the Spring Web MVC Framework. To start with, let us have a working Eclipse IDE in place and consider the following steps to develop a Dynamic Form based Web Application using the Spring Web Framework.
| Step | Description |
|---|---|
| 1 | Create a project with a name HelloWeb under a package com.tutorialspoint as explained in the Spring MVC — Hello World chapter. |
| 2 | Create Java classes Student, StudentController and StudentValidator under the com.tutorialspoint package. |
| 3 | Create view files addStudent.jsp, result.jsp under the jsp sub-folder. |
| 4 | The final step is to create the content of the source and configuration files and export the application as explained below. |
Student.java
package com.tutorialspoint;
public class Student {
private Integer age;
private String name;
private Integer id;
public void setAge(Integer age) {
this.age = age;
}
public Integer getAge() {
return age;
}
public void setName(String name) {
this.name = name;
}
public String getName() {
return name;
}
public void setId(Integer id) {
this.id = id;
}
public Integer getId() {
return id;
}
}
StudentValidator.java
package com.tutorialspoint;
import org.springframework.validation.Errors;
import org.springframework.validation.ValidationUtils;
import org.springframework.validation.Validator;
public class StudentValidator implements Validator {
@Override
public boolean supports(Class<?> clazz) {
return Student.class.isAssignableFrom(clazz);
}
@Override
public void validate(Object target, Errors errors) {
ValidationUtils.rejectIfEmptyOrWhitespace(errors,
"name", "required.name","Field name is required.");
}
}
StudentController.java
package com.tutorialspoint;
import org.springframework.beans.factory.annotation.Autowired;
import org.springframework.beans.factory.annotation.Qualifier;
import org.springframework.stereotype.Controller;
import org.springframework.ui.Model;
import org.springframework.validation.BindingResult;
import org.springframework.validation.Validator;
import org.springframework.validation.annotation.Validated;
import org.springframework.web.bind.WebDataBinder;
import org.springframework.web.bind.annotation.InitBinder;
import org.springframework.web.bind.annotation.ModelAttribute;
import org.springframework.web.bind.annotation.RequestMapping;
import org.springframework.web.bind.annotation.RequestMethod;
import org.springframework.web.servlet.ModelAndView;
@Controller
public class StudentController {
@Autowired
@Qualifier("studentValidator")
private Validator validator;
@InitBinder
private void initBinder(WebDataBinder binder) {
binder.setValidator(validator);
}
@RequestMapping(value = "/addStudent", method = RequestMethod.GET)
public ModelAndView student() {
return new ModelAndView("addStudent", "command", new Student());
}
@ModelAttribute("student")
public Student createStudentModel() {
return new Student();
}
@RequestMapping(value = "/addStudent", method = RequestMethod.POST)
public String addStudent(@ModelAttribute("student") @Validated Student student,
BindingResult bindingResult, Model model) {
if (bindingResult.hasErrors()) {
return "addStudent";
}
model.addAttribute("name", student.getName());
model.addAttribute("age", student.getAge());
model.addAttribute("id", student.getId());
return "result";
}
}
HelloWeb-servlet.xml
<beans xmlns = "http://www.springframework.org/schema/beans"
xmlns:context = "http://www.springframework.org/schema/context"
xmlns:xsi = "http://www.w3.org/2001/XMLSchema-instance"
xsi:schemaLocation = "
http://www.springframework.org/schema/beans
http://www.springframework.org/schema/beans/spring-beans-3.0.xsd
http://www.springframework.org/schema/context
http://www.springframework.org/schema/context/spring-context-3.0.xsd">
<context:component-scan base-package = "com.tutorialspoint" />
<bean class = "org.springframework.web.servlet.view.InternalResourceViewResolver">
<property name = "prefix" value = "/WEB-INF/jsp/" />
<property name = "suffix" value = ".jsp" />
</bean>
<bean id = "studentValidator" class = "com.tutorialspoint.StudentValidator" />
</beans>
Here, for the first service method student(), we have passed a blank Studentobject in the ModelAndView object with name «command», because the spring framework expects an object with name «command», if you are using <form:form> tags in your JSP file. So, when student() method is called, it returns addStudent.jsp view.
The second service method addStudent() will be called against a POST method on the HelloWeb/addStudent URL. You will prepare your model object based on the submitted information. Finally, a «result» view will be returned from the service method, which will result in rendering the result.jsp. In case there are errors generated using validator then same view «addStudent» is returned, Spring automatically injects error messages from BindingResult in view.
addStudent.jsp
<%@taglib uri = "http://www.springframework.org/tags/form" prefix = "form"%>
<html>
<head>
<title>Spring MVC Form Handling</title>
</head>
<style>
.error {
color: #ff0000;
}
.errorblock {
color: #000;
background-color: #ffEEEE;
border: 3px solid #ff0000;
padding: 8px;
margin: 16px;
}
</style>
<body>
<h2>Student Information</h2>
<form:form method = "POST" action = "/HelloWeb/addStudent" commandName = "student">
<form:errors path = "*" cssClass = "errorblock" element = "div" />
<table>
<tr>
<td><form:label path = "name">Name</form:label></td>
<td><form:input path = "name" /></td>
<td><form:errors path = "name" cssClass = "error" /></td>
</tr>
<tr>
<td><form:label path = "age">Age</form:label></td>
<td><form:input path = "age" /></td>
</tr>
<tr>
<td><form:label path = "id">id</form:label></td>
<td><form:input path = "id" /></td>
</tr>
<tr>
<td colspan = "2">
<input type = "submit" value = "Submit"/>
</td>
</tr>
</table>
</form:form>
</body>
</html>
Here we are using <form:errors /> tag with path=»*» to render error messages. For example
<form:errors path = "*" cssClass = "errorblock" element = "div" />
It will render the error messages for all input validations.
We are using <form:errors /> tag with path=»name» to render error message for name field. For example
<form:errors path = "name" cssClass = "error" />
It will render error messages for the name field validations.
result.jsp
<%@taglib uri = "http://www.springframework.org/tags/form" prefix = "form"%>
<html>
<head>
<title>Spring MVC Form Handling</title>
</head>
<body>
<h2>Submitted Student Information</h2>
<table>
<tr>
<td>Name</td>
<td>${name}</td>
</tr>
<tr>
<td>Age</td>
<td>${age}</td>
</tr>
<tr>
<td>ID</td>
<td>${id}</td>
</tr>
</table>
</body>
</html>
Once you are done with creating source and configuration files, export your application. Right click on your application, use Export → WAR File option and save the HelloWeb.war file in Tomcat’s webapps folder.
Now, start your Tomcat server and make sure you are able to access other webpages from webapps folder using a standard browser. Try a URL − http://localhost:8080/HelloWeb/addStudent and we will see the following screen, if everything is fine with the Spring Web Application.

After submitting the required information, click on the submit button to submit the form. You should see the following screen, if everything is fine with the Spring Web Application.
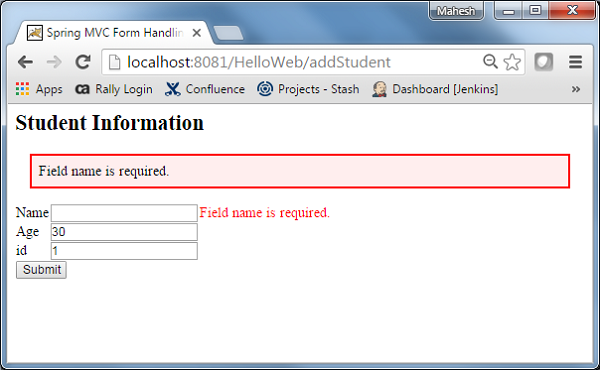
Spring MVC — File Upload Example
The following example shows how to use File Upload Control in forms using the Spring Web MVC framework. To start with, let us have a working Eclipse IDE in place and adhere to the following steps to develop a Dynamic Form based Web Application using the Spring Web Framework.
| Step | Description |
|---|---|
| 1 | Create a project with a name HelloWeb under a package com.tutorialspoint as explained in the Spring MVC — Hello World chapter. |
| 2 | Create Java classes FileModel, FileUploadController under the com.tutorialspoint package. |
| 3 | Create view files fileUpload.jsp, success.jsp under the jsp sub-folder. |
| 4 | Create a folder temp under the WebContent sub-folder. |
| 5 | Download Apache Commons FileUpload library commons-fileupload.jar and Apache Commons IO library commons-io.jar. Put them in your CLASSPATH. |
| 6 | The final step is to create the content of the source and configuration files and export the application as explained below. |
FileModel.java
package com.tutorialspoint;
import org.springframework.web.multipart.MultipartFile;
public class FileModel {
private MultipartFile file;
public MultipartFile getFile() {
return file;
}
public void setFile(MultipartFile file) {
this.file = file;
}
}
FileUploadController.java
package com.tutorialspoint;
import java.io.File;
import java.io.IOException;
import javax.servlet.ServletContext;
import org.springframework.beans.factory.annotation.Autowired;
import org.springframework.stereotype.Controller;
import org.springframework.ui.ModelMap;
import org.springframework.util.FileCopyUtils;
import org.springframework.validation.BindingResult;
import org.springframework.validation.annotation.Validated;
import org.springframework.web.bind.annotation.RequestMapping;
import org.springframework.web.bind.annotation.RequestMethod;
import org.springframework.web.multipart.MultipartFile;
import org.springframework.web.servlet.ModelAndView;
@Controller
public class FileUploadController {
@Autowired
ServletContext context;
@RequestMapping(value = "/fileUploadPage", method = RequestMethod.GET)
public ModelAndView fileUploadPage() {
FileModel file = new FileModel();
ModelAndView modelAndView = new ModelAndView("fileUpload", "command", file);
return modelAndView;
}
@RequestMapping(value="/fileUploadPage", method = RequestMethod.POST)
public String fileUpload(@Validated FileModel file, BindingResult result, ModelMap model) throws IOException {
if (result.hasErrors()) {
System.out.println("validation errors");
return "fileUploadPage";
} else {
System.out.println("Fetching file");
MultipartFile multipartFile = file.getFile();
String uploadPath = context.getRealPath("") + File.separator + "temp" + File.separator;
//Now do something with file...
FileCopyUtils.copy(file.getFile().getBytes(), new File(uploadPath+file.getFile().getOriginalFilename()));
String fileName = multipartFile.getOriginalFilename();
model.addAttribute("fileName", fileName);
return "success";
}
}
}
HelloWeb-servlet.xml
<beans xmlns = "http://www.springframework.org/schema/beans"
xmlns:context = "http://www.springframework.org/schema/context"
xmlns:xsi = "http://www.w3.org/2001/XMLSchema-instance"
xsi:schemaLocation = "
http://www.springframework.org/schema/beans
http://www.springframework.org/schema/beans/spring-beans-3.0.xsd
http://www.springframework.org/schema/context
http://www.springframework.org/schema/context/spring-context-3.0.xsd">
<context:component-scan base-package = "com.tutorialspoint" />
<bean class = "org.springframework.web.servlet.view.InternalResourceViewResolver">
<property name = "prefix" value = "/WEB-INF/jsp/" />
<property name = "suffix" value = ".jsp" />
</bean>
<bean id = "multipartResolver"
class = "org.springframework.web.multipart.commons.CommonsMultipartResolver" />
</beans>
Here, for the first service method fileUploadPage(), we have passed a blank FileModel object in the ModelAndView object with name «command», because the spring framework expects an object with name «command», if you are using <form:form> tags in your JSP file. So, when fileUploadPage() method is called, it returns fileUpload.jsp view.
The second service method fileUpload() will be called against a POST method on the HelloWeb/fileUploadPage URL. You will prepare the file to be uploaded based on the submitted information. Finally, a «success» view will be returned from the service method, which will result in rendering success.jsp.
fileUpload.jsp
<%@ page contentType="text/html; charset = UTF-8" %>
<%@ taglib prefix = "form" uri = "http://www.springframework.org/tags/form"%>
<html>
<head>
<title>File Upload Example</title>
</head>
<body>
<form:form method = "POST" modelAttribute = "fileUpload"
enctype = "multipart/form-data">
Please select a file to upload :
<input type = "file" name = "file" />
<input type = "submit" value = "upload" />
</form:form>
</body>
</html>
Here, we are using modelAttribute attribute with value=»fileUpload» to map the file Upload control with the server model.
success.jsp
<%@ page contentType = "text/html; charset = UTF-8" %>
<html>
<head>
<title>File Upload Example</title>
</head>
<body>
FileName :
lt;b> ${fileName} </b> - Uploaded Successfully.
</body>
</html>
Once you are done with creating source and configuration files, export your application. Right click on your application, use Export → WAR File option and save the HelloWeb.war file in the Tomcat’s webapps folder.
Now, start your Tomcat server and make sure you are able to access other webpages from the webapps folder using a standard browser. Try a URL– http://localhost:8080/HelloWeb/fileUploadPage and we will see the following screen, if everything is fine with the Spring Web Application.
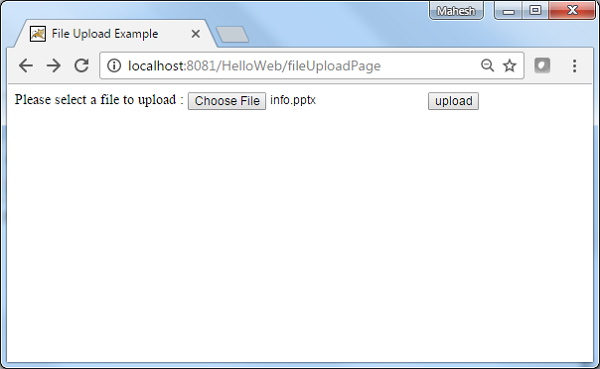
After submitting the required information, click on the submit button to submit the form. You should see the following screen, if everything is fine with the Spring Web Application.
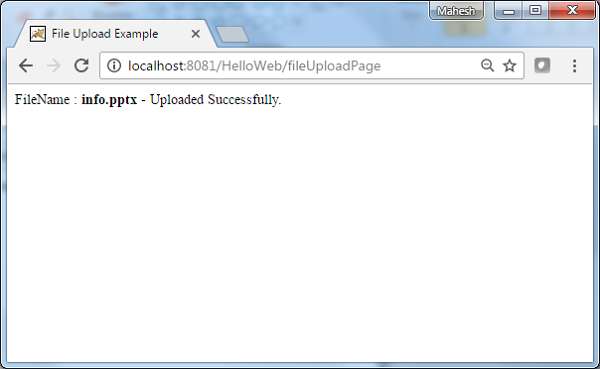
Spring MVC — Bean Name Url Handler Mapping Example
The following example shows how to use Bean Name URL Handler Mapping using the Spring Web MVC Framework. The BeanNameUrlHandlerMapping class is the default handler mapping class, which maps the URL request(s) to the name of the beans mentioned in the configuration.
<beans>
<bean class = "org.springframework.web.servlet.view.InternalResourceViewResolver">
<property name = "prefix" value = "/WEB-INF/jsp/"/>
<property name = "suffix" value = ".jsp"/>
</bean>
<bean class = "org.springframework.web.servlet.handler.BeanNameUrlHandlerMapping"/>
<bean name = "/helloWorld.htm"
class = "com.tutorialspoint.HelloController" />
<bean name = "/hello*"
class = "com.tutorialspoint.HelloController" />
<bean name = "/welcome.htm"
class = "com.tutorialspoint.WelcomeController"/>
</beans>
For example, using the above configuration, if URI
-
/helloWorld.htm or /hello{any letter}.htm is requested, DispatcherServlet will forward the request to the HelloController.
-
/welcome.htm is requested, DispatcherServlet will forward the request to the WelcomeController.
-
/welcome1.htm is requested, DispatcherServlet will not find any controller and server will throw 404 status error.
To start with, let us have a working Eclipse IDE in place and consider the following steps to develop a Dynamic Form based Web Application using the Spring Web Framework.
| Step | Description |
|---|---|
| 1 | Create a project with a name TestWeb under a package com.tutorialspoint as explained in the Spring MVC — Hello World chapter. |
| 2 | Create Java classes HelloController, WelcomeController under the com.tutorialspoint package. |
| 3 | Create view files hello.jsp, welcome.jsp under the jsp sub-folder. |
| 4 | The final step is to create the content of all source and configuration files and export the application as explained below. |
HelloController.java
package com.tutorialspoint;
import javax.servlet.http.HttpServletRequest;
import javax.servlet.http.HttpServletResponse;
import org.springframework.web.servlet.ModelAndView;
import org.springframework.web.servlet.mvc.AbstractController;
public class HelloController extends AbstractController{
@Override
protected ModelAndView handleRequestInternal(HttpServletRequest request,
HttpServletResponse response) throws Exception {
ModelAndView model = new ModelAndView("hello");
model.addObject("message", "Hello World!");
return model;
}
}
WelcomeController.java
package com.tutorialspoint;
import javax.servlet.http.HttpServletRequest;
import javax.servlet.http.HttpServletResponse;
import org.springframework.web.servlet.ModelAndView;
import org.springframework.web.servlet.mvc.AbstractController;
public class WelcomeController extends AbstractController{
@Override
protected ModelAndView handleRequestInternal(HttpServletRequest request,
HttpServletResponse response) throws Exception {
ModelAndView model = new ModelAndView("welcome");
model.addObject("message", "Welcome!");
return model;
}
}
TestWeb-servlet.xml
<beans xmlns = "http://www.springframework.org/schema/beans"
xmlns:context = "http://www.springframework.org/schema/context"
xmlns:xsi = "http://www.w3.org/2001/XMLSchema-instance"
xsi:schemaLocation = "
http://www.springframework.org/schema/beans
http://www.springframework.org/schema/beans/spring-beans-3.0.xsd
http://www.springframework.org/schema/context
http://www.springframework.org/schema/context/spring-context-3.0.xsd">
<bean class = "org.springframework.web.servlet.view.InternalResourceViewResolver">
<property name = "prefix" value = "/WEB-INF/jsp/"/>
<property name = "suffix" value = ".jsp"/>
</bean>
<bean class = "org.springframework.web.servlet.handler.BeanNameUrlHandlerMapping"/>
<bean name = "/helloWorld.htm"
class = "com.tutorialspoint.HelloController" />
<bean name = "/hello*"
class = "com.tutorialspoint.HelloController" />
<bean name = "/welcome.htm"
class = "com.tutorialspoint.WelcomeController"/>
</beans>
hello.jsp
<%@ page contentType = "text/html; charset = UTF-8" %>
<html>
<head>
<title>Hello World</title>
</head>
<body>
<h2>${message}</h2>
</body>
</html>
welcome.jsp
<%@ page contentType = "text/html; charset = UTF-8" %>
<html>
<head>
<title>Welcome</title>
</head>
<body>
<h2>${message}</h2>
</body>
</html>
Once you are done with creating source and configuration files, export your application. Right click on your application, use Export → WAR File option and save the TestWeb.war file in the Tomcat’s webapps folder.
Now, start your Tomcat server and make sure you are able to access other webpages from the webapps folder by using a standard browser. Try a URL − http://localhost:8080/TestWeb/helloWorld.htm and we will see the following screen, if everything is fine with the Spring Web Application.

Try a URL − http://localhost:8080/TestWeb/hello.htm and we will see the following screen, if everything is fine with the Spring Web Application.

Try a URL http://localhost:8080/TestWeb/welcome.htm and we will see the following screen, if everything is fine with the Spring Web Application.

Try a URL http://localhost:8080/TestWeb/welcome1.htm and we will see the following screen, if everything is fine with the Spring Web Application.

Spring MVC — Controller Class Name Handler Mapping Example
The following example shows how to use the Controller Class Name Handler Mapping using the Spring Web MVC framework. The ControllerClassNameHandlerMapping class is the convention-based handler mapping class, which maps the URL request(s) to the name of the controllers mentioned in the configuration. This class takes the Controller names and converts them to lower case with a leading «/».
For example − HelloController maps to «/hello*» URL.
<beans>
<bean class="org.springframework.web.servlet.view.InternalResourceViewResolver">
<property name = "prefix" value = "/WEB-INF/jsp/"/>
<property name = "suffix" value = ".jsp"/>
</bean>
<bean class = "org.springframework.web.servlet.mvc.support.ControllerClassNameHandlerMapping"/>
<bean class = "com.tutorialspoint.HelloController" />
<bean class = "com.tutorialspoint.WelcomeController"/>
</beans>
For example, using above configuration, if URI
-
/helloWorld.htm or /hello{any letter}.htm is requested, DispatcherServlet will forward the request to the HelloController.
-
/welcome.htm is requested, DispatcherServlet will forward the request to the WelcomeController.
-
/Welcome.htm is requested where W is capital cased, DispatcherServlet will not find any controller and the server will throw 404 status error.
To start with it, let us have a working Eclipse IDE in place and follow the subsequent steps to develop a Dynamic Form based Web Application using Spring Web Framework.
| Step | Description |
|---|---|
| 1 | Create a project with a name TestWeb under a package com.tutorialspoint as explained in the Spring MVC — Hello World chapter. |
| 2 | Create Java classes HelloController and WelcomeController under the com.tutorialspoint package. |
| 3 | Create view files hello.jsp, welcome.jsp under the jsp sub-folder. |
| 4 | The final step is to create the content of the source and configuration files and export the application as explained below. |
HelloController.java
package com.tutorialspoint;
import javax.servlet.http.HttpServletRequest;
import javax.servlet.http.HttpServletResponse;
import org.springframework.web.servlet.ModelAndView;
import org.springframework.web.servlet.mvc.AbstractController;
public class HelloController extends AbstractController{
@Override
protected ModelAndView handleRequestInternal(HttpServletRequest request,
HttpServletResponse response) throws Exception {
ModelAndView model = new ModelAndView("hello");
model.addObject("message", "Hello World!");
return model;
}
}
WelcomeController.java
package com.tutorialspoint;
import javax.servlet.http.HttpServletRequest;
import javax.servlet.http.HttpServletResponse;
import org.springframework.web.servlet.ModelAndView;
import org.springframework.web.servlet.mvc.AbstractController;
public class WelcomeController extends AbstractController{
@Override
protected ModelAndView handleRequestInternal(HttpServletRequest request,
HttpServletResponse response) throws Exception {
ModelAndView model = new ModelAndView("welcome");
model.addObject("message", "Welcome!");
return model;
}
}
TestWeb-servlet.xml
<beans xmlns = "http://www.springframework.org/schema/beans"
xmlns:context = "http://www.springframework.org/schema/context"
xmlns:xsi = "http://www.w3.org/2001/XMLSchema-instance"
xsi:schemaLocation = "
http://www.springframework.org/schema/beans
http://www.springframework.org/schema/beans/spring-beans-3.0.xsd
http://www.springframework.org/schema/context
http://www.springframework.org/schema/context/spring-context-3.0.xsd">
<bean class = "org.springframework.web.servlet.view.InternalResourceViewResolver">
<property name = "prefix" value = "/WEB-INF/jsp/"/>
<property name = "suffix" value = ".jsp"/>
</bean>
<bean class = "org.springframework.web.servlet.mvc.support.ControllerClassNameHandlerMapping"/>
<bean class = "com.tutorialspoint.HelloController" />
<bean class = "com.tutorialspoint.WelcomeController"/>
</beans>
hello.jsp
<%@ page contentType="text/html; charset = UTF-8" %>
<html>
<head>
<title>Hello World</title>
</head>
<body>
<h2>${message}</h2>
</body>
</html>
welcome.jsp
<%@ page contentType = "text/html; charset=UTF-8" %>
<html>
<head>
<title>Welcome</title>
</head>
<body>
<h2>${message}</h2>
</body>
</html>
Once you are done with creating source and configuration files, export your application. Right click on the application, use the Export → WAR File option and save the TestWeb.war file in Tomcat’s webapps folder.
Now, start your Tomcat server and make sure you are able to access other webpages from the webapps folder using a standard browser. Try a URL − http://localhost:8080/TestWeb/helloWorld.htm and we will see the following screen, if everything is fine with the Spring Web Application.
Try a URL http://localhost:8080/TestWeb/hello.htm and we will see the following screen, if everything is fine with the Spring Web Application.
Try a URL http://localhost:8080/TestWeb/welcome.htm and we will see the following screen, if everything is fine with the Spring Web Application.
Try a URL http://localhost:8080/TestWeb/Welcome.htm and we will see the following screen, if everything is fine with the Spring Web Application.

Spring MVC — Simple Url Handler Mapping Example
The following example shows how to use Simple URL Handler Mapping using the Spring Web MVC framework. The SimpleUrlHandlerMapping class helps to explicitly-map URLs with their controllers respectively.
<beans>
<bean class = "org.springframework.web.servlet.view.InternalResourceViewResolver">
<property name = "prefix" value = "/WEB-INF/jsp/"/>
<property name = "suffix" value = ".jsp"/>
</bean>
<bean class = "org.springframework.web.servlet.handler.SimpleUrlHandlerMapping">
<property name = "mappings">
<props>
<prop key = "/welcome.htm">welcomeController</prop>
<prop key = "/helloWorld.htm">helloController</prop>
</props>
</property>
</bean>
<bean id = "helloController" class = "com.tutorialspoint.HelloController" />
<bean id = "welcomeController" class = "com.tutorialspoint.WelcomeController"/>
</beans>
For example, using above configuration, if URI
-
/helloWorld.htm is requested, DispatcherServlet will forward the request to the HelloController.
-
/welcome.htm is requested, DispatcherServlet will forward the request to the WelcomeController.
To start with, let us have a working Eclipse IDE in place and consider the following steps to develop a Dynamic Form based Web Application using the Spring Web Framework.
| Step | Description |
|---|---|
| 1 | Create a project with a name TestWeb under a package com.tutorialspoint as explained in the Spring MVC — Hello World chapter. |
| 2 | Create Java classes HelloController and WelcomeController under the com.tutorialspoint package. |
| 3 | Create view files hello.jsp and welcome.jsp under the jsp sub-folder. |
| 4 | The final step is to create the content of the source and configuration files and export the application as explained below. |
HelloController.java
package com.tutorialspoint;
import javax.servlet.http.HttpServletRequest;
import javax.servlet.http.HttpServletResponse;
import org.springframework.web.servlet.ModelAndView;
import org.springframework.web.servlet.mvc.AbstractController;
public class HelloController extends AbstractController{
@Override
protected ModelAndView handleRequestInternal(HttpServletRequest request,
HttpServletResponse response) throws Exception {
ModelAndView model = new ModelAndView("hello");
model.addObject("message", "Hello World!");
return model;
}
}
WelcomeController.java
package com.tutorialspoint;
import javax.servlet.http.HttpServletRequest;
import javax.servlet.http.HttpServletResponse;
import org.springframework.web.servlet.ModelAndView;
import org.springframework.web.servlet.mvc.AbstractController;
public class WelcomeController extends AbstractController{
@Override
protected ModelAndView handleRequestInternal(HttpServletRequest request,
HttpServletResponse response) throws Exception {
ModelAndView model = new ModelAndView("welcome");
model.addObject("message", "Welcome!");
return model;
}
}
TestWeb-servlet.xml
<beans xmlns = "http://www.springframework.org/schema/beans"
xmlns:context = "http://www.springframework.org/schema/context"
xmlns:xsi = "http://www.w3.org/2001/XMLSchema-instance"
xsi:schemaLocation = "
http://www.springframework.org/schema/beans
http://www.springframework.org/schema/beans/spring-beans-3.0.xsd
http://www.springframework.org/schema/context
http://www.springframework.org/schema/context/spring-context-3.0.xsd">
<bean class = "org.springframework.web.servlet.view.InternalResourceViewResolver">
<property name = "prefix" value = "/WEB-INF/jsp/"/>
<property name = "suffix" value = ".jsp"/>
</bean>
<bean class = "org.springframework.web.servlet.handler.SimpleUrlHandlerMapping">
<property name = "mappings">
<props>
<prop key = "/welcome.htm">welcomeController</prop>
<prop key = "/helloWorld.htm">helloController</prop>
</props>
</property>
</bean>
<bean id = "helloController" class = "com.tutorialspoint.HelloController" />
<bean id = "welcomeController" class = "com.tutorialspoint.WelcomeController"/>
</beans>
hello.jsp
<%@ page contentType = "text/html; charset = UTF-8" %>
<html>
<head>
<title>Hello World</title>
</head>
<body>
<h2>${message}</h2>
</body>
</html>
welcome.jsp
<%@ page contentType = "text/html; charset = UTF-8" %>
<html>
<head>
<title>Welcome</title>
</head>
<body>
<h2>${message}</h2>
</body>
</html>
Once you are done with creating source and configuration files, export your application. Right click on your application, use the Export → WAR File option and save your TestWeb.war file in Tomcat’s webapps folder.
Now, start your Tomcat server and make sure you are able to access other webpages from the webapps folder by using a standard browser. Try a URL − http://localhost:8080/TestWeb/helloWorld.htm and we will see the following screen, if everything is fine with the Spring Web Application.
Try a URL http://localhost:8080/TestWeb/welcome.htm and you should see the following result if everything is fine with your Spring Web Application.
Spring MVC — Multi Action Controller Example
The following example shows how to use the Multi Action Controller using the Spring Web MVC framework. The MultiActionController class helps to map multiple URLs with their methods in a single controller respectively.
package com.tutorialspoint;
import javax.servlet.http.HttpServletRequest;
import javax.servlet.http.HttpServletResponse;
import org.springframework.web.servlet.ModelAndView;
import org.springframework.web.servlet.mvc.multiaction.MultiActionController;
public class UserController extends MultiActionController{
public ModelAndView home(HttpServletRequest request,
HttpServletResponse response) throws Exception {
ModelAndView model = new ModelAndView("home");
model.addObject("message", "Home");
return model;
}
public ModelAndView add(HttpServletRequest request,
HttpServletResponse response) throws Exception {
ModelAndView model = new ModelAndView("user");
model.addObject("message", "Add");
return model;
}
public ModelAndView remove(HttpServletRequest request,
HttpServletResponse response) throws Exception {
ModelAndView model = new ModelAndView("user");
model.addObject("message", "Remove");
return model;
}
}
<bean class = "org.springframework.web.servlet.handler.BeanNameUrlHandlerMapping"/> <bean name = "/home.htm" class = "com.tutorialspoint.UserController" /> <bean name = "/user/*.htm" class = "com.tutorialspoint.UserController" />
For example, using the above configuration, if URI −
-
/home.htm is requested, DispatcherServlet will forward the request to the UserController home() method.
-
user/add.htm is requested, DispatcherServlet will forward the request to the UserController add() method.
-
user/remove.htm is requested, DispatcherServlet will forward the request to the UserController remove() method.
To begin with, let us have a working Eclipse IDE in place and stick to the following steps to develop a Dynamic Form based Web Application using the Spring Web Framework.
| Step | Description |
|---|---|
| 1 | Create a project with a name TestWeb under a package com.tutorialspoint as explained in the Spring MVC — Hello World chapter. |
| 2 | Create a Java class UserController under the com.tutorialspoint package. |
| 3 | Create view files home.jsp and user.jsp under the jsp sub-folder. |
| 4 | The final step is to create the content of the source and configuration files and export the application as explained below. |
UserController.java
package com.tutorialspoint;
import javax.servlet.http.HttpServletRequest;
import javax.servlet.http.HttpServletResponse;
import org.springframework.web.servlet.ModelAndView;
import org.springframework.web.servlet.mvc.multiaction.MultiActionController;
public class UserController extends MultiActionController{
public ModelAndView home(HttpServletRequest request,
HttpServletResponse response) throws Exception {
ModelAndView model = new ModelAndView("home");
model.addObject("message", "Home");
return model;
}
public ModelAndView add(HttpServletRequest request,
HttpServletResponse response) throws Exception {
ModelAndView model = new ModelAndView("user");
model.addObject("message", "Add");
return model;
}
public ModelAndView remove(HttpServletRequest request,
HttpServletResponse response) throws Exception {
ModelAndView model = new ModelAndView("user");
model.addObject("message", "Remove");
return model;
}
}
TestWeb-servlet.xml
<beans xmlns = "http://www.springframework.org/schema/beans"
xmlns:context = "http://www.springframework.org/schema/context"
xmlns:xsi = "http://www.w3.org/2001/XMLSchema-instance"
xsi:schemaLocation = "
http://www.springframework.org/schema/beans
http://www.springframework.org/schema/beans/spring-beans-3.0.xsd
http://www.springframework.org/schema/context
http://www.springframework.org/schema/context/spring-context-3.0.xsd">
<bean class = "org.springframework.web.servlet.view.InternalResourceViewResolver">
<property name = "prefix" value = "/WEB-INF/jsp/"/>
<property name = "suffix" value = ".jsp"/>
</bean>
<bean class = "org.springframework.web.servlet.handler.BeanNameUrlHandlerMapping"/>
<bean name = "/home.htm"
class = "com.tutorialspoint.UserController" />
<bean name = "/user/*.htm"
class = "com.tutorialspoint.UserController" />
</beans>
home.jsp
<%@ page contentType = "text/html; charset = UTF-8" %>
<html>
<head>
<meta http-equiv = "Content-Type" content = "text/html; charset = ISO-8859-1">
<title>Home</title>
</head>
<body>
<a href = "user/add.htm" >Add</a> <br>
<a href = "user/remove.htm" >Remove</a>
</body>
</html>
user.jsp
<%@ page contentType = "text/html; charset = UTF-8" %>
<html>
<head>
<title>Hello World</title>
</head>
<body>
<h2>${message}</h2>
</body>
</html>
Once you are done with creating source and configuration files, export your application. Right click on your application, use Export → WAR File option and save the TestWeb.war file in Tomcat’s webapps folder.
Now, start your Tomcat server and make sure you are able to access other webpages from webapps folder using a standard browser. Now, try a URL − http://localhost:8080/TestWeb/home.htm and we will see the following screen, if everything is fine with the Spring Web Application.
Try a URL http://localhost:8080/TestWeb/user/add.htm and we will see the following screen, if everything is fine with the Spring Web Application.
Spring MVC — Properties Method Name Resolver Example
The following example shows how to use the Properties Method Name Resolver method of a Multi Action Controller using Spring Web MVC framework. The MultiActionController class helps to map multiple URLs with their methods in a single controller respectively.
package com.tutorialspoint;
import javax.servlet.http.HttpServletRequest;
import javax.servlet.http.HttpServletResponse;
import org.springframework.web.servlet.ModelAndView;
import org.springframework.web.servlet.mvc.multiaction.MultiActionController;
public class UserController extends MultiActionController{
public ModelAndView home(HttpServletRequest request,
HttpServletResponse response) throws Exception {
ModelAndView model = new ModelAndView("user");
model.addObject("message", "Home");
return model;
}
public ModelAndView add(HttpServletRequest request,
HttpServletResponse response) throws Exception {
ModelAndView model = new ModelAndView("user");
model.addObject("message", "Add");
return model;
}
public ModelAndView remove(HttpServletRequest request,
HttpServletResponse response) throws Exception {
ModelAndView model = new ModelAndView("user");
model.addObject("message", "Remove");
return model;
}
}
<bean class = "com.tutorialspoint.UserController">
<property name = "methodNameResolver">
<bean class = "org.springframework.web.servlet.mvc.multiaction.PropertiesMethodNameResolver">
<property name = "mappings">
<props>
<prop key = "/user/home.htm">home</prop>
<prop key = "/user/add.htm">add</prop>
<prop key = "/user/remove.htm">update</prop>
</props>
</property>
</bean>
</property>
</bean>
For example, using the above configuration, if URI −
-
/user/home.htm is requested, DispatcherServlet will forward the request to the UserController home() method.
-
/user/add.htm is requested, DispatcherServlet will forward the request to the UserController add() method.
-
/user/remove.htm is requested, DispatcherServlet will forward the request to the UserController remove() method.
To start with it, let us have a working Eclipse IDE in place and consider the following steps to develop a Dynamic Form based Web Application using the Spring Web Framework.
| Step | Description |
|---|---|
| 1 | Create a project with a name TestWeb under a package com.tutorialspoint as explained in the Spring MVC — Hello World chapter. |
| 2 | Create Java class UserController under the com.tutorialspoint package. |
| 3 | Create a view file user.jsp under the jsp sub-folder. |
| 4 | The final step is to create the content of the source and configuration files and export the application as explained below. |
UserController.java
package com.tutorialspoint;
import javax.servlet.http.HttpServletRequest;
import javax.servlet.http.HttpServletResponse;
import org.springframework.web.servlet.ModelAndView;
import org.springframework.web.servlet.mvc.multiaction.MultiActionController;
public class UserController extends MultiActionController{
public ModelAndView home(HttpServletRequest request,
HttpServletResponse response) throws Exception {
ModelAndView model = new ModelAndView("user");
model.addObject("message", "Home");
return model;
}
public ModelAndView add(HttpServletRequest request,
HttpServletResponse response) throws Exception {
ModelAndView model = new ModelAndView("user");
model.addObject("message", "Add");
return model;
}
public ModelAndView remove(HttpServletRequest request,
HttpServletResponse response) throws Exception {
ModelAndView model = new ModelAndView("user");
model.addObject("message", "Remove");
return model;
}
}
TestWeb-servlet.xml
<beans xmlns = "http://www.springframework.org/schema/beans"
xmlns:context = "http://www.springframework.org/schema/context"
xmlns:xsi = "http://www.w3.org/2001/XMLSchema-instance"
xsi:schemaLocation = "
http://www.springframework.org/schema/beans
http://www.springframework.org/schema/beans/spring-beans-3.0.xsd
http://www.springframework.org/schema/context
http://www.springframework.org/schema/context/spring-context-3.0.xsd">
<bean class = "org.springframework.web.servlet.view.InternalResourceViewResolver">
<property name = "prefix" value = "/WEB-INF/jsp/"/>
<property name = "suffix" value = ".jsp"/>
</bean>
<bean class = "org.springframework.web.servlet.mvc.support.ControllerClassNameHandlerMapping">
<property name = "caseSensitive" value = "true" />
</bean>
<bean class = "com.tutorialspoint.UserController">
<property name = "methodNameResolver">
<bean class = "org.springframework.web.servlet.mvc.multiaction.PropertiesMethodNameResolver">
<property name = "mappings">
<props>
<prop key = "/user/home.htm">home</prop>
<prop key = "/user/add.htm">add</prop>
<prop key = "/user/remove.htm">update</prop>
</props>
</property>
</bean>
</property>
</bean>
</beans>
user.jsp
<%@ page contentType = "text/html; charset = UTF-8" %>
<html>
<head>
<title>Hello World</title>
</head>
<body>
<h2>${message}</h2>
</body>
</html>
Once you are done with creating source and configuration files, export your application. Right click on your application, use Export → WAR File option and save the TestWeb.war file in Tomcat’s webapps folder.
Now, start your Tomcat server and make sure you are able to access other webpages from the webapps folder using a standard browser. Now, try a URL − http://localhost:8080/TestWeb/user/add.htm and we will see the following screen, if everything is fine with the Spring Web Application.
Spring MVC — Parameter Method Name Resolver Example
The following example shows how to use the Parameter Method Name Resolver of a Multi Action Controller using the Spring Web MVC framework. The MultiActionController class helps to map multiple URLs with their methods in a single controller respectively.
package com.tutorialspoint;
import javax.servlet.http.HttpServletRequest;
import javax.servlet.http.HttpServletResponse;
import org.springframework.web.servlet.ModelAndView;
import org.springframework.web.servlet.mvc.multiaction.MultiActionController;
public class UserController extends MultiActionController{
public ModelAndView home(HttpServletRequest request,
HttpServletResponse response) throws Exception {
ModelAndView model = new ModelAndView("user");
model.addObject("message", "Home");
return model;
}
public ModelAndView add(HttpServletRequest request,
HttpServletResponse response) throws Exception {
ModelAndView model = new ModelAndView("user");
model.addObject("message", "Add");
return model;
}
public ModelAndView remove(HttpServletRequest request,
HttpServletResponse response) throws Exception {
ModelAndView model = new ModelAndView("user");
model.addObject("message", "Remove");
return model;
}
}
<bean class = "com.tutorialspoint.UserController">
<property name = "methodNameResolver">
<bean class = "org.springframework.web.servlet.mvc.multiaction.ParameterMethodNameResolver">
<property name = "paramName" value = "action"/>
</bean>
</property>
</bean>
For example, using the above configuration, if URI −
-
/user/*.htm?action=home is requested, DispatcherServlet will forward the request to the UserController home() method.
-
/user/*.htm?action=add is requested, DispatcherServlet will forward the request to the UserController add() method.
-
/user/*.htm?action=remove is requested, DispatcherServlet will forward the request to the UserController remove() method.
To start with, let us have a working Eclipse IDE in place and adhere to the following steps to develop a Dynamic Form based Web Application using the Spring Web Framework.
| Step | Description |
|---|---|
| 1 | Create a project with a name TestWeb under a package com.tutorialspoint as explained in the Spring MVC — Hello World chapter. |
| 2 | Create a Java class UserController under the com.tutorialspoint package. |
| 3 | Create a view file user.jsp under the jsp sub-folder. |
| 4 | The final step is to create the content of the source and configuration files and export the application as explained below. |
UserController.java
package com.tutorialspoint;
import javax.servlet.http.HttpServletRequest;
import javax.servlet.http.HttpServletResponse;
import org.springframework.web.servlet.ModelAndView;
import org.springframework.web.servlet.mvc.multiaction.MultiActionController;
public class UserController extends MultiActionController{
public ModelAndView home(HttpServletRequest request,
HttpServletResponse response) throws Exception {
ModelAndView model = new ModelAndView("user");
model.addObject("message", "Home");
return model;
}
public ModelAndView add(HttpServletRequest request,
HttpServletResponse response) throws Exception {
ModelAndView model = new ModelAndView("user");
model.addObject("message", "Add");
return model;
}
public ModelAndView remove(HttpServletRequest request,
HttpServletResponse response) throws Exception {
ModelAndView model = new ModelAndView("user");
model.addObject("message", "Remove");
return model;
}
}
TestWeb-servlet.xml
<beans xmlns = "http://www.springframework.org/schema/beans"
xmlns:context = "http://www.springframework.org/schema/context"
xmlns:xsi = "http://www.w3.org/2001/XMLSchema-instance"
xsi:schemaLocation = "
http://www.springframework.org/schema/beans
http://www.springframework.org/schema/beans/spring-beans-3.0.xsd
http://www.springframework.org/schema/context
http://www.springframework.org/schema/context/spring-context-3.0.xsd">
<bean class = "org.springframework.web.servlet.view.InternalResourceViewResolver">
<property name = "prefix" value = "/WEB-INF/jsp/"/>
<property name = "suffix" value = ".jsp"/>
</bean>
<bean class = "org.springframework.web.servlet.mvc.support.ControllerClassNameHandlerMapping">
<property name = "caseSensitive" value = "true" />
</bean>
<bean class = "com.tutorialspoint.UserController">
<property name = "methodNameResolver">
<bean class = "org.springframework.web.servlet.mvc.multiaction.ParameterMethodNameResolver">
<property name = "paramName" value = "action"/>
</bean>
</property>
</bean>
</beans>
user.jsp
<%@ page contentType="text/html; charset=UTF-8" %>
<html>
<head>
<title>Hello World</title>
</head>
<body>
<h2>${message}</h2>
</body>
</html>
Once you are done with creating source and configuration files, export your application. Right click on your application, use Export → WAR File option and save the TestWeb.war file in Tomcat’s webapps folder.
Now, start your Tomcat server and make sure you are able to access other webpages from the webapps folder using a standard browser. Now, try a URL − http://localhost:8080/TestWeb/user/test.htm?action=home and we will see the following screen, if everything is fine with the Spring Web Application.
Spring MVC — Parameterizable View Controller Example
The following example shows how to use the Parameterizable View Controller method of a Multi Action Controller using the Spring Web MVC framework. The Parameterizable View allows mapping a webpage with a request.
package com.tutorialspoint;
import javax.servlet.http.HttpServletRequest;
import javax.servlet.http.HttpServletResponse;
import org.springframework.web.servlet.ModelAndView;
import org.springframework.web.servlet.mvc.multiaction.MultiActionController;
public class UserController extends MultiActionController{
public ModelAndView home(HttpServletRequest request,
HttpServletResponse response) throws Exception {
ModelAndView model = new ModelAndView("user");
model.addObject("message", "Home");
return model;
}
}
<bean class="org.springframework.web.servlet.handler.SimpleUrlHandlerMapping">
<property name="mappings">
<value>
index.htm=userController
</value>
</property>
</bean>
<bean id="userController" class="org.springframework.web.servlet.mvc.ParameterizableViewController">
<property name="viewName" value="user"/>
</bean>
For example, using the above configuration, if URI.
-
/index.htm is requested, DispatcherServlet will forward the request to the UserController controller with viewName set as user.jsp.
To start with it, let us have a working Eclipse IDE in place and stick to the following steps to develop a Dynamic Form based Web Application using Spring Web Framework.
| Step | Description |
|---|---|
| 1 | Create a project with a name TestWeb under a package com.tutorialspoint as explained in the Spring MVC — Hello World chapter. |
| 2 | Create a Java class UserController under the com.tutorialspoint package. |
| 3 | Create a view file user.jsp under the jsp sub-folder. |
| 4 | The final step is to create the content of the source and configuration files and export the application as explained below. |
UserController.java
package com.tutorialspoint;
import javax.servlet.http.HttpServletRequest;
import javax.servlet.http.HttpServletResponse;
import org.springframework.web.servlet.ModelAndView;
import org.springframework.web.servlet.mvc.multiaction.MultiActionController;
public class UserController extends MultiActionController{
public ModelAndView home(HttpServletRequest request,
HttpServletResponse response) throws Exception {
ModelAndView model = new ModelAndView("user");
model.addObject("message", "Home");
return model;
}
}
TestWeb-servlet.xml
<beans xmlns = "http://www.springframework.org/schema/beans"
xmlns:context = "http://www.springframework.org/schema/context"
xmlns:xsi = "http://www.w3.org/2001/XMLSchema-instance"
xsi:schemaLocation = "
http://www.springframework.org/schema/beans
http://www.springframework.org/schema/beans/spring-beans-3.0.xsd
http://www.springframework.org/schema/context
http://www.springframework.org/schema/context/spring-context-3.0.xsd">
<bean class = "org.springframework.web.servlet.view.InternalResourceViewResolver">
<property name = "prefix" value = "/WEB-INF/jsp/"/>
<property name = "suffix" value = ".jsp"/>
</bean>
<bean class = "org.springframework.web.servlet.handler.SimpleUrlHandlerMapping">
<property name = "mappings">
<value>
index.htm = userController
</value>
</property>
</bean>
<bean id = "userController" class = "org.springframework.web.servlet.mvc.ParameterizableViewController">
<property name = "viewName" value="user"/>
</bean>
</beans>
user.jsp
<%@ page contentType="text/html; charset=UTF-8" %>
<html>
<head>
<title>Hello World</title>
</head>
<body>
<h2>Hello World</h2>
</body>
</html>
Once you are done with creating source and configuration files, export your application. Right click on your application, use Export → WAR File option and save the TestWeb.war file in Tomcat’s webapps folder.
Now, start your Tomcat server and make sure you are able to access other webpages from webapps folder using a standard browser. Now, try a URL – http://localhost:8080/TestWeb/index.htm and you will see the following screen, if everything is fine with the Spring Web Application.
Spring MVC — Internal Resource View Resolver Example
The InternalResourceViewResolver is used to resolve the provided URI to actual URI. The following example shows how to use the InternalResourceViewResolver using the Spring Web MVC Framework. The InternalResourceViewResolver allows mapping webpages with requests.
package com.tutorialspoint;
import org.springframework.stereotype.Controller;
import org.springframework.web.bind.annotation.RequestMapping;
import org.springframework.web.bind.annotation.RequestMethod;
import org.springframework.ui.ModelMap;
@Controller
@RequestMapping("/hello")
public class HelloController{
@RequestMapping(method = RequestMethod.GET)
public String printHello(ModelMap model) {
model.addAttribute("message", "Hello Spring MVC Framework!");
return "hello";
}
}
<bean class = "org.springframework.web.servlet.view.InternalResourceViewResolver"> <property name = "prefix" value = "/WEB-INF/jsp/"/> <property name = "suffix" value = ".jsp"/> </bean>
For example, using the above configuration, if URI
-
/hello is requested, DispatcherServlet will forward the request to the prefix + viewname + suffix = /WEB-INF/jsp/hello.jsp.
To start with, let us have a working Eclipse IDE in place and then consider the following steps to develop a Dynamic Form based Web Application using the Spring Web Framework.
| Step | Description |
|---|---|
| 1 | Create a project with a name TestWeb under a package com.tutorialspointas explained in the Spring MVC — Hello World Example chapter. |
| 2 | Create a Java classes HelloController under the com.tutorialspointpackage. |
| 3 | Create a view file hello.jsp under jsp sub-folder. |
| 4 | The final step is to create the content of the source and configuration files and export the application as explained below. |
HelloController.java
package com.tutorialspoint;
import org.springframework.stereotype.Controller;
import org.springframework.web.bind.annotation.RequestMapping;
import org.springframework.web.bind.annotation.RequestMethod;
import org.springframework.ui.ModelMap;
@Controller
@RequestMapping("/hello")
public class HelloController{
@RequestMapping(method = RequestMethod.GET)
public String printHello(ModelMap model) {
model.addAttribute("message", "Hello Spring MVC Framework!");
return "hello";
}
}
TestWeb-servlet.xml
<beans xmlns = "http://www.springframework.org/schema/beans"
xmlns:context = "http://www.springframework.org/schema/context"
xmlns:xsi = "http://www.w3.org/2001/XMLSchema-instance"
xsi:schemaLocation = "
http://www.springframework.org/schema/beans
http://www.springframework.org/schema/beans/spring-beans-3.0.xsd
http://www.springframework.org/schema/context
http://www.springframework.org/schema/context/spring-context-3.0.xsd">
<context:component-scan base-package = "com.tutorialspoint" />
<bean class = "org.springframework.web.servlet.view.InternalResourceViewResolver">
<property name = "prefix" value = "/WEB-INF/jsp/" />
<property name = "suffix" value = ".jsp" />
</bean>
</beans>
hello.jsp
<%@ page contentType = "text/html; charset = UTF-8" %>
<html>
<head>
<title>Hello World</title>
</head>
<body>
<h2>${message}</h2>
</body>
</html>
Once you are done with creating source and configuration files, export your application. Right click on your application, use Export → WAR File option and save the TestWeb.war file in Tomcat’s webapps folder.
Now, start your Tomcat server and make sure you are able to access other webpages from the webapps folder using a standard browser. Try to access the URL – http://localhost:8080/TestWeb/hello and if everything is fine with the Spring Web Application, we will see the following screen.

Spring MVC — Xml View Resolver Example
The XmlViewResolver is used to resolve the view names using view beans defined in xml file. The following example shows how to use the XmlViewResolver using Spring Web MVC framework.
TestWeb-servlet.xml
<bean class = "org.springframework.web.servlet.view.XmlViewResolver">
<property name = "location">
<value>/WEB-INF/views.xml</value>
</property>
</bean>
views.xml
<bean id = "hello" class = "org.springframework.web.servlet.view.JstlView"> <property name = "url" value = "/WEB-INF/jsp/hello.jsp" /> </bean>
For example, using the above configuration, if URI −
-
/hello is requested, DispatcherServlet will forward the request to the hello.jsp defined by bean hello in the view.xml.
To start with, let us have a working Eclipse IDE in place and stick to the following steps to develop a Dynamic Form based Web Application using the Spring Web Framework.
| Step | Description |
|---|---|
| 1 | Create a project with a name TestWeb under a package com.tutorialspoint as explained in the Spring MVC — Hello World chapter. |
| 2 | Create a Java class HelloController under the com.tutorialspointpackage. |
| 3 | Create a view file hello.jsp under the jsp sub-folder. |
| 4 | Download JSTL library jstl.jar. Put it in your CLASSPATH. |
| 5 | The final step is to create the content of the source and configuration files and export the application as explained below. |
HelloController.java
package com.tutorialspoint;
import org.springframework.stereotype.Controller;
import org.springframework.web.bind.annotation.RequestMapping;
import org.springframework.web.bind.annotation.RequestMethod;
import org.springframework.ui.ModelMap;
@Controller
@RequestMapping("/hello")
public class HelloController{
@RequestMapping(method = RequestMethod.GET)
public String printHello(ModelMap model) {
model.addAttribute("message", "Hello Spring MVC Framework!");
return "hello";
}
}
TestWeb-servlet.xml
<beans xmlns = "http://www.springframework.org/schema/beans"
xmlns:context = "http://www.springframework.org/schema/context"
xmlns:xsi = "http://www.w3.org/2001/XMLSchema-instance"
xsi:schemaLocation = "
http://www.springframework.org/schema/beans
http://www.springframework.org/schema/beans/spring-beans-3.0.xsd
http://www.springframework.org/schema/context
http://www.springframework.org/schema/context/spring-context-3.0.xsd">
<context:component-scan base-package = "com.tutorialspoint" />
<bean class = "org.springframework.web.servlet.view.XmlViewResolver">
<property name = "location">
<value>/WEB-INF/views.xml</value>
</property>
</bean>
</beans>
views.xml
<beans xmlns = "http://www.springframework.org/schema/beans"
xmlns:context = "http://www.springframework.org/schema/context"
xmlns:xsi = "http://www.w3.org/2001/XMLSchema-instance"
xsi:schemaLocation = "
http://www.springframework.org/schema/beans
http://www.springframework.org/schema/beans/spring-beans-3.0.xsd
http://www.springframework.org/schema/context
http://www.springframework.org/schema/context/spring-context-3.0.xsd">
<bean id = "hello"
class = "org.springframework.web.servlet.view.JstlView">
<property name = "url" value = "/WEB-INF/jsp/hello.jsp" />
</bean>
</beans>
hello.jsp
<%@ page contentType = "text/html; charset = UTF-8" %>
<html>
<head>
<title>Hello World</title>
</head>
<body>
<h2>${message}</h2>
</body>
</html>
Once you are done with creating source and configuration files, export your application. Right click on your application, use Export → WAR File option and save the HelloWeb.war file in Tomcat’s webapps folder.
Now, start your Tomcat server and make sure you are able to access other webpages from the webapps folder using a standard browser. Try to access the URL − http://localhost:8080/HelloWeb/hello and if everything is fine with the Spring Web Application, we will see the following screen.
Spring MVC — Resource Bundle View Resolver Example
The ResourceBundleViewResolver is used to resolve the view names using view beans defined in the properties file. The following example shows how to use the ResourceBundleViewResolver using the Spring Web MVC Framework.
TestWeb-servlet.xml
<bean class = "org.springframework.web.servlet.view.ResourceBundleViewResolver"> <property name = "basename" value = "views" /> </bean>
Here, the basename refers to name of the resource bundle, which carries the views. The default name of the resource bundle is views.properties, which can be overridden using the basename property.
views.properties
hello.(class) = org.springframework.web.servlet.view.JstlView hello.url = /WEB-INF/jsp/hello.jsp
For example, using the above configuration, if URI −
-
/hello is requested, DispatcherServlet will forward the request to the hello.jsp defined by bean hello in the views.properties.
-
Here, «hello» is the view name to be matched. Whereas, class refers to the view type and URL is the view’s location.
To start with, let us have a working Eclipse IDE in place and consider the following steps to develop a Dynamic Form based Web Application using Spring Web Framework.
| Step | Description |
|---|---|
| 1 | Create a project with a name TestWeb under a package com.tutorialspoint as explained in the Spring MVC — Hello World chapter. |
| 2 | Create a Java class HelloController under the com.tutorialspointpackage. |
| 3 | Create a view file hello.jsp under the jsp sub-folder. |
| 4 | Create a properties file views.properties under the src folder. |
| 5 | Download JSTL library jstl.jar. Put it in your CLASSPATH. |
| 6 | The final step is to create the content of the source and configuration files and export the application as explained below. |
HelloController.java
package com.tutorialspoint;
import org.springframework.stereotype.Controller;
import org.springframework.web.bind.annotation.RequestMapping;
import org.springframework.web.bind.annotation.RequestMethod;
import org.springframework.ui.ModelMap;
@Controller
@RequestMapping("/hello")
public class HelloController{
@RequestMapping(method = RequestMethod.GET)
public String printHello(ModelMap model) {
model.addAttribute("message", "Hello Spring MVC Framework!");
return "hello";
}
}
TestWeb-servlet.xml
<beans xmlns = "http://www.springframework.org/schema/beans"
xmlns:context = "http://www.springframework.org/schema/context"
xmlns:xsi = "http://www.w3.org/2001/XMLSchema-instance"
xsi:schemaLocation = "
http://www.springframework.org/schema/beans
http://www.springframework.org/schema/beans/spring-beans-3.0.xsd
http://www.springframework.org/schema/context
http://www.springframework.org/schema/context/spring-context-3.0.xsd">
<context:component-scan base-package = "com.tutorialspoint" />
<bean class = "org.springframework.web.servlet.view.ResourceBundleViewResolver">
<property name = "basename" value = "views" />
</bean>
</beans>
views.properties
hello.(class) = org.springframework.web.servlet.view.JstlView hello.url = /WEB-INF/jsp/hello.jsp
hello.jsp
<%@ page contentType="text/html; charset=UTF-8" %>
<html>
<head>
<title>Hello World</title>
</head>
<body>
<h2>${message}</h2>
</body>
</html>
Once you are done with creating source and configuration files, export your application. Right click on your application, use Export → WAR File option and save your HelloWeb.war file in Tomcat’s webapps folder.
Now, start your Tomcat server and make sure you are able to access other webpages from the webapps folder using a standard browser. Try to access the URL − http://localhost:8080/HelloWeb/hello and if everything is fine with the Spring Web Application, we will see the following screen.
Spring MVC — Multiple Resolver Mapping Example
In case you want to use a Multiple View Resolver in a Spring MVC application then priority order can be set using the order property. The following example shows how to use the ResourceBundleViewResolver and the InternalResourceViewResolver in the Spring Web MVC Framework.
TestWeb-servlet.xml
<bean class = "org.springframework.web.servlet.view.ResourceBundleViewResolver"> <property name = "basename" value = "views" /> <property name = "order" value = "0" /> </bean> <bean class = "org.springframework.web.servlet.view.InternalResourceViewResolver"> <property name = "prefix" value = "/WEB-INF/jsp/" /> <property name = "suffix" value = ".jsp" /> <property name = "order" value = "1" /> </bean>
Here, the order property defines the ranking of a view resolver. In this, 0 is the first resolver and 1 is the next resolver and so on.
views.properties
hello.(class) = org.springframework.web.servlet.view.JstlView hello.url = /WEB-INF/jsp/hello.jsp
For example, using the above configuration, if URI −
-
/hello is requested, DispatcherServlet will forward the request to the hello.jsp defined by bean hello in views.properties.
To start with, let us have a working Eclipse IDE in place and consider the following steps to develop a Dynamic Form based Web Application using the Spring Web Framework.
| Step | Description |
|---|---|
| 1 | Create a project with a name TestWeb under a package com.tutorialspoint as explained in the Spring MVC — Hello World chapter. |
| 2 | Create a Java class HelloController under the com.tutorialspointpackage. |
| 3 | Create a view file hello.jsp under the jsp sub-folder. |
| 4 | Create a properties file views.properties under the SRC folder. |
| 5 | Download the JSTL library jstl.jar. Put it in your CLASSPATH. |
| 6 | The final step is to create the content of the source and configuration files and export the application as explained below. |
HelloController.java
package com.tutorialspoint;
import org.springframework.stereotype.Controller;
import org.springframework.web.bind.annotation.RequestMapping;
import org.springframework.web.bind.annotation.RequestMethod;
import org.springframework.ui.ModelMap;
@Controller
@RequestMapping("/hello")
public class HelloController{
@RequestMapping(method = RequestMethod.GET)
public String printHello(ModelMap model) {
model.addAttribute("message", "Hello Spring MVC Framework!");
return "hello";
}
}
TestWeb-servlet.xml
<beans xmlns = "http://www.springframework.org/schema/beans"
xmlns:context = "http://www.springframework.org/schema/context"
xmlns:xsi = "http://www.w3.org/2001/XMLSchema-instance"
xsi:schemaLocation = "
http://www.springframework.org/schema/beans
http://www.springframework.org/schema/beans/spring-beans-3.0.xsd
http://www.springframework.org/schema/context
http://www.springframework.org/schema/context/spring-context-3.0.xsd">
<context:component-scan base-package = "com.tutorialspoint" />
<bean class = "org.springframework.web.servlet.view.ResourceBundleViewResolver">
<property name = "basename" value = "views" />
<property name = "order" value = "0" />
</bean>
<bean class = "org.springframework.web.servlet.view.InternalResourceViewResolver">
<property name = "prefix" value = "/WEB-INF/jsp/" />
<property name = "suffix" value = ".jsp" />
<property name = "order" value = "1" />
</bean>
</beans>
views.properties
hello.(class) = org.springframework.web.servlet.view.JstlView hello.url = /WEB-INF/jsp/hello.jsp
hello.jsp
<%@ page contentType = "text/html; charset = UTF-8" %>
<html>
<head>
<title>Hello World</title>
</head>
<body>
<h2>${message}</h2>
</body>
</html>
Once you are done with creating source and configuration files, export your application. Right click on your application, use Export → WAR File option and save your HelloWeb.war file in Tomcat’s webapps folder.
Now, start the Tomcat server and make sure you are able to access other webpages from the webapps folder using a standard browser. Try to access the URL − http://localhost:8080/HelloWeb/hello, if everything is fine with the Spring Web Application, we will see the following screen.
Spring MVC — Hibernate Validator Example
The following example shows how to use Error Handling and Validators in forms using the Spring Web MVC framework. To begin with, let us have a working Eclipse IDE in place and adhere to the following steps to develop a Dynamic Form based Web Application using the Spring Web Framework.
| Step | Description |
|---|---|
| 1 | Create a project with the name TestWeb under a package com.tutorialspoint as explained in the Spring MVC — Hello World chapter. |
| 2 | Create Java classes Student, StudentController and StudentValidator under the com.tutorialspoint package. |
| 3 | Create view files addStudent.jsp and result.jsp under the jsp sub-folder. |
| 4 | Download Hibernate Validator library Hibernate Validator. Extract hibernate-validator-5.3.4.Final.jar and required dependencies present under the required folder of the downloaded zip file. Put them in your CLASSPATH. |
| 5 | Create a properties file messages.properties under the SRC folder. |
| 6 | The final step is to create the content of the source and configuration files and export the application as explained below. |
Student.java
package com.tutorialspoint;
import org.hibernate.validator.constraints.NotEmpty;
import org.hibernate.validator.constraints.Range;
public class Student {
@Range(min = 1, max = 150)
private Integer age;
@NotEmpty
private String name;
private Integer id;
public void setAge(Integer age) {
this.age = age;
}
public Integer getAge() {
return age;
}
public void setName(String name) {
this.name = name;
}
public String getName() {
return name;
}
public void setId(Integer id) {
this.id = id;
}
public Integer getId() {
return id;
}
}
StudentController.java
package com.tutorialspoint;
import org.springframework.stereotype.Controller;
import org.springframework.ui.Model;
import org.springframework.validation.BindingResult;
import org.springframework.validation.annotation.Validated;
import org.springframework.web.bind.annotation.ModelAttribute;
import org.springframework.web.bind.annotation.RequestMapping;
import org.springframework.web.bind.annotation.RequestMethod;
import org.springframework.web.servlet.ModelAndView;
@Controller
public class StudentController {
@RequestMapping(value = "/addStudent", method = RequestMethod.GET)
public ModelAndView student() {
return new ModelAndView("addStudent", "command", new Student());
}
@ModelAttribute("student")
public Student createStudentModel() {
return new Student();
}
@RequestMapping(value = "/addStudent", method = RequestMethod.POST)
public String addStudent(@ModelAttribute("student") @Validated Student student,
BindingResult bindingResult, Model model) {
if (bindingResult.hasErrors()) {
return "addStudent";
}
model.addAttribute("name", student.getName());
model.addAttribute("age", student.getAge());
model.addAttribute("id", student.getId());
return "result";
}
}
messages.properties
NotEmpty.student.name = Name is required! Range.student.age = Age value must be between 1 and 150!
Here, the key is <Annotation>.<object-name>.<attribute>. Value is the message to be displayed.
TestWeb-servlet.xml
<beans xmlns = "http://www.springframework.org/schema/beans"
xmlns:context = "http://www.springframework.org/schema/context"
xmlns:mvc = "http://www.springframework.org/schema/mvc"
xmlns:xsi = "http://www.w3.org/2001/XMLSchema-instance"
xsi:schemaLocation = "
http://www.springframework.org/schema/beans
http://www.springframework.org/schema/beans/spring-beans-3.0.xsd
http://www.springframework.org/schema/context
http://www.springframework.org/schema/context/spring-context-3.0.xsd
http://www.springframework.org/schema/mvc
http://www.springframework.org/schema/mvc/spring-mvc-3.0.xsd">
<context:component-scan base-package = "com.tutorialspoint" />
<mvc:annotation-driven />
<bean class = "org.springframework.context.support.ResourceBundleMessageSource"
id = "messageSource">
<property name = "basename" value = "messages" />
</bean>
<bean class = "org.springframework.web.servlet.view.InternalResourceViewResolver">
<property name = "prefix" value = "/WEB-INF/jsp/" />
<property name = "suffix" value = ".jsp" />
</bean>
</beans>
Here, for the first service method student(), we have passed a blank Studentobject> in the ModelAndView object with name «command», because the spring framework expects an object with name «command», if you are using <form:form> tags in your JSP file. So, when the student() method is called, it returns addStudent.jsp view.
The second service method addStudent() will be called against a POST method on the HelloWeb/addStudent URL. You will prepare your model object based on the submitted information. Finally, a «result» view will be returned from the service method, which will result in rendering the result.jsp. In case there are errors generated using validator then same view «addStudent» is returned, Spring automatically injects error messages from BindingResult in view.
addStudent.jsp
<%@taglib uri = "http://www.springframework.org/tags/form" prefix = "form"%>
<html>
<head>
<title>Spring MVC Form Handling</title>
</head>
<style>
.error {
color: #ff0000;
}
.errorblock {
color: #000;
background-color: #ffEEEE;
border: 3px solid #ff0000;
padding: 8px;
margin: 16px;
}
</style>
<body>
<h2>Student Information</h2>
<form:form method = "POST" action = "/TestWeb/addStudent" commandName = "student">
<form:errors path = "*" cssClass = "errorblock" element = "div" />
<table>
<tr>
<td><form:label path = "name">Name</form:label></td>
<td><form:input path = "name" /></td>
<td><form:errors path = "name" cssClass = "error" /></td>
</tr>
<tr>
<td><form:label path = "age">Age</form:label></td>
<td><form:input path = "age" /></td>
<td><form:errors path = "age" cssClass = "error" /></td>
</tr>
<tr>
<td><form:label path = "id">id</form:label></td>
<td><form:input path = "id" /></td>
</tr>
<tr>
<td colspan = "2">
<input type = "submit" value = "Submit"/>
</td>
</tr>
</table>
</form:form>
</body>
</html>
Here, we are using the <form:errors /> tag with path=»*» to render error messages. For example −
<form:errors path = "*" cssClass = "errorblock" element = "div" />
It will render error messages for all input validations. We are using <form:errors /> tag with path = «name» to render error message for the name field.
For example −
<form:errors path = "name" cssClass = "error" /> <form:errors path = "age" cssClass = "error" />
It will render error messages for name and age field validations.
result.jsp
<%@taglib uri = "http://www.springframework.org/tags/form" prefix = "form"%>
<html>
<head>
<title>Spring MVC Form Handling</title>
</head>
<body>
<h2>Submitted Student Information</h2>
<table>
<tr>
<td>Name</td>
<td>${name}</td>
</tr>
<tr>
<td>Age</td>
<td>${age}</td>
</tr>
<tr>
<td>ID</td>
<td>${id}</td>
</tr>
</table>
</body>
</html>
Once you are done with creating source and configuration files, export your application. Right click on your application, use Export → WAR File option and save the HelloWeb.war file in Tomcat’s webapps folder.
Now, start the Tomcat server and make sure you are able to access other webpages from the webapps folder using a standard browser. Try a URL − http://localhost:8080/TestWeb/addStudent and we will see the following screen, if you have entered invalid values.

Spring MVC — Generate RSS Feed Example
The following example shows how to generate RSS Feed using the Spring Web MVC Framework. To start with, let us have a working Eclipse IDE in place and then consider the following steps to develop a Dynamic Form based Web Application using the Spring Web Framework.
| Step | Description |
|---|---|
| 1 | Create a project with the name TestWeb under a package com.tutorialspoint as explained in the Spring MVC — Hello World chapter. |
| 2 | Create Java classes RSSMessage, RSSFeedViewer and RSSController under the com.tutorialspoint package. |
| 3 | Download the Rome library Rome and its dependencies rome-utils, jdom and slf4j from the same maven repository page. Put them in your CLASSPATH. |
| 4 | Create a properties file messages.properties under the SRC folder. |
| 5 | The final step is to create the content of the source and configuration files and export the application as explained below. |
RSSMessage.java
package com.tutorialspoint;
import java.util.Date;
public class RSSMessage {
String title;
String url;
String summary;
Date createdDate;
public String getTitle() {
return title;
}
public void setTitle(String title) {
this.title = title;
}
public String getUrl() {
return url;
}
public void setUrl(String url) {
this.url = url;
}
public String getSummary() {
return summary;
}
public void setSummary(String summary) {
this.summary = summary;
}
public Date getCreatedDate() {
return createdDate;
}
public void setCreatedDate(Date createdDate) {
this.createdDate = createdDate;
}
}
RSSFeedViewer.java
package com.tutorialspoint;
import java.util.ArrayList;
import java.util.List;
import java.util.Map;
import javax.servlet.http.HttpServletRequest;
import javax.servlet.http.HttpServletResponse;
import org.springframework.web.servlet.view.feed.AbstractRssFeedView;
import com.rometools.rome.feed.rss.Channel;
import com.rometools.rome.feed.rss.Content;
import com.rometools.rome.feed.rss.Item;
public class RSSFeedViewer extends AbstractRssFeedView {
@Override
protected void buildFeedMetadata(Map<String, Object> model, Channel feed,
HttpServletRequest request) {
feed.setTitle("TutorialsPoint Dot Com");
feed.setDescription("Java Tutorials and Examples");
feed.setLink("http://www.tutorialspoint.com");
super.buildFeedMetadata(model, feed, request);
}
@Override
protected List<Item> buildFeedItems(Map<String, Object> model,
HttpServletRequest request, HttpServletResponse response) throws Exception {
List<RSSMessage> listContent = (List<RSSMessage>) model.get("feedContent");
List<Item> items = new ArrayList<Item>(listContent.size());
for(RSSMessage tempContent : listContent ){
Item item = new Item();
Content content = new Content();
content.setValue(tempContent.getSummary());
item.setContent(content);
item.setTitle(tempContent.getTitle());
item.setLink(tempContent.getUrl());
item.setPubDate(tempContent.getCreatedDate());
items.add(item);
}
return items;
}
}
RSSController.java
package com.tutorialspoint;
import java.util.ArrayList;
import java.util.Date;
import java.util.List;
import org.springframework.stereotype.Controller;
import org.springframework.web.bind.annotation.RequestMapping;
import org.springframework.web.bind.annotation.RequestMethod;
import org.springframework.web.servlet.ModelAndView;
@Controller
public class RSSController {
@RequestMapping(value="/rssfeed", method = RequestMethod.GET)
public ModelAndView getFeedInRss() {
List<RSSMessage> items = new ArrayList<RSSMessage>();
RSSMessage content = new RSSMessage();
content.setTitle("Spring Tutorial");
content.setUrl("http://www.tutorialspoint/spring");
content.setSummary("Spring tutorial summary...");
content.setCreatedDate(new Date());
items.add(content);
RSSMessage content2 = new RSSMessage();
content2.setTitle("Spring MVC");
content2.setUrl("http://www.tutorialspoint/springmvc");
content2.setSummary("Spring MVC tutorial summary...");
content2.setCreatedDate(new Date());
items.add(content2);
ModelAndView mav = new ModelAndView();
mav.setViewName("rssViewer");
mav.addObject("feedContent", items);
return mav;
}
}
TestWeb-servlet.xml
<beans xmlns = "http://www.springframework.org/schema/beans" xmlns:context = "http://www.springframework.org/schema/context" xmlns:xsi = "http://www.w3.org/2001/XMLSchema-instance" xsi:schemaLocation = " http://www.springframework.org/schema/beans http://www.springframework.org/schema/beans/spring-beans-3.0.xsd http://www.springframework.org/schema/context http://www.springframework.org/schema/context/spring-context-3.0.xsd"> <context:component-scan base-package = "com.tutorialspoint" /> <bean class = "org.springframework.web.servlet.view.BeanNameViewResolver" /> <bean id = "rssViewer" class = "com.tutorialspoint.RSSFeedViewer" /> </beans>
Here, we have created a RSS feed POJO RSSMessage and a RSS Message Viewer, which extends the AbstractRssFeedView and overrides its method. In RSSController, we have generated a sample RSS Feed.
Once you are done with creating source and configuration files, export your application. Right click on your application, use Export → WAR File option and save the TestWeb.war file in Tomcat’s webapps folder.
Now, start your Tomcat server and make sure you are able to access other webpages from the webapps folder using a standard browser. Try a URL − http://localhost:8080/TestWeb/rssfeed and we will see the following screen.
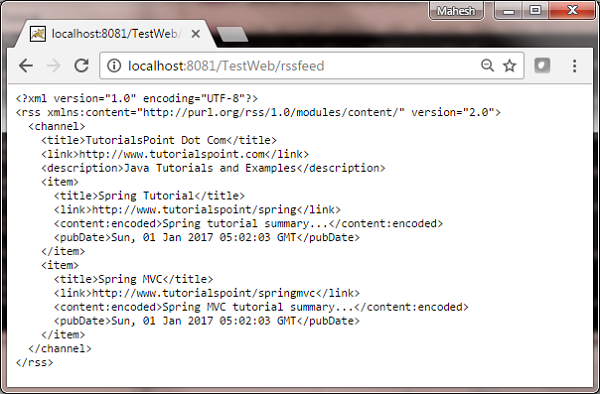
Spring MVC — Generate XML Example
The following example shows how to generate XML using the Spring Web MVC Framework. To begin with, let us have a working Eclipse IDE in place and stick to the following steps to develop a Dynamic Form based Web Application using the Spring Web Framework.
| Step | Description |
|---|---|
| 1 | Create a project with a name TestWeb under a package com.tutorialspoint as explained in the Spring MVC — Hello World chapter. |
| 2 | Create Java classes User and UserController under the com.tutorialspointpackage. |
| 3 | The final step is to create the content of the source and configuration files and export the application as explained below. |
User.java
package com.tutorialspoint;
import javax.xml.bind.annotation.XmlElement;
import javax.xml.bind.annotation.XmlRootElement;
@XmlRootElement(name = "user")
public class User {
private String name;
private int id;
public String getName() {
return name;
}
@XmlElement
public void setName(String name) {
this.name = name;
}
public int getId() {
return id;
}
@XmlElement
public void setId(int id) {
this.id = id;
}
}
UserController.java
package com.tutorialspoint;
import org.springframework.stereotype.Controller;
import org.springframework.web.bind.annotation.PathVariable;
import org.springframework.web.bind.annotation.RequestMapping;
import org.springframework.web.bind.annotation.RequestMethod;
import org.springframework.web.bind.annotation.ResponseBody;
@Controller
@RequestMapping("/user")
public class UserController {
@RequestMapping(value="{name}", method = RequestMethod.GET)
public @ResponseBody User getUser(@PathVariable String name) {
User user = new User();
user.setName(name);
user.setId(1);
return user;
}
}
TestWeb-servlet.xml
<beans xmlns = "http://www.springframework.org/schema/beans" xmlns:context = "http://www.springframework.org/schema/context" xmlns:xsi = "http://www.w3.org/2001/XMLSchema-instance" xmlns:mvc = "http://www.springframework.org/schema/mvc" xsi:schemaLocation = " http://www.springframework.org/schema/beans http://www.springframework.org/schema/beans/spring-beans-3.0.xsd http://www.springframework.org/schema/context http://www.springframework.org/schema/context/spring-context-3.0.xsd http://www.springframework.org/schema/mvc http://www.springframework.org/schema/mvc/spring-mvc-3.0.xsd"> <context:component-scan base-package = "com.tutorialspoint" /> <mvc:annotation-driven /> </beans>
Here, we have created an XML Mapped POJO User and in the UserController, we have returned the User. Spring automatically handles the XML conversion based on RequestMapping.
Once you are done with creating source and configuration files, export your application. Right click on your application, use Export → WAR File option and save your TestWeb.war file in Tomcat’s webapps folder.
Now, start the Tomcat server and make sure you are able to access other webpages from the webapps folder using a standard browser. Try a URL – http://localhost:8080/TestWeb/mahesh and we will see the following screen.
Spring MVC — Generate JSON Example
The following example shows how to generate JSON using the Spring Web MVC Framework. To start with, let us have a working Eclipse IDE in place and consider the following steps to develop a Dynamic Form based Web Application using the Spring Web Framework −
| Step | Description |
|---|---|
| 1 | Create a project with a name TestWeb under a package com.tutorialspoint as explained in the Spring MVC — Hello World chapter. |
| 2 | Create a Java classes User, UserController under the com.tutorialspoint package. |
| 3 | Download Jackson libraries Jackson Core, Jackson Databind and Jackson Annotations from maven repository page. Put them in your CLASSPATH. |
| 4 | The final step is to create the content of all the source and configuration files and export the application as explained below. |
User.java
package com.tutorialspoint;
public class User {
private String name;
private int id;
public String getName() {
return name;
}
public void setName(String name) {
this.name = name;
}
public int getId() {
return id;
}
public void setId(int id) {
this.id = id;
}
}
UserController.java
package com.tutorialspoint;
import org.springframework.stereotype.Controller;
import org.springframework.web.bind.annotation.PathVariable;
import org.springframework.web.bind.annotation.RequestMapping;
import org.springframework.web.bind.annotation.RequestMethod;
import org.springframework.web.bind.annotation.ResponseBody;
@Controller
@RequestMapping("/user")
public class UserController {
@RequestMapping(value="{name}", method = RequestMethod.GET)
public @ResponseBody User getUser(@PathVariable String name) {
User user = new User();
user.setName(name);
user.setId(1);
return user;
}
}
TestWeb-servlet.xml
<beans xmlns = http://www.springframework.org/schema/beans" xmlns:context = http://www.springframework.org/schema/context" xmlns:xsi = http://www.w3.org/2001/XMLSchema-instance" xmlns:mvc = http://www.springframework.org/schema/mvc" xsi:schemaLocation = http://www.springframework.org/schema/beans http://www.springframework.org/schema/beans/spring-beans-3.0.xsd http://www.springframework.org/schema/context http://www.springframework.org/schema/context/spring-context-3.0.xsd http://www.springframework.org/schema/mvc http://www.springframework.org/schema/mvc/spring-mvc-3.0.xsd"> <context:component-scan base-package = com.tutorialspoint" /> <mvc:annotation-driven /> </beans>
Here, we have created a Simple POJO User and in UserController we have returned the User. Spring automatically handles the JSON conversion based on RequestMapping and Jackson jar present in the classpath.
Once you are done with creating source and configuration files, export your application. Right click on your application, use Export → WAR File option and save your TestWeb.war file in Tomcat’s webapps folder.
Now, start the Tomcat server and make sure you are able to access other webpages from the webapps folder using a standard browser. Try a URL – http://localhost:8080/TestWeb/mahesh and we will see the following screen.

Spring MVC — Generate Excel Example
The following example shows how to generate Excel using the Spring Web MVC Framework. To begin with, let us have a working Eclipse IDE in place and stick to the following steps to develop a Dynamic Form based Web Application using the Spring Web Framework.
| Step | Description |
|---|---|
| 1 | Create a project with a name TestWeb under a package com.tutorialspoint as explained in the Spring MVC — Hello World chapter. |
| 2 | Create Java classes UserExcelView and ExcelController under the com.tutorialspoint package. |
| 3 | Download the Apache POI library Apache POI from the maven repository page. Put it in your CLASSPATH. |
| 4 | The final step is to create the content of the source and configuration files and export the application as explained below. |
ExcelController.java
package com.tutorialspoint;
import java.util.HashMap;
import java.util.Map;
import javax.servlet.http.HttpServletRequest;
import javax.servlet.http.HttpServletResponse;
import org.springframework.web.servlet.ModelAndView;
import org.springframework.web.servlet.mvc.AbstractController;
public class ExcelController extends AbstractController {
@Override
protected ModelAndView handleRequestInternal(HttpServletRequest request,
HttpServletResponse response) throws Exception {
//user data
Map<String,String> userData = new HashMap<String,String>();
userData.put("1", "Mahesh");
userData.put("2", "Suresh");
userData.put("3", "Ramesh");
userData.put("4", "Naresh");
return new ModelAndView("UserSummary","userData",userData);
}
}
UserExcelView.java
package com.tutorialspoint;
import java.util.Map;
import javax.servlet.http.HttpServletRequest;
import javax.servlet.http.HttpServletResponse;
import org.apache.poi.hssf.usermodel.HSSFRow;
import org.apache.poi.hssf.usermodel.HSSFSheet;
import org.apache.poi.hssf.usermodel.HSSFWorkbook;
import org.springframework.web.servlet.view.document.AbstractExcelView;
public class UserExcelView extends AbstractExcelView {
@Override
protected void buildExcelDocument(Map<String, Object> model,
HSSFWorkbook workbook, HttpServletRequest request, HttpServletResponse response)
throws Exception {
Map<String,String> userData = (Map<String,String>) model.get("userData");
//create a wordsheet
HSSFSheet sheet = workbook.createSheet("User Report");
HSSFRow header = sheet.createRow(0);
header.createCell(0).setCellValue("Roll No");
header.createCell(1).setCellValue("Name");
int rowNum = 1;
for (Map.Entry<String, String> entry : userData.entrySet()) {
//create the row data
HSSFRow row = sheet.createRow(rowNum++);
row.createCell(0).setCellValue(entry.getKey());
row.createCell(1).setCellValue(entry.getValue());
}
}
}
TestWeb-servlet.xml
<beans xmlns = "http://www.springframework.org/schema/beans"
xmlns:context = "http://www.springframework.org/schema/context"
xmlns:xsi = "http://www.w3.org/2001/XMLSchema-instance"
xmlns:mvc = "http://www.springframework.org/schema/mvc"
xsi:schemaLocation = "
http://www.springframework.org/schema/beans
http://www.springframework.org/schema/beans/spring-beans-3.0.xsd
http://www.springframework.org/schema/context
http://www.springframework.org/schema/context/spring-context-3.0.xsd
http://www.springframework.org/schema/mvc
http://www.springframework.org/schema/mvc/spring-mvc-3.0.xsd">
<bean class = "org.springframework.web.servlet.mvc.support.ControllerClassNameHandlerMapping" />
<bean class = "com.tutorialspoint.ExcelController" />
<bean class = "org.springframework.web.servlet.view.XmlViewResolver">
<property name = "location">
<value>/WEB-INF/views.xml</value>
</property>
</bean>
</beans>
views.xml
<beans xmlns = "http://www.springframework.org/schema/beans" xmlns:context = "http://www.springframework.org/schema/context" xmlns:xsi = "http://www.w3.org/2001/XMLSchema-instance" xsi:schemaLocation = " http://www.springframework.org/schema/beans http://www.springframework.org/schema/beans/spring-beans-3.0.xsd http://www.springframework.org/schema/context http://www.springframework.org/schema/context/spring-context-3.0.xsd"> <bean id = "UserSummary" class = "com.tutorialspoint.UserExcelView"></bean> </beans>
Here, we have created an ExcelController and an ExcelView. Apache POI library deals with Microsoft Office file formats and will convert the data to an excel document.
Once you are done with creating source and configuration files, export your application. Right click on your application, use Export → WAR File option and save the TestWeb.war file in Tomcat’s webapps folder.
Now, start the Tomcat server and make sure you are able to access other webpages from the webapps folder using a standard browser. Try a URL − http://localhost:8080/TestWeb/excel and we will see the following screen.

Spring MVC — Generate PDF Example
The following example shows how to generate a PDF using the Spring Web MVC Framework. To start with, let us have a working Eclipse IDE in place and adhere to the following steps to develop a Dynamic Form based Web Application using the Spring Web Framework.
| Step | Description |
|---|---|
| 1 | Create a project with a name TestWeb under a package com.tutorialspoint as explained in the Spring MVC — Hello World chapter. |
| 2 | Create Java classes UserPDFView and PDFController under the com.tutorialspoint package. |
| 3 | Download the iText library − iText from the maven repository page. Put it in your CLASSPATH. |
| 4 | The final step is to create the content of the source and configuration files and export the application as explained below. |
PDFController.java
package com.tutorialspoint;
import java.util.HashMap;
import java.util.Map;
import javax.servlet.http.HttpServletRequest;
import javax.servlet.http.HttpServletResponse;
import org.springframework.web.servlet.ModelAndView;
import org.springframework.web.servlet.mvc.AbstractController;
public class PDFController extends AbstractController {
@Override
protected ModelAndView handleRequestInternal(HttpServletRequest request,
HttpServletResponse response) throws Exception {
//user data
Map<String,String> userData = new HashMap<String,String>();
userData.put("1", "Mahesh");
userData.put("2", "Suresh");
userData.put("3", "Ramesh");
userData.put("4", "Naresh");
return new ModelAndView("UserSummary","userData",userData);
}
}
UserExcelView.java
package com.tutorialspoint;
import java.util.Map;
import javax.servlet.http.HttpServletRequest;
import javax.servlet.http.HttpServletResponse;
import org.springframework.web.servlet.view.document.AbstractPdfView;
import com.lowagie.text.Document;
import com.lowagie.text.Table;
import com.lowagie.text.pdf.PdfWriter;
public class UserPDFView extends AbstractPdfView {
protected void buildPdfDocument(Map<String, Object> model, Document document,
PdfWriter pdfWriter, HttpServletRequest request, HttpServletResponse response)
throws Exception {
Map<String,String> userData = (Map<String,String>) model.get("userData");
Table table = new Table(2);
table.addCell("Roll No");
table.addCell("Name");
for (Map.Entry<String, String> entry : userData.entrySet()) {
table.addCell(entry.getKey());
table.addCell(entry.getValue());
}
document.add(table);
}
}
TestWeb-servlet.xml
<beans xmlns = "http://www.springframework.org/schema/beans"
xmlns:context = "http://www.springframework.org/schema/context"
xmlns:xsi = "http://www.w3.org/2001/XMLSchema-instance"
xmlns:mvc = "http://www.springframework.org/schema/mvc"
xsi:schemaLocation = "
http://www.springframework.org/schema/beans
http://www.springframework.org/schema/beans/spring-beans-3.0.xsd
http://www.springframework.org/schema/context
http://www.springframework.org/schema/context/spring-context-3.0.xsd
http://www.springframework.org/schema/mvc
http://www.springframework.org/schema/mvc/spring-mvc-3.0.xsd">
<bean class = "org.springframework.web.servlet.mvc.support.ControllerClassNameHandlerMapping" />
<bean class = "com.tutorialspoint.PDFController" />
<bean class = "org.springframework.web.servlet.view.XmlViewResolver">
<property name = "location">
<value>/WEB-INF/views.xml</value>
</property>
</bean>
</beans>
views.xml
<beans xmlns = "http://www.springframework.org/schema/beans" xmlns:context = "http://www.springframework.org/schema/context" xmlns:xsi = "http://www.w3.org/2001/XMLSchema-instance" xsi:schemaLocation = " http://www.springframework.org/schema/beans http://www.springframework.org/schema/beans/spring-beans-3.0.xsd http://www.springframework.org/schema/context http://www.springframework.org/schema/context/spring-context-3.0.xsd"> <bean id = "UserSummary" class = "com.tutorialspoint.UserPDFView"></bean> </beans>
Here, we have created a PDFController and UserPDFView. iText library deals with the PDF file formats and will convert the data to a PDF document.
Once you are done with creating source and configuration files, export your application. Right click on your application, use Export → WAR File option and save the TestWeb.war file in Tomcat’s webapps folder.
Now, start the Tomcat server and make sure you are able to access other webpages from the webapps folder using a standard browser. We can also try the following URL − http://localhost:8080/TestWeb/pdf and if all goes as planned, we will see the following screen.
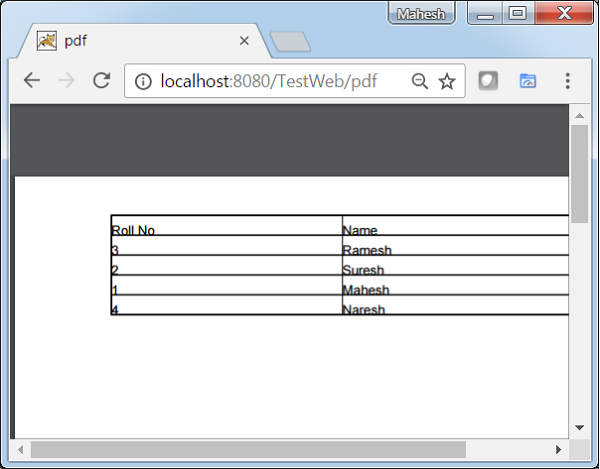
Spring MVC — Integrate LOG4J Example
The following example shows how to integrate LOG4J using the Spring Web MVC Framework. To start with, let us have a working Eclipse IDE in place and stick to the following steps to develop a Dynamic Form based Web Application using the Spring Web Framework.
| Step | Description |
|---|---|
| 1 | Create a project with the name TestWeb under a package com.tutorialspoint as explained in the Spring MVC — Hello World chapter. |
| 2 | Create a Java class HelloController under the com.tutorialspointpackage. |
| 3 | Download the log4j library LOG4J from the maven repository page. Put it in your CLASSPATH. |
| 4 | Create a log4j.properties under the SRC folder. |
| 5 | The final step is to create the content of the source and configuration files and export the application as explained below. |
HelloController.java
package com.tutorialspoint;
import org.apache.log4j.Logger;
import org.springframework.stereotype.Controller;
import org.springframework.web.bind.annotation.RequestMapping;
import org.springframework.web.bind.annotation.RequestMethod;
import org.springframework.ui.ModelMap;
@Controller
@RequestMapping("/hello")
public class HelloController{
private static final Logger LOGGER = Logger.getLogger(HelloController.class);
@RequestMapping(method = RequestMethod.GET)
public String printHello(ModelMap model) {
LOGGER.info("printHello started.");
//logs debug message
if(LOGGER.isDebugEnabled()){
LOGGER.debug("Inside: printHello");
}
//logs exception
LOGGER.error("Logging a sample exception", new Exception("Testing"));
model.addAttribute("message", "Hello Spring MVC Framework!");
LOGGER.info("printHello ended.");
return "hello";
}
}
log4j.properties
# Root logger option
log4j.rootLogger = DEBUG, stdout, file
# Redirect log messages to console
log4j.appender.stdout = org.apache.log4j.ConsoleAppender
log4j.appender.stdout.Target = System.out
log4j.appender.stdout.layout = org.apache.log4j.PatternLayout
log4j.appender.stdout.layout.ConversionPattern = %d{yyyy-MM-dd HH:mm:ss} %-5p %c{1}:%L - %m%n
# Redirect log messages to a log file
log4j.appender.file = org.apache.log4j.RollingFileAppender
#outputs to Tomcat home
log4j.appender.file.File = ${catalina.home}/logs/myapp.log
log4j.appender.file.MaxFileSize = 5MB
log4j.appender.file.MaxBackupIndex = 10
log4j.appender.file.layout = org.apache.log4j.PatternLayout
log4j.appender.file.layout.ConversionPattern = %d{yyyy-MM-dd HH:mm:ss} %-5p %c{1}:%L - %m%n
TestWeb-servlet.xml
<beans xmlns = "http://www.springframework.org/schema/beans"
xmlns:context = "http://www.springframework.org/schema/context"
xmlns:xsi = "http://www.w3.org/2001/XMLSchema-instance"
xmlns:mvc = "http://www.springframework.org/schema/mvc"
xsi:schemaLocation = "
http://www.springframework.org/schema/beans
http://www.springframework.org/schema/beans/spring-beans-3.0.xsd
http://www.springframework.org/schema/context
http://www.springframework.org/schema/context/spring-context-3.0.xsd
http://www.springframework.org/schema/mvc
http://www.springframework.org/schema/mvc/spring-mvc-3.0.xsd">
<context:component-scan base-package = "com.tutorialspoint" />
<bean class = "org.springframework.web.servlet.view.InternalResourceViewResolver">
<property name = "prefix" value = "/WEB-INF/jsp/" />
<property name = "suffix" value = ".jsp" />
</bean>
</beans>
hello.jsp
<%@ page contentType = "text/html; charset = UTF-8" %>
<html>
<head>
<title>Hello World</title>
</head>
<body>
<h2>${message}</h2>
</body>
</html>
Here, we have configured the LOG4J to log details on the Tomcat console and in the file present in &t; tomcat home → logs as myapp.log.
Once you are done with creating source and configuration files, export your application. Right click on your application, use Export → WAR File option and save your TestWeb.war file in Tomcat’s webapps folder.
Now, start the Tomcat server and make sure you are able to access other webpages from the webapps folder using a standard browser. Try a URL −http://localhost:8080/TestWeb/hello and we will see the following screen on Tomcat’s log.