-
Инструкции по эксплуатации
1

HOTPOINT-ARISTON TCS 73B GP (EU) инструкция по эксплуатации
(80 страниц)
- Языки:Русский
-
Тип:
PDF -
Размер:
3.96 MB -
Описание:
Сушильная машина
Просмотр
На NoDevice можно скачать инструкцию по эксплуатации для HOTPOINT-ARISTON TCS 73B GP (EU). Руководство пользователя необходимо для ознакомления с правилами установки и эксплуатации HOTPOINT-ARISTON TCS 73B GP (EU). Инструкции по использованию помогут правильно настроить HOTPOINT-ARISTON TCS 73B GP (EU), исправить ошибки и выявить неполадки.
Перейти к контенту
![]()
Русские электронные инструкции по эксплуатации
Постоянно обновляемый большой каталог документации по эксплуатации и использованию современных устройств и оборудования на русском языке. Бесплатное скачивание файлов.
Поиск:
Главная
♥ В закладки
Просмотр инструкции в pdf


.jpg)
Инструкция по эксплуатации стиральной машины Hotpoint-Ariston TCS 73B GP (EU).
Скачать инструкцию к стиральной машине Hotpoint-Ariston TCS 73B GP (EU) (856,39 КБ)

Инструкции по эксплуатации стиральных машин Hotpoint-Ariston
« Инструкция к стиральной машине Samsung WW70A4S21CE
» Инструкция к микроволновой печи Haier HMB-MM207SA
Вам также может быть интересно

Инструкция к микроволновой печи Hotpoint-Ariston MWHA 13321 VAN

Инструкция к стиральной машине Hotpoint-Ariston RZ 1047 W EU

Инструкция к индукционной варочной панели Hotpoint-Ariston HS 2560C BF

Инструкция к стиральной машине Hotpoint-Ariston RSD 8229 ST K

Инструкция к газовой варочной панели Hotpoint-Ariston 641 PCN IX-HA RU

Инструкция к холодильнику Hotpoint-Ariston HDC 320 W

Инструкция к кондиционеру Hotpoint-Ariston SPOWHA 409
.jpg)
Инструкция к стиральной машине Hotpoint-Ariston QVE 111697 SS (CIS)
Добавить комментарий
Имя *
Email *
Сайт
Комментарий


![]()


Сохранить моё имя, email и адрес сайта в этом браузере для последующих моих комментариев.
- Добавить инструкцию
- Заказать инструкцию
49
RU
Русский
RU
Руководство по
эксплуатации
СУШИЛЬНАЯ МАШИНА ДЛЯ БЕЛЬЯ
!
Этот символ напоминает Вам о
необходимости консультации данного
технического руководства.
!
Храните настоящие инструкции рядом с машиной для
их быстрой консультации. Всегда храните инструкции
рядом с сушильной машиной. В случае продажи или
передачи изделия другим лицам не забудьте передать
вместе с ней настоящие инструкции с тем, чтобы новый
владелец изделия мог ознакомиться с предупреждениями и
рекомендациями по эксплуатации сушильной машины.
!
Внимательно прочитайте настоящие инструкции: на
следующих страницах приводятся важные сведения по
монтажу и рекомендации по эксплуатации данного бытового
электроприбора.
TCS 73B
www.hotpoint.eu
Содержание
Установка, 50
Место установки сушильной машины
Вентиляция
Электрическое подключение
Подготовительные работы
Условия хранения и транспортировки
Предупреждения, 52
Общие требования безопасности
Энергосбережение и охрана окружающей среды
Уход и обслуживание, 54
Отключение электропитания
Чистка фильтра после каждого цикла
Проверка барабана после каждого цикла
Слив бачка для сбора воды в конце каждого цикла
Чистка конденсатора
Чистка сушильной машины
Описание сушильной машины, 56
Характеристики
Консоль управления
Порядок выполнения цикла сушки, 58
Выбор и запуск программы
Программы и дополнительные функции, 59
Таблица программ
Программы Специальная/Спортивная одежда/Частичная
Опции
Открывание двери
Типы белья, 62
Подготовка белья
Этикетки на белье
Продолжительность сушки
Неисправности и методы их устранения, 63
Сервисное обслуживание, 64
Запасные части
Сведения о сдаче в утиль и переработке
56
RU
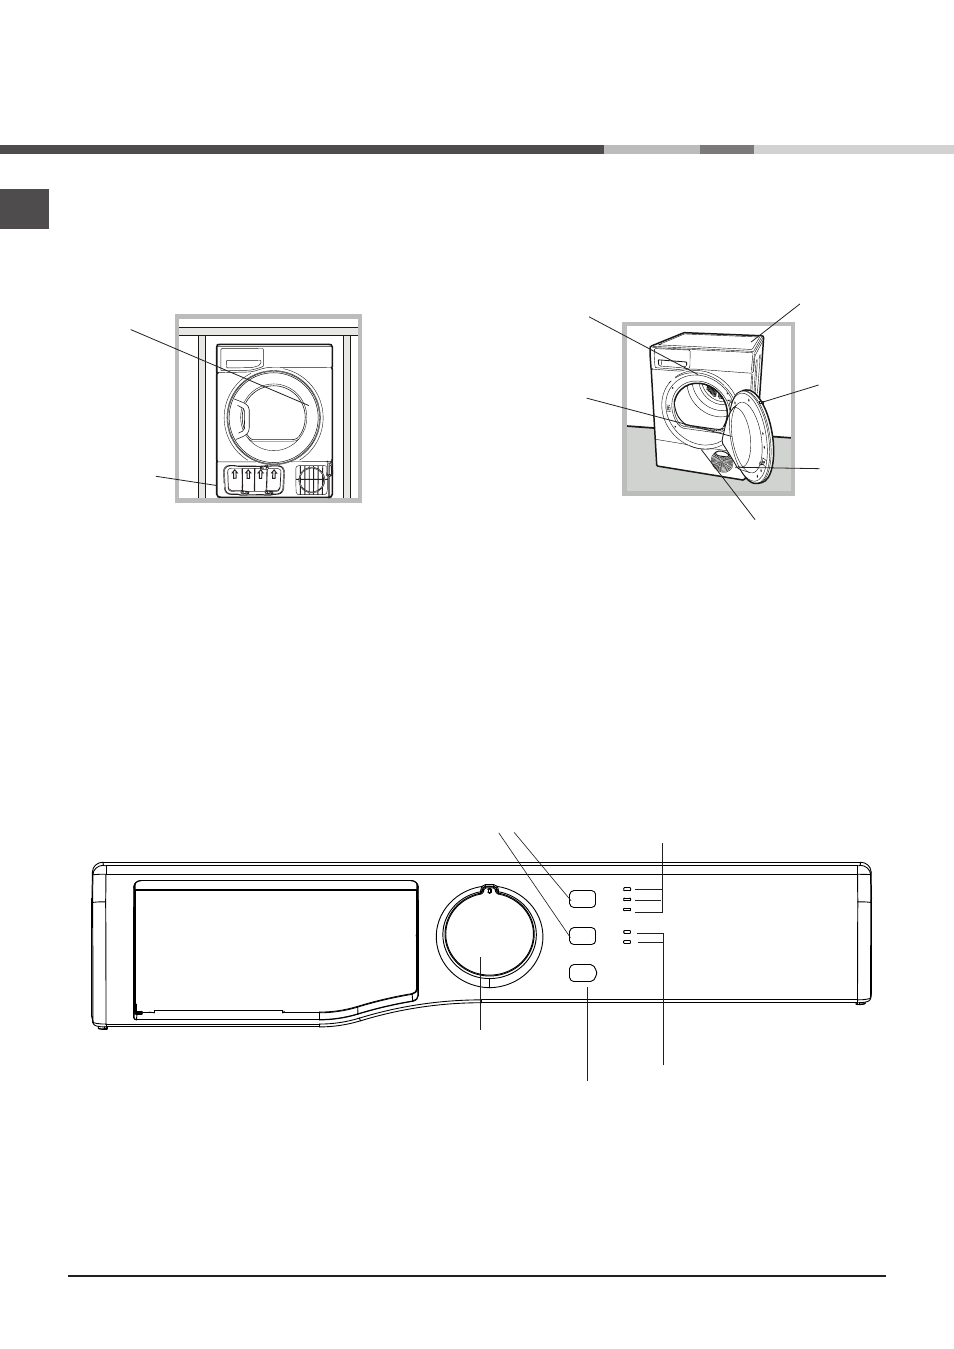
Нажмите
на люк
Конденсатор
(крышка
открыта)
Бачок для
слива воды
Паспортная
табличка
Ручка крышки конденсатора
(потянуть, чтобы открыть)
Фильтр
Воздухозаборная
решетка
Описание
сушильной машины
Порядок открывания люка
Консоль управления
Характеристики
Серийный
номер и н
омер модели
Регулятор программ и
переключатель на OFF
595
3
4
5
6
7
8
9
10
11
12
13
14
3
4
5
6
7
8
9
10
11
12
13
14
Код пресс-ф ормы :
A1
Modification:
Approval:
Volume:
Scale:
Material:
General Tolerances:
Size:
Ident. Material:
Denomination:
Errore: Nessun riferimento
Stamp Code:
Replaces:
According to the law we reserve the property of the present design with prohibition of use and reproduction
Weight:
RCT:
Format:
Proprieté Merloni, ne peut être reproduit, copier et diffusé sans notre accord. Tous droits réservés
Remplace:
Code Outillage:
Errore: Nessun riferimento
Designation:
Identification Matière:
Tolerance General:
Matière:
Echelle:
Poids:
Visa:
RCT:
Modification:
Volume:
Opis Modyfikacji:
RCT:
Zatwierdzil:
Objetosc:
Skala:
Material:
Tolerancje Ogolne:
Format:
Symbol Materialu:
Opis:
Errore: Nessun riferimento
Kod Tlocznika:
Zastepuje:
Zgodnie z prawem rysunek jest wlasnoscia Merloni, i zabrania sie jego uzywania, kopiowania i rozpowszechniania.
Waga:
Modificacao:
Formato:
Tolerancias gerais:
RCT:
Escala:
Volume:
Visto:
Material:
Identificacao Material:
Designacao:
Errore: Nessun riferimento
Codigo Ferramenta:
Substituido:
Nos termos da lei reservamos a propriedade deste desenho sendo proibido o seu uso e reproducao não autorizados
Peso:
Degisiklik:
RCT:
Vize:
Hacim:
Olcek:
Malzeme:
Genel Toleranslar:
Format:
Metaryal Tanimi:
Tanım:
Errore: Nessun riferimento
Baskı Kodu:
Yerine Gecmek:
Aşağıdaki dizaynın çoğaltılması ve bizden başkasının kullanması Kanunlar gereğince yasaktır.
Agirlik:
Modifica:
RCT:
Visto:
Peso:
Scala:
Tolleranze Generali:
Formato:
Ident. Materiale:
Materiale:
Errore: Nessun riferimento
Denominazione:
Codice Stampo:
Sostituisce:
A termini di legge ci riserviamo la proprietà del presente disegno con divieto di uso e riproduzione
Volume:
Ревизия:
RCT:
Согласовано:
Обьем:
М асш таб:
Материал (тип):
Неуказанны е Допуски:
Ф ормат:
Код Материалa:
Наименование:
Заме няет Код:
Настоящи й чертеж является собственностью М ерлони, его использование и перепечатка запрещ ены. Все права защи ще ны
Вес:
Errore: Nessun riferimento
Errore: Nessun riferimento
Errore: Nessun riferimento
Errore: Nessun riferimento
Errore: Nessun riferimento
Errore: Nessun riferimento
Errore: Nessun riferimento
Errore: Nessun riferimento
Errore: Nessun riferimento
Errore: Nessun riferimento
Errore: Nessun riferimento
Кнопка и индикатор
START/PAUSE
Индикаторы
ухода
Индикаторы
фаз сушки
или запуска с
задержкой
Кнопки и
индикаторы
Просмотр
Доступно к просмотру 80 страниц. Рекомендуем вам скачать файл инструкции, поскольку онлайн просмотр документа может сильно отличаться от оригинала.
-
Instruction manual
TUMBLE DRYER                                     Contents
GB
Installation, 2
Where to install the tumble dryer
EN             FR             PT                    Ventilation
Electrical connections
English,1      Francais,17    Portugues,33           Preliminary information
Warnings, 4
General safety
RU             KZ                                   Saving energy and respecting the environment
Русский, 49    ?аза?ша,65                            Care and maintenance, 6
Disconnecting the power supply
Cleaning the filter after each cycle
Checking the drum after each cycle
Emptying the water container after each cycle
Cleaning the condenser unit
Cleaning the tumble dryer
Description of the tumble dryer, 8
Features
TCS 73B                                             Control panel
How to carry out a drying cycle, 10
Starting and selecting a programme
Programmes and options, 11
Programme chart
Special programmes
Options
Opening the door
www.hotpoint.eu
Laundry, 14
Sorting laundry
!     This symbol reminds you to read this           Care labels
instruction manual.                                  Drying times
! Keep this manual at hand for immediate reference whenever   Troubleshooting, 15
necessary. Always store this manual close to the tumble dryer and   Assistance and Guarantee, 16
remember to pass it on to any new owners when selling or tran-  Spare parts
sferring the appliance, so they may familiarise with the warnings   Information on recycling and disposal
and suggestions herein contained.
! Read these instructions carefully: the following pages contain
important information on installation and useful suggestions for
operating the appliance.
To activate your free* 10 years parts guarantee
Call free on 0800 597 8557
*Labour charges not included. Terms and conditions apply. Lines open 364 days a year.
Calls are free from a BT landline. Charges from other providers and mobiles may apply.
.
1
-
Installation
Where to install the tumble dryer
GB                                                                    1                    2
• Install the dryer far                                   2
from gas ranges, stoves,
radiators or hobs, as       10 mm
flames may damage it.                                                                            1
If the dryer is installed
below a worktop, en-           15 mm  15 mm                                      Less than 1m
sure there are 10 mm
between the upper
panel of the dryer and                                 Picture A               Picture B
any objects above it,
and 15 mm between the sides of the machi-
ne and the walls or furniture units adjacent           Electrical connections
to it. This ensures adequate air circulation.          Before plugging the appliance into the socket,
The appliance must be installed with the rear          check the following:
surface placed against a wall.                         •  Make sure your hands are dry.
•  The socket must have an earth connection.
Ventilation                                            •  The socket must be able to withstand the
• The room must be adequately ventilated while the dryer is   machine’s maximum power output as indi-
running. Make sure that the dryer is installed in a room free   cated on the rating plate (see Description
of humidity and with adequate air circulation. The flow of air   of the tumble dryer).
around the dryer is essential to allow water to condense du-
ring drying; the dryer will not function properly if it is placed   •  The power supply voltage must fall within
in an enclosed space or inside a cabinet.                the values indicated on the data plate (see
Description of the tumble dryer).
! Some condensation may form if the dryer is used in a small
or cold room.                                          •  The socket must be compatible with the
!We do not recommend that the dryer is                   dryer’s plug. Should this not be the case,
installed in a cupboard but the dryer must never         replace the plug or the socket.
be installed behind a lockable door, a sliding         ! DO NOT use extension cords.
door or a door with a hinge on the opposite            ! The dryer must not be installed outdoors,
side to that of the dryer door.                        even if the space is sheltered. It can be very
dangerous if exposed to rain or storms.
Water drain                                            ! Once installed, the dryer’s electrical wire
If your dryer is installed next to a drain the water can be   and plug must be within reach.
plumbed into this drain. This does away with the need to   ! The power cord must not be bent or
empty the water container. If the dryer is stacked onto or
installed next to a washing machine it can share the same   squashed.
drain. The height of the drain must be less than 3’ (1 m) from   ! The power cord is supplied fitted with a
the bottom of the dryer.                               BS1363 plug and with a 13 amp BS1362 fuse.
Remove existing hose from position shown in picture A and fit   If it is necessary to fit a replacement fuse, it must
a suitable length of hose and connect as shown in picture B.  be a 13 Amp ASTA approved to BS1362 type.
WARNING: The plug must not be used without
! Make sure that the hose is not squashed or kinked
when the dryer is in its final location.               a fuse cover. If a replacement fuse holder/cover
is required, it must be of the same colour coding
or wording as shown on the base of the plug.
Replacements are available from authorised
dealers.
Preliminary information
Once the tumble dryer is installed, clean the inside of the
drum before operating it and remove any dirt accumulated
during transportation.
2
-
Where to install the tumble dryer                               Maximum load sizes: 7 kg
1  2                                                                                                               GB
• Install the dryer far   2
from gas ranges, stoves,
radiators or hobs, as   10 mm
flames may damage it.  1
If the dryer is installed
below a worktop, en-  15 mm  15 mm  Less than 1m
sure there are 10 mm
between the upper
panel of the dryer and   Picture A  Picture B
any objects above it,
and 15 mm between the sides of the machi-
ne and the walls or furniture units adjacent   Electrical connections
to it. This ensures adequate air circulation.  Before plugging the appliance into the socket,
The appliance must be installed with the rear   check the following:   Product Data - Regulation 392/2012.
surface placed against a wall.   •  Make sure your hands are dry.  Brand
•  The socket must have an earth connection.                    Hotpoint/Ariston
Ventilation  •  The socket must be able to withstand the       Model
• The room must be adequately ventilated while the dryer is   machine’s maximum power output as indi-   TCS 73B GP (EU)
running. Make sure that the dryer is installed in a room free   cated on the rating plate (see Description   Rated capacity of cotton laundry for the "standard cotton
of humidity and with adequate air circulation. The flow of air   of the tumble dryer).  programme" at full load - kg   7.0
around the dryer is essential to allow water to condense du-   This household tumble drier is a        Condenser
ring drying; the dryer will not function properly if it is placed   •  The power supply voltage must fall within   Energy efficiency class on a scale from A+++ (low consumption)
in an enclosed space or inside a cabinet.  the values indicated on the data plate (see   to D (high consumption)    B
Description of the tumble dryer).                              The weighted Annual Energy Consumption (AEc)*  kWh 1)   503.0
! Some condensation may form if the dryer is used in a small   This household tumble drier is a        Automatic
or cold room.  •  The socket must be compatible with the       Energy consumption full load; Edry - kWh 2)   4.23
!We do not recommend that the dryer is   dryer’s plug. Should this not be the case,   Energy consumption partial load; Edry? - kWh 2)   2.29
installed in a cupboard but the dryer must never   replace the plug or the socket.  Power consumption: off-mode  (Po) - Watts   0.42
be installed behind a lockable door, a sliding   ! DO NOT use extension cords.  Power consumption: left-on mode (Pl) - Watts   2.24
Duration of the 'left-on mode' for  power management system -
door or a door with a hinge on the opposite   ! The dryer must not be installed outdoors,   minutes        30
side to that of the dryer door.  even if the space is sheltered. It can be very   Prog. Time - weighted (Tt) full & partial load - minutes 3)   94
dangerous if exposed to rain or storms.                        Full load (Tdry) - minutes                 125
Water drain  ! Once installed, the dryer’s electrical wire     Partial load (Tdry?) - minutes              70
Condensation efficiency class on a scale from G (least efficient) to
If your dryer is installed next to a drain the water can be   and plug must be within reach.  A (most efficient)   B
plumbed into this drain. This does away with the need to   ! The power cord must not be bent or   Average condensation efficiency - %
empty the water container. If the dryer is stacked onto or     weighted (Ct) full & partial load 3)        81
installed next to a washing machine it can share the same   squashed.  full load  (Cdry)                   81
drain. The height of the drain must be less than 3’ (1 m) from   ! The power cord is supplied fitted with a   partial load  (Cdry?)   81
the bottom of the dryer.  BS1363 plug and with a 13 amp BS1362 fuse.   Airborne acoustical noise emissions - dB(A) re 1 pW   69.0
Remove existing hose from position shown in picture A and fit   If it is necessary to fit a replacement fuse, it must   1) "Standard cotton” at full and partial load is the standard programme to which the
a suitable length of hose and connect as shown in picture B.  be a 13 Amp ASTA approved to BS1362 type.   information in the label and the fiche relates. The standard cotton program is
suitable to dry at cupboard level (0%)  cotton laundry and is the most efficient
WARNING: The plug must not be used without                     programme in terms of energy consumption. Partial load is half the rated load.
! Make sure that the hose is not squashed or kinked
when the dryer is in its final location.  a fuse cover. If a replacement fuse holder/cover   2) based on 160 drying cycles of the standard cotton programme at full and partial
is required, it must be of the same colour coding              load, and the consumption of  the low-power modes.  Actual energy consumption
or wording as shown on the base of the plug.                   will depend on how the appliance is used.
Replacements are available from authorised                     3) Weighted average of 3 cycles at full load and 4 cycles at half load.
Regulation 932/2012.
dealers.                                                       Energy consumption in kWh, for program “Synthetics” full load   1.87
Preliminary information                                        Programme time in minute, for program “Synthetics” full load   70
Once the tumble dryer is installed, clean the inside of the    Partial load for program “Synthetics” N/A
drum before operating it and remove any dirt accumulated
during transportation.
3
- 1
- 2
- 3
- 4
- 80