By Doug Radcliffe
Design by Collin Oguro
SWAT 4 places you in command of a five-man special weapons and tactics team. This isn’t a run-and-gun shooter. Not only could a single bullet end your game but an unauthorized use of force penalty can mean the difference between career advancement and mission failure. Skills such as precise aim and agile movement still apply; however, adept command of your team and efficient use of equipment take precedence.
GameSpot’s Game Guide to SWAT 4 offers strategies for leading your squad, equipment selection, and details on the career scoring system. You’ll find coverage of weapons and tactical items as well as walkthroughs for all career missions, multiplayer tips, and some cheat codes.
General Strategies
This section compiles general strategies for succeeding in SWAT 4’s career mode. You’ll find tips on using your squad, considering the right equipment for the right situation, and maximizing your score.
Squad Leader
It is obvious SWAT 4’s career mode isn’t tackled like a typical first-person shooter. It isn’t run and gun and see how many bad guys you can mow down during a particular mission. For starters, weapon damage is realistic. One accurate shot from an armed suspect and your life and mission are over. Since it’s easy to be surprised by a hidden suspect, carelessly entering areas often results in hitting the restart mission button. Also, you advance through the single-player mode based on a scoring system. Shooting suspects without provocation results in negative points. Too much negative and you will have to replay the mission.
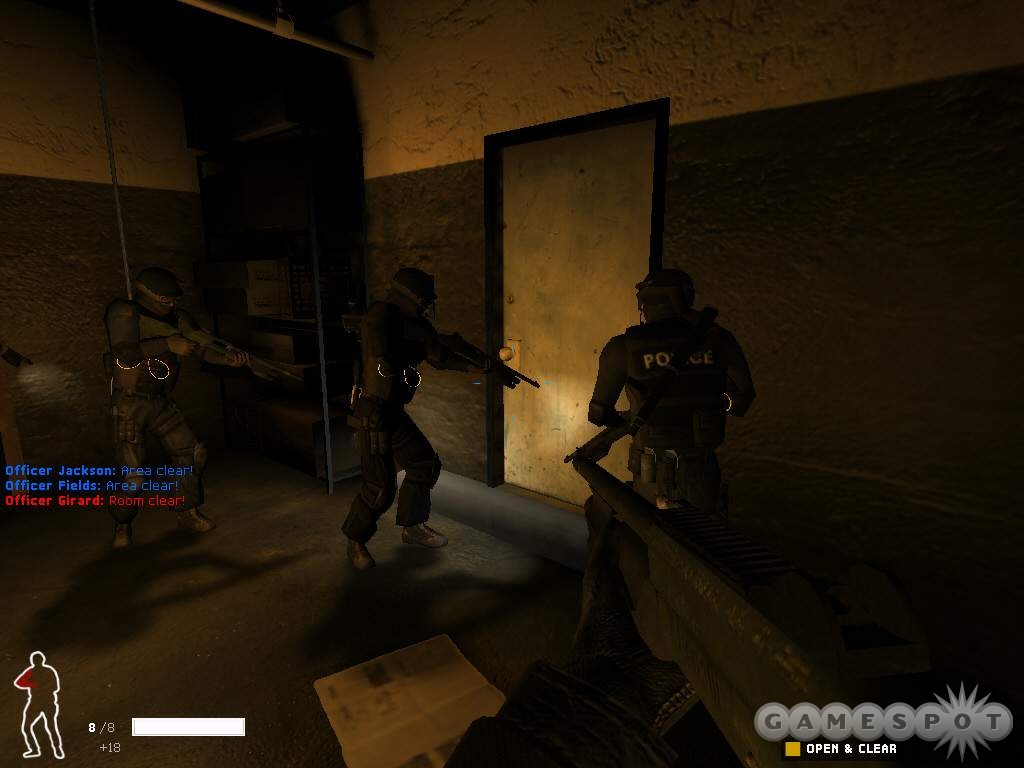
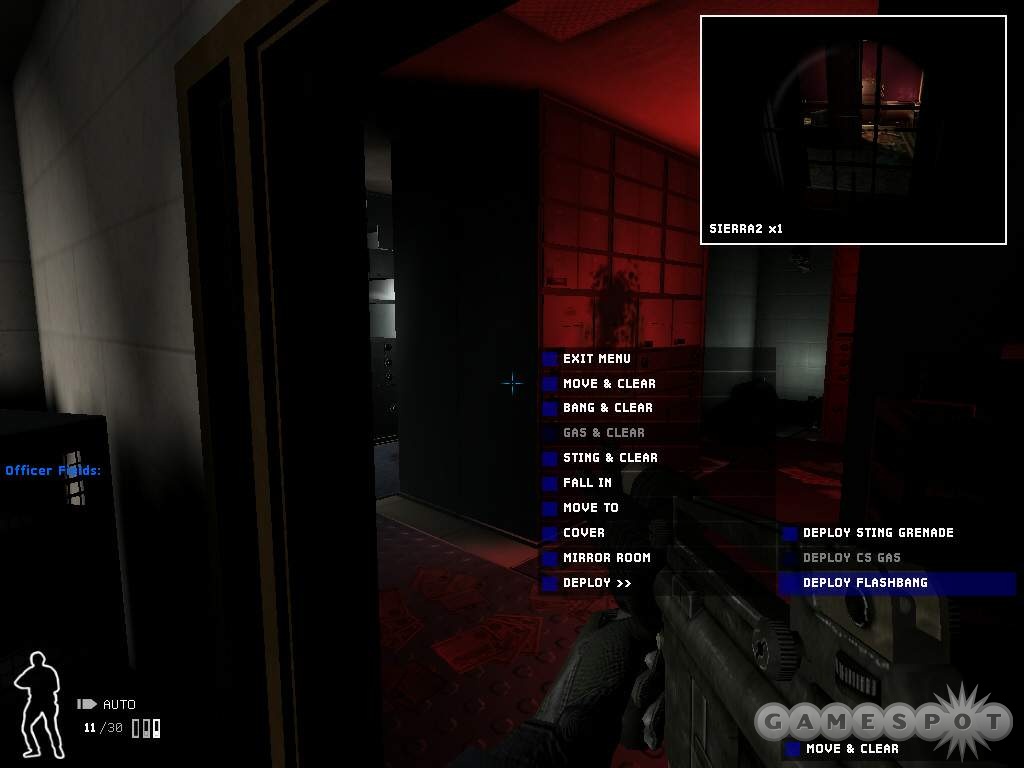
You also have a squad—two 2-man teams—at your disposal. You could complete a mission by ordering the squad to check every room, clear every area, and apprehend every suspect. You could remain behind the action and bark orders. On the other hand, you could take the point while still ordering team members to perform specific tasks. Consistent mission success is often a blending of the two. Often you may want to manually toss a grenade so it reaches a particular area. Ordering a team member to deploy a grenade in the room lacks precision and accuracy; the team member will simply deploy the grenade in the room without thought of position.
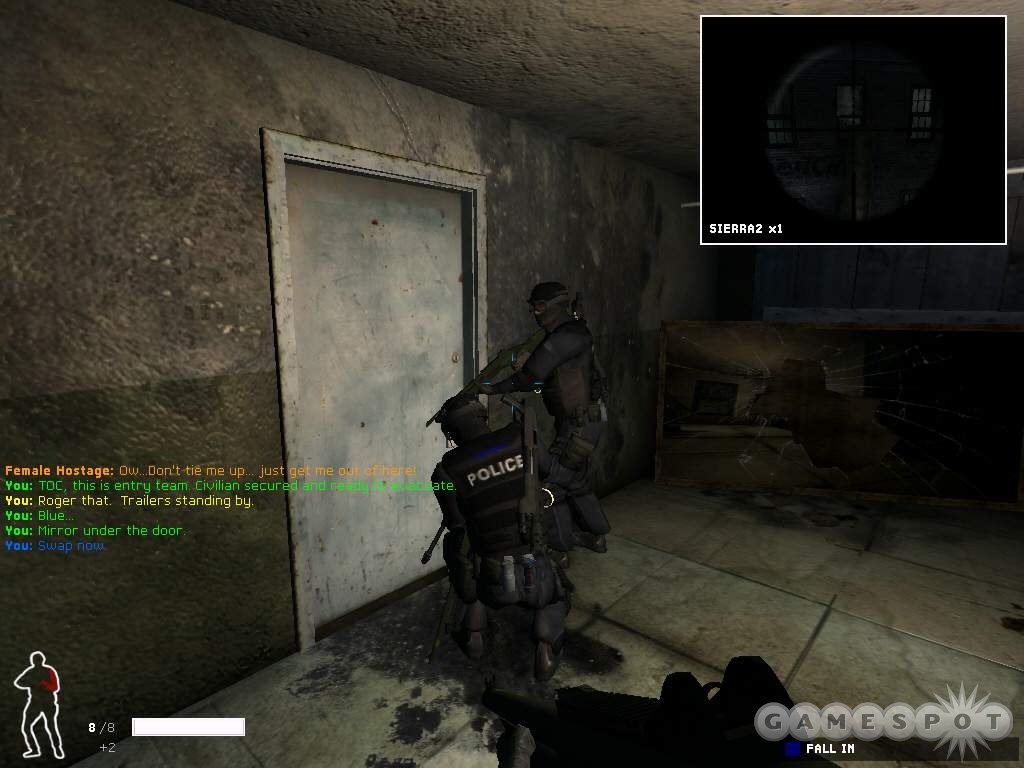
The two teams can also be, and in most occasions should be, controlled independently. Perhaps you’ve encountered a room with two entrances. Instead of breaching one door and entering through just one entrance, you could split up the two teams to stack on both doors. You could order each team to toss a flashbang into the room for maximum coverage. If you chose to enter through just one door, suspects hiding out near the second door could surprise your squad and possibly score a few easy kills.
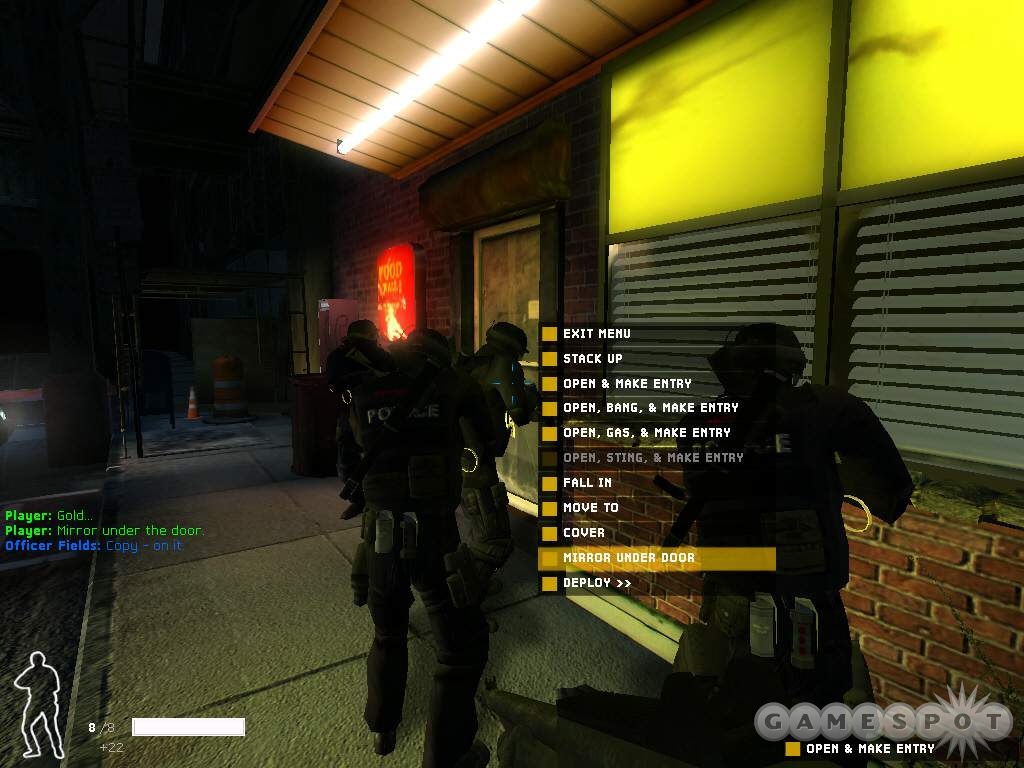
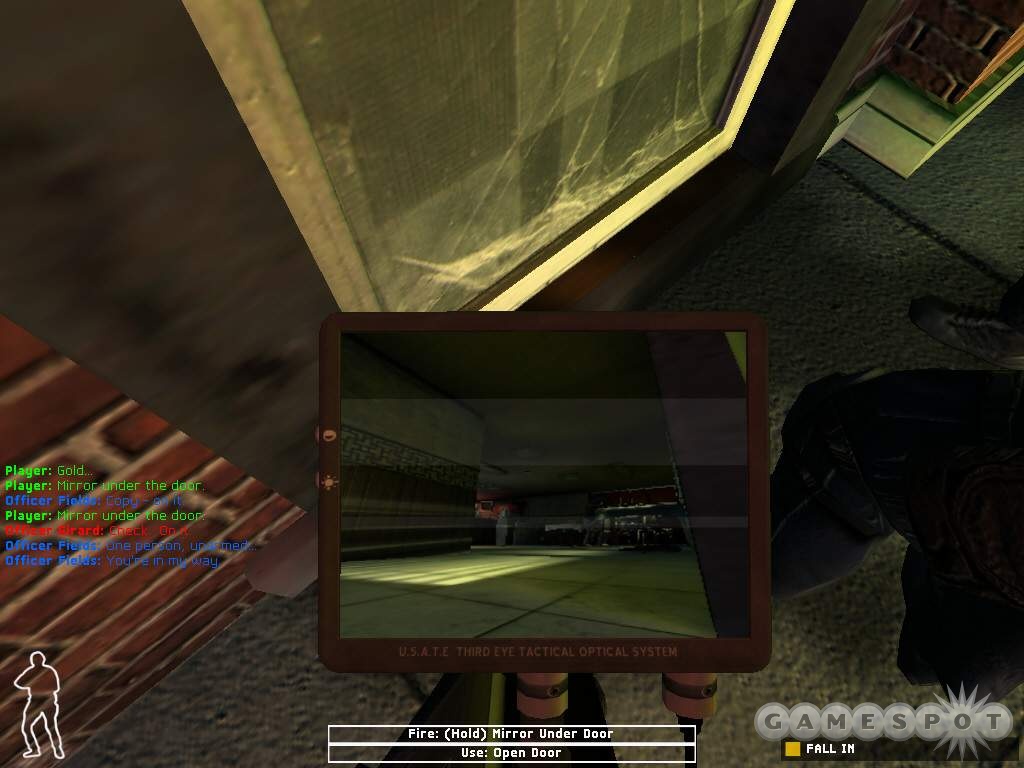
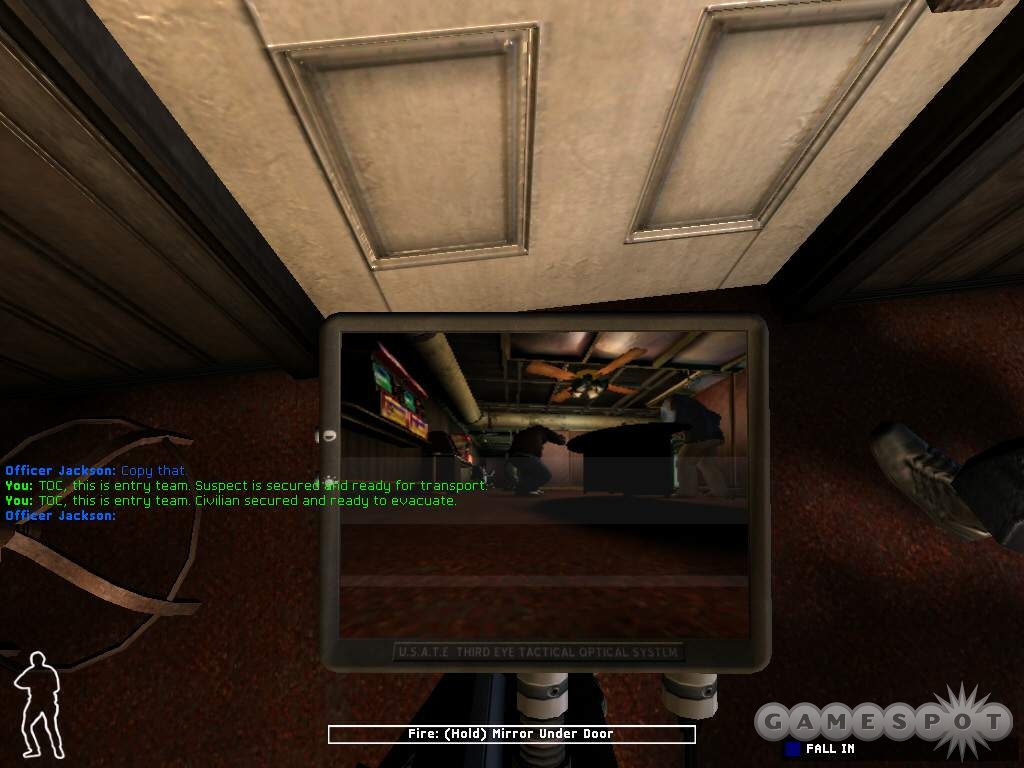
It’s good practice to check under every door before entering a room. Order a team member to «mirror under door» so he’ll use the optiwand to check what’s on the other side. Keep in mind, however, that your team members aren’t infallible. Although they’ll certainly report any human seen, it’s possible for suspects to hide out of visual range and remain unreported. Don’t assume just because a team member (or even you) can’t see a threat inside the room that the room is completely clear, especially as you reach the latter missions or increase the difficulty level.
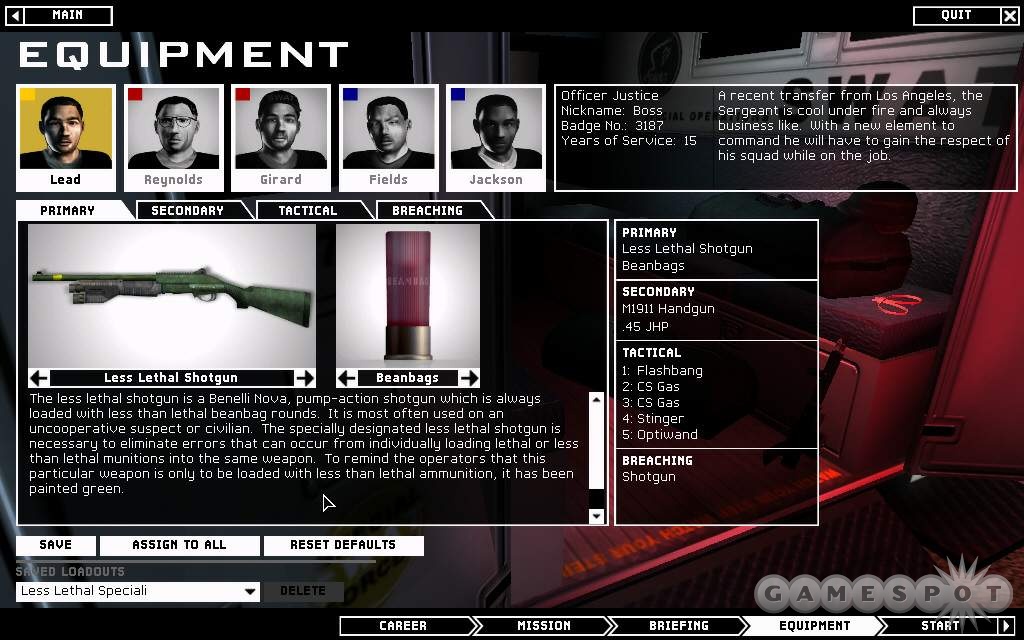
If you plan to use team members to cover particular areas or roam sections without your immediate support, it’s not a bad idea to arm them with non-lethal firearms. It’s possible a team member could get aggressive and slay a suspect resulting in an unauthorized use of deadly force penalty. A weapon like the less-lethal shotgun is a very viable firearm, particularly coupled with other compliance items, such as the available grenades.
Right Equipment, Right Situation
During career mode, use the mission briefing to determine the best equipment for the job. You’ll use each of the three grenade types to help encourage suspects to subdue but each grenade does a better job depending on the room layout and situation. If the briefing describes suspects wearing gas masks then the CS gas grenades lose their effectiveness (though the mission may still include suspects without gas masks).
For clearing open rooms and hallways with little or no obstructions, use a flashbang. Check the room with an optiwand and if you spot a suspect, note which direction the suspect is facing. If he’s standing guard looking away from the entrance door, the flashbang might have no effect unless the suspect turns around when the door is opened. If the are obstructions within the room, it’ll be better to manually toss the flashbang so you can get the grenade as close to where you want it as possible.
In rooms with obstructions, alcoves, and cover, use a CS gas grenade. The gas dissipates through the room, behind cover, and into corners. In larger rooms, the gas may not cover the entire area so you may need a second grenade (or just preparedness) to counter suspects hiding in the far corners. Upon tossing a gas grenade into a room, listen carefully for coughing sounds. That’s your cue that a suspect (or perhaps a civilian) are under the influence.
Stinger grenades explode in a barrage of damaging rubber balls. To dizzy and disorient a target, the stinger grenade’s rubber balls must strike the target, which means grenade placement can be important. Tossing a stinger grenade next to a cluttered room’s entrance could have little or no effect for those suspects hiding out inside. Use a stinger grenade when you think a suspect may be hiding behind cover or around an alcove. Take cover and after the stinger explodes, charge toward the disoriented subject and order him or her to comply.
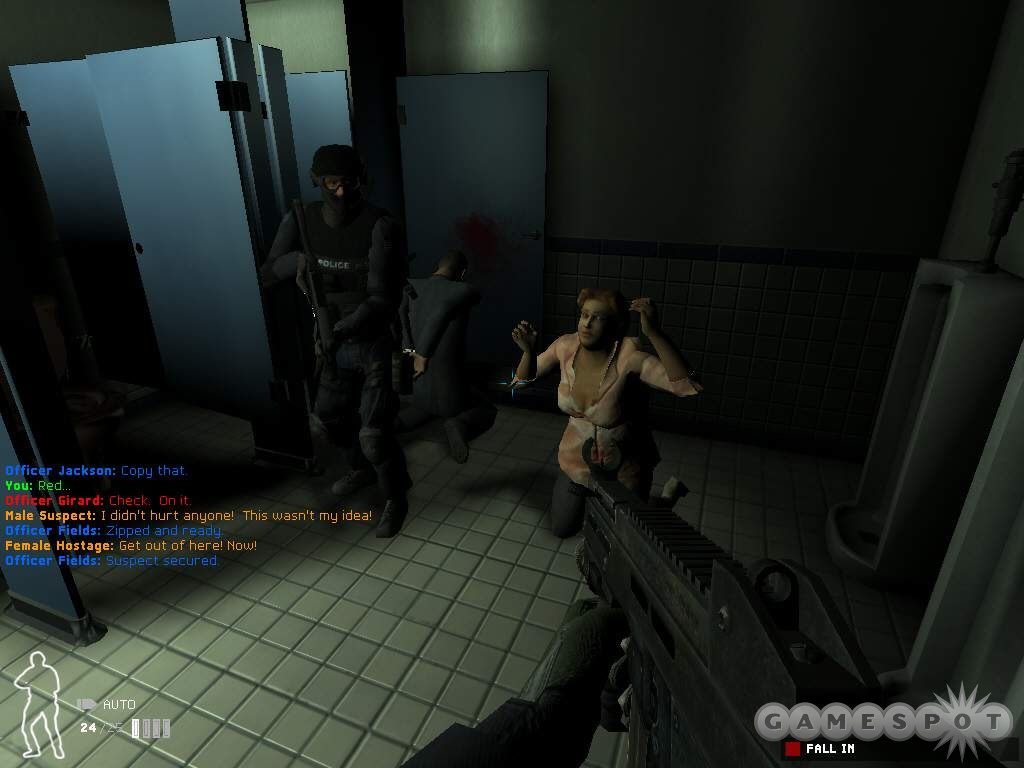
Utilize a taser and pepper spray against uncooperative civilians and suspects. There will be a time when a civilian refuses to comply with your shouted orders. The civilian simply won’t raise his or her hands and assume the «restrain» position. Equip your «encouragement» to basically force the civilian to comply. You could drop a grenade at the civilian’s feet but it’s easier to use the taser or pepper spray to give the civilian extra motivation to listen to your commands. Against uncooperative civilians, the pepper spray is the better option so you can save the taser for uncooperative suspects.
You’ve tossed a grenade into a room and the suspect is disoriented but continues to carry his weapon. You shout repeatedly and the suspect won’t drop the firearm. Obviously the suspect needs some encouragement. Arm the taser, approach the uncooperative suspect, and fire into the suspect’s chest.
High Scoring
Successfully advancing in career mode depends on your mission score. Essentially you’re graded on your ability to follow SWAT procedure (for example, not simply killing every suspect regardless of their actions). The following list provides tips on obtaining the highest mission scores possible (out of 100).

- Simply completing all mission objectives nets 40 points—no matter what actions you took during the mission.
- If all civilians during the mission emerge unharmed, 5 points is added to your score.
- If all squad members survive the mission, 10 points is added to your score.
- If all suspects are restrained at the end of the mission, 5 points is added to your score.
- Complete the mission without injury to your own character to receive 5 points.
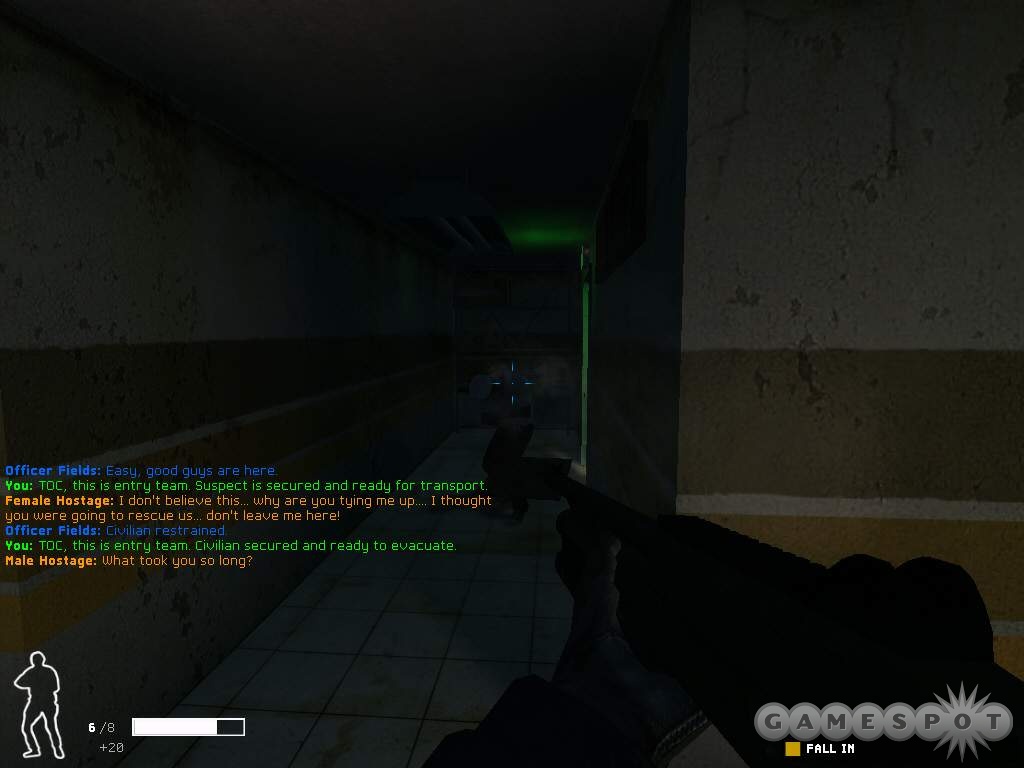
- Report status to TOC when necessary to receive a full 5 bonus points (you’ll receive a portion of the points depending on how many opportunities you squander). Status situations include reporting restrained suspects or civilians, incapacitated civilians, dead suspects, dead squad members, etc.
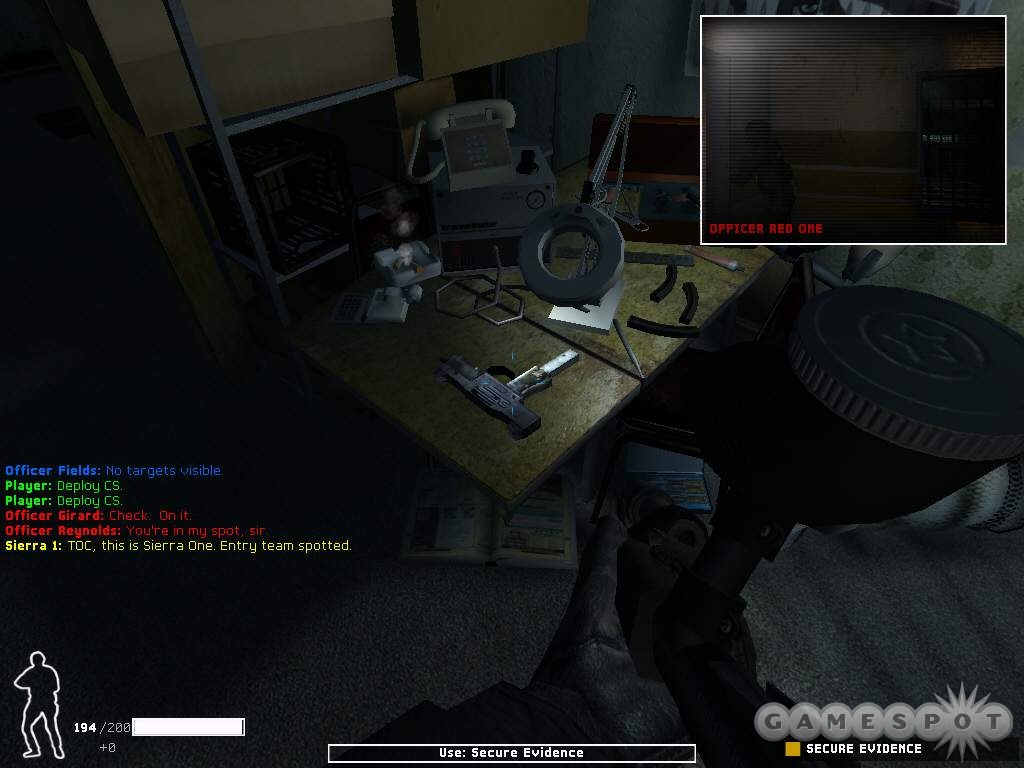
- Recover weapons to receive a possible 5 bonus points (you’ll receive a portion depending on how many you miss). Every time an armed suspect surrenders, he or she drops a weapon (or even two). Recover those weapons to secure the evidence.
- You can hit ESC at any time during the mission to see how many status reports or weapons you’ve missed so far. Note that the status reports aren’t entirely accurate because it may register civilians you haven’t quite reached. Check again near the end of the mission to stay on top of it.
- You receive a percentage of a possible 25 points depending on the number of suspects arrested or incapacitated. The best case scenario is to arrest all suspect.
- There are also penalties to your possible score. If one of the officers is shot and incapacitated or killed, you must report the situation to TOC. Failing to do so subtracts 5 points from your score.
- Incapacitating a hostage subtracts 5 points per hostage and killing a hostage subtracts 15 from your score. Since mission objectives generally include rescue all civilians, this will penalty will likely lead to mission failure as well.
- Injuring a fellow officer subtracts 5 points and killing a fellow officer subtracts 15 points. The team won’t look kindly on these acts either; expect to be fired upon for your betrayal.
- Arguably the toughest penalty is the unauthorized use of force (and deadly force). You can’t just kill suspects without cause. If a suspect raises his weapon or fires in your direction, you’re authorized to use force to subdue the suspect. If the suspect threatens a hostage with a weapon, you are authorized to use force. But you can’t just walk into a room and shoot an armed suspect. Receiving an unauthorized use of force penalty subtracts 5 points; receiving an unauthorized use of deadly force subtracts 10 points.
Weapons
Achieving high scores in SWAT 4’s career mode often requires a non-lethal approach. A jittery trigger finger with lethal firearms could result in an unauthorized use of force penalty or just simply a suspect’s death which nullifies a chance at a perfect rating. Practice using the pepper-ball gun or less-lethal shotgun as your primary weapon. Couple these weapons with strategic use of tactical equipment for optimum effect.
It’s also possible to find similar success with an assault rifle or sub machinegun. Plus if required, you have the punch to end an armed suspect’s fury at a moment’s notice. This section covers SWAT 4’s primary and secondary weapon offerings.
Pepper-ball Gun
This weapon has its roots in recreational paintball. But instead of paint, the pellets are filled with OC gas, technically oleoresin capsicum, the active ingredient in pepper spray. Pelt a suspect around the head with the pepper-ball gun. As he suffers the effects, shout for the suspect to comply, continue to pelt him with OC, or switch to another device (a taser gun for instance) to encourage the suspect to subdue. The pepper-ball gun is rendered less useful against suspects wearing gas masks.
Less-Lethal Shotgun
If you’re aiming for perfect mission scores, the less-lethal shotgun should be high—or at the top—on your list as the weapon of choice. The less-lethal shotgun fires beanbags at the targeted suspect or civilian. Use the weapon to encourage suspects to subdue without risking their life (and reduction of your mission score).
The weapon’s downside is its relatively sparse ammunition. It can be quite easy to be careless and fire more beanbags than necessary. If you’re at closer range, hit a suspect with a beanbag, shout repeatedly, and if the suspect refuses to subdue, provide more encouragement. You could also follow up with pepper spray or a taser to conserve the beanbag ammo.
Nova Pump and M4 Super 90
The nova pump and M4 Super 90 shotguns pack a massive punch but at the expense of precision. Blasting away inside a room with suspects and hostages can have undesired—to say the least—results. Trying to counter an angry suspect at long range could injure nearby hostages caught within the shotgun’s spread. With higher accuracy weapons, it’s possible to encourage a suspect to drop their weapon by firing a round into their arm or leg. But the shotgun’s power, and inaccuracies at longer range, leaves little finesse.
The nova pump fires slower but holds 8 shells at a time; the M4 Super 90 fires much quicker but with just a 5 round magazine. Use 12 Gauge Slug ammunition against armored targets and 00 Buck ammunition to counter unarmored foes.
GB36s Assault Rifle and Colt M4A1 Carbine
The GB36s and Colt M4A1 carbine are extremely powerful assault rifles with pinpoint accuracy under controlled firing and seem to be more adept at piercing armored targets (with FMJ ammo). For optimum precision, crouch, remain steady, and fire the assault rifles in short, controlled bursts (the GB36s even has a 2-round burst firing mode).
These weapons lose an enormous amount of accuracy if you attempt to move and fire at the same time (though you can move while crouched and maintain accuracy as long as you don’t swivel around wildly). If you spot a hostile suspect and plan to retaliate with one of these weapons, crouch behind cover immediately and aim your shot carefully. Both the GB36s and M4A1 carbine are accurate enough to force a suspect to drop their weapons (hit in the arm or leg) from longer range. It is possible, though the weapons’ power means if you’re off slightly the suspect could suffer a fatal wound.
The GB36s includes full automatic and 2-round burst firing modes (stick with the 2-round burst nearly all of the time, there’s just too much kickback in automatic mode) and the carbine offers semi and full automatic. Both can use either jacketed hollow point (JHP) or full metal jacket (FMJ) ammunition. Equip JHP for unarmored targets and FMJ for missions with armored hostiles.
.45 SMG and 9mm SMG
The .45 sub machinegun is the more powerful of the two but requires controlled firing for optimum accuracy (there’s only semi and full automatic firing modes, no burst mode). The 9mm sub machinegun is less powerful but a bit more accurate with its 3-round burst firing to complement its semi-automatic mode. In multiplayer player vs. player modes, the .45 SMG has the edge because of its power against armored targets.
Both weapons can be equipped with jacketed hollow point (use against unarmored targets) and full metal jacket (use against armored targets) ammunition. The 9mm SMG also comes in suppressed variety; it sports a sound and flash suppressor.
M1911 and 9mm Handgun
The M1911 and 9mm handguns are possible secondary weapons. Although in general the taser is a better choice (it’s another relatively easy-to-use item to help subdue uncooperative civilians and suspects), both handguns can serve a similar purpose, even if you’re attempting to restrain armed suspects instead of eliminate them. Aim for the suspect’s arm carrying the weapon or pop a couple in the suspect’s leg to encourage surrender. You might say that lacks the ease of the taser, though.
The M1911 is more powerful than the 9mm and should be used if you aren’t adverse to returning deadly fire. The 9mm lacks the damage potential of its counterpart but can carry over twice the ammo in a single clip (17 round magazine to the M1911’s 8 round magazine). Use jacketed hollow point (JHP) ammo against unarmored foes and FMJ (full metal jacket) against armored suspects.
Taser Stun Gun
The taser is the ideal secondary weapon, especially if you’re trying to avoid incapacitating or killing suspects. It’s even a means of dealing with an uncooperative civilian (in lieu of pepper spray). You won’t want to charge an alert suspect and expect to subdue him with a taser gun—you will be shot long before you’re within taser range. Instead, save the taser for when you have used a flashbang, stinger, or gas grenade to disorient a suspect and he won’t drop his weapon even after repeated shouts. The weapon’s one downside is that it must be reloaded after every use. Aim carefully and start shouting orders as soon as the taser finds its mark.
Equipment
Tactical items are arguably the most important equipment in a SWAT squad member’s arsenal. These items prevent mission disasters and can save a squad member’s life as well as any lethal firearm. This section covers strategies for a squad member’s tactical equipment options.
Pepper Spray
There are occasions when a civilian refuses to cooperate with your team’s verbal orders. You’re attempting to subdue the civilian but he won’t raise his hands and assume the «restrain» position no matter how many times you shout. That’s when it’s time to break out the pepper spray! Aim for the civilian’s head and fire the pepper spray. Don’t go overboard; shout and spray enough so the civilian complies with your commands.
Alternatively you could drop a flashbang or gas grenade at the civilian’s feet to receive a little cooperation but obviously that’s not the optimum way to use a grenade! Use one of your equipment slots for pepper spray and keep the team loaded with grenades. If a civilian won’t cooperate, take the lead and use the pepper spray as necessary.
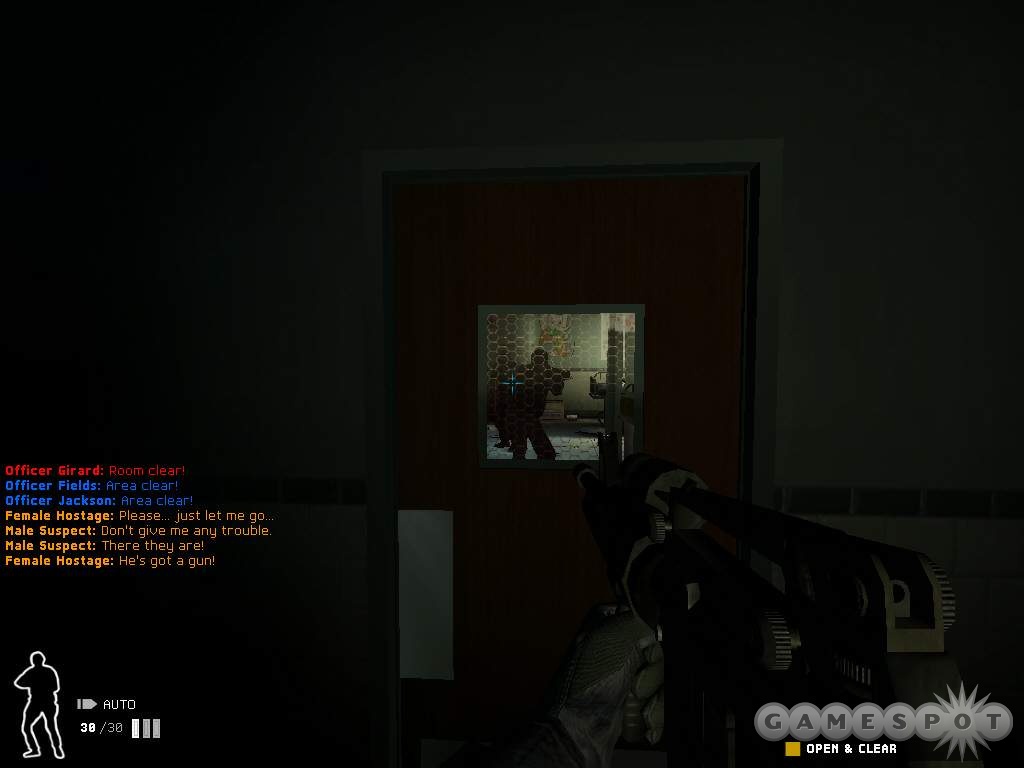
Optiwand
The optiwand is an observation device used to look under closed doors or around corners. Walk up against a door, point the reticle at the bottom of the door to reveal the optiwand icon, and then press fire to automatically switch to the optiwand and use it to check underneath the door. You can also equip the optiwand before reaching the door and perform the same actions.
Approach a corner and equip the optiwand. Press fire to extend the optiwand to look around the corner. You may have to adjust your position at the corner for the best viewing angle but the optiwand should allow you to see down a hallway or around an obstruction within a cluttered room.
You can order team members to check under doors with the optiwand and they’ll check for suspects and civilians inside. However, don’t always take their word as gospel. As missions progress in difficulty, suspects become much more adept at finding the right spot within a room to hide and remain undetected by the optiwand. It’s a good idea to manually equip an optiwand so you can be the one to check out a room. Look for signs that a suspect might be inside, such as a shadow on the ground or flickers of movement at the edge of cover or an obstruction.
In general, it’s wise to equip your character with an optiwand on each mission. Also provide one optiwand per team so you can split the teams up, have them check under doors, and then open and clear rooms simultaneously. If you don’t mind the extra work, you could be the one to control the optiwand at each moment and fill the team’s inventory slots with extra grenades.
Door Wedge
Use door wedges to essentially lockdown passages so suspects can’t enter a particular room or flee a specific direction. Suspects in adjacent rooms will often hear what’s going on in your current location. If you’re causing a lot of noise, such as barking commands to a subdued suspect or hostage, hurling flashbangs, or firing weapons, then nearby suspects can enter the room and surprise you and your team.
You can help prevent these events by using door wedges to protect your rear flank. Also in rooms with multiple entrances and exits you can wedge particular routes shut while splitting your team to stack the other doors. Use in missions with multiple floors. Wedge off access to the stairwell from one floor while you clear the other floor without worry that suspects enter the stairwell and await your return.
Flashbang
The flashbang is a blinding and deafening grenade. Basically it causes extreme disorientation to targets with line of sight on the flashbang’s explosion. Take advantage of the disorientation and subdue the target as quickly as possible. Since a suspect needs to actually see the explosion, the flashbangs are best used in uncluttered rooms or hallways. If a room contains a lot of debris or dividers or other cover, a flashbang could be rendered nearly useless.
But when you do encounter a cluttered room with lots of cover, instead of ordering a team member to toss in the flashbang, hurl in the flashbang on your own. If the suspect isn’t a threat to shoot as soon as you open the door, you can line up your toss and throw the grenade closer to the suspect—ideally right at the target’s feet. A team member’s toss lacks aim and precision.
The fastest way to render a flashbang useless is to actually look at the explosion! Make sure you are turned away and out of the explosion’s line of sight. The flashbang’s explosion affects you far more than it affects a suspect. By the time you can see and hear what’s going on, the suspect has likely recovered and not too happy about the current situation. After a successful bang, storm the room quickly, order suspects to subdue, and if they aren’t dropping their firearms quickly enough, provide extra encouragement with beanbags, pepperballs, tasers, or slugs to the arm.
CS Gas
Utilize the CS (chlorobenzylidene malonitrile or tear gas) gas grenade in cluttered rooms. Suspects can hide behind cover from the effects of a flashbang but the CS gas spreads throughout the room. Toss a CS gas grenade into a room and wait a moment before charging inside. Listen carefully for the coughs—now the gas affects the suspect. Move in quickly and order the suspect to subdue. Use extra encouragement if needed through pepper spray, beanbags, or other means.
The gas spreads fairly quickly (and, unfortunately, dissipates fairly quickly as well) but might not cover larger rooms. You can use a gas grenade, enter the room, and follow up with another gas grenade or stinger grenade for the other side of the area. Or if you know the suspect is on the far side of the room, manually toss the gas grenade inside so it dissipates toward the enemy or enemies.
Briefings that reveal mission suspects are wearing gas masks will render the CS gas grenades nearly useless. Gas obviously won’t be effective against the gas masked targets; however, it’s possible to encounter other suspects in the mission that aren’t wearing masks. For those missions, equip more flashbangs and stingers but retain a couple gas grenades for certain situations.
Sting Grenade
The stinger grenade explodes in a fury of rubber balls; any suspect or civilian within the blast radius suffers dizziness and disorientation from the impact. The stinger can be effective because it can’t be avoided by using a gas mask, like the CS gas grenade, and it can’t be turned away from, like the flashbang.
Toss the stinger grenade next to or near a suspect. It’s not usually useful to order a team member to open, sting, and clear a room unless you’re sure that a suspect is close to the entry door. The sting grenade needs to be close to a suspect to be effective. It’s best to toss the stinger after either spotting a suspect behind cover (such as seeing a shadow or moving arm) or as a means of rooting out a suspect from around debris or other obstruction. The rubber balls will have an effect on you as well; don’t be near the stinger when it explodes!
C2 and Breaching Shotgun
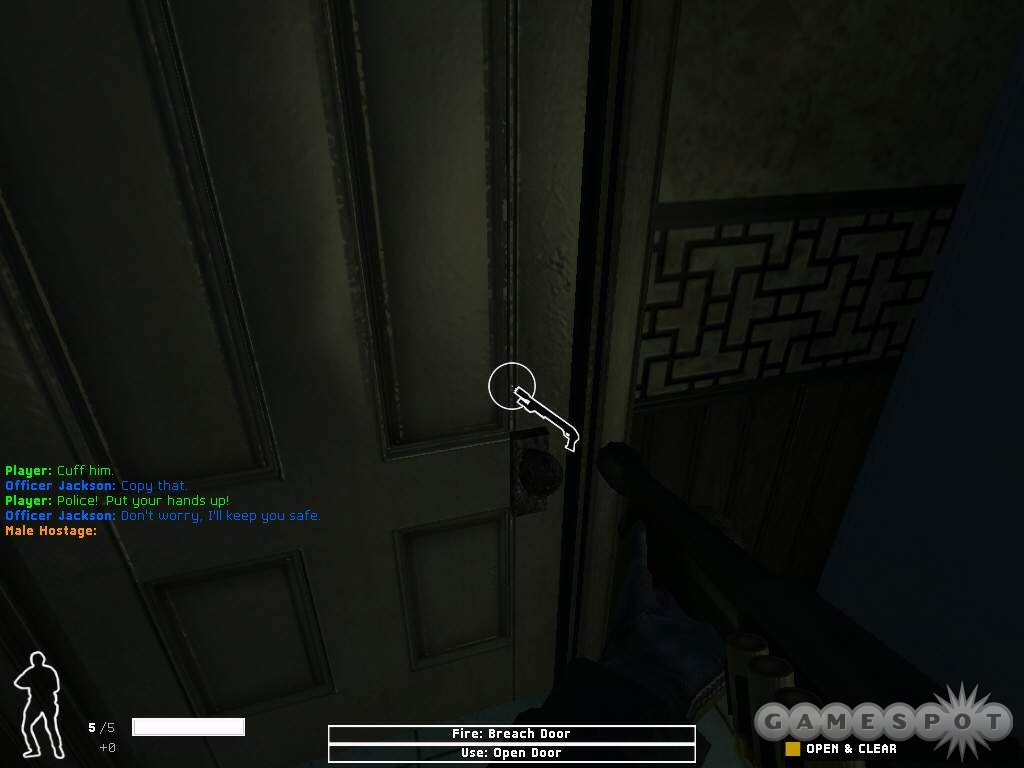
The C2 explosive and the breaching shotgun are two means of breaking through locked doors (another would be to actually pick the lock). The benefit of the breaching shotgun is its extremely quick; essentially just aim and fire! The C2 explosive is slower to use but can actually stun suspects on the other side of the door.
If you encounter a small closet or bathroom and use the optiwand and see a suspect inside, you could try and order the team to open, bang, and clear. However, after opening the door, the suspect will almost certainly fire on the team. Often team members will go down against this one suspect hiding in a bathroom.
Instead, use the C2 explosive to breach the door and stun the suspect inside. Enter the small room and order the suspect to subdue and add any encouragement if needed. It’s smart to have at least one or two team members with C2 explosives to counter these smaller spaces.
Walkthrough
SWAT 4’s career mode offers thirteen stand-alone missions. The mission level design and objectives remain the same each time you play but the location of suspects, hostages, and certain objective-related items change with each attempt. Loadout options are also extremely varied depending on how you want to attempt a mission. If you’re trying for maximum points, use a non-lethal set. But if you’d rather gain entry with ample firepower, consider a duo of lethal firearms to complement your tactical equipment.
This section features walkthroughs for all thirteen career missions. You have near limitless freedom in how you chose to tackle a particular mission. Also, since many mission elements are randomized and the unpredictable nature of armed suspects, a particular room could play differently on each attempt. The following walkthroughs provide a sample path through each mission and include suggestions for loadout, entry point, and how to tackle specific areas and room layouts.
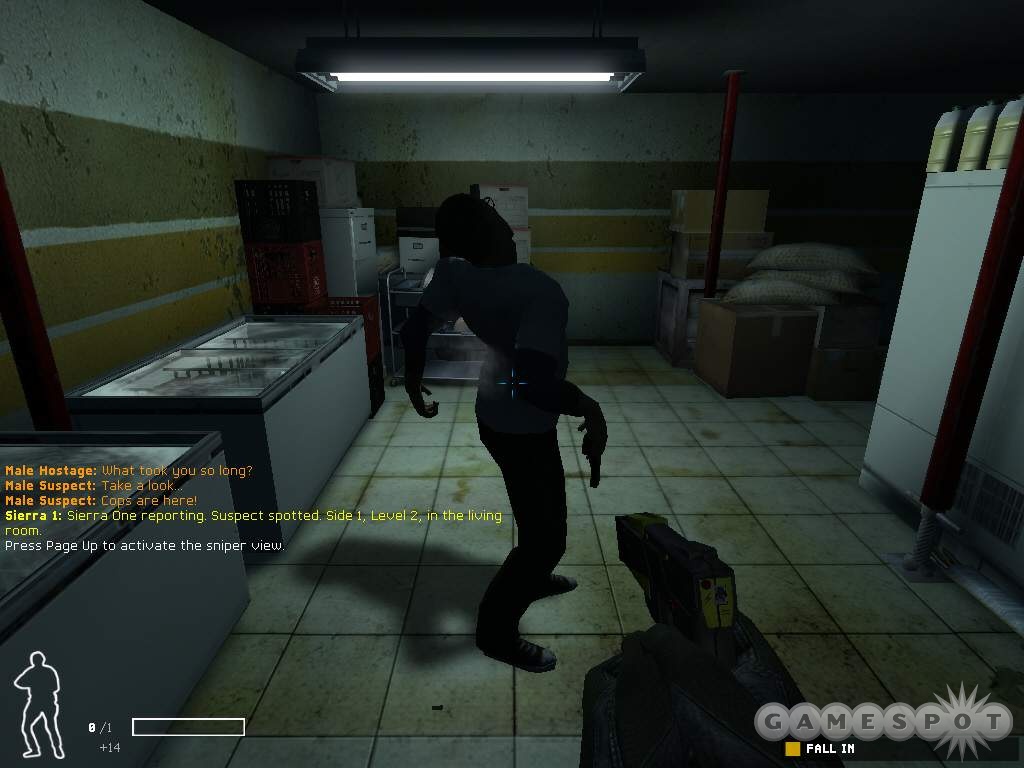
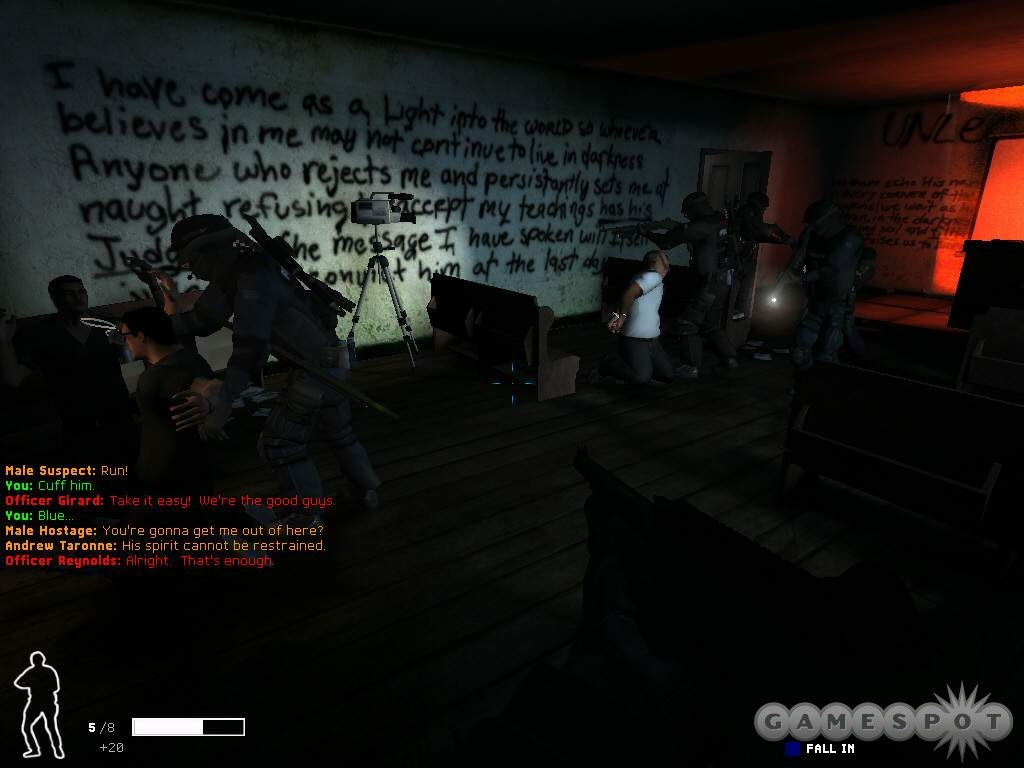
Food Wall Restaurant
The owner of the Food Wall Restaurant, Lian Niu, deals in illegal modification of firearms such as fabricating custom high-volume magazines. Niu maintains an apartment above the restaurant. Ten minutes ago, a detective spotted Alex «The Knife» Jimenez, a hit man with Columbian connections and a key suspect in multiple homicides. Jimenez is there to have modifications made to his MAC-10.
Objectives: Neutralize Alex Jimenez. Neutralize Lian Niu. Bring order to chaos. Rescue all of the civilians. Secure the MAC-10.
Loadout: Equip team members with a non-lethal primary weapon (pepper-ball gun or less lethal shotgun) and a secondary firearm. If you choose to use a firearm, select jacketed hollow point ammo because there are no armored suspects in the mission. Give each team member a mix of flashbangs and CS gas grenades. Give each team one optiwand and a couple door wedges so you can split up the teams and have each properly equipped for cautious entry and covered closure.
The mission’s entry point is at the corner of the alley and the restaurant’s front entrance. There are two doors into the restaurant and they’re not far apart. Order one team to stack up on the front door or use a door wedge to keep the exit shut. Proceed down the alley and order the other team to fall in.
It’s possible to find civilians or even a suspect hanging near the restaurant’s back door. Order the civilians or suspect down. Use the pepperball gun or less-lethal shotgun if necessary to subdue a suspect. Handcuff anyone in the alley and report in. Order a team to mirror under door to check for occupants in the hall. Maneuver inside and order a team member to close and wedge the exit.
From the alley back door, the kitchen lies to the left, door to the stairs is ahead, and there’s a storage room to the right. If the stairs door is closed, use a door wedge to keep the passage shut. Search the storage room with the optiwand. If there’s a suspect inside, order the team to open, gas, and clear. There’s some cover in the room so a flashbang may not be as successful.
Use the optiwand around the corner into the kitchen to search for occupants. Gas and subdue any suspects lurking around. By now you can order the second team, if still stacked up at the restaurant’s front entrance, to use the optiwand to check the dining area then to open and clear the room (and gas or flashbang as necessary). Move through the kitchen to meet up with the second team.
Check the small storage room for occupants. If there’s a suspect inside, order a team to open, gas, and clear. You could also breach using C2 but it risks injuring the occupant. Breach if the occupant is away from the door. Use the optiwand to check the bathrooms. The bottom floor should be clear by now.
Walk to the door leading to the stairwell. You can order one team to cover the hall and take the second team up the stairs. There’s a door on the left that leads into the apartment. Order the team to mirror under the door and flashbang or gas the interior if there’s a suspect inside. Past the door, check around the corner with an optiwand and order a team to flashbang or gas the area around the corner.
Search the desk in this work area to find the MAC-10. Secure the evidence before moving onward. Continue into the apartment and check around the corner and gas or flashbang as necessary. There are two doors inside; the door on the left leads back to the stairwell and the door on the right leads to the bedroom. It’s the last room in the apartment; check for occupants using the optiwand and open, gas, and clear.
To achieve the highest possible score, use non-lethal means to apprehend all suspects (and anyone armed). Restrain everyone and report them in. Secure the evidence and report it in. If you lose a team member, report it.
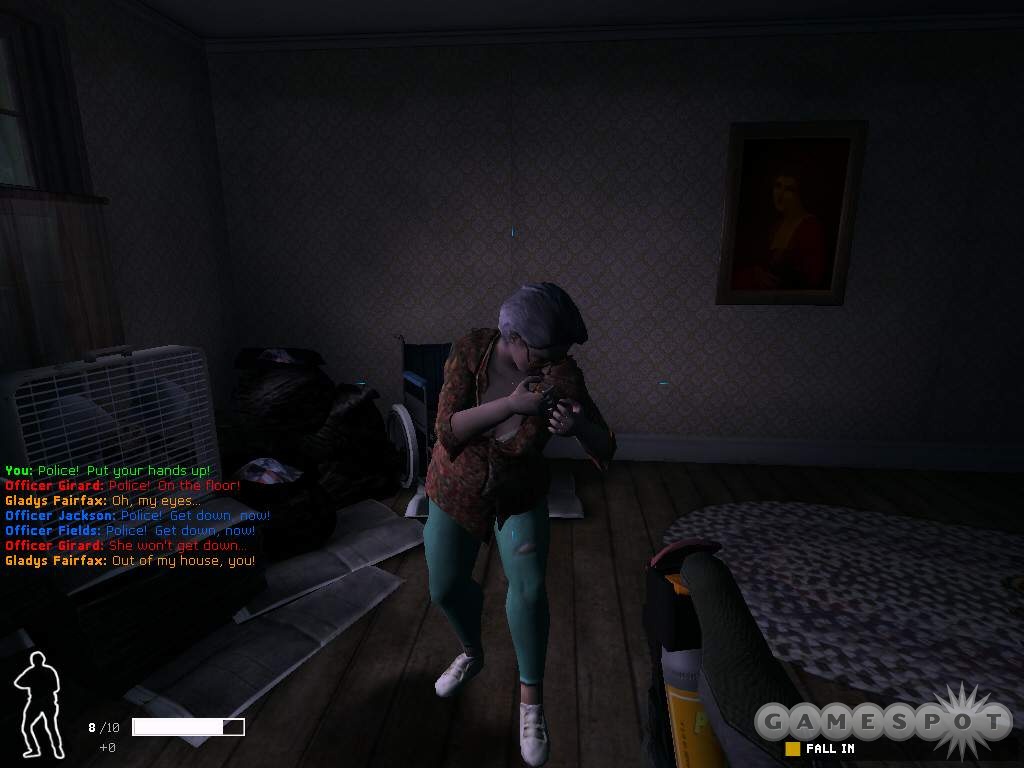
Fairfax Residence
Lawrence Fairfax is the number one suspect in a series of grisly homicides. It’s believed a student named Melinda Kline, who went missing six days ago, may be held at his house. The suspect’s mother, Gladys Fairfax, is also believed to be in the home and should be considered an unpredictable subject.
Objectives: Bring order to chaos. Rescue all of the civilians. Rescue Melinda Kline. Neutralize Lawrence Fairfax.
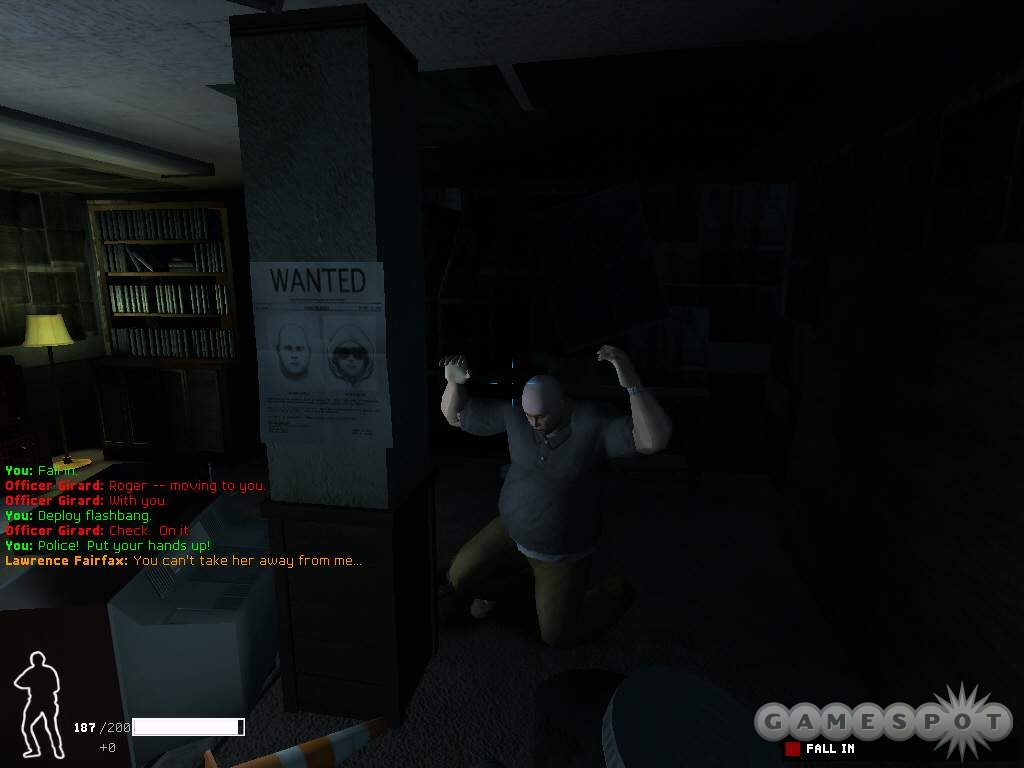
Loadout: Equip the pepperball gun or less-lethal shotgun with a secondary 9mm handgun or taser. Use hollow point bullets as there are no armored targets. You’ll likely keep the squad together but equip at least a couple optiwands and a few door wedges. You’ll also want team members with pepper spray to subdue the unpredictable mother (or use the taser). Use a mix of flashbangs and CS gas grenades.
There are two entries into the Fairfax residence. There’s backyard access into the rear door of the first floor then there’s a driveway entrance into the garage that leads directly into the basement area. Use the garage entrance as suspects are found on the basement level; also, this is where you’ll locate the hostage or hostages.
Order the team to mirror under the door into the garage. Pick the lock if necessary and enter the garage. Door wedge the exit door. Use the optiwand to see beneath the next door on the right side. Look carefully for occupants as there could be a second suspect inside the room. Open, gas (or bang), and clear the room. Subdue the suspect, recover weapon, and report in.
Proceed left down the hall. The door on the right leads to the stairs; you can wedge the door to prevent anyone from entering the basement while you continue the search. The second door leads into the bedroom and a third into a small storage room. Search the storage room and then use the optiwand under the bedroom door.
Lawrence Fairfax could be inside the bedroom but you may not notice him even with the optiwand. He could be behind some cover. Open the door quietly and try and spot any movement behind the cover on the room’s left side. Deply a flashbang into the room and shout orders to force Lawrence to stand down. Recover his weapon, restrain him, and report in.
Locate the door in the back right corner of the bedroom. Check under the door then enter and find Lawrence’s «chamber». If the suspect is inside, deploy CS or flashbang and order Lawrence to stand down. Report the possible hostage inside the room. Find another door on the room’s back wall. Check under the door then proceed through the tunnel to another chamber to find Melinda Kline. If the suspect is inside, pelt him with pepper or beanbags and shout for him to stand down. Report in.
The entire basement should be secure at this point. Return to the stairwell door. Check the stairs for occupants then proceed to the residence’s first floor. There are three doors down the left hall that lead into a bathroom and two bedrooms. Check each for occupants and clear.
The room across from the stairs leads into the kitchen; off to the right you’ll find the dining and living room area. Gladys Fairfax, the suspect’s mother, is likely on the first floor somewhere. She could be near the dining area or in one of the bedrooms. She’s not cooperative and will likely require pepper spray to subdue. Order the team to pepper Gladys then restrain her and report in.
Qwik Fuel Convenience Store
There’s a hostage situation inside the Qwik Fuel Convenience store on Pitkin Avenue—at least three hostages (store employees) are barricaded inside. Officers on the scene observed multiple gunmen, number unknown, and at least one unarmed civilian. One perpetrator has been identified: Alice Jenkins. She was in process of committing armed robbery for drug money. Given the erratic behavior, at least some of the suspects may be high.
Objectives: Bring order to chaos. Rescue all of the civilians. Rescue Heidi Rosenstein. Rescue Willis Fischer. Rescue Kim Dong Yin. Neutralize Alice Jenkins.
Loadout: Arm the team with non-lethal equipment, either the beanbag shotgun or the peppergun. Tactical equipment should include a mix of flashbang and CS gas grenades for all members then split up the door wedges and optiwands.
Entry point begins near the convenience store’s back entrance. This leads into the storage and loading area. You can use this entrance immediately or proceed around the right corner toward a second back entrance. If you choose this route, use the optiwand to check around the corner. Some suspects might be lurking along this alley at the store’s rear. Toss a flashbang before approaching. Pelt a suspect with beanbags or pepperballs to force them to subdue. Report in any captures and be sure to retrieve their weaponry.
Beware of a storage container along the wall. You can’t tell from the approach but it’s open and hollow and there could be someone lurking inside. Check around the corner with the optiwand and hurl a grenade inside to subdue the subject. Order a team member to check the bathrooms. The door to the left of the bathrooms leads into the store’s office. This path is much closer to potential suspect locations: offices and the storefront.
If you don’t choose the office entrance then wedge it with a door wedge to prevent escape. Return to the door at the entry point, check for occupants, pick the lock, and move inside. Subdue any occupants of the storage room and report in. There are doorways on the left and right sides of the room. The left is open; a suspect could see or hear you if they’re lurking in that area. The door on the right leads to the loading dock.
Check the double doors back into the store. If it’s clear, pick the lock. If not, pick then deploy a grenade inside and subdue anyone lurking inside. The path descends into another storage room along the right side. There’s a single door leading out of this storage area. Order a team member to check under the door with the optiwand.
It’s a hallway that leads to the offices on the left though you can also see the storefront ahead. If there’s a suspect patrolling the storefront, he could see you and you’ll have to use a lethal firearm to shoot through the glass. To prevent being seen, toggle Sierra 1 and check the storefront for suspects. When it’s clear, enter the hall. You can wedge this door since it’s the only path back through the loading dock. Proceed toward the left and the store’s offices.
Regroup inside the offices at the end of the hall. Check the room as needed and enter using a flashbang or gas to subdue anyone inside. This office is a safe haven before the two most heavily trafficked areas, the other office (with the store’s cash) left of this office’s exit and the main shopping area to the right of this office’s exit.
Tackle the shopping area first since you’ll be spotted by anyone inside once you leave the office. Sierra 1 can give you eyes on the suspect’s movements inside the shopping area. Also you can control the sniper and disarm suspects or even shoot them (though you’re striving for non-lethal means if you’re gunning for a higher score). Cloud the shopping area with flashbangs and CS gas to disorient anyone inside. Use your non-lethal weapon and shouts to subdue suspects. Handcuff everyone in the room and report them in. Recover weapon evidence.
Now check the primary office where the money is found. Look under the door using the optiwand. Deploy CS gas and flashbangs inside the room to disorient the occupants. Enter and quickly subdue the targets, handcuff, report in, and recover weaponry. The refrigeration room is through the next door. If the mission isn’t over, check it for remaining suspects or civilians to complete the task.
A-Bomb Nightclub
You’re called into a rapid deployment at an ongoing shots fired situation; potential gang altercation within the A-Bomb Nightclub. Expect to find many armed gunmen inside and several capacitated and incapacitated hostages. There are two possible entry points: the front door, past the ticket booth, and a back alley loading zone.
Objectives: Bring order to chaos. Rescue all of the civilians.
Loadout: Arm the team with non-lethal primary weapons and a handgun or taser secondary weapon. There are no armored targets so jacketed hollow point ammunition is sufficient if you decide to use a lethal firearm. Equip plenty of flashbangs and CS gas grenades. The nightclub is large and many rooms have multiple entrances and exits so you will likely need flashbangs or gas to help clear rooms and subdue occupants. Remove all of the pepper spray and replace with an extra grenade. Make sure both red and blue have one optiwand and two door wedges.
There are two entrances. For the purposes of this walkthrough, we’re going to use the side entrance. There are a lot of doors, rooms, and hallways from the front entrance so the side entrance begins a bit calmer, at least in theory. Check the side entrance with a mirror then open and clear. You may notice the first incapacitated hostage in this room. To achieve the highest score possible, you must report all of the incapacitated hostages in to TOC so search all rooms carefully.
The door on the opposite side of the room leads into a stage area. Don’t use that door just yet. Order red team to stack up against the door and use blue team to search the left hall. A door on the right side of the hall leads into a bar area. If the door is open, expect occupants inside. If it is open, toss a gas grenade into the room then enter with blue team and subdue any suspects or hostages. Shout orders and pelt a suspect until he subdues. Restrain, report, and secure firearms. There’s only one exit from this room; the door on the right leads into the stage area again.
If you go past the door into this bar area, the path bends around a corner to the right and moves upstairs to the second floor. Don’t proceed there yet. But you can check around the corner with an optiwand to see if any suspects are patrolling the area.
Order blue team to stack on the door into the stage area located in the bar. You should have two teams in two locations both prepared to enter the same room. You can order both teams to use optiwands on the door to reaffirm suspects. Order a team to bang or gas the room and the other to clear. Or even toss in two gas grenades. You should enter the room and cover the left side; there are two exit doors there that suspects may try to either flee from or even enter from. Shout at any suspect in these doorways to protect your team. Restrain and report everyone in the room. Secure weaponry then focus on the two exit doors.
Stack one team on the left door and another on the right. Beyond this door is a storage room and stairwell to left and a long hallway to the right that leads down to the front entrance, the ticket booth, a hall of bathrooms, and another stage. This can be a potentially dangerous hallway. Order the team at the left door to deploy a flashbang and the team on the right to open, gas, and clear. Send the left team after the right moves in. Assist the team on the right as there are likely more suspects in the hall than toward the storage room.
If the left side is clear, order the team to cover the area. Down the hall on the right, be careful down the hall as you can be visible from the ticket booth. Also, the door across the ticket booth leads to another stage that’s likely occupied. Go down the hall on the right and check the bathrooms. If there are any armed occupants, open, gas, and clear.
The door to the left of the men’s room goes into the ticket booth. Check under the door with the optiwand. If there are armed occupants, open, bang, and clear. Return to the storage area and regroup the teams. Sierra 1 is focused on this storage room so you can snipe a target if you want or use non-lethal means to apprehend the target. Check under the storage room door on the right and clear the room of occupants.
The door ahead leads into the other stage. Like the other, it contains multiple exits and entrances. Check under the door. Deploy a flashbang and/or gas inside the room before entering. Subdue all occupants and report in to TOC. The door straight ahead leads into an office. Have one team clear the office while the other moves toward the front entrance with you. Check a second office on the opposite side of the hallway past the front entrance.
You’ve now cleared the first floor. Return to the storage room door and stack onto the door on the opposite wall. This is a stairwell to the second floor. Check under the door if it’s closed. If there’s a suspect on the stairs, deploy a flashbang and enter. Be careful ordering a team to clear the stairwell because they will ascend to the top and could be targets for any suspects on the second floor.
At the upstairs door, open and deploy a flashbang and/or gas after checking underneath. Move off to the right after entering as suspects can flee around the corner. Stop them in their tracks with a non-lethal weapon. Have one team restrain suspects and hostages while another team deploys gas into the next open area. Gas the area before entering or you may suffer some nasty crossfire from hard to see suspects. Order any remaining occupants down. Make a final sweep for incapacitated hostages and make you have reported in all restrained suspects and civilians and secured all weapons.
Victory Imports Auto Center
A botched theft has turned into a barricaded situation. Responding to a 911 call, an officer interrupts two individuals in the process of stealing a car from Victory Imports. At least one hostage is known to be inside: Gary Altman, a mechanic who was apparently working late. Expect to find several more civilians inside. There are two possible entry points: the parking area north entrance and the roof. The parking and repair garages comprise the lower level and the second floor is office space.
Objectives: Bring order to chaos. Rescue all of the civilians. Rescue Gary Altman.
Loadout: Arm the team with non-lethal primary weapons and handgun or taser as a secondary weapon (hollow point ammo is adequate). This is a good-sized structure so eschew the pepper spray for extra CS gas grenades and flashbangs. Take at least one door wedge and an optiwand for each team.
Enter through the parking garage. It’s quite dark so use the flashlight. Descend into the garage and peer around the left corner. You may spot a suspect running back into a repair garage or one may remain outside and take shots at your team. If one remains behind, blind him with a flashbang and subdue him. Check near the van for an incapacitated hostage and report it in.
There are two repair garage entrances here. Close the doors if they’re open and order one team for each door. Check underneath the door with the optiwand. If you continue through the garage, you can look around a left corner to find a third door: it also leads into the second garage. Be careful if this door is open as a suspect might surprise you.
The left garage has an upper floor, which does pose some problems if you just charge inside. Flashbang that garage even if the team reports no suspects inside. Aid that garage clearance and check that upper floor as soon as you move in. Beware of any suspects in the back trying to get into the adjacent garage. Order a team up the stairs to wedge the door at the top. This leads into the second floor offices so it’s best to keep it shut for now so no suspects can escape. If there are suspects in that office, they can shoot out the windows so proceed carefully.
Clear the adjacent garage using two teams; one at the door they started at and the second at the door in the back left corner of the first garage. The second garage leads back into the parking area, into a third garage, and the left door into a hall toward a restroom and storage area. Order a team to mirror the middle door to look within the third garage. Deploy a gas grenade inside if a suspect is spotted; when he starts coughing, enter and subdue him. Report in and recover weapons as you move.
Proceed into the hallway. It’s quite dark and it’s easy to miss a suspect hiding in a corner. Use the flashlight or be extra careful and toss a CS gas grenade into the hall. Order a team to check under the bathroom door on the right. If there’s a suspect inside, it’s tough to restrain him without suffering a casualty. You can breach the door with C2 but you may incapacitate the suspect. If you try and deploy a grenade inside, you may lose a team member.
Toss a CS gas grenade down into the storage area if you see someone lurking about. Watch the stairwell on the left for suspects coming down. There’s another door on the back left corner of the storage area. Use the optiwand to peek inside. Subdue anyone inside.
The door on the right side of the storage area leads back into the parking garage. There’s likely a suspect (or two) on the left alcove out this door. The best way to deal with them is to open the door, toss a flashbang toward the left alcove, and then exit the door and subdue them. Move the team into the parking garage and close the door behind you. Keep a team stacked on the door in case some suspect attempts to surprise you. Check behind the air unit across the garage. Toss a grenade if you’re being shot at.
Return to the stairwell in the storage area and ascend cautiously. At the top of the stairs, lean out and check both directions. Use the flashlight to check dark spaces. Go to the right. There are two halls to the right. Toss a CS gas grenade down the first hall. Make sure the grenade reaches a small alcove down the hall. Listen for coughing then subdue anyone down there. Don’t continue down this hall.
Instead, proceed down the next hall. It runs adjacent to the sales counter. Liberally gas (or flashbang) the lobby across from the counter in case there are suspects lurking around. Be careful as you check the arcade area. There’s one more office in the back corner; it’s the same room that’s at the top of that first garage that you wedged shut. Check the door before entering then gas or flashbang as needed.
There could also be suspects on the rooftop. Return to the stairwell and ascend the staircase to the roof. The rooftop is quite open so it’s extremely important to move carefully. Use all remaining grenades and listen for disoriented suspects. Shout and use your non-lethal weapon to force the suspects to subdue. Check to make sure you have reported everything in before advancing to the next mission.
Red Library Offices
Multiple gunmen have stormed the offices at the Wainwright Mill Center. The gunmen shot their way through several businesses before getting pinned down by patrol in one of the offices. It all started with an attempted bank robbery and lead to two security officers shot, a vehicle pursuit, and finally a barricade situation inside Red Library, a software company. Sierra 1 and Sierra 2 are focused on the third floor; Sierra 1 into the break area and Sierra 2 into a conference room.
Objectives: Bring order to chaos. Rescue all of the civilians. Rescue Warren Rooney.
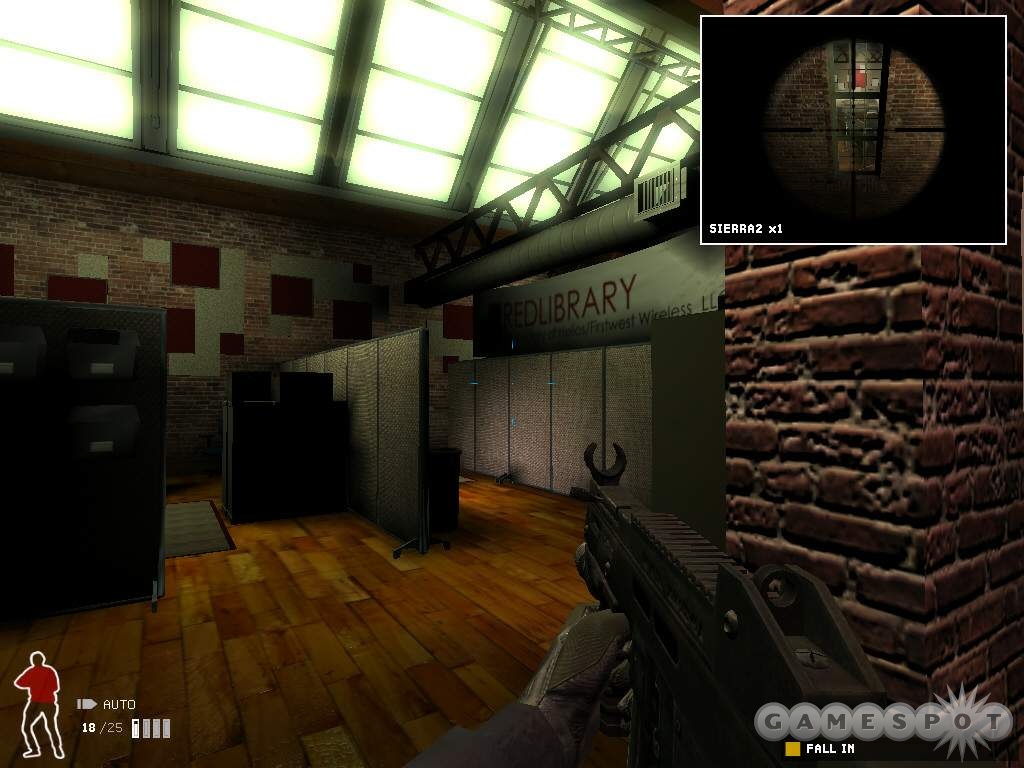
Loadout: Despite the briefing’s implications, expect to find many armed gunmen, including more than two gunmen with gas masks and body armor. You can use a less-lethal shotgun, though it’s slightly less effective against the armor. If you choose a lethal firearm, arm with full metal jacket ammunition for their armor piercing capabilities. If you’re looking to avoid aggressive force then you must order suspects to subdue and only use deadly force against a suspect if you’re threatened or fired upon. Aim for the arm carrying the firearm. Because some suspects wear gas masks, load up on flashbangs. You’ll want a couple door wedges and an optiwand per team.
There are two entries for the mission. You can enter through the parking garage level, which provides direct access to the stairwell leading to all three floors of the software company. Or you can proceed through the front entrance on the first floor. Take the parking garage for its stairwell access. You can clear out any suspects within the stairwell (that may cause surprises as you search the floors) and any that enter from their respective floors.
As you move through the parking garage, check around the first corner carefully as there could be a suspect near the stairwell door. There could also be a suspect in the back alcove. Check the door—likely locked. Order the team to pick the lock and check with a mirror. Take the lead and enter the stairwell. Turn left and look up to scan for suspects on the stairs. If you find any, order them to subdue or even toss a flashbang and retreat. If the suspect fails to comply, fire your weapon near them and then at their arm. If they fire, eliminate the suspect. Report in and recover the weapon as usual.
You can essentially search the three floors in any order. You may also want to use door wedges to keep the other floors closed as you search and clear particular floors.
Check the door into level one using the optiwand. Enter the first floor. The door ahead leads into a series of cubicles in the primary offices. Consider wedging the door as you search the rest of the floor because you can enter the cubicles through another entrance and this prevents any suspects from surprising you from behind.
The hall to the left leads to an elevator (likely holding an incapacitated hostage), a stairwell, and a couple bathrooms. You can check the bathrooms with an optiwand but you probably won’t be able to see anyone inside even though there could be hostages and even armed suspects. The view is blocked. However, you can enter and check the bathroom mirror to try and spot anyone in or near the stalls. Toss a flashbang into the bathroom if there’s any question. Shout for any armed suspects to subdue before approaching.
The hall to the left of the bathroom leads into the reception’s desk (careful of suspects behind the desk) and then into the cubicles on the right. The cubicles are a very dangerous location because it’s easy to be surprised if you aren’t scanning every area carefully. Listen for audio cues—suspect’s talking to hostages—so you can gauge if there are any threats inside. Hurl flashbangs into the alcoves as needed to subdue suspects. Comb the floor and report in completely and recover all weapons.
Ascend to the second level. You’ll find additional workstations, which like the cubicles contain alcoves where suspects can hide. Listen for audio cues and toss a flashbang or two to try and root out any threats. Check the area on the left for an incapacitated hostage. Be careful near the window on the right; suspects can spot you through the server room window. Search the server rooms cautiously.
Proceed to the third level. The stairs exit into a three-prong hallway. Use the optiwand to check under the door and attempt to spot any suspects. Check to see if the suspects are to the left, center, or right. Keep your team back, open the door, and toss the flashbang in the suspects’ direction so you ensure they become disoriented. Order the team to clear the room and subdue the suspects.
Find the conference room to the left and the recreation room to the left (there’s also a closet that could contain a suspect; may need to use C2 to breach and incapacitate the occupant). Sierra 1 and 2 can assist in locating any suspects in the conference room or recreation room. Note that there’s also a balcony overlooking the cubicles on level two.
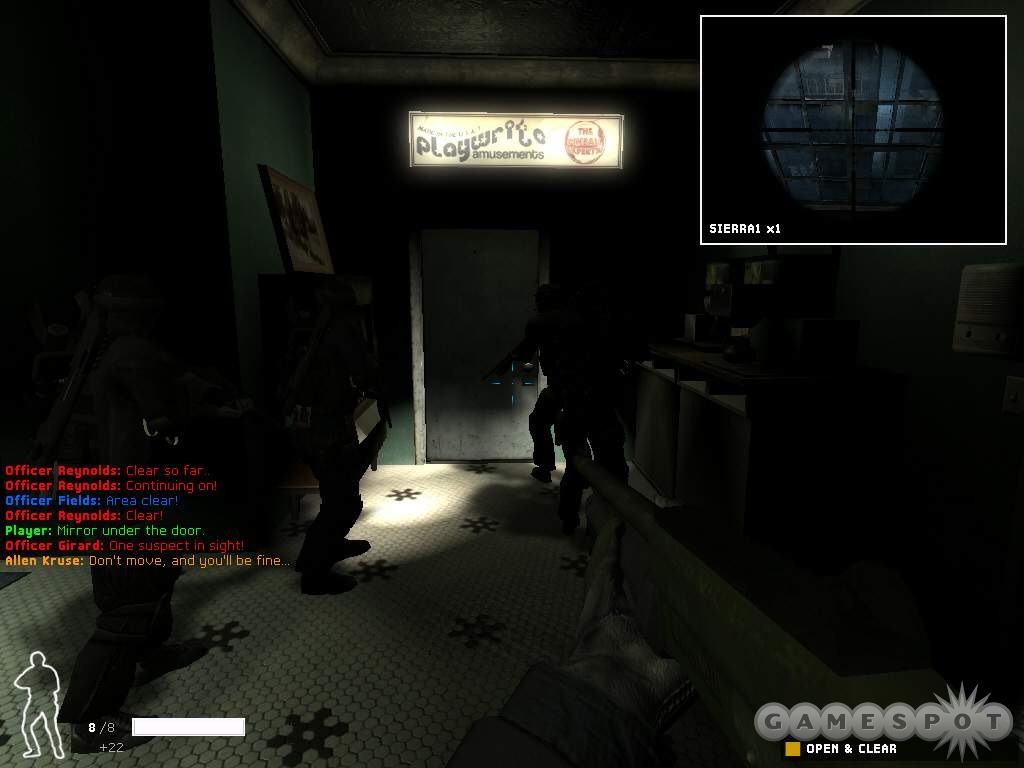
Northside Vending and Amusements
Vice has been keeping an eye on Northside Vending and Amusements while building a case against an alleged bookmaking operation. Detective Jeremy Walsh is working the case undercover and is currently unaccounted for. It must be assumed that Detective Walsh is in danger.
Objectives: Bring order to chaos. Rescue all of the civilians. Arrest Louie Baccus. Neutralize Simon Gowan. Neutralize Allen Kraus. Rescue Detective Walsh.
Loadout: Equip non-lethal primary weapons with handgun or taser back-ups. Be sure each team has one optiwand. You don’t really need too many door wedges for the mission; perhaps one per team at most. Load up on CS gas grenades and a few flashbangs. You should carry at least two gas grenades and one flashbang. A couple stingers can help root out suspects from behind cover.
You enter Northside Vending and Amusements from a back door; Sierra 1 covers a warehouse-type room. The SWAT van pulls the cage off of the back door. Order the team to check under the door and unlock if necessary. Enter the building. The door ahead leads into a lobby; it might be open. Close the door to prevent surprises while you check the room on the right. Use the optiwand to scan the bathroom.
Check the door into the lobby. Enter and spot two doors—both lead into the same room. It’s the warehouse-type room that Sierra 1 is currently fixed on. Check Sierra 1’s viewpoint and look for occupants. Check the left door. The door on the right opens into an alcove within the same room; the alcove contains a staircase that runs to a balcony overlooking the room. It’s possible to use the high ground to get a jump on suspects within the room but it’s also easy to get spotted attempting to reach the stairs. From the top of the stairs you can toss flashbangs or gas grenades into the room’s center.
Deploy a flashbang from the left door before entering and subdue any suspects and civilians within. It’s a large storage room. If you’re cautious, toss a second grenade toward the far right side of the room to root out any remaining offenders. Proceed to that side of the room and locate a door. Check under the door; it’s the stairwell. Toss a grenade down the stairs if suspects are present. As you descend the stairs, a new objective appears.
Objective: Investigate the Laundromat.
Shots are being fired at the neighboring Laundromat. One of Walsh’s contacts reports the shop and the Laundromat are connected. There are two doors at the bottom of the stairs. Wedge the door on the left. Check the door on the right. It leads into a short hallway with a casher’s office on the right side. It may be difficult to spot anyone within the office so toss in a gas grenade to be sure. Find the entrance to the cashier’s office in a hall on the right side of the room.
Use the mirror to search the next room for occupants. It’s a bar and lounge area. There are some obstructions. Toss in a flashbang if the suspects are within view or use a gas grenade and wait for the coughing before charging in. Use the optiwand to check the next door leading into the casino. Expect it to be heavily occupied, including armed suspects. Hurl in a few gas grenades and possibly a flashbang to be extra cautious. Shout police orders and charge the room. If any are uncooperative, pelt them with a non-lethal weapon (or pepper spray or taser if equipped). Restrain and report all suspects and secure all weaponry.
Check under the next door. This is the betting room. Toss in some gas grenades. Beware of suspects on the far side of the room. You may not be able to see them until you’re inside. The door on the right leads into an office. Check with the optiwand before entering. The office connects to the cashier’s area.
From the betting area, find the door on the opposite side of the room. It’s a dark corner so use the flashlight to find the door. Use the optiwand to check the room. It’s difficult to see what’s inside the room. Look to the far right side for movement. You should be able to see something even with the obstruction. Open the door and toss in a gas grenade to the far right side followed by a flashbang straight ahead near the stairs. Expect suspects to come down the stairs.
Order the team inside and to clear the room. You take point on the stairs and order any suspects on the staircase to stand down. Make them cooperate if necessary. Secure the room and report in all restrained suspects and civilians.
Ascend the stairs into the Laundromat. Beware of suspects hiding around the corner to the left—don’t just charge ahead. If you have a lot of grenades left, use one! Check the bathroom on the left side. Check under the final door ahead. Gas the room with remaining grenades. Secure the room and find an incapacitated Detective Walsh inside. Report his location and complete the mission if other objectives have been completed.
DuPlessis Wholesale Diamond Center
The DuPlessis Diamond Center was broken into just before closing time. Witnesses report multiple suspects armed with machine guns and wearing body armor. None of the wholesaler’s employees are known to have exited the building.
Objectives: Bring order to chaos. Rescue all of the civilians.

Loadout: There are armored suspects wearing gas masks in this task—though not all of them. You could select the «Assaulter (FMJ)» preset loadout and make adjustments as necessary or attempt to use non-lethal means with the less-lethal shotgun. Equip more flashbangs and stingers than gas grenades. You may want a gas grenade or two since they can be extremely helpful within the obstruction-ridden workshops if you can tell if the suspect isn’t wearing a gas mask.
There are two possible entry points for the mission: the main lobby entrance on side 1, level 1 and a second floor service entrance on side 3, level 2. The second floor entrance is better because you can work your way down into the center without concern that suspects will descend or ascend from the other floors (the center contains a basement level containing the vault).
Order the team to check the door ahead of you. It leads to a dangerously open area. The path to the left is an open passage into a stairwell. If you’re too noisy in the room, suspects could enter from that passage. Enter the area and subdue anyone inside. Keep a look on the open passage to the left. You may want to ready a stinger grenade to toss if suspects start to approach.
The door ahead leads into an adjacent hallway. You can move around to the left and proceed down a hall on the right. Note the metal detector. You know suspects are around if you hear the detector go off and you or your team aren’t anywhere near its location. If you move around this side, keep an eye on the open passage to avoid surprises.
Past the metal detector, search the office on the left. Use the optiwand and toss in a flashbang if necessary to subdue any suspects inside. The two doors within this office lead to stairwells and possible suspect-heavy areas. Watch the doors if you make a lot of noise or even wedge them if desired.
Search the hall down the right side. Keep an eye behind you. Report any incapacitated hostages on the ground within the hallway. The first door on the right leads back toward the entry point. So there are three doors and rooms to search. Start with the room in the back right corner.
It’s another office. Check the room with the optiwand and use a flashbang or stinger before entering. Next check the conference room in the back left corner of the hallway. If the door on the opposite side of the conference room is open, be very cautious. This leads to another hallway and if it’s open, that likely means there’s a suspect patrolling nearby. If there’s just a hostage in the room, close the door so you can prepare on how to deal with any suspects in the hall. Also, check with Sierra 1 and Sierra 2. They have eyes on the two rooms on the opposite side of this hall. You can find out if there are suspects in these rooms. If you’re too noisy, the suspects may exit.
Also, the hall leads to a balcony staircase. There’s no door at the end of the hall so any suspects on the balcony could enter the hall. Be ready with a stinger grenade.
Use the optiwand to scan the hall and use a flashbang before exiting the conference room. The nearest door leads into a room that’s currently under watch by Sierra 1. The adjacent office is under watch by Sierra 2. Enter these rooms if needed or use the sniper to eliminate any suspects inside.
Proceed to the balcony and subdue any suspects patrolling the area. Hurl a couple flashbangs onto the left and right sides of the balcony and send your team in opposite directions to clear the staircase.
Descend the stairs into the main lobby (and the other entry point). Check the double doors on the left with the optiwand to search for suspects inside the security room.
The door on the right leads to the first of several work areas. These are challenging rooms because of the amount of wall obstructions within the room. You may want to manually toss grenades so you can better aim the flashbangs, stingers, or gas grenades at or close to targets. Your team may not be able to spot everyone using the optiwand so don’t just charge in if the team reports no one inside the room.
Approach the door on the opposite wall. The one on the right leads to a hallway and could be wedged if you want to be cautious about surprises. The opposite door leads into another work area with plenty of obstructions. Order the team to hurl in a grenade or manually toss one. The area on the right side leads to a stairwell. Expect to encounter a couple guards there. Deploy a stinger or flashbang toward the stairwell before approaching. There’s one more work area to the right of the stairwell. Search it like the others before descending into the vault.
Go down the stairs. The vault is a maze-like room with plenty of obstructions. Deploy gas, flashbangs, and stingers in all directions and root out any suspects. Keep one team covering the door so you can search the left or right side with the other team without worry of getting shot in the back. Follow the vault to the opposite side to find a small office. Deploy a grenade inside the office before entering and subdue any suspects that attempt to escape. Comb the center for any weapons you missed or suspects you forgot to report in if necessary.
Children of Taronne Tenement
A group of cultist nut-jobs calling themselves the Taronnians intend to blow up their house sky high taking a chunk of the neighborhood with them. You soon discover the entire tenement is littered with explosives, which means one stray shot could be your last.
Objectives: Bring order to chaos. Rescue all of the civilians. Neutralize Andrew Taronne.

Loadout: None of the suspects are armored so use a non-lethal setup. Take some pepper spray for dealing with uncooperative suspects. Load up on CS gas grenades and a couple flashbangs and sting grenades but primarily gas grenades. Take a door wedge or two to protect your rear flank. Equip each team with an optiwand.
There are two possible entry points for the mission: the front door at side 1, level 1 and an upper level fire escape at side 2, level 2. The upper floor entry allows you to work down through the first floor and basement level. Use the fire escape for the purposes of this walkthrough.
Stack up the door on the fire escape. It’s likely locked. Pick the lock and enter the long hallway. It could be deserted or it could contain suspects or hostages. If you make noise, suspects from the rooms along the hallway could enter and fire. Be prepared to subdue them or even use a gas grenade or stinger as encouragement.
The first door on the right leads to a stairwell. Order one team to stack up on the door while a second team mirrors the first door on the left. This left door leads into a storage room with back kitchen. Even if the team reports no suspects inside (or even just one hostage) there could be a suspect on the right side of the room that’s hard to detect. Consider gassing the room.
There are doors to the left and right inside the room. The door on the left leads to a large stairwell. Consider wedging the door to prevent surprises. Order a team to check under the right door. It leads to a room under construction with another kitchen area to the left. Gas the room if necessary and clear the kitchen. The door to the right in this room returns to the hallway.
The kitchen leads to another door. Order a team to stack up on the door and check with the optiwand. The next room is a church; it runs far to the right and fleeing suspects will exit into the mail room covered by Sierra 1. Gas the church and quickly order suspects to subdue if any are attempting to flee into the mail room. Encourage them with some non-lethal projectiles to their back or weapon arm.
Cover the mail room door while you restrain suspects and hostages within the church. The mail room can be extremely dangerous. There are a couple alcoves to the left and right of the door where suspects can hide and ambush your team. Also, the room runs around a corner to the right providing another hiding spot for armed threats. Listen to Sierra 1 to see if any suspects are spotted; though even if Sierra 1 doesn’t see a suspect, there could be several inside the room.
Deploy a flashbang into the mail room. Check the alcoves to the left and right of the entry door immediately. Consider tossing a gas grenade around the corner to the right. The doors inside the mail room lead into the same storage room. Order each team on each door and use the optiwand. Gas the room if there are any threats inside. Beware of a small closet on the left side; there’s no door so use the wand to peek around the wall and into the closet. The door at the room’s rear leads to a final storage room on this level.
You have a couple choices in descending to the first floor. You can use the balcony staircase bypassed earlier. The danger is that there could be suspects on the upper balcony and the lower room—and they all can have line of fire on your team. You should gas both levels before charging into the room and attempting to subdue all the suspects in the area.
Alternatively you could return to the second floor main hallway and use the staircase at its end to descend to the first floor entry point. There are two doors at the entry point. While facing away from the entry point, check the door on the right. Gas the storage room and enter. Each of these storage areas contains the back kitchen area. There’s another storage room on the right side that needs clearing. Return to the hall and check the next door on the right. Gas and clear this storage area and kitchen. A door on the left in this room leads to the balcony staircase. Wedge the door for now.

Return to the entry point and clear the rooms on the left side of the first floor. A storage room and kitchen is first. Gas the room if there are threats inside. The door on the left leads to some sleeping quarters. Check the room and bang it if necessary.
The door on the right side of the storage room leads to more sleeping quarters, though it’s a bit more dangerous than the other room. This room contains a bathroom on the left side. The commotion could alert a suspect inside the bathroom. Consider tossing a flashbang into the room then after a few seconds a gas grenade. This should take care of anyone who came out of the bathroom to investigate the flashbang. Secure the room.
Continue down the next hallway to find a stairwell. Descend the stairs toward the basement. Check the door with an optiwand and use a couple grenades to help subdue anyone in the basement and the laundry area. Watch for suspects entering from the doorway ahead. The final room is the balcony staircase. Enter from either floor and use remaining grenades to subdue the suspects inside.
St. Michael’s Medical Center
Hyun-Jun Park, a South Korean diplomat, was attacked by six gunmen while exiting a restaurant. He was routed to St. Michael’s Medical Center for emergency treatment. With security slow to get into place, a group of gunmen (presumably the same six) rushed the medical center. The gunmen are well-armed and armored.
Objectives: Bring order to chaos. Rescue all of the civilians. Rescue Hyun-Jun Park.
Loadout: The majority of the suspects occupying the medical center are armored. You can use an assaulter preset with full metal jacket ammunition or take the less-lethal shotgun for a non-lethal attempt. Equip a mixture of flashbang, stinger, and gas grenades. Make sure each team has one optiwand. Take a door wedge or two to complete the equipment list.
There are two entry points into the medical center. You can follow the approach into the main foyer at side 1, level 1 or access a hallway from the research wing at side 3, level 1. Both entries offer a number of dangers. Both areas are quite open with lots of entrances and exits. For the purposes of this walkthrough, we’re going to enter from the research wing at side 3, level 1.
Approach the double door. You can look through the window to check for suspects (likely one will run away from your position down the right hallway). You can check many rooms through the windows; however, if you can see a suspect that suspect can also see you. This could cause the suspect to fire on you or even a hostage, which could quickly end a mission.
Enter through the double doors. Check the room on the left into the medical records area. You may not be able to see any suspects on the right side of the room. Toss a gas grenade inside the room to be extra cautious. Scan the room for hostages, incapacitated civilians, and restrain any suspects inside. The opposite door within the records room leads behind the desk. Check there for any incapacitated or dead hostages.
Return to the main hallway. Report to TOC any incapacitated or dead hostages found within the room. Check the door on the right side using the optiwand. Once again, it can be tough seeing suspects hiding in the darkness on the right side of this patient room. Gas the room or use a flashlight to scan that side of the room before entering.
The door on the left leads to an adjacent patient room and likely contains suspects. Send the team to the door with the deploy flashbang or gas command. Don’t order the team to check the door. While the team stands at the door, the suspects inside could see the team and kill a hostage. Quickly deploy gas or a flashbang and rush in to subdue the suspects inside.
Exit to the main hall from the door in this room. The double door on the left leads to another dark patient room. Toss in a flashbang manually to reach the dark corners on the right side. Check behind the desk on the opposite side of the hall for incapacitated hostages. Don’t go through this door. Instead continue around the corner to the right side and find another double door.
These double doors lead directly into the main lobby. Check the window and proceed into the hallway. Toss a gas grenade into the lobby area near the desk. Be careful ordering the team to deploy. You may accidentally order them to deploy at the double doors near the other entry point. This leaves them exposed to any gunmen inside the lobby. Gas the lobby then search and subdue. Toss a gas grenade inside the waiting room on the right side of the lobby.
Check behind the front desk then toss a flashbang or gas grenade into the office behind the desk. This office connects to the previous hallway. Search near the waiting room on its right side for a door. It leads into the basement level.
Descend the stairs and approach the door. Check the door with the wand. The hall beyond is «L-shaped» and you will likely not be able to see suspects that are along the right side of the hallway. Toss a flashbang, gas, or stinger grenade down the hall. Approach the door in this hallway. It leads into the locker room. Check the door, though there are way too many obstructions to trust the optiwand. Toss in a gas grenade then storm the locker room. Search the showers in the back for any incapacitated hostages or fleeing suspects.
Exit to hall and go around the right side. Spot the door into the autopsy room on the left. Check the door and gas the room before entering. Continue through the double doors and reach the corner of the long hallway toward the left side. Toss grenades down the hall to encourage suspects to surrender. Subdue remaining suspects and hostages. Continue around the left corner into a storage area to complete the mission.
The Wolcott Projects
Organized Crime Control Bureau has been pursuing a flow of illegal arms into the city. An undercover officer has notified OCCB of a major deal going down.
Objectives: Bring order to chaos. Rescue all of the civilians. Neutralize Hadeon Koshka. Rendezvous with Jennings.
Loadout: Select and alter the less lethal specialist preset. There are no armored suspects so you can use the pepperball gun or the less lethal shotgun to subdue targets. Take two door wedges and an optiwand for each team. Mix your grenade selection to approximately two-thirds gas, one-third flashbang, and one-third stinger. Gas will prove most useful in general because of the structure’s layout.
There are two entry points for the mission: the front entrance or a side entrance. Take the side entrance because it offers several additional entry points, including the front entrance if you wish. Check around the right corner. The wall along the right side isn’t in great shape and there’s actually an entrance into this first floor kitchen-in-disrepair. Continue down the alley.
Use Sierra 1’s eyes to check out the building’s corner. You can see both the upper and lower level. If the area is clear, move past. If not you can subdue a target with the shotguns or even use Sierra 1 to shoot an arm. Move carefully around the corner; there could be a suspect or more toward the building’s other corner.
Walk halfway down this alley and find the basement door on the right. You can continue forward and search the front area of the building. You’ll have another chance at this during the walkthrough or you can clear it now; there could be suspects or hostages among the debris near the front entrance.
Order a team to check under the basement door. You may not be able to see all or any of the suspects inside. Order the team to gas the room. Watch the far left and right corners of the room as suspects might avoid exposure if you enter the room quickly.
Check the door inside the basement. It leads into a stairwell connecting the basement and both floors. Ascend the first floor and wedge the first floor door so no surprises come through. Continue to the second floor door and have a team check under the door with the optiwand.
The second floor is a very dangerous area. Many of the structure’s walls are ruined and missing. There are a lot of obstructions for suspects to hide behind and avoid flashbangs and it can be difficult to assess the situation with the optiwand. You’ll likely want to gas every new room regardless of what you see or don’t see on the other side. Use the optiwand to look under the door as well as look around corners to spot shadows or the edges of suspect movements.
Gas the first area on the second floor. Beware of the obstructed area to the left. Toss another flashbang or gas grenade down the left hallway to be sure you’ve found all the suspects. Exploring the right side of the area is where Sierra 2 has eyes so zoom in and check out the area before exploring. Explore the upper right side to find the corner where Sierra 1 has eyes.
Start down the left hall. The door on the right leads to a stairwell. Wedge the door with your second door wedge. The second opening on the right lacks a door. Toss a gas grenade into the burnt room then move in to subdue any suspects inside. There’s a kitchen on the far side of this room; toss another grenade inside to encourage suspects to surrender. Scan around the team continuously. It’s so open that it’s easy to get shot from any direction, particularly if you missed a suspect. Check the adjacent, cluttered room. Toss in a flashbang before to be sure. Report any incapacitated hostages inside.
Return to the first stairwell (the one you used to reach the second floor) and return to the wedged door. Remove the wedge. Check under the door with the wand though you may want to gas the hall beyond anyhow. If you cause a commotion, watch for suspects to emerge from the first door on the right. Toss a gas grenade inside that room before entering. Subdue anyone inside. The door on the other side of this room leads out to the corner where Sierra 1 has targeted.
The second door on the right is the other stairwell. The door at the top is wedged so subdue any suspects inside the stairwell. There’s a mirror on the floor near the corner ahead; you can spot any suspects around the corner with careful observation. The door on the left leads to the front entrance, which should be checked if you didn’t before.
Follow the hall around to the left side. Check the door then toss a gas grenade inside the room. Suspects inside may run for cover (like behind a bookcase) so subdue them quickly with your non-lethal weapon. The door on the right leads to the ruined kitchen that’s exposed to the back alley. Check the door on the right side of the kitchen.
You can use the wand but you likely won’t be able to see a suspect hiding in the room’s right side. Toss in a flashbang and gas grenade toward that side. Beware of the bathroom door on the right side. Stack a team on the door while you order the other team to clear the room. Subdue the suspect inside this firing room (could very well be the main target, Hadeon Koshka. Check under the bathroom door and, if there’s a suspect inside, toss in a flashbang.
Old Granite Hotel
The self-declared militia group America Now has taken real estate heir James Beticourt Jr. and Lawrence Adams, his general contractor, hostage. The suspects are holed up on the top two floors of the Old Granite Hotel demanding 12 million dollars random.
Objectives: Bring order to chaos. Rescue all of the civilians. Rescue James Betincourt. Rescue Lawrence Adams.
Loadout: The 7th floor of the Old Granite Hotel is entirely under construction, which provides a lot of cover and hiding spots for the suspects. Maximize your grenade count. Gas grenades are ideal for the 6th floor hotel rooms but you should use flashbangs and stingers to toss around corners and ahead to cover spots on the cluttered top floor. There are armored suspects in the mission so take full metal jacket ammunition if you plan to use a lethal firearm otherwise arm the less-lethal shotgun. Equip one door wedge for the group if you want to explore the 7th floor first (can wedge the 6th floor door) or if you want to wedge the 6th floor door while you search it. Also use one optiwand per team.
There are two entry points for the mission: the elevator shaft (entry from on top of the elevator car stopped on level five) or the stairwell. Choose the stairwell because it provides access to both level six and level seven so you can pick the floor to tackle first…however, there’s a surprise waiting inside the stairwell.
If you ascend the stairs between the sixth and seventh floors you’ll discover a briefcase bomb. As soon as you approach the bomb, a timer starts. From that point forward you have 9 minutes, 13 seconds to disarm all of the bombs (four bombs total). If you ignore that first bomb, the timer doesn’t start. The remaining bombs are located on the 7th floor so it’s possible to clear the 7th floor first, end the timer, and then complete the 6th floor.
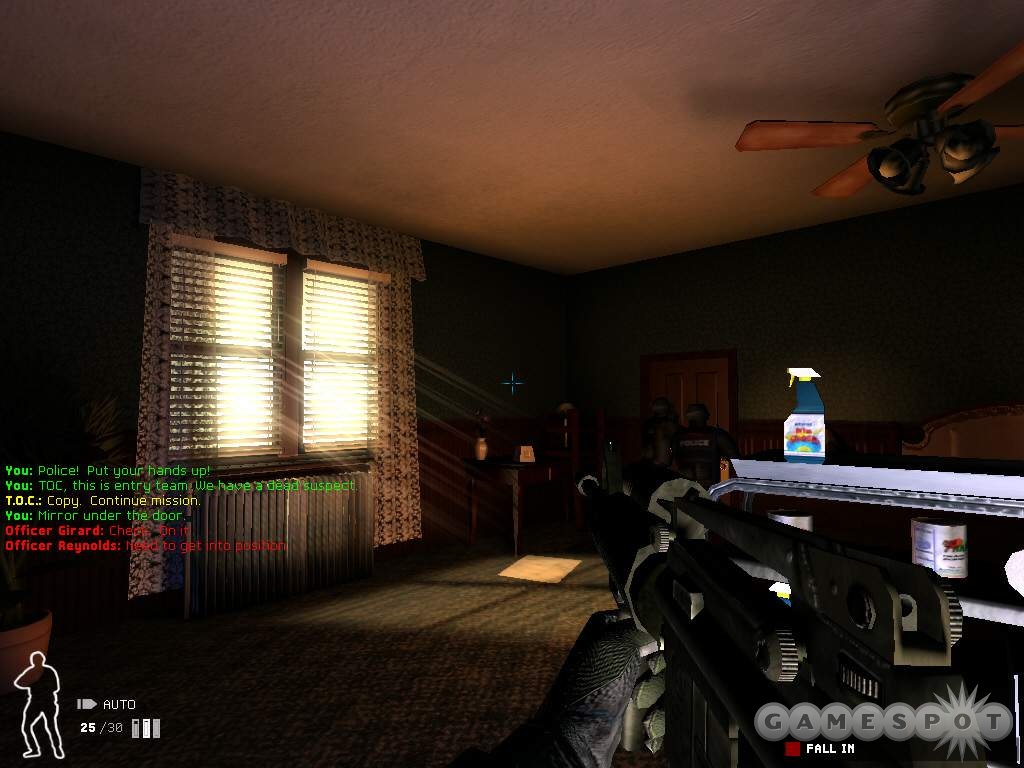
For the purposes of this walkthrough, we’ll clear the 6th floor first. It seems most of the guards (and the hostages) are on the 7th floor. Walk to the 6th floor door and check it with the optiwand. It’s a hallway with more area over to the right than the left. Exit into the hall and scan the hall to the right. Have a sting grenade ready in case there’s a suspect at the hall’s end. Order a team to stack up on the left door and check it with an optiwand.
The hall beyond the door leads to the 6th floor hotel rooms. The hallway bends to the right so it can be difficult to see a patrolling suspect. Also, be cautious of suspects exiting the hotel rooms and entering the hall. Walk forward to the doors on the left and right side of the hall. Check the right door, which leads to a small maintenance area, and then the left door into room 622. Gas the hotel room before entering. Save your flashbangs and sting grenades for the tougher 7th floor. Be careful at the entrance; there are two alcoves that flank the hotel room entrance doors. One side is a bathroom (usually closed) and the other is a closet. Beware of guards entering the room from the bathroom.
Follow the main hall toward the next set of doors on the left side. The elevator entry point lies to the right. Move carefully toward the corner and check for suspects hiding near the elevator. Sierra 1 has eyes on room 623 so you should be able to see if there is a suspect inside the room, though remember the bathroom and the closet on the left side. Gas the room before entering if you’re extra cautious. A door inside room 623 leads into room 624. Check under the door with the optiwand before entering and clearing.
The hall continues around to a final room, 625, on the left side. It’s the same configuration as the other rooms, though in disarray. Check the room using the wand before entering (or gassing and entering). Return to the staircase and ascend to the 7th floor and spot the bomb.
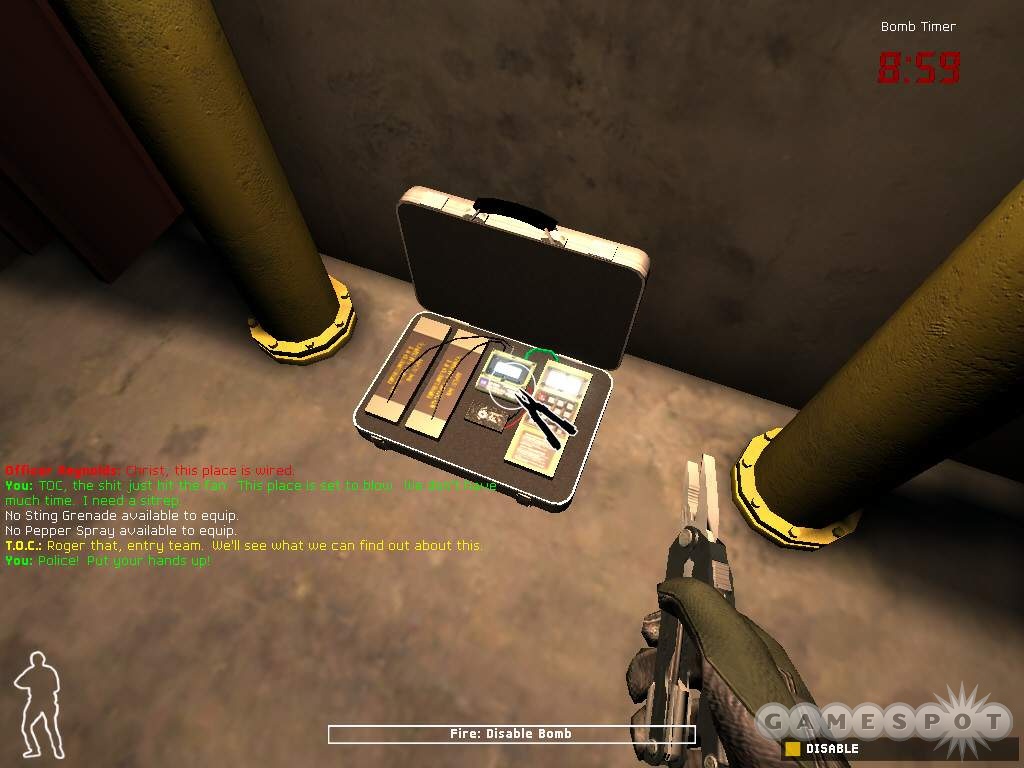
Objective: Find and deactivate the bombs.
As stated previously, when you encounter the bomb in the stairwell, a timer starts; you have 9 minutes and 13 seconds to find the remaining bombs. There are three more and are randomly positioned on the 7th floor. Reach the 7th floor door. Order a team to stack up on the 7th floor door while the second team checks under the opposite «Employees Only» door.
You probably won’t be able to detect any suspects hiding on the far right side of this room. Manually toss a flashbang or stinger to the end of the room before entering. Subdue any suspects inside; you may also discover a hostage.
Check under the door into the 7th floor. It’s a hallway with an open passage just to the left and a long stretch to the right. Have a flashbang ready and use it either through the passage or down the hall to the right depending on suspect location. Suspects through the passage on the left seem to have a tendency to hide around in a left alcove. Be ready for them if you move through. Check the corners for bombs before approaching the door on the left.
You can check under the door but you’ll only be able to see around the entrance. This is a cluttered area that’s in construction. The room bends around to the left almost in a complete circle. It’s filled with obstructions and debris—basically plenty of cover for suspects. As you work through the room, toss flashbangs or sting grenades at the obstructions. Subdue all guards inside and check the back corners for briefcase bombs.
Return to the hall and follow it around to the right. Watch the debris ahead; suspects on the other side can fire at your position. Toss a grenade in their direction if necessary but watch the door on the left for suspects that hear the commotion. To get around the debris you must move through the room on the left. Sierra 2 has eyes on the room so check and see if there are suspects inside. Sweep through the room. Use the optiwand around the corner and check the corners for bombs.
Continue down the hall to the next door on the left. It’s a smaller room, though the back area is obstructed. Manually toss a sting or flashbang into the back corner to root out any suspects hiding in there. Check the alcove on the right for a possible bomb location.
Follow the hall around to the right and find the last door on the left. Use remaining grenades. Gas the room (or sting or flashbang) then manually toss a flashbang or sting grenade to the back corner. Check the room for suspects, hostages, and bombs. The mission ends once all four bombs are deactivated, the two hostages are recovered, and suspects apprehended or slain.
Mt. Threshold Research Center
The Army of Faith broke into the Hologen research facility at Mt. Threshold. Trapped inside are the building’s late working scientists and graduate students. The suspects have released a statement declaring their willingness to become martyrs.
Objectives: Bring order to chaos. Rescue all of the civilians. Rescue Dr. Theodore Sturgeon. Neutralize Jean Trouffant. Secure the briefcase.
Loadout: Armored suspects fill the research center. Equip full metal jacket ammo if you plan to use lethal firearms. Load the team up with a mix of flashbangs, stinger, and gas grenades. You should take four door wedges if you follow this walkthrough to prevent suspects surprising your team from the rear flank. Arm each team with an optiwand.
Choose between two possible entry points: the main lobby on the first floor or a second floor side entrance. Choose the main lobby. You can clear the main lobby and use a wedge on the double doors that lead to the rest of the first floor then you can search the second floor completely before returning to complete the lower level. Search the main lobby for incapacitated hostages. There are many throughout the research center.
Ascend the staircase to the second floor of the lobby. There are two doors: a set of double doors on the left and a single door to its right. Use a wedge on the double doors and order a team to check the single door with an optiwand. This door leads into the computer analysis room.
The computer analysis room contains some side alcoves that suspects can use to avoid the gas or flashbang. Toss in either and shout to try and root suspects from their hiding spot. You may want to use a second grenade to encourage any suspects within to submit to your team’s authority.
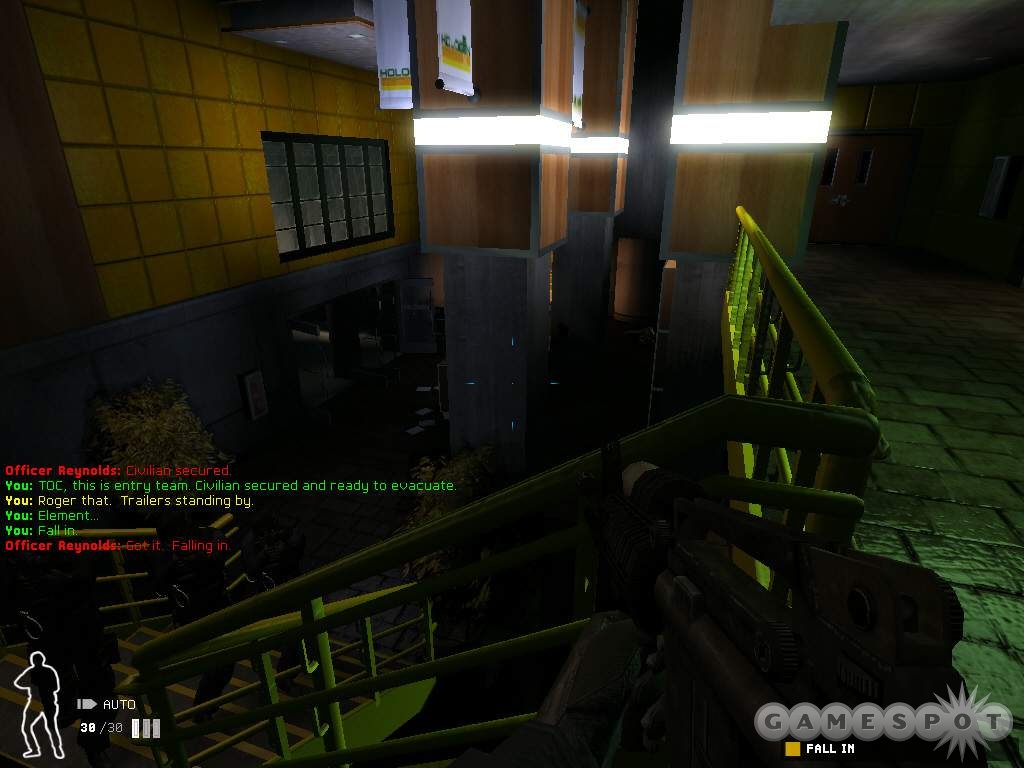
Find the exit door on the far left corner of the room. Check the door with an optiwand to see if the hall contains suspects. The hall beyond features a set of double doors on the left and a single door found to the right. Order a team to stack up or cover the double doors (or you could use a wedge) and check the door on the right that leads into wetbench analysis.
Toss a gas grenade or flashbang into the wetbench analysis room before sending the team inside. Cross the room to the far left to find the exit door. Check the hall beyond with the optiwand. The hall contains a door on the right (the other entry point, which should be checked), double doors to the far left (leads into the same main hall that other double doors do), and a single door to the right of the double doors. Stack up on that door; it leads into the clean room.
Check the door with an optiwand but realize there could very well be suspects inside regardless. Once inside the room, beware of a hiding spot on the right as you enter. Toss a flashbang there if you’re cautious. Reach the end of the room and find a door on the left and right sides of the room. The left door returns to the main hall so stack up on the right door. Check it with an optiwand. It’s the cryogenics room.
A suspect can hide behind the pillar in the back of the room. Even if the team reports no one inside, be very cautious upon entering the room. Toss a stinger just past the pillar. Open the door on the right side of the room to find the stairwell to the first floor. Start down once you’re sure you’ve cleared the entire floor. You can see the lower cryogenics room from the stairs. Toss a gas grenade into the room below before descending the staircase fully.
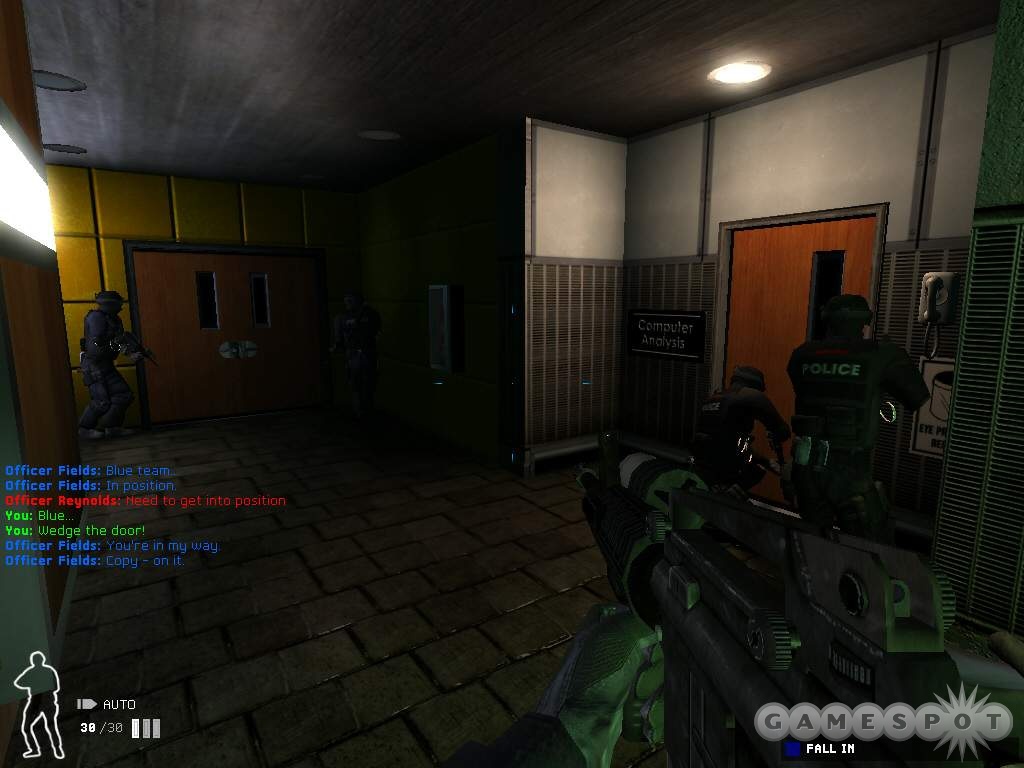
Check the door that leads into the first floor clean room. Toss a gas grenade inside. The room stretches across to the left side so you may want to use a second grenade (such as a stinger) to cover that side.
Approach the clean room exit. Use the optiwand to check the hall. Exit and wedge the double doors on the right if possible. There are two doors into the same central workstation area. Order a team to stack up on each door. Order both teams to bang and clear (or toss in your own grenade manually to aid one team).
Find the door in the back right of the central workstation. Check with the optiwand before exiting. The set of double doors to the right connects to the main hallway; if you still have a door wedge, use it. Approach the single door on the opposite wall. Check using the optiwand. The door leads into the animal research area.
There are three doors inside this room. Order one team to stack up on the middle door and then take the other team through the door to the far left. Check with the optiwand and toss in a flashbang if necessary. Watch the door in the back right corner of this room; if it’s open, suspects might come in or could spot you when you move close. Order the second team to stack on this door. Now order both teams to gas or flashbang the room and clear. The room is multilevel; each door leads to its own level and they’re fairly separate.
Move to the door in the back right corner and check the final room on the floor using the optiwand. Use remaining grenades to clear the room and subdue any suspects inside. The mission ends once you have subdued suspects, neutralized Jean Trouffant (the suspect without the mask), rescued hostages, and found Dr. Theodore Sturgeon and his briefcase.
Multiplayer
This section covers general strategies specific to SWAT 4’s multiplayer modes. You’ll find info on additional weapons and protection found in multiplayer as well as tips on the different game modes.
Additional Weapons and Protection
SWAT 4’s multiplayer modes add some new hardware to the weapon and equipment arsenal. Primary weapon selection also features the AK-47 machine gun. It has a slower fire rate and muzzle velocity than the carbine but uses a higher caliber bullet for added damage against heavy armor targets (FMJ ammo). The GAL sub-machine gun offers an extremely high rate of fire but with a lot of kick back (difficult to keep aim steady in full auto mode). It’s also equipped with a sound and flash suppressor. Finally the Colt Python is a .357 magnum packed with a serious punch balanced by a slow rate of fire and long reload (though the potential for one shot slaughters). All of these weapons lack tactical flashlights.
You can equip protection in multiplayer. Wear the helmet to nullify flashbangs and add damage protection to the head region. The other choice is to wear the gas mask. It provides immunity to CS gas grenades and greatly reduces the duration of pepper spray and pepper-ball attack. However, it restricts vision and offers no additional head armor. You can also choose between light and heavy body armor. Light armor protects better from hollow point ammo and buckshot; heavy armor reduces the effect of stinger grenades and less-lethal shotguns, but more vulnerable to assault rifles.
General Tips
- In Barricaded Suspects where arrests matter, consider the taser as your secondary weapon. You can make a quick arrest if you sneak up on an opponent. Aim true and nail your foe with the taser stun gun. Switch to handcuffs and complete the restraint for extra points.
- Like the single-player career game, you can die very quickly, often before you even know where the shot was coming from. Although it’s wise to stick together, it can be a double-edged sword. By sticking together, you increase your chances of scoring kills when outnumbering opponents. On the other hand, if you’re all wearing helmets and an unseen foe drops a CS gas grenade at your feet, your «sticking together squad» could be incapacitated and arrested easily.
- While sticking together, know the entrances and exits of your current location. If necessary, close and wedges doors to protect a vulnerable flank while you maintain watch on a high-traffic hallway and wait for enemies to attempt and maneuver through.
- Adjust your equipment to the other team’s trends. If the other team is using a lot of gas grenades, switch to the gas mask. If the team is using flashbangs, wear a helmet. Consider this a chess game that’s likely to go back and forth.
- Multilevel rooms or stairwells are some of the most dangerous areas in multiplayer. It can be difficult to spot enemies on an upper balcony or window and extremely hazardous attempting to ascend a stairwell with a waiting enemy on top. Inside a stairwell, toss a stinger grenade to the upper flight as you work your way up the stairs. In a multilevel room, lean around corners and search for enemy positions while remaining mostly behind cover. If you spot an enemy, toss a stinger at the enemy’s position and quickly advance through the area to an area without disadvantage.
- Like the career mode, you’re much more accurate when not moving (or crouched). Running around wildly and attempting to hit a target—even a stationary target—won’t be consistently successful. You should avoid being out in the open to begin with so practice remaining behind cover, crouched, and fire with short, controlled bursts to increase accuracy.
- In Rapid Deployment, the SWAT team should work on careful, cautious advancement and gaining a foothold on particular areas. This way the team can push forward in protection of one another and reach the bomb sites. Close off and wedge entry points behind you and maintain awareness on all vulnerabilities around your position. Protect teammates attempting to disarm bombs. The extra seconds, even if you perish, could allow your teammate to diffuse the bomb. Work as a team in rushing a single bomb site to overwhelm a spread out suspect team.
- Suspects in Rapid Deployment should focus on chokepoints leading to bomb sites. Minimize the number of available paths to each bomb site. Don’t panic if you lose a bomb or two. Focus on the protection of fewer bomb sites. If and when you’re down to a single bomb site, fall back but maintain a perimeter. For example, if all suspects hide within the same room with the bomb, a batch of sting grenades from unseen SWAT members could dizzy the entire team.
- In VIP Escort, the VIP isn’t completely defenseless. The VIP carries a handgun, two clips, a gas grenade, pepper spray, and a door wedge. It’s enough to provide support but not sufficient to fend off a group of suspects. Obviously stick close to the SWAT team and regroup as needed to remain strong in numbers. Close off passages with door wedges to slow down suspects.
- The VIP’s survival is important to both teams. The suspects must capture, hold, and then assassinate the VIP. Once the VIP is captured, the task somewhat resembles one final bomb in the Rapid Deployment mode. Guard the VIP at close-quarters but maintain a perimeter so a fury of grenades doesn’t immobilize the entire team. Keep an eye on the VIP, who can move slowly around even while restrained. Use pepper spray or a taser to control the VIP.
Cheat Codes
To enable SWAT 4 cheat codes, you must edit the Swat4.ini file in your SWAT 4 system directory. It’s highly recommended that you backup this file before making any changes. Be careful!
In the Swat4.ini file, locate the «EnableDevTools=False» line under the [Engine.GameEngine» %> heading. Change False to True so the line now reads «EnableDevTools=True». This enables SWAT 4 cheat codes.
Load SWAT 4 and start a career mission. Hit the «~» key to open up the game’s console. Note that codes must be reentered at the start of new missions or restarts. Type in the following codes to enable the corresponding cheat:
behindview 1 — Toggles to third-person perspective.
behindview 0 — Toggles to first-person perspective.
god — Enables invulnerability. You’ll still take damage but won’t die. This means you will still be hobbled by injuries and move slowly.
ghost — Toggles no clipping. You can walk through walls or fly through ceilings.
walk — Turns off no clipping mode.
setgravity # — Alter gravity by entering a value for #.
The products discussed here were independently chosen by our editors.
GameSpot may get a share of the revenue if you buy anything featured on our site.
SWAT 4: The Stetchkov Syndicate
Управление
Поскольку в дополнении к оригинальной игре SWAT 4 напрочь отсутствует тренировочная миссия, то новичкам следует напомнить о некоторых немаловажных элементах управления командой из четырех человек и непосредственным управлением игровым персонажем (a.k.a. Boss).
Контекстное меню.
Приказы бойцам спецназа, подчиненным вашему подопечному, можно отдавать с помощью всего лишь двух клавиш («пробел» и правая кнопка «мыши»). «Пробелом» активируются команды по умолчанию. Например, если перекрестие прицела навести на какой-либо объект (дверь, улика), то в правом нижнем углу экрана появится надпись с действием по умолчанию. При наведении прицела на заложника или сдавшегося террориста надпись будет гласить: «Надеть наручники». Если вы в это время нажмете на «пробел», то один из ваших подчиненных поспешит выполнить приказ и закует цель в пластиковые наручники. Если же направить прицел на любую дверь, команда откроет дверь и зачистит помещение. Под прицелом коридор — зайти и зачистить. Угол — посмотреть за угол (с помощью оптического провода). В перекрестии прицела нет никаких объектов — перегруппироваться и примкнуть к лидеру (то бишь к вам). Правой кнопкой «мыши» можно активировать полный список команд (контекстное меню), а затем, удерживая кнопку, переместить указатель на нужную строку из списка и, отпустив кнопку «мыши», активировать команду.
Все вышеперечисленное было в оригинальной игре. Теперь же пора приступить к новинкам сезона . В дополнении под названием «The Stetchkov Syndicate » появилась новая опция «удержания приказов», перечисленных в списке контекстного меню. Данная опция предоставляет еще более четкий контроль над действиями своих подопечных, поскольку с ее помощью можно отдать необходимую команду отряду спецназовцев заранее и только потом, при нажатии «пробела», заставить их выполнять приказ. Это позволяет расставить «синий» и «красный» отряды возле разных дверей, ведущих в одно помещение, удерживая кнопку » control » отдать им приказ «войти и зачистить» и проникнуть в комнату практически одновременно. Данная тактика проникновения со стопроцентной вероятностью позволит застать врасплох находящихся в помещении террористов.
Красно-сине-золотой спецназ.
Отряд состоит из лидера и четырех человек. Четыре спецназовца, в свою очередь, делятся на два отряда по два человека в каждом. Командовать копами можно как по отдельности, так и в качестве единой команды. Если в правом нижнем углу цвет строки с командами по умолчанию окрашен в золотой цвет, значит, в данный момент управление осуществляется всеми четырьмя спецназовцами. Если строка окрашена в красный цвет — первой командой. Синий — второй. Возможность разбить отряд дает широкие тактические возможности. Какие? Во-первых, вы сможете штурмовать помещение одновременно с разных сторон. Во-вторых, оставить одну команду прикрывать тыл. В-третьих, отрезать путь к отступлению представителям криминалитета. И так далее по списку.
Я всегда с собой беру видеокамеру.
В то время как один из отрядов находится вне вашего поля зрения, у вас есть возможность наблюдать за его действиями с помощью встроенных в шлемы каждого спецназовца видеокамер. При активации такой видеокамеры в правом верхнем углу экрана появляется окно, где отображается имя бойца и все, что он перед собой видит. Активация этих окон осуществляется с помощью нажатия клавиши «Caps Lock». При этом окно увеличивается в два раза и в его центре появляется перекрестие прицела. В это время вы можете осмотреть окружающее бойца помещение. Так же при активации этих окон есть возможность отдавать приказы отрядам на расстоянии. Для этого необходимо точно так же, как и в обычном режиме, зажать ПКМ и, наведя перекрестие прицела, например на дверь, выбрать приказ из списка контекстного меню. Затем остается только сидеть и наблюдать за исполнением приказа.
Помимо напарников через видеокамеру можно взглянуть на то, что перед собой видят снайперы, а поскольку эти парни напрочь отказываются открывать по неприятелю огонь, то и управление снайперской винтовкой и непосредственным нажатием на курок придется заняться вам. Окна снайперов активируются тем же образом, что и окна отрядов, а стрельба из снайперской винтовки осуществляется с помощью любимой всеми геймерами мира левой кнопкой «мыши». Как только в поле зрения снайпера попадает подозрительная личность, он сразу же докладывает об этом лидеру отряда. После сообщения переключитесь на окно снайпера, и у вас появится возможность ликвидировать террориста. Однако следует учитывать тот факт, что за каждого подозреваемого, убитого снайпером, снимаются очки престижа, поэтому лучшим вариантом развития событий будет отстрел не головы супостата, а какой-либо конечности. В идеале лучше отстрелить террористу запястье правой руки, что приведет к его обезоруживанию (автомат то он выронит, но следует учитывать еще и тот факт, что большинство матерых и хорошо экипированных преступников зачастую вооружены пистолетами). Более того, уровень морали подстреленного террориста понижается ниже плинтуса и даже если он услышит крик защитников правопорядка из соседней комнаты, то поспешит сдаться.
Пара-тройка советов
Цели во всех миссиях звучат одинаково: «Устранить беззаконие». А вот как это сделать без нанесения телесных повреждений заложникам и брутального отстрела всех террористов? Ну, во-первых, штурмуя помещение кричать примерно следующее:
:Всем на пол — работает ОМОН!
Правда даже такие истерические крики ваших напарников порой бесполезны против уверенных в себе и хорошо вооруженных преступников. Да что там преступники, даже заложники частенько отказываются подчиняться мол: «Моя твоя не понимать». Подобное безобразие можно исправить метким пуском струи слезоточивого газа в глаза выстрелом из нелетального оружия или новинкой сезона — хуком справа. Подвергшаяся подобным издевательствам личность быстренько поднимет руки и будет смиренно ждать, пока вы закуете ее в пластиковые наручники.
Всех в обезьянник — там разберутся ху из ху.
Заковывать в наручники необходимо абсолютно всех (и террористов и мирных граждан), поскольку у бойцов SWAT просто нет времени выяснять личность стоящего перед ними человека. Когда произведен арест, об этом следует сразу же доложить в штаб, что позволит получить больше рейтинга успешности выполнения миссии. Затем необходимо собрать все улики (оружие, наркотики) и продолжать выполнять задание.
Высокоморальные субъекты.
Подчинение правозащитникам зависит от такого параметра как мораль. Высокоморальные личности не будут сотрудничать с представителями полиции до тех пор, пока не испытают на себе всю мощь гранаты «Жало» или пока не вкусят зловонных газовых гранат, а добропорядочные граждане будут просто игнорировать SWAT до тех пор, пока не получат подзатыльник или затрещину. Так же эффективного понижения уровня морали можно добиться наведением на подозреваемого оружия выстрелом в ногу (руку) или выстрелом рядом с головой строптивца.
Несанкционированное применение грубой силы.
«Что за: хм, термин?» — спросите вы. Объясняю. Дело в том, что бойцы отряда SWAT имеют право использовать оружие на поражение только когда жизни офицера или заложника угрожает опасность и ни в каких иных случаях. Неправомерное же использование летального оружия может привести к значительной потере рейтинга успешности выполнения миссии. Поэтому, встретив преступника, необходимо сначала постараться с помощью диких криков убедить его бросить оружие и стать на колени. Однако если же он не подчинится стражам правопорядка, вы все равно не вправе открывать по нему огонь на поражение, поскольку преступник не представляет никакой угрозы офицерам полиции и заложникам до тех пор, пока не поднимет оружие и не начнет целиться в окружающих. Только после этого в игре сработает так называемый триггер, который отключит систему зачисления штрафных очков за несанкционированное применение грубой силы. Именно из-за этой системы намного выгодней пользоваться в бою нелетальным оружием (например, пейнтбольным ружьем, стреляющим шариками, заправленными перечным газом).
Нападение доцентов-убийц с Марса.
Похоже, что глава преступного синдиката товарищ Стечков набирает в свои ряды исключительно выпускников знаменитого Гарварда. Только этим можно объяснить резкое повышение IQ (точнее AI) преступников по сравнению с теми индивидуумами, некогда населявшими уровни предыдущей части игры. Прошла та лафа, когда можно было спокойно оставить без присмотра сдавшегося террориста и, не заковав его в наручники, без каких-либо опасений уйти по своим делам. Теперь же стоит остерегаться выстрела в спину, поскольку супостаты обучены подбирать выброшенное ими ранее оружие и, зайдя с тыла, расстрелять защитников закона, как Гитлера.
Более того каждому террористу из SWAT 4 — The Stetchkov Syndicate в пору вручить по знаменитой премии «Оскар» за блестящую актерскую игру, ведь так реалистично имитировать повиновение приказам бойцов спецназа не умеет, пожалуй, ни одна голливудская знаменитость. Представьте себе ситуацию: перед вами террорист, который, якобы, собирается сдаваться. Он, подчиняясь истошным крикам спецназовцев, начинает медленно опускать на землю оружие. Вы же в это время расслабляетесь, думая, что дело сделано и осталось только достать наручники и сопроводить представителя криминалитета в полицейский участок, как вдруг преступник резко поднимает вверх автомат (либо, выбросив автомат, достает из-за пояса пистолет) и, пятясь боком к дверному проему, скашивает половину отряда автоматной очередью. Проблема заключается в том, что быстро ликвидировать террориста в подобной ситуации практически невозможно, а вот нахвататься свинца — сколько душе угодно. Поэтому, если вы вдруг заметите, что какой-либо преступник решил сдаться без единого выстрела, будьте очень осторожны, ведь перед вами, возможно, стоит какой-нибудь доморощенный Роберт де Ниро, решивший разыграть перед вами спектакль с целью прославиться в криминальном сообществе, уложив весь отряд SWAT в аккуратные штабеля.
Имбецилы со стажем.
По сравнению с поумневшими преступниками ваши товарищи по оружию остались такими же глупыми, как пробки. Хотя они теперь и умеют при необходимости доставать из кобуры пистолеты, но все же до сих пор могут застрять в дверном проеме, создать в узком коридоре пробку и подорвать сами себя при попытке взломать дверь с помощью С-2. В первых двух случаях подопечных можно отодвинуть с дороги, подойдя к ним вплотную. В последнем же случае категорически не рекомендуется мешать им устанавливать на дверь взрывчатку, поскольку бойцы могут так и остаться у двери, не успев спрятаться за угол и погибнуть от взрывной волны.
Нередки случаи, когда оперативники, направляясь по коридору к очередной двери, могут получить автоматную очередь от террориста, спрятавшегося за где-нибудь за углом. Поэтому вам, как лидеру группы, всегда следует возглавлять команду и идти впереди, внимательно осматривая все достопримечательности местных уровней. Так же рекомендуется, получив, например, подтверждение от одного из бойцов, что за очередной дверью кто-то находится, убедиться в этом самому, проверить в какой именно части помещения находится противник и знает ли он о вашем приближении. Если знает, то лучше проделать всю работу по обезоруживанию террориста самому, оставив группу прикрывать тылы.
Но все же напарники далеко не бесполезны. Использовать их не столько можно, сколько нужно, но с умом. Например, подконтрольные вам офицеры полиции могут пригодиться при штурме какого-нибудь большого помещения с несколькими дверями. В этом случае напарников следует расставить у всех возможных путей отхода террористов и, ворвавшись в помещение со всех доступных сторон, без особого труда арестовать подозрительных личностей.
Первый, первый! Я последний! Докладываю:
После того, как вы со своими напарниками взломали дверь, набросали газовых гранат, ворвались в помещение и повязали всех подозрительных личностей и заложников, пришла пора собрать оружие преступников и доложить о выполнении задания в штаб. Достигается это за счет наведения перекрестия прицела на арестованную личность и нажатия «пробела». Рапортовать в штаб вовсе необязательно, однако данная опция поможет вам легко заработать несколько лишних очков рейтинга успешности выполнения миссии, а на высоких уровнях сложности борьба идет за каждое очко.
Оружие
Правильно выбранное оружие не один раз поможет в опасной ситуации, поэтому относиться к его выбору, как себе, так и членам команды, следует со всей ответственностью. Для этого рекомендуется внимательно прослушивать предшествующие миссиям брифинги, читать и анализировать информацию о численности заложников и террористов, об их вооружении и экипировке. В выборе оружия вам поможет нижеизложенное описание всего игрового вооружения.
Боеприпасы
Full Metal Jacket (FMJ) — цельнометаллические патроны с большой пробивной силой способны пробивать кевларовые бронежилеты и шлемы, однако наносят меньше повреждений по сравнению со вторым типом боеприпасов.
Jacketed Hollow Point (JHP) — обычные патроны со слегка притупленным наконечником наносят значительные повреждения, тем не менее, не способны пробить кевлар.
12 Gauge Slugs — патроны для дробовиков с большой пробивной силой, так же, как и цельнометаллические, способны пробить большинство бронежилетов и шлемов.
00 Buck Shots — патроны, заправленные дробью, способны наносить значительные повреждения, тем не менее, не способны пробить кевлар.
Beanbags — патроны для нелетальных помповых дробовиков, заправленные горохом (не шучу!).
Pepper balls — шарики с перечным газом для пейнтбольного ружья.
EMD cartridges (electro-muscular disruption) — специальные картриджи для нелетального пистолета.
Первичное оружие
Название: 9mm SMG (MP5);
Режим стрельбы: Полуавтоматический, очередью по три патрона;
Скорострельность: Высокая;
Точность: Выше среднего;
Пробивная сила: Выше среднего;
Магазин: 30 патронов;
Тип боеприпасов: FMJ, JHP;
Описание: Знаменитый автомат MP 5 немецкой фирмы Heckler and Koch, компактные размеры которого не понижают маневренности бойца при использовании в замкнутом пространстве. Не оснащен глушителем. Пробивная сила высока ровно настолько, насколько это необходимо для пробивания кевларовых бронежилетов.
Название: Silenced 9mm SMG (MP 5 с глушителем);
Режим стрельбы: Полуавтоматический, очередью по три патрона;
Скорострельность: Выше среднего;
Точность: Выше среднего;
Пробивная сила: Средняя;
Магазин: 30 патронов;
Тип боеприпасов: FMJ, JHP;
Описание: Тот же автомат MP 5, только оснащенный глушителем и подавителем вспышки. Оснащение автомата глушителем негативно отразилось на его скорострельности и пробивной силе. Пробивная сила чуть ниже 9mm SMG без глушителя.
Название: .45 SMG;
Режим стрельбы: Автоматический, полуавтоматический;
Скорострельность: Средняя;
Точность: Высокая;
Пробивная сила: Высокая;
Магазин: 25 патронов;
Тип боеприпасов: FMJ, JHP;
Описание: Еще одно изделие немецкой фирмы Heckler and Koch . Так же известен, как UMP. Автомат, созданный из полимеров и оптоволокна весьма легок, благодаря чему эффективен при использовании в замкнутых пространствах. Весьма похож на своего предшественника — автомат М P 5, однако за счет увеличенного по сравнению с 9mm SMG калибра патронов (9мм — .35 калибр), обладает большей пробивной силой. Скорострельность понижена, что позволяет вести более точной огонь по цели.
Название: GB36s Assault Rifle;
Режим стрельбы: Автоматический, очередью по два патрона;
Скорострельность: Высокая;
Точность: Выше среднего;
Пробивная сила: Высокая;
Магазин: 30 патронов;
Тип боеприпасов: FMJ, JHP;
Описание: Немецкая штурмовая винтовка, созданная в 90-х годах исключительно для вооружения немецкой армии вскоре приобрела всемирную известность за свою надежность и простоту использования. Имея калибр .223 (5.56 мм) обладает огромной пробивной силой. Единственная в игре альтернатива знаменитой американской винтовке М4А1.
Название: Colt M4A1 Carbine;
Режим стрельбы: Автоматический, полуавтоматический;
Скорострельность: Высокая;
Точность: Средняя;
Пробивная сила: Высокая;
Магазин: 30 патронов;
Тип боеприпасов: FMJ, JHP;
Описание: Американская штурмовая винтовка, созданная на базе знаменитой M -16, получившей широкое применение во вьетнамском конфликте. Очередная модификация знаменитой винтовки до сих пор состоит на вооружении в армии США. Стреляющая патронами калибра 5.56 мм винтовка обладает высокой пробивной силой, однако повышенная скорострельность и большая отдача повышают разброс пуль на больших дистанциях, из-за этого рекомендуется вести огонь исключительно очередями. Укороченный, по сравнению с оригинальной M-16 ствол винтовки, повышает маневренность бойца при использовании в замкнутом пространстве.
Название: M4 Super 90;
Режим стрельбы: Автоматический;
Скорострельность: Высокая;
Точность: Средняя;
Пробивная сила: Очень высокая;
Магазин: 5 патронов + 25 в запасе;
Тип боеприпасов: 12 Gauge Slugs, 00 Buck Shots;
Описание: Дробовик фирмы Benelli. Автоматический режим стрельбы позволяет не передергивать затвор после каждого выстрела, за счет чего скорострельность, по сравнению с остальными дробовиками в игре, повышается до максимального уровня. Разброс дроби весьма велик, что может привести к нанесению травм заложникам и членам команды. На больших расстояниях малоэффективен. Рекомендуется начинающим спецназовцам.
Название: Nova Pump;
Режим стрельбы: Одиночный;
Скорострельность: Низкая;
Точность: Средняя;
Пробивная сила: Очень высокая;
Магазин: 8 патронов + 22 в запасе;
Тип боеприпасов: 12 Gauge Slugs, 00 Buck Shots;
Описание: Одна из самых последних разработок фирмы Benelli. Классический помповый дробовик, требующий перезарядки после каждого выстрела. Увеличенная вместительность магазина позволяет заряжать дробовик на три патрона больше по сравнению с M4 Super 90. Та же самая пробивная сила и тот же самый разброс дроби. Рекомендуется исключительно для любителей мощных дробовиков.
Название: Less-Lethal Shotgun;
Режим стрельбы: Одиночный;
Скорострельность: Низкая;
Точность: Средняя;
Пробивная сила: Низкая;
Магазин: 8 патронов + 22 в запасе;
Тип боеприпасов: Beanbags;
Описание: Такой же классический помповый дробовик от Benelli ,как и Nova Pump, только нелетальный. В качестве боеприпасов используются так называемые «мешочки с горохом». При попадании таких зарядов в цель противник испытывает сильную боль и за счет этого дезориентируется в пространстве. Использование нелетальных боеприпасов позволяет вести огонь из дробовика на опережение, не задумываясь о штрафных очках. При столкновении с противниками, экипированными в кевларовые бронежилеты и защитные маски, огонь следует вести по любым конечностям, поскольку, при попадании в кевлар, «мешочки с горохом» не производят никакого эффекта на цель.
Название: Pepper Ball Gun;
Режим стрельбы: Полуавтоматический;
Скорострельность: Средняя;
Точность: Средняя;
Пробивная сила: Низкая;
Магазин: 200 патронов;
Тип боеприпасов: Pepper balls;
Описание: Уникальная и наиболее универсальная модель нелетального оружия в игре, основанная на оружии для игры в пейнтбол. В качестве боеприпасов используются «перечные шарики», которые разгоняются при помощи сжатого диоксида углерода и выстреливаются наружу. При попадании в цель шарик лопается, перечный газ выходит наружу и действует на противника как обычный слезоточивый газ, дезориентируя его и значительно понижая мораль. Хотя диоксид углерода и разгоняет шарик до приличной скорости, однако его незначительный вес все же негативно влияет на траекторию полета шарика, что не позволяет вести прицельный огонь на большие расстояния. Огромный боезапас и отсутствие необходимости перезаряжать оружие выгодно отличают Pepper Ball Gun от остального оружия в игре. Однако следует учитывать тот факт, что перечный газ не действует на противников, экипированных противогазами.
Вторичное оружие
Название: M1911;
Режим стрельбы: Полуавтоматический;
Скорострельность: Ниже средней;
Точность: Выше средней;
Пробивная сила: Высокая;
Магазин: 8 патронов;
Тип боеприпасов: FMJ, JHP;
Описание: Знаменитый кольт 45-го калибра, вот уже несколько десятков лет состоящий на вооружении правоохранительных органов. Высокая пробивная сила позволяет наносить значительные повреждения преступникам, экипированным в бронежилеты. Хорошо сочетается в паре с любым нелетальным оружием.
Название: 9mm Handgun;
Режим стрельбы: Полуавтоматический;
Скорострельность: Средняя;
Точность: Выше средней;
Пробивная сила: Выше средней;
Магазин: 17 патронов;
Тип боеприпасов: FMJ, JHP;
Описание: Пистолет австрийского производства, наполовину состоящий из полимеров, что делает его очень легким и удобным в обращении. Хотя пробивная сила и уступает кольту 45-го калибра, однако вместительный магазин и повышенная скорострельность делает его одним из самых популярных в правоохранительных органах пистолетов.
Название: Taser Stun Gun;
Режим стрельбы: Одиночный;
Скорострельность: Низкая;
Точность: Ниже средней;
Пробивная сила: Низкая;
Магазин: 1 патрон + 15 в запасе;
Тип боеприпасов: EMD cartridges;
Описание: Довольно эффективный, но очень трудный в использовании нелетальный пистолет, в котором вместо патронов используются специальные электрические картриджи. Электрический заряд при попадании в цель вызывает непроизвольные сокращения мышечной ткани, что приводит к деморализации противника. Однако маленький радиус стрельбы, низкая точность и необходимость перезарядки после каждого выстрела делает Taser Stun Gun очень трудным в применении нелетальным оружием.
Оружие взлома
Название: C2 Explosives;
Пробивная сила: Очень высокая;
Описание: Взрывчатка с детонатором — предназначенная для взлома дверных замков. Хотя установка и подрыв заряда занимает достаточно много времени, но все же способность взрывной волны обезвреживать преступников, находящихся непосредственно за дверью, делает C2 лучшим средством для взлома. Следует так же учитывать тот факт, что взорванную с помощью данной взрывчатки дверь в дальнейшем невозможно будет закрыть.
Название: Breaching Shotgun;
Пробивная сила: Очень высокая;
Описание: Модифицированная модель обычного помпового дробовика, единственным предназначением которого является взлом дверных замков. Взлом, по сравнению с использованием взрывчатки, происходит быстрее, однако нанести какие-либо повреждения противнику, находящемуся непосредственно за дверью, невозможно. Выбитая мощным зарядом дверь резко распахивается, делая бойца на некоторое время уязвимым для атак со стороны преступников, находящихся за дверью. Данный дробовик не способен нанести никаких повреждений противникам даже при стрельбе в упор.
Тактическая экипировка
Название: Flashbang;
Описание: Световая граната, вызывающая временную слепоту и дезориентацию противников. Имеет больший радиус действия по сравнению со sting-гранатой, поэтому при детонации рекомендуется находиться подальше от эпицентра взрыва. Является отличным диверсионным устройством, при правильном применении которого можно получить значительное тактическое превосходство над противниками, пораженными эффектом световой гранаты.
Название: CS Gas;
Описание: Граната со слезоточивым газом, в основу которого входит вещество chlorobenzylidene malonitrile. При взрыве данной гранаты выделяется газ, вызывающий у противников жжение в глазах, раздражение слизистой оболочки носа и сильный кашель. После взрыва гранаты следует подождать, пока слезоточивый газ не заполнит помещение и только затем идти на штурм.
Название: Stinger Grenades;
Описание: «Жало» похожа на обычную осколочную гранату, однако при взрыве вместо осколков в стороны на большой скорости разлетаются резиновые шарики, которые при попадании в цель вызывают у противников сильную боль и приводят к временной дезориентации. Резиновые шарики не способны нанести каких-либо физических повреждений, однако за счет невыносимой боли могут значительно снизить уровень морали противников, а иногда даже привести к травмам.
Название: Pepper Spray;
Описание: Обычный газовый баллончик с пульверизатором, распрыскивающим перечный газ. Свойства перечного газа схожи со свойствами газа в шариках для нелетального пейнтбольного ружья. Эффективен в качестве средства убеждения несговорчивых заложников. Так же можно использовать и против вооруженных террористов, однако эта затея весьма рискованная, поскольку струя газа имеет маленький радиус действия и естественно не способна производить никакого эффекта на преступников, экипированных противогазами.
Название: Optiwand;
Описание: Очень полезное и эффективное в использовании устройство, которое состоит из длинной трубки, на конце которой укреплена миниатюрная видеокамера. Сама видеокамера посылает сигнал на жидкокристаллический монитор, установленный в другом конце трубки. С помощью этого «оптиглаза», как его любят называть в народе, можно заглядывать за угол и, просовывая трубку под дверь, осматривать помещения на предмет присутствия в них подозрительных личностей. Сама трубка очень гибкая, что позволяет вращать видеокамеру на ее конце, чтобы как следует осмотреть окрестности. Рекомендуется брать с собой Optiwand на все без исключения миссии. Так же желательно выдавать каждой команде по одному такому приспособлению.
Название: Door Wedge;
Описание: Обычный дверной клин, позволяющий подпереть дверь так, чтобы ее невозможно было открыть ни с той, ни с другой стороны. Тактические возможности приспособления очень широки. Например, с его помощью можно заблокировать все пути отступления террористов или перекрыть двери, ведущие на лестничные пролеты. Резиновая прокладка на клине предотвращает открытие двери с помощью брутальной силы. Снять клин можно лишь с помощью специального инструмента, которым, к счастью, не экипирован ни один террорист. Установка и снятие клина происходит в считанные секунды, что позволяет быстро заблокировать дверь и, не теряя лишнего времени, продолжить осмотр помещения. Рекомендуется брать с собой дверной клин на все без исключения миссии. Так же желательно выдавать каждой команде по одному такому приспособлению.
Название: Multi-Tool;
Описание: Универсальный инструмент, представляющий собой набор отмычек ножей и других полезных приспособлений. С его помощью можно бесшумно открывать запертые двери, снимать дверные клинья и обезвреживать бомбы с часовым механизмом. Подобным приспособлением оснащен каждый персонаж (по умолчанию — клавиша «8»), поэтому нет необходимости проверять перед каждой миссией его наличие в экипировке команды.
Новое оснащение
Первичное оружие
Название: 5.7×28 мм Submachine Gun;
Режим стрельбы: Полуавтоматический, очередью по три патрона;
Скорострельность: Высокая;
Точность: Выше среднего;
Пробивная сила: Выше среднего;
Магазин: 50 патронов;
Тип боеприпасов: FMJ, JHP;
Описание: Этот автомат, разработанный ведущими европейскими производителями оружия, в основном используется войсками, предпочитающими малогабаритное оружие. Легок в использовании, надежен в боевых условиях и отлично сбалансирован.
Название: Colt Accurized Rifle;
Режим стрельбы: Полуавтоматический, автоматический;
Скорострельность: Высокая;
Точность: Высокая;
Пробивная сила: Высокая;
Магазин: 20 патронов;
Тип боеприпасов: FMJ, JHP;
Описание: Смесь штурмовой винтовки и снайперского ружья. Встроенный оптический прицел позволяет вести очень точный огонь на большом расстоянии. Патроны 5.56 мм обладают высокой пробивной силой и способны пробивать бронежилеты всех типов. Винтовка так же снабжена глушителем и подавителем вспышки. Однако ее длина может оказаться помехой в узких помещениях.
Название: 40mm Grenade Launcher;
Режим стрельбы: Одиночный;
Скорострельность: Низкая;
Точность: Средняя;
Пробивная сила: Низкая;
Магазин: 1 патрон;
Тип боеприпасов: Baton, Flashbang, CS Gas, Stinger;
Описание: 40 миллиметровый гранатомет является обычным полицейским оборудованием, для использования в нестандартных ситуациях, как например спасение заложников или подавление мятежей. Его способность стрелять различными нелетальными снарядами сделало его применение очень многогранным. Может стрелять четырьмя различными типами нелетальных боеприпасов. Baton состоит из трех резиновых шариков, весящих по 20 граммов каждый, которые при попадании в цель на большой скорости вызывают у противника сильную боль тем самым дезориентируя его. Flashbang является аналогом световой гранаты и создает такой же по громкости хлопок и такую же яркую вспышку. CS Gas так же, как и газовая граната, при взрыве выделяет слезоточивый газ. Stinger, соответственно, является аналогом гранаты «жало». Единственным отличием между этими нелетальными снарядами и их ручными аналогами является возможность с помощью 40 миллиметрового гранатомета забрасывать их намного дальше.
Вторичное оружие
Название: Mark 19 Semi-Automatic Pistol;
Режим стрельбы: Полуавтоматический;
Скорострельность: Средняя;
Точность: Выше среднего;
Пробивная сила: Выше среднего;
Магазин: 8 патронов;
Тип боеприпасов: FMJ, JHP;
Описание: Очень удобный и весьма мощный пистолет 50-го калибра единственным недостатком которого является отсутствие встроенного фонарика.
Название: Cobra Stun Gun;
Режим стрельбы: Одиночный;
Скорострельность: Низкая;
Точность: Средняя;
Пробивная сила: Низкая;
Магазин: 1 картридж;
Тип боеприпасов: Картриджи;
Описание: Кобра является двух целевым нелетальным оружием. Оно выстреливает двумя электродами по цели, а затем через соединительные провода посылает в них электрический импульс. Разряд вызывает неконтролируемое сокращение мышечной ткани цели, вне зависимости от его силы воли. В итоге цель испытывает сильную боль и деморализацию. У оружия больше дальность стрельбы, чем у его предшественников и оно может выстрелить по четыре или два по два электрода. Также его можно использовать как оружие непосредственного контакта. Встроенный компьютер записывает информацию об интенсивности и длительности шока, и других факторов.
Тактическая экипировка
Название: Ammo Pouch;
Описание: Обычная сумка для патронов, которая крепится на поясе спецназовца рядом с нелетальными гранатами. В ней можно носить две дополнительных обоймы для первичного оружия (кроме перечного ружья).
Название: Night Vision;
Описание: Прибор ночного видения, работающий по принципу усиления доступного света и позволяющий лучше видеть в темных местах. Из-за недостатка цвета и ограниченного поля зрения прибор может затруднить различение противников, заложников и членов команды.
Миссия 1
Название: Место развлечений.
Ситуация: В службу 911 поступил экстренный звонок от Оскара Богарта, владельца игрового зала, расположенного на улице Гауер. Он сообщил, что из зала с игровыми автоматами доносятся звуки выстрелов. Детективы из двенадцатого отдела утверждают, что этот зал облюбован торговцами наркотиков. Свидетели говорят, что между Хавьером Эрайдсом, местным наркобароном, и группой неизвестных случился спор, который быстро перерос в бойню, когда новые знакомые Эрайдса достали пушки. Налицо криминальная война.
Цели:
Устранить беззаконие.
Спасти всех гражданских.
Спасти Оскара Богарта.
Нейтрализовать Хавьера Эрайдса.
Сохранить улики.
Проникновение:
Служебный вход.
Пожарный выход.
Подозреваемые:
Хавьер Эрайдс.
Гражданские:
Оскар Богарт.
Рекомендуемое снаряжение:
Первичное оружие — Перечное ружье (для всех членов команды);
Вторичное оружие — 9-мм пистолет с цельнометаллическими патронами;
Тактический комплект — По одному оптическому проводу на команду плюс гранаты (в основном газовые);
Устройство для взлома — С2;
Средство защиты — Кевларовый шлем.
Выполнение: Проникновение в здание желательно осуществить с пожарного выхода. Подойдя к двери, прикажите одной из команд проверить под дверью. Это осуществляется путем наведения перекрестия прицела на дверь и последующего нажатия правой кнопки мыши, после которого на экране появляется контекстное меню команд. Выбрав команду, отпустите ПКМ, вследствие чего двое ее членов подойдут к двери, расположатся штурмовым порядком и один из спецназовцев, присев на корточки, осмотрит при помощи оптического провода находящееся по ту сторону двери помещение. После выполнения приказа спецназовец доложит о присутствии в расположенном за дверью помещении вооруженного террориста. Теперь следует поступить следующим образом: наведя прицел на дверь, нажмите правую клавишу мыши, и выбираете команду «газ и зачистить». Спецназовцы откроют дверь и бросят газовую гранату. Подождав несколько секунд, пока газ начнет заполнять помещение, штурмуйте помещение, входя в дверь вслед за своей командой.
Зайдя в помещение, вы видите плачущего от газа террориста. Прикажите этой плаксе сдаваться (по умолчанию — клавиша «F»). Если же он откажется подчиняться стражам правопорядка, то заставьте террориста плакать пуще прежнего, ударив его кулаком в область туловища или лица, прыснув в него струю перечного газа из газового баллончика, взорвав рядом с ним гранату «жало» и для полной картины выстрелив ему в ногу. После подобных издевательств террористы, как правило, спешат сдаваться спецназовцам. Закуйте террориста в наручники (по умолчанию — клавиша » H «). Заковав террориста, наведите на него прицел и нажмите клавишу » F «, дабы рапортовать начальству об успешном обезоруживании преступника. Если же у вас нет абсолютно никакого желания заниматься обычной бюрократической рутиной, наведите перекрестие прицела на подозреваемого и нажмите клавишу «Space», чтобы один из ваших подчиненных сделал всю работу за вас. Один готов, но это отнюдь не последний террорист в этом здании.
Проникнув в здание с пожарного выхода, вы окажетесь в помещении с четырьмя дверьми. Одна сразу слева от вас, три остальных — в конце комнаты. Двери, расположенные по левой стороне — вход в большой игровой зал. Дверь в конце комнаты по правую сторону — выход на улицу. Проверьте, что находится за дверью прямо перед вами. Если там прячется заложник, прикажите команде открыть дверь и зачистить помещение. Гражданский, увидав представителей закона, сразу сдается.
В данной комнате три двери. Дверь по левую сторону ведет в малый игровой зал, дверь прямо перед вами — выход в коридор. Зачистите сначала коридор, приказав команде посмотреть, что находится по ту сторону двери. Продвигаясь в конец коридора, смотрите в оба, поскольку слева от вас будет лестница, ведущая на второй этаж, по которой может ходить патруль. Увидев его, сразу стреляйте в лицо, чтобы террорист не успел убежать. После подобной внезапной атаки вооруженный бандит начинает чихать и кашлять от огромной дозы перца. Пока он не пришел в себя, прикажите ему сдаться. Затем, продолжая движение по коридору, по правую сторону вы заметите двери в мужской и женский туалеты. Обычно там прячется преступник с наркотиками и пытается в прямом смысле слова спустить улики в унитаз. После поимки преступника двигайтесь в конец коридора к двери, которая ведет в малый игровой зал.
В зале обычно никого не бывает, но все равно проверить стоит. Оказавшись в игровом зале, вы увидите перед собой две двери, ведущие в большой игровой зал. Разбейте команду на две подгруппы: красных разместите возле левой двери, синих — возле правой. Прикажите обеим командам посмотреть под дверью. Похоже, что у них здесь намечается вечеринка. Трое вооруженных подозреваемых и один гражданский. Прикажите красным и синим бросить в помещение гранаты и арестовать преступников. После этого происходит молниеносный штурм. Забегая в зал, приказывайте всем террористам сдаться властям, в противном случае открывайте огонь на поражение. Граждане бандиты, понимая, что при неподчинении блюстителям закона могут скоропостижно скончаться от переизбытка свинца в организме, с неохотой сдаются. После того, как все присутствующие в помещении личности будут закованы в пластиковые наручники, можете считать, что зачистка первого этажа окончена. Соберите команду воедино и возвращаетесь в коридор.
Выйдя в коридор, поднимайтесь по лестнице на второй этаж. На втором этаже в правом углу стоит на коленях гражданский. Оденьте на него наручники, а затем продвигайтесь по правой стороне. Дойдя до конца, слева вы заметите дверь. Если за ней террорист, стоящий прямо напротив двери, на пролом не идите. Возьмите пластиковую взрывчатку, прилепите ее на дверь и взрывайте. От взрыва дверь ударит террориста с такой силой, что тот просто потеряет сознание. Если там несколько террористов, то обойдите их с другой стороны. Увидев, что дверь открыта, кидайте туда газовую гранату и штурмуйте помещение.
По левой стороне второго этажа расположены двери, ведущие в бильярдный зал и туалет. Террористов там обычно не бывает, но все же стоит проверить.
После зачистки второго этажа миссия окончена. Теперь можете расслабиться собрать все улики, доложить о выполненной работе в штаб и возвращаться на базу.
Миссия 2
Название: Сестры милосердия.
Ситуация: Около двух часов назад группа вооруженных людей попыталась ограбить почту на углу улиц Уоттс и Лонсдейл. Им противостояли вооруженные охранники, и когда те открыли огонь, грабители сбежали. По всей видимости, их водитель запаниковал и уехал без них. Когда офицер полиции приказал преступникам сдаться, они открыли огонь и скрылись в доме сестер милосердия. Очевидцы утверждают, что подозреваемых было не меньше пяти человек, которые были вооружены дробовиками и автоматическим оружием.
Цели:
Устранить беззаконие.
Спасти всех гражданских.
Спасти Лайонела Макартура.
Проникновение:
Передний вход.
Вход доставки.
Подозреваемые:
Неизвестны.
Гражданские:
Леонард Макартур.
Рекомендуемое снаряжение:
Первичное оружие — Перечное ружье (себе и командирам отряда) и нелетальный дробовик;
Вторичное оружие — 9-мм пистолет с цельнометаллическими патронами;
Тактический комплект — По одному оптическому проводу на команду, гранаты (в основном газовые), несколько дверных клиньев;
Устройство для взлома — С2;
Средство защиты — Кевларовый шлем.
Выполнение: Проникновение в здание желательно осуществить через передний вход. Перед вами окажется дверь с прозрачными стеклами, так что прежде чем входить, подойдите к двери и осмотритесь. Убедившись, что там никого нет, аккуратно откройте дверь и пройдите в комнату. Эта комната напоминает зал ожидания. Здесь есть пункт регистрации людей преклонного возраста и только что вышедших из тюрьмы или больницы. Слева от вас дверь, за которой находится небольшое офисное помещение. Повернувшись лицом к двери, вы заметите по правую сторону регистрационный пункт. Сразу за ним две огромные двери, ведущие в молитвенный зал. Разбейте команду на две подгруппы. Красным прикажите установить под правую дверь клин, синей команде — под левую. Таким способом вы отрежете террористам путь к отступлению.
После установки дверных клиньев проверьте маленькое офисное помещение, расположенное слева от вас. В это помещение ведут два входа — передний и боковой. Прикажите синим посмотреть под переднюю дверь. Пока команда синих занята, расположите команду красных у бокового входа. Если никого нет, то продвигайтесь дальше. Если есть, возьмите комнату штурмом по двум направлениям. Таким способом штурма вы вводите террориста на некоторое время в состояние ступора. После успешного обезвреживания преступника продвигайтесь дальше.
Идите к двери с надписью «NO SMOKING», затем соберите команду воедино и прикажите посмотреть, что под дверью. За дверью могут находиться приблизительно три террориста и столько же заложников. Прикажите своим спецназовцам взломать дверь и, бросив газовые гранаты, зачистить помещение. Учтите, что спецназовцы кидают гранаты не очень далеко и газ не распространится до конца комнаты. Чтобы это поправить, последуйте их примеру и, взяв в руки газовую гранату, выдерните чеку и держите. После открытия двери бросайте гранату в самый конец комнаты. После того, как газ начнет рассеиваться, идите на штурм помещения, но будьте бдительны, потому как в комнате есть еще две двери, ведущие в коридор, через которые в любой момент могут зайти террористы, патрулирующие коридор. Быстренько связывайте преступников, разбивайте команду на две группы, разместите синих у левой двери, красных — у правой, и отдайте приказ обоим командам провести осмотр под дверью. Если ваши подопечные обнаружат террористов, отдайте приказ обеим командам бросить световые гранаты и зачистить коридор, а поскольку в нем нет каких-либо препятствий, будьте уверены в том, что вспышка достанет террориста даже в конце коридора.
Зачистив коридор, продвигайтесь к двери, за которой находится молитвенный зал. Обязательно проверьте, что по ту сторону двери, поскольку там может находиться заложник. Зачистив зал, возвращайтесь обратно в коридор. В самом его конце по левую сторону расположены три двери. Все они ведут в столовую, в которой могут находиться и террористы и заложники. Расположите группы у каждой двери и прикажите всем группам зачистить помещение. Сами же оставайтесь в коридоре, отрезая путь к отступлению тем террористам, которые вздумают ретироваться с поля боя. Арестовав всех, двигайтесь к лестнице, которая ведет на второй этаж. Поднимаясь по лестнице, будьте осторожны и старайтесь почаще смотреть при помощи оптического провода за угол. Когда вы поднимитесь на второй этаж, снайпер по рации доложит, что вы в его поле зрения, так что не выстрелите по ошибке в самого себя.
По левую сторону расположены две двери. Прикажите своей команде осмотреть помещение за первой дверью, а сами направляйтесь ко второй. Если за вашей дверью окажется террорист, смело открывайте дверь и кидайте газовую гранату. Приказав преступнику сдаться, защелкните на его руках наручники и подтягивайте к себе остальных. В комнате две двери — слева и справа. За дверью слева может находиться террорист и одна сестра милосердия. Всем вместе штурмовать помещение нет смысла, поэтому возьмите отдельную группу и прикажите зачистить комнату, бросив перед штурмом одну из гранат. Затем вновь соберите команду и идите к двери, за которой располагается жилое помещение с находящимися внутри гражданскими. Наденьте на всех наручники и ступайте к зеленой двери. Это туалет, в котором всегда находятся два террориста и заложник. Схватив террористов и обезопасив заложника, продвигайтесь в конец комнаты к двери, за которой находится лестница, ведущая на первый этаж в молитвенный зал. Не забудьте проверить, что находится за дверью. Обычно за ней прячется один террорист и парочка заложников, один из которых Леонард Макартур. После успешного спасения Макартура доложите в штаб об успешном выполнении задания и возвращайтесь на базу.
Миссия 3
Название: Улица продавцов.
Ситуация: Приблизительно 45 минут назад группа, известная как Гражданские Против Сатанинской Музыки (ГПСМ), штурмовали концерт в Эале на улице Селлерс. Они несколько раз выстрелили в толпу, ранив людей и посеяв панику. Музыкальна группа под названием Проделки Дьявола, убежала со сцены, но ГПСМ кинулись за ними. Они заявляют, что сейчас группа у них в заложниках.
Цели:
Устранить беззаконие.
Спасти всех гражданских.
Нейтрализовать Эндрю Нориана.
Проникновение:
Сторона 1, уровень 1, главный вход.
Сторона 3, уровень 1, погрузочный док.
Подозреваемые:
Эндрю Нориан.
Неизвестны.
Гражданские:
Неизвестны.
Рекомендуемое снаряжение:
Первичное оружие — .45 SMG с боеприпасами FMJ;
Вторичное оружие — Cobra Stun Gun ;
Тактический комплект — По одному оптическому проводу на команду, гранаты (в основном газовые);
Устройство для взлома — С2;
Средство защиты — Кевларовый шлем.
Выполнение: Проникновение лучше всего осуществлять через главный вход. В этом случае вы окажетесь в помещении для покупки билетов на концерт, в котором обычно находятся два заложника. Один лежит раненый за кассовой стойкой, а другой находится в конце коридора. Обезопасив заложников, готовьтесь к штурму концертного зала. Для этого красную команду разместите у главного входа в зал, а с командой синих продвигайтесь к двери, за которой находится мужская и женская уборные, дверь — ведущая в офис менеджера, лестница — ведущая на второй этаж и боковой вход в концертный зал. Акцентируйте свое внимание на мужской уборной, поскольку в ней могут находится террорист и заложник. Обезопасив заложника от угроз террориста и заковав его в наручники, рапортуйте руководству, что субъекты готовы к эвакуации. Далее проведите завершающую стадию штурма концертного зала.
Разместите команду синих у бокового входа в зал. Красным отдаете команду «газ и зачистить», а синим прикажите ворваться в помещение и зачистить его. После чего происходит штурм концертного зала. Попадая в зал, будьте осторожны, потому как это большое помещение с балконами по правую и левую сторону зала, на которых могут находиться террористы. Перед концертной сценой лежит два раненых заложника, на сцене находится стоящий на коленях любитель сатанинской музыки, а за его спиной представитель организации ГПСМ, который вооружен знаменитым автоматом Калашникова. Увидев представителей закона, дуло его автомата внезапно начинает смотреть в вашу сторону, спецназ в таких ситуациях никогда не церемонится и всегда открывает огонь первым, в результате чего борец против сатанинской музыки погибает смертью храбрых.
Собрав команды в единое целое, продвигайтесь вглубь концертного зала, то есть за кулисы. Это помещение имеет множество укрытий, за которыми могут спрятаться представители ГПСМ. Перед зачисткой закулисного помещения киньте туда пару газовых гранат, газ в этом случае будет наиболее эффективным, потому что он легко рассеивается в помещениях такого типа. После того, как газ начал действовать, и вы услышали непристойные выражения в ваш адрес, молниеносно проводите зачистку помещения. Повязав и террористов и заложников, рапортуете в штаб. Закулисное помещение имеет ходы, ведущие в офис менеджера, дверь в подсобку, вход на погрузочный док (большие двери с зеленой вывеской «EXIT»).
Проведите зачистку погрузочного дока, при этом убедившись при помощи оптического провода, что за дверью никого нет. Зачистив погрузочный док, идете к двери, которая находится по правую сторону дока. За этой дверью обычно находится террорист и заложник. Дверь соединена извилистым коридором с закулисным помещением. Полностью зачистив коридор и промежуточное помещение с несколькими террористами и парой заложников внутри, не следует подниматься по лестнице, ведущей на второй этаж, поскольку там может быть хорошо организованная засада. Лучше продвигайтесь дальше по коридору в закулисное помещение. Тактически разместите своих спецназовцев: команду красных расположите у бокового входа в офис менеджера, а с командой синих проведите зачистку подсобного помещения, в которой могут находиться два заложника (террористов там обычно не бывает). Зачистив подсобку, команду синих разместите у заднего входа в офис менеджера, сами же идете к переднему входу. Дайте команду к зачистке сначала синим, а затем и красным. Через несколько секунд после отдачи приказа вломитесь вместе со своей командой в помещение. Такой способ захвата помещений очень эффективен, поскольку вы не позволяете террористам совершить побег.
На второй этаж ведут две лестницы: первая находится возле бокового входа в зал, вторая в извилистом коридоре, который связывает погрузочный док и закулисное помещение. Лучше всего на второй этаж входить по лестнице, которая находится возле офиса менеджера. На эту лестницу можно попасть, выйдя из офиса через главный вход, пройдя туалеты и повернув налево. Поднявшись по лестнице, вы упираетесь в двери, за которыми находится коридор, ведущий в ресторан. Зачистите ресторан с особой осторожностью, потому как за стойкой в дальнем правом углу могут находиться несколько вооруженных террористов. Если после ваших истошных воплей они не сдадутся, то вам придется стрелять на поражение. Обязательно проверьте кухонный холодильник, который находится про правую сторону от стойки, но там обычно представители ГПСМ не скрываются — слишком холодно.
Из ресторана есть два выхода на смотровые балконы концертного зала, на которых могут находиться раненые или убитые после штурма концертного зала террористы. Отрапортуйте в штаб и продвигайтесь обратно в ресторан. Дальше держите путь в левое крыло. Пройдя до конца, вы упираетесь в баррикады, которые выложены из картонных коробок и всякого ненужного хлама. Перед баррикадами дверь, за которой находится офисное помещение. Убедившись с помощью оптического провода, что за дверью находится лишь одна беспомощная женщина, смело скомандуйте желтым зачистить комнату. Зачистив помещение и эвакуировав женщину, продвигайтесь в конец офиса, где находится дверь. Выйдя через нее, вы окажетесь по ту сторону баррикад левого крыла.
Перед вами лежит и корчится от боли заложник, у которого огнестрельное ранение в грудь. Сообщив начальству об эвакуации раненого, отдайте приказ команде синих прикрыть левую дверь. Затем при помощи оптического провода посмотрите, что находится за правой дверью и штурмуете вместе со своей командой помещение. Если террористы, наглотавшись газа, не сдаются, используйте на них шокер Кобра или бейте в челюсть — верный способ заставить преступника подчиниться вашей воле. Обезопасив комнату, прикажите красным посмотреть под дверью, которая находится в конце комнаты.
А за дверью опять вечеринка с вооруженными до зубов представителями ГПСМ и несколькими заложниками. Оставив команду красных на прикрытие двери, возвращайтесь к команде синих, предварительно убедившись, что за левой дверью никого нет. В конце складского помещения есть дверь, которая ведет на все ту же вечеринку с представителями ГПСМ. Расставив команды тактическим порядком, начинайте штурм следующим образом: в первую очередь синим отдайте приказ открыть дверь, бросить внутрь газовую гранату и зачистить помещение, а затем прикажите красным ворваться на склад. После штурма вяжите всех по рукам и ногам и, получив короткую передышку, как следует осмотрите помещение. Присмотревшись, вы увидите прозрачные пластиковые пакеты с белым порошком, который очень похож на наркотики. Об этой находке сразу же доложит руководству один из ваших подчиненных. Если все прошло успешно, то руководство вскоре сообщит вам по рации об успешном выполнении миссии.
Миссия 4
Название: Департамент сельского хозяйства.
Ситуация: У департамента сельского хозяйства есть офисы на Правительственной Площади, которые находятся на Гедди авеню. Около 50-ти минут назад туда ворвалась группа вооруженных людей со штурмовыми винтовками и импровизированным взрывным устройством. Террористы должны были заложить это взрывное устройство и отойти, но бомба сработала раньше времени. В силу этих обстоятельств террористы остались забаррикадированными на втором этаже.
Цели:
Устранить беззаконие.
Спасти всех гражданских.
Спасти Риту Уинстон.
Проникновение:
Главный вход.
Задний вход.
Подозреваемые:
Неизвестны.
Гражданские:
Рита Уинстон.
Рекомендуемое снаряжение:
Первичное оружие — .45 SMG с боеприпасами FMJ;
Вторичное оружие — Cobra Stun Gun ;
Тактический комплект — По одному оптическому проводу на команду, гранаты разного типа;
Устройство для взлома — С2;
Средство защиты — Прибор ночного видения (обязательно возьмите его с собой, поскольку в этом здании очень много темных помещений).
Выполнение: В здание проникайте с главного входа. Оказавшись внутри, вы слышите странный писк. Идя на звук, вы найдете странный серебристый чемоданчик. О нет! Это же ситуация под кодовым номером 9968 с пластиковой взрывчаткой, от которой все может взлететь на воздух. Сообщив в штаб о сложившейся ситуации и, потребовав саперов, вы будете неприятно удивлены отказом. Придется брать дело в свои руки. На все про все у вас пятнадцать минут. Возьмите Multi-Tool (по умолчанию — клавиша «8») и самостоятельно обезвредьте бомбу.
Следующая бомба находится в комнате за металлической дверью, в которую можно проникнуть, повернув налево от только что обезвреженной бомбы. Наденьте прибор ночного видения и, заходя в комнату, будьте осторожны, поскольку там могут находиться террористы. У вас есть преимущество над террористами, ведь они не всегда могут заметить вас в темноте. Нашпиговав террориста свинцом или связав его по рукам и ногам, можете отдать приказ об обезвреживании бомбы красной команде, наведя прицел на чемодан и нажав по умолчанию клавишу «Space». Не теряя времени, отдайте приказ синей команде посмотреть под дверью, которая находится прямо в конце комнаты. Сами тем временем защелкните наручники на руках подозреваемого.
Третья бомба находится в коридоре, в который можно попасть, выйдя через правую дверь из той комнаты, в которой вы сейчас находитесь. Открыв эту дверь вам нужно пройти к стене, перед которой лежат два велосипеда, а затем повернуть на право. Будьте осторожны! Эту бомбу может охранять террорист. Бросьте за угол газовую гранату, потому как открыв огонь, вы можете ранить заложника и, взяв в плен террориста, начните обезвреживать бомбу. Команде желтых отдайте приказ прикрывать ваш тыл.
Четвертая бомба находится на все том же втором этаже, но по другую сторону дыры, которая образовалась в результате неумелого обращения с взрывчатыми веществами. Эта дыра высотой в три этажа доставит вам некоторое неудобство, поскольку она разделяет здание напополам. На другую сторону второго этажа вы можете попасть, вернувшись назад в то помещение, где обезвредили вторую бомбу. Зайдя, поверните направо. Обезвредив бомбу, продвигайтесь вглубь коридора.
В конце коридора находится лестница, ведущая на третий этаж. Перед тем как подниматься по лестнице, бросьте через перила, которые находятся прямо над вашей головой, гранату стингер, потому как там могут находиться незваные гости. После взрыва гранаты молнией поднимайтесь по лестнице и мужественным голосом приказывайте всем сдаться. Заковав плохих парней в наручники и обезвредив пятую по счету бомбу, двигаетесь дальше.
В комнате, в которой вы сейчас находитесь, есть две двери, ведущие на коридор с входом на кухню. Там находится шестая по счету бомба. Обезвреживаете ее и, выйдя через левую дверь кухни, вы видите по правую сторону лестницу, ведущую на первый этаж, а прямо перед собой дверь с надписью «Маркетинг».
Комнату маркетинга штурмуйте сразу с трех входов, которые расположены последовательно слева от вас. Расположив красную команду у заднего входа, синею у среднего, а сами став у передней двери, отдавайте приказ красным и синим бросить газовую гранату и зачистить помещение. Повязав всех террористов и обезвредив последнюю бомбу, можно приступить к зачистке подвального помещения. Благо с этого момента вы можете не торопиться, поскольку таймер больше не будет отсчитывать секунды до взрыва бомбы.
В подвал можно попасть, спустившись по лестнице, которая находится рядом с комнатой маркетинга. Спускаясь по лестнице, проверьте с помощью оптического провода, что находится за углом слева от вас, ведь за углом, скорее всего, может находиться террорист. Газовую гранату бросать не следует, потому, как террорист экипирован противогазом. Лучше бросьте стингер, чтобы жизнь малиной не казалась.
С террористами больше не будет никаких проблем. Теперь пройдитесь по этажам и обезопасьте всех штатских, надев на них наручники и доложив об эвакуации в штаб. Эту процедуру делайте в последнюю очередь, потому что если вы будете это делать сразу, то у вас не хватит времени на обезвреживание чемоданчиков с бомбами.
Миссия 5
Название: Лаборатория по производству наркотиков.
Ситуация: Три часа назад мужчина, пожелавший остаться неизвестным, сообщил, что на улице Говалин работает новая лаборатория по производству наркотиков. Наблюдение обнаружило неплохую организацию, промышленное оборудование для приготовления и высушивания наркотиков. Аноним утверждает, что лаборатория контролируется Стечковым. Насчет подозреваемых наблюдение ответило следующее: ребята, в основном, вооружены дробовиками, пистолетами скорпион и на некоторых одеты противогазы.
Цели:
Устранить беззаконие.
Спасти всех штатских.
Проникновение:
Передняя дверь.
Задняя аллея.
Подозреваемые:
Неизвестны.
Гражданские:
Неизвестны.
Рекомендуемое снаряжение:
Первичное оружие — .45 SMG с боеприпасами FMJ;
Вторичное оружие — Cobra Stun Gun ;
Тактический комплект — По одному оптическому проводу на команду, гранаты (в основном световые и «жало», поскольку большинство преступников экипированы противогазами);
Устройство для взлома — С2;
Средство защиты — Кевларовый шлем.
Выполнение: Проникновение в здание осуществляется через переднюю дверь. Обязательно посмотрите, что находится за дверью. Войдя внутрь, вы окажитесь в узком коридоре, который сворачивает налево и тянется в самый конец первого этажа. Сразу справа от вас расположена большая дверь. Возле нее разместите команду красных, а с синими продвигайтесь дальше по коридору до входа в комнату, которая напоминает небольшой склад. Приближаясь, будьте осторожны, так как в любой момент из комнаты может выйти вооруженный человек с противогазом на лице. Если это случилось, присядьте, прижмитесь ближе к стене и попытайтесь уговорить террориста сдать оружие. Ежели он откажется подчиниться, заставьте его метким выстрелом в запястье правой руки выбросить оружие. После подобных издевательств террорист обычно сдается, моля вас больше о пощаде. В комнате так же находится заложник, обезопасив его, поверните направо и пройдите в кухню.
В кухне расположены две двери. Левая дверь ведет на улицу, дверь по центру — это задний вход в большой зал. Прямо за этой дверью находятся два террориста. Команда красных должна быть расположена у переднего входа в огромный зал. Штурм зала начните следующим образом: первый приказ о зачистке помещения отдайте команде красных (это сработает как отвлекающий маневр). Затем команде синих отдайте тот же приказ. Разница в секунду при отдаче приказа сыграет вам на руку. Террористы, увидев красных, попытаются сбежать через дверь, в которую заходит команда синих. Этим вы собьете противника с толку, и им ничего не останется, кроме как сдаться. Зачистив зал, возвращайтесь через кухню обратно в коридор.
Выйдя в коридор, разместите команду синих у двери, которая находится слева от вас. С командой красных сверните направо и продвигайтесь вглубь коридора. Здесь расположена еще одна дверь. Прикажите команде красных посмотреть, что находится по ту сторону двери и штурмуйте два разных помещения, которые связаны между собой дырой в стене. Первыми пускай штурмуют красные, и только затем синие. Взяв террористов в плен, соберите команду в одну группу и возвращаетесь обратно в коридор.
Продвигаясь дальше. По левой стороне коридора находятся три двери, последовательно расположенные друг за другом. За первой дверью находится спальная. Обычно там некого нет, но на всякий случай проверьте. За средней дверью находится ванная комната, в которой ботаник-самоучка варит дьявольское зелье. За третьей дверью расположена еще одна спальная, в которой находится один террорист. При помощи оптического провода вы его не увидите, так что попросите ваших подчиненных зачистить помещение, предварительно бросив внутрь газовую гранату. Учтите, что как только вы откроете дверь, террорист сразу же начнет палить во все, что движется. Взяв в плен террориста, возвращайтесь в коридор.
Перед вами лестница, ведущая вниз. Слева, в конце коридора, есть дверь, за которой спрятан целый конопляный лес. Проверьте, нет ли там чего-нибудь подозрительного, и спускайтесь по лестнице на первый этаж. Спускаясь по лестнице, постарайтесь не напороться на патруль. Спустившись, вы попадете в коридор с множеством дверей. Одну команду оставьте на прикрытии, а сами аккуратно проследуйте по коридору.
По мере продвижения коридор сворачивает налево. За поворотом обычно находится террорист, который стоит к вам спиной. Аккуратно подкравшись к преступнику, подшутите над ним, выстрелив из шокера ему в спину, а затем, вежливо попросив его сдаться. После возвращайтесь обратно к своей команде.
По левой стороне в начале коридора находится дверь. Посмотрите под дверью и, убедившись в том, что она не заперта, отдайте команде приказ зачистить помещение. Взяв присутствующих в комнате террористов в плен, продвигаетесь в самый конец комнаты, с левой стороны которой находится дверь. При помощи оптического провода проверьте, что находится по ту сторону и входите.
Оказавшись в помещении, в котором по левую сторону находится выход в коридор, идите прямо в ботанический сад. При входе в сад будьте осторожны, поскольку справа от вас за дверным проемом может находиться представитель криминалитета. Бросьте туда гранату стингер, затем, вламываясь всей бригадой, прикажите террористу сдать оружие и стать на колени. Пока офицеры пакуют террориста, вы, тем временем, можете проверить, что находится за дверью, которая расположена в конце ботанического сада. За дверью есть помещение, которое начинается узким коридором и заканчивается комнатой приблизительно в десять квадратных метров. Это помещение лучше штурмовать следующим образом: команду красных разместите у двери, а с командой синих продвигайтесь в коридор. Выйдя в коридор, поверните направо и пройдите до конца коридора (дверь в помещение будет находиться по правую сторону). Разместив команды, приготовьтесь к штурму и, набросав побольше гранат различного типа, врывайтесь внутрь. В помещении находятся один террорист и бедолага-ботаник. Взяв всех в плен, собирайте команду в единое целое и возвращайтесь в коридор.
Теперь вам осталось зачистить единственную комнату, которая находится на этом этаже, по левую сторону коридора. Обычно там находится один ботаник и много-много травки. После этого центральная прикажет вам собрать траву, всех террористов и ботаников, и возвращаться на базу.
Миссия 6
Название: Станция «Улица Фреснал».
Ситуация: Две банды, из которых одна точно Стечкова, устроили перестрелку на станции метро «Улица Фреснал». В полицейский участок поступило сообщение о тяжеловооруженных подозреваемых и об огромном числе раненых гражданских. Подставной коп по имени Уилкенс участвует в переделке. Он насчитал минимум десять человек, некоторые из них вооружены штурмовыми винтовками и носят бронежилеты. Вскоре после того, как он вышел на связь, контакт был утерян. Возможно он ранен и нуждается в скорой медицинской помощи. Ему на подмогу в срочном порядке выслана группа SWAT .
Цели:
Устранить беззаконие.
Нейтрализовать Антона Гиоргиева.
Спасти всех гражданских.
Найти офицера Уилкенса.
Проникновение:
Вход с улицы Фреснал.
Вход с улицы Максвелл.
Подозреваемые:
Антон Георгиев.
Неизвестны.
Гражданские:
Неизвестны.
Рекомендуемое снаряжение:
Первичное оружие — Перечное ружье (себе и двум командирам групп), остальным — .45 SMG с боеприпасами FMJ;
Вторичное оружие — Cobra Stun Gun и 9-мм пистолет с цельнометаллическими патронами;
Тактический комплект — По одному оптическому проводу на команду, гранаты (в основном газовые);
Устройство для взлома — С2 либо дробовик;
Средство защиты — Кевларовый шлем.
Выполнение: Проникновение осуществляется с улицы Фреснал. После проникновения перед вами будет двустворчатая дверь, за которой слышны чьи-то шаги. Прикажите команде желтых посмотреть, что находится по ту сторону двери. Если там окажется подозреваемый, проводите зачистку молниеносно, потому как помещение за дверями очень большое — это зал для покупки билетов на метро. В этом зале расположено кассовое помещение. Оббегите его вокруг, так как за ним могут прятаться заложники, но не теряйте бдительности, ведь там могут быть и террористы. Далее найдите двери, на которых слева находится надпись » D А NGER » (двери расположены за кассовым помещением). Найдя их, посмотрите с помощью оптического провода, что находится по ту сторону (смотрите внимательно, так как в помещении может находиться террорист, который стоит в левом дальнем углу за колонной, и из-за этого его тяжело заметить). Обнаружив его, подтяните к себе всю команду, отдайте приказ о зачистке и штурмуйте. Если террорист не сдается, то стреляйте ему в лицо перечными шариками. После непродолжительного чихания он обычно сдается.
В помещении, в котором вы находитесь, есть лестница, ведущая на платформу №2, и зеленая дверь, которая расположена по правую сторону от вас. Лестницу оставьте в покое и занимайтесь зачисткой первого этажа. Отдайте приказ команде желтых посмотреть, что находится за зеленой дверью. За дверью офисное помещение с камерами наружного наблюдения, в котором многочисленные преграды затрудняют обзор. Чтобы узнать, есть внутри какая-то опасность или нет, вернитесь в помещении для продажи билетов. Здесь расположена зеленая дверь с надписью «EMPLOYEES ONLY». Это и есть боковой вход в офисное помещение. Посмотрите при помощи оптического провода под дверь. Убедившись в том, что там есть хотя бы один террорист, подзывайте к себе команду и отдавайте приказ о зачистке. После удачного штурма вяжите всех и рапортуйте о ходе выполнения задания в штаб.
В конце офисного помещения есть дверь, за которой находится промежуточная комната перед входом в метро с улицы Максвелл. Прикажите команде посмотреть, что находится за дверью. Гранаты не тратьте, а сразу отдавайте приказ о зачистке. Ворвавшись в помещение, продвигайтесь вглубь и идите между стеной и рекламными щитами. Увидев террориста, сразу стреляйте ему в лицо перечными шариками, и только потом просите его сдаться. Обезопасив раненых заложников, доложите в штаб о том, что заложники в очень плохом состоянии и требуют скорой медицинской помощи. После рапорта продвигайтесь дальше.
В конце комнаты есть дверь, за которой находится помещение, представляющее собой длинный коридор с выходом на улицу Максвелл. По правую его сторону находится лестница, ведущая на платформу №1. Смотрите в оба, так как на лестнице могут находиться несколько террористов. Пока они вас не заметили, киньте на ступеньки газовую гранату. Если же они вас заметят, то террористы начнут разбегаться кто куда, или, хуже того, откроют по вам огонь что крайне нежелательно. Спускайтесь вниз по ступенькам всем составом.
Помещение, в котором вы оказались, похоже на буфет. Слева от вас находится стойка, за которой может находиться вооруженный человек, а справа дверь. Разместите команду синих возле нее и прикажите попробовать, открыта ли дверь. С командой красных продвигайтесь к противоположной двери, ведущей в то же самое помещение. Зачистив комнату и взяв всех в плен, возвращайтесь на исходную позицию. Затем следуйте к турникетам, проверив перед этим мужской и женский туалеты.
Пройдя через турникеты, вы попадете на посадочную платформу. Перед вами не платформа, а прямо театр военных действий: раненый гражданский, лужи крови, бесчисленное множество гильз и пулевых отверстий в стенах. Держа палец на спусковом крючке, продвигаетесь в конец перрона, где есть две двери. За этими дверьми раздевалка для рабочих и подсобное помещение, которые связаны между собой. Соберите команду воедино, разместите у двери, которая находится справа, и отдайте приказ о зачистке. После успешного штурма закуйте всех в пластиковые наручники и держите путь в раздевалку, в которой есть туалет. Проверив его, идите к лестнице, ведущей в компрессорное помещение.
Попав в компрессорное помещение, осторожно зачистите его. Пройдя через все компрессорное помещение, вы упретесь в металлическую дверь. Прикажите своей команде посмотреть под дверью и оставьте их прикрывать тыл, а сами осмотрите всю комнату вплоть до лестницы. Поднимаясь по лестнице, будьте осторожны, поскольку здесь идет разветвление, ведущее налево и направо. Поднявшись наверх, прижмитесь к передним перилам и спиной продвигайтесь ко вторым маленьким ступенькам. Если вас вдруг увидит террорист, подсядьте под перила, таким образом, вы в надежном укрытии и вам удобно вести огонь. Поднявшись по маленьким ступенькам, подзовите к себе остальную команду. Оставьте команду на прикрытие этой зоны, а сами продвигайтесь вправо по извилистому коридору к двери. Проверьте, что за ней и заходите внутрь.
Вы оказались в генераторной. Слева от вас две двери, одна из которых сломана. Посмотрите, что находится за дверью, ведь за дверью может находиться террорист, патрулирующий перрон. Как только он отвернется к вам спиной и пойдет в сторону дверей, за которыми стоит ваша команда, открывайте дверь и стреляйте в него перечными шариками, не высовываясь из-за открытой двери, так как она будет прикрывать ваш тыл. Повязав супостата по рукам и ногам, подзывайте остальных и продвигайтесь вглубь платформы. Вскоре перед вами появится лестница, ведущая наверх. За лестницей находится туалет, который стоит проверить. После проверки туалета сообщите об успешном выполнении задания и возвращайтесь на базу.
Миссия 7
Название: Склад Стечкова.
Ситуация: После случая в метро судья Рейнер выдал ордер на арест Кирилла Стечкова, главы клана Стечковых. Камрад Стечков находится сейчас на Харингтоун Роуд. По анонимным сведениям это здание члены банды используют в качестве штаб-квартиры. Необходимо арестовать всех членов банды и ликвидировать Кирилла Стечкова. Ликвидация Кирилла посодействует восстановлению порядка в городе.
Цели:
Нейтрализовать Кирилла Стечкова.
Спасти всех гражданских.
Устранить беззаконие.
Проникновение:
Главный вход.
Боковой вход из доков.
Подозреваемые:
Кирилл Стеков.
Федор Стечков.
Гражданские:
Неизвестны.
Рекомендуемое снаряжение:
Первичное оружие — Нелетальный помповый дробовик;
Вторичное оружие — 9-мм пистолет с цельнометаллическими патронами;
Тактический комплект — По одному оптическому проводу на команду, гранаты (в основном газовые), несколько дверных клиньев;
Устройство для взлома — С2 либо дробовик;
Средство защиты — Кевларовый шлем.
Выполнение: Проникновение рекомендуется осуществить через главный вход. Перед вами дверь с надписью на верху «TEL». Перед тем, как послать команду проверить, что по ту сторону двери — аккуратно осмотритесь. Подойдите к большим окнам и посмотрите в них. Убедившись, что в офисе никого нет, можете заходить, отдав команде перед этим приказ о зачистке.
В офисе три двери: слева, справа и по центру. Красным скомандуйте проверить, что находится за дверью по левой стороне, синим отдайте приказ проверить, что находится за дверью по центру, сами проверьте, что находится за дверью справа. После подтверждения о присутствии в одном из помещений подозрительных личностей, соберите команду воедино и идите на штурм. После удачного штурма не забудьте проверить остальные двери.
Дверь в конце помещения, которое вы только что штурмовали, ведет в начало коридора. За дверью в центре коридора находится извилистая комната, при зачистке которой будьте бдительны, так как там очень много препятствий, за которыми возможно скрываются террористы. После зачистки вернитесь в коридор и, проверив по ходу движения туалет, продвигайтесь в конец коридора. Старайтесь все время держать палец на спусковом крючке и остерегайтесь патрулирующих коридор террористов. В конце есть зеленая дверь с надписью «EXIT» (выход на улицу). Сверните налево по коридору и заблокируйте дверь справа, ведущую на склад, дверным клином. Затем идите через противоположную дверь в офисное помещение, после зачистки которого не забудьте проверить на наличие подозрительных личностей и прилежащие к нему комнаты. После соберите команду двигайтесь в начало коридора к лестнице и спуститесь по ней вниз.
Оказавшись внизу, по правую сторону от себя вы заметите деревянную дверь. Проверьте, что за нею и отдайте команде распоряжение о штурме помещения. Затем идите по коридору, ведущему в бойлерную. В конце коридора по левую его сторону находится небольшое офисное помещение с парой ящиков АК-47 и полной сумкой денег. А вот и компромат на камрада Стечкова. Доложите о находке в штаб и идите к двум дверям, ведущим в одну комнату. Разбейте команду на две группы и расставьте их у каждой двери. Одной из команд прикажите посмотреть под дверью, и если они доложат об обнаружении подозрительного субъекта, отдайте обоим подразделениям приказ о зачистке помещения. Взяв террориста в плен, рапортуйте в штаб и не забудьте упомянуть о том, что пленник очень похож на Кирилла Стечкова. Пришла пора схватить Федора Стечкова.
Возвращаетесь назад в бойлерную. Прямо по курсу расположена дверь, за которой находится целый оружейный склад: АК-47, РПК, гранаты марки РГД-5, помповые ружья, автоматы УЗИ. В помещении, где вы сейчас находитесь, есть две двери, которые ведут в общий большой склад. Этот склад тоже нужно зачистить. Зачищая склад, будьте предельно бдительны, потому как склад очень большой и в нем много контейнеров, за которыми могут притаиться преступники. Выйдя со склада, поверните налево и поднимитесь по железным ступенькам на второй этаж.
Поднявшись наверх, вы окажитесь возле двери, скрывающей за собой небольшое офисное помещение. Проверьте его, вернитесь на лестничную площадку и спускайтесь на первый этаж.Продвигайтесь в конец склада, расположенном на первом этаже и смотрите в оба, поскольку из-за угла в любой момент может выскочить террорист. Дойдя до конца склада, поверните направо и пройдите мимо зеленой машины к дверям, которые ведут на улицу. Именно там и находится Федор Стечков. Будьте очень осторожны, так как Стечков никогда не ходит без своего телохранителя. После того, как главарь преступного синдиката будет схвачен и закован в пластиковые наручники, доложите в штаб об успешном выполнении задания, соберите оставшиеся улики и возвращайтесь домой.
24 мая 2006
24.05.06
0
49K
Разместите команду синих у бокового входа в зал. Красным отдаете команду «газ и зачистить», а синим прикажите ворваться в помещение и зачистить его. После чего происходит штурм концертного зала. Попадая в зал, будьте осторожны, потому как это большое помещение с балконами по правую и левую сторону зала, на которых могут находиться террористы. Перед концертной сценой лежит два раненых заложника, на сцене находится стоящий на коленях любитель сатанинской музыки, а за его спиной представитель организации ГПСМ, который вооружен знаменитым автоматом Калашникова. Увидев представителей закона, дуло его автомата внезапно начинает смотреть в вашу сторону, спецназ в таких ситуациях никогда не церемонится и всегда открывает огонь первым, в результате чего борец против сатанинской музыки погибает смертью храбрых.
Собрав команды в единое целое, продвигайтесь вглубь концертного зала, то есть за кулисы. Это помещение имеет множество укрытий, за которыми могут спрятаться представители ГПСМ. Перед зачисткой закулисного помещения киньте туда пару газовых гранат, газ в этом случае будет наиболее эффективным, потому что он легко рассеивается в помещениях такого типа. После того, как газ начал действовать, и вы услышали непристойные выражения в ваш адрес, молниеносно проводите зачистку помещения. Повязав и террористов и заложников, рапортуете в штаб. Закулисное помещение имеет ходы, ведущие в офис менеджера, дверь в подсобку, вход на погрузочный док (большие двери с зеленой вывеской «EXIT»).
Проведите зачистку погрузочного дока, при этом убедившись при помощи оптического провода, что за дверью никого нет. Зачистив погрузочный док, идете к двери, которая находится по правую сторону дока. За этой дверью обычно находится террорист и заложник. Дверь соединена извилистым коридором с закулисным помещением. Полностью зачистив коридор и промежуточное помещение с несколькими террористами и парой заложников внутри, не следует подниматься по лестнице, ведущей на второй этаж, поскольку там может быть хорошо организованная засада. Лучше продвигайтесь дальше по коридору в закулисное помещение. Тактически разместите своих спецназовцев: команду красных расположите у бокового входа в офис менеджера, а с командой синих проведите зачистку подсобного помещения, в которой могут находиться два заложника (террористов там обычно не бывает). Зачистив подсобку, команду синих разместите у заднего входа в офис менеджера, сами же идете к переднему входу. Дайте команду к зачистке сначала синим, а затем и красным. Через несколько секунд после отдачи приказа вломитесь вместе со своей командой в помещение. Такой способ захвата помещений очень эффективен, поскольку вы не позволяете террористам совершить побег.
На второй этаж ведут две лестницы: первая находится возле бокового входа в зал, вторая в извилистом коридоре, который связывает погрузочный док и закулисное помещение. Лучше всего на второй этаж входить по лестнице, которая находится возле офиса менеджера. На эту лестницу можно попасть, выйдя из офиса через главный вход, пройдя туалеты и повернув налево. Поднявшись по лестнице, вы упираетесь в двери, за которыми находится коридор, ведущий в ресторан. Зачистите ресторан с особой осторожностью, потому как за стойкой в дальнем правом углу могут находиться несколько вооруженных террористов. Если после ваших истошных воплей они не сдадутся, то вам придется стрелять на поражение. Обязательно проверьте кухонный холодильник, который находится про правую сторону от стойки, но там обычно представители ГПСМ не скрываются – слишком холодно.
Из ресторана есть два выхода на смотровые балконы концертного зала, на которых могут находиться раненые или убитые после штурма концертного зала террористы. Отрапортуйте в штаб и продвигайтесь обратно в ресторан. Дальше держите путь в левое крыло. Пройдя до конца, вы упираетесь в баррикады, которые выложены из картонных коробок и всякого ненужного хлама. Перед баррикадами дверь, за которой находится офисное помещение. Убедившись с помощью оптического провода, что за дверью находится лишь одна беспомощная женщина, смело скомандуйте желтым зачистить комнату. Зачистив помещение и эвакуировав женщину, продвигайтесь в конец офиса, где находится дверь. Выйдя через нее, вы окажетесь по ту сторону баррикад левого крыла.
Перед вами лежит и корчится от боли заложник, у которого огнестрельное ранение в грудь. Сообщив начальству об эвакуации раненого, отдайте приказ команде синих прикрыть левую дверь. Затем при помощи оптического провода посмотрите, что находится за правой дверью и штурмуете вместе со своей командой помещение. Если террористы, наглотавшись газа, не сдаются, используйте на них шокер Кобра или бейте в челюсть – верный способ заставить преступника подчиниться вашей воле. Обезопасив комнату, прикажите красным посмотреть под дверью, которая находится в конце комнаты.
А за дверью опять вечеринка с вооруженными до зубов представителями ГПСМ и несколькими заложниками. Оставив команду красных на прикрытие двери, возвращайтесь к команде синих, предварительно убедившись, что за левой дверью никого нет. В конце складского помещения есть дверь, которая ведет на все ту же вечеринку с представителями ГПСМ. Расставив команды тактическим порядком, начинайте штурм следующим образом: в первую очередь синим отдайте приказ открыть дверь, бросить внутрь газовую гранату и зачистить помещение, а затем прикажите красным ворваться на склад. После штурма вяжите всех по рукам и ногам и, получив короткую передышку, как следует осмотрите помещение. Присмотревшись, вы увидите прозрачные пластиковые пакеты с белым порошком, который очень похож на наркотики. Об этой находке сразу же доложит руководству один из ваших подчиненных. Если все прошло успешно, то руководство вскоре сообщит вам по рации об успешном выполнении миссии.
Миссия 4
Название: Департамент сельского хозяйства.
Ситуация: У департамента сельского хозяйства есть офисы на Правительственной Площади, которые находятся на Гедди авеню. Около 50-ти минут назад туда ворвалась группа вооруженных людей со штурмовыми винтовками и импровизированным взрывным устройством. Террористы должны были заложить это взрывное устройство и отойти, но бомба сработала раньше времени. В силу этих обстоятельств террористы остались забаррикадированными на втором этаже.
Цели:
-
Устранить беззаконие.
-
Спасти всех гражданских.
-
Спасти Риту Уинстон.
Проникновение:
-
Главный вход.
-
Задний вход.
Подозреваемые:
-
Неизвестны.
Гражданские:
-
Рита Уинстон.
Рекомендуемое снаряжение:
-
Первичное оружие – .45 SMG с боеприпасами FMJ;
-
Вторичное оружие – Cobra Stun Gun ;
-
Тактический комплект – По одному оптическому проводу на команду, гранаты разного типа;
-
Устройство для взлома – С2;
-
Средство защиты – Прибор ночного видения (обязательно возьмите его с собой, поскольку в этом здании очень много темных помещений).
Выполнение: В здание проникайте с главного входа. Оказавшись внутри, вы слышите странный писк. Идя на звук, вы найдете странный серебристый чемоданчик. О нет! Это же ситуация под кодовым номером 9968 с пластиковой взрывчаткой, от которой все может взлететь на воздух. Сообщив в штаб о сложившейся ситуации и, потребовав саперов, вы будете неприятно удивлены отказом. Придется брать дело в свои руки. На все про все у вас пятнадцать минут. Возьмите Multi-Tool (по умолчанию – клавиша «8») и самостоятельно обезвредьте бомбу.
Следующая бомба находится в комнате за металлической дверью, в которую можно проникнуть, повернув налево от только что обезвреженной бомбы. Наденьте прибор ночного видения и, заходя в комнату, будьте осторожны, поскольку там могут находиться террористы. У вас есть преимущество над террористами, ведь они не всегда могут заметить вас в темноте. Нашпиговав террориста свинцом или связав его по рукам и ногам, можете отдать приказ об обезвреживании бомбы красной команде, наведя прицел на чемодан и нажав по умолчанию клавишу «Space». Не теряя времени, отдайте приказ синей команде посмотреть под дверью, которая находится прямо в конце комнаты. Сами тем временем защелкните наручники на руках подозреваемого.
Третья бомба находится в коридоре, в который можно попасть, выйдя через правую дверь из той комнаты, в которой вы сейчас находитесь. Открыв эту дверь вам нужно пройти к стене, перед которой лежат два велосипеда, а затем повернуть на право. Будьте осторожны! Эту бомбу может охранять террорист. Бросьте за угол газовую гранату, потому как открыв огонь, вы можете ранить заложника и, взяв в плен террориста, начните обезвреживать бомбу. Команде желтых отдайте приказ прикрывать ваш тыл.
Четвертая бомба находится на все том же втором этаже, но по другую сторону дыры, которая образовалась в результате неумелого обращения с взрывчатыми веществами. Эта дыра высотой в три этажа доставит вам некоторое неудобство, поскольку она разделяет здание напополам. На другую сторону второго этажа вы можете попасть, вернувшись назад в то помещение, где обезвредили вторую бомбу. Зайдя, поверните направо. Обезвредив бомбу, продвигайтесь вглубь коридора.
В конце коридора находится лестница, ведущая на третий этаж. Перед тем как подниматься по лестнице, бросьте через перила, которые находятся прямо над вашей головой, гранату стингер, потому как там могут находиться незваные гости. После взрыва гранаты молнией поднимайтесь по лестнице и мужественным голосом приказывайте всем сдаться. Заковав плохих парней в наручники и обезвредив пятую по счету бомбу, двигаетесь дальше.
В комнате, в которой вы сейчас находитесь, есть две двери, ведущие на коридор с входом на кухню. Там находится шестая по счету бомба. Обезвреживаете ее и, выйдя через левую дверь кухни, вы видите по правую сторону лестницу, ведущую на первый этаж, а прямо перед собой дверь с надписью «Маркетинг».
Комнату маркетинга штурмуйте сразу с трех входов, которые расположены последовательно слева от вас. Расположив красную команду у заднего входа, синею у среднего, а сами став у передней двери, отдавайте приказ красным и синим бросить газовую гранату и зачистить помещение. Повязав всех террористов и обезвредив последнюю бомбу, можно приступить к зачистке подвального помещения. Благо с этого момента вы можете не торопиться, поскольку таймер больше не будет отсчитывать секунды до взрыва бомбы.
В подвал можно попасть, спустившись по лестнице, которая находится рядом с комнатой маркетинга. Спускаясь по лестнице, проверьте с помощью оптического провода, что находится за углом слева от вас, ведь за углом, скорее всего, может находиться террорист. Газовую гранату бросать не следует, потому, как террорист экипирован противогазом. Лучше бросьте стингер, чтобы жизнь малиной не казалась.
С террористами больше не будет никаких проблем. Теперь пройдитесь по этажам и обезопасьте всех штатских, надев на них наручники и доложив об эвакуации в штаб. Эту процедуру делайте в последнюю очередь, потому что если вы будете это делать сразу, то у вас не хватит времени на обезвреживание чемоданчиков с бомбами.
Миссия 5
Название: Лаборатория по производству наркотиков.
Ситуация: Три часа назад мужчина, пожелавший остаться неизвестным, сообщил, что на улице Говалин работает новая лаборатория по производству наркотиков. Наблюдение обнаружило неплохую организацию, промышленное оборудование для приготовления и высушивания наркотиков. Аноним утверждает, что лаборатория контролируется Стечковым. Насчет подозреваемых наблюдение ответило следующее: ребята, в основном, вооружены дробовиками, пистолетами скорпион и на некоторых одеты противогазы.
Цели:
-
Устранить беззаконие.
-
Спасти всех штатских.
Проникновение:
-
Передняя дверь.
-
Задняя аллея.
Подозреваемые:
-
Неизвестны.
Гражданские:
-
Неизвестны.
Рекомендуемое снаряжение:
-
Первичное оружие – .45 SMG с боеприпасами FMJ;
-
Вторичное оружие – Cobra Stun Gun ;
-
Тактический комплект – По одному оптическому проводу на команду, гранаты (в основном световые и «жало», поскольку большинство преступников экипированы противогазами);
-
Устройство для взлома – С2;
-
Средство защиты – Кевларовый шлем.
Выполнение: Проникновение в здание осуществляется через переднюю дверь. Обязательно посмотрите, что находится за дверью. Войдя внутрь, вы окажитесь в узком коридоре, который сворачивает налево и тянется в самый конец первого этажа. Сразу справа от вас расположена большая дверь. Возле нее разместите команду красных, а с синими продвигайтесь дальше по коридору до входа в комнату, которая напоминает небольшой склад. Приближаясь, будьте осторожны, так как в любой момент из комнаты может выйти вооруженный человек с противогазом на лице. Если это случилось, присядьте, прижмитесь ближе к стене и попытайтесь уговорить террориста сдать оружие. Ежели он откажется подчиниться, заставьте его метким выстрелом в запястье правой руки выбросить оружие. После подобных издевательств террорист обычно сдается, моля вас больше о пощаде. В комнате так же находится заложник, обезопасив его, поверните направо и пройдите в кухню.
Поддержи Стопгейм!
LIMITED WARRANTY
THE LICENSOR expressly disclaims any warranty for the Program, Editor, and Manual(s).
The Program, Editor and Manual(s) are provided «as is» without warranty of any kind,
either express or implied, including, without limitation, the implied warranties of
merchantability, fitness for a particular purpose, or non-infringement.
The entire risk arising out of use or performance of the Program, Editor and Manual(s)
remains with you, However it is warranted that the media containing the Program shall be
free from defects in material and workmanship under normal use and services and the
Program will perform substantially in accordance with the accompanying written
materials, for a period of 2 (two) years from the date of your purchase of the Program.
In the event that the media proves to be defective during that time period please directly
contact your retailer.
In order to enforce the above-mentioned warranty retailer should be informed of the
defect at least 2 (two) months following its discovery.
Some states/jurisdiction do not allow limitation on duration of an implied warranty, so the
above limitation may not apply to you.
This Limited Warranty does not affect the application of any legal warranty provided by
the applicable laws and regulations.
Перед тем, как начать, хотел бы поблагодарить всех, кто читает мои статьи. Спасибо, Вы даёте искру, для разжигания пламени! Это первая из новых трёх статей, которые выйдут в ближайшее время. Ниже, Вы увидите советы, по прохождению игры. Я подготовил 4 совета.
Что такое сложность в SWAT 4?
Для начала стоит понять, что такое сложность?
Как такового нарастания “сложности” в игре нет. Играть сложнее не становится, если выбрать вместо легкого, средний уровень. Но при этом в игре существует другая система, которая эту сложность и задаёт – система очков.
Что такое очки? Очки – это этакая валюта, которую начисляют или не начисляют, а иногда ещё и снимают в зависимости от ваших действий и поступков во время задания. Т.е, допустим, Вы обезвредили преступника. Это хорошо, или плохо? Безусловно, хорошо. Но есть одно “НО”. Если Вы обезвредили его, когда он не предпринимал каких-либо враждебных действий против вас, очки вам не начислят, а даже наоборот, отнимут, за необоснованное применение летального оружия.
Или, допустим, возьмём другую ситуацию. Вы увидели преступника, и он навел прицел на заложника. У вас развязываются руки, любое применение оружия, допустимо в данной ситуации, и чего бы, не произошло с преступником, очки вам начислят.
Улавливаете суть, верно? Любые действия, влекут за собой начисление или сброс очков. В этом и заключается вся сложность игры. «А, для чего тогда уровни сложности» – спросите Вы. А я отвечу. С помощью уровней, задаётся планка, для перехода на другой уровень. Простым языком, уровень определяет, сколько очков необходимо, чтобы успешно пройти задание.
I. Подборка снаряжения и оборудования для выполнения задания.
Это самая важная часть подготовки, перед началом задания. Вам даётся выбор, среди нескольких видов летального и не летального оружия. Так же, Вы можете выбрать, какое оборудование взять на задание. И в зависимости от вашей роли в этом задании, нужно сделать выбор.
Разберём ситуацию. У вас задание: войти в здание, обезвредить всех преступников и спасти заложников. Банально. Но не спешите с выводами. Если Вы, играете на предельном уровне сложности, то любые потери, травмы, или какие-то неверные действия могут не дать вам, успешно пройти задание. Именно для этого и нужно понимать, какая роль у вас в этом задании. Вы рвётесь вперёд, а команда играет роль помощников, или же Вы и команда, одно целое? Исходя из этого, необходимо понимать, какое оружие и оборудование, выдать каждому члену отряда.
В случае, если Вы, будете отыгрывать роль авангарда, то необходимо максимально количество гранат разного типа. Так же, вам понадобиться зонд, для осмотра помещения за дверью, без риска для себя и команды. И на тяжелом уровне, Вам придётся обладать невероятным чутьём и выдержкой, чтобы не сделать ошибку. Не каждый игрок, может похвастаться такими качествами. Поэтому, рекомендуется брать основным оружием, не летальный дробовик с резиновой дробью, или же пейнтбольное ружье (сразу хочу оговориться, пейнтбольное ружье, рекомендуется против противников, не имеющих средств защиты (бронежилетов, касок, противогазов)). Вторым оружием, можно выбрать летальное оружие, либо же тазер, тут все на ваше усмотрение.
Но надо помнить, что помимо преступников, вам необходимо задержать и всех гражданских. У каждого из них свой характер, и не каждый гражданский даст себя скрутить, после призыва поднять руки и встать на колени. Поэтому, вам может пригодиться тазер или же баллончик газом. Так что, выбор за вами.
II. Грамотное управление командой.
В игре присутствует расширенная система управления командой. Что нам понадобится, это разделение на команды, с помощью TAB. Это способствует более гибкому выполнению задания. Так же это позволяет выдавать команде, свои уникальные указания, основываясь на их снаряжении и оружии. Именно поэтому, настоятельно советую пройти обучение. В нем очень хорошо раскрывается вся механика игры.
От себя добавлю, что стоит разделить группы. Одним дать одно снаряжение и оружие, другим другое. Допустим, одна группа для штурма вместе с вами, другая для задержания непокорных гражданских. Но это разумеется уже, ваш выбор.
III. Максимальная подготовка к заданию. Изучение задания.
Перед тем, как начать задание, игра даст вам информацию. И я настоятельно рекомендую вдаваться во все подробности. Потому, что сначала так не скажешь, но в описании, расписано всё, что нужно, чтобы не попасть впросак.
Игра в принципе даёт вам всю нужную информацию, нужно её только увидеть и переварить. Так же стоит изучать карту (если конечно она имеется). Потому, что в игре нет мини карты, и надо полагаться на свою память. Конечно, вам дадут подглядывать иногда на карту, но там нет иконок или маркеров, как в привычных играх. Так что, вам придётся полагаться на самих себя.
IV. Как стоит проходить игру на предельном уровне?
Это не совет, а скорее просто моё наблюдение. Если Вы, так же, как и Я любите играть на максимальном уровне, то следует принять несколько фактов:
1. Вам придётся ходить одному, оставляя команду позади.
Потому, что слишком рискованно. Если хотя бы один член команды будет ранен, то очки снимутся. Так же, команда, часто мешается перед лицом, и иногда, можно подстрелить своих. В этом большой минус игры.
2. Почти всегда, вам придётся ходить с не летальным оружием.
Придётся рисковать и верить в то, что резиновая пуля подействует и противник сдастся. Почему так? Потому, что велик шанс, провалить задание, из-за одного-двух убитых противников. Это добавляет сложности.
Спасибо, что прочитали мою статью! Надеюсь, вам понравилось! Добавлю, всё что Вы делаете, Вы делаете на своё усмотрение. Я никого не заставляю следовать именно моим советам. Если вам понравилось, оценивайте, пишите комментарии. Буду рад пообщаться с вами. Удачи на полях виртуальных сражений!