-
Contents
-
Table of Contents
-
Troubleshooting
-
Bookmarks
Quick Links
D01054920B
DP-004
Portable
4-Track Digital
Pocketstudio
This device has a serial
number located on the
bottom panel. Please
record it and retain it for
your records.
Serial number:
__________________
OWNER’S MANUAL
Related Manuals for Tascam DP-004
Summary of Contents for Tascam DP-004
-
Page 1
D01054920B DP-004 Portable 4-Track Digital Pocketstudio This device has a serial number located on the bottom panel. Please record it and retain it for your records. Serial number: __________________ OWNER’S MANUAL… -
Page 2: Important Safety Precautions
Do not expose this apparatus to drips or splashes. ASCAM DP-004 Do not place any objects filled with liquids, such as vases, on the apparatus. •…
-
Page 3: Important Safety Instructions
CAUTION Changes or modifications to this equipment not expressly approved by TEAC CORPORATION for compliance could void the user’s authority to operate this equipment. Model Number Trade Name : TASCAM Responsible party Address : 7733 Telegraph Road, Montebello, Telephone number This device complies with Part 15 of the FCC Rules.
-
Page 4: Tascam Dp-
For more information about collection and recycling of old products and batteries, please contact your local municipality, your waste disposal service or the point of sale where you purchased the items. TASCAM DP-004 Information on Disposal in other Countries outside the European Union These symbols are only valid in the European Union.
-
Page 5: Table Of Contents
Setting the contrast Table of Contents … 28 … 28 … 31 … 31 … 32 … 32 … 33 … 34 … 34 … 36 … 38 … 39 … 43 … 44 … 45 … 46 TASCAM DP-004…
-
Page 6
Recording the master track … 64 Undoing operations (undo) … 66 Undoing the last operation (single undo) … 66 TASCAM DP-004 Undoing a previous operation (multi-undo) … 66 Erasing the operation history … 68 7–Recorder Functions Punching in and out Bouncing tracks Using the bounce function … -
Page 7
Audio performance … 103 General … 103 Optional accessories … 104 Computer requirements … 104 Dimensions … 104 Block diagram Messages 14–Commonly-used Functions … 87 … 91 … 103 Table of Contents … 105 … 106 … 109 TASCAM DP-004… -
Page 8: Introduction
Manual conventions This manual often refers to the DP-004 as “the unit” and the SD card as the “card.” When we refer to DP-004 features such as keys and connections, we display them like this:…
-
Page 9: Product Parts
(e.g. key, key). F2 ( EXEC We give hints and tips on using the DP-004 when you see this icon. A note provides additional explanations for NOTE special situations. A caution shows that you may lose data CAUTION (recordings) if you do not follow the instructions.
-
Page 10: About Sd Cards
This unit uses SD cards for recording and playback. SD and SDHC cards that are at least 512 MB in size can be used. A list of SD cards that have been tested with this unit can be found on the TASCAM web site (www.tascam.com). Precautions for use SD cards are delicate media.
-
Page 11: 2-Quick Start Guides
A screen prompting you to format it appears if you insert such an SD card. 2 Insert four AA batteries into the compartment, paying attention to the plus/minus (+/–) orienta- tion. This unit can use alkaline or NiMH batteries. TASCAM DP-004…
-
Page 12
3 Close the battery compartment cover after install- ing the SD card and batteries. 4 Connect headphones to the Headphones TASCAM DP-004 CAUTION The volume adjustment dial is small and does not have any indications. Before turning the power ON, always turn it in the direction of the arrow until it stops to minimize the volume. -
Page 13: Playing And Mixing The Demo Song
, and press the SONG wheel to select , and press the DATA LOAD screen that shows a SONG LOAD wheel to select DATA DEMOSONG key. EXEC screen reopens. SONG key to reopen the Home Screen. HOME TASCAM DP-004 , and press…
-
Page 14
Use the knobs to adjust the balance between LEVEL tracks 1–4. Use the dial to adjust the final monitoring VOLUME level. TASCAM DP-004 key and use ¥ MASTER LEVEL 7 Use the tracks 1–4. knobs to adjust the stereo position of… -
Page 15: Shutting Down The Unit
MIC/LINE–GUITAR switch to MIC/LINE. 3 Press the INPUT SETTING screen. SETTING connector INPUT A switch on the left side key to open the INPUT TASCAM DP-004…
-
Page 16
INPUT B At first, the input source for IN A is already selected. 4 Use the wheel to change the DATA GUITAR/LINE TASCAM DP-004 5 Press the INPUT B IN B 6. Use the DATA channels. INT . MIC B-Low… -
Page 17: Loading A Song File
3 Use the DATA to open the SONG LOAD appears. key to open the screen. MENU MENU wheel to select and press SONG menu screen. wheel to select and press LOAD screen. A list of the songs TASCAM DP-004 ¥ ¥…
-
Page 18: Setting The Guitar As Track 1 Recording Source
1 in this example. See “Adding another recording (1)” on page 21 and “Adding another recording (2)” on page 22 for how to change track recording sources. TASCAM DP-004 and press Adjusting the input level and monitoring SONG001…
-
Page 19: Recording Guitar To Track 1
REC indicator of the track that it is assigned to is not lit. Recording guitar to track 1 1 Press the that the track is in record standby. key. The key blinks showing TRACK 1 REC TASCAM DP-004…
-
Page 20: Listening To Your Recording
You are recording. Play your guitar! 3 When you are finished, press the stop ( stop recording. TASCAM DP-004 4 Press the TRACK 1 REC Listening to your recording 1 To go to the beginning of the song, press the…
-
Page 21: Adding Another Recording (1)-Record Guitar To Track 2
) that are the INPUT A INPUT B is assigned as the recording INPUT A is assigned INPUT B (¶) key to select to change its TRACK 2 IN B wheel to set the input to DATA IN A TASCAM DP-004…
-
Page 22: Adding Another Recording (2)-Record Vocals On Track 3
Á record ( ) key to start recording. The – key stops blinking and stays lit constantly. TASCAM DP-004 You are recording again. Play your guitar! 9 When you are finished, press the stop ( stop recording. 10 Press the TRACK 2 REC Adding another recording (2)—record vocals…
-
Page 23
, change it to INT . MIC B-Mid . If the indicator continues to light even , move the sound source INT . MIC B-Low is shown by the MIC B TASCAM DP-004 INT . MIC . If INT . -
Page 24: Mixing The Tracks
ª Press the playback ( ) key to play the recorded Á guitar tracks while you practice the vocal part. TASCAM DP-004 dial as Both guitar parts and your singing can be heard VOLUME through the headphones. 8 Use the track…
-
Page 25: Mastering The Mix
“ ” appears and this position is set SET OUT ! as the point, which will be the end point of the master. screen. I /O SETTING key at F4 ( TASCAM DP-004…
-
Page 26
F4 ( EXEC recording mode and return to the Home Screen. TASCAM DP-004 key) to return to the 7 Press the playback (Á) key while pressing RECORDER MODE and holding the record (–) key to start master recording. -
Page 27: Shutting Down The Unit
Do not remove the card or batteries when the unit is turned on. Failure to power off properly first will cause any recordings and settings made since POCKETSTUD IO the last power off and song save to be lost. This data cannot be recovered. TASCAM DP-004…
-
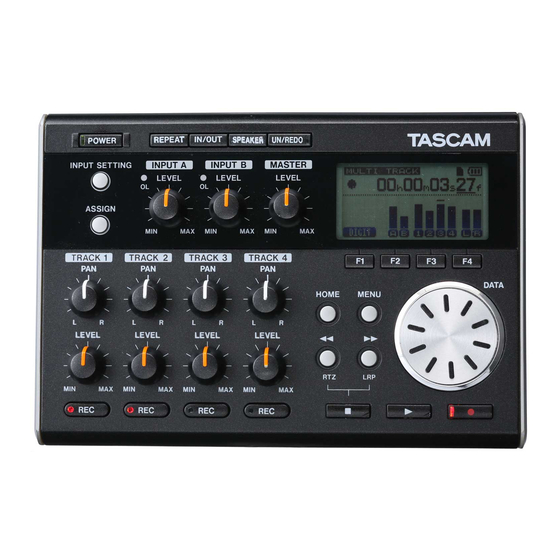
Page 28: 3-Names And Functions Of Parts
Press and hold this key to turn the unit ON and OFF. (See “Start-up & shutdown” on page 36.) The indicator lights when the power is on. TASCAM DP-004 REPEAT key Turns the repeat playback mode on and off. (See “Repeat playback”…
-
Page 29
If you press the key while holding down the (overload) PLAY (¥) key, recording will begin on every track in recording standby mode (the LEVEL screen where INPUT ASSIGN key to put a track in recording standby RECORD (–) indicator lights). TASCAM DP-004… -
Page 30
STOP ( · ) key Press this key alone to stop recording, playback, fast forward and fast rewind. If you press the Ô TASCAM DP-004 or key at the same time, the transport will also locate to the head of the song ( recording start position (LRP). -
Page 31: Front Panel
Set the MIC/LINE-GUITAR to match the input. channel INPUT B (external mic) is chosen on the screen. Unbalanced line and mic channel INPUT A (external mic) is chosen on screen. Unbalanced guitar, line switch on the left side panel TASCAM DP-004…
-
Page 32: Right Side Panel
92.) DC IN 5V connector Connect a dedicated power adaptor (PS-P520, sold separately). TASCAM DP-004 Left side panel MIC/LINE-GUITAR switch Set this switch to match the input signal to the jack on the rear panel. For mic or line signals, set it .
-
Page 33: Bottom
3–Names and Functions of Parts Battery compartment The batteries (four AA) that power the unit are inserted here. The SD card slot is in the back of the compartment. SD card slot Insert the SD card into the slot. TASCAM DP-004…
-
Page 34: 4-Preparations
• A list of SD cards that have been tested with this • unit can be found on the TASCAM web site (www.tascam.com). Insert the SD card into the SD card slot inside the battery compartment on the bottom of the unit.
-
Page 35: Preparing The Power
SD card” section. Insert 4 AA batteries in the box according to the + and — indications. Protected CAUTION The included alkaline batteries are for confirming the operation of the unit and might not last very long. 4–Preparations TASCAM DP-004…
-
Page 36: Connecting An Ac Adapter (Sold Separately)
PS-P520 (sold separately) DC plug NOTE The adapter powers the unit if the adapter is connected even if batteries are installed. TASCAM DP-004 Start-up & shutdown Starting up the unit Press and hold the “ ” appears (or the TASCAM green).
-
Page 37: Shutting Down
When the power is turned off, the operation history of the currently loaded song will be erased (cleared). You will not be able to undo or redo operations on the song when you turn the power back on. TASCAM DP-004…
-
Page 38: Formatting Sd Cards
The first time you put a new SD card in this unit, a screen prompting you to format it appears. TASCAM DP-004 NOTE The screen prompting you to format it also appears if you put in an SD card that has been formatted by any device other than this unit.
-
Page 39: Display Screens
When a battery is being used, a battery icon shows the amount of power remaining in bars ( The battery is almost dead and the power will soon turn off if the icon has no bars AC adapter (sold separately) . When using the appears. TASCAM DP-004…
-
Page 40: Screen Organization
Level meter for stereo outputs (L, R) Shows the output signal level from the connector. TASCAM DP-004 Screen Organization The display provides information and allow various settings to be made and functions to be used.
-
Page 41: Using The Screens
§ and ¶ at the bottom of the screen 4–Preparations ¥ MENU opens the sub-menu screen.) TRACK ED IT DATA at the bottom of the BA CK screen above, press the TUNER TASCAM DP-004…
-
Page 42
NEXT screen. To leave a screen accessed by a dedicated key press • the function key that corresponds to TASCAM DP-004 wheel to set To execute the function, press the function key that • corresponds to To return to the Home Screen from a menu screen •… -
Page 43: Editing Names
SAVE CREATE (¥) key (See “5-Song item from the menu WAVE (¥) key (see “Exporting a stereo item from the SONG BACKUP DATA BACKUP (¥) key to open the key (see “Backing-up songs” on page TASCAM DP-004 NAME SONG…
-
Page 44: Recorder Modes
F4 ( cursor position. When finished editing, press the • the new name. TASCAM DP-004 Recorder modes This unit has four recorder modes. The ordinary mode is Multitrack mode. In this mode, this unit functions as a multitrack recorder. The other modes are Bounce, Master Rec and Master Play.
-
Page 45: Connecting With Other Equipment
INPUT A or INPUT B Right side panel connections TASCAM PS-P520 (sold separately) Connect guitars and basses to INPUT A NOTE Recorder functions cannot be used when connected to a computer by USB 4–Preparations AC outlet DC plug Computer TASCAM DP-004…
-
Page 46: Left Side Panel Connections
Left side panel connections Headphones Speakers with built-in amplification or audio system TASCAM DP-004 Setting the contrast The LCD display contrast can be adjusted. Use the following procedures to adjust the contrast. 1 When the Home Screen is open, press the to open the screen.
-
Page 47: 5-Song Management
DATA CARD key to open the menu screen. ¥) CARD 3 Use the wheel to select DATA PARTITION key to open the ¥) PARTITION display shows the MTR partition list. screen. MENU and press the and press screen TASCAM DP-004…
-
Page 48: Loading A Saved Song
EXEC 5 Press to select. The unit saves the current F3 ( TASCAM DP-004 song before changing partitions. It then loads the last used song on that partition. Loading a saved song Follow these procedures to load a song from the active partition.
-
Page 49: Creating A New Song
3 Turn the (¥) key. to save the currently loaded song and EXEC key to open the MENU wheel to select , and press the DATA SONG menu screen. SONG wheel to select , and press the DATA SAVE TASCAM DP-004…
-
Page 50: Viewing Song Information
SONG Viewing song information You can check the name, partition and remaining recording time of the currently loaded song. TASCAM DP-004 1. When the Home Screen is open, press the to open the screen. MENU 2. Turn the…
-
Page 51: Copying Songs
7 Turn the partition and press the wheel to select a song that you want DATA (✔) key. key to open a screen where you F2 ( NEXT wheel to select the copy destination DATA key. F4 ( EXEC TASCAM DP-004…
-
Page 52: Erasing Songs
(¥) key to open the menu screen. SONG 3 Turn the wheel to select DATA ERASE (¥) key. TASCAM DP-004 menu screen This opens the list of songs in the active partition. F1 ( BACK 4 Turn the to erase and press the A check appears in the checkbox.
-
Page 53: Protecting Songs
“ ,” and DATA PROTECT key. F2 ( EXEC menu SONG Song ” appears and the operation is prevented. to “ ” in step 4. PROTECT TASCAM DP-004…
-
Page 54: 6-Basic Recording
INPUT SETTING Use the items to set the input sources IN A IN B for the channels. INPUT A INPUT B TASCAM DP-004 2 Use the setting, and turn the IN B input source. INPUT A INPUT selection choices IN A…
-
Page 55: Monitoring The Input Signal
6–Basic Recording indicator is not lit. INPUT A connector. LINE OUT channels. INPUT B INPUT SETTING screen. (§) and (¶) keys to select the wheel to select the DATA TASCAM DP-004 INPUT B key to open MODE…
-
Page 56: About The Ol Indicators And Meters
As shown below, if a “–” appears at the top of a TASCAM DP-004 meter, the level is too high (when a “–” appears, it will stay on screen for a while before automatically…
-
Page 57: Assigning Input Channels
This unit can simultaneously record a maximum of two tracks. You can also record one input channel to two tracks simultaneously (in this case, you cannot use the other input channel). You cannot assign two input channels to the same track. knob. MASTER LEVEL TASCAM DP-004…
-
Page 58: Making The First Recording
(¶) keys to select a track to change its current input channel. 3 Turn the wheel to set the input to DATA TASCAM DP-004 screen. 4 When finished making settings, press the key to return to the Home Screen. Making the first recording…
-
Page 59
To go to the beginning of the song (00:00:00:00), press the stop (ª) key. (This is the Return To Zero (RTZ) function) 6 Press the playback (Á) key to play the recorded 6–Basic Recording Ô key while pressing and holding the TASCAM DP-004… -
Page 60: Overdubbing
Use the LEVEL dial or the volume on your monitoring VOLUME system to adjust the final monitoring volume. TASCAM DP-004 MASTER NOTE • Track PAN and LEVEL knobs control the playback output signal on already recorded tracks. They do not control the input signals.
-
Page 61: Setting Up To Overdub
(Á) key to start playback. Just as though you were recording, you can monitor the sound of already recorded tracks playing back and the input source on the track for recording, allowing you to check the monitor balance and volume. TASCAM DP-004…
-
Page 62: Recording An Overdub
If the volume is too loud, the sound will be distorted. TASCAM DP-004 NOTE The track meters on the Home Screen show the recorded signal levels on the tracks. Therefore, these meters do not change even when the LEVEL knobs are adjusted.
-
Page 63: Setting The End Point
For how to adjust the OUT point and for other functions, see “Setting IN and OUT points” on page 73. 6–Basic Recording key at F4 ( ” appears and this position is set as key to return to the Home Screen. HOME TASCAM DP-004…
-
Page 64: Recording The Master Track
In this mode, the track mix signal (which will be recorded) is heard through headphones or a moni- toring system during playback and recording. TASCAM DP-004 NOTE When this unit is in master recording mode, some play- back functions and other functions do not work. If you try to use these functions, the “In Master Mode”…
-
Page 65
“Exporting a stereo master” on page 100). • A stereo master can be copied to any track pair among tracks 1–4 by creating a “clone” track (see “CLONE TRACK (track duplication)” on page 87). 6–Basic Recording ) key to start playback. Á TASCAM DP-004… -
Page 66: Undoing Operations (Undo)
(when undo has been used). Cancelling an undo operation (redo) Press the key when it is lit to return to the UN/REDO TASCAM DP-004 state of the last operation. The UN/REDO turns OFF. NOTE If single undo is used when multi-undo (described below) has already been used to return the unit to a previous state, it will go one more step backward.
-
Page 67
Erased events cannot be restored. • When the power is turned OFF the operation screen, HISTORY history is completely erased. The operation history is not restored when the power is turned ON again. 6–Basic Recording TASCAM DP-004… -
Page 68: Erasing The Operation History
4 Press the key to clear the operation history F3 ( and erase unused data. The Home Screen reopens when this operation completes. TASCAM DP-004 To cancel erasing the operation history, press the • key instead of the • If you open the HISTORY screen immediately after erasing the operation history, the event (operation) that appears is “0”…
-
Page 69: 7-Recorder Functions
1–4 as a stereo mix to tracks 1 and 2 (stereo bounce), or bounce tracks 1–4 as a mono mix to track 1 (mono bounce). NOTE Inside this unit, a mixdown is made to create a mix master that is recorded to the designated tracks. TASCAM DP-004…
-
Page 70: Using The Bounce Function
(single undo)” on page 66). Using the bounce function 1 Press to open the REC MODE RECORDER MODE TASCAM DP-004 2 Turn the 3 Press the mode and return to the Home Screen. Can be overwritten 4 Press the tracks (the indicators light).
-
Page 71: Confirming The Result
1 Use the key to return HOME between the time divisions. You can edit the value at the cursor positions. The seconds are selected in the following figure. key to move the cursor (underline) F1 ( D IGIT TASCAM DP-004…
-
Page 72: Rtz And Lrp
4 After setting the desired time value, press the playback (Á) key to start playback from that position. TASCAM DP-004 RTZ and LRP Use simple key operations to return to the top of a song or to the position where recording last started.
-
Page 73: Fast Forward/Rewind Search
You can also use the F3 and F4 keys to capture IN and OUT points when the Home Screen is open. screen. I /O SETTING key at desired ” or “ ” SET OUT ! TASCAM DP-004…
-
Page 74: Editing In/Out Points
(see the first I /O SETTING screen figure in the previous section), press the key to open the edit screen. ED IT TASCAM DP-004 2 Edit the values of IN and OUT points using the following guidelines. Use the (§) and (¶) keys to move the cursor…
-
Page 75: Using Repeat Playback
Turn the Repeat Int to set the value from 0.5 to 9.9 sec. in 0.1-sec. units. 4 When finished making settings, press the key to return to the Home Screen. screen. MENU , and press screen. wheel DATA HOME TASCAM DP-004…
-
Page 76: 8-Miscellaneous Functions
Select (metronome OFF), REC&PLAY both during recording and playback) or (functions only during recording). TASCAM DP-004 TEMPO Set speed from 20 to 250 beats per minute (BPM). BEAT Set the frequency of the accent from 1 to 12 for different time signatures.
-
Page 77: Tuner
For example, in the following screen, the desired tuning is D but the string pitch is too low. screen. MENU wheel to select and press the TUNER screen. TUNER item (standard Calibration wheel to set the standard frequency TASCAM DP-004…
-
Page 78: Turning The Power Off Automatically
You can set the time until the power automatically turns OFF after the last use when using the batteries. 1 When the Home Screen is open, press the to open the screen. MENU TASCAM DP-004 2 Select PREFERENCE PREFERENCE 3 Use the Off setting value, and turn the…
-
Page 79: Viewing Information
1 When the Home Screen is open, press the to open the MENU 2 Turn the DATA (¥) key. to initialize the unit. The PREFERENCE key to cancel initialization. key to return to the HOME MENU screen. wheel to select and press INFORMATION TASCAM DP-004…
-
Page 80
F4 ( PREV NEXT page. The pages contain the following information. page: name and partition of currently loaded SONG song, remaining recording time on partition TASCAM DP-004 page: MTR partitions and capacities, FAT CARD partition capacity page: SYSTEM Repeat Interval… -
Page 81: 9-Sd Card Management
SD cards have write-protect (lock) switches. Unprotected Files cannot be recorded or edited on a card if you slide its switch down. Slide the switch down if you want to prevent the contents of the card from being changed or erased. Protected TASCAM DP-004…
-
Page 82: Formatting Cards And Setting Partition Sizes
DATA FORMAT (¥) key. screen opens. FORMAT TASCAM DP-004 The following table shows the FAT and MTR screen. partition sizes for different SD card capacities. The MENU FAT partition size is set automatically according , and press the to card capacity.
-
Page 83: Reformatting Mtr Partitions
(¥) key to open the 3 Turn the DATA menu screen CARD key instead of F4 ( key. key to open the MENU wheel to select , and press the CARD menu screen. CARD wheel to select REFORMAT TASCAM DP-004 MENU…
-
Page 84: Reformatting The Fat Partition
DATA want to reformat and press the A pop-up message warning that all data on the partition will be erased appears. TASCAM DP-004 screen. 5 Press the REFORMAT When reformatting finishes the •…
-
Page 85: Initializing Sd Cards
To cancel initialization, press the • of the F3 ( CAUTION If you want to use the card with a DP-004 again you will need to format it (see “Formatting SD cards” on page 38). key to open the MENU…
-
Page 86: 10-Editing Tracks
Edit points Among track editing functions, SILENT, CUT and OPEN use the IN and OUT points for editing. These TASCAM DP-004 are the same IN and OUT points used for repeat playback. See “Setting IN and OUT points” (on page 73) for instructions about how to do this.
-
Page 87: Clone Track (Track Duplication)
1 /2 SOURCE TRK choices are (single track). If ) or 1 /2 , the choices are DESTINATION TRK F2 ( EXEC key to return to F1 ( BACK menu screen without editing. TASCAM DP-004 SOURCE , the MASTER 1 /2…
-
Page 88: Clean Out (Track Erase)
This completely erases the selected track. This erases the entire track, so the IN and OUT points have no effect. There is only one parameter. TASCAM DP-004 CLEAN OUT TRK Select the track or tracks to erase. The choices are (single track),…
-
Page 89: Cut (Remove Part)
IN point. As a result, the length of the track becomes shorter. F2 ( EXEC key to return BACK There is only one parameter. The IN and OUT points appear on the screen, but they cannot be changed here. 10–Editing Tracks TASCAM DP-004…
-
Page 90: Open (Insert Silence)
This operation splits a track at the IN point and the beginning of the part after the IN point is shifted to the OUT point. As a result, the length of the track becomes longer. TASCAM DP-004 (single track), 1 /2 (tracks 1 to There is only one parameter.
-
Page 91: 11-Exchanging Data With A Computer
One or more tracks can be converted to WAV files and exported to a computer, and WAV files (one at a time) on a computer can be imported to this unit. These WAV files are stored on the WAVE directory of this unit’s FAT partition. TASCAM DP-004…
-
Page 92: Supported Operating Systems
CAUTION When disconnecting this unit from the computer, follow the correct procedures for your computer OS. If TASCAM DP-004 these procedures are not followed correctly, data on the FAT partition could be damaged (see “Connecting with a computer” below).
-
Page 93: Disconnecting
If you turn the unit’s power ON after making the USB connection, the screen above appears right away. The unit appears as an external drive named “DP-004” on the computer’s display. CAUTION • Do not make a USB connection when the remain- ing battery level is low.
-
Page 94: Song Backup And Restoration
Trash, or type Command-E to eject the DP-004. Depending on the OS version or OS settings you might also be able to eject the “DP-004” icon by clicking an eject button next to it in the Finder window or by using a control key.
-
Page 95
Ô / DATA keys, to name the song (maximum of 8 char- F2 ( EXEC ” and an icon appear on the display. DATA BACKUP TASCAM DP-004 key. -
Page 96: Restoring Songs
CD-R, for example. • You can also restore a backed-up song file to a differ- ent DP-004 unit. Since files can be shared freely between DP-004 units, you can easily conduct over- dubbing or mixdown at different locations. TASCAM DP-004 Restoring songs Basically, restoring is the reverse of backing up.
-
Page 97: Track Import And Export
2 Use the computer to copy WAV files on its drive to the WAVE directory in this unit’s FAT partition. 3 Disconnect the unit from the computer using the proper procedures and then remove the USB cable (see “Disconnecting” on page 93). TASCAM DP-004…
-
Page 98
FAT partition, but those spaces are not included in the actual file name. 6 Turn the wheel to select the WAV file that you DATA TASCAM DP-004 want to import, and press the DATA The amount of open space on the currently active (¥) key to partition and the size of the selected WAV file appear on the display. -
Page 99: Exporting Tracks
In step 3 above, if you press the F2 (NEXT) key after selecting a track but before putting a checkmark next to any track, the selected track is exported alone. key. The F2 ( NEXT TASCAM DP-004…
-
Page 100: Exporting A Stereo Master
“.WAV” extension. Furthermore, do not use special TASCAM DP-004 symbols, for example. You can import the tracks that you exported to the • computer to this unit or another DP-004. – ”) Are you sure? Exporting a stereo master You can export a stereo master that you have made on the unit (see “Mastering”…
-
Page 101
7 After copying finishes, disconnect the unit from the computer using the proper procedures and then remove the USB cable (see “Disconnecting” on page 93). wheel and the key. A F2 ( EXEC TASCAM DP-004… -
Page 102: 12-Troubleshooting
Is the control set to high enough? • VOLUME TASCAM DP-004 Why does the sound I’m recording sound distorted? Are the • LEVEL the top panel of the unit set too high? Is the input source too loud? Isn’t the monitor system distorted as the monitor…
-
Page 103: 13-Specifications & Messages
General Recording media SD card (512 MB — 2 GB) or SDHC card (4 GB — 32 GB) File system MTR partition: TASCAM original FAT partition: FAT32 Battery life About 8 hours (Record mode) About 8.5 hours (Music playback mode) (when measured with alkaline batteries.
-
Page 104: Optional Accessories
USB (USB 2.0 recommended) Macintosh Power PC, iMac, G3, G4 266 MHz or faster 64 MB or more memory USB port (USB 2.0 recommended) TASCAM DP-004 Recommended USB host controller Intel chipset Supported OS Windows Windows 2000 SP4 or later, Windows XP and Windows Vista Macintosh Mac OS X 10.2 or later…
-
Page 105: Block Diagram
�� ����� ��� ����� ����� � �� �� ����� ��� ����� ����� �� �� �� ����������� ��������� ����� ������ ��� �� ����� ������ ������ ������ ����� �������� ������ �������� ������������������� ������ ��������������������� ��� ��� ��� ��� ������������������ ������������������ TASCAM DP-004…
-
Page 106: Block Diagram Messages
You tried to export a master track which was too large for the remaining space on fthe FAT partition Master T rack T oo Large («Exporting a stereo master» on page 100) . Connect the unit to a computer and free up some space on the FAT partition. TASCAM DP-004 Meaning and remedy…
-
Page 107
Save the song and turn the unit off and then on, and perform track edit again. T rk Edi t F ai l Replace the batteries with new ones or use a PS-P520 AC adapter (sold separately). Battery Empty 13–Specifications & Messages Meaning and remedy ® ® CARD FORMAT TASCAM DP-004… -
Page 108
If these error message continue to appear, please contact a TEAC Repair Center. SD Read Busy SD Wri te Busy /F Error F i leErr Audio Rst F ai l SaveParam F ai l Mount Error SD-Card Error ! TASCAM DP-004 Meaning and remedy… -
Page 109: 14-Commonly-Used Functions
This section is a brief guide to some operations on the DP-004 which may not be immediately obvious from looking at the panel controls. Key sequences are written like this: “press and hold the key and press STOP How to…
-
Page 110
Insert silence at a point in a track Cut and close up part a track Remove a section of a track and replace it with silence Make an exact copy of (clone) a track TASCAM DP-004 Keys, etc. TO press REC MODE ® MASTER ®… -
Page 111
See «Assigning input channels» on page 57. See «Setting interval between repetitions» on page 75. ® PREFERENCE See «Turning the power off automatically» on page 78. ® PREFERENCE See «Setting the contrast» on page 46. ® PREFERENCE Description TASCAM DP-004… -
Page 112
Río Churubusco 364, Colonia Del Carmen, Delegación Coyoacán, CP 04100, México DF, México TEAC UK LIMITED Phone: +44-8451-302511 Suites 19 & 20, Building 6, Croxley Green Business Park, Hatters Lane, Watford, Hertfordshire. WD18 8TE, U.K. TEAC EUROPE GmbH Phone: +49-611-71580 Bahnstrasse 12, 65205 Wiesbaden-Erbenheim, Germany DP-004 www.tascam.jp www.tascam.com www.tascam.com www.teacmexico.net www.tascam.co.uk www.tascam.de…
КАТАЛОГ

Артикул: 186608
Tascam DP-004 четырех канальная цифровая портастудия
- Описание товара
- Характеристики
- Видео
- Отзывы
- Аксессуары
распечатать
Производитель: Tascam
Характеристики и комплектация могут быть изменены фирмой-производителем без предварительного уведомления.
Фото и описания товара на сайте могут не точно соответствовать товару.
Описание
Как и популярные кассетные портастудии Tascam, DP-004 призвана сделать процесс записи материала простым и удобным. Музыканты могут записать акустические инструменты, используя встроенный стерео микрофон, а затем наложить вокал или партию соло на сделанную запись. Будь то запись демо-версии песни, урок музыки или работа с уже записанным материалом, DP-004 способна вдохновлять на создание музыки, не усложняя процесс и не нарушая привычную ход работы. Портастудия DP-004 обеспечивает возможность цифровой записи 4 треков в CD-качестве. С ее помощью пользователь может записывать сигнал двух источников одновременно, и максимальное количество треков в сведении может доходить до четырех. Операция Bounce позволяет свести имеющиеся треки в один, что поможет освободить «дорожки» для записи новых треков. Кроме того, четыре имеющихся трека можно независимо настроить по уровню, и свести в стерео трек, отстроив мастер уровень записи. DP-004 – это превосходный вариант как для новичков, так и для опытных авторов песен, композиторов, музыкальных групп, преподавателей музыки и иностранных языков, и удобный инструмент для создания программных записей систем оповещения в школе и прочих организациях.
Особенности:
- Сверхкомпактный многоканальный рекордер
- Простой, интуитивно понятный пользовательский интерфейс
- Высококачественная запись (44.1кГц/16-бит), создавайте хиты в стандарте CD качества
- Отсутствие механических частей в корпусе гарантирует надежность, долговечность в использовании и отсутствие лишних шумов
- Одновременная запись 2-треков, записываете стерео трек или два независимых источника
- Одновременное воспроизведение 4 треков
- Встроенный конденсаторный стерео микрофон
- Два микрофонно-линейных входа: подключайте микрофоны, синтезаторы, гитары, drum машины и прочее оборудование напрямую в портастудию
- Регуляторы уровня и панорамы: настраивайте уровень и положение источника в панораме независимо для каждого из каналов
- Функция Bounce: сводите имеющиеся треки в один, освобождая «дорожки» для новых записей
- Мастер регулятор уровня: сводите записанный материал в стерео файл, который можно будет переместить на компьютер, записать на CD или перевести в формат MP3
- Возможности навигации по трекам: перемещайтесь в начало и конец записи простым нажатием на клавишу
- Повтор воспроизведения: устанавливайте точки входа и выхода из «петли» для многократного воспроизведения фрагмента. Это полезная функция, в особенности для репетиций.
- Функции редактирования: копирование и удаление треков, вырезание фрагментов записи и вставка тишины
- Функции отмена и повтора последнего действия Undo/Redo: до 500 шагов (в зависимости от вместительности карты памяти)
- Хроматический тюнер и метроном: точно настройте Ваш инструмент и играйте в нужном темпе
- Порт USB 2.0 для подключения к компьютеру
- Экспортируйте и импортируйте Ваши записи в формате WAV для резервного копирования или восстановления и дальнейшей работы
- Возможность работы от AA батарей или опционального блока питания
Технические характеристики:
- Два 1/4″ небалансных mic/line входа
- Переключаемый гитарный вход
- Наушники/Линейный выход
- USB 2.0 соединение
- Одновременная запись 4 каналов
- Запись с качеством 44.1 кГц/16-Бт WAV
- Запись на носител SD Card media (1 ГБ карта в комплекте)
- Режимы записи Autopunch, повтор или отмена записи
- Качественный микс на выходе
- Разъемы:
2 микрофонных/линейных входа (джеки 6,3 мм)
переключаемый гитарный вход
выход линейный/на наушники
порт USB 2.0 - Питание: от сети через адаптер (в комплект поставки не входит) или от батарей стандарта АА
- Габариты (ШхВхГ): 155 x 33,5 x107 мм
- Вес: 360 г
Добавить отзыв
Краткое содержание страницы № 1
D01054920B
DP-004
Portable
4-Track Digital
Pocketstudio
This device has a serial
number located on the
bottom panel. Please
record it and retain it for
your records.
Serial number:
__________________
OWNER’S MANUAL
Краткое содержание страницы № 2
IMPORTANT SAFETY PRECAUTIONS 1 Read these instructions. Do not place any objects filled with liquids, such as vases, on the apparatus. • 2 Keep these instructions. • Do not install this apparatus in a confined space such as a book case or 3 Heed all warnings. similar unit. 4 Follow all instructions. The apparatus should be located close enough to the AC outlet so that you • 5 Do not use this apparatus near water. can easily grasp the power cord plug at any time. 6 Clean only with dry c
Краткое содержание страницы № 3
IMPORTANT SAFETY INSTRUCTIONS The unit power should be off when you install and replace batteries. • FOR U.S.A. • Remove the batteries if you do not plan to use the unit for a long time. Batteries could rupture or leak, causing fire, injury or stains around them. If TO THE USER the battery fluid leaks, wipe away any fluid on the battery case before insert- This equipment has been tested and found to comply with the limits for a Class B digital device, pursuant to Part 15 of the FCC Rules.
Краткое содержание страницы № 4
IMPORTANT SAFETY PRECAUTIONS Information for Users on Collection and Information on Disposal in other Countries Disposal of Old Equipment and used Batteries outside the European Union These symbols on the products, packaging, and/or accompanying documents These symbols are only valid in the European Union. If you wish to discard mean that used electrical and electronic products and batteries should not these items, please contact your local authorities or dealer and ask for the be mixed with
Краткое содержание страницы № 5
Table of Contents 1–Introduction …………………………………………………………… 8 3–Names and Functions of Parts …………………….. 28 Overview of this unit ………………………………………………….. 8 Top panel ………………………………………………………………….. 28 About this manual ……………………………………………………… 8 Front panel ………………………………………………………
Краткое содержание страницы № 6
Table of Contents Undoing a previous operation (multi-undo) …………………….. 66 5–Song Management …………………………………………… 47 Erasing the operation history ……………………………………….. 68 Partitions and songs …………………………………………………. 47 Selecting the active partition ……………………………………. 47 7–Recorder Functions …………………………………………… 69 Loading a saved son
Краткое содержание страницы № 7
Table of Contents Block diagram …………………………………………………………. 105 10–Editing Tracks ……………………………………………………. 86 Messages ………………………………………………………………… 106 Overview of track editing …………………………………………. 86 Edit points ………………………………………………………………… 86 14–Commonly-used Functions ………………………
Краткое содержание страницы № 8
1–Introduction Thank you for your purchase of TASCAM’s About this manual 4-track digital Pocketstudio, the DP-004. The DP-004 is designed to provide you with Please read chapter 2, “Quick Start Guides,” first great sound in an easy-to-use compact package, and follow the instructions in it to learn about and allowing you to concentrate on the music, and not practice using this unit’s functions. on the recording process. Chapter 3 explains the functions of the keys, knobs, connectors and ot
Краткое содержание страницы № 9
1–Introduction The four keys beneath the LCD display are called Product parts function keys, and are referred to as F1, F2, F3 and F4 from left to right. The functions displayed at the You should find these items in the box: bottom of the screen above the keys are sometimes Main unit …………………………………………………………. 1 • shown after the key name in parentheses (e.g. F4 (¥) SD Card (in the unit) …………………………………………. 1 • key, F2
Краткое содержание страницы № 10
1–Introduction Macintosh, Mac OS and Mac OS X are trademarks Do not put things on top of them or twist them. • of Apple Inc. Do not hit them. • Other company names and product names in this document are the trademarks or registered trademarks of their respective owners. Beware of condensation If the unit is moved from a cold to a warm place, or used after a sudden temperature change, there About SD cards is a danger of condensation; vapor in the air could condense on the internal mech
Краткое содержание страницы № 11
2–Quick Start Guides CAUTION QSG 1–Playback and mixing • Do not insert the card backwards or apply unnec- essary force. This could damage the slot or card. First, we will play the demo song on the included • Do not remove the SD card when the unit’s power SD card. The SD card with the demo song is shipped is ON. Make sure the unit power is OFF before you already installed in the battery compartment on the remove the card. If you remove the SD card while the power is ON, all recordings a
Краткое содержание страницы № 12
2–Quick Start Guides TIP CAUTION This unit can also be powered by a PS-P520 power The volume adjustment dial is small and does not have any indications. Before turning the power ON, always adapter (sold separately) (see “Connecting an AC turn it in the direction of the arrow until it stops to adapter” on page 36). minimize the volume. Sudden bursts of loud sounds can cause hearing damage and speaker damage, for CAUTION example. • Do not remove the batteries or disconnect the power cabl
Краткое содержание страницы № 13
2–Quick Start Guides 3 Rotate the DATA wheel to select LOAD, and press the F4 (¥) key to open the SONG LOAD screen that shows a Playing and mixing the demo song list of songs. Before the unit is shipped, a demo song is stored on its SD card. We are now going to use basic playback and mixing features with this demo song. 1 Press the MENU key when the Home Screen is open. The MENU screen is displayed. 4 Rotate the DATA wheel to select DEMOSONG, and press the F2 (EXEC) key. The demo song lo
Краткое содержание страницы № 14
2–Quick Start Guides 6 To hear the demo song, press the ¥ key and use the LEVEL knobs for tracks 1–4, the MASTER LEVEL knob and the VOLUME dial. The MASTER LEVEL knob adjusts the volume of all four tracks at the same time. The standard position is around 2–3 o’clock. Use the LEVEL knobs to adjust the balance between tracks 1–4. Use the VOLUME dial to adjust the final monitoring level. 7 Use the PAN knobs to adjust the stereo position of tracks 1–4. 14 TASCAM DP-004
Краткое содержание страницы № 15
2–Quick Start Guides mix the tracks down. Shutting down the unit In this section, we assume that you have already If you are finished, shut the unit down unless you followed the instructions in “QSG 1–Playback want to try the features in QSG 2 on the following and mixing” to connect monitoring equipment and page now. install the SD card. Press and hold the POWER key until “POCKETSTUDIO” TIP appears on the screen. The unit shuts down This example uses the built-in mic for recording vo
Краткое содержание страницы № 16
2–Quick Start Guides 5 Press the F4 (¶) key to select the current input for IN B (INPUT B channel). The IN A and IN B items are used to set the input 6. Use the DATA wheel to set the IN B input source to sources for the INPUT A and INPUT B channels. INT.MIC B-Low, INT.MIC B-Mid or INT.MIC B-High. This sets MIC B, which is the built-in mic on the At first, the input source for IN A (INPUT A channel) right side of the front panel as the input source is already selected. for INPUT B. 4
Краткое содержание страницы № 17
2–Quick Start Guides open, press the MENU key to open the MENU screen. NOTE INT.MIC B-Low, INT.MIC B-Mid, INT.MIC B-High change the sensitivity of the built-in mics. Set it according to the loudness of the subject being recorded. If you are not sure which setting to use, choose INT. MIC B-Low. If the input level is too low after adjusting it later, return to this screen and change the setting to INT. MIC B-Mid. If the input level is still too low, change this 2 Use the DATA wheel to select
Краткое содержание страницы № 18
2–Quick Start Guides 4 Use the DATA wheel keys to select SONG001 and press Adjusting the input level and monitoring F2 (EXEC) to load this song that does not have any recordings in it yet. Use the INPUT A channel LEVEL knob to adjust the guitar input level. The SONG menu screen reopens. Set the LEVEL knob so that the INPUT A channel OL 5 Press the HOME key to return to the Home Screen. indicator does not light even when the loudest sound to be recorded is input. If the indicator continues
Краткое содержание страницы № 19
2–Quick Start Guides If you turn up the MASTER LEVEL knob and the VOLUME dial, you can hear the guitar on the left channel of your headphones, and the L meter on the screen moves. NOTE If you change the MODE item on the INPUT SETTING screen to mono mode (MONOx2), you will be able to hear the guitar sound on both left and right channels and NOTE both the L and R meters on the screen will move (see “Monitoring the input signal” on page 55). When the input source is a built-in mic, the sig
Краткое содержание страницы № 20
2–Quick Start Guides 4 Press the TRACK 1 REC key again. Its light turns off. Listening to your recording 1 To go to the beginning of the song, press the Ô key while pressing and holding the stop (ª) key. 2 Press the playback (Á) key while pressing and (This is the Return To Zero (RTZ) function) holding the record (–) key to start recording. The track 1 REC key stops blinking and stays lit constantly. You are recording. Play your guitar! 2 Press the playback (Á) key to play the recorded
-
Инструкции по эксплуатации
1

Tascam DP-004 инструкция по эксплуатации
(112 страниц)
- Языки:Английский
-
Тип:
PDF -
Размер:
7.21 MB
Просмотр
На NoDevice можно скачать инструкцию по эксплуатации для Tascam DP-004. Руководство пользователя необходимо для ознакомления с правилами установки и эксплуатации Tascam DP-004. Инструкции по использованию помогут правильно настроить Tascam DP-004, исправить ошибки и выявить неполадки.
инструкцияTascam DP-004

DP-004
Portable
4-Track Digital
Pocketstudio
D01054920B
OWNER’S MANUAL
This device has a serial
number located on the
bottom panel. Please
record it and retain it for
your records.
Serial number:
__________________
Посмотреть инструкция для Tascam DP-004 бесплатно. Руководство относится к категории Hi-Fi системы, 2 человек(а) дали ему среднюю оценку 8.3. Руководство доступно на следующих языках: английский. У вас есть вопрос о Tascam DP-004 или вам нужна помощь? Задайте свой вопрос здесь
- Table of Contents
- 1-Introduction
- 2-Quick Start Guides
- 3-Names and Functions of Parts
- 4-Preparations
- 5-Song Management
- 6-Basic Recording
- 7-Recorder Functions
- 8-Miscellaneous
- 9-SD Card Management
- 10-Editing Tracks
- 11-Exchanging Data with a Computer
- 12-Troubleshooting
- 13-Specifications and Messages
- 14-Commonly-used Functions
Нужна помощь?
У вас есть вопрос о Tascam а ответа нет в руководстве? Задайте свой вопрос здесь Дай исчерпывающее описание проблемы и четко задайте свой вопрос. Чем детальнее описание проблемы или вопроса, тем легче будет другим пользователям Tascam предоставить вам исчерпывающий ответ.
Количество вопросов: 0


Главная
| Tascam | |
| DP-004 | DP-004 | |
| Hi-Fi система | |
| английский | |
| Руководство пользователя (PDF) |
Не можете найти ответ на свой вопрос в руководстве? Вы можете найти ответ на свой вопрос ниже, в разделе часто задаваемых вопросов о Tascam DP-004.
Когда звук считается слишком громким?
Могут ли устройства разных марок подключаться друг к другу при помощи Bluetooth?
Что такое Bluetooth?
Что такое HDMI?
Как лучше всего выполнять чистку Hi-Fi система?
Что такое Dolby Atmos?
Инструкция Tascam DP-004 доступно в русский?
Не нашли свой вопрос? Задайте свой вопрос здесь
Нет результатов

Tascam DP-24SD
инструкция108 страниц(ы)

Tascam DP-03SD
инструкция76 страниц(ы)

Tascam DP-02
инструкция80 страниц(ы)

Tascam DP-32
инструкция104 страниц(ы)

Tascam US-16×08
инструкция92 страниц(ы)

Tascam US-1X2HR
инструкция22 страниц(ы)

Tascam SD-20M
инструкция44 страниц(ы)

Tascam Mixcast 4
инструкция124 страниц(ы)

Tascam US-122
инструкция36 страниц(ы)

Tascam SERIES 208i
инструкция88 страниц(ы)
Посмотреть все Tascam руководства Посмотреть все Tascam Hi-Fi система руководства
Скачать
DP-004
Portable
4-Track Digital
Pocketstudio
D01054920B
OWNER’S MANUAL
This device has a serial
number located on the
bottom panel. Please
record it and retain it for
your records.
Serial number:
__________________
-
Tascam DP-004 — page 1
DP-004 Portable 4-Track Digital Pocketstudio D01054920B OWNER’S MANU AL This device has a serial number located on the bottom panel. Please record it and retain it for your records. Serial number: __________________ …
-
Tascam DP-004 — page 2
2 T ASC AM D P- 0 04 IM POR T ANT S AFET Y PRECA UTIONS 1 Read these instructions. 2 Keep these instructions. 3 Heed all warnings. 4 Follow all instructions. 5 Do not use this apparatus near water . 6 Clean only with dry cloth. 7 Do not block any ventilation openings. Install in accordance with the manufacturer’s instructions. 8 Do not install …
-
Tascam DP-004 — page 3
IM POR T ANT S AFET Y INSTR UC TIONS T ASCA M DP — 0 04 3 Th e un it p owe r sh ou ld b e of f w he n you i ns t all a n d re pl ac e ba t ter ie s . • R e m o v e t h e b a t t e r i e s i f y o u d o n o t p l a n t o u s e t h e u n i t f o r a l o n g t i m e . • Bat t er ie s c ou ld ru ptu re o r l ea k , ca us in g f ir e, i nj ur y or s …
-
Tascam DP-004 — page 4
4 T ASCA M DP — 0 04 IM POR T ANT S AFET Y PRECA UTIONS Information for Users on Collection and Disposal of Old Equipment and used Batteries These symbols on the products, packaging, and/or accompanying documents mean that used electrical and electronic products and batteries should not be mixed with general household waste. For proper treatment, r …
-
Tascam DP-004 — page 5
T ASCA M DP — 0 04 5 T ab le of Con tents 1– Introduction …………………………………………………………… 8 Over v iew of this unit ………………………………………………….. 8 Ab out this manual ……………………………………………………… 8 Manual conv ention s …………………….. …
-
Tascam DP-004 — page 6
6 T ASCA M DP — 0 04 T able of C ontents 5 –Son g Management …………………………………………… 47 Par titions and s ongs …………………………………………………. 4 7 Selec tin g the ac tive par tition ……………………………………. 4 7 Loading a s aved song ………………………………….. …
-
Tascam DP-004 — page 7
T ASCA M DP — 0 04 7 T able of C ontents 10 – Editing T racks ……………………………………………………. 8 6 Over v iew of track e diting …………………………………………. 86 Edit po int s ………………………………………………………………… 8 6 Basic ed iting p roc edur es …………… …
-
Tascam DP-004 — page 8
8 T ASCA M DP — 0 04 Thank you for your purchase of T ASCAM’ s 4-track digital Pocketstudio, the DP-004. The DP-004 is designed to provide you with great sound in an easy-to-use compact package, allowing you to concentrate on the music, and not on the recording process. Overv iew of this unit Using an SD card this unit can record two tracks simul …
-
Tascam DP-004 — page 9
T ASCA M DP — 0 04 9 The four keys beneath the LCD display are called function keys, and are referred to as F1 , F2 , F3 and F4 from left to right. The functions displayed at the bottom of the screen above the keys are sometimes shown after the key name in parentheses (e.g. F4 ( ¥ ) key , F2 ( EXEC ) key). TIP W e give hints and tips on using the …
-
Tascam DP-004 — page 10
10 TASCAM DP — 0 04 Macintosh, Mac OS and Mac OS X are trademarks of Apple Inc. Other company names and product names in this document are the trademarks or registered trademarks of their respective owners. About SD c ards This unit uses SD cards for recording and playback. SD and SD HC card s th at are at lea st 5 12 MB i n siz e can b e used . A …
-
Tascam DP-004 — page 11
2– Quick S tar t Guides T ASCA M DP — 0 04 11 QSG 1 – Playback and mixing First, we will play the demo song on the included SD card. The SD card with the demo song is shipped already installed in the battery compartment on the bottom of the unit, but we will start by explaining how to insert an SD card here. Preparing to list en to the demo so …
-
Tascam DP-004 — page 12
12 TASCAM D P- 0 04 2– Quick S tar t Guides TIP This unit can also be powered by a PS — P520 power adapter (sold separately) (see “C onnec ting an AC adapter” on pag e 36) . CAUTION Do not r e move the b at ter ies o r dis con ne c t the • powe r cab le wh ile th e unit p ower i s ON . I f you do so, t he uni t can not shut d own pr op e …
-
Tascam DP-004 — page 13
2– Quick S tar t Guides T ASCA M DP — 0 04 13 Playing and mixing the dem o song Before the unit is shipped, a demo song is stored on its SD card. W e are now going to use basic playback and mixing features with this demo song. 1 Pre ss the MENU key when the H ome Screen i s open . The MENU screen i s d isplayed. 2 Rotate the D ATA whee l to sele …
-
Tascam DP-004 — page 14
14 T ASCA M D P- 0 04 2– Quick S tar t Guides 6 T o hear the demo song, press the ¥ key and use the LEV EL knobs for t racks 1– 4, the M AS TER L E VE L k nob and the VOL UME di al . The MA ST ER LE V E L k nob adj usts the volume of al l four track s at the same t i me. The st anda rd posit i on is around 2 –3 o’ clock. Use the LEVEL k …
-
Tascam DP-004 — page 15
2– Quick S tar t Guides T ASCA M DP — 0 04 15 Shut ting down the u nit If you are nished, shut the unit down unless you want to try the features in QSG 2 on the following page now . Press and hold the POWER key until “ POCKETSTUD I O ” appears on the screen. The unit shuts down automatically after completing a shutdown procedure that saves …
-
Tascam DP-004 — page 16
16 TASCAM D P- 0 04 2– Quick S tar t Guides The IN A and IN B items are us ed to s et the input source s for the INPU T A and IN PUT B chan nels . At f i rst , the i nput source for IN A ( INPUT A channel) is al re ady sele cte d. 4 Use the D ATA whe el to change the IN A input source to G UIT A R / LIN E . 5 Pre ss the F4 ( ¶ ) key to selec t t …
-
Tascam DP-004 — page 17
2– Quick S tar t Guides T ASCA M DP — 0 04 17 NOTE IN T .MIC B — Low, INT .MIC B — Mid, I N T .MIC B — High change the sensitivity of the built-in mics. Set it according to the loudness of the subject b eing re corded. If you are not sure whic h set ting to use, choose IN T . MIC B — Low. If the in put level is too low af ter adjusting it later , …
-
Tascam DP-004 — page 18
18 TASCAM DP — 0 04 2– Quick S tar t Guides 4 Use the DA T A wheel keys t o sele ct SONG00 1 and press F2 (E X EC) to l oad thi s song that doe s not hav e any record i ngs i n it yet. The SONG menu screen reop ens. 5 Pre ss the HOME key to retu rn t o the Home Screen. Setting the g uitar as track 1 recording source The default settings are for t …
-
Tascam DP-004 — page 19
2– Quick S tar t Guides T ASCA M DP — 0 04 19 If you turn up the MAS TE R LE V EL knob and the VOL UME dial, you can hear the guitar on the left channel of your headphones, and the L meter on the screen moves. NOTE If you change the MODE item on the I NPUT SETT ING screen to mono mo de ( MONOx2 ), you will be able to hear the guitar sound on both …
-
Tascam DP-004 — page 20
20 T AS CAM D P- 0 0 4 2– Quick S tar t Guides 2 Pre ss the playback ( Á ) key wh i le pres si ng and holdi ng the re cord ( – ) key to star t re cordi ng. The tr ack 1 REC key stops bl i nk i ng and st ays lit consta ntly . Y ou are record ing. Play your gu itar! 3 When you are f i n ishe d, pre ss the st op ( ª ) k ey to stop rec ordi ng. 4 …
-
Tascam DP-004 — page 21
2– Quick S tar t Guides T ASCA M DP — 0 04 21 TIP Use the track 1 PAN knob to set the stereo position of • the track signal. If you are not sati s fied with the re corded sound, • follow the procedures above again from the beg inning. If you are sati sfi ed with this recording conti nue to the nex t sec tion. Adding another recording …
-
Tascam DP-004 — page 22
22 T A SCA M DP — 00 4 2– Quick S tar t Guides NOTE Y ou do not nee d to change the input if you want to record the lead guitar on track 3. 4 Pre ss the HOME key to retu rn t o the Home Screen. 5 Pre ss the TR ACK 2 REC key . The key bli n ks show i ng that the track i s in r ecord st andby . 6 Pre ss the Ô key whi le pre ssi ng and hold i ng th …
-
Tascam DP-004 — page 23
2– Quick S tar t Guides T ASCA M DP — 0 04 23 3 T u r n the D ATA wheel to s et the i nput to IN B . NOTE By default, IN PU T B is set as the recording source for tracks 2 and 4 , so you do not need to change the input if you want to record the vocal on track 4. 4 Pre ss the HOME key to retu rn t o the Home Screen. 5 Pre ss the TR ACK 3 REC key . …
-
Tascam DP-004 — page 24
24 T ASCA M DP — 0 04 2– Quick S tar t Guides Ra ise the M AS TE R LE V EL k nob and VOLUME d ia l as nece ssar y t o hear the m ic i nput through the vocal s. CAUTION Always monitor through headphones when using a mic. If you monitor through speakers, feedback could occur and the recorded sound might not be right. NOTE When the input source is o …
-
Tascam DP-004 — page 25
2– Quick S tar t Guides T ASCA M DP — 0 04 25 2 Use the track PA N k nobs to adjust the stereo posit ion i ng of the tr acks . W atch the L and R meters at the r i ght side of the di splay as you ad just levels and pann i ng. Mastering the mix Now we will record your stereo mix. W e call this process mastering. The time between the song’ s begi …
-
Tascam DP-004 — page 26
26 T A SCA M DP — 00 4 2– Quick S tar t Guides TIP Y ou can also set the OUT p oint when playback is stoppe d by pressing the F4 (OU T ) k ey . 3 Pre ss the IN/OUT key ( or HOME key ) to ret ur n to the Home Screen. 4 Pre ss the R EC MO DE key to ope n the RECORDER MODE screen. 5 T u r n the D ATA wheel to s elec t MASTER REC . 6 Pre ss the F4 ( …
-
Tascam DP-004 — page 27
2– Quick S tar t Guides T ASCA M DP — 0 04 27 1 1 Pres s the playback ( Á ) key to pl ay the stereo master that you created . Shut ting down the u nit Shutdown the unit when you are nished. 1 Pre ss and hold the POWER key unti l POCKETSTUD I O appear s on the screen. 2 The power tur ns off a ft er the un it complete s its shutdown proce ss , …
-
Tascam DP-004 — page 28
28 T A SCA M DP — 00 4 3 – Names and F unctions of P ar ts T op panel 1 POWE R key a nd i ndi ca tor Pre ss a nd hold this key to t u r n t he u n it ON and OFF . ( See “ Sta r t-up & shutd own” on page 36. ) The i nd icator l ights whe n the p ow er i s on. 2 RE PE A T key T ur ns t he re pe at playback mode on a nd off. ( See “Rep eat …
-
Tascam DP-004 — page 29
3 – Names and F unctions of P ar ts T ASCA M DP — 0 04 29 5 UN / RE DO key a n d ind ic ato r Pre ss t h is to u ndo t he la st act ion. P res s agai n t o redo it. (See “Undoing ope rat ions (undo )” on page 66. ) Pre ss t h is key while pr essi ng and holdi ng the STOP ( · ) key to op en t he H I STORY scre en whe re you can u ndo multiple …
-
Tascam DP-004 — page 30
30 T AS CAM D P- 0 0 4 3 – Names and F unctions of P ar ts r Func ti on key s The f u nct ions of these keys a re show n at the b ot tom of the scre en a nd de pend on t he cu r re nt scre en. NOTE In this manual , the four function keys are referred to as F 1 , F 2, F3 and F4 in order from lef t and right. Sometimes, the name of the function is …
-
Tascam DP-004 — page 31
3 – Names and F unctions of P ar ts T ASCA M DP — 0 04 31 Front panel d MIC A Th is i s a built-in om n id ir ect ional m ic t hat ca n be selecte d as t he IN PUT A ch an nel input ( I NT . MI C A-Low , IN T . MIC A — Mid , IN T . MIC A — Hi g h ). f MIC B Th is i s a built-in om n id ir ect ional m ic t hat ca n be selecte d as t he IN PUT B ch …
-
Tascam DP-004 — page 32
32 T A SCA M DP — 00 4 3 – Names and F unctions of P ar ts Right si de panel j USB connector Con ne ct the u n it to a c ompute r usi ng the i ncluded US B cable. Th is al lows to shar i ng, i mpor t i ng and expor ti ng f iles b et ween t he u n it and t he compute r, includi ng ba ck up of the song d at a. (See “Con nect i ng wit h a compute …
-
Tascam DP-004 — page 33
3 – Names and F unctions of P ar ts T ASCA M DP — 0 04 33 CAUTION The volume adjustment dial is small and does not have any indications. Before turning the power ON, always turn it in the direction of the arrow until it stops to minimize the volume. Sudden bursts of loud sounds can cause hearing damage and speaker damage, for example. Bot tom x B …
-
Tascam DP-004 — page 34
34 T A SCA M DP- 00 4 4 – Prepar ati ons Preparing the pow er and SD c ard Inst alling an SD card An SD card is used as recording media for recording and playback. Card s t hat comply with SD and SD HC sta nd a rds • can b e used . Card s should be at least 5 1 2 M B i n size. • A list of SD cards t hat have been te sted w ith t h is • u ni …
-
Tascam DP-004 — page 35
4 – Prepar ati ons T ASCA M DP — 0 04 35 CAUTION Do not remove the card or batteries when the unit is turned on. Failure to power off properly first will cause and recordings and settings made since the last power off and song save to be lost. This data cannot be recovered. NOTE If a protec ted SD card is inserte d, playback is possible, but you …
-
Tascam DP-004 — page 36
36 T AS CAM D P- 0 0 4 4 – Prepar ati ons Connecting an AC adapter (sold separately) T o use the PS-P520 AC adapter (sold separately), connect the adapter to the unit and the adapter to the power cord before plugging it into an outlet. TASCAM PS-P520 (sold separately) DC plug AC outlet NOTE The adapter power s the unit if the adapter is conn e ct …
-
Tascam DP-004 — page 37
4 – Prepar ati ons T ASCA M DP — 0 04 37 When the unit starts up it defaults to the multitrack recorder mode regardless of the mode used last before shutting down. (See “Recorder modes” on page 44.) W ARNING When switching the unit on and off, we suggest that you turn down the volume of any speakers or amplifiers connected to the unit. Also, …
-
Tascam DP-004 — page 38
38 T AS CAM D P- 0 0 4 4 – Prepar ati ons Format ting SD cards T o use a new SD card with this unit, it is necessary to format it rst. SD cards formatted by the unit are divided into MTR partitions and F A T partitions. SD cards with high capacities can be formatted with multiple partitions. For more information about partitions see “9–SD …
-
Tascam DP-004 — page 39
4 – Prepar ati ons T ASCA M DP — 0 04 39 Displa y screens This display shows various screens for making settings and using functions and the Home Screen, which shows the status of the recorder . Home Screen The Home Screen is the basic screen that appears on the display . This is the screen that is used for recording and playback. When you turn t …
-
Tascam DP-004 — page 40
40 T AS CAM D P- 0 0 4 4 – Prepar ati ons 5 Re co rd er t r an sp or t s ta te W hen playi ng ¥ app ea r s. W hen st opp ed · a ppe ar s. W hen r ecord i ng – app ea rs. 6 Rep e at p lay ba ck m ode i nd ic ato r W hen r ep eat playback is act ive appears. 7 Re co rd er t im e co un ter Sho ws t he elapsed t i me f rom t he st a r t of the so …
-
Tascam DP-004 — page 41
4 – Prepar ati ons T ASCA M DP — 0 04 41 Using the screens When the Home Screen is open, use the MENU key or a dedicated key to open a screen. Then, use the D ATA wheel or the four function keys below the display to make changes on the screen. Note that during playback and while recording, screens that might access the SD card cannot be opened. I …
-
Tascam DP-004 — page 42
42 T A SCA M DP — 00 4 4 – Prepar ati ons to select items a nd t u r n t he D ATA wheel to set values. T o cont i nue to the next op erat ion, pre ss the f u nct ion • key that cor resp onds to NEXT at the bot tom of the scre en. T o leave a screen a cces sed by a ded icated key press • the f u nc tion key that cor resp onds t o E XIT . T o e …
-
Tascam DP-004 — page 43
4 – Prepar ati ons T ASCA M DP — 0 04 43 there are other items below the COPY item. Pre ss t he • F4 ( ¥ ) key to open t he L OA D scre en. I n t he L OA D scre en exa mpl e below , t he songs saved on the SD card appe ar i n a l ist. NOTE T o return to the previous scree n, press the F1 (BA CK) k ey . T o load a song, t u r n t he • D ATA w …
-
Tascam DP-004 — page 44
44 T AS CAM D P- 0 0 4 4 – Prepar ati ons Y ou can edit the name as follows. Use the • Ô / keys to mov e the cu r sor ( unde rline ) position. The cu r sor position is where ed iti ng occu r s. T u r n t he • D ATA wheel to change the cha r act er s at the cu r sor ( unde rli ne ) p osition. Ordi n ar y sy mbols, nume rals a nd Engl ish …
-
Tascam DP-004 — page 45
4 – Prepar ati ons T ASCA M DP — 0 04 45 Connecting with other equipme nt Connect guitars and basses to INPUT A Connect keyboards to INPUT A or INPUT B Connect mics to INPUT A or INPUT B TASCAM PS-P520 (sold separately) AC outlet DC plug Computer USB Rear panel connections Right side panel connections NOTE Recorder func tions cannot be used when …
-
Tascam DP-004 — page 46
46 T AS CAM D P- 0 0 4 4 – Prepar ati ons Lef t side panel connections Headphones Speakers with built-in amplification or audio system Setting the contrast The LCD display contrast can be adjusted. Use the following procedures to adjust the contrast. 1 When the Home Scree n is open , press t he MENU key to open the MENU screen. 2 T u r n the D AT …
-
Tascam DP-004 — page 47
5 – Song Manageme nt T ASCA M DP — 0 04 47 This unit manages data in song les. Ordinarily , every song is given its own le. The rst step is to load the song that you want to manage (load an existing song or create a new song). In a song, in addition to saving the audio data for the recorded multitrack (tracks 1–4), stereo master mixes …
-
Tascam DP-004 — page 48
48 T AS CAM D P- 0 0 4 5 – Song Manageme nt SD card with one partition SD card with multiple partitions An a ster i sk ( Ú ) sho ws the ac t ive part it ion . The si z es of the part it ions a re shown ( not av ai l able space ). 4 Rotate the D ATA whee l to sele ct the par t it ion a nd press F2 ( EXEC ) . A conf i rmat ion me ssage appea rs . …
-
Tascam DP-004 — page 49
5 – Song Manageme nt T ASCA M DP — 0 04 49 Creat ing a new song Follow these procedures to create a new song in the active partition 1 With the t ransp ort st opped and the Home Screen open, pre ss the MENU key to open the MENU screen. 2 Use the DA T A wheel t o sele ct SONG and press F4 ( ¥ ) to open the SONG menu screen. 3 Use the DA T A wheel …
-
Tascam DP-004 — page 50
50 T AS CAM D P- 0 0 4 5 – Song Manageme nt The SONG SAVE screen appears. 4 Change the song name i f you w ant and then pres s the F2 ( EXEC ) key (s e e “Editing names” on page 43 ). “ S tor i ng Song ” appears while the song is being saved and “ Save Comp l ete ” appears when it is done. Then the SONG menu screen reopens. Viewing so …
-
Tascam DP-004 — page 51
5 – Song Manageme nt T ASCA M DP — 0 04 51 Copying songs Songs in the currently active partition can be copied to the same and different MTR partitions. Multiple songs can also be copied at once. 1 When the t ra nspor t is st opped and the Home Screen i s open , press MENU to open the MENU screen. 2 T u r n the D ATA wheel to s elec t SONG , and …
-
Tascam DP-004 — page 52
52 T ASCAM D P- 0 0 4 5 – Song Manageme nt When c opyi ng complete s, t he SONG menu screen reopens . T o ca ncel copyi ng a song, press t he • F1 ( BACK ) key in ste ad of the F4 ( EXEC ) key . Eras ing songs Songs can be erased. Y ou can also erase multiple songs at once. Y ou might want to erase unneeded songs if the SD card starts to run ou …
-
Tascam DP-004 — page 53
5 – Song Manageme nt T ASCA M DP — 0 04 53 7 Pre ss the F3 ( YES ) key . A f ter the song s are eras ed , the SONG menu screen reop ens. T o ca ncel er asi ng a song, press the • F4 ( NO ) key in ste ad of the F3 ( YES ) key . E ver y M TR p ar tit ion must always ha ve at least one • song, so if yo u er a se all t he songs on a par t ition, …
-
Tascam DP-004 — page 54
54 T AS CA M DP- 00 4 6 – Basi c Record ing Selecting the input source This unit has two input channels ( INP UT A and I NPU T B ) that can be selected separately as input sources. The built-in microphones (front panel MIC A and MIC B ) and external input signals (input through the rear panel INP UT A and I NPU T B connectors) can be selected as …
-
Tascam DP-004 — page 55
6 – Basi c Record ing T ASCA M DP — 0 04 55 selec te d as the I NPU T A i nput source in st ep 2 above, set the MIC/LIN E– GUIT AR sw itch on the lef t side panel appropriate ly . Set it to G U I TA R when conne ct- ing a n elec t r ic gu it ar or elec t r ic bass d i rec tl y . Set it to MIC/LINE when inputt i ng a m ic or l i ne sig nal . TIP …
-
Tascam DP-004 — page 56
56 T A SCA M DP — 00 4 6 – Basi c Record ing input monitor mode . MONOx2 : input sig nal s from both I NPU T A and IN PU T B channel s are output as a combi ned mono sig nal from both the lef t and r ig ht channels . STEREO : input sig nal s from I NPU T A and IN PUT B channels a re output separat ely on the lef t and r ight chan nels , resp ec t …
-
Tascam DP-004 — page 57
6 – Basi c Record ing T ASCA M DP — 0 04 57 NOTE If an OL indicator in the input section is lighting even though the input meter is showing a su itable level, the input signal is too strong and the sound is di stor ted. Lower the volume output on the input source. T rack meters (1–4) These meters show either the playback signal level or the inp …
-
Tascam DP-004 — page 58
58 T AS CAM D P- 0 0 4 6 – Basi c Record ing 1 Pre ss ASSIGN to open the I NPUT ASS I GN screen. As shown above, the input channel that is the record i ng source for each t rack (1 – 4) is shown . In the i n it ia l set t i ng, I NPU T A is a ssi gne d as the record i ng source for t racks 1 a nd 3, and IN PUT B i s ass ig ned as t he record i …
-
Tascam DP-004 — page 59
6 – Basi c Record ing T ASCA M DP — 0 04 59 F or example, i f you press the REC keys for track 1, tr ack 2 and track 3 i n that order , t rack 1, which was presse d f i rst , w i l l no longer be i n rec ord standby , but track 2 and tr ack 3, which were presse d af ter wards , w i l l be i n re cord st andby . 2 Set the re cordi ng level. T ur n …
-
Tascam DP-004 — page 60
60 T AS CAM D P- 0 0 4 6 – Basi c Record ing tr ack. Use the t rack LEV EL k nob and the MAS TE R LEV EL k nob to adj ust the playback lev el. Use the VOL UME di al or the volume on yo ur mon itor i ng system t o adj ust the f i nal moni tor ing volume. NOTE T r ack PAN and LEVEL knobs control the pla yback • output signal on already re cord …
-
Tascam DP-004 — page 61
6 – Basi c Record ing T ASCA M DP — 0 04 61 Setting up to overdub T o prepare for overdubbing, set the unit according to the following guidelines. REC indicator settings T u r n OFF t he • REC i ndicator s of alrea dy rec orded t ra cks. Pre ss t he • REC key on the t ra ck th at yo u want t o ov erdub t o put it into record st a ndby ( REC i …
-
Tascam DP-004 — page 62
62 T AS CAM D P- 0 0 4 6 – Basi c Record ing Recording an ov erdub Press the playback ( Á ) key while pressing and holding the record ( – ) key to start recording on the record track. Y ou can listen to the playback sound while overdubbing. Mi xd ow n Adjusting the volumes and stereo positions of the recorded tracks to create a well-balance st …
-
Tascam DP-004 — page 63
6 – Basi c Record ing T ASCA M DP — 0 04 63 processed further or combined with other recordings (see “Exporting a stereo master” on page 100). NOTE Only one ste reo maste r can be made in a song at a time. Setting the e nd point Before you start mastering, set the mastering end point. The time between the song’ s zero point (00: 00: 00: 00) …
-
Tascam DP-004 — page 64
64 T AS CAM D P- 0 0 4 6 – Basi c Record ing Recording the master tra ck Set the OUT point before you start mastering. 1 Pre ss the R EC MO DE key to ope n the RECORDER MODE screen. 2 T u r n the D ATA wheel to s elec t MASTER REC . 3 Pre ss the F4 ( EXEC ) key to put the unit i nto mast er record i ng mode and ret ur n to the Home Scree n. In th …
-
Tascam DP-004 — page 65
6 – Basi c Record ing T ASCA M DP — 0 04 65 6 T u r n the D ATA wheel to s elec t MASTER PLAY . 7 Pre ss the F4 ( EXEC ) key to put this u ni t into ma ster playback mode and retur n to the Home Scree n. 8 Pre ss the playback ( Á ) key to pl ay the stereo master that you created . The stere o mast er sound is output through t he / LIN E OU T con …
-
Tascam DP-004 — page 66
66 T AS CAM D P- 0 0 4 6 – Basi c Record ing Undoing opera tions ( undo ) This unit allows you to undo an operation or recording that did not work as planned or was otherwise unsatisfactory . Undo can be used on many ordinary operations, including editing and recording operations. This unit has two types of undo functions. Single undo can be used …
-
Tascam DP-004 — page 67
6 – Basi c Record ing T ASCA M DP — 0 04 67 event list starts at the bottom with event number “ 0 ” ( -START UP- ). The top event is the most recent and has “ * ” next to it. All events that occurred after a selected event can be undone at once. This operation is called “multi- undo” because it allows you to undo multiple events and r …
-
Tascam DP-004 — page 68
68 T AS CAM D P- 0 0 4 6 – Basi c Record ing Eras ing the operation history When the power is turned OFF , the operation history of the currently loaded song is erased (cleared). The operation history is not restored, so past operations cannot be undone or redone when the power is turned ON again. NOTE The ope ration hi storie s of songs tha t ar …
-
Tascam DP-004 — page 69
7 – Recorder F unctions T ASCA M DP — 0 04 69 Punching in and out Punching in/out is a technique to replace a part of an already recorded track. Start playback and when you reach the part that you want to replace, switch to record (punch in), then switch back to playback (or stop) when you nish the part that you want to replace (punch out). 1 …
-
Tascam DP-004 — page 70
70 T ASCAM D P- 0 0 4 7 – Recorder F unctions Can be overwritten Can be overwritten Source tracks are erased when they are bounce destinations. (In the illustration above the drum parts are overwritten by the stereo mix). However , you can use the unit’ s (undo) function to return to the previous state if you make a mistake (see “Undoing the …
-
Tascam DP-004 — page 71
7 – Recorder F unctions T ASCA M DP — 0 04 71 the way left (b ounced to t rack 1 or 3) or all the way ri ght (track 2 or 4). U se the M AST ER L E VE L k nob to adj ust the ov era l l level. 6 Af ter re tu rn i ng to the st ar t of the song, pres s the playback ( Á ) key whi le pre ssi ng and hold i ng the record ( – ) key to star t t he bounc …
-
Tascam DP-004 — page 72
72 T A SCA M DP — 00 4 7 – Recorder F unctions 2 T u r n the D ATA wheel to chan ge the value abo ve the cursor . When adjusti ng, the value w i l l ca rr y ov er automatic al ly when it re aches the h ighe st or low es t value in a f ield . F or example, when t ur n in g the D ATA wheel to i ncrea se the value in t he seconds f ie ld, t he numbe …
-
Tascam DP-004 — page 73
7 – Recorder F unctions T ASCA M DP — 0 04 73 F ast for ward / rewind search Press the Ô or key when stopped or during playback to rewind or fast forward, respectively . Each time you press one of these keys, the speed increases from 10x to 50x, 100x and 1000x. Repeat pl ayback Use the repeat playback function to play the same part again and …
-
Tascam DP-004 — page 74
74 T ASCA M D P- 0 04 7 – Recorder F unctions SET IN SET OUT Editing IN / OUT points 1 When the I /O SETT I NG screen i s open (see the f i rs t screen f ig u re in t he previous se ct ion), press the F2 ( E DI T ) key to open the ed it scre en. 2 Edi t the values of IN a nd OUT poi nts usi ng the follow i ng gu idel i ne s. Use the • F3 ( § ) …
-
Tascam DP-004 — page 75
7 – Recorder F unctions T ASCA M DP — 0 04 75 Using repeat pla y back 1 Set the st ar t i ng ( I N ) and end i ng (O UT ) po int s for the t ime that you want to repeat , and then ret ur n to the Home Screen. 2 Pre ss the R E P E AT key to st ar t re peat playback. The repeat icon on the Home Scree n appear s. Repeat icon Playback start s from th …
-
Tascam DP-004 — page 76
76 T ASCAM D P- 00 4 8 – Misce l la neous Functi ons Metronome This unit has a built-in metronome function that can be used when the recorder is operating. Y ou can set it to function during both playback and recording or only during recording. 1 When the Home Scree n is open , press t he MENU key to open the MENU screen. 2 T u r n the D ATA whee …
-
Tascam DP-004 — page 77
8 – Misce l la neous Functi ons T ASCA M DP — 0 04 77 When the metronome is ope rating, you can adju st the • LEV EL, but other items on the ME TRO NOM E scree n cannot be changed. TIP Y ou can use the metronome like a clic k track to help • k ee p time when re cording the first tr acks (rhythm guitar , b ass, etc.) i n a song. If you …
-
Tascam DP-004 — page 78
78 T A SCA M DP — 00 4 8 – Misce l la neous Functi ons The rec ta ngle at the m idd le of the meter darkens when the str i ng i s in t u ne. 7 When f i n ished t u ni ng, pre ss the HOME key to ret ur n to the Home Screen. T urning the power of f automatically Y ou can set the time until the power automatically turns OFF after the last use when u …
-
Tascam DP-004 — page 79
8 – Misce l la neous Functi ons T ASCA M DP — 0 04 79 1 When the Home Scree n is open , press t he MENU key to open the MENU screen. 2 T u r n the D ATA wheel to s elec t PREFERENCE , and press the F4 ( ¥ ) key to open the PREFERENCE screen. 3 Use the F3 ( § ) and F4 ( ¶ ) keys to se lec t Exec next to the Ini tial iz e item. 4 Pre ss F2 ( EXE …
-
Tascam DP-004 — page 80
80 T AS CAM D P- 0 0 4 8 – Misce l la neous Functi ons The I NFORMAT I ON screen SONG page appears . The I NFORMAT I ON screen ha s four pages i ncludi ng thi s one. 3 Use the F3 ( PREV ) and F4 ( NEXT ) keys to change the page. The pages c ontai n the fol lowi ng i n format ion. SONG page: name and partition of currently loaded song, remaining r …
-
Tascam DP-004 — page 81
9 – SD Card Managemen t T ASCA M DP — 0 04 81 Overv iew of partitions As described in “Partitions and songs” (page 47), SD cards formatted by this unit are divided into partitions. MTR partitions are for recording data while the F A T partition can be accessed with a personal computer . High-capacity cards can have multiple MTR partitions. In …
-
Tascam DP-004 — page 82
82 T A SCA M DP — 00 4 9 – SD Card Managemen t Format ting cards and set ting par tition sizes This operation formats the entire card and allows you set MTR partition sizes for high-capacity cards. CAUTION This operation erases all the data on the card and cannot be undone! Confirm that you will not lose important data before formatting a card. …
-
Tascam DP-004 — page 83
9 – SD Card Managemen t T ASCA M DP — 0 04 83 Card capacity and partition size Card capacity F A T partition size MTR partition size 32 GB 4 GB 2 GB, 4 GB, 8 GB or 16 GB 16 GB 4 GB 2 GB, 4 GB or 8 GB 8 GB 2 GB 2 GB or 4 GB 4 GB 2 GB 2 GB fixed 2 GB 1 GB 1 GB fixed 1 GB 512 MB 512MB fixed 512 MB 256 MB 256MB fixed 4 If the c ard capacit y i s …
-
Tascam DP-004 — page 84
84 T AS CAM D P- 00 4 9 – SD Card Managemen t Pre ss the F4 ( ¥ ) key to open the REFORMAT scre en. A l ist of the MT R par t it ions a nd thei r si ze s ( not open capacit ie s ) appear . A * marks the ac t ive part it ion. 4 T u r n the D ATA wheel to s elec t the par t it ion that you want to reformat and press the F2 ( EXEC ) key . A pop -up …
-
Tascam DP-004 — page 85
9 – SD Card Managemen t T ASCA M DP — 0 04 85 ( ¥ ) key to open the CARD menu screen. 3 T u r n the D ATA wheel to s elec t FAT REF ORMAT , and press the F4 ( ¥ ) key . A pop -up me ssage war ni ng that a l l dat a on the F A T par t it ion w i l l be era sed app ear s. 4 Pre ss the F3 ( YES ) key to reformat the F A T par t it ion. W hen refor …
-
Tascam DP-004 — page 86
86 T AS CAM D P- 0 0 4 1 0 – Edi ti ng T r ack s Editing on a conventional tape recorder in the past required advanced techniques, but with this unit editing tracks is easy and accurate. Moreover , with a tape recorder , an editing error could not be undone, but this unit uses nondestructive editing, allowing you to edit without altering the orig …
-
Tascam DP-004 — page 87
1 0 – Edi ti ng T r ack s T ASCA M DP — 0 04 87 4 Sele ct the set t in g item value. I f there are mult iple set t i ng item s, us e the F3 ( § ) a nd F4 ( ¶ ) keys to selec t an it em. T ur n the D ATA wheel t o selec t a value. The d if ferent set t i ng s are expla i ned i n the follow i ng sec t ions for each fu nct ion. 5 Pre ss the F2 ( E …
-
Tascam DP-004 — page 88
88 T AS CAM D P- 0 0 4 1 0 – Edi ti ng T r ack s NOTE If you choose the same track for both the SOURCE TRK and the DEST IN A TIO N TRK and pres s the F2 (E XEC) key , the “Same T rack” m ess age appe ars and the op eration is cancelled. CLE AN OUT (track erase) This completely erases the selected track. This erases the entire track, so the IN …
-
Tascam DP-004 — page 89
1 0 – Edi ti ng T r ack s T ASCA M DP — 0 04 89 There is only one parameter . The IN and OUT points appear on the screen, but they cannot be changed here. SILENCE TRK Sel ect t he t r ack or t ra cks t hat you want to silence par ts of. The choi ces a re 1 to 4 ( si ngle tr ack ), 1/ 2 , 3 /4 ( t rack pai r s ) a nd 1– 4 ( al l t ra cks ). Af t …
-
Tascam DP-004 — page 90
90 T AS CAM D P- 0 0 4 1 0 – Edi ti ng T r ack s CUT TRK Sel ect t he t r ack or t ra cks t hat you want to silence par ts of. The choi ces a re 1 to 4 ( si ngle tr ack ), 1/ 2 , 3 /4 ( t rack pai r s ), 1 – 4 ( al l t ra cks ) a nd ALL ( t rack s 1 to 4 and t he mast er t r ack ). Af t er set t i ng the pa ra mete r , pre ss the F2 ( EXEC ) ke …
-
Tascam DP-004 — page 91
1 1– Ex changi ng Da ta wi th a Computer T ASCA M DP — 0 04 91 Y ou can backup song data on this unit to a computer and restore backed-up song data later . Moreover , you can export track les and master les from a song to a computer and import audio les on the computer to the unit. Data transfer always occurs between the unit’ s F A T …
-
Tascam DP-004 — page 92
92 T AS CA M DP- 00 4 1 1– Ex changi ng Da ta wi th a Computer Stereo master mix A stereo master mix made on this unit can be transferred to a computer as a stereo W A V le from the W A VE directory on the F A T partition. Only export is possible. Supported operating systems Y ou can connect this unit to computers with the following operating …
-
Tascam DP-004 — page 93
1 1– Ex changi ng Da ta wi th a Computer T ASCA M DP — 0 04 93 before the USB connection becomes effective. When connected, the following screen appears on the display . If you turn the unit’ s power ON after making the USB connection, the screen above appears right away . The unit appears as an external drive named “DP-004” on the computer …
-
Tascam DP-004 — page 94
94 T A SCA M DP- 00 4 1 1– Ex changi ng Da ta wi th a Computer 1 Left- cl ick on thi s icon to open a p op -up bar . C l ick thi s pop — up bar to d iscon nec t thi s un it from the computer . 2 Af ter a me ssa ge appears on the computer scree n sayi ng that th is u nit c an be d i sconne cte d , remov e the USB cable. Th is u nit re st ar ts and …
-
Tascam DP-004 — page 95
1 1– Ex changi ng Da ta wi th a Computer T ASCA M DP — 0 04 95 2 Use the D ATA whe el to se lec t SONG BACKUP , and press the F4 ( ¥ ) key to open a song l is t. 3 T u r n the D ATA wheel to s elec t the song that you want to backup, and press the F4 ( NEXT ) key . A screen appe ars that a l lows yo u to s et the f i l e name for the song bein g …
-
Tascam DP-004 — page 96
96 T AS CAM D P- 0 0 4 1 1– Ex changi ng Da ta wi th a Computer 6 Connect th i s un it to a computer usi ng the USB cable ( se e “ Connect i ng w i th a computer ” on page 9 2) . 7 Use the compu ter t o copy backup f i le s from the BA CK U P d i rec tor y on the F A T par t it ion of the un it to the computer . 8 Af ter c opyi ng f i ni shes …
-
Tascam DP-004 — page 97
1 1– Ex changi ng Da ta wi th a Computer T ASCA M DP — 0 04 97 NOTE An error me ssa ge appe ars if there are no fi les on the F A T par titio n. 6 T u r n the D ATA wheel to s elec t the f i le that you w ant to rest ore, and pre ss the F2 ( EXEC ) key . The act ual s ong name and a conf i rmat ion me ssa ge (“ A r e y o u s u r e ?”) appear …
-
Tascam DP-004 — page 98
98 T AS CAM D P- 0 0 4 1 1– Ex changi ng Da ta wi th a Computer 4 Af ter th i s un it res tar t s automatic al l y , press the MENU ke y to ope n the MENU screen. T ur n the D ATA wheel to se lec t WAVE , and press the F4 ( ¥ ) key to open the WAVE menu. 5 T u r n the D ATA wheel to s elec t I MPORT TRACK , and press the F4 ( ¥ ) key . W A V f …
-
Tascam DP-004 — page 99
1 1– Ex changi ng Da ta wi th a Computer T ASCA M DP — 0 04 99 Ex por ting tracks Y ou can export tracks as 16-bit, 44.1-kHz mono W A V les. 1 With the t ransp ort st opped and the Home Screen open, pre ss the MENU key to open the MENU screen. T u r n the D ATA wheel to s elec t WAVE , and press the F4 ( ¥ ) key to open the WAVE menu. 2 T u r …
-
Tascam DP-004 — page 100
10 0 T ASCA M DP — 0 04 1 1– Ex changi ng Da ta wi th a Computer 5 Pre ss the F4 ( EXEC ) key . T he selec te d tr ack is expor te d to the F A T par t it ion w ith t he ed ite d f i le name w ith the “ . W A V ” ext ension added a s the tr ack f i le name . If you hav e previ ously expor te d a tr ack f i le w ith t he same name, a con f i r …
-
Tascam DP-004 — page 101
1 1– Ex changi ng Da ta wi th a Computer T ASCA M DP — 0 04 101 NOTE If there is no stere o master , an error mes sage ap pear s. 3 Use the Ô / ke ys , the D ATA whee l and the F3 and F4 keys to ed it the name of the stere o master f i le b ei ng expor te d (See “Editing name s” on page 43 ). 4 Af ter s et t i ng the name, pre ss the F2 …
-
Tascam DP-004 — page 102
10 2 TASCAM D P- 0 04 1 2– T roubleshooting When working with any new piece of equipment like the unit, it’ s sometimes difcult to work out whey something isn’t happening the way you expect. The main thing is to take your time—after all, you’re not paying hourly studio rates! Stop and think. Ask yourself questions, like the ones below …
-
Tascam DP-004 — page 103
1 3 – Specif icati ons & Messages T ASCA M DP — 0 04 10 3 Audio input / output ratings INPUT A T erminal: Standard phone jack, Unbalanced Input impedance: 10k Ω min. (with INPUT A selectable switch set to MIC/LINE ) 1M Ω (with INPUT A selectable switch set to G U I TA R ) Standard input level: –10 dBV Maximum input level: +6 dBV Headroo …
-
Tascam DP-004 — page 104
10 4 TASCAM DP — 0 04 1 3 – Specif icati ons & Messages Operating temperature range 5 — 35°C Power consumption 1 W Dimensions 155.0 (W) x 33.5 (H) x 107.0 (D) mm (w/o projections) Weight 360 g (w/o batteries) Optional ac cessories AC adapter PS-P520 Computer requirements Windows Pentium 300 MHz or faster 128 MB or more memory USB (USB 2.0 re …
-
Tascam DP-004 — page 105
1 3 – Specif icati ons & Messages T ASCA M DP — 0 04 10 5 Block diagr am ? …
-
Tascam DP-004 — page 106
10 6 T ASCA M DP — 0 04 1 3 – Specif icati ons & Messages Messages The following popup messages alert you to conditions that may arise while you are using the unit. Consult this table if you see something you do not understand. Messages Meaning and remedy Empty Export T rack Y ou are tr ying to export a track («T rack import and export&q …
-
Tascam DP-004 — page 107
1 3 – Specif icati ons & Messages T ASCA M DP — 0 04 107 Messages Meaning and remedy N o Disk S pa c e Y ou tried to create a song, but there is not enough space on the partition to create a song («Creating a new song» on page 49). Free up some space and try again. No Mas ter T rk Y ou have tried to use a non-existent master track a …
-
Tascam DP-004 — page 108
10 8 T ASCA M DP — 0 04 1 3 – Specif icati ons & Messages Messages Meaning and remedy Bat tery Low Replace the batteries with new ones or use a PS-P520 AC adapter (sold separately). S D Size E r r o r Use an SD card larger than 512 MB. Work Memory F u l l Even if the card has enough remaining memory space, this error may occur when you record …
-
Tascam DP-004 — page 109
1 4 – Commonl y — used Functions T ASCA M DP — 0 04 10 9 Th is s ect ion is a br ief g uide to s ome oper at ions on t he DP — 0 04 wh ich may not be im med iately obvious f rom looki ng at t he pa nel cont rols. Key sequenc es a re w r it t en l i ke th is: STOP + Ô me an s “pre ss a nd hold the STOP key and pre ss Ô .” Menu items a re w r …
-
Tascam DP-004 — page 110
11 0 T ASCA M D P- 0 04 1 4 – Commonl y — used Functions How to Keys, etc. TO press Description Create a stereo master track REC M OD E ® MASTER See «Mastering» on page 62. Export a stereo master to a PC MENU ® WAVE ® EXPORT MASTER See «Exporting a stereo master» on page 100. Redo one operation UNDO/REDO See «Undoing o …
-
Tascam DP-004 — page 111
1 4 – Commonl y — used Functions T ASCA M DP — 0 04 111 How to Keys, etc. TO press Description Export a track’s contents to PC MENU ® WAVE ® EXPORT TRACK See «Exporting tracks» on page 99. Bounce tracks REC M OD E ® BOUNCE See «Bouncing tracks» on page 69. Format one partition M EN U ® CARD ® REFORMAT See «Refor …
-
Tascam DP-004 — page 112
TEAC CORPOR A TION Pho ne : + 81-42-3 56 — 91 4 3 www. tascam.j p 1-47 Och ia i, Tama- sh i, Tokyo 2 0 6 -8 53 0 J ap an TE AC A ME RI CA , IN C. Pho ne : +1-323 -726- 03 0 3 www. tascam.co m 7733 Tele gr a ph R oad , Mo nte be ll o, Ca li fo rn ia 9 0 6 40, U SA TE AC CA N ADA LTD. Pho ne : +1905 — 8 9 0 — 80 0 8 Fac s imi le : +1905 — 8 9 0 -9 8 …