
- Manuals
- Brands
- Yealink Manuals
- IP Phone
- SIP-T27G
- User manual
-
Contents
-
Table of Contents
-
Bookmarks
Quick Links
https://arttel.ru/
`
https://arttel.ru/shop/ip-telefony/yealink-sip-t27g
Related Manuals for Yealink SIP-T27G
Summary of Contents for Yealink SIP-T27G
-
Page 1
https://arttel.ru/shop/ip-telefony/yealink-sip-t27g… -
Page 2
Yealink and/or its respective suppliers are not responsible for the suitability of the information contained in this document for any reason. The information is provided “as is”, and Yealink does not provide any warranty and is subject to change without notice. All risks other than risks caused by use of the information are borne by the recipient. -
Page 3
The EULA for this product is available on the Yealink Support page for the product. -
Page 4
GPL. Please refer to the GPL for the exact terms and conditions of the license. The original GPL license, source code of components licensed under GPL and used in Yealink products can be downloaded online: http://www.yealink.com/GPLOpenSource.aspx?BaseInfoCateId=293&NewsCateId=293&CateId=293. -
Page 5: About This Guide
This guide provides everything you need to quickly use your new phone. First, verify with your system administrator that the IP network is ready for phone configuration. Also be sure to read the Packaging Contents in this guide before you set up and use the SIP-T27G IP phone. Yealink Products Regulatory Notices guide See the for all regulatory and safety guidance.
-
Page 6: Changes For Release 81, Guide Version 81.70
User Guide for the SIP-T27G IP Phone Volume on page Changes for Release 81, Guide Version 81.70 The following section is new: Parking a Call/Retrieving a Parked Call to the Monitored User on page Major updates have occurred to the following sections:…
-
Page 7: Table Of Contents
Phone Status …………………………..21 Basic Network Settings ……………………….22 Wireless Network Settings ……………………..24 Activating the Wi-Fi Mode ……………………..25 Connecting to the Wireless Network ………………….25 Viewing the Wireless Network Information ………………. 28 Managing the Saved Wireless Network ………………..29 https://arttel.ru/shop/ip-telefony/yealink-sip-t27g…
-
Page 8
User Guide for the SIP-T27G IP Phone Disconnecting the Wireless Network Connection …………….30 Deactivating the Wi-Fi Mode ……………………30 Registration …………………………..30 Idle Screen …………………………..31 Entering Data and Editing Fields……………………31 Customizing Your Phone …………. 35 General Settings …………………………35 Power Saving ………………………… -
Page 9: Table Of Contents
Using BLF Feature on the IP Phone ………………….152 BLF List …………………………….154 Call Recording …………………………156 Recording Using a USB Flash Drive ………………….156 Recording Using a Record Key ……………………162 Hot Desking …………………………..165 Intercom …………………………… 166 https://arttel.ru/shop/ip-telefony/yealink-sip-t27g…
-
Page 10
User Guide for the SIP-T27G IP Phone Configuring the Intercom Feature on the IP Phone…………….166 Using Intercom …………………………169 Multicast Paging …………………………170 Sending RTP Stream ……………………….170 Receiving RTP Stream ……………………… 173 Using Multicast Paging ……………………..175 Music on Hold (MoH) ………………………. -
Page 11: Overview
User Interfaces Documentations If you require additional information or assistance with your new phone, contact your system administrator. Hardware Component Instructions The main hardware components of the SIP-T27G IP phone are the LCD screen and the keypad. https://arttel.ru/shop/ip-telefony/yealink-sip-t27g…
-
Page 12
User Guide for the SIP-T27G IP Phone Hardware component instructions of the SIP-T27G IP phone are: Item Description Shows information about calls, messages, soft keys, time, date and other relevant data: • Default account • Call information—caller ID, call duration ①… -
Page 13: Icon Instructions
Icons appearing on the top of the LCD screen are described in the following table: Icons Description Network is unavailable Hands-free (speakerphone) mode Handset mode Headset mode Voice Mail Text Message Auto Answer Do Not Disturb (DND) Keep Mute Ringer volume is 0 Phone Lock Missed Calls Call Forward Wi-Fi connection is successful https://arttel.ru/shop/ip-telefony/yealink-sip-t27g…
-
Page 14: Line Key Icons
User Guide for the SIP-T27G IP Phone Icons Description Wi-Fi connection fails Bluetooth mode is on Bluetooth headset is both paired and connected Recording starts successfully (Using a USB flash drive) Recording is paused (Using a USB flash drive)
-
Page 15: Other Icons
A call cannot be recorded Recording starts successfully Recording cannot be started Recording cannot be stopped Icon indicator (associated with call history) Icon Description Received Calls Placed Calls Missed Calls Forwarded Calls Icon indicator (associated with contact) Icon Description The contact icon https://arttel.ru/shop/ip-telefony/yealink-sip-t27g…
-
Page 16: Led Instructions
User Guide for the SIP-T27G IP Phone LED Instructions Power Indicator LED LED Status Description Solid red The phone is initializing. Fast-flashing red (300ms) The phone is ringing. Slow-flashing red (1s) The phone receives a text message or voice mail.
-
Page 17
The bridged line is idle. Fast-flashing green The bridged line receives an incoming call. Solid green (for local BLA The bridged line is in conversation. phone) The bridged line is dialing. Solid red (for monitoring BLA The bridged line is seized. phone) https://arttel.ru/shop/ip-telefony/yealink-sip-t27g… -
Page 18: User Interfaces
LED are configurable via web user interface. You can also customize the BLF key LED status and BLF key behavior. For more information, contact your system administrator. User Interfaces Two ways to customize configurations of your SIP-T27G IP phone: The user interface on the IP phone. …
-
Page 19
—Contact Management √ —Directory —Local Directory √ —Blacklist √ —Remote Phone Book —Call History Management √ —Search Source List in Dialing —Logo Customization —Headset Use √ —Bluetooth Headset √ —DSS Keys √ —Account Management √ —Dial Plan —Emergency Number https://arttel.ru/shop/ip-telefony/yealink-sip-t27g… -
Page 20
User Guide for the SIP-T27G IP Phone Options Phone User Interface Web User Interface —Live Dialpad —Hotline √ Basic Call Features —Recent Call In Dialing —Auto Answer √ —Auto Redial √ —Call Completion √ —ReCall √ —Do Not Disturb (DND) √… -
Page 21: Documentations
√ Note The table above lists most of the feature options. Please refer to the relevant sections for more information. Documentations The following table shows documentations available for the SIP-T27G IP phone. Name Contents Where found Language Basic call features…
-
Page 22
User Guide for the SIP-T27G IP Phone https://arttel.ru/shop/ip-telefony/yealink-sip-t27g… -
Page 23: Getting Started
Entering Data and Editing Fields If you require additional information or assistance with your new phone, contact your system administrator. Packaging Contents The following components are included in your SIP-T27G IP phone package: SIP-T27G IP Phone https://arttel.ru/shop/ip-telefony/yealink-sip-t27g…
-
Page 24
User Guide for the SIP-T27G IP Phone Phone Stand Handset & Handset Cord Ethernet Cable Quick Start Guide Check the list before installation. If you find anything missing, contact your system administrator. https://arttel.ru/shop/ip-telefony/yealink-sip-t27g… -
Page 25: Optional Accessories
Getting Started Optional Accessories The following items are optional accessories for your SIP-T27G IP phone. You need to purchase them separately if required. Power Adapter (5.5mm DC plug) Wall Mount Bracket Headset YHS32/YHS33 Wireless Headset Adapter EHS36 …
-
Page 26: Phone Installation
Wi-Fi USB Dongle WF40 Note We recommend that you use the accessories provided or approved by Yealink. The use of unapproved third-party accessories may result in reduced performance. Phone Installation If your phone is already installed, proceed to Phone Initialization on page 20.
-
Page 27
Yealink Wall Mount For more information on how to attach the wall mount bracket, refer to Quick Installation Guide for Yealink IP Phones Connect the handset and optional headset Note The EXT port can also be used to connect an expansion module EXP20. -
Page 28
User Guide for the SIP-T27G IP Phone Connect the optional USB flash drive The USB flash drive should be purchased separately if required. Note The USB port can also be used to connect the Bluetooth USB dongle BT40 or Wi-Fi USB dongle WF40. -
Page 29
The IP phone should be used with Yealink original power adapter (5V/1.2A) only. The use of the third-party power adapter may cause the damage to the phone. Power over Ethernet With the included or a regular Ethernet cable, the SIP-T27G IP phone can be powered from a PoE-compliant switch or hub. To connect the PoE: Connect the Ethernet cable between the Internet port on the phone and an available port on the in-line power switch/hub. -
Page 30: Network Connection
Connecting to the Wireless Network Yealink SIP-T27G IP phone supports Wi-Fi feature. You can connect your phone to a wireless network. The wireless network is more convenient and cost-effective than wired network. The PC port is unavailable when using wireless network. For more information on how to connect to a…
-
Page 31: Phone Status
To view the phone status via web user interface: Open a web browser on your computer. Enter the IP address in the browser’s address bar, and then press the Enter key. (e.g., “http://192.168.0.10” for IPv4 or “http://[2005:1:1:1:215:65ff:fe64:6e0a]” for IPv6). https://arttel.ru/shop/ip-telefony/yealink-sip-t27g…
-
Page 32: Basic Network Settings
User Guide for the SIP-T27G IP Phone Enter the user name (admin) and password (admin) in the login page. Click Login to login. The phone status is displayed on the first page of the web user interface. If IP mode of the phone is configured as IPv4 & IPv6, you can enter either of them in the Note browser’s address bar to view the phone status.
-
Page 33
Press the Save soft key to accept the change or the Back soft key to cancel. You can configure a static IPv6 address for the IP phone. Before configuring it, make sure that the IP mode is configured as IPv6 or IPv4 & IPv6. https://arttel.ru/shop/ip-telefony/yealink-sip-t27g… -
Page 34: Wireless Network Settings
User Guide for the SIP-T27G IP Phone To configure a static IPv6 address via phone user interface: Press Menu->Settings->Advanced Settings (default password: admin) ->Network->WAN Port. Press to select IPv6 and then press the Enter soft key. Press to select Static IPv6 Client and then press the Enter soft key.
-
Page 35: Activating The Wi-Fi Mode
Press the Save soft key. The IP phone scans the available wireless networks in your area. Connecting to the Wireless Network Three ways to connect SIP-T27G IP phone to the wireless network: Manually connect to an available wireless network …
-
Page 36
User Guide for the SIP-T27G IP Phone available networks), and then press the Enter soft key. If there is no available wireless network, press the Scan soft key to search for the wireless network again. Press to select the desired wireless network. -
Page 37
WPS can automatically configure a wireless network with a network name (SSID) and strong WPA data encryption and authentication. Two methods supported by Yealink IP phones in the Wi-Fi protected setup: Push Button Configuration (PBC): The user simply has to press WPS key on both the IP … -
Page 38: Viewing The Wireless Network Information
User Guide for the SIP-T27G IP Phone Log into your gateway/router’s web interface, and configure it to search the clients. For more information, refer to the documentation from the gateway/router manufacturer. Once WPS-PIN setup has completed successfully, the gateway/router’s web interface will prompt success.
-
Page 39: Managing The Saved Wireless Network
Press the Save soft key. To change the priority of the wireless network: Select Move Up or Move Down from the prompt list to improve or lower the priority of the wireless network that the IP phone automatically connects to. https://arttel.ru/shop/ip-telefony/yealink-sip-t27g…
-
Page 40: Disconnecting The Wireless Network Connection
The SIP-T27G IP phone supports up to 6 accounts. If your phone is not registered, you may have to register it. For more information on…
-
Page 41: Idle Screen
When your phone keypad matches the input mode, you can press the keypad repeatedly to view the character (or number) options and stop to select. When the character (or number) you want to enter displays in the field, wait for one second, and enter the next character (or number). https://arttel.ru/shop/ip-telefony/yealink-sip-t27g…
-
Page 42
User Guide for the SIP-T27G IP Phone The following table lists the input modes and character (or number) options for the keypad: Input Mode Keypad (initials in capitals) abc2ä æå à á abc2ä æå à á ABC2ÄÆÅ 2abcABC â ã ç… -
Page 43
If it is in the uppercase (ABC soft key), lowercase (abc soft key), uppercase and lowercase (Abc soft key) or alphanumeric (2aB soft key) input mode, it will provide the following special characters: *.,’?!-()@/:_;+&%=<>£$¥ ¤ []{}~^¡ ¿ § #»|. https://arttel.ru/shop/ip-telefony/yealink-sip-t27g… -
Page 44
User Guide for the SIP-T27G IP Phone If you want to Then you can If it is in the numeric (123 soft key) input mode, it will provide the following special characters: .*:/@[]. Press to position the cursor to the right of the text you want to delete, and then press Delete text you entered. -
Page 45: Customizing Your Phone
Customizing Your Phone Customizing Your Phone You can customize your SIP-T27G IP phone by personally configuring certain settings, for example, contrast, time & date and ring tones. You can add contacts to the phone’s local directory manually or from call history. You can also personalize different ring tones for different callers.
-
Page 46
User Guide for the SIP-T27G IP Phone The office hour and idle timeout (minutes) settings work only if the power saving feature is enabled. Note Power saving is configurable via web user interface only. Enabling the Power Saving To enable the power saving feature via web user interface: Click on Settings->Power Saving. -
Page 47
The default value is 960, you can set to 1-960. Enter the desired value in the Off Hours Idle TimeOut field. The default value is 10, you can set to 1-10. Enter the desired value in the User Input Extension Idle TimeOut field. https://arttel.ru/shop/ip-telefony/yealink-sip-t27g… -
Page 48: Backlight
15s, 30s, 1min, 2min, 5min, 10min or 30min: Backlight is turned off when the phone is inactive after the designated time (in seconds). You can also change the intensity of the LCD screen of EXP20 connected to the SIP-T27G IP phone. To configure the backlight via phone user interface: Press Menu->Settings->Basic Settings->Display->Backlight.
-
Page 49: Contrast
Backlight is configurable via web user interface at the path Settings->Preference. Contrast You can configure the LCD screen contrast of EXP20 or SIP-T27G to a comfortable level. Ensure EXP20 has been connected to the phone before configuration. The intensity of contrast ranges from 1 to 10 and the highest intensity is 10.
-
Page 50: Time & Date
User Guide for the SIP-T27G IP Phone change the language for the phone user interface and the web user interface respectively. To change the language for the phone user interface: Press Menu->Settings->Basic Settings->Language. Press to select the desired language.
-
Page 51
To configure the time and date format via phone user interface: Press Menu->Settings->Basic Settings->Time & Date->Time & Date Format. Press , or the Switch soft key to select the desired time format (12 Hour or 24 Hour) from the Time Format field. https://arttel.ru/shop/ip-telefony/yealink-sip-t27g… -
Page 52: Administrator Password
User Guide for the SIP-T27G IP Phone Press , or the Switch soft key to select the desired date format from the Date Format field. Press the Save soft key to accept the change or the Back soft key to cancel.
-
Page 53: Key As Send
You can lock your phone temporarily when you are not using it. This feature helps to protect your phone from unauthorized use. Phone lock consists of the following: The Menu soft key is locked. You cannot access the menu of the Menu Key: phone until unlocked. https://arttel.ru/shop/ip-telefony/yealink-sip-t27g…
-
Page 54
User Guide for the SIP-T27G IP Phone The function keys are locked. You cannot use the MESSAGE, RD, Function Keys: HOLD, MUTE, TRAN, CONF, OK, X, navigation keys, soft keys and line keys until unlocked. All keys are locked except the Volume key, digit keys, # key, * key, All Keys: HEADSET key and Speakerphone key. -
Page 55
To unlock the phone via phone user interface: Press any locked key, enter the “Phone Lock” screen. Enter the desired PIN in the Unlock PIN field. Press the OK soft key to unlock the phone. The icon disappears from the LCD screen. https://arttel.ru/shop/ip-telefony/yealink-sip-t27g… -
Page 56: Audio Settings
User Guide for the SIP-T27G IP Phone You can long press or wait for a period of time (if configured) to lock the phone again. You can also unlock the phone by administrator password. When you enter the administrator Note password to unlock the phone, the phone will turn to the Change PIN screen.
-
Page 57
(handset, speakerphone or headset). You can also press to adjust the volume when playing back the recording calls. For Note more information, refer to Playing Back Recorded Calls on page 160. https://arttel.ru/shop/ip-telefony/yealink-sip-t27g… -
Page 58: Ring Tones
User Guide for the SIP-T27G IP Phone Ring Tones Ring tones are used to indicate incoming calls. You can select different ring tones to distinguish different accounts registered on your phone, or to distinguish your phone from your neighbor’s.
-
Page 59
The priority of ring tone for an incoming call on the phone is as follows: Contact ring tone (refer to Adding Contacts) >Group ring tone (refer to Adding Groups) >Account ring tone >Phone ring tone. Uploading custom ring tones for your phone is configurable via web user interface only. https://arttel.ru/shop/ip-telefony/yealink-sip-t27g… -
Page 60: Key Tone
User Guide for the SIP-T27G IP Phone Key Tone If you enable key tone, the phone will produce a sound when you press the keypad. To configure key tone via phone user interface: Press Menu->Settings->Basic Settings->Sound->Key Tone. Press , or the Switch soft key to select Enabled or Disabled from the Key Tone field.
-
Page 61
The list(s) to access for the Directory soft key is configurable via web user interface only. view the directory list(s) via phone user interface: Press the Directory soft key when the phone is idle. The LCD screen displays the enabled list(s) in the directory. https://arttel.ru/shop/ip-telefony/yealink-sip-t27g… -
Page 62: Local Directory
User Guide for the SIP-T27G IP Phone If there is only one list in the directory, press the Directory soft key to enter this list directly. Note If the remote phone book and LDAP are not configured in advance, you cannot see remote phone book and LDAP lists on the phone user interface.
-
Page 63
Directory on page , press Menu->Directory->Local Directory to enter the local directory. Select the desired contact group. Press the Option soft key, and then select Detail from the prompt list. Press to highlight the group information and then edit. https://arttel.ru/shop/ip-telefony/yealink-sip-t27g… -
Page 64
User Guide for the SIP-T27G IP Phone Press the Save soft key to accept the change or the Back soft key to cancel. Deleting Groups To delete a group from the local directory: Press the Directory soft key. The IP phone enters the local directory directly as there is only Local Directory enabled in the directory by default. -
Page 65
If Auto is selected, this contact will use the ring tone according to the priority: Group ring tone (refer to Adding Groups) >Account ring tone (refer to Ring Tones) >Phone ring tone (refer to Ring Tones). Press , or the Switch soft key to select the desired group from the Group field. https://arttel.ru/shop/ip-telefony/yealink-sip-t27g… -
Page 66
User Guide for the SIP-T27G IP Phone Press the Add soft key to accept the change or the Back soft key to cancel. Note If the contact already exists in the directory, the LCD screen will prompt “Contact name existed!”. -
Page 67
Press the Save soft key to accept the change or the Back soft key to cancel. Deleting Contacts To delete a contact from the local directory: Press the Directory soft key. https://arttel.ru/shop/ip-telefony/yealink-sip-t27g… -
Page 68
User Guide for the SIP-T27G IP Phone The IP phone enters the local directory directly as there is only Local Directory enabled in the directory by default. If Local Directory is removed from the directory refer to Directory on page , press Menu->Directory->Local Directory to enter the local directory. -
Page 69
The IP phone enters the local directory directly as there is only Local Directory enabled in the directory by default. If Local Directory is removed from the directory refer to Directory on page , press Menu->Directory->Local Directory to enter the local directory. Press the Search soft key. https://arttel.ru/shop/ip-telefony/yealink-sip-t27g… -
Page 70
User Guide for the SIP-T27G IP Phone Enter a few continuous characters of the contact name or continuous numbers of the contact number (office, mobile or other number) using the keypad. The contacts whose name or phone number matches the characters entered will appear on the LCD screen. -
Page 71: Blacklist
Importing/exporting contact lists is available via web user interface only. Note Blacklist The built-in phone directory can store names and phone numbers for a blacklist. You can store up to 30 contacts, add, edit, delete or search for a contact in the blacklist directory, and even call https://arttel.ru/shop/ip-telefony/yealink-sip-t27g…
-
Page 72
User Guide for the SIP-T27G IP Phone a contact from the blacklist directory. Incoming calls from blacklist directory contacts will be rejected automatically. To add a contact to the blacklist directory manually: Press Menu->Directory->Blacklist. Press the Add soft key. -
Page 73: Remote Phone Book
To configure an access URL for a remote phone book via web user interface: Click on Directory->Remote Phone Book. Enter the access URL in the Remote URL field. Enter the name in the Display Name field. Enter the desired refresh period in the Update Time Interval(Seconds) field. https://arttel.ru/shop/ip-telefony/yealink-sip-t27g…
-
Page 74
User Guide for the SIP-T27G IP Phone The default value is 21600. Click Confirm to accept the change. Note An access URL for a remote phone book is configurable via web user interface only. The size of a remote phone book file should be less than 1.5M. We recommend you to download less than 5000 remote contacts from the remote server. -
Page 75: Call History Management
Click Confirm to accept the change. Call History Management The SIP-T27G IP phone maintains call history lists of Missed Calls, Placed Calls, Received Calls and Forwarded Calls. Each call history list supports up to 100 entries. You can view call history, place a call, add a contact or delete an entry from the call history list.
-
Page 76: Placing A Call From History Records
User Guide for the SIP-T27G IP Phone Placing a Call from History Records To place a call from the call history list: Press the History soft key. Press to switch among All Calls, Missed Calls, Placed Calls, Received Calls and Forwarded Calls.
-
Page 77: Disabling History Record
To configure search source list in dialing via web user interface: Click on Directory->Setting. In the Search Source List In Dialing block, select the desired list from the Disabled column and click The selected list appears in the Enabled column. https://arttel.ru/shop/ip-telefony/yealink-sip-t27g…
-
Page 78
User Guide for the SIP-T27G IP Phone Repeat the step 2 to add more lists to the Enabled column. To remove a list from the Enabled column, select the desired list and then click To adjust the display order of the enabled list, select the desired list, and click The LCD screen will display search results in the adjusted order. -
Page 79: System Customizations
Delete item will appear after you upload a custom logo, you can click Delete to delete the custom logo. The logo file format must be *.dob, contact your system administrator for more information. A custom logo can be uploaded via web user interface only. https://arttel.ru/shop/ip-telefony/yealink-sip-t27g…
-
Page 80: Headset Use
User Guide for the SIP-T27G IP Phone Headset Use If you want to use a wired headset, physically connect your headset to the phone and activate the headset mode for use. For more information on physically connecting a headset, refer to Phone Installation on page 16.
-
Page 81
Once the phone connects to a call, the headset connected to the headset jack will have full-duplex capabilities, while the one connected to the handset jack will only be able to listen. https://arttel.ru/shop/ip-telefony/yealink-sip-t27g… -
Page 82: Bluetooth Headset
Dual headset is configurable via web user interface only. Bluetooth Headset The SIP-T27G IP phone supports Bluetooth. Bluetooth enables low-bandwidth wireless connections within a range of 10 meters (32 feet). The best performance is in the 1 to 2 meters (3 to 6 feet) range.
-
Page 83
Bluetooth headset is discoverable. For more information, refer to the documentation from the Bluetooth headset manufacturer. To pair and connect your Bluetooth headset to your IP phone: Press Menu->Settings->Basic Settings->Bluetooth. Press the Scan soft key to search the Bluetooth devices. https://arttel.ru/shop/ip-telefony/yealink-sip-t27g… -
Page 84
User Guide for the SIP-T27G IP Phone The phone proceeds to scan the local Bluetooth devices. When the phone completes scanning, it will display the available Bluetooth devices on the LCD screen. Select the desired Bluetooth headset and then press Connect soft key. -
Page 85
Enter the desired name in the Device Name field. The default device name is “Yealink T27G”. Press the Save soft key to accept the change or the Back soft key to cancel. The preconfigured Bluetooth device name will display in scanning list of other devices. -
Page 86: Dss Keys
User Guide for the SIP-T27G IP Phone Deleting the Paired Bluetooth Headset You can delete your Bluetooth headset from your phone. When you delete the Bluetooth headset, it will disappear from the Paired Bluetooth Device list. To connect it to your IP phone again, you need to scan and connect it again.
-
Page 87
Customizing Your Phone introduced in the following. The SIP-T27G IP phone supports 21 line keys and 14 programable keys. Line Keys You can assign predefined functionalities to line keys. You can also define a label for a line key feature which will appear on the LCD screen. -
Page 88
User Guide for the SIP-T27G IP Phone When you assign functionality to line key located in line key 9-21, the label of the line key 8-14 are indicated on the second page, and the labels of the line key 15-21 are indicated on the third page. -
Page 89
Voice Mail Direct Pickup Group Pickup DTMF Prefix Local Group XML Group XML Browser LDAP Conference Forward Transfer Hold Group Listening Multicast Paging https://arttel.ru/shop/ip-telefony/yealink-sip-t27g… -
Page 90
User Guide for the SIP-T27G IP Phone Paging List Zero Touch Phone Lock Directory For the features not listed above, refer to Basic Call Features on page Advanced Phone Features on page 147. For more information, contact your system administrator. -
Page 91
Label (key label displayed on the LCD screen) Value (DTMF sequence) Usage: Press the DSS key during an active call to send the key sequence specified in the Value field. DTMF sequence can only contain “0-9”, “*”, “#” and ”A-E”. Note https://arttel.ru/shop/ip-telefony/yealink-sip-t27g… -
Page 92
User Guide for the SIP-T27G IP Phone Prefix You can use this key feature to add a specified prefix number before the dialed number. Type (Key Event) Dependencies: Key Type (Prefix) Label (key label displayed on the LCD screen) -
Page 93
You can use this key feature to forward an incoming call to someone else. For more information, refer to Call Forward on page 117. Type (Key Event) Dependencies: Key Type (Forward) Label (key label displayed on the LCD screen) Value (the number you want to forward to) https://arttel.ru/shop/ip-telefony/yealink-sip-t27g… -
Page 94
User Guide for the SIP-T27G IP Phone Usage: Press the Forward key to forward an incoming call to the number specified in the Value field. If the Value field is left blank, the Forward key performs the same as the Forward soft key when Note receiving an incoming call. -
Page 95
Press the Group Listening key again to deactivate the group listening mode. Zero Touch You can use this key feature to quickly configure auto provision and network parameters. https://arttel.ru/shop/ip-telefony/yealink-sip-t27g… -
Page 96
User Guide for the SIP-T27G IP Phone Type (Key Event) Dependencies: Key Type (Zero Touch) Label (key label displayed on the LCD screen) Usage: Press the Zero Touch key to access the zero touch screen. Press the OK soft key within a few seconds. -
Page 97
To customize programable keys via web user interface: Click on Dsskey->Programable Key. Customize specific features for these keys. (Optional.) Enter the string that will appear on the LCD screen in the Label field. Label is configurable only when customizing SoftKey (1-4). https://arttel.ru/shop/ip-telefony/yealink-sip-t27g… -
Page 98: Account Management
Usage: Press the Switch Account Down key to scroll down the account list to select the desired default account. Ext Keys If EXP20 is connected to the SIP-T27G IP phone, you can customize features for ext keys. To customize ext keys via phone user interface: Long press the desired ext key on EXP20.
-
Page 99
The following figures demonstrate single or multiple accounts registered on the phone: Single account: Multiple accounts: To disable an account via phone user interface: Press Menu->Settings->Advanced Settings (default password: admin) ->Accounts. Select the desired account and then press the Enter soft key. Select Disabled from the Activation field. https://arttel.ru/shop/ip-telefony/yealink-sip-t27g… -
Page 100: Dial Plan
Dial Plan Dial plan is a string of characters that governs the way your SIP-T27G IP phone processes the inputs received from your phone keypad. The SIP-T27G IP phone supports the following dial plan features: Replace Rule …
-
Page 101
“Prefix: 1” and “Replace: 1234”, when you try to dial out the number “1234”, you just need to enter “1” on the phone and then press the Send soft key. To add a replace rule via web user interface: Click on Settings->Dial Plan->Replace Rule. https://arttel.ru/shop/ip-telefony/yealink-sip-t27g… -
Page 102
User Guide for the SIP-T27G IP Phone Enter the string (e.g., 1) in the Prefix field. Enter the string (e.g., 1234) in the Replace field. Enter the desired line ID in the Account field or leave it blank. Click Add to add the replace rule. -
Page 103
You can configure the delay time for dial now rules. That is, you can configure your phone to automatically dial out the phone number which matches a dial now rule, after the designated delay time. To configure the time out for dial now rule via web user interface: Click on Features->General Information. https://arttel.ru/shop/ip-telefony/yealink-sip-t27g… -
Page 104
User Guide for the SIP-T27G IP Phone Enter the time between 0 and 14 (seconds) in the Time Out for Dial Now Rule field. The default value is “1”. Click Confirm to accept the change. Note Time out for dial now rule is configurable via web user interface only. -
Page 105
Enter the desired value in the BlockOut NumberX field. Enter the desired line ID in the Account field or leave it blank. For more information on the valid values for the Account field, refer to Replace Rule page 91. https://arttel.ru/shop/ip-telefony/yealink-sip-t27g… -
Page 106: Emergency Number
User Guide for the SIP-T27G IP Phone Click Confirm to add the block out number. Note Block out number is configurable via web user interface only. Emergency Number Public telephone networks in countries around the world have a single emergency telephone number (emergency services number), that allows a caller to contact local emergency services for assistance when necessary.
-
Page 107: Live Dialpad
Customizing Your Phone Live Dialpad You can enable live dialpad feature on the SIP-T27G IP phone, which enables the IP phone to automatically dial out a phone number without pressing the send key. You can also configure a delay, and then the phone will dial out the phone number automatically after the designated period of time.
-
Page 108
User Guide for the SIP-T27G IP Phone The valid values range from 0 to 10 (seconds) and the default value is 4. Press the Save soft key to accept the change or the Back soft key to cancel. Hotline is configurable via web user interface at the path Features->General Information. -
Page 109: Basic Call Features
Basic Call Features Basic Call Features The SIP-T27G IP phone is designed to be easily used like a regular phone on a public switched telephone network (PSTN). You can place calls, answer calls, transfer a call to someone else, or conduct a conference call.
-
Page 110: Placing Calls
User Guide for the SIP-T27G IP Phone Placing Calls You can place a call in one of three ways using your SIP-T27G IP phone: Using the handset Using the speakerphone Using the headset You can also dial the number first, and then choose the way you want to speak to the other party.
-
Page 111
The SIP-T27G IP phone can handle a maximum of 50 calls at one time. To place multiple calls: You can have more than one call on your SIP-T27G IP phone. To place a new call during an active call, do one of the following: Press the line key. -
Page 112: Answering Calls
User Guide for the SIP-T27G IP Phone You can press to switch between calls, and then press the Resume soft key to retrieve the desired call. Note If multiple accounts are registered on the phone, you can first press the desired line key on the idle screen or press the Line soft key on the dialing screen, and then you can use the selected account to place a call.
-
Page 113: Auto Answer
, or the Switch soft key to select Enabled from the Status field. Press the Save soft key to accept the change or the Back soft key to cancel. The icon appears on the LCD screen only when the auto answer feature is enabled for the default account. https://arttel.ru/shop/ip-telefony/yealink-sip-t27g…
-
Page 114: Ending Calls
User Guide for the SIP-T27G IP Phone Auto answer is configurable via web user interface at the path Account->Basic. Auto answer only takes effect when there is no other call in progress on the phone. If there is a…
-
Page 115: Recent Call In Dialing
To view placed calls list when the phone is on the dialing screen: Pick up the handset, press the Speakerphone key or press the line key. The LCD screen displays the placed calls list. You can also enter a few continuous characters of the contact name or continuous numbers https://arttel.ru/shop/ip-telefony/yealink-sip-t27g…
-
Page 116: Auto Redial
User Guide for the SIP-T27G IP Phone of the contact number (office, mobile or other number) to search from placed calls list. Auto Redial You can enable auto redial to automatically redial a phone number when the called party is busy.
-
Page 117: Call Completion
You can use call completion to notify the caller who failed to reach a desired party when the party becomes available to receive a call. To configure call completion via phone user interface: Press Menu->Features->Call Completion. Press , or the Switch soft key to select Enabled from the Call Completion field. https://arttel.ru/shop/ip-telefony/yealink-sip-t27g…
-
Page 118: Recall
User Guide for the SIP-T27G IP Phone Press the Save soft key to accept the change or the Back soft key to cancel. Call completion is configurable via web user interface at the path Features->General Information. To use call completion: When the called party is busy, the following prompt will appear on the LCD screen of the phone: Press the OK soft key, the phone returns to the idle screen and call completion is activated.
-
Page 119: Call Mute
When you mute the phone in an idle state or any other states, the icon appears on the status bar. Note Keep mute should be pre-configured by your system administrator. https://arttel.ru/shop/ip-telefony/yealink-sip-t27g…
-
Page 120: Muting A Call
User Guide for the SIP-T27G IP Phone Muting a Call To mute a call: Press during an active call. The LCD screen indicates that the call is now muted. To un-mute a call: Press again to un-mute the call.
-
Page 121
Press the corresponding line key to retrieve the call. If more than two calls are on hold, a numbered prompt appears on the LCD screen, for example «2/4», indicating that this is the second call out of four calls. https://arttel.ru/shop/ip-telefony/yealink-sip-t27g… -
Page 122: Do Not Disturb (Dnd)
User Guide for the SIP-T27G IP Phone Do Not Disturb (DND) You can use DND to reject incoming calls automatically on the phone. The prompt message «n New Missed Call(s)» («n» indicates the number of missed calls, e.g., 1 New Missed Call(s)) will appear on the LCD screen, and callers will receive a busy message.
-
Page 123
When DND and busy forward are activated in phone mode, calls will be sent to the configured destination number. For more information on busy forward, refer to Call Forward on page 117. To activate DND in custom mode: Press the DND soft key when the phone is idle. https://arttel.ru/shop/ip-telefony/yealink-sip-t27g… -
Page 124
User Guide for the SIP-T27G IP Phone The LCD screen displays a list of accounts on the phone. You can activate it for a specific account: Press to select the desired account and then press the Enter soft key. -
Page 125
You can receive incoming calls from authorized numbers when DND is activated. To configure the DND authorized numbers via web user interface: Click on Features->Forward&DND. Select Enabled from the pull-down list of DND Emergency. Enter the numbers in the DND Authorized Numbers field. https://arttel.ru/shop/ip-telefony/yealink-sip-t27g… -
Page 126
User Guide for the SIP-T27G IP Phone For multiple numbers, enter a comma between every two numbers. Click Confirm to accept the change. When DND is activated on the phone, the phone can still receive incoming calls from the numbers specified in the DND Authorized Numbers field. -
Page 127: Call Forward
There are two call forward modes: Phone (default): Call forward is effective for the phone system. Custom: Call forward can be configured for each or all accounts. To configure the call forward mode via web user interface: Click on Features->Forward&DND. https://arttel.ru/shop/ip-telefony/yealink-sip-t27g…
-
Page 128
User Guide for the SIP-T27G IP Phone In the Forward block, mark the desired radio box in the Mode field. Click Confirm to accept the change. Note Call forward mode is configurable via web user interface only. To activate call forward in phone mode: Press Menu->Features->Call Forward or press… -
Page 129
(Optional.) Enter the no answer forward on code or off code respectively in the On Code or Off Code field. Press the Save soft key to accept the change or the Back soft key to cancel. The icon on the status bar indicates that the call forward is activated. https://arttel.ru/shop/ip-telefony/yealink-sip-t27g… -
Page 130
User Guide for the SIP-T27G IP Phone To activate call forward in custom mode: Press Menu->Features->Call Forward or press when the phone is idle. Press to select the desired account, and then press the Enter soft key. Press to select the desired forwarding type, and then press the Enter soft key. -
Page 131
Press the OK soft key to accept the change or the Cancel soft key to cancel. c) If you select No Answer Forward, you can activate it for a specific account. Press , or the Switch soft key to select Enabled from the No Answer https://arttel.ru/shop/ip-telefony/yealink-sip-t27g… -
Page 132
User Guide for the SIP-T27G IP Phone Forward field. Enter the destination number you want to forward unanswered incoming calls to in the Forward to field. Press , or the Switch soft key to select the ring time to wait before forwarding from the After Ring Time field. -
Page 133
*71 (may vary on different servers), and the target number to be 1234. When you activate Always Forward on the IP phone, the IP phone sends *711234 to the server, and then the server will activate Always Forward feature on the server side, hence being able to get the right status of the extension. https://arttel.ru/shop/ip-telefony/yealink-sip-t27g… -
Page 134
User Guide for the SIP-T27G IP Phone Call forward is configurable via web user interface at the path Features->Forward&DND. Note You can also enter the SIP URL or IP address in the Forward to field. For more information on… -
Page 135: Dynamic Forwarding
Semi-Attended Transfer: Transfer a call when the target phone is ringing. Attended Transfer (Consultative Transfer): Transfer a call with prior consulting. Allow Trans Exist Call You can also transfer a call to another existing call during multiple calls. https://arttel.ru/shop/ip-telefony/yealink-sip-t27g…
-
Page 136: Blind Transfer
User Guide for the SIP-T27G IP Phone To enable allow trans exist call via web user interface: Click on Features->General Information. Select Enabled from the pull-down list of Allow Trans Exist Call. Click Confirm to accept the change. Blind Transfer Before performing a blind transfer (except you use dial number method), make sure that the transfer mode on DSS key is configured as Blind Transfer.
-
Page 137
Transfer soft key during a call. You can do one of the following: Press to select the desired hold call you want to transfer the call to. Press or the Select soft key. Select New Call, you can do one of the following: https://arttel.ru/shop/ip-telefony/yealink-sip-t27g… -
Page 138: Semi-Attended Transfer
User Guide for the SIP-T27G IP Phone Enter the number you want to transfer the call to. Press or the Transfer soft key to complete the transfer. If you are using a handset, the transfer can be completed by hanging up the handset.
-
Page 139: Attended Transfer
Press the Directory soft key, and then select Remote Phone Book. Select the desired group and search for the contact (Directory should be configured in advance. Refer to Directory on page Remote Phone Book on page for more information). https://arttel.ru/shop/ip-telefony/yealink-sip-t27g…
-
Page 140: Call Waiting
User Guide for the SIP-T27G IP Phone Press or the Send soft key to dial out. If Allow Trans Exist Call (refer to Allow Trans Exist Call on page 125) is enabled, you can select the New Call and repeat steps mentioned above to complete transfer.
-
Page 141: Conference
Local Conference The SIP-T27G IP phone supports up to 3 parties (including yourself) in a conference call. This is the default method of conference called Local Conference. To set up a local conference call, make sure local conference feature is enabled. For more Note information, contact your system administrator.
-
Page 142: Network Conference
Press the End Call soft key to drop the conference call. Network Conference You can use network conference feature on the SIP-T27G IP phone to conduct a conference with multiple participants. This feature allows you to perform the following: Join two calls together into a conference call.
-
Page 143: Call Park/Retrieve
The procedures to set up a network conference call on specific servers may be different from introduced above. Contact your system administrator for more information. Call Park/Retrieve You can use call park feature to place a call on hold, and then retrieve the call from another https://arttel.ru/shop/ip-telefony/yealink-sip-t27g…
-
Page 144
User Guide for the SIP-T27G IP Phone phone in the system (for example, a phone in another office or conference room). You can park an active call by pressing the Park soft key or call park key (if configured) on the phone. If the call is parked successfully, there is a voice prompt confirming that the call was parked. -
Page 145: Fac Mode
Click Confirm to accept the change. Note If the Park or Retrieve soft key doesn’t appear on the LCD screen, please select Disabled from the pull-down list of Custom Softkey via web user interface at path Settings->Softkey Layout. https://arttel.ru/shop/ip-telefony/yealink-sip-t27g…
-
Page 146
User Guide for the SIP-T27G IP Phone To park a call in FAC mode: During a call, press the Park soft key (You may need to press the More soft key to see the Park soft key) or the call park key (if configured). -
Page 147: Transfer Mode
(Optional.) Enter the call park code in the Call Park Code field. It is configured for the Park soft key. This call park code will also apply to the call park key. (Optional.) Enter the park retrieve code in the Park Retrieve Code field. https://arttel.ru/shop/ip-telefony/yealink-sip-t27g…
-
Page 148
User Guide for the SIP-T27G IP Phone It is configured for the Retrieve soft key. This park retrieve code will also apply to the call park key. Click Confirm to accept the change. If the Park or Retrieve soft key doesn’t appear on the LCD screen, please select Disabled from Note the pull-down list of Custom Softkey via web user interface at path Settings->Softkey… -
Page 149: Call Pickup
The phone will retrieve the parked call from the shared parking lot. Call Pickup You can use call pickup to answer someone else’s incoming call on your phone. The SIP-T27G IP phone supports directed call pickup and group call pickup. Directed call pickup is used for picking up a call that is ringing at a target phone number.
-
Page 150
User Guide for the SIP-T27G IP Phone Enter the directed call pickup code in the Directed Call Pickup Code field. Click Confirm to accept the change. To configure the directed call pickup code on a per-line basis via web user interface: Click on Account->Advanced. -
Page 151: Group Call Pickup
To enable group call pickup and configure the group call pickup code on a global basis via web user interface: Click on Features->Call Pickup. Select Enabled from the pull-down list of Group Call Pickup. Enter the group call pickup code in the Group Call Pickup Code field. Click Confirm to accept the change. https://arttel.ru/shop/ip-telefony/yealink-sip-t27g…
-
Page 152
User Guide for the SIP-T27G IP Phone To configure the group call pickup code on a per-line basis via web user interface: Click on Account->Advanced. Select the desired account from the pull-down list of Account. Enter the group call pickup code in the Group Call Pickup Code field. -
Page 153: Anonymous Call
The phone will send the configured on code or off code depending on your selection when you enable or disable anonymous call feature on the phone. (Optional.) Enter the anonymous call on code in the On Code field. (Optional.) Enter the anonymous call off code in the Off Code field. https://arttel.ru/shop/ip-telefony/yealink-sip-t27g…
-
Page 154: Anonymous Call Rejection
User Guide for the SIP-T27G IP Phone Press the Save soft key to accept the change or the Back soft key to cancel. Anonymous call is configurable via web user interface at the path Account->Basic. To place an anonymous call: Using the specific line on the phone to place a call to phone B.
-
Page 155
(Optional.) Enter the anonymous call rejection off code in the Off Code field. Press the Save soft key to accept the change or the Back soft key to cancel. Anonymous call rejection is configurable via web user interface at the path Account->Basic. https://arttel.ru/shop/ip-telefony/yealink-sip-t27g… -
Page 156
User Guide for the SIP-T27G IP Phone https://arttel.ru/shop/ip-telefony/yealink-sip-t27g… -
Page 157: Advanced Phone Features
Advanced Phone Features Advanced Phone Features This chapter provides operating instructions for the advanced features of the SIP-T27G IP phone. Topics include: If you require additional information or assistance with your new phone, contact your system administrator. Busy Lamp Field (BLF) You can use BLF to monitor a specific line for status changes on the phone.
-
Page 158
User Guide for the SIP-T27G IP Phone If it is configured, when the monitored user receives an incoming call, the supervisor can press the BLF key to pick up the call directly. Contact your system administrator for more information. -
Page 159
If your phone is locked and the type of the phone lock is configured as Function Keys or All Note Keys, you cannot use the Pick Up, Send, New Call and Cancel soft keys until unlocked. For more information refer to Phone Lock on page 43. https://arttel.ru/shop/ip-telefony/yealink-sip-t27g… -
Page 160
User Guide for the SIP-T27G IP Phone Configuring Directed Call Pickup Code If you configure the directed call pickup code in advance, you can pick up the monitored user’s incoming call by pressing the BLF key. You can configure the directed call pickup code when configuring a BLF key. -
Page 161
If you select Attended Transfer, press the BLF key to dial out the monitored phone number and then perform an attended or a semi-attended transfer. If you select New Call, press the BLF key to place a new call to the monitored user. https://arttel.ru/shop/ip-telefony/yealink-sip-t27g… -
Page 162: Using Blf Feature On The Ip Phone
User Guide for the SIP-T27G IP Phone The original call is placed on hold. Click Confirm to accept the change. Note Transfer Mode on DSS Key is also applicable to BLF list feature. Using BLF Feature on the IP Phone You can use the BLF key in the following ways: Place a call to the monitored user.
-
Page 163
If the directed call pickup code is not configured, the phone will place a call to the monitored Note user instead of picking up an incoming call of the monitored user when you press the BLF key or the DPickup soft key. https://arttel.ru/shop/ip-telefony/yealink-sip-t27g… -
Page 164: Blf List
User Guide for the SIP-T27G IP Phone Parking a Call/Retrieving a Parked Call to the Monitored User You can press the desired BLF key to park a call or retrieve a parked call directly in FAC mode. It should be pre-configured by your system administrator.
-
Page 165
BLF List keys beginning from the first unused DSS key (The default order of BLF list keys assigned automatically is Line Key->Ext Key. To customize the assignment order, contact your system administrator.). Once any DSS key is seized, the IP phone will skip to configure the next DSS key. https://arttel.ru/shop/ip-telefony/yealink-sip-t27g… -
Page 166: Call Recording
139. Call Recording The SIP-T27G IP phone supports local and server recording. If you insert a USB flash drive into the USB port on your phone, you can record active calls on your phone. The recordings are saved as *.wav files on your USB flash drive. You can also record active calls by pressing a record…
-
Page 167
The phone prompts you to answer an incoming call Call Recording You can record active calls or conferences. To record a call: Press the More soft key, and then press the StartREC soft key during a call. https://arttel.ru/shop/ip-telefony/yealink-sip-t27g… -
Page 168
User Guide for the SIP-T27G IP Phone The LCD screen displays the icon and recording duration. During the recording, you can do the following: Press the More soft key, and then press the PauseREC soft key. Then appears on the LCD screen and the duration stops counting. -
Page 169
When you end a call while recording, the recording will be stopped and saved as *.wav files on the USB flash drive automatically. To stop recording while the phone records, do one of the following: Press the More soft key, and then press the StopREC soft key. https://arttel.ru/shop/ip-telefony/yealink-sip-t27g… -
Page 170
User Guide for the SIP-T27G IP Phone The LCD screen prompts “Call has been successfully recorded on USB device”, the recording icon and recording duration disappear. Press the More soft key and then press the End Call soft key. -
Page 171
If you are playing back a recorded call and an incoming call arrives on your phone, the playback pauses and the phone rings. You can press the Play soft key again to play the recording when ending the call. https://arttel.ru/shop/ip-telefony/yealink-sip-t27g… -
Page 172: Recording Using A Record Key
User Guide for the SIP-T27G IP Phone Deleting the Recorded File To delete a recorded file: Press Menu->USB->Browse Audio. Press to highlight the recording you want to delete. Press the Delete soft key. The LCD screen prompts the following warning: Press the OK soft key to confirm the deletion or the Cancel soft key to cancel.
-
Page 173
Press the Save soft key to accept the change or the Back soft key to cancel. Record key is configurable via web user interface at the path Dsskey->Line Key. Configuring a URL Record Key To configure a URL record key via phone user interface: Press Menu->Features->DSS Keys. https://arttel.ru/shop/ip-telefony/yealink-sip-t27g… -
Page 174
User Guide for the SIP-T27G IP Phone Select the desired DSS key. Press , or the Switch soft key to select URL Record from the Type field. (Optional.) Enter the string that will appear on the LCD screen in the Label field. -
Page 175: Hot Desking
You can use hot desking on the SIP-T27G IP phone to log out of existing accounts and then log into a new account. As a result, many users can share the phone resource at different times. To use this feature, you need to configure a hot desking key in advance.
-
Page 176: Intercom
User Guide for the SIP-T27G IP Phone The LCD screen prompts the following warning: Press the OK soft key, registration configurations of all accounts on the phone will be cleared immediately. The login wizard will be displayed as below: Enter the login information in each field.
-
Page 177
Intercom key is configurable via web user interface at the path Dsskey->Line Key. Incoming Intercom Calls The SIP-T27G IP phone supports automatically to answer an incoming intercom call by default. The phone automatically plays a warning tone when it receives an incoming intercom call. In addition, you can enable the phone to mute the microphone when it automatically answers an incoming intercom call. -
Page 178
User Guide for the SIP-T27G IP Phone Intercom Allow You can enable or disable the phone to automatically answer an incoming intercom call. If Intercom Allow is enabled, the phone will automatically answer an incoming intercom call. If Intercom Allow is disabled, the phone will handle an incoming intercom call like a normal call instead of directly rejecting it. -
Page 179: Using Intercom
You can configure the directed call pickup code when configuring an intercom key. For more information, refer to Configuring an Intercom Key on page 166. To pick up an incoming call when the monitored phone is ringing: Press the intercom key. https://arttel.ru/shop/ip-telefony/yealink-sip-t27g…
-
Page 180: Multicast Paging
The following describes 31 paging channels: 0: You can broadcast audio to channel 0. Note that the Yealink IP phones running old firmware version (old paging mechanism) can be regarded as listening to channel 0. It is the default channel.
-
Page 181
To configure paging list via phone user interface: Press the paging list key when the phone is idle. If the paging list key is not configured, you can also press Menu->Features->Paging List to configure the paging list. Press to select a desired paging group. https://arttel.ru/shop/ip-telefony/yealink-sip-t27g… -
Page 182
User Guide for the SIP-T27G IP Phone The default tag is Empty if it is not configured before. Press the Option soft key, and then press the Edit soft key. Enter the multicast IP address and port number (e.g., 224.5.6.20:10008) in the Address field. -
Page 183: Receiving Rtp Stream
RTP stream is listened in the hands-free (speakerphone) mode by default. If you want to listen the Note RTP stream using the engaged audio device (speakerphone, handset or headset), contact your system administrator for more information. Fixed volume to play RTP stream for specified paging group is configurable by your system administrator. https://arttel.ru/shop/ip-telefony/yealink-sip-t27g…
-
Page 184
User Guide for the SIP-T27G IP Phone How the phone handles incoming multicast paging calls depends on Paging Barge, Ignore DND and Paging Priority Active parameters configured via web user interface. Paging Barge The paging barge parameter defines the priority of the voice call in progress. If the priority of an incoming multicast paging call is lower than that of the active call, it will be ignored automatically. -
Page 185: Using Multicast Paging
The multicast paging key LED illuminates solid green. The following figure shows a multicast RTP session on the phone: You can do the following: To place the current multicast RTP session on hold, press the Hold soft key. https://arttel.ru/shop/ip-telefony/yealink-sip-t27g…
-
Page 186
User Guide for the SIP-T27G IP Phone The sender’s phone places the multicast RTP session on hold and receiver’s phone releases the session. To resume the held multicast RTP session, press the Resume soft key. The multicast RTP session is established again. -
Page 187: Music On Hold (Moh)
When you place a call on hold, the held party can hear the music. For this feature to function, all involved parties cannot use encrypted RTP (SRTP). Note Music on hold server is configurable via web user interface only. https://arttel.ru/shop/ip-telefony/yealink-sip-t27g…
-
Page 188: Automatic Call Distribution (Acd)
ACD on the SIP-T27G IP phone allows the ACD system to distribute large volumes of incoming calls to the registered ACD users. To use this feature, you should configure an ACD key in advance.
-
Page 189: Shared Call Appearance (Sca)
Either the boss or the secretary can answer the call. Calls on the shared line can be placed on hold, barged in or retrieved from another shared phone. https://arttel.ru/shop/ip-telefony/yealink-sip-t27g…
-
Page 190: Configuring Sca Feature On The Ip Phone
User Guide for the SIP-T27G IP Phone Configuring SCA Feature on the IP Phone You can configure a primary account on the IP phone and other alternate accounts on the other IP phones. In a SCA Hybrid Key System scenario, you can automatically assign multiple DSS keys with Line type for a registered shared line on the phone (If auto linekeys feature is enabled).
-
Page 191
Advanced Phone Features Auto LineKeys is enabled, you can automatically assign multiple DSS keys with Line type for a registered shared line on the phone. Click Confirm to accept the change. https://arttel.ru/shop/ip-telefony/yealink-sip-t27g… -
Page 192
User Guide for the SIP-T27G IP Phone To configure the shared line settings and the number of line key on phone A via web user interface: Register the primary account 4603. Click on Advanced, and then select Shared Call Appearance from the pull-down list of Shared Line. -
Page 193
The phone A will automatically configure the line keys from the first unused DSS key, according to the configured number in the Number of line key field. To configure the shared line settings and the number of line key on phone B via web user interface: Register the alternate account 4603_1. https://arttel.ru/shop/ip-telefony/yealink-sip-t27g… -
Page 194
User Guide for the SIP-T27G IP Phone (Enter the primary account 4603 in the Register Name field.) Click on Advanced, and then select Shared Call Appearance from the pull-down list of Shared Line. Enter the desired number in the Number of line key field. -
Page 195
Configuring the private hold soft key may affect the softkey layout in the Talking state. Contact your administrator for more information. To configure a private hold key via phone user interface: Press Menu->Features->DSS Keys. Select the desired DSS key. Press , or the Switch soft key to select Key Event from the Type field. https://arttel.ru/shop/ip-telefony/yealink-sip-t27g… -
Page 196
User Guide for the SIP-T27G IP Phone Press , or the Switch soft key to select Private Hold from the Key Type field. (Optional.) Enter the string that will appear on the LCD screen in the Label field. Press the Save soft key to accept the change or the Back soft key to cancel. -
Page 197: Using Sca Feature On The Ip Phone
Using SCA Feature on the IP Phone This section provides you with detailed information on using the SIP-T27G IP phone in a SCA Hybrid Key System scenario. In a SCA Hybrid Key System scenario, the status of the line key LED which associates with a shared line will change.
-
Page 198
The LED indicators of the line key 2 on both phone A and phone B will fast flash green. You can answer the incoming call on either phone A or phone B. The LCD screen of phone A displays the information of the incoming call (e.g., “Incoming call: 4604 Yealink”). Note Make sure call waiting feature is enabled on phone A. -
Page 199
Hold soft key on phone A when party A and party C are talking. The line key LEDs on phone A slowly flash green and phone B slowly flash red when the shared line call is placed on hold. https://arttel.ru/shop/ip-telefony/yealink-sip-t27g… -
Page 200
User Guide for the SIP-T27G IP Phone To place a call on private hold: Press the PriHold soft key or private hold key on phone A when there is an active call on the shared line (You may need to press the More soft key to see the PriHold soft key). -
Page 201
If the other party (not the shared line party) presses the End Call soft key, the conference call is ended. You can also press the line key with the solid red LED indicator on phone B to set up a conference call with the other parties in the active call. https://arttel.ru/shop/ip-telefony/yealink-sip-t27g… -
Page 202
User Guide for the SIP-T27G IP Phone If phone A has more than one call, do the following: Long press the desired line key on phone B. The list of calls appears on the LCD screen of phone B. -
Page 203
Long press the desired line key on phone B. The Cancel, Call Pull, New Call and Retrieve soft keys appear on the LCD screen of phone Press the Call Pull soft key. The held call has been retrieved from the phone A successfully. https://arttel.ru/shop/ip-telefony/yealink-sip-t27g… -
Page 204: Bridged Line Appearance (Bla)
User Guide for the SIP-T27G IP Phone Bridged Line Appearance (BLA) BLA allows users to share a SIP line on two or more IP phones. Users can monitor the specific extension (BLA number) for status changes on each IP phone. To use this feature, a BLA group should be pre-configured on the server and one of them is specified as a BLA number.
-
Page 205
To register an account and configure BLA feature on phone A via web user interface: Register the account 14019833020. Click on Advanced, and then select Draft BLA from the pull-down list of Shared Line. Enter the desired number in the BLA Number field. Click Confirm to accept the change. https://arttel.ru/shop/ip-telefony/yealink-sip-t27g… -
Page 206
User Guide for the SIP-T27G IP Phone To register an account and configure BLA feature on phone B via web user interface: Register the account 10462190020. Click on Advanced, and then select Draft BLA from the pull-down list of Shared Line. -
Page 207: Using Bla Feature On The Ip Phone
Using BLA Feature on the IP Phone This section provides you with detailed information on using the SIP-T27G IP phone in a BLA scenario. In a BLA scenario, the status of the line key LED which associates with a bridged line will change.
-
Page 208
User Guide for the SIP-T27G IP Phone Answering Calls When the phone C dials the BLA number “14084588327”, an incoming call will arrive on the bridged line. The phone A and phone B ring simultaneously and the LED indicators of the line key on both phone A and phone B will flash green. -
Page 209: Messages
Messages Short Message Service (SMS) You can send and receive text messages using the SIP-T27G IP phone. New text messages can be indicated both acoustically and visually. When receiving a new text message, the phone will play a warning tone. The power indicator LED will slowly flash red, and the LCD screen will prompt “n New Text Message(s)”…
-
Page 210
User Guide for the SIP-T27G IP Phone Select the desired message and then press the View soft key. If the phone prompts receiving new text messages, you can also press the View soft key to read Note the new messages directly. -
Page 211: Voice Mail
Voice Mail You can leave voice mails for someone else using the SIP-T27G IP phone. You can also listen to voice mails that are stored in a voice mailbox. This feature is set up on the server side. It is not available on all servers.
-
Page 212
User Guide for the SIP-T27G IP Phone When receiving a new voice mail, the phone will play a warning tone. The power indicator LED will slowly flash red, and the LCD screen will prompt “n New Voice Mail(s)” (“n” indicates the number of unread voice messages, e.g., 27 New Voice Mail(s)) and a flashing icon… -
Page 213: Message Waiting Indicator (Mwi)
LED slowly flashes red. This will be cleared when you retrieve all voice mails or delete them. The MWI service is unsolicited for some servers, so the SIP-T27G IP phone only handles the MWI messages sent from the server. But for other servers, the MWI service is solicited, so the SIP-T27G IP phone must enable subscription for MWI.
-
Page 214
User Guide for the SIP-T27G IP Phone The MWI subscription parameters you need to know: Options Description Enable or disable a subscription for MWI service. Subscribe for MWI Period of MWI subscription. The IP phone sends a refresh MWI Subscription Period SUBSCRIBE request before initial SUBSCRIBE expiration. -
Page 215
Enter the desired voice mail number in the Voice Mail field. Click Confirm to accept the change. The IP phone will subscribe to the voice mail number for MWI service using Subscribe MWI To Voice Mail. Note MWI subscription is configurable via web user interface only. https://arttel.ru/shop/ip-telefony/yealink-sip-t27g… -
Page 216
User Guide for the SIP-T27G IP Phone https://arttel.ru/shop/ip-telefony/yealink-sip-t27g… -
Page 217: Appendix
East Africa Time, Iraq(Baghdad), Russia(Moscow) +3:30 Iran(Teheran) Armenia(Yerevan), Azerbaijan(Baku), Georgia(Tbilisi), Kazakhstan(Aktau), Russia(Samara) +4:30 Afghanistan(Kabul) Kazakhstan(Aqtobe), Kyrgyzstan(Bishkek), Pakistan(Islamabad), Russia(Chelyabinsk) +5:30 India(Calcutta) +5:45 Nepal(Katmandu) Kazakhstan(Astana, Almaty), Russia(Novosibirsk,Omsk) +6:30 Myanmar(Naypyitaw) Russia(Krasnoyarsk), Thailand(Bangkok) Australia(Perth), China(Beijing), Russia(Irkutsk, Ulan-Ude), Singapore(Singapore) +8:45 Eucla Japan(Tokyo), Korea(Seoul), Russia(Yakutsk,Chita) https://arttel.ru/shop/ip-telefony/yealink-sip-t27g…
-
Page 218
User Guide for the SIP-T27G IP Phone Time Zone Time Zone Name +9:30 Australia(Adelaide), Australia(Darwin) Australia(Brisbane), Australia(Hobart), Australia(Sydney,Melboume,Canberra), Russia(Vladivostok) +10:30 Australia(Lord Howe Islands) New Caledonia(Noumea), Russia(Srednekolymsk Time) +11:30 Norfolk Island New Zealand(Wellington,Auckland), Russia(Kamchatka Time) +12:45 New Zealand(Chatham Islands) Tonga(Nukualofa) -
Page 219: Appendix B — Menu Structure
Appendix Appendix B – Menu Structure https://arttel.ru/shop/ip-telefony/yealink-sip-t27g…
-
Page 220
User Guide for the SIP-T27G IP Phone https://arttel.ru/shop/ip-telefony/yealink-sip-t27g… -
Page 221: Index
Configuring an Access URL Idle Screen Configuring an Intercom Key Importing/Exporting Contact lists Configuring BLA Feature on the IP Phone In This Guide Configuring SCA Feature on the IP Phone Incoming Intercom Calls Intercom Configuring the Intercom Feature on the IP https://arttel.ru/shop/ip-telefony/yealink-sip-t27g…
-
Page 222
User Guide for the SIP-T27G IP Phone Replace Rule Ring Tones Key As Send Key Tone Search Source List in Dialing Searching for Contacts Language Semi-attended Transfer LED Instructions Sending RTP Stream Line Key Icons Shared Call Appearance (SCA)
Сегодня мы поговорим с вами о базовой настройке телефона Yealink T27G и подключим его к Asterisk. Этот телефон является корпоративным и ему можно настроить до 6 учетных записей. На борту стоит мощный чипсет Aries, а также поддерживает гигабитное соединение. Экран с диагональю 3.66 дюйма, который сделает работу ваших сотрудников более приятной. Характеристики телефона: 6 SIP-линий. […]
Сегодня мы поговорим с вами о базовой настройке телефона
Yealink T27G и подключим его к Asterisk. Этот телефон является
корпоративным и ему можно настроить до
6 учетных записей. На борту стоит мощный
чипсет Aries,
а также поддерживает гигабитное соединение. Экран с диагональю 3.66 дюйма,
который сделает работу ваших сотрудников более приятной.
Характеристики
телефона:
- 6
SIP-линий. - Полная
русификация. - VoiceMail,
SIP SMS. - Автоматическое
обновление необходимых конфигурация и ПО через сервер
(TFTP/FTP/HTTP/HTTPS/PNP/DHCP). - А
также большинство функций других аппаратов данной марки.
Сетевые параметры:
- SIP
2.0 (RFC3261). - in-band DTMF, out-of band RFC2833 DTMF и SIP INFO.
- IPv6.
- MD5 и
MD5-sess, SRTP, HTTPS, TLS, DNS SRV, 802.1x - NAT,
STUN. - DHCP/статический
IP-адрес/PPPoE. - VLAN (IEEE 802.1p/q tagging), TOS (layer 3).
- openVPN
Основные
параметры:
- Два
Gigabit порта RJ-45. - Разъем
для гарнитуры RJ9
(4P4C). - Питание: DC 5В,2A.
- РоЕ.
Поддержка SRTP для России отсутствует
Настройка
Данная инструкция написана под версию прошивки 69.81.14.1,
если у вас более старая версия, то рекомендую обновиться. После того как мы
подключим телефон к нашей сети, необходимо определить его IP адрес,
его можно посмотреть, нажав последовательность кнопок меню -> статус. Вводим наш IP адрес в адресную строку
браузера, попадаем на окно аутентификации, по умолчанию стандартные логин и
пароль admin:admin.

В дальнейшем настоятельно рекомендую сменить пароль на более надежный, в целях обеспечения безопасности и предотвращения попыток взлома.
После ввода логина и пароля мы попадаем на окно статуса.

В данном окне мы видим: версию ПО и сетевые параметры нашего
телефона. Далее мы переходим в меню Аккаунт.

- Выбираем
необходимый нам аккаунт для настройки. У нас это 1 - Далее
в поле Sip-аккаунт выбираем параметр «Включено» - В
поля лейбл отображаемое имя вводим имя абонент - В
поля Идентификационное имя и имя пользователя вводим внутренний номер - В
поле пароль вводим пароль, который мы создали для нашего внутреннего номера - В
пол SIP-сервер вводим ip-адрес нашего сервера asterisk и порт 5060 - В
поле голосовая почта, вводим сервисный код, для прослушивания почты, у нас это
*97.
После всех этих манипуляций, телефон должен быть
зарегистрирован на нашем сервере и им можно пользоваться.
Далее рассмотрим дополнительные настройки. Перейдем в меню
Аккаунт->Кодеки
В данном меню выберем кодеки, которые мы будем использовать,
а также расставим им приоритет при помощи кнопок вверх и вниз, в котором они
будут использоваться.

Базовые настройки сети
Перейдем в Сеть->Основные. Здесь мы видим несколько типов настройки сети
для нашего аппарата. В WAN имеется возможность настройки по DHCP. Также настройки можно прописать в
ручную либо использовать аутентификацию по PPPoE. В настройках LAN можем использовать режим bridge, а также можно
настроить телефон как роутер и он сам будет раздавать сеть.

Настройка кнопок
В меню DSS мы можем
вручную настроить все программируемые кнопки на нашем телефоне. Имеет
возможность настройки BLF
(отображение статуса другого абонента).

Также существует возможность
подключение дополнительной панели BLF, если вам необходимо отслеживать статусы большего количества
абонентов. Настройка этой панели выглядит следующим образом.

Меню «Настройки»
В настройках меню «Настройки»
имеется множество параметров, но мы рассмотрим основные. В подменю настройки мы
можем указать язык интерфейса, выбрать часовой пояс, указать адрес NTP сервера,
указать формат даты отображаемого времени, выбрать рингтон и заставку рабочего
экрана телефона.

Также телефон умеет отправлять SMS.
!Информер. Чтобы SMS отправлялись через сервер, необходима
интеграция с GSM шлюзом либо сервисом отправки СМС.
Выбирает аккаунт, номер
назначение и пишется текст СМС.

Изменить
базовый логин и пароль можно в разделе безопасность.

На этом обзор и настройка телефона Yealink T27G окончены
Характеристики
-
Свойства IP-телефонов
-
1 Гбит/с, Gigabit Ethernet
-
Поддержка PoE, Блок питания в комплекте, HD звук, Крепление на стену
-
Программируемые BLF клавиши
-
Участников конференц-вызова
(чел.) -
Гарнитура, Модуль расширения, USB
Описание
Данная модель телефона снята с производства. Аналог — Yealink SIP-T43U
Yealink SIP-T27G — это IP-телефон улучшен в нескольких аспектах. Аппарат поддерживает технологию Gigabit Ethernet, что позволяет использовать её в высокоскоростных сетях передачи данных без снижения их производительности. Телефон обзавелся поддержкой популярного кодека Opus. Производитель оборудовал данный телефон портом USB, который может быть использован и для работы с Bluetooth гарнитурами (для этого потребуется USB-донгл Yealink BT40), и для работы в беспроводных сетях Wi-Fi (донгл Yealink WF40).
Yealink SIP-T27G имеет качественный дисплей с разрешением 240×120 точек и диагональю 3.66 дюйма, на котором отлично видно всю выводимую информацию. Также телефон имеет 8 программируемых клавиш с подсветкой, которые могут выполнять до 21 действия, благодаря функции прокрутки экрана. К телефону можно подключить до 6 дополнительных панелей расширения Yealink EXP20. Телефон имеет поддержку передачи HD звука и возможность крепления на стену.
Технические характеристики телефонов
Функции телефона
- 6 SIP-аккаунтов
- Удержание, отключение микрофона, DND («Не беспокоить»)
- Быстрый набор, горячая линия
- Переадресация, режим ожидания, трансфер
- Групповое прослушивание, SIP SMS, экстренные вызовы
- 3-сторонняя конференция
- Выбор мелодии/загрузка/удаление
- Настройка времени: автоматически или вручную
- Правила набора
- XML-браузер, Action URL/URI
- Встроенные скриншоты
- RTCP-XR, VQ-RTCPXR
- USB-порт для:
- подключения Bluetooth-гарнитур при помощи адаптера Yealink BT40;
- подключения к беспроводным сетям WiFi при помощи адаптера Yealink WF40.
- записи разговоров на flash
Экран и индикаторы
- Графический 3.66″ LCD-экран с разрешением 240х120
- LED-индикатор питания и MWI
- Индикаторы состояния линий с красно-зеленой подсветкой
- Поддержка нескольких языков
- Caller ID с именем и номером
- Энергосбережение
Функциональные кнопки
- Клавиатура с русскими и английскими буквами
- 8 кнопок линий с индикаторами и возможностью программирования (до 21-ого значения на 3-х страницах экрана)
- 6 навигационных клавиш
- Клавиши регулировки громкости
- 8 функциональных клавиш: трансфер, гарнитура, повторный набор номера, громкая связь, голосовая почта, конференция, вкл/откл микрофона
Кодеки и настройки голоса
- Широкополосные кодеки: G.722, Opus (16kHz)
- Кодеки: G.711 (A/u), G.729AB, G.729, G.723.1, G.726, iLBC, Opus (8kHz)
- DTMF: In-band, Out-of-band (RFC2833), SIP INFO
- Full-duplex (полнодуплексная) громкая связь с AEC (подавление эха)
- VAD (обнаружение активности голоса), CNG (генератор комфортного шума), AEC (подавление эха), PLC (маркирование потери пакета с медиа-данными), AJB (адаптивный буфер для голосовых пакетов), AGC (автоматическая регулировка чувствительности микрофона)
Записные книги
- Локальная записная книга до 1000 контактов
- Черный список
- Удаленная записная книга XML, LDAP
- Интеллектуальный поиск
- Поиск по записным книгам, импорт/экспорт локальной записной книги
- История вызовов: набранные/принятые/пропущенные/переадресованные
Интеграция с IP-АТС
- Анонимный вызов, отклонение анонимных вызовов
- BLF
- BLA
- Hot-desking, экстренный вызов, интерком, paging, music on hold, напоминание
- MWI, напоминание, запись разговора
- Голосовая почта, парковка вызова, захват вызова
Управление
- Настройка телефона: веб-интерфейс/экран телефона/Autoprovision
- FTP/TFTP/HTTP/HTTPS/PnP Autoprovision
- Zero-sp-touch, TR069
- Блокировка клавиатуры
- Сброс к настройкам по умолчанию, перезагрузка
- Логи: PCAP Trace, system log
Сетевые характеристики и безопасность
- SIPv1 (RFC2543), SIPv2 (RFC3261)
- NAT, STUN
- Способы вызова: Proxy и peer-to-peer (по IP-адресу)
- Получение IP: Статический/DHCP
- HTTP/HTTPS-сервер
- Синхронизация времени и даты через SNTP
- UDP/TCP/DNS-SRV (RFC3263)
- QoS: 802.1p/Q tagging (VLAN), Layer 3 ToS DSCP
- Поддержка TLS
- Управление HTTPS-сертификатами
- AES шифрование конфигурационных файлов
- Поддержка стандартов шифрования и идентификации (MD5 и MD5-sess)
- SRTP (Внимание! В продуктах, предназначенных для стран-участников Таможенного союза, данный функционал отсутствует.)
- Поддержка IEEE802.1X
- Поддержка IPv6
- LLDP/CDP/DHCP VLAN
Физические характеристики
- Крепление к стене
- 2хRJ45 Ethernet-порта 10/100/1000Мбит/с
- POE (IEEE 802.3af), class 3
- 1хRJ9 для подключения трубки
- 1хRJ9 для подключения гарнитуры
- 1xUSB-порт
- 1xRJ12 EXT-порт, поддержка до 6 модулей расширения
- Блок питания: Вход 100-240V AC, Выход 5V, 1.2А
- Потребление через блок питания: 1.4 — 3.0W
- Потребление через POE: 1.7 — 7.0W
- Размеры (Ш*Г*В*Т): 265мм*210мм*170.5мм*53.5мм
- Рабочая влажность: 10~95%
- Рабочая температура: -10~50˚C
Упаковка и габариты
| Размеры индивидуальной упаковки, мм | 305*225*118 |
| Вес индивидуальной упаковки, кг | 1.36 |
| Размеры коробки, мм | 610*310*238 |
| Количество штук в коробке | 5 |
| Вес брутто коробки, кг | 7.8 |
| Объём коробки, куб.м | 0.05 |
Время на прочтение
8 мин
Количество просмотров 15K
Несмотря на то, что 2017 год только подошел к своему экватору, можно уверенно констатировать – для Yealink он станет одним из самых продуктивных за всю историю существования этой славной компании. За пять месяцев текущего года производитель полностью обновил один модельный ряд своих IP-телефонов и анонсировал выпуск совершенно новой линейки устройств. Речь идет об обновленной линейке SIP-T4S и новых IP-телефонах серии SIP-T5, о которых мы обязательно напишем отдельно. Но первым из всех новинок был анонсирован и выпущен IP телефон Yealink SIP-T27G. О нем мы сегодня и поведем наш рассказ.
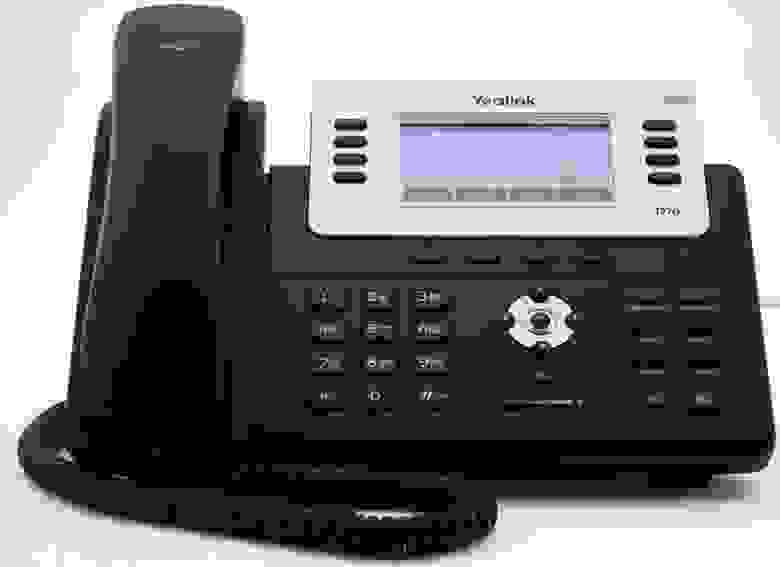
Если быть точным, то SIP-T27G – это не совсем новый IP телефон, скорее, это некоторое перерождение модели SIP-T27P, на замену которой он и вышел. Выглядят эти телефоны абсолютно одинаково и может показаться, что все отличия между ними заключаются в поддержке гигабитной сети, на что намекает буква G в названии нового телефона. Однако, это не совсем так – разработчики наделили SIP-T27G рядом совершенно новых функций, таких как поддержка кодека Opus, беспроводных сетей Wi-Fi и Bluetooth, а также возможностью записи разговоров и их локального хранения. Обо всех этих функциях мы сегодня подробно поговорим, но вначале кратко пробежимся по основным характеристикам телефона.
Общие характеристики
Итак, Yealink SIP-T27G – это IP телефон, работающий по протоколу SIP и поддерживающий 6 независимых VoIP-аккаунтов. Телефон оборудован достаточно большим графическим экраном с диагональю 3.66 дюйма и подсветкой (разрешение – 240×120 точек). На задней панели расположены два сетевых порта с поддержкой Gigabit Ethernet, два разъема 4P4C для подключения телефонной трубки и проводной гарнитуры, а также вход для блока питания. Последний, кстати, использовать необязательно, так как телефон поддерживает PoE (максимальная потребляемая мощность – 7 Вт). Там же, на задней панели, находятся порты USB и 6P6C для подключения модулей расширения – об обоих этих разъемах мы поговорим подробнее.
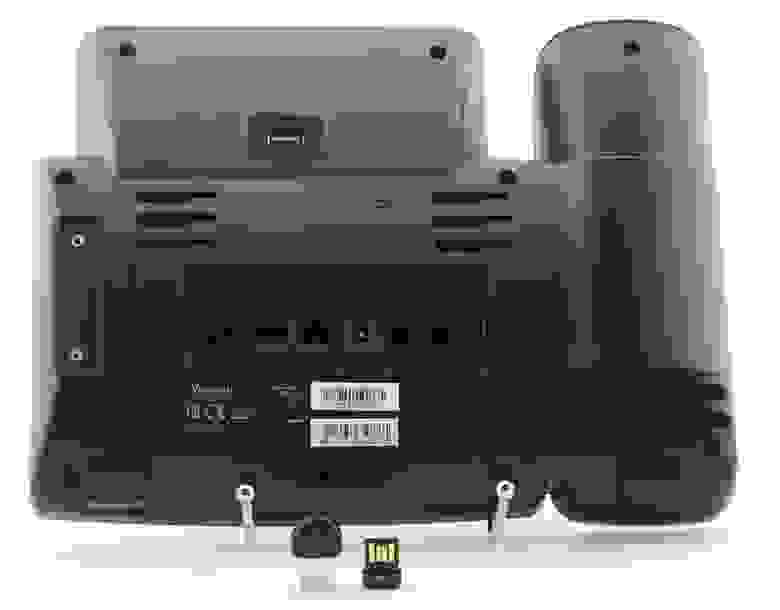
Задняя панель Yealink SIP-T27G, адаптеры WF40 и BT40
Виртуальные клавиши BLF
Список поддерживаемых телефоном SIP-T27G функций вполне стандартен – различные опции обработки вызовов, трехсторонняя конференц-связь, SIP-SMS, рингтоны, отключение микрофона, черный список и так далее. Из нестандартного стоит выделить наличие так называемых экранных программируемых клавиш. Что они собой представляют? Слева и справа от дисплея расположены 8 клавиш со встроенным двухцветным светодиодом каждая. Их можно использовать как для выбора VoIP-аккаунта (а телефон, напомним, поддерживает 6 аккаунтов), так и для других задач по своему усмотрению. Самый распространённый вариант их использования – это индикация статуса абонента. На клавиши «вешаются» внутренние номера коллег – теперь их можно не только вызвать в одно касание, но и отслеживать их статус (светодиод горит зеленым – телефон свободен, красным – занят, мигающий красный – на телефон поступает вызов). При соответствующей настройке телефонной станции, этими клавишами также можно перехватывать поступающие на телефоны коллег вызовы.
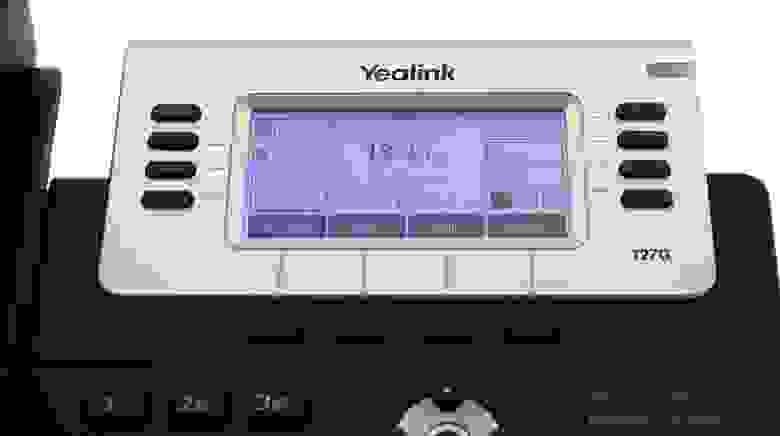
Особенность этих клавиш заключается в том, что для подписи назначенных на них действий они используют не бумажный вкладыш, а экран телефона. Это, в свою очередь, позволяет увеличить количество назначенных на них действий путем пролистывания страниц экрана. В случае с SIP-T27G доступны три виртуальные страницы экрана, что позволяет запрограммировать на 8 клавиш до 21 действия. Конечно, у такого решения есть и минусы – для того, чтобы добраться до второй и третьей страницы требуется выполнить дополнительные действия, но в целом, это неплохой компромисс между функциональностью и компактностью телефона.
Поддержка панелей EXP20
Для тех пользователей, для которых наличие большого числа программируемых клавиш – обязательное условие, предусмотрена возможность подключения к телефону дополнительных панелей расширения EXP20. Каждая панель имеет 20 светодиодных клавиш, для подписи назначенных на клавиши действий используется, опять же, графический дисплей с разрешением 160×320 пикселей и подсветкой. Как и в случае с программируемыми клавишами телефона, у EXP20 также есть возможность пролистывания между страницами экрана – правда у панели страниц не три, а две. Таким образом, к двадцати физическим клавишам добавляется еще восемнадцать виртуальных.
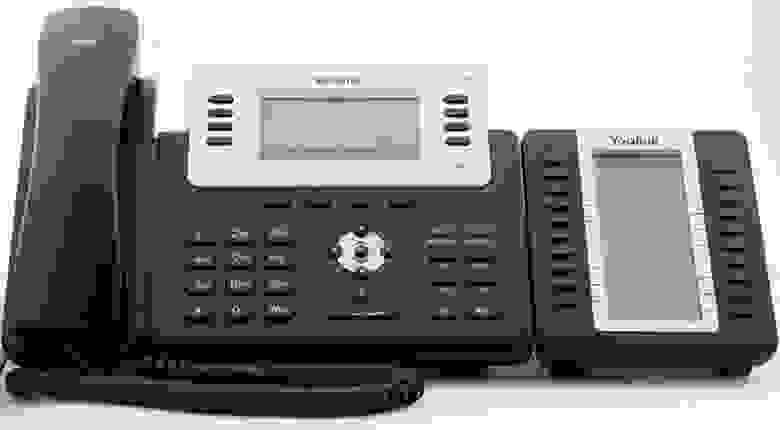
К одному телефону Yealink SIP-T27G можно подключить до 6 панелей EXP20 в цепочку. При подключении одной или двух панелей, дополнительного питания не потребуется. При большем количестве панелей необходимо использовать отдельный блок питания 5В/1.2А (в комплект поставки не входит). Панели жестко крепятся к телефону и между собой специальной металлической планкой, а подключение осуществляется через порт 6P6C. Помимо индикации статуса абонента, клавиши могут выполнять еще 32 различных типа действий, например, доступ к голосовой почте, LDAP-каталогу, парковка вызова, интерком, ввод префикса, конференц-связь и другие.
Запись разговоров
Главной же особенностью нового телефона SIP-T27G по сравнению с предыдущей моделью SIP-T27P является наличие USB-порта. Причем, в отличие от некоторых других производителей, в телефонах которых этот порт имеет чисто декоративное назначение, у SIP-T27G он используется по полной программе. А именно, он может выполнять три различные функции: подключение Bluetooth адаптера, Wi-Fi адаптера или обычной флешки для локального хранения записанных телефонных разговоров. Начнем с последней функции.
Вообще говоря, пользователи телефонов Yealink и раньше могли самостоятельно записывать свои телефонные разговоры благодаря функции «запись по требованию». В этом случае, телефон по нажатию специальной клавиши отправляет на IP-АТС определенный старкод, а станция, если на ней данная функция была предварительно настроена администратором, начинает записывать текущий разговор. Все записи, соответственно, также в этом случае хранятся на самой IP-АТС.
В случае с SIP-T27G, телефон может сам записывать разговор, вне зависимости от настроек телефонной станции и хранить записанные разговоры локально, на USB-флешке. Однако, без вмешательства администратора активировать данную функцию у пользователя не получится. Дело в том, что включить функцию записи на USB можно только через конфигурационный файл. Проще всего экспортировать конфигурационный файл из Web-интерфейса телефона, добавить в него строчку features.usb_call_recording.enable = 1 и загрузить обратно. Так же, для того, чтобы данная функция работала корректно, необходимо, чтобы прошивка телефона была не старше версии 69.81.0.110.

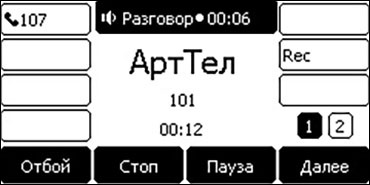
После того, как все эти условия выполнены, достаточно подключить флешку к USB порту и через несколько секунд телефон рапортует об её успешном обнаружении. Теперь во время разговора пользователю становятся доступны дополнительные клавиши, с помощью которых он может запустить запись, остановить её или поставить на паузу. Записанные разговоры сохраняются в формате .wav с битрейтом 128 Кбит/с, ограничение на максимальный размер файла записи – 2 Гб. Прослушивание записанных разговоров доступно прямо из меню телефона, там же можно посмотреть информацию по свободному и занятому объему флешки. В целом, данная функция кажется весьма интересной, а её реализация — хорошо продуманной.
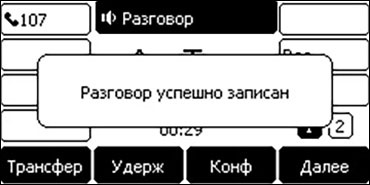
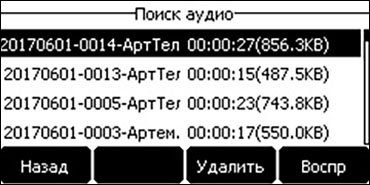
Поддержка Bluetooth
Второй вариант использования USB-порта SIP-T27G – это подключение Bluetooth-донгла Yealink BT40, что позволяет телефону работать с беспроводными гарнитурами. При первом подключении донгла, телефон предложит включить поддержку Bluetooth (это также можно сделать предварительно в Web-интерфейсе телефона), а потом – просканировать эфир для поиска Bluetooth устройств. Донгл работает по спецификации Bluetooth V4.0+HS, телефон может хранить в памяти до 60 сопряженных беспроводных устройств.
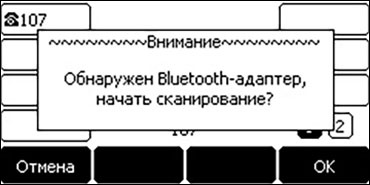
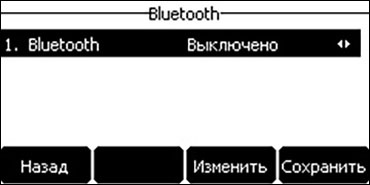
Для переключения режима работы телефона предназначена клавиша «HEADSET» с зеленой светодиодной подсветкой. Когда она горит – все вызовы будут приниматься и совершаться через гарнитуру. Отвечать на входящие звонки также можно привычным образом – с помощью клавиши приема вызова на самой гарнитуре. В целом можно сказать, что поддержка Bluetooth гарнитур – это очень удобная опция для сотрудников, которые активно используют телефон в своей работе. Особенно удобно, когда гарнитура подключена и к стационарному, и к сотовому телефону одновременно – тогда все вызовы можно принимать и совершать с помощью одного устройства, не занимая при этом руки.
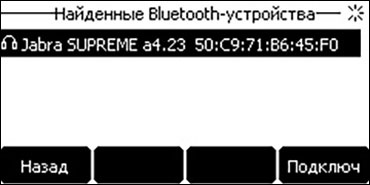

Поддержка Wi-Fi
Вместо Bluetooth донгла или флешки, USB-порт телефона можно занять адаптером беспроводных сетей Yealink WF40. С его помощью телефон может подключаться к сетям Wi-Fi, что позволяет телефону успешно работать при отсутствии проводной сети. Такая ситуация все чаще встречается в современных небольших офисах. Кроме того, адаптер WF40 может оказаться крайне полезен при установке телефона в таких местах, в которых не всегда присутствует проводная сеть, например, проходные, склады, комнаты охраны и так далее.
Работа с адаптером WF40 аналогична работе с адаптером BT40. При подключении WF40 к телефону SIP-T27G, пользователю будет предложено включить поддержку Wi-Fi и произвести сканирование доступных сетей. Поддерживается возможность подключения к автоматически найденным сетям, ручной ввод параметров сети, а также подключение в режиме WPS.


Адаптер WF40 работает по стандарту IEEE802.11b/g/n на частоте 2.4 ГГц и поддерживает следующие технологии безопасности: 64/128/152-bit WEP Encryption, WPA-PSK,WPA2-PSK. Для корректной работы адаптера требуется, чтобы прошивка телефона Yealink SIP-T27G была не старше версии 69.81.0.90. Также стоит помнить, что технологии Wi-Fi и VoIP не очень-то здорово подходят друг другу. Использовать подключение IP-телефонов по Wi-Fi можно в порядке исключения, рассчитывать на построение всей телефонной сети в таком режиме лучше не стоит, особенно при использовании дешевого сетевого оборудования.
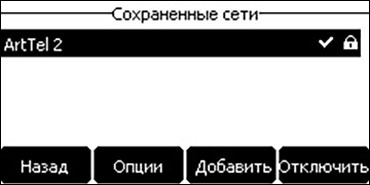
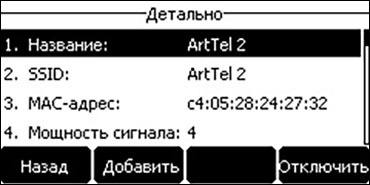
Использование нескольких адаптеров одновременно
Вопрос, который напрашивается сам собой – а можно ли использовать несколько USB-устройств с телефоном Yealink SIP-T27G одновременно? Документация не дает прямого ответа на этот вопрос, но поскольку USB-порт у телефона всего один, то штатным режимом его работы можно считать использование только одного USB-устройства одновременно. Впрочем, нам никто не мешает использовать обычный USB-разветвитель, чтобы получить ответ на наш вопрос эмпирическим путем.
У нас получились следующие результаты – Wi-Fi адаптер отлично работает совместно с флешкой. При попытке использовать Bluetooth-донгл с чем-либо еще сразу же начинаются проблемы – телефон начинает подтормаживать и даже иногда зависать. Если использовать донгл BT40 совместно с WF40 еще возможно – просто значительно снижается удобство работы – то в совместном использовании его с флешкой смысла никакого нет – разговоры пишутся некорректно со значительным замедлением речи.
Второй интересный вопрос – можно ли подключать к телефону сторонние USB-устройства в качестве Bluetooth и Wi-Fi адаптеров? Скажем так, производитель не гарантирует такую работу и рекомендует использовать только оригинальные донглы Yealink BT40 и WF40. Однако, попавшиеся нам под руку noname Bluetooth адаптер и дешевый Wi-Fi донгл производства TP-LINK отлично заработали с телефоном. Равно как и родные BT40 и WF40 прекрасно завелись на ПК под управлением Windows 10 (для Wi-Fi донгла потребовалась установка драйверов; драйвера от TP-LINK отлично подошли). Тем не менее, не факт, что такой фокус пройдет с любыми другими устройствами, и для гарантированной совместимости лучше использовать родные донглы.
Поддержка Opus
Существует мнение, что уже в ближайшем будущем Opus станет основным кодеком, используемым в сетях VoIP на многие годы вперед. Мнение это вполне обоснованно, поскольку новый кодек действительно обладает рядом выдающихся характеристик и практически лишен слабых мест. К главным преимуществам Opus можно отнести отличное соотношение качества голоса к битрейту, а также минимальную вносимую задержку, что критически важно в сетях VoIP. Кроме того, Opus является открытым форматом, соответственно его использование не требует отчисления лицензионных платежей. Наконец, кодек пользуется поддержкой сильных игроков IT-индустрии, что также позволяет оптимистично оценивать его будущее.
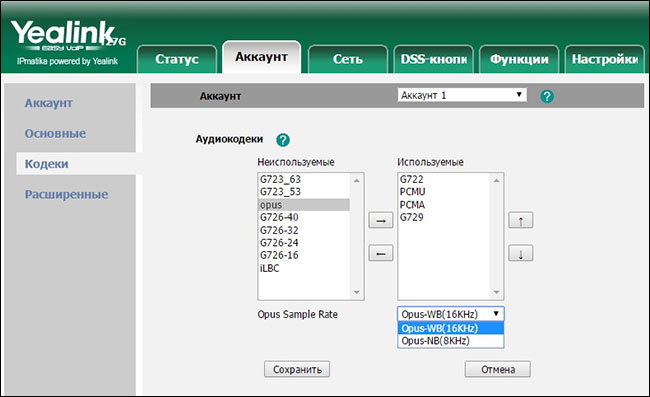
Компания Yealink не отстает от прогресса и активно добавляет поддержку Opus не только в свои новые продукты, но и в уже существующие телефоны. Так, начиная с версии прошивки x.81.0.15 новый кодек поддерживают телефоны SIP-T19 E2, SIP-T21 E2, SIP-T23G и SIP-T40P, а начиная с версии x.81.0.110 – модели SIP-T27G, SIP-T41S, SIP-T42S, SIP-T46S и SIP-T48S. При этом, если старые модели телефонов поддерживают кодирование только в широкополосном режиме с частотой дискретизации 16 кГц, то новые аппараты (SIP-T27G в их числе) могут также работать и в узкополосном режиме на 8 кГц. Выбор режима осуществляется в Web-интерфейсе телефона в разделе Аккаунт > Кодеки.
Заключение
На первый взгляд, выход телефона SIP-T27G на замену модели SIP-T27P не предвещал ничего интересного. Казалось бы, производитель просто обновил железо, поработал над повышением эффективности и стабильности, добавил поддержку Gigabit Ethernet – обычный эволюционный процесс. Тем более, цена телефона не изменилась по сравнению с предшественником (примерно 8000 рублей на сегодняшний день). По факту же оказалось, что это совсем другой IP-телефон с совершенно другими возможностями, пусть и в прежнем корпусе. Поддержка беспроводных гарнитур, Wi-Fi, локальной записи разговоров, кодека Opus, той же гигабитной сети – ни одно из этих улучшений не является формальностью, а, напротив, может представлять существенный интерес для довольно широкого круга пользователей.
Инструкция YEALINK SIP-T23G на русском языке в формате pdf для устройства: телефон проводной. Прочитайте инструкцию для ознакомления с функциями и условиями эксплуатации, характеристиками и способами исправления неисправностей. Данное руководство пользователя поможет использовать весь функционал изделия и увеличит срок службы при условии соблюдения всех правил изложенных в документе.


- Производитель: Yealink
В т.ч. НДС 20%
Характеристики
Описание
Активное продвижение товаров и услуг, анализ требований современного потребителя, повышение эффективности ведения бизнеса — всё это невозможно представить без налаженной системы коммуникации на предприятии. Сотрудники должны иметь постоянную возможность обмениваться информацией, передавать важные сведения, связываться с потенциальными и действующими клиентами. Это непрерывный процесс, требующий использования высокотехнологичных инструментов. Ярким примером может служить новая модель стационарного телефона Yealink SIP-T21P E2. Несмотря на широкий функционал устройства, который будет подробно описан ниже, а также стильный дизайн и долговечную конструкцию, продукт сохраняет доступную стоимость, за что ещё больше ценится многочисленными покупателями на мировом и российском рынках.
К отличительным особенностям данной модели можно отнести ряд дополнений к предыдущему поколению телефонов SIP-T21P. Теперь устройство обладает усовершенствованным чипсетом и более мощным процессором для улучшенной производительности. Также производитель добавил подсветку LCD-экрана с разрешением 132 х 64, изменил цвет корпуса и внедрил возможность питания по системе PoE (Power over Ethernet). Телефон в отличие от многих других моделей товарной линейки компании имеет 2 SIP-аккаунта.
Стационарный телефон Yealink SIP-T21P E2 содержит в себе простор для качественной и эффективной коммуникации. Это обуславливает большое количество функций:
- Запись в телефонную книгу до 1000 контактов, поделённых на 5 групп. Загрузка и выгрузка контактной информации на другой носитель. Интеграция удалённых телефонных справочников, содержащих до 2000 записей. Хранение истории вызовов до 100 элементов. Интеллектуальный поиск по справочнику.
- Регулировка громкости вызова, выбор мелодии звонка.
- Режим телефонной конференции, интерком-вызовы (в том числе и групповые разговоры Paging), горячая линия, автоответчик, переадресация, автодозвон, функции удержания и ожидания, голосовая почта, отправка и получение SIP SMS.
- Интеграция с популярными платформами для голосовой связи, например: BroadSoft, Genesys. Поддержка системы Yealink RPS (Redirection and Provisioning Service).
- Быстрый и ускоренный набор номера телефона для экономии времени.
Производитель гарантирует максимально качественный и чистый звук благодаря внедрению в аппарат инновационных систем. К ним относятся:
- AEC — технология подавления эха;
- AGC — программная настройка уровня чувствительности микрофона;
- CNG — генератор комфортного шума;
- VAD — система распознавания голосовых волн;
- PLC — отметка ликвидации пакета с медиа-информацией.
Навигация по меню телефона осуществляется полностью на русском языке, однако при необходимости можно использовать и английскую раскладку клавиатуры.
Корпус серого цвета с деталями в бежевом оттенке снабжён панелями с необходимыми клавишами. Четыре контекстно-зависимые, шесть навигационных и одна функциональная кнопка с возможностью перепрограммирования под индивидуальные нужды. Ещё пять клавиш не поддаются перепрограммированию: из них четыре функциональные: для активации голосовой почты, включения гарнитуры, совершения повторного вызова и громкой связи; а также одна светодиодная с активным доступом к голосовой почте.
Yealink SIP-T21P E2 — это гармоничное сочетание цены и качества, которое полностью подтверждается во время эксплуатации. Большой популярностью продукт пользуется не только при установке в колл-центрах: его активно приобретают крупные компании и мелкие фирмы с различной направленностью деятельности. Это эффективное решение для качественной связи с клиентской базой и между сотрудниками.
Продолжаем цикл статей по обзору и настройке IP-телефонов Yealink. Следующим решили осветить аппарат Yealink SIP-T21P (и его родного брата Yealink SIP-T21). По своим характеристикам и внешнему виду телефоны идентичны, с одним лишь отличием — модель SIP-T21P поддерживает питание по технологии PoE, что отмечается буквой «P» в ее названии. Несмотря на это отличие, обе модели поставляются со штатным блоком питания. Поэтому SIP-T21P можно смело рассматривать как дальновидный вариант — если в будущем компания решит перейти на PoE-технологии, то телефон менять не придется.
Заметим
Не забываем, что для подачи электричества на телефонный аппарат Yealink SIP-T21P E2 с поддержкой PoE, необходимо, чтобы в наличии был специальный свитч с PoE-питанием. Без него телефон не будет получать питание через витую пару.
Помогите с настройкой
Внешний вид и функционал
Телефон Yealink SIP-T21P — отлично подойдет любому сотруднику офиса, как модель со слегка расширенными возможностями в сравнении с более простыми линейками, или как бюджетный вариант для руководителя небольшой компании.
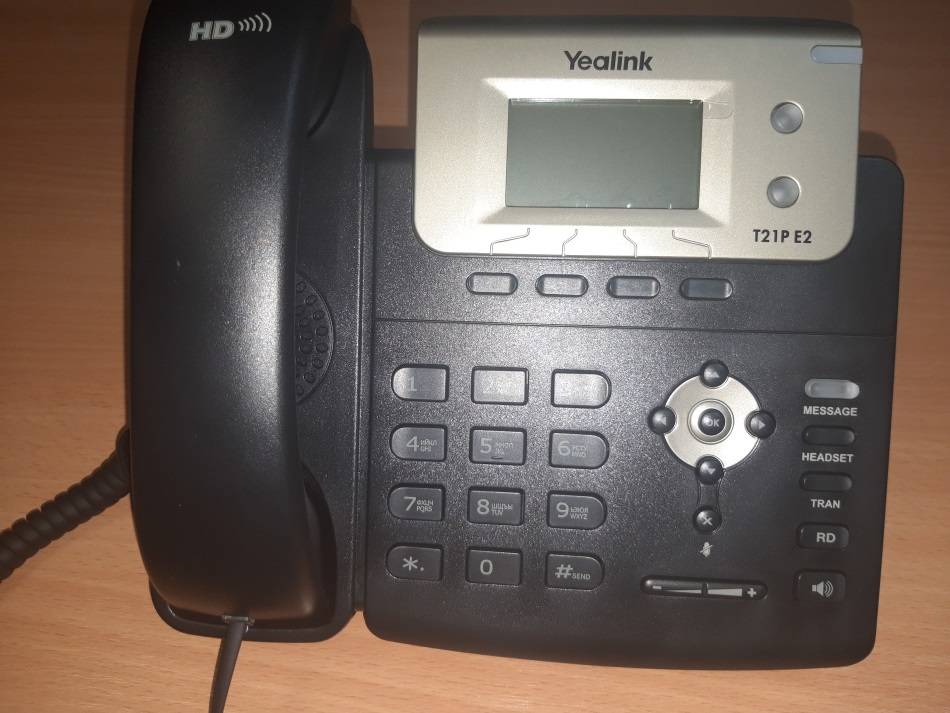
Телефон имеет набор стандартных функциональных клавиш, а также приятное дополнение — BLF клавиши.
- 2 настраиваемые BLF клавиши, к которым можно привязать множество функций, таких как: быстрый дозвон, быстрый трансфер/переадресация, отображение статуса абонента и многие другие;
- 4 контекстно-зависимые функциональные клавиши. Эти кнопки меняют свою функцию в зависимости от состояния, в котором находится телефон — состояние «покоя» (стандартное), при входящем звонке, при активном разговоре, при исходящем звонке, при наборе номера, при навигации по меню и настройкам;
- Клавиши навигации по меню и кнопка ОК;
- Фиксированные функциональные клавиши — голосовая почта, переключение на гарнитуру, трансфер звонка, список последних 100 набранных номеров, громкая связь;
- Клавиши регулирования громкости.
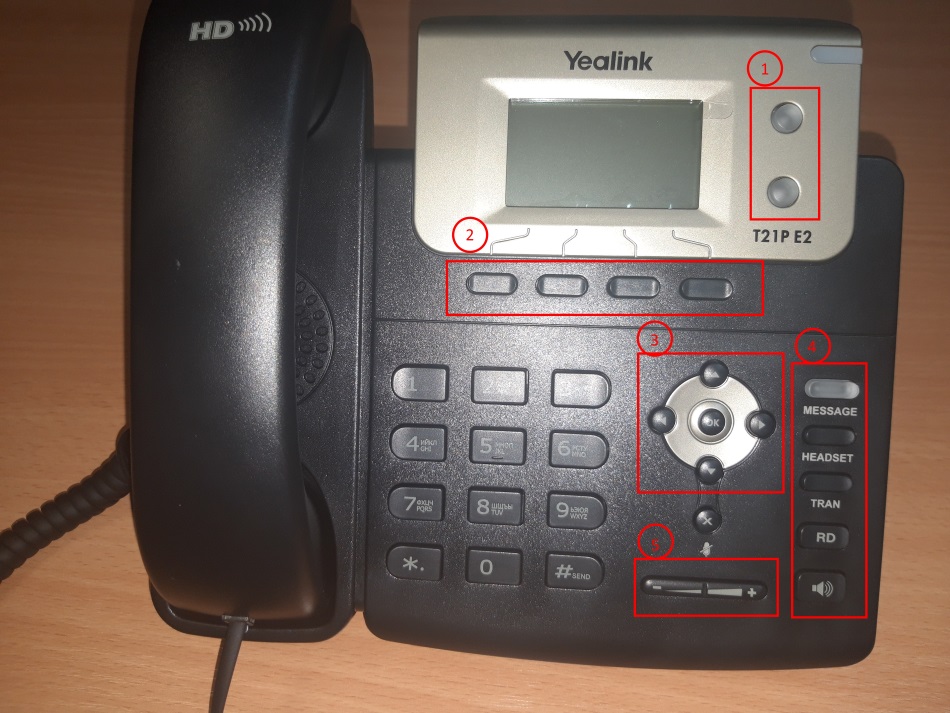
Настройка телефона
Благодаря удобному и понятному интерфейсу настройка телефонов Yealink занимает считанные минуты.
Прежде всего, необходимо зайти в веб-интерфейс телефона по его IP-адресу, узнать который можно, нажав кнопку OK. После чего, на экране откроется меню «Статус», где и будет показан адрес.
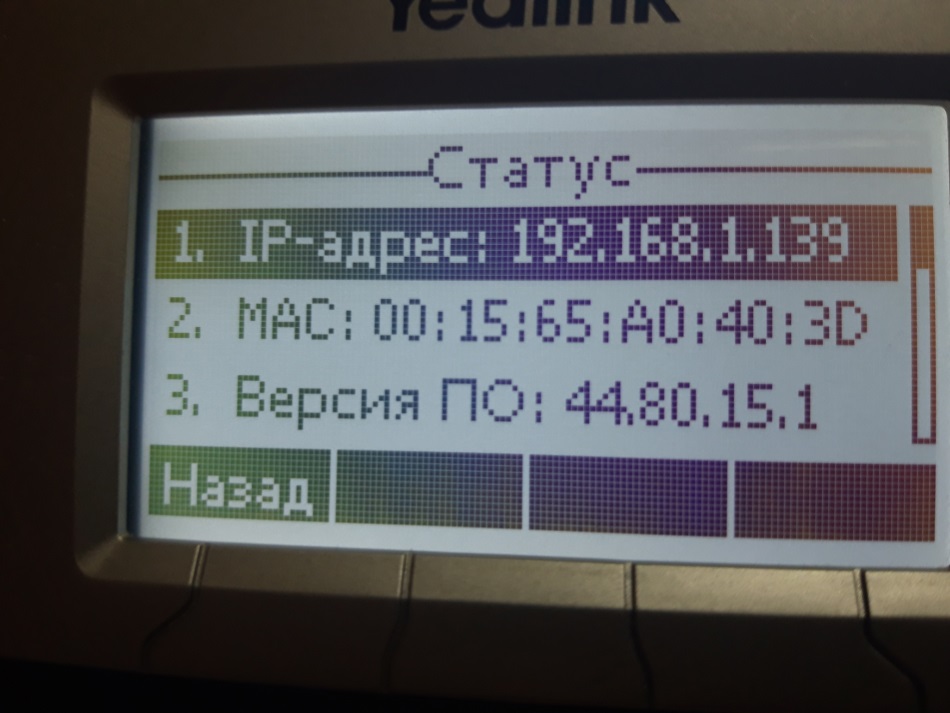
Вводим этот адрес в любом браузере компьютера, подключенного к этой же сети. Далее указываем стандартный логин и пароль: admin/admin.
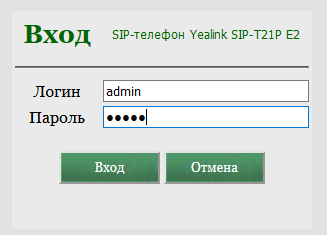
Попав в режим настроек телефона, можно приступить к тем самым настройкам. В первую очередь подключаем телефон к офисной АТС или провайдеру IP-телефонии. Для этого на верхней панели выбираем вкладку «Аккаунт» и указываем следующие параметры:
- Лейбл — будет отображаться на экране телефона. Значение произвольное, это может быть ваше имя или внутренний номер в АТС;
- Отображаемое имя — будет отображаться у другого абонента вашей офисной АТС при звонке с этого аппарата. Значение также произвольное, для удобства стоит указать либо внутренний номер, либо должность, либо имя;
- Имя регистрации и пароль — ваши логин и пароль на АТС или сервере провайдера телефонии. Значения строгие, по нему будет проходить авторизация на сервере;
- АдресSIP-сервера — IP-адрес сервера АТС или провайдера, к которому будет подключаться аппарат.
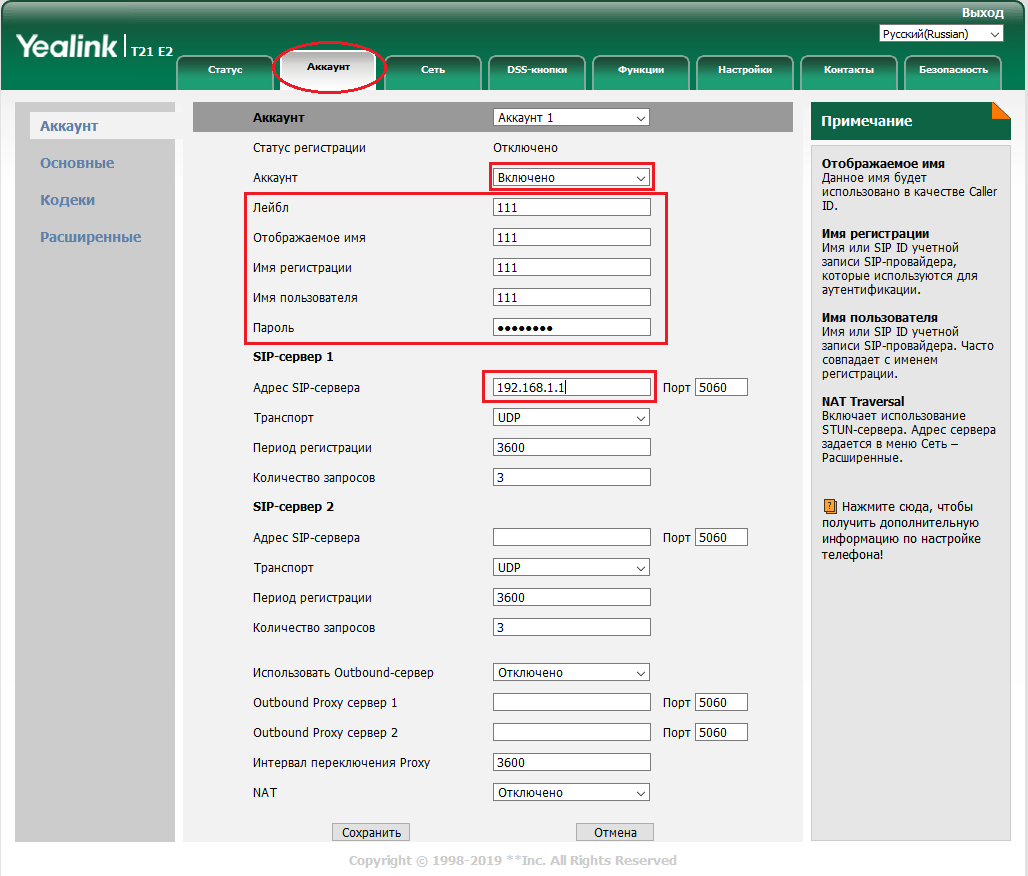
Заполнив необходимые поля, в поле аккаунт выбираем значение «Включено», и внизу экрана нажимаем «Сохранить». Если все данные были введены верно, то строка «Статус регистрации» будет отображать значение «Зарегистрировано».
На этом основные настройки аппарата закончены. Приступаем к дополнительным возможностям и повышению комфорта использования.

В закладке DSS-кнопки можно настроить BLF клавиши под необходимые функции. Тип действия выбирается из списка, значения и лейбл заполняются в соответствии. В данном примере мы настроили первую кнопку на быстрый дозвон часто набираемого номера, а вторую на трансфер звонка на другого менеджера.
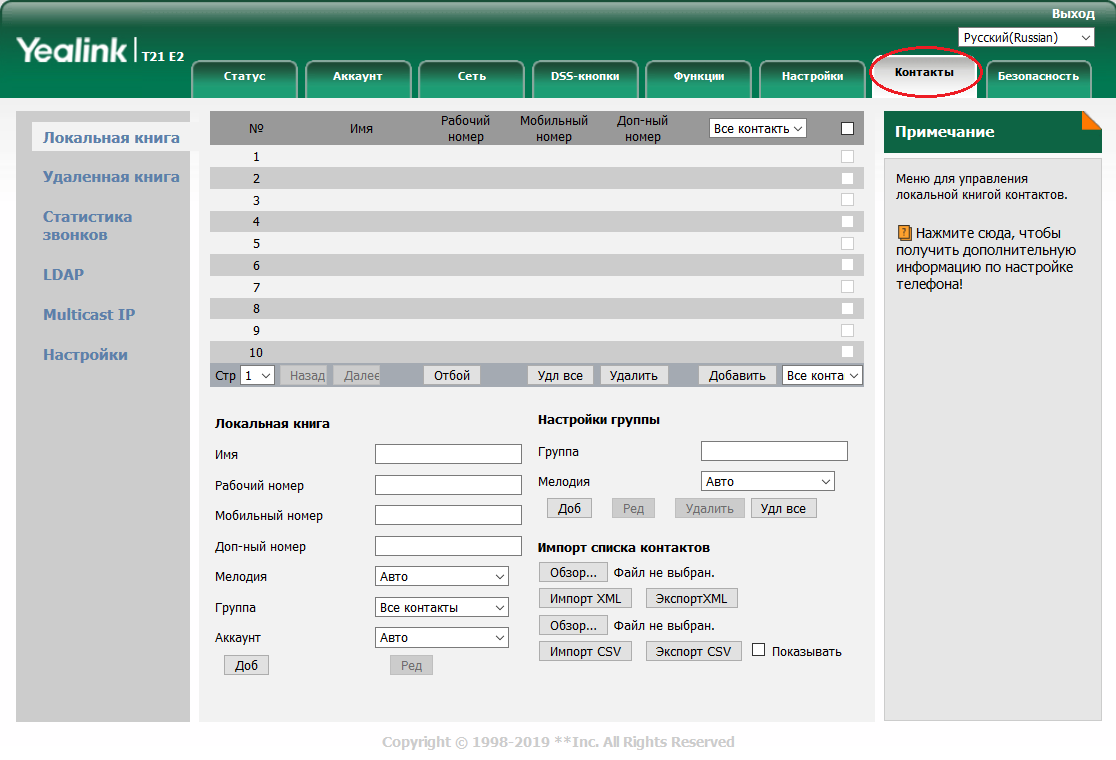
Телефон без встроенной книги контактов неудобен, это факт. Настоятельно рекомендуем воспользоваться книгой контактов, в будущем поможет сохранить огромное количество времени. В закладках выбираем «Контакты» и добавляем номера телефонов.
Контакты можно группировать и присваивать различные мелодии (которые, кстати, можно загружать на аппарат самостоятельно). Можно автоматизировать этот процесс с помощью импорта XML или CSV списка контактов. Для каждого контакта можно привязать до 3 номеров. Чтобы добавить контакты, не обязательно заходить в веб-интерфейс, это можно сделать и на самом аппарате, но занимает это немного больше времени.
Как подключить наушники к ip телефону Yealink T21 E2?
Иногда для удобства пользования телефоном и для освобождения рук, требуется подключение к телефону гарнитуры. Yealink SIP T21 E2 предоставляет такую возможность. Для этого необходимо выбрать и купить телефонные наушники с разъёмом RJ9 и подключить их в соответствующий разъём на торце телефона (обозначено соответствующей иконкой).
Для активации работы наушников телефон следует перевести в режим работы с гарнитурой, нажам на клавиатуре соответствующую клавишу.
После выполнения этих процедур вы комфортно сможете работать с гарнитурой освободив свои руки.
Резюме
Yealink SIP-T21P соответствует требованиям современного офисного работника. Он удобен в использовании, надежен и практичен. Если вы задумываетесь о приобретении SIP-аппаратов для своего офиса и готовы вложить несколько больше, чем того требуют самые бюджетные варианты, то стоит присмотреться к этой модели.
«>