-
Contents
-
Table of Contents
-
Troubleshooting
-
Bookmarks
Quick Links
Contact SAMSUNG WORLDWIDE
If you have any questions or comments relating to Samsung products, please contact the SAMSUNG customer care centre.
Country
Customer Care Centre
EIRE
0818 717 100
U.K
0845 SAMSUNG (7267864)
Web Site
www.samsung.com/ie
www.samsung.com/uk
BN68-01968R-01
LED TV
imagine the possibilities
Thank you for purchasing this Samsung product.
To receive more complete service, please register
your product at
www.samsung.com/register
Model
Serial No.
Troubleshooting
Summary of Contents for Samsung UE32B6000VW
 10:54
10:54
Как ПРАВИЛЬНО обновить — ПРОШИВКУ — через USB в ТВ SAMSUNG !
 19:09
19:09
ТВ ЖК Samsung не ловит каналы
 08:37
08:37
Ремонт телевизора Samsung UE32ES6757M Звук есть, нет изображения
 08:56
08:56
Прошивка телевизора Samsung при помощи USB флешки
 01:33
01:33
Телевизор Cамcунг подключение к интернету по локальной сети WI — FI
 07:55
07:55
Review: Samsung UE40B6000 LED LCD TV
 29:21
29:21
Самостоятельный ремонт LED подсветки тв Samsung UE32F5500!
 08:12
08:12
Установка модуля условного доступа Триколор в телевизор.
LED TV user manual imagine the possibilities Thank you for …
Led tv, User manual, Imagine the possibilities
- Изображение
- Текст
- Содержание
BN68-02388J-00
LED TV
user manual
imagine the possibilities
Thank you for purchasing this Samsung product.
To receive more complete service, please register
your product at
www.samsung.com/register
Model Serial No.
Contact SAMSUNG WORLDWIDE
If you have any questions or comments relating to Samsung products, please contact the SAMSUNG customer care centre.
Country
Customer Care Centre
Web Site
AUSTRIA
0810 — SAMSUNG (7267864, € 0.07/min)
www.samsung.com/at
BELGIUM
02 201 2418
www.samsung.com/be
www.samsung.com/be_fr
CZECH REPUBLIC
800 — SAMSUNG (800-726786)
www.samsung.com/cz
Distributor pro Českou republiku:
Samsung Zrt., česká organizační složka, Oasis Florenc, Sokolovská394/17, 180 00, Praha 8
DENMARK
8 — SAMSUNG (7267864)
www.samsung.com/dk
EIRE
0818 717 100
www.samsung.com/ie
FINLAND
30 — 6227 515
www.samsung.com/fi
FRANCE
01 4863 0000
www.samsung.com/fr
GERMANY
01805 — SAMSUNG (7267864, € 0.14/Min)
www.samsung.de
HUNGARY
06 — 80 — SAMSUNG (7267864)
www.samsung.com/hu
ITALIA
800 — SAMSUNG (7267864)
www.samsung.com/it
LUXEMBURG
02 261 03 710
www.samsung.com/lu
NETHERLANDS
0900-SAMSUNG (0900-7267864) (€ 0,10/Min)
www.samsung.com/nl
NORWAY
3 — SAMSUNG (7267864)
www.samsung.com/no
POLAND
0 801 1SAMSUNG(172678)
022 — 607 — 93 — 33
www.samsung.com/pl
PORTUGAL
808 20 — SAMSUNG (7267864)
www.samsung.com/pt
SLOVAKIA
0800 — SAMSUNG (7267864)
www.samsung.com/sk
SPAIN
902 — 1 — SAMSUNG (902 172 678)
www.samsung.com/es
SWEDEN
075 — SAMSUNG (726 78 64)
www.samsung.com/se
SWITZERLAND
0848 — SAMSUNG (7267864, CHF 0.08/min)
www.samsung.com/ch
U.K
0845 SAMSUNG (7267864)
www.samsung.com/uk
TURKEY
444 77 11
www.samsung.com/tr
ESTONIA
800-7267
www.samsung.com/ee
LATVIA
8000-7267
www.samsung.com/lv
LITHUANIA
8-800-77777
www.samsung.com/lt
KAZAHSTAN
8-10-800-500-55-500
www.samsung.com/kz_ru
KYRGYZSTAN
00-800-500-55-500
—
RUSSIA
8-800-555-55-55
www.samsung.ru
TADJIKISTAN
8-10-800-500-55-500
—
UKRAINE
8-800-502-0000
www.samsung.ua
UZBEKISTAN
8-10-800-500-55-500
www.samsung.com/kz_ru
BN68-02388J-L04.indb 1
2009-06-09 �� 5:52:58

Digital TV Notice
1. Functionalities related to Digital TV(DVB) are only available in countries/areas where DVB-T (MPEG2 and MPEG4 AVC) digital
terrestrial signals are broadcasted or where you are able to access to a compatible DVB-C(MPEG2 and MPEG4 AAC) cable-
TV service. Please check with your local dealer the possibility to receive DVB-T or DVB-C signal.
2. DVB-T is the DVB European consortium standard for the broadcast transmission of digital terrestrial television and DVB-
C is that for the broadcast transmission of digital TV over cable. However, some differentiated features like EPG (Electric
Programme Guide), VOD (Video on Demand) and so on, are not included in this specification. So, they cannot be workable at
this moment.
3. Although this TV set meets the latest DVB-T and DVB-C standards, as of [August, 2008], the compatibility with future DVB-T
digital terrestrial and DVB-C digital cable broadcasts cannot be guaranteed.
4. Depending on the countries/areas where this TV set is used some cable-TV providers may charge an additional fee for such a
service and you may be required to agree to terms and conditions of their business.
5. Some Digital TV functions might be unavailable in some countries or regions and DVB-C might not work correctly with some
cable service providers.
6. For more information, please contact your local Samsung customer care centre.
Precautions When Displaying a Still Image
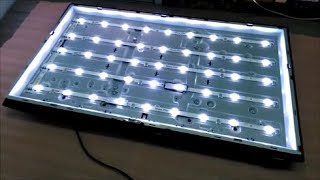
A still image may cause permanent damage to the TV screen
Do not display still image and partially still on the LED panel for more than 2 hours as it can cause screen image retention.
This image retention is also known as screen burn. To avoid such image retention, reduce the degree of brightness and
contrast of the screen when displaying a still image.
Watching the LED TV in 4:3 format for a long period of time may leave traces of borders displayed on the
left, right and centre of the screen caused by the difference of light emission on the screen. Playing a DVD or
a game console may cause a similar effect to the screen. Damages caused by the above effect are not
covered by the Warranty.
Displaying still images from Video games and PC for longer than a certain period of time may produce partial after-images. To
prevent this effect, reduce the ‘brightness’ and ‘contrast’ when displaying still images.
© 2009 Samsung Electronics Co., Ltd. All rights reserved.
❑
❑
●
●
●
BN68-02388J-L04.indb 1
2009-06-09 �� 5:52:58

License TruSurround HD, SRS and symbol are trademarks of SR…
Страница 3
- Изображение
- Текст
English — 1
License
TruSurround HD, SRS and symbol are trademarks of SRS Labs, Inc. TruSurround HD technology is
incorporated under license from SRS Labs, Inc.
Manufactured under license from Dolby Laboratories. Dolby and the double-D symbol are trademarks of
Dolby Laboratories.
Symbol
N
O
T
Note
One-Touch Button
TOOLS Button
Press
❑
❑
SETTING UP YOUR TV
Viewing the Control Panel ……………………………………………………….. 2
Accessories …………………………………………………………………………… 3
Viewing the Connection Panel ………………………………………………….. 4
Viewing the Remote Control …………………………………………………….. 7
Installing Batteries in the Remote Control ………………………………….. 8
Viewing the menus …………………………………………………………………. 8
Placing Your Television in Standby Mode …………………………………… 9
Plug & Play Feature ………………………………………………………………… 9
Viewing the Display ………………………………………………………………. 10
CHANNEL
Channel Menu ……………………………………………………………………… 10
Managing Channels ……………………………………………………………… 13
PICTURE
Configuring the Picture Menu …………………………………………………. 15
Using Your TV as a Computer (PC) Display ……………………………… 19
Setting up the TV with your PC……………………………………………….. 20
SOUND
Configuring the Sound Menu ………………………………………………….. 21
Selecting the Sound Mode …………………………………………………….. 22
SETUP
Configuring the Setup Menu …………………………………………………… 23
Setting the Time ……………………………………………………………………. 26
INPUT / SUPPORT
Input Menu …………………………………………………………………………… 28
Support Menu ………………………………………………………………………. 28
■
■
■
■
■
■
■
■
■
■
■
■
■
■
■
■
■
■
■
■
MEDIA PLAY (USB)
Connecting a USB Device ……………………………………………………… 30
Media Play Function ……………………………………………………………… 31
Photo List Option Menu …………………………………………………………. 32
Viewing a Photo or Slide Show……………………………………………….. 33
Slide Show Option Menu ……………………………………………………….. 34
Music List Option Menu …………………………………………………………. 35
Playing Music ………………………………………………………………………. 36
Music Play option Menu ………………………………………………………… 37
Using the Setup Menu …………………………………………………………… 37
ANYNET+
Connecting Anynet+ Devices ………………………………………………….. 38
Setting Up Anynet+ ……………………………………………………………….. 39
Switching between Anynet+ Devices ……………………………………….. 40
Recording ……………………………………………………………………………. 41
Listening through a Receiver (Home theatre) ……………………………. 41
Troubleshooting for Anynet+ …………………………………………………… 42
RECOMMENDATIONS
Teletext Feature ……………………………………………………………………. 43
Installing the Stand ……………………………………………………………….. 44
Disconnecting the Stand ………………………………………………………… 45
Installing the Wall Mount Kit …………………………………………………… 45
Anti-Theft Kensington Lock ……………………………………………………. 45
Assembling the Cables ………………………………………………………….. 46
Preparing before installing Wall-Mount …………………………………….. 46
Securing the Installation Space ………………………………………………. 47
Securing the TV to the Wall ……………………………………………………. 47
Troubleshooting: Before Contacting Service Personnel ……………… 48
Specifications ………………………………………………………………………. 49
GNU GENERAL PUBLIC LICENSE
END OF TERMS AND CONDITIONS
GNU Lesser General Public License (LGPL)
END OF TERMS AND CONDITIONS
LICENSE ISSUES
■
■
■
■
■
■
■
■
■
■
■
■
■
■
■
■
■
■
■
■
■
■
■
■
■
■
■
■
■
■
■
CONTENTS
Eng
lish
BN68-02388J-L04.indb 1
2009-06-09 �� 5:52:59

Seting up your tv, Viewing the control panel, Setting up your tv
Страница 4
- Изображение
- Текст
English — 2
SETTING UP YOUR TV
Figures and illustrations in this User Manual are provided for reference only and may differ from actual product appearance.
Product design and specifications may be changed without notice in order to enhance product performance.
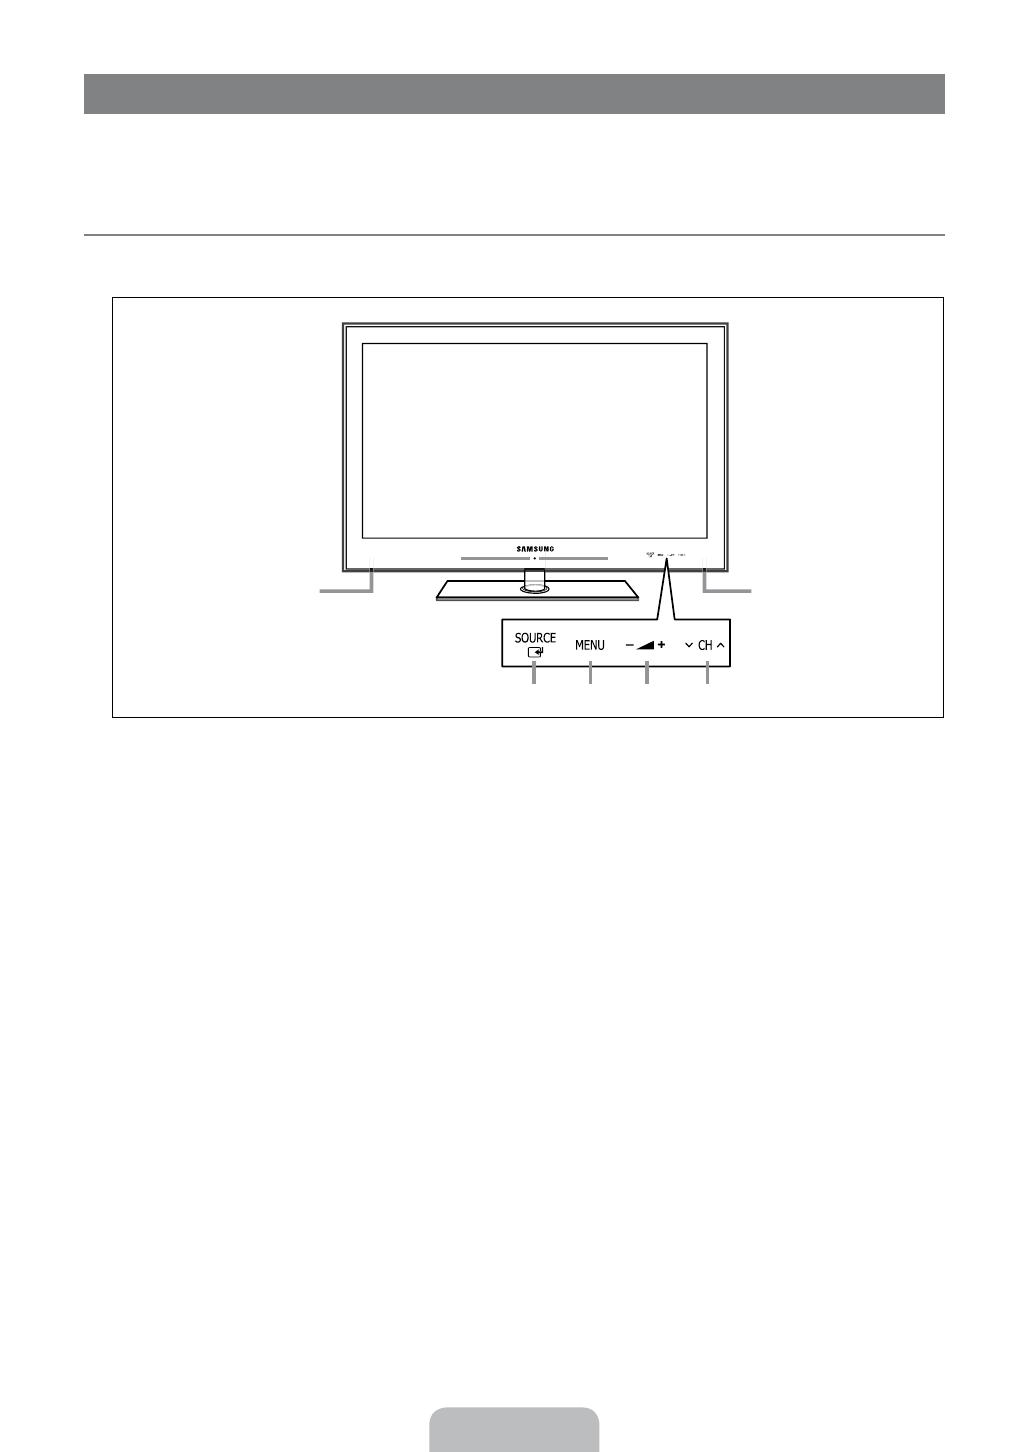
Viewing the Control Panel
The product colour and shape may vary depending on the model.
The front panel buttons can be activated by touching it with your finger.
1
REMOTE CONTROL SENSOR: Aim the remote control towards this spot on the TV.
2
P (POWER): Press to turn the TV on and off.
3
z: Press to change channels. In the on-screen menu, use the z buttons as you would use the ▼ and ▲
buttons on the remote control.
4
Y: Press to increase or decrease the volume. In the on-screen menu, use the Y buttons as you would use the
◄ and ► buttons on the remote control.
5
MENU: Press to see an on-screen menu of your TV’s features.
6
SOURCE E: Toggles between all the available input sources. In the on-screen menu, use this button as you use the
ENTERE button on the remote control.
7
SPEAKERS
N
¦
N
N
7
6
5
4
3
1
2
7
BN68-02388J-L04.indb 2
2009-06-09 �� 5:52:59

English — 3
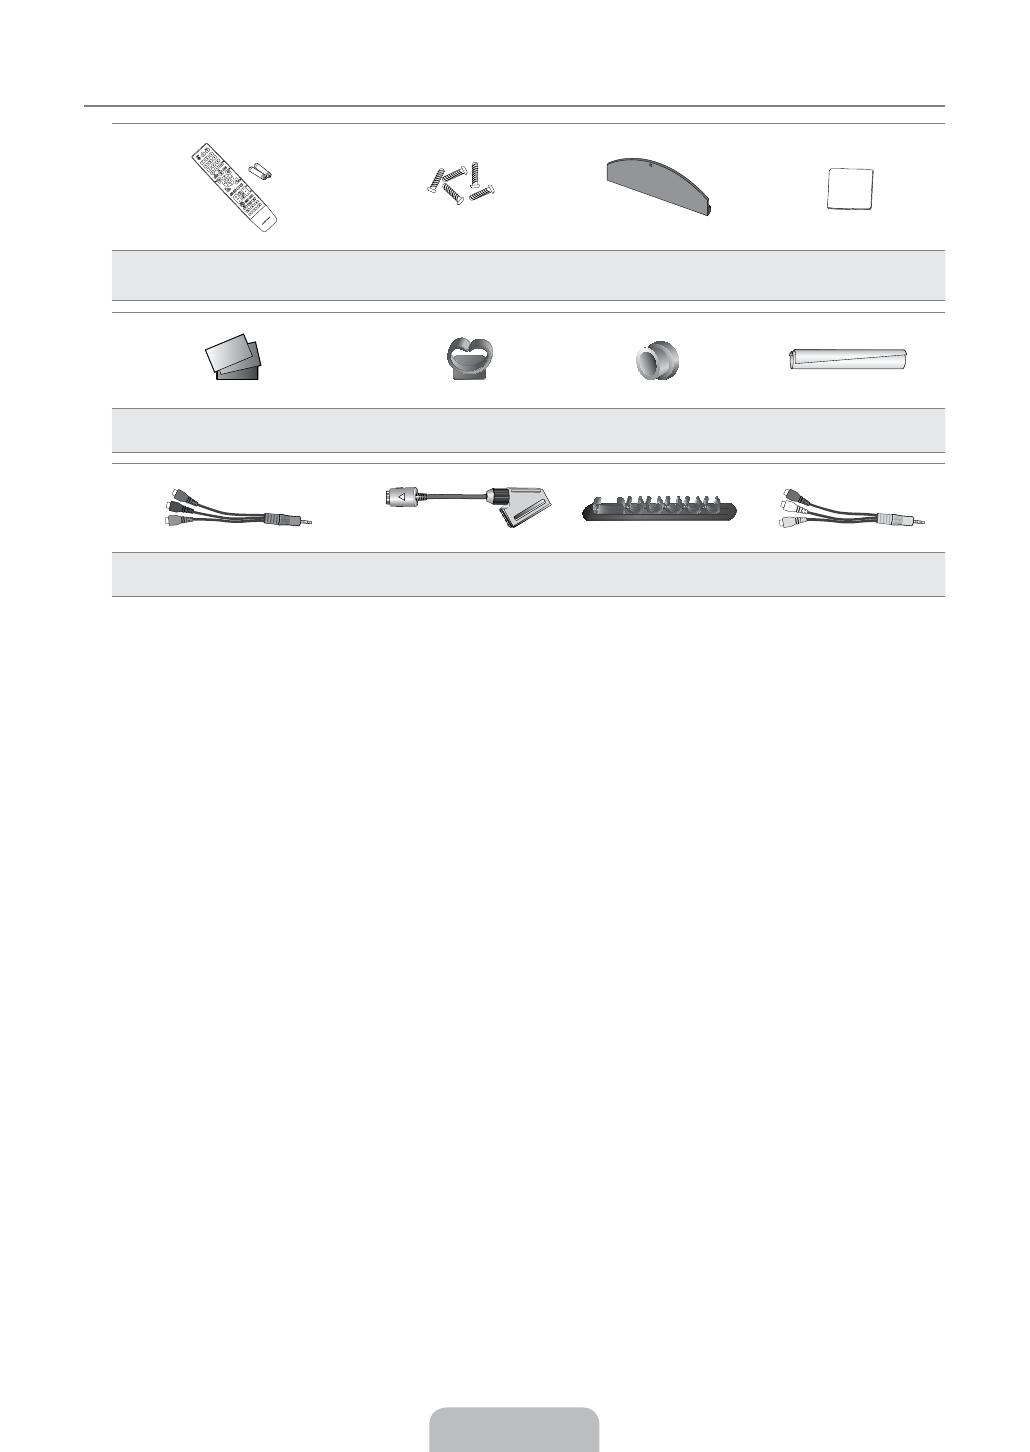
Accessories
Remote Control & Batteries
(AAA x 2)
Cover-Bottom
Cleaning Cloth
Warranty Card / Safety Guide
(Not available in all locations)
Holder-Wire Stand
Holder-Ring (4ea)
Holder-Wire Cable
(Depending on the model)
Holder-Wire (3ea)
SCART Cable
AV Cable
Component Cable
Please make sure the following items are included with your LED TV. If any items are missing, contact your dealer.
The items colour and shape may vary depending on the model.
¦
N
N
BN68-02388J-L04.indb 3
2009-06-09 �� 5:53:00

English — 4
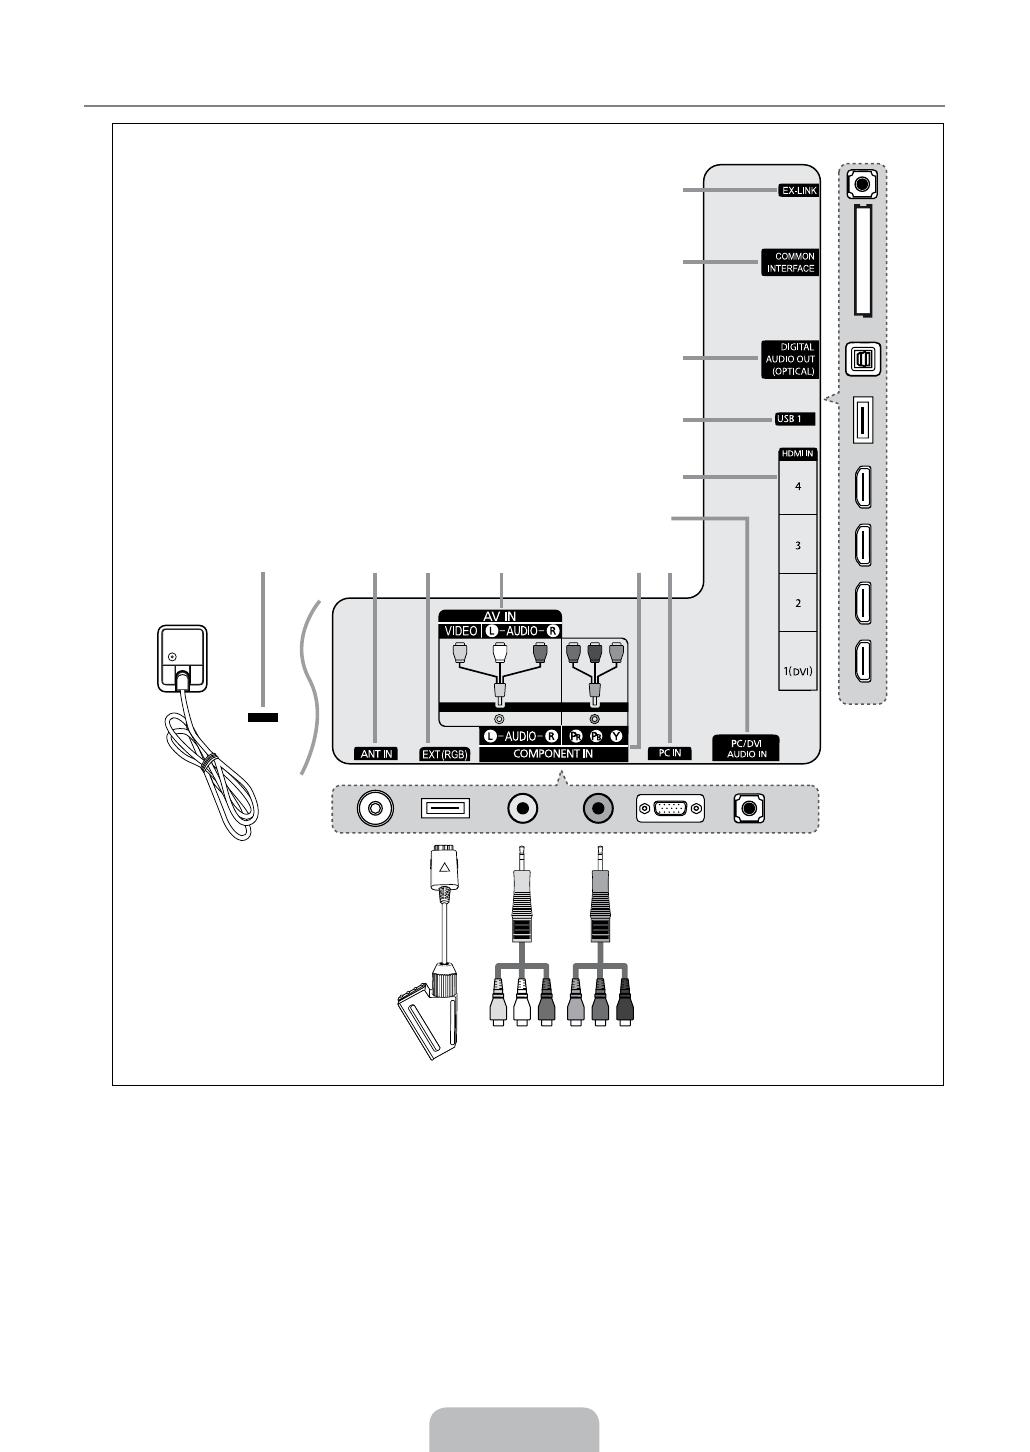
Viewing the Connection Panel
The product colour and shape may vary depending on the model.
For best cable connection to this product, be sure to use a cable with a maximum thickness as below:
Below 40 inch model: Max 0.47inch (12mm)
40 inch and above model: Max 0.55inch (14mm)
●
●
¦
N
N
1
2 3
5
4
8
9
0
!
@
6
7
[TV Rear Panel]
Power Input
BN68-02388J-L04.indb 4
2009-06-09 �� 5:53:01

English — 5
1
KENSINGTON LOCK
The Kensington Lock (optional) is a device used to physically fix the system when used in a public place. If you want to use a
locking device, contact the dealer where you purchased the TV.
The location of the Kensington Lock may be different depending on its model.
When connecting, use the appropriate connector.
2
ANT IN
Connects to an antenna or cable TV system.
3
EXT (RGB)
Inputs or outputs for external devices, such as VCR, DVD, video game device or video disc players.
When connecting, use the appropriate connector.
In EXT Mode, DTV Out supports MPEG SD Video and Audio only.
Input/Output Specification
Connector
Input
Output
Video
Audio (L / R)
RGB
Video + Audio (L / R)
EXT
O
O
O
Only TV or DTV output is available.
4
AV IN [VIDEO] / [R-AUDIO-L]
Video and audio inputs for external devices, such as a camcorder or VCR.
When connecting, use the appropriate connector.
5
COMPONENT IN
Connects Component video / audio.
When connecting, use the appropriate connector.
6
PC IN
Connects to the video output jacks on your PC.
If your PC supports an HDMI connection, you can connect this to the
HDMI IN 1(DVI), 2, 3 or 4 terminal.
If your PC supports a DVI connection, you can connect this to the
HDMI IN 1(DVI) / PC/DVI AUDIO IN terminal.
7
PC/DVI AUDIO IN
Connect to the audio output jack on your PC.
DVI audio outputs for external devices.
8
HDMI IN 1(DVI), 2, 3, 4
Connects to the HDMI jack of a device with an HDMI output.
No sound connection is needed for an HDMI to HDMI connection.
What is HDMI?
HDMI(High-Definition Multimedia Interface), is an interface that enables the transmission of digital audio and video signals
using a single cable.
The difference between HDMI and DVI is that the HDMI device is smaller than DVI’s one.
The TV may not output sound and pictures may be displayed with abnormal colour when DVD / Blu-ray player / Cable
Box / Satellite receiver (Set-Top Box) supporting HDMI versions older than 1.3 are connected. When connecting an older
HDMI cable and there is no sound, connect the HDMI cable to the
HDMI IN 1(DVI) jack and the audio cables to the
PC/DVI AUDIO IN jacks on the back of the TV. If this happens, contact the company that provided the DVD / Blu-ray
player / Cable Box / Satellite receiver (Set-Top Box) to confirm the HDMI version, then request an upgrade.
Use the
HDMI IN 1(DVI) jack for DVI connection to an external device. Use a DVI to HDMI cable or DVI-HDMI adapter
(DVI to HDMI) for video connection and the
PC/DVI AUDIO IN jacks for audio. When using an HDMI / DVI cable
connection, you must use the
HDMI IN 1(DVI) jack.
HDMI cables that are not 1.3 may cause annoying flicker or no screen display.
9
USB1
Connector for software upgrades and Media Play, etc.
N
N
N
N
N
N
N
N
N
N
N
N
N
BN68-02388J-L04.indb 5
2009-06-09 �� 5:53:01

English — 6
0
DIGITAL AUDIO OUT (OPTICAL)
Connects to a Digital Audio component such as a Home theatre receiver.
When a Digital Audio System is connected to the
DIGITAL AUDIO OUT (OPTICAL) jack: Decrease the volume of the TV
and adjust the volume level with the system’s volume control.
5.1CH audio is possible when the TV is connected to an external device supporting 5.1CH.
When the receiver (home theatre) is set to On, you can hear sound output from the TV’s Optical jack. When the TV is
displaying a DTV(air) signal, the TV will send out 5.1 channel sound to the Home theatre receiver. When the source is a
digital component such as a DVD / Blu-ray player / Cable Box / Satellite receiver (Set-Top Box) and is connected to the
TV via HDMI, only 2 channel sound will be heard from the Home Theatre receiver. If you want to hear 5.1 channel audio,
connect the digital audio out jack on DVD / Blu-ray player / Cable Box / Satellite receiver (Set-Top Box) directly to an
Amplifier or Home Theatre, not the TV.
!
COMMON INTERFACE Slot
Insert CI (Common Interface) card into the slot.
When not inserting ‘CI CARD’ in some channels, ‘Scrambled Signal’ is displayed on the screen.
The pairing information containing a telephone number, CI CARD ID, Host ID and other information will be displayed in
about 2~3 minutes. If an error message is displayed, please contact your service provider.
When the channel information configuration has finished, the message ‘Updating Completed’ is displayed, indicating that
the channel list is now updated.
You must obtain a CI CARD from a local cable service provider. Remove the CI CARD by carefully pulling it out with your
hands since dropping the CI CARD may cause damage to it.
Insert the CI-Card in the direction marked on it.
The place of the
COMMON INTERFACE Slot may be different depending on its model.
CAM is not supported in some countries and regions, check with your authorized dealer.
@
EX-LINK
Connector for service only.
N
N
N
–
–
–
N
N
N
N
BN68-02388J-L04.indb 6
2009-06-09 �� 5:53:01

English —
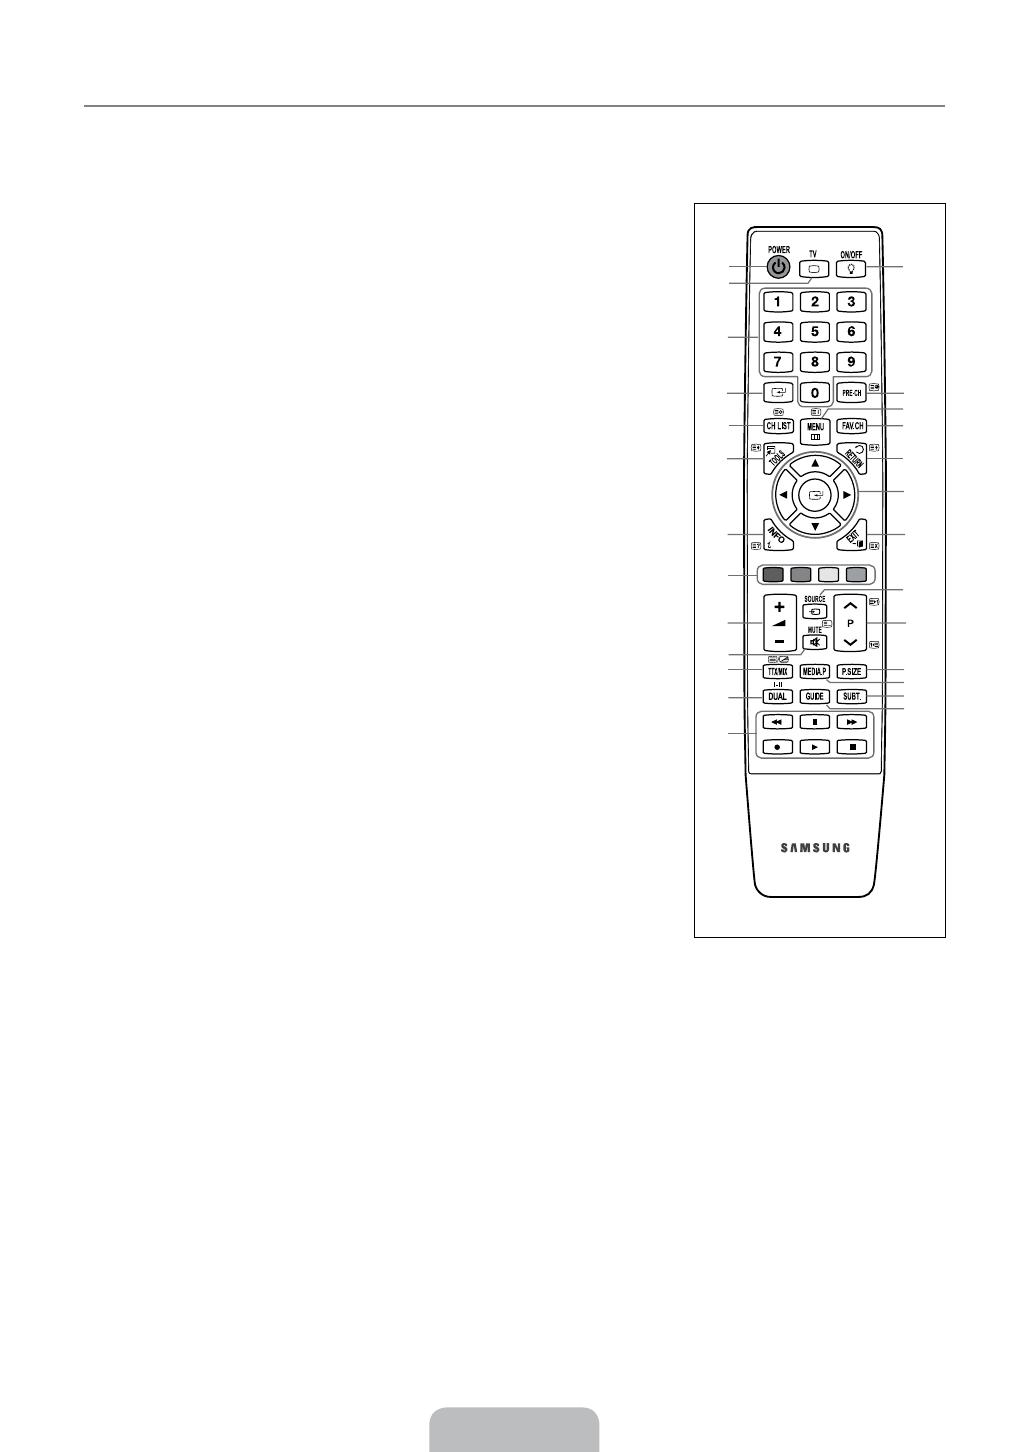
Viewing the Remote Control
You can use the remote control up to a distance of about 23 feet from the TV.
The performance of the remote control may be affected by bright light.
The product colour and shape may vary depending on the model.
1
POWER : Turns the TV on and
off.
2
TV : Selects the TV mode
directly.
3
NUMERIC BUTTONS : Press to
change the channel.
4
FAV.CH : Used to display
Favourites Channel Lists on the
screen.
5
INFO : Press to display
information on the TV screen.
6
TOOLS : Use to quickly select
frequently used functions.
7
CH LIST : Used to display
Channel Lists on the screen.
8
COLOUR BUTTONS : Use these
buttons in the
Channel list,
Media Play menu, etc.
9
Y : Press to increase or
decrease the volume.
0
MUTE M : Press to temporarily
cut off the sound.
@
DUAL : Sound effect selection.
#
Use these buttons in the Media
Play and Anynet+ modes.
(∏: This remote can be used
to control recording on Samsung
recorders with the Anynet+
feature)
$
ON/OFF @: Pressing the
ON/OFF @ light button toggles
between on and off. When the
remote control is on, and a button
is pressed on the remote control,
the remote control buttons will
be lit for a moment. (Using the
remote control with the
ON/OFF
@ light button set to On will
reduce the battery usage time.)
%
PRE-CH : Enables you to return
to the previous channel you were
watching.
^
MENU : Displays the main on-
screen menu.
&
GUIDE : Electronic Programme
Guide (EPG) display
*
RETURN : Returns to the
previous menu
(
UP▲ / DOWN▼ / LEFT◄ /
RIGHT► / ENTERE : Use to
select on-screen menu items and
change menu values.
)
EXIT : Press to exit the menu.
a
SOURCE : Press to display
and select the available video
sources.
b
>P < : Press to change
channels.
c
P.SIZE : Picture size selection.
d
MEDIA.P : Allows you to play
music files and pictures.
e
SUBT. : Digital subtitle display
f
AD : Audio Description selection.
Teletext Functions
2
: : Exit from the Teletext
display
5
5 : Teletext reveal
6
4 : Teletext size selection
7
8 : Teletext store
8
Fastext topic selection
!
/ : Alternately select
Teletext, Double, or Mix .
%
1 : Teletext sub page
^
6 : Teletext index
*
9 : Teletext hold
)
7 : Teletext cancel
a
0 : Teletext mode selection
(LIST / FLOF)
b
2: Teletext next page
3: Teletext previous page
¦
N
N
N
INFO
2
1
3
4
5
0
6
7
8
9
!
@
#
$
%
^
&
*
)
b
c
d
e
f
a
(
CH
LIS
T
AD
BN68-02388J-L04.indb 7
2009-06-09 �� 5:53:01

Installing batteries in the remote control, Viewing the menus, Operation
English, Operation the osd (on screen display)
- Изображение
- Текст
English —
Installing Batteries in the Remote Control
1. Lift the cover at the back of the remote control upward as shown in the figure.
2. Install two AAA size batteries.
Make sure to match the ‘+’ and ‘–’ ends of the batteries with the diagram
inside the compartment.
3. Replace the cover.
Remove the batteries and store them in a cool, dry place if you won’t be using
the remote control for a long time.
If the remote control doesn’t work, check the following:
Is the TV power on?
Are the plus and minus ends of the batteries reversed?
Are the batteries drained?
Is there a power outage or is the power cord unplugged?
Is there a special fluorescent light or neon sign nearby?
OPERATION
Viewing the menus
Before using the TV, follow the steps below to learn how to navigate the menu in order to select and adjust different functions.
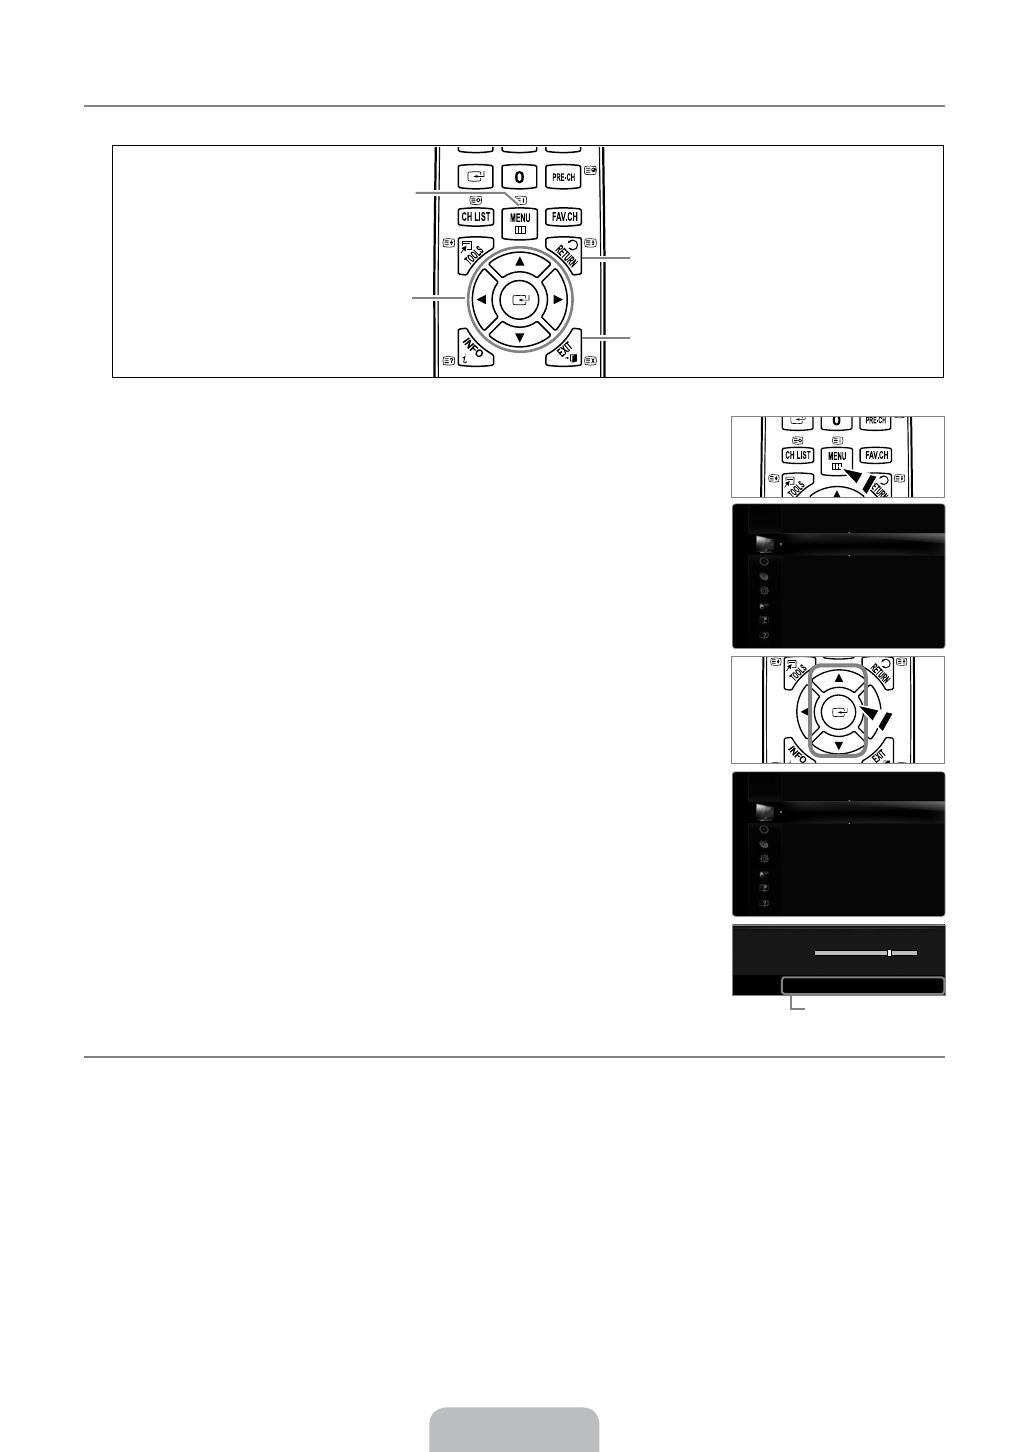
Operation the OSD (On Screen Display)
The access step may differ depending on the selected menu.
1. Press the MENU button.
2. The main menu appears on the screen. The menu’s left side has icons : Picture, Sound,
Channel, Setup, Input, Application, Support.
3. Press the ▲ or ▼ button to select one of the icons.
4. Then press the ENTERE button to access the icon’s sub-menu.
5. Press the ▲ or ▼ button to select the icon’s submenu.
6. Press the ◄ or ► button to decrease or increase the value of a particular item. The
adjustment OSD may differ depending on the selected menu.
. Press the ENTERE button to complete the configuration. Press the EXIT button to exit.
¦
N
N
N
¦
❑
INFO
CH
LIS
T
AD
MENU Button
Display the main on-screen menu.
ENTERE / DIRECTION Buttons
Move the cursor and select an
item. Select the currently selected
item. Confirm the setting.
RETURN Button
Return to the previous menu.
EXIT
Exit the on-screen menu.
INFO
CH
LIS
T
AD
INFO
CH
LIS
T
AD
Mode
: Standard
▶
Backlight
: 7
Contrast
: 95
Brightness
: 45
Sharpness
: 50
Colour
: 50
Tint (G/R)
: G50/R50
Advanced Settings
Picture
Mode
: Standard
Backlight
: 7
▶
Contrast
: 95
Brightness
: 45
Sharpness
: 50
Colour
: 50
Tint (G/R)
: G50/R50
Advanced Settings
Picture Options
Picture
7
U Move L Adjust E Enter R Return
▲
Backlight
▼
Help icon
BN68-02388J-L04.indb 8
2009-06-09 �� 5:53:02

Комментарии
Перед началом установки и эксплуатации внимательно прочитайте данную инструкцию для телевизора Samsung UE-32B6000VW.
Рекомендации: Для очистки не используйте такие химические вещества, как воск, бензин, спирт, растворители, инсектициды, освежители воздуха, смазочные или моющие вещества. Это может привести повреждению поверхностей телевизора или стиранию надписей на нем.

Описание инструкции Samsung UE-32B6000VW:
Тип устройства: Телевизоры;
Фирма производитель: Samsung;
Модель: Samsung UE-32B6000VW;
Язык инструкции: русский;
Формат файла: pdf;
Количество страниц: 51;
Размер файла: 11 Мб.
Инструкция для Samsung UE-32B6000VW:
В руководстве Samsung UE-32B6000VW содержатся важные сведения: список принадлежностей, подключение и подготовка к работе (установка батареек, использование пульта ДУ, просмотр меню), настройка каналов, настройка изображения и звука, установка времени, описание функций, подключение к компьютеру (опциально), чистка и уход, поиск и устранение неисправностей.
Инструкции для похожих моделей, которые помогают нашим пользователям:
BN68-01968P-00
Если у вас есть предложения или вопросы по продуктам Samsung, связывайтесь с информационным центром Samsung.
ESTONIA 800-7267 www.samsung.com/ee
LATVIA 8000-7267 www.samsung.com/lv
LITHUANIA 8-800-77777 www.samsung.com/lt
KAZAHSTAN 8-10-800-500-55-500 www.samsung.com/kz_ru
KYRGYZSTAN 00-800-500-55-500 —
RUSSIA 8-800-555-55-55 www.samsung.ru
TADJIKISTAN 8-10-800-500-55-500 —
UKRAINE 8-800-502-0000 www.samsung.ua
UZBEKISTAN 8-10-800-500-55-500 www.samsung.com/kz_ru
LED TV
руководство пользователя
удивительные возможности
Благодарим за приобретение продукции компании
Samsung. Для получения полного обслуживания
зарегистрируйте свое устройство по адресу
www.samsung.ru/club/registration
Модель Серийный номер
UE32B6000V
UE40B6000V
UE46B6000V
BN68-01968P-Eng.indb 1 2009-04-08 �� 5:34:14

Functionalities related to Digital TV(DVB) are only available in countries/areas where DVB-T (MPEG2 and MPEG4 AVC) digital
terrestrial signals are broadcasted or where you are able to access to a compatible DVB-C(MPEG2 and MPEG4 AAC) cable-
TV service. Please check with your local dealer the possibility to receive DVB-T or DVB-C signal.
DVB-T is the DVB European consortium standard for the broadcast transmission of digital terrestrial television and DVB-
C is that for the broadcast transmission of digital TV over cable. However, some differentiated features like EPG (Electric
Programme Guide), VOD (Video on Demand) and so on, are not included in this specification. So, they cannot be workable at
this moment.
Although this TV set meets the latest DVB-T and DVB-C standards, as of [August, 2008], the compatibility with future DVB-T
digital terrestrial and DVB-C digital cable broadcasts cannot be guaranteed.
Depending on the countries/areas where this TV set is used some cable-TV providers may charge an additional fee for such a
service and you may be required to agree to terms and conditions of their business.
Some Digital TV functions might be unavailable in some countries or regions and DVB-C might not work correctly with some
cable service providers.
For more information, please contact your local Samsung customer care centre.”
A still image may cause permanent damage to the TV screen.
Do not display still image and partially still on the LED panel for more than 2 hours as it can cause screen image retention.
This image retention is also known as screen burn. To avoid such image retention, reduce the degree of brightness and
contrast of the screen when displaying a still image.
Watching the LED TV in 4:3 format for a long period of time may leave traces of borders displayed on the
left, right and centre of the screen caused by the difference of light emission on the screen. Playing a DVD or
a game console may cause a similar effect to the screen. Damages caused by the above effect are not
covered by the Warranty.
Displaying still images from Video games and PC for longer than a certain period of time may produce partial after-images. To
prevent this effect, reduce the ‘brightness’ and ‘contrast’ when displaying still images.
© 2009 Samsung Electronics Co., Ltd. All rights reserved.
❑
❑
●
●
●
BN68-01968P-Eng.indb 1 2009-04-08 �� 5:34:14
, SRS and symbol are trademarks of SRS Labs, Inc. technology is
incorporated under license from SRS Labs, Inc.
Manufactured under license from Dolby Laboratories. Dolby and the double-D symbol are trademarks of
Dolby Laboratories.
N O T
Note One-Touch Button TOOL Button Press
❑
❑
Viewing the Control Panel ……………………………………………………….. 2
Accessories …………………………………………………………………………… 3
Viewing the Connection Panel ………………………………………………….. 4
Viewing the Remote Control …………………………………………………….. 7
Installing Batteries in the Remote Control ………………………………….. 8
Viewing the menus …………………………………………………………………. 9
Placing Your Television in Standby Mode …………………………………… 9
Plug & Play Feature ………………………………………………………………. 10
L
Channel Menu ……………………………………………………………………….11
Managing Channels ……………………………………………………………… 14
E
Conguring the Picture Menu …………………………………………………. 16
Using Your TV as a Computer (PC) Display ……………………………… 20
Setting up the TV with your PC……………………………………………….. 21
D
Conguring the Sound Menu ………………………………………………….. 22
Selecting the Sound Mode …………………………………………………….. 23
P
Conguring the Setup Menu …………………………………………………… 24
Setting the Time ……………………………………………………………………. 26
Input Menu …………………………………………………………………………… 28
Support Menu ………………………………………………………………………. 28
■
■
■
■
■
■
■
■
■
■
■
■
■
■
■
■
■
■
■
)
Connecting a USB Device ……………………………………………………… 30
Media Play Function ……………………………………………………………… 31
Sorting the Photo List ……………………………………………………………. 32
Photo List Option Menu …………………………………………………………. 33
Viewing a Photo or Slide Show……………………………………………….. 34
Slide Show Option Menu ……………………………………………………….. 35
Sorting the Music List ……………………………………………………………. 37
Music List Option Menu …………………………………………………………. 38
Playing a Music ……………………………………………………………………. 39
Using the Setup Menu …………………………………………………………… 40
Music Play option Menu ………………………………………………………… 40
+
Connecting Anynet
+
Devices ………………………………………………….. 41
Setting Up Anynet
+
……………………………………………………………….. 42
Switching between Anynet
+
Devices ……………………………………….. 42
Recording ……………………………………………………………………………. 43
Listening through a Receiver (Home Theatre)…………………………… 43
Troubleshooting for Anynet
+
…………………………………………………… 44
Teletext Feature ……………………………………………………………………. 45
Installing the Stand ……………………………………………………………….. 46
Disconnecting the Stand ………………………………………………………… 47
Installing the Wall Mount Kit …………………………………………………… 47
Anti-Theft Kensington Lock ……………………………………………………. 47
Assembling the Cables ………………………………………………………….. 48
Preparing before installing Wall-Mount …………………………………….. 48
Securing the Installation Space ………………………………………………. 49
Securing the TV to the Wall ……………………………………………………. 49
Troubleshooting: Before Contacting Service Personnel ……………… 50
Specications ………………………………………………………………………. 51
■
■
■
■
■
■
■
■
■
■
■
■
■
■
■
■
■
■
■
■
■
■
■
■
■
■
■
■
English
BN68-01968P-Eng.indb 1 2009-04-08 �� 5:34:15
Figures and illustrations in this User Manual are provided for reference only and may differ from actual product appearance.
Product design and specifications may be changed without notice in order to enhance product performance.
The product colour and shape may vary depending on the model.
The front panel buttons can be activated by touching it with your finger.
1 : Aim the remote control towards this spot on the TV.
2
P
: Press to turn the TV on and off.
3
z
: Press to change channels. In the on-screen menu, use the
z
buttons as you would use the ▼ and ▲
buttons on the remote control.
4
Y
: Press to increase or decrease the volume. In the on-screen menu, use the
Y
buttons as you would use the
◄ and ► buttons on the remote control.
5 : Press to see an on-screen menu of your TV’s features.
6
E
: Toggles between all the available input sources. In the on-screen menu, use this button as you use the
E
button on the remote control.
7
N
¦
N
N
BN68-01968P-Eng.indb 2 2009-04-08 �� 5:34:15
Remote Control & Batteries
(AAA x 2)
Stand Screw X 5 Cover-Bottom Cleaning Cloth
Warranty Card / Safety Guide (Not
available in all locations)
Holder-Wire Stand Holder-Ring (4ea)
Holder-Wire Cable
(Depending on the model)
Component Cable SCART Cable
Holder-Wire (3ea)
connecter connecter
AV Cable
Please make sure the following items are included with your LED TV. If any items are missing, contact your dealer.
The items colour and shape may vary depending on the model.
¦
N
N
(M4 X L10)
BN68-01968P-Eng.indb 3 2009-04-08 �� 5:34:17
The product colour and shape may vary depending on the model.
1
The Kensington Lock (optional) is a device used to physically fix the system when used in a public place. If you want to use a
locking device, contact the dealer where you purchased the TV.
The location of the Kensington Lock may be different depending on its model.
When connecting, use the appropriate connector.
2
Connects to an antenna or cable TV system.
¦
N
N
N
BN68-01968P-Eng.indb 4 2009-04-08 �� 5:34:17

3
Inputs or outputs for external devices, such as VCR, DVD, video game device or video disc players.
When connecting, use the appropriate connector.
In EXT Mode, DTV Out supports MPEG SD Video and Audio only.
Input/Output Specification
Connector
Input Output
Video Audio (L / R) RGB Video + Audio (L / R)
O O O Only TV or DTV output is available.
4
Video and audio inputs for external devices, such as a camcorder or VCR.
When connecting, use the appropriate connector.
5
Connects Component video / audio.
When connecting, use the appropriate connector.
6
Connects to the video output jacks on your PC.
If your PC supports an HDMI connection, you can connect this to the or 4 terminal.
If your PC supports a DVI connection, you can connect this to the terminal.
7
Connect to the audio output jack on your PC.
DVI audio outputs for external devices.
8
Connects to the HDMI jack of a device with an HDMI output.
No sound connection is needed for an HDMI to HDMI connection.
Use an HDMI cable which is smaller than 14mm.
What is HDMI?
HDMI(High-Definition Multimedia Interface), is an interface that enables the transmission of digital audio and video signals
using a single cable.
The difference between HDMI and DVI is that the HDMI device is smaller than DVI’s one.
The TV may not output sound and pictures may be displayed with abnormal colour when DVD / Blu-ray player / Cable
Box / Satellite receiver (Set-Top Box) supporting HDMI versions older than 1.3 are connected. When connecting an older
HDMI cable and there is no sound, connect the HDMI cable to the jack and the audio cables to the
jacks on the back of the TV. If this happens, contact the company that provided the DVD / Blu-ray player /
Cable Box / Satellite receiver (Set-Top Box) to confirm the HDMI version, then request an upgrade.
Use the jack for DVI connection to an external device. Use a DVI to HDMI cable or DVI-HDMI adapter
(DVI to HDMI) for video connection and the jacks for audio. When using an HDMI / DVI cable
connection, you must use the jack.
HDMI cables that are not 1.3 may cause annoying flicker or no screen display.
9
Connector for software upgrades and Media Play, etc.
0
Connects to a Digital Audio component such as a Home theatre receiver.
When a Digital Audio System is connected to the jack: Decrease the volume of the TV
and adjust the volume level with the system’s volume control.
5.1CH audio is possible when the TV is connected to an external device supporting 5.1CH.
When the receiver (home theatre) is set to On, you can hear sound output from the TV’s Optical jack. When the TV is
displaying a DTV(air) signal, the TV will send out 5.1 channel sound to the Home theatre receiver. When the source is a
digital component such as a DVD / Blu-ray player / Cable Box / Satellite receiver (Set-Top Box) and is connected to the
TV via HDMI, only 2 channel sound will be heard from the Home Theatre receiver. If you want to hear 5.1 channel audio,
connect the digital audio out jack on DVD / Blu-ray player / Cable Box / Satellite receiver (Set-Top Box) directly to an
Amplifier or Home Theatre, not the TV.
N
N
N
N
N
N
N
N
N
N
N
N
N
N
N
BN68-01968P-Eng.indb 5 2009-04-08 �� 5:34:17

! Slot
Insert CI (Common Interface) card into the slot.
When not inserting ‘CI CARD’ in some channels, ‘Scrambled Signal’ is displayed on the screen.
The pairing information containing a telephone number, CI CARD ID, Host ID and other information will be displayed in
about 2~3 minutes. If an error message is displayed, please contact your service provider.
When the channel information configuration has finished, the message ‘Updating Completed’ is displayed, indicating that
the channel list is now updated.
You must obtain a CI CARD from a local cable service provider. Remove the CI CARD by carefully pulling it out with your
hands since dropping the CI CARD may cause damage to it.
Insert the CI-Card in the direction marked on it.
The place of the Slot may be different depending on its model.
CAM is not supported in some countries and regions, check with your authorized dealer.
@
Connector for service only.
N
N
N
N
BN68-01968P-Eng.indb 6 2009-04-08 �� 5:34:17
You can use the remote control up to a distance of about 23 feet from the TV.
The performance of the remote control may be affected by bright light.
The product colour and shape may vary depending on the model.
1
: Turns the TV on and
off.
2
: Selects the TV mode
directly.
3
: Press to
change the channel.
4
E
: Performs the same function
as the
E
button of
the directional buttons. When
switching channels with the
numeric buttons, and you press
the channel number and then the
E
button, the channel is
immediately switched.
5
: Used to display
Channel Lists on the screen.
6
: Use to quickly select
frequently used functions.
7
: Press to display
information on the TV screen.
8
: Use
these buttons in the
, menu, etc.
9
Y
: Press to increase or
decrease the volume.
0
M
Press to temporarily
cut off the sound.
@
:Sound effect selection.
#
Use these buttons in the
and
+
modes. (
∏
:
This remote can be used to
control recording on Samsung
recorders with the Anynet
+
feature)
$
@
: Pressing the
@
light button toggles
between on and off. When the
remote control is on, and a button
is pressed on the remote control,
the remote control buttons will
be lit for a moment. (Using the
remote control with the
@
light button set to On will
reduce the battery usage time.)
%
Enables you to return
to the previous channel you were
watching.
^
: Displays the main on-
screen menu.
&
: Used to display
Favourites Channel Lists on the
screen.
*
: Returns to the
previous menu
(
E
: Use to
select on-screen menu items and
change menu values.
)
: Press to exit the menu.
a
: Press to display
and select the available video
sources.
b
>
P
<
: Press to change
channels.
c
: Allows you to play
music files and pictures.
d
: Picture size selection.
e
: Digital subtitle display
f
: Electronic Programme
Guide (EPG) display
2
:
: Exit from the Teletext
display
5
8
: Teletext store
6
4
: Teletext size selection
7
5
: Teletext reveal
8
Fastext topic selection
0
0
: Teletext mode selection
(LIST / FLOF)
!
/
: Alternately select
Teletext, Double, or Mix.
%
1
: Teletext sub page
^
6
: Teletext index
*
9
: Teletext hold
)
7
: Teletext cancel
b
2
: Teletext next page
3
: Teletext previous page
¦
N
N
N
2
1
3
4
5
0
6
7
8
9
!
@
#
$
%
^
&
*
)
b
c
d
e
f
a
(
BN68-01968P-Eng.indb 7 2009-04-08 �� 5:34:18

Lift the cover at the back of the remote control upward as shown in the
figure.
Install two AAA size batteries.
Make sure to match the ‘+’ and ‘–’ ends of the batteries with the
diagram inside the compartment.
Replace the cover.
Remove the batteries and store them in a cool, dry place if you won’t
be using the remote control for a long time. (Assuming typical TV
usage, the batteries should last for about one year.)
If the remote control doesn’t work, check the following:
Is the TV power on?
Are the plus and minus ends of the batteries reversed?
Are the batteries drained?
Is there a power outage or is the power cord unplugged?
Is there a special fluorescent light or neon sign nearby?RATI
¦
N
N
N
●
●
●
●
●
BN68-01968P-Eng.indb 8 2009-04-08 �� 5:34:18
Before using the TV, follow the steps below to learn how to navigate the menu in order to select and adjust different functions.
The access step may differ depending on the selected menu.
Press the button.
The main menu appears on the screen. The menu’s left side has icons :
Press the ▲ or ▼ button to select one of the icons.
Then press the
E
button to access the icon’s sub-menu.
Press the ▲ or ▼ button to select the icon’s submenu.
Press the ◄ or ► button to decrease or increase the value of a particular item. The
adjustment OSD may differ depending on the selected menu.
Press the
E
button to complete the configuration. Press the button to exit.
Your set can be placed in standby mode in order to reduce the power consumption. The standby mode can be useful when you
wish to interrupt viewing temporarily (during a meal, for example).
Press the
P
button on the remote control.
The screen is turned off and a standby indicator appears on your set.
To switch your set back on, simply press the
P
button again.
Do not leave your set in standby mode for long periods of time (when you are away on holiday, for example). It is best to
unplug the set from the mains and aerial.
¦
❑
¦
N
N
Button
Display the main on-screen menu.
E
/ DIRECTION Button
Move the cursor and select an
item. Select the currently selected
item. Confirm the setting.
Button
Return to the previous menu.
Exit the on-screen menu.
Mode :Standard ▶
Backlight :7
Contrast :95
Brightness :45
Sharpness :50
Colour :50
Tint(G/R) :G50/R50
AdvancedSettings
Picture
Mode :Standard
Backlight :7 ▶
Contrast :95
Brightness :45
Sharpness :50
Colour :50
Tint(G/R) :G50/R50
AdvancedSettings
PictureOptions
Picture
7
U
Move
L
Adjust
E
Enter
R
Return
▲
Backlight
▼
Help icon
BN68-01968P-Eng.indb 9 2009-04-08 �� 5:34:18
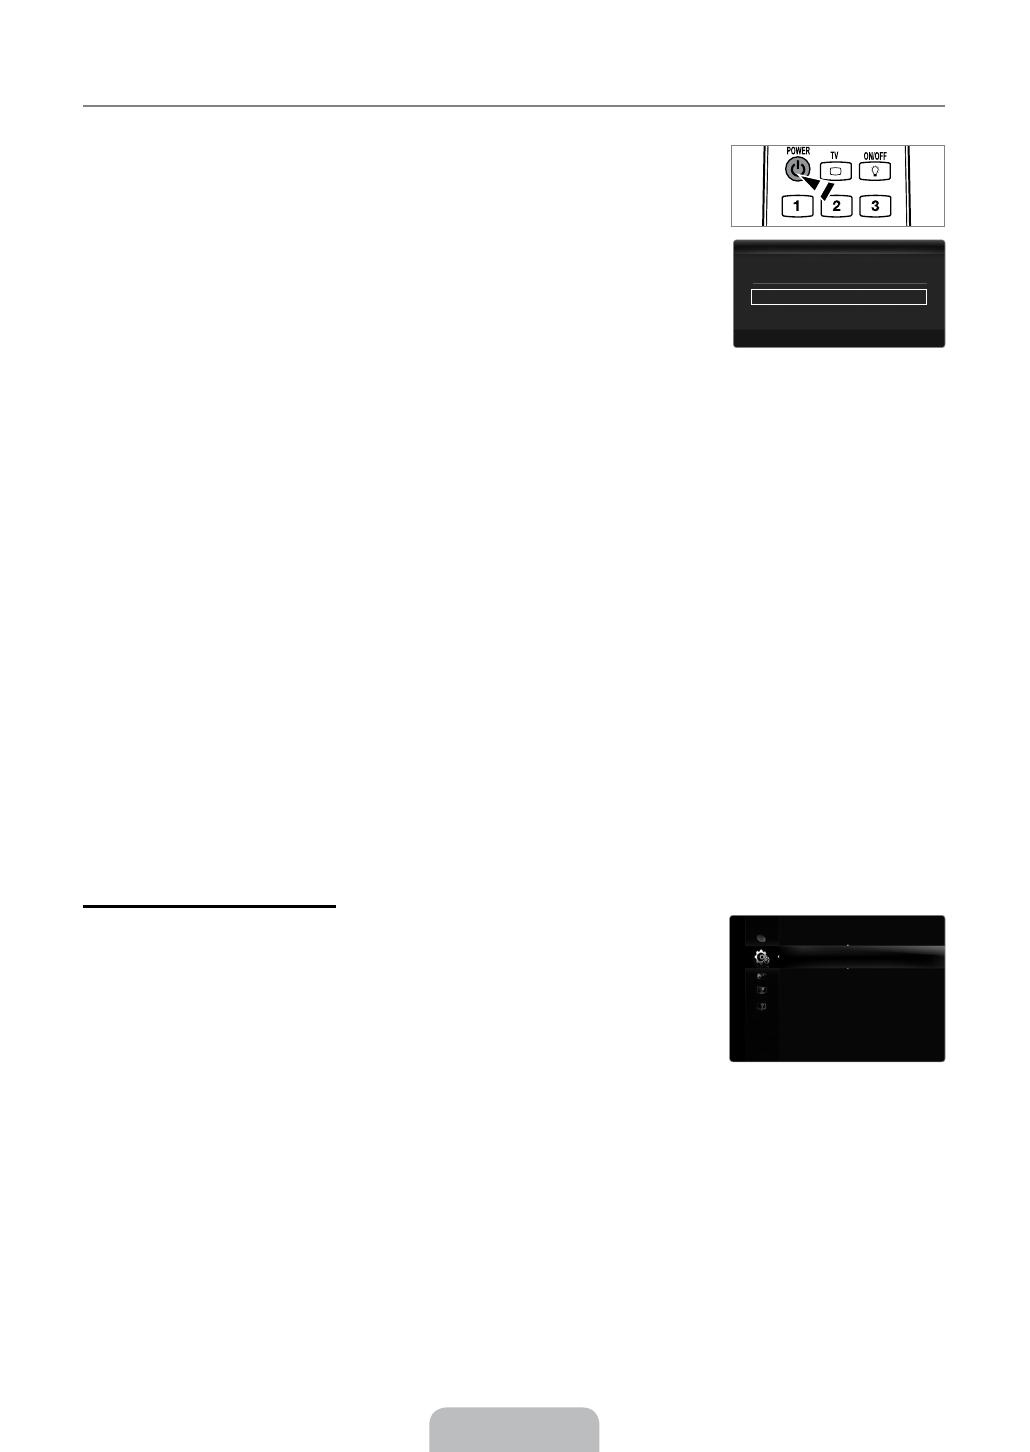
When the TV is initially powered on, basic settings proceed automatically and subsequently.
Press the button on the remote control.
You can also use the
P
button on the TV.
The message is displayed.
Press the
E
button. Select the appropriate language by pressing the ▲ or ▼
button. Press the
E
button to confirm your choice.
Press the ◄ or ► button to select or , then the
E
button.
We recommend setting the TV to mode for the best picture in your home
environment.
mode is only intended for use in retail environments.
If the unit is accidentally set to mode and you want to return to
(Standard): Press the volume button on the TV. When the volume OSD is displayed, press and hold the
button on the TV for 5 seconds.
Press the
E
button. Select the appropriate country by pressing the ▲ or ▼ button. Press the
E
button to
confirm your choice.
Press the ▲ or ▼ button to select or , then press the
E
button.
Air antenna signal.
Cable antenna signal.
Press the ▲ or ▼ button to select the channel source to memorize. Press the
E
button to select .
When setting the antenna source to , a step appears allowing you to set a value for the digital channel search. For
more information, refer to .
: Digital and Analogue channels.
Digital: Digital channels.
: Analogue channels.
The channel search will start and end automatically.
Press the
E
button at any time to interrupt the memorization process.
After all the available channels are stored, the message is displayed.
Press the
E
button. Press the ▲ or ▼ button to select , then Press the
E
button.
If you select , is displayed.
If you have received a digital signal, the time will be set automatically. If not, select to set the clock.
The description for the connection method providing the best HD screen quality is displayed. Check the description and press
the
E
button.
The message is displayed. When you have finished, press the
E
button.
Press the button to display the menu. Press the ▲ or ▼ button to select ,
then press the
E
button.
Press the
E
button again to select .
Enter your 4 digit PIN number. The default PIN number of a new TV set is ‘0-0-0-0’.
If you want to change PIN number, use the function.
The feature is only available in the TV mode.
¦
N
N
N
N
N
N
N
N
N
N
N
N
N
N
N
N
Plug&Play ▶
Language :English
Time
GameMode :Off
BDWise :On
ChildLock :On
ChangePIN
ParentalLock
Setup
SelecttheOSDLanguage.
MenuLanguage :English ▶
E
Enter
Plug&Play
BN68-01968P-Eng.indb 10 2009-04-08 �� 5:34:19

You can change the country for analogue channels.
You can change the country for digital channels.
The PIN number input screen appears. Enter your 4 digit PIN number.
You can scan for the frequency ranges available to you (and availability depends on your country). Automatically allocated
programme numbers may not correspond to actual or desired programme numbers.
If a channel is locked using the function, the PIN input window appears.
Antenna source to memorize
: Digital and Analogue channels.
Digital: Digital channels.
: Analogue channels.
:
Provide a value to scan for cable channels.
: Displays the network identification code.
: Displays the frequency for the channel. (Differs in each country)
: Displays available modulation values.
: Displays available symbol rates.
Scans for all channels with active broadcast stations and stores them in the TV’s memory.
If you want to stop Auto Store, press the
E
button.
The message will be displayed.
Select by pressing the ◄ or ► button, then press the
E
button.
Scans for a channel manually and stores it in the TV’s memory.
If a channel is locked using the function, the PIN input window appears.
Manual store for digital channels.
is only available in DTV mode.
: Set the Channel number using the ▲, ▼ or number (0~9) buttons.
: Set the frequency using the number buttons.
: Set the bandwidth using the ▲, ▼ or number (0~9) buttons.
When it has finished, channels are updated in the channel list.
Manual store for analogue channel.
(Programme number to be assigned to a channel): Sets the programme number using the ▲, ▼ or number (0~9)
buttons.
: Sets the colour system value using the ▲ or ▼ button.
: Sets the sound system value using the ▲ or ▼ button.
¦
❑
■
■
N
❑
N
■
●
●
●
●
N
N
N
❑
N
N
■
N
●
●
●
N
■
●
●
●
Country ▶
AutoStore
ManualStore
CableSearchOption
FullGuide
MiniGuide
DefaultGuide :FullGuide
ChannelList
Channel
BN68-01968P-Eng.indb 11 2009-04-08 �� 5:34:19

(When you know the number of the channel to be stored): Press the ▲ or ▼ button to select C (Air channel) or
(Cable channel). Press the ► button, then press the ▲, ▼ or number (0~9) buttons to select the required number.
You can also select the channel number directly by pressing the number (0~9) buttons.
If there is abnormal sound or no sound, reselect the sound standard required.
(When you do not know the channel numbers): Press the ▲ or ▼ button to start the search. The tuner scans the
frequency range until the first channel or the channel that you selected is received on the screen.
(When you store the channel and associated programme number): Set to by pressing the
E
button.
Channel mode
P (Programme mode): When completing tuning, the broadcasting stations in your area have been assigned to position
numbers from P00 to P99. You can select a channel by entering the position number in this mode.
C (Air channel mode): You can select a channel by entering the assigned number to each air broadcasting station in this
mode.
S (Cable channel mode): You can select a channel by entering the assigned number for each cable channel in this mode.
Using this function, you can manually add the channel range to be scanned by Full Search mode of the Auto Store function.
(Frequency Start): Set the start frequency (Differs in each country)
(Frequency Stop): Set the stop frequency (Differs in each country)
: Displays available modulation values.
: Displays available symbol rates.
The EPG (Electronic Programme Guide) information is provided by the broadcasters. Programme entries may appear blank or out
of date as a result of the information broadcast on a given channel. The display will dynamically update as soon as new information
becomes available.
You can also display the guide menu simply by pressing the button. (To configure the , refer to the
descriptions.)
Displays the programme information as time ordered One hour segments. Two hours of programme information is displayed which
may be scrolled forwards or backwards in time.
The information of each programme is displayed by each line on the current channel Mini Guide screen from the current
programme onwards according to the programme starting time order.
You can decide whether to display either the or the when the button on the remote control is
pressed.
For detailed procedures on using the , refer to the instructions.
You can select these options by simply pressing the button on the remote control.
When press the P
>
/
<
button, Channels will be switched within the selected channel list.
Channels will be switched within the memorized channel list.
Channels will be switched within the favourite channel list.
●
N
N
N
●
N
❑
●
●
●
●
❑
O
■
■
❑
❑
O
❑
■
■
BN68-01968P-Eng.indb 12 2009-04-08 �� 5:34:19
If the reception is clear, you do not have to fine tune the channel, as this is done automatically during the search and store
operation. If the signal is weak or distorted, you may have to fine tune the channel manually.
Fine tuned channels that have been saved are marked with an asterisk “*” on the right-hand side of the channel number in the
channel banner.
To reset the fine-tuning, select by pressing the ▲ or ▼ button and then press the
E
button.
Only Analogue TV channels can be fine tuned.
Watch a programme in the EPG list Select a programme by pressing the ▲, ▼, ◄, ► button.
Exit the guide Press the blue button
If the next programme is selected, it is scheduled with the clock icon displayed. If the
E
button is pressed again, press
the ◄, ► button to select, the scheduling is cancelled with the clock icon gone.
View programme information Select a programme of your choice by pressing the ▲, ▼, ◄, ► button.
Then press the button when the programme of your choice is
highlighted.
The programme title is on the upper part of the screen centre.
Please click on button for the detailed information. Channel Number, Running Time, Status Bar, Parental Level, Video
Quality Information (HD / SD), Sound Modes, Subtitle or Teletext, languages of Subtitle or Teletext and brief summary of the
highlighted programme are included on the detailed information. “…” will be appeared if the summary is long.
Toggle between the and Press the Red button repeatedly.
In Full Guide
Scrolls backwards quickly (24 hours).
Scrolls forwards quickly (24 hours).
Press the Green button repeatedly.
Press the Yellow button repeatedly.
In Mini Guide
Display previous page quickly.
Display next page quickly.
Press the Green button.
Press the Yellow button.
❑
N
N
N
FullGuide
E
Watch Information MiniGuide +24Hours Exit
DTVCable900ftn2:10Tue1Jun
FreshmenOnCampus
2:00-2:30
NoDetailedInformation
Today
2:00-3:00 3:00-4:00
MintExtra
Loaded
40withDynamiteMC
TheDistillery
SmashHits!Sunday
900ftn
901ITVPlay
902Kerrang!
903Kiss
904oneword
905Hits
▼
StreetHypn..
Kisstory
NoInformation
NoInformation
NoInformation
FreshmenO..
900
E
Watch Information FullGuide NextPage Exit
MiniGuide DTVCable900ftn
StreetHypnosis
BoozeBritain
2:00
2:30
5:00
FreshmenOnCampus
▼
BN68-01968P-Eng.indb 13 2009-04-08 �� 5:34:19

Using this menu, you can add / delete or set favourites channels and use the programme guide
for digital broadcasts.
Shows all currently available channels.
Shows all added channels.
Shows all favourite channels.
To select the favourites channels you have set up, press the button on the remote control.
Shows all current reserved programmes.
Select a channel in the or screen by pressing the ▲ / ▼ buttons, and pressing
the
E
button. Then you can watch the selected channel.
Using the Colour buttons with the Channel List
Red (): Toggle between your and .
Green (): Enlarges or shrinks a channel number.
Yellow (): Selects multiple channel lists. You can perform the add/delete or add to favourites/delete from favourites
function for multiple channels at the same time. Select the required channels and press the Yellow button to set all the
selected channels at the same time. The
c
mark appears to the left of the selected channels.
(): Displays the (or ), (or ), (or ),
(or)or menu. (The
Options menus may differ depending on the situation.)
Channel Status Display Icons
A
: An Analogue channel.
c
: A channel selected by pressing the Yellow button.
*
: A channel set as a Favourite.
(
: A programme currently being broadcast.
: A locked channel.
)
: A reserved programme
)
Press the button to use the option menu.
Option menu items may differ depending on the channel status.
You can delete or add a channel to display the channels you want.
All deleted channels will be shown on menu.
A gray-coloured channel indicates the channel has been deleted.
The menu only appears for deleted channels.
You can also delete a channel to the or menu in the same
manner.
You can set channels you watch frequently as favourites.
Press the button to display the menu. You can also set the add to (or delete from) Favourite by selecting
(or ).
The “
*
” symbol will be displayed and the channel will be set as a favourite.
All favourite channels will be shown on menu.
You can lock a channel so that the channel cannot be selected and viewed.
This function is available only when the is set to .
The PIN number input screen appears. Enter your 4 digit PIN number.
The default PIN number of a new TV set is ‘0-0-0-0’. You can change the PIN, by selecting from the menu.
The ‘
’ symbol will be displayed and the channel will be locked.
¦
■
■
■
O
■
N
N
N
●
●
●
●
●
●
N
N
■
N
N
N
N
■
T
N
N
■
N
N
N
N
AllChannels
824UKTVGold
825UKTVstyle
A
1C—
A
2C—
A
3C—
A
4C—
A
5C—
A
6C—
A
7C—
A
8C—
All ChannelType Zoom Select
T
Tools
Delete
AddtoFavourite
Lock
TimerViewing
EditChannelName
Sort
AddedChannels
824UKTVGold
825UKTVstyle
A
1C—
A
2C—
A
3C—
A
4C—
A
5C—
A
6C—
A
7C—
A
8C—
All ChannelType Zoom Select
T
Tools
BN68-01968P-Eng.indb 14 2009-04-08 �� 5:34:20

If you reserve a programme you want to watch, the channel is automatically switched to the reserved channel in the Channel List;
even when you are watching another channel. To reserve a programme, set the current time first.
Only memorized channels can be reserved.
You can set the channel, day, month, year, hour and minute directly by pressing the number buttons on the remote control.
Reserving a programme will be shown in the menu.
Digital Programme Guide and Viewing Reservation
When a digital channel is selected, and you press the ► button, the Programme Guide for the channel appears. You can
reserve a programme according to the procedures described above.
Channels can labelled so that their call letters appear whenever the channel is selected.
The names of digital broadcasting channels are automatically assigned and cannot be renamed.
You can also edit the channel number by pressing the number buttons on the remote control.
This operation allows you to change the programme numbers of the stored channels. This operation may be necessary after using
the auto store.
: You can select all the channels in the channel list.
: You can deselect all the selected channels.
You can only select when there is a selected channel.
For detailed procedures on setting up options, refer to the ‘Channel Menu’ instructions.
If a channel is locked using the function, the PIN input window appears.
)
You can view, modify or delete a reservation.
Press the button to use the option menu.
Select to change a viewing reservation.
Select to cancel a viewin`g reservation.
Select to view a viewing reservation.
(You can also change the reservation information.)
Select all reserved programmes.
■
N
N
N
N
■
N
■
■
■
●
●
N
■
N
N
N
■
■
■
■
Programmed
1/1/2009
13:595TV1
)
18:592TV3
)
TheEqualizer
20:592TV3
)
McMillan&Wife
21:592TV3
)
M.Spillane’smike
All Zoom Select
T
Tools
E
Information
ChangeInfo
CancelSchedules
Information
SelectAll
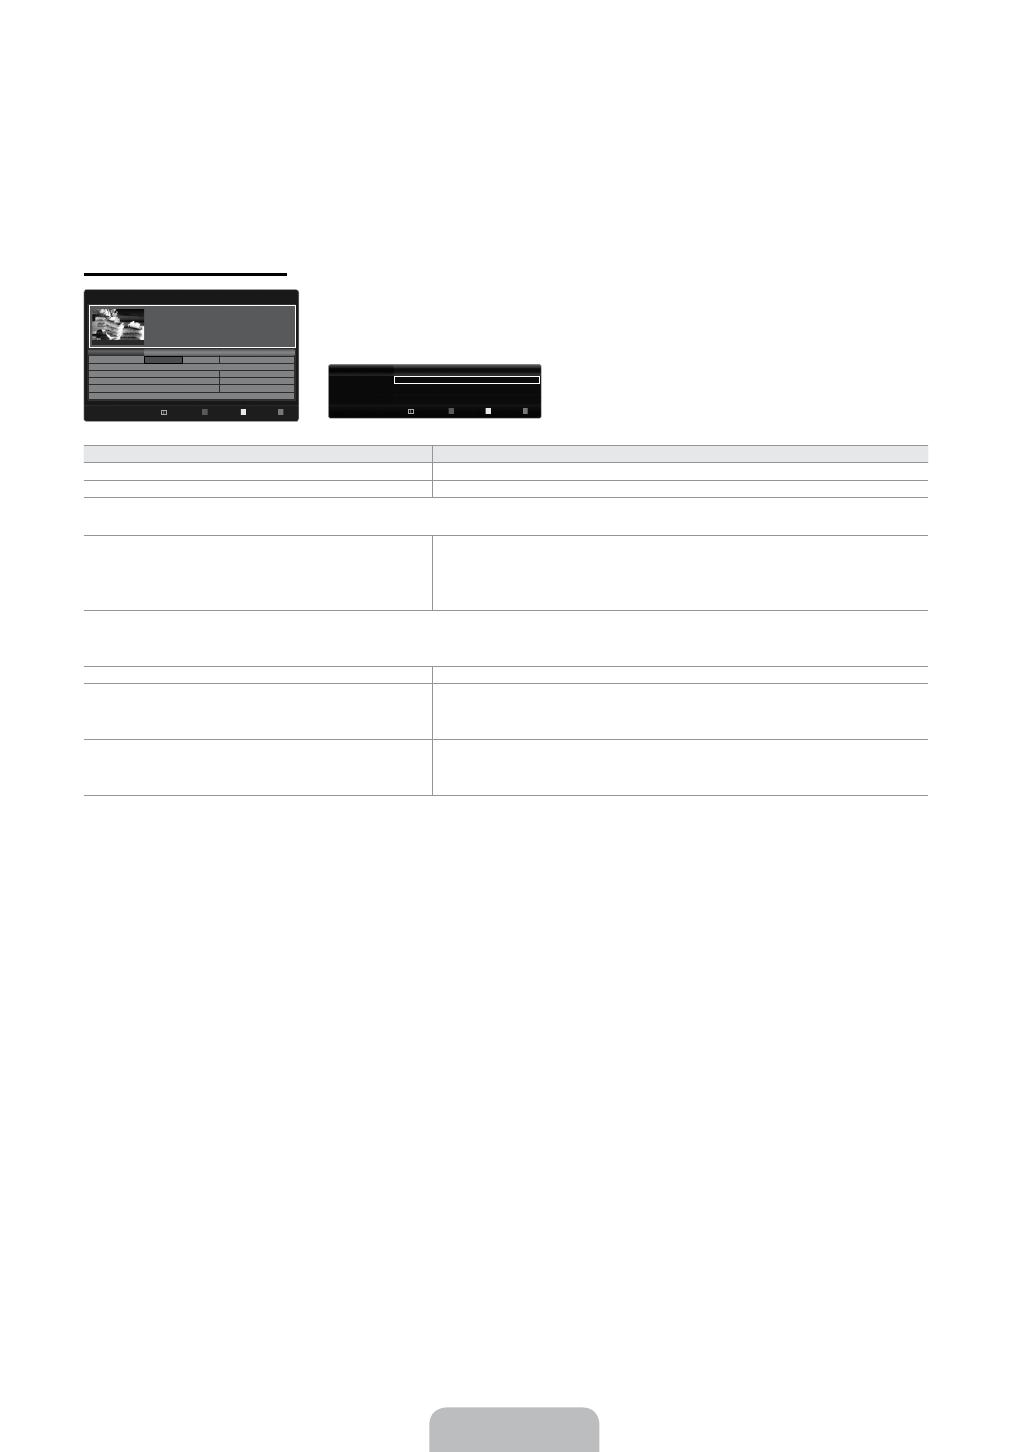
BN68-01968P-Eng.indb 15 2009-04-08 �� 5:34:20

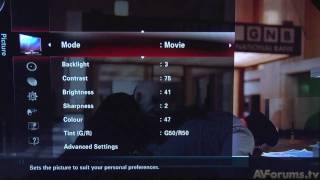
You can select the type of picture which best corresponds to your viewing requirements.
Press the button to display the menu. You can also set the picture mode by
selecting .
Selects the picture for increased definition in a bright room.
Selects the picture for the optimum display in a normal environment.
Selects the picture for an optimum and eye-comfortable display.
Selects the picture for viewing movies in a dark room.
Your television has several setting options that allow you to control the picture quality.
: Adjusts the brightness of LED back light.
: Adjusts the contrast level of the picture.
: Adjusts the brightness level of the picture
: Adjusts the edge definition of the picture.
: Adjusts colour saturation of the picture.
: Adjusts the colour tint of the picture.
In analogue modes of the PAL system, you cannot use the Function.
When you make changes to or the OSD will be adjusted
accordingly.
In PC mode, you can only make changes to and .
Settings can be adjusted and stored for each external device you have connected to an input of the TV.
The energy consumed during use can be signicantly reduced if the brightness level of the picture is lowered, which will
reduce the overall running cost.
¦
❑
T
■
■
■
■
❑
●
●
●
●
●
●
N
N
N
N
N
Mode :Standard ▶
Backlight :7
Contrast :95
Brightness :45
Sharpness :50
Colour :50
Tint(G/R) :G50/R50
AdvancedSettings
Picture
7
U
Move
L
Adjust
E
Enter
R
Return
▲
Backlight
▼
BN68-01968P-Eng.indb 16 2009-04-08 �� 5:34:20

Samsung’s new TVs allow you to make even more precise picture settings than previous
models.
is available in or mode.
In PC mode, you can only make changes to and
from among the items.
You can select the black level on the screen to adjust the screen depth.
You can adjust the screen contrast so that the optimal contrast is provided.
You can adjust the primary colour (red, green, blue) intensity.
Colour space is a colour matrix composed of red, green and blue colours. Select your favourites colour space to experience the
most natural colour.
: Auto Colour Space automatically adjusts to the most natural colour tone based on programme sources.
: Native Colour Space offers deep and rich colour tone.
: Adjusts the colour range to suit your preference.
Changing the adjustment value will refresh the adjusted screen.
Settings can be adjusted and stored for each external device you have connected to an input of the TV. For example, if
you have a DVD player connected to HDMI 1 and it is currently selected, settings and adjustments will be saved for the
DVD player.
or
is available when is set to .
In , you can adjust the RGB values for the selected colour.
To reset the adjusted RGB value, select .
: Adjusts the red saturation level of the selected colour.
: Adjusts the green saturation level of the selected colour.
: Adjusts the blue saturation level of the selected colour.
: Resets the colour space to the default values.
You can adjust the colour temperature for more natural picture colours.
: Adjusts the red colour darkness.
: Adjusts the green colour darkness.
: Adjusts the blue colour darkness.
: Adjusts the red colour brightness.
: Adjusts the green colour brightness.
: Adjusts the blue colour brightness.
: The previously adjusted white balance will be reset to the factory defaults.
You can emphasize the pink ‘flesh tone’ in the picture.
Changing the adjustment value will refresh the adjusted screen.
You can emphasize object boundaries in the picture.
Setting the xvYCC mode to on increases detail and colour space when watching movies from an external device (ie. DVD player)
connected to the HDMI or Component IN jacks.
is available when the picture mode is set to , and the external input is set to HDMI or Component mode.
This function may not be supported depending on your external device.
❑
N
N
■
■
■
■
●
●
●
N
N
N
N
N
■
●
●
●
●
●
●
●
■
N
■
■
N
N
BlackTone :Off ▶
DynamicContrast :Medium
Gamma :0
ColourSpace :Native
WhiteBalance
FleshTone :0
EdgeEnhancement :On
U
Move
E
Enter
R
Return
AdvancedSettings
BN68-01968P-Eng.indb 17 2009-04-08 �� 5:34:20

In PC mode, you can only make changes to the and from among the
items in .
or is only activated when the picture mode is .
Settings can be adjusted and stored for each external device you have connected to an
input of the TV.
Occasionally, you may want to change the size of the image on your screen. Your TV comes
with several screen size options, each designed to work best with specific types of video input. Your cable box/satellite receiver
may have its own set of screen sizes as well. In general, though, you should view the TV in 16:9 mode as much as possible.
You can select these options by simply pressing the button on the remote control.
: Automatically adjusts the picture size to the aspect ratio.
: Adjusts the picture size to 16:9 appropriate for DVDs or wide broadcasting.
: Magnify the size of the picture more than 4:3.
: Magnifies the 16:9 wide picture (in the vertical direction) to fit the screen size.
4:3: This is the default setting for a video movie or normal broadcasting.
: Use the function to see the full image without any cut-off when HDMI (720p / 1080i / 1080p) or Component (1080i
/ 1080p) signals are input.
Depending on the input source, the picture size options may vary.
The items available may differ depending on the selected mode.
In PC Mode, only and 4:3 mode can be adjusted.
Settings can be adjusted and stored for each external device you have connected to an input of the TV.
Temporary image retention may occur when viewing a static image on the set for more than two hours.
: Press the ► button to Select , then press the
E
button. Press the ▲ or ▼ button to move the
picture up / down. Then press the
E
button.
: Press the ► button to Select , then press the
E
button. Press the ▲ or ▼ button to move the picture
up and down. Then press the
E
button. Press the ► button to Select , then press the
E
button. Press
the ▲ or ▼ button to magnify or reduce the picture size in the vertical direction. Then press the
E
button.
After selecting in (1080i / 1080p) or (1080i / 1080p) mode: Select by pressing the ◄
or ► button. Use the ▲, ▼, ◄ or ► button to move the picture.
: Press the ◄ or ► button to select , then press the
E
button. You can initialize the setting.
If you use the function with HDMI 720p input, 1 line will be cut at the top, bottom, left and right as in the Overscan
function.
When setting the picture size to in a 16:9 wide TV, you can determine the picture size you want to see the 4:3 WSS
(Wide Screen Service) image or nothing. Each individual European country requires different picture size so this function is
intended for users to select it.
: Sets the picture to 16:9 wide mode.
: Magnify the size of the picture more than 4:3.
: Magnify the size of the picture vertically on screen.
4:3: Sets the picture to 4:3 normal mode.
This function is available in mode.
This function is not available in PC, Component or HDMI mode.
If the broadcast signal received by your TV is weak, you can activate the Digital Noise Reduction feature to help reduce any static
and ghosting that may appear on the screen.
When the signal is weak, select one of the other options until the best picture is displayed.
You can select the black level on the screen to adjust the screen depth.
This function is active only when an external device is connected to the TV via HDMI (RGB signals).
❑
N
■
N
N
■
O
●
●
●
●
●
●
N
N
N
N
N
N
N
N
N
■
●
●
●
●
N
N
■
N
■
N
ColourTone :Normal ▶
Size :AutoWide
ScreenMode :16:9
DigitalNR :Auto
HDMIBlackLevel :Normal
FilmMode :Off
100HzMotionPlus :Standard
▼
U
Move
E
Enter
R
Return
PictureOptions
BN68-01968P-Eng.indb 18 2009-04-08 �� 5:34:20
Инструкцию для Samsung UE-32 B6000 VW на русском языке, в формате pdf можно скачать с нашего сайта. Наш каталог предоставляем Вам инструкцию производителя фирмы Samsung, которая была взята из открытых источников. Ознакомившись с руководством по эксплуатации от Samsung, Вы на все 100% и правильно сможете воспользоваться всеми функциями устройства.
Для сохранения инструкции «Телевизор Samsung UE-32 B6000 VW» на русском языке на вашем компьютере либо телефоне, нажмите кнопку «Скачать инструкцию». Если активна кнопка «Инструкция онлайн», то Вы можете просмотреть документ (manual), в своём браузере онлайн.
Если у Вас нет возможности скачать инструкцию по эксплуатации либо просмотреть её, Вы можете поделиться ссылкой на эту страницу в социальных сетях и при удобном моменте скачать инструкцию. Либо добавьте эту страницу в закладки Вашего браузера, нажав кнопку «Добавить страницу в закладки браузера».