Watch Now This tutorial has a related video course created by the Real Python team. Watch it together with the written tutorial to deepen your understanding: Thonny: The Beginner-Friendly Python Editor
Are you a Python beginner looking for a tool that can support your learning? This article is for you! Every programmer needs a place to write their code. This article will discuss an awesome tool called Thonny that will enable you to start working with Python in a beginner-friendly environment.
In this article, you’ll learn:
- How to install Thonny on your computer
- How to navigate Thonny’s user interface to use its built-in features
- How to use Thonny to write and run your code
- How to use Thonny to debug your code
By the end of this article, you’ll be comfortable with the development workflow in Thonny and ready to use it for your Python learning.
So what is Thonny? Great question!
Thonny is a free Python Integrated Development Environment (IDE) that was especially designed with the beginner Pythonista in mind. Specifically, it has a built-in debugger that can help when you run into nasty bugs, and it offers the ability to do step through expression evaluation, among other really awesome features.
Installing Thonny
This article assumes that you have Python 3 installed on your computer. If not, please review Python 3 Installation & Setup.
Web Download
The web download can be accessed via a web browser by visiting the Thonny website. Once on the page, you will see a light gray box in the top right corner like this:
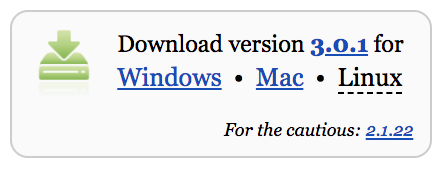
Once you’ve found the gray box, click the appropriate link for your operating system. This tutorial assumes you’ve downloaded version 3.0.1.
Command Line Download
You can also install Thonny via your system’s command line. On Windows, you can do this by starting a program called Command Prompt, while on macOS and Linux you start a program called Terminal. Once you’ve done that, enter the following command:
The User Interface
Let’s make sure you understand what Thonny has to offer. Think of Thonny as the workroom in which you will create amazing Python projects. Your workroom contains a toolbox containing many tools that will enable you to be a rock star Pythonista. In this section, you’ll learn about each of the features of the UI that’ll help you use each of the tools in your Thonny toolbox.
The Code Editor and Shell
Now that you have Thonny installed, open the application. You should see a window with several icons across the top, and two white areas:

Notice the two main sections of the window. The top section is your code editor, where you will write all of your code. The bottom half is your Shell, where you will see outputs from your code.
The Icons
Across the top you’ll see several icons. Let’s explore what each of them does. You’ll see an image of the icons below, with a letter above each one. We will use these letters to talk about each of the icons:

Working our way from left to right, below is a description of each of the icons in the image.
A: The paper icon allows you to create a new file. Typically in Python you want to separate your programs into separate files. You’ll use this button later in the tutorial to create your first program in Thonny!
B: The open folder icon allows you to open a file that already exists on your computer. This might be useful if you come back to a program that you worked on previously.
C: The floppy disk icon allows you to save your code. Press this early and often. You’ll use this later to save your first Thonny Python program.
D: The play icon allows you to run your code. Remember that the code you write is meant to be executed. Running your code means you’re telling Python, “Do what I told you to do!” (In other words, “Read through my code and execute what I wrote.”)
E: The bug icon allows you to debug your code. It’s inevitable that you will encounter bugs when you’re writing code. A bug is another word for a problem. Bugs can come in many forms, sometimes appearing when you use inappropriate syntax and sometimes when your logic is incorrect.
Thonny’s bug button is typically used to spot and investigate bugs. You’ll work with this later in the tutorial. By the way, if you’re wondering why they’re called bugs, there’s also a fun story of how it came about!
F-H: The arrow icons allow you to run your programs step by step. This can be very useful when you’re debugging or, in other words, trying to find those nasty bugs in your code. These icons are used after you press the bug icon. You’ll notice as you hit each arrow, a yellow highlighted bar will indicate which line or section Python is currently evaluating:
- The F arrow tells Python to take a big step, meaning jumping to the next line or block of code.
- The G arrow tells Python to take a small step, meaning diving deep into each component of an expression.
- The H arrow tells Python to exit out of the debugger.
I: The resume icon allows you to return to play mode from debug mode. This is useful in the instance when you no longer want to go step by step through the code, and instead want your program to finish running.
J: The stop icon allows you to stop running your code. This can be particularly useful if, let’s say, your code runs a program that opens a new window, and you want to stop that program. You’ll use the stop icon later in the tutorial.
Let’s Try It!
Get ready to write your first official Python program in Thonny:
-
Enter the following code into the code editor:
-
Click the play button to run your program.
-
See the output in the Shell window.
-
Click the play button again to see that it says hello one more time.
Congratulations! You’ve now completed your first program in Thonny! You should see Hello world! printed inside the Shell, also known as the console. This is because your program told Python to print this phrase, and the console is where you see the output of this execution.
Other UI Features
To see more of the other features that Thonny has to offer, navigate to the menu bar and select the View dropdown. You should see that Shell has a check mark next to it, which is why you see the Shell section in Thonny’s application window:

Let’s explore some of the other offerings, specifically those that will be useful to a beginning Pythonista:
-
Help: You’ll select the Help view if you want more information about working with Thonny. Currently this section offers more reading on the following topics: Running Programs Step-wise, how to install 3rd Party Packages, or using Scientific Python Packages.
-
Variables: This feature can be very valuable. A variable in Python is a value that you define in code. Variables can be numbers, strings, or other complex data structures. This section allows you to see the values assigned to all of the variables in your program.
-
Assistant: The Assistant is there to give you helpful hints when you hit Exceptions or other types of errors.
The other features will become useful as you advance your skills. Check them out once you get more comfortable with Thonny!
The Code Editor
Now that you have an understanding of the UI, let’s use Thonny to write another little program. In this section, you’ll go through the features of Thonny that will help guide you through your development workflow.
Write Some Code
In the code editor (top portion of the UI), add the following function:
def factorial(num):
    if num == 1:
        return 1
    else:
        return num * factorial(num - 1)

print(factorial(3))
Save Your Code
Before we move on, let’s save your program. Last time, you were prompted to do this after pressing the play button. You can also do this by clicking the blue floppy disk icon or by going to the menu bar and selecting File > Save. Let’s call the program factorial.py.
Run Your Code
In order to run your code, find and press the play icon. The output should look like this:

Debug Your Code
To truly understand what this function is doing, try the step feature. Take a few large and small steps through the function to see what is happening. Remember you can do this by pressing the arrow icons:

As you can see, the steps will show how the computer is evaluating each part of the code. Each pop up window is like a piece of scratch paper that the computer is using to compute each portion of the code. Without this awesome feature, this may have been hard to conceptualize—but now you’ve got it!
Stop Running Your Code
So far, there hasn’t been a need to hit the stop icon for this program, particularly because it exits as soon as it has executed print(). Try increasing the number being passed to the factorial function to 100:
def factorial(num):
    if num == 1:
        return 1
    else:
        return num * factorial(num - 1)

print(factorial(100))
Then step through the function. After a while, you will notice that you will be clicking for a long time to reach the end. This is a good time to use the stop button. The stop button can be really useful to stop a program that is either intentionally or unintentionally running continuously.
Find Syntax Errors in Your Code
Now that you have a simple program that works, let’s break it! By intentionally creating an error in your factorial program, you’ll be able to see how Thonny handles these types of issues.
We will be creating what is called a syntax error. A syntax error is an error that indicates that your code is syntactically incorrect. In other words, your code does not follow the proper way to write Python. When Python notices the error, it will display a syntax error to complain about your invalid code.
Above the print statement, let’s add another print statement that says print("The factorial of 100 is:"). Now let’s go ahead and create syntax errors. In the first print statement, remove the second quotation mark, and in the other remove the second parenthesis.
As you do this, you should see that Thonny will highlight your SyntaxErrors. Missing quotations are highlighted in green, and missing parenthesis are in gray:

For beginners, this is a great resource that will allow you to help spot any typos while you’re writing. Some of the most common and frustrating errors when you start programming are missing quotes and mismatched parentheses.
If you have your Assistant View turned on, you will also notice that it will give you a helpful message to guide you in the right direction when you are debugging:

As you get more comfortable with Thonny, the Assistant can be a useful tool to help you get unstuck!
The Package Manager
As you continue to learn Python, it can be quite useful to download a Python package to use inside of your code. This allows you to use code that someone else has written inside of your program.
Consider an example where you want to do some calculations in your code. Instead of writing your own calculator, you might want to use a third-party package called simplecalculator. In order to do this, you’ll use Thonny’s package manager.
The package manager will allow you to install packages that you will need to use with your program. Specifically, it allows you to add more tools to your toolbox. Thonny has the built-in benefit of handling any conflicts with other Python interpreters.
To access the package manager, go to the menu bar and select Tools > Manage Packages… This should pop open a new window with a search field. Type simplecalculator into that field and click the Search button.
The output should look similar to this:

Go ahead and click Install to install this package. You will see a small window pop up showing the system’s logs while it installs the package. Once it completes, you are ready to use simplecalculator in your code!
In the next section, you will use the simplecalculator package along with some of the other skills you’ve learned in this tutorial to create a simple calculator program.
Check Your Understanding
You’ve learned so much about Thonny so far! Here’s what you’ve learned:
- Where to write your code
- How to save your code
- How to run your code
- How to stop your code from running
- Where to see your code execute
- How to spot
SyntaxErrors - How to install third party packages
Let’s check your understanding of these concepts.
Now that you have simplecalculator installed, let’s create a simple program that will use this package. You’ll also use this as an opportunity to check that you understand some of the UI and development features that you’ve learned thus far in the tutorial.
Part 1: Create a File, Add Some Code, and Understand the Code
In Part 1, you will create a file, and add some code to it! Do your best to try to dig into what the code is actually doing. If you get stuck, check out the Take a Deeper Look window. Let’s get started:
- Start a new file.
- Add the following code into your Thonny code editor:
 1from calculator.simple import SimpleCalculator
 2
 3my_calculator = SimpleCalculator()
 4my_calculator.run('2 * 2')
 5print(my_calculator.lcd)
This code will print out the result of 2 * 2 to the Thonny Shell in the main UI. To understand what each part of the code is doing, check out the Take a Deeper Look section below.
-
Line 1: This code imports the library
calculatorinside of the package calledsimplecalculator. From this library, we import the class calledSimpleCalculatorfrom a file calledsimple.py. You can see the code here. -
Lines 2: This is a blank line behind code blocks, which is generally a preferred style. Read more about Python Code Quality in this article.
-
Line 3: Here we create an instance of the class
SimpleCalculatorand assign it to a variable calledmy_calculator. This can be used to run different calculators. If you’re new to classes, you can learn more about object-oriented programming here. -
Line 4: Here we have the calculator run the operation
2 * 2by callingrun()and passing in the expression as a string. -
Line 5: Here we print the result of the calculation. You’ll notice in order to get the most recent calculation result, we must access the attribute called
lcd.
Great! Now that you know exactly what your calculator code is doing, let’s move on to running this code!
Part 2: Save the File, View the Variables, and Run Your Code
Now it’s time to save and run your code. In this section, you’ll make use of two of the icons we reviewed earlier:
- Save your new file as
calculations.py. - Open the Variables window and make note of the two variables listed. You should see
SimpleCalculatorandmy_calculator. This section also gives you insight into the value that each variable is pointing to. - Run your code! You should see
4.0in the output:

Great job! Next you’ll explore how Thonny’s debugger can help you to better understand this code.
Other Great Beginner Features
As you get more comfortable with Thonny, the features in this section will come in quite handy.
Debugging
Using your calculations.py script, you’re going to use the debugger to investigate what is happening. Update your code in calculations.py to the following:
from calculator.simple import SimpleCalculator

def create_add_string(x, y):
    '''Returns a string containing an addition expression.'''
    return 'x + y'

my_calculator = SimpleCalculator()
my_calculator.run(create_add_string(2, 2))
print(my_calculator.lcd)
Hit the save icon to save this version.
You’ll notice the code has a new function called create_add_string(). If you’re unfamiliar with Python functions, learn more in this awesome Real Python course!
As you inspect the function, you may notice why this script will not work as expected. If not, that’s okay! Thonny is going to help you see exactly what is going on, and squash that bug! Go ahead and run your program and see what happens. The Shell output should be the following:
>>> %Run calculations.py
0
Oh no! Now you can see there is a bug in your program. The answer should be 4! Next, you’ll use Thonny’s debugger to find the bug.
Let’s Try It!
Now that we have a bug in our program, this is a great chance to use Thonny’s debugging features:
-
Click the bug icon at the top of the window. This enters debugger mode.
-
You should see the import statements highlighted. Click the small step arrow icon, the yellow arrow in the middle. Keep pressing this to see how the debugger works. You should notice that it highlights each step that Python takes to evaluate your program. Once it hits
create_add_string(), you should see a new window pop up. -
Examine the pop up window carefully. You should see that it shows the values for x and y. Keep pressing the small step icon until you see the value that Python will return to your program. It will be enclosed in a light-blue box:

Oh no! There’s the bug! It looks like Python will return a string containing the lettersxandy(meaning'x + y'and not a string containing the values of those variables, like'2 + 2', which is what the calculator is expecting.) Each time you see a light-blue box, you can think of this as Python replacing subexpressions with their values, step by step. The pop up window can be thought of as a piece of scratch paper that Python uses to figure out those values. Continue to step through the program to see how this bug results in a calculation of0. -
The bug here has to do with string formatting. If you are unfamiliar with string formatting, check out this article on Python String Formatting Best Practices. Inside
create_add_string(), the f-string formatting method should be used. Update this function to the following:def create_add_string(x, y): '''Returns a string containing an addition expression.''' return f'{x} + {y}' -
Run your program again. You should see the following output:
>>> %Run calculations.py 4.0

Success! You have just demonstrated how the step-by-step debugger can help you find a problem in your code! Next you’ll learn about some other fun Thonny features.
Variable Scope Highlighting
Thonny offers variable highlighting to remind you that the same name doesn’t always mean the same variable. In order for this feature to work, on the menu bar, go to Thonny > Preferences and ensure that Highlight matching names is checked.
Notice in the code snippet below, that create_add_string() now has a new variable called my_calculator, though this is not the same as the my_calculator on lines 10 and 11. You should be able to tell because Thonny highlights the variables that reference the same thing. This my_calculator inside the function only exists within the scope of that function, which is why it is not highlighted when the cursor is on the other my_calculator variable on line 10:

This feature can really help you avoid typos and understand the scope of your variables.
Code Completion
Thonny also offers code completion for APIs. Notice in the snapshot below how pressing the Tab key shows the methods available from the random library:

This can be very useful when you’re working with libraries and don’t want to look at the documentation to find a method or attribute name.
Working on a Pre-Existing Project
Now that you’ve learned the basic features of Thonny, let’s explore how you can use it to work on a pre-existing project.
Find a File on Your Computer
Opening a file on your computer is as easy as going to the menu bar, selecting File > Open, and using your browser to navigate to the file. You can also use the open folder icon at the top of the screen to do this as well.
If you have a requirements.txt file and pip locally installed, you can pip install these from the Thonny system Shell. If you don’t have pip installed, remember you can use the Package Manager to install it:
$ pip install -r requirements.txt
Work on a Project From Github
Now that you are a Thonny expert, you can use it to work on the exercises from Real Python Course 1: Introduction to Python:
-
Navigate to the Real Python GitHub repo called book1-exercises.
-
Click the green button labeled Clone or download and select Download Zip.
-
Click the opening folder icon to navigate and find the downloaded files. You should find a folder called
book1-exercises1. -
Open one of the files and start working!
This is useful because there are tons of cool projects available on GitHub!
Conclusion
Awesome job getting through this tutorial on Thonny!
You can now start using Thonny to write, debug, and run Python code! If you like Thonny, you might also like some of the other IDEs we’ve listed in Python IDEs and Code Editors (Guide).
Thonny is actively maintained, and new features are being added all the time. There are several awesome new features that are currently in beta that can be found on the Thonny Blog. Thonny’s main development takes place at the Institute of Computer Science of the University of Tartu, Estonia, as well as by contributors around the world.
Watch Now This tutorial has a related video course created by the Real Python team. Watch it together with the written tutorial to deepen your understanding: Thonny: The Beginner-Friendly Python Editor
Вы новичок в Python, ищите инструмент, который бы поддерживал ваше обучение? Эта статья для вас! Каждому программисту нужно место для написания своего кода. В этой статье будет обсуждаться замечательный инструмент под названием Thonny, который позволит вам начать работу с Python в среде, удобной для начинающих.
*В этой статье вы узнаете:*
-
Как установить Thonny на свой компьютер
-
Как ориентироваться в пользовательском интерфейсе Thonny, чтобы использовать его встроенные функции
-
Как использовать Thonny для написания и запуска вашего кода
-
Как использовать Thonny для отладки вашего кода
К концу этой статьи вы освоитесь с процессом разработки в Thonny и будете готовы использовать его для изучения Python.
Так что же такое Тонни? Отличный вопрос!
Thonny — это бесплатная интегрированная среда разработки Python (IDE), специально разработанная для начинающих Pythonista. В частности, у него есть встроенный отладчик, который может помочь, когда вы сталкиваетесь с неприятными ошибками, и он предлагает возможность выполнять пошаговую оценку выражений, помимо других действительно потрясающих функций.
*Бесплатный образец главы:* ссылка: [Загрузите бесплатный образец главы из курса Real Python] и получите практические навыки программирования на Python.
Установка Тонни
В этой статье предполагается, что на вашем компьютере установлен Python 3. Если нет, просмотрите Python 3 Установка и настройка.
Загрузка через Интернет
Доступ к веб-загрузке можно получить через веб-браузер, посетив веб-сайт Thonny. Оказавшись на странице, вы увидите светло-серую рамку в правом верхнем углу, например:
Как только вы нашли серое поле, нажмите на соответствующую ссылку для вашей операционной системы. В этом руководстве предполагается, что вы загрузили версию 3.0.1.
Загрузка из командной строки
Вы также можете установить Thonny через командную строку вашей системы. В Windows вы можете сделать это, запустив программу под названием Command Prompt , а в macOS и Linux вы запустите программу под названием Terminal . Сделав это, введите следующую команду:
Интерфейс пользователя
Давайте удостоверимся, что вы понимаете, что может предложить Тонни. Думайте о Тонни как о рабочей комнате, в которой вы будете создавать удивительные проекты Python. Ваша рабочая комната содержит набор инструментов, содержащий множество инструментов, которые позволят вам стать рок-звездой Pythonista. В этом разделе вы узнаете о каждой из функций пользовательского интерфейса, которые помогут вам использовать каждый из инструментов в наборе инструментов Thonny.
Редактор кода и оболочка
Теперь, когда у вас установлен Thonny, откройте приложение. Вы должны увидеть окно с несколькими значками в верхней части и двумя белыми областями:
Обратите внимание на два основных раздела окна. В верхнем разделе находится ваш редактор кода, где вы будете писать весь свой код. Нижняя половина — это ваша оболочка, где вы увидите выходные данные из вашего кода.
Иконы
Вверху вы увидите несколько значков. Давайте рассмотрим, что делает каждый из них. Вы увидите изображение значков ниже, с буквой над каждым. Мы будем использовать эти буквы, чтобы поговорить о каждой иконке:
Направляясь слева направо, ниже приведено описание каждого из значков на изображении.
*A:* Значок бумаги позволяет создать новый файл. Обычно в Python вы хотите разделить ваши программы на отдельные файлы. Вы будете использовать эту кнопку позже в руководстве, чтобы создать свою первую программу в Thonny!
*B:* Значок открытой папки позволяет открыть файл, который уже существует на вашем компьютере. Это может быть полезно, если вы вернетесь к программе, над которой работали ранее.
*C:* Значок дискеты позволяет сохранить ваш код. Нажмите это рано и часто. Вы будете использовать это позже, чтобы сохранить свою первую программу Thonny Python.
*D:* Значок воспроизведения позволяет запускать ваш код. Помните, что код, который вы пишете, предназначен для выполнения. Запуск вашего кода означает, что вы говорите Python: «Делай то, что я тебе говорил!» (Другими словами: «Прочитайте мой код и выполните то, что я написал».)
*E:* Значок ошибки позволяет отлаживать ваш код. Это неизбежно, что вы будете сталкиваться с ошибками, когда вы пишете код. Ошибка - другое слово для проблемы. Ошибки могут проявляться во многих формах, иногда они появляются, когда вы используете неподходящий синтаксис, а иногда, когда ваша логика неверна.
Кнопка ошибки Тонни обычно используется для выявления и изучения ошибок. Вы будете работать с этим позже в этом уроке. Кстати, если вы задаетесь вопросом, почему их называют ошибками, есть также забавная story о том, как это произошло!
*F-H:* Значки со стрелками позволяют запускать ваши программы шаг за шагом. Это может быть очень полезно, когда вы отлаживаете или, другими словами, пытаетесь найти эти неприятные ошибки в вашем коде. Эти значки используются после нажатия значка ошибки. Когда вы нажмете на каждую стрелку, вы заметите, что желтая подсвеченная полоса укажет, какую линию или раздел Python в настоящее время оценивает:
*Стрелка* F * указывает Python сделать большой шаг, означающий переход к следующей строке или блоку кода. *Стрелка* G * указывает Python сделать небольшой шаг, что означает углубление в каждый компонент выражения. *Стрелка* H * указывает Python выйти из отладчика.
*I:* Значок возобновления позволяет вам вернуться в режим воспроизведения из режима отладки. Это полезно в том случае, когда вы больше не хотите пошагово проходить по коду и вместо этого хотите, чтобы ваша программа завершила работу.
*J:* Значок остановки позволяет вам остановить выполнение кода. Это может быть особенно полезно, если, скажем, ваш код запускает программу, которая открывает новое окно, и вы хотите остановить эту программу. Вы будете использовать значок остановки позже в руководстве.
Давай попробуем!
Будьте готовы написать свою первую официальную программу на Python на Thonny:
-
Введите следующий код в редакторе кода:
-
Нажмите кнопку воспроизведения, чтобы запустить вашу программу.
-
Смотрите вывод в окне оболочки.
-
Нажмите кнопку воспроизведения еще раз, чтобы увидеть, что он говорит привет еще раз.
Поздравляем! Вы закончили свою первую программу в Тонни! Вы должны увидеть + Hello world! + Внутри Shell, также называемой консолью. Это потому, что ваша программа сказала Python напечатать эту фразу, а консоль — это место, где вы видите результат этого выполнения.
Другие функции интерфейса
Чтобы увидеть больше других функций, которые может предложить Тонни, перейдите к строке меню и выберите раскрывающийся список View. Вы должны увидеть, что рядом с Shell стоит галочка, вот почему вы видите раздел Shell в окне приложения Thonny:
Давайте рассмотрим некоторые другие предложения, в частности те, которые будут полезны для начинающего Pythonista:
-
Справка: Вы выберете представление Help, если хотите получить больше информации о работе с Thonny. В настоящее время этот раздел предлагает дополнительные материалы для чтения по следующим темам: Полезное выполнение программ, _ Как установить _3-й пакет сторонних разработчиков или Использование пакетов Scientific Python.
-
Переменные: Эта функция может быть очень ценной. Переменная в Python — это значение, которое вы определяете в коде. Переменными могут быть числа, строки или другие сложные структуры данных. В этом разделе вы можете увидеть значения, назначенные всем variables в вашей программе.
-
Помощник: Помощник здесь, чтобы дать вам полезные советы, когда вы нажимаете Исключения или другие типы ошибок.
Другие функции станут полезными по мере развития ваших навыков. Проверьте их, как только вы освоитесь с Тонни!
Редактор кода
Теперь, когда у вас есть понимание пользовательского интерфейса, давайте использовать Тонни, чтобы написать еще одну небольшую программу. В этом разделе вы познакомитесь с функциями Thonny, которые помогут вам в процессе разработки.
Напишите некоторый код
В редакторе кода (верхняя часть пользовательского интерфейса) добавьте следующую функцию:
def factorial(num):
if num == 1:
return 1
else:
return num *factorial(num - 1)
print(factorial(3))Сохраните ваш код
Прежде чем мы продолжим, давайте сохраним вашу программу. В прошлый раз вам предложили сделать это после нажатия кнопки воспроизведения. Вы также можете сделать это, нажав синий значок дискеты или перейдя в строку меню и выбрав File> Save. Давайте назовем программу + factorial.py +.
Запустите ваш код
Чтобы запустить код, найдите и нажмите значок воспроизведения. Вывод должен выглядеть так:
Отладка вашего кода
Чтобы по-настоящему понять, что делает эта функция, попробуйте функцию step. Сделайте несколько больших и маленьких шагов через функцию, чтобы увидеть, что происходит. Помните, что вы можете сделать это, нажав значки со стрелками:
Как вы можете видеть, шаги покажут, как компьютер оценивает каждую часть кода. Каждое всплывающее окно похоже на бумажку, которую компьютер использует для вычисления каждой части кода. Без этой потрясающей функции это, возможно, было бы трудно осмыслить, но теперь вы ее получили!
Прекратите запуск вашего кода
До сих пор не было необходимости нажимать значок остановки для этой программы, особенно потому, что она завершается, как только она выполняет + print () +. Попробуйте увеличить число, передаваемое факториальной функции, до + 100 +:
def factorial(num):
if num == 1:
return 1
else:
return num* factorial(num - 1)
print(factorial(100))Затем перейдите через функцию. Через некоторое время вы заметите, что будете долго нажимать, чтобы дойти до конца. Это хорошее время, чтобы использовать кнопку остановки. Кнопка «Стоп» может быть действительно полезна для остановки программы, которая намеренно или непреднамеренно работает непрерывно.
Найти синтаксические ошибки в вашем коде
Теперь, когда у вас есть простая программа, которая работает, давайте сломаем ее! Умышленно создавая ошибку в своей факториальной программе, вы сможете увидеть, как Thonny справляется с этими типами проблем.
Мы будем создавать то, что называется синтаксической ошибкой . Синтаксическая ошибка — это ошибка, которая указывает, что ваш код синтаксически неверен. Другими словами, ваш код не следует правильному способу написания Python. Когда Python замечает ошибку, он отображает синтаксическую ошибку, чтобы пожаловаться на неверный код.
Над оператором print добавим еще один оператор print, который говорит + print (" Факториал 100 равен: ") +. Теперь давайте продолжим и создадим синтаксические ошибки. В первом операторе печати удалите вторую кавычку, а в другом удалите вторую скобку.
Когда вы сделаете это, вы увидите, что Thonny выделит ваши + SyntaxErrors +. Недостающие цитаты выделены зеленым цветом, а недостающие скобки — серым:
Для начинающих это отличный ресурс, который поможет вам обнаружить любые опечатки во время написания. Некоторые из наиболее распространенных и разочаровывающих ошибок при запуске программирования — отсутствие кавычек и несоответствующих скобок.
Если у вас включен Assistant View, вы также заметите, что он даст вам полезное сообщение, которое поможет вам в правильном направлении при отладке:
Когда вы будете чувствовать себя более комфортно с Тонни, помощник может стать полезным инструментом, который поможет вам разобраться!
Диспетчер пакетов
Поскольку вы продолжаете изучать Python, может быть весьма полезно загрузить пакет Python для использования внутри вашего кода. Это позволяет вам использовать код, который кто-то другой написал внутри вашей программы.
Рассмотрим пример, в котором вы хотите выполнить некоторые вычисления в своем коде. Вместо написания собственного калькулятора, вы можете использовать third-party пакет, называемый + simplecalculator +. Для этого вам понадобится менеджер пакетов Thonny.
Менеджер пакетов позволит вам установить пакеты, которые вам понадобятся в вашей программе. В частности, это позволяет вам добавить больше инструментов в ваш набор инструментов. Thonny имеет встроенное преимущество обработки любых конфликтов с другими интерпретаторами Python.
Чтобы получить доступ к менеджеру пакетов, перейдите в строку меню и выберите Tools> Manage Packages… _ Это должно открыть новое окно с полем поиска. Введите + simplecalculator + в это поле и нажмите кнопку _Search.
Вывод должен выглядеть примерно так:
Идите дальше и нажмите Install, чтобы установить этот пакет. Вы увидите всплывающее небольшое окно, в котором отображаются журналы системы во время установки пакета. После завершения вы готовы использовать + simplecalculator + в своем коде!
В следующем разделе вы будете использовать пакет + simplecalculator + вместе с некоторыми другими навыками, которые вы узнали в этом руководстве, для создания простой программы калькулятора.
Проверьте свое понимание
Вы так много узнали о Тонни! Вот что вы узнали:
-
Где написать свой код
-
Как сохранить свой код
-
Как запустить ваш код
-
Как остановить ваш код от запуска
-
Где увидеть выполнение вашего кода
-
Как определить
+ SyntaxErrors +
*Как установить сторонние пакеты
Давайте проверим ваше понимание этих концепций.
Теперь, когда у вас установлен + simplecalculator +, давайте создадим простую программу, которая будет использовать этот пакет. Вы также будете использовать это как возможность проверить, понимаете ли вы некоторые из пользовательских интерфейсов и функций разработки, которые вы изучили до сих пор в этом руководстве.
Часть 1. Создание файла, добавление некоторого кода и понимание кода
В первой части вы создадите файл и добавите к нему некоторый код! Делайте все возможное, чтобы попытаться понять, что на самом деле делает код. Если вы застряли, посмотрите на Take a Deeper Look window. Давайте начнем:
-
Начать новый файл.
-
Добавьте следующий код в редактор кода Thonny:
1 from calculator.simple import SimpleCalculator
2
3 my_calculator = SimpleCalculator()
4 my_calculator.run('2* 2')
5 print(my_calculator.lcd)Этот код выведет результат +2 * 2 + в оболочку Thonny в главном интерфейсе пользователя. Чтобы понять, что делает каждая часть кода, ознакомьтесь с разделом Take a Deeper Look ниже.
Большой! Теперь, когда вы точно знаете, что делает код вашего калькулятора, давайте перейдем к выполнению этого кода!
Часть 2. Сохраните файл, просмотрите переменные и запустите ваш код
Теперь пришло время сохранить и запустить ваш код. В этом разделе вы будете использовать две иконки, которые мы рассмотрели ранее:
-
Сохраните новый файл как
+ computing.py +. -
Откройте окно Variables и запишите две перечисленные переменные. Вы должны увидеть
+ SimpleCalculator +и+ my_calculator +. Этот раздел также дает вам представление о значении, на которое указывает каждая переменная. -
Запустите свой код! Вы должны увидеть
+ 4.0 +в выводе:
Отличная работа! Далее вы узнаете, как отладчик Thonny может помочь вам лучше понять этот код.
Другие отличные особенности для начинающих
По мере того, как вы будете чувствовать себя более комфортно с Тонни, функции в этом разделе будут весьма полезными.
отладка
Используя ваш скрипт + computing.py +, вы будете использовать отладчик для расследования происходящего. Обновите ваш код в + computing.py + до следующего:
from calculator.simple import SimpleCalculator
def create_add_string(x, y):
'''Returns a string containing an addition expression.'''
return 'x + y'
my_calculator = SimpleCalculator()
my_calculator.run(create_add_string(2, 2))
print(my_calculator.lcd)Нажмите значок сохранения, чтобы сохранить эту версию.
Вы заметите, что в коде есть новая функция + create_add_string () +. Если вы не знакомы с функциями Python, узнайте больше на thsomes курс Real Python!
При проверке функции вы можете заметить, почему этот скрипт не будет работать должным образом. Если нет, то все в порядке! Тонни поможет вам точно понять, что происходит, и уничтожит эту ошибку! Идите вперед и запустите вашу программу и посмотрите, что произойдет Вывод Shell должен быть следующим:
>>> %Run calculations.py
0о нет! Теперь вы можете видеть, что в вашей программе есть ошибка. Ответ должен быть 4! Далее вы будете использовать отладчик Тонни, чтобы найти ошибку.
Давай попробуем!
Теперь, когда у нас есть ошибка в нашей программе, это отличный шанс использовать функции отладки Thonny:
-
Нажмите на значок ошибки в верхней части окна. Это входит в режим отладчика.
-
Вы должны увидеть выделенные операторы импорта. Нажмите на маленький значок стрелки шага, желтая стрелка посередине. Продолжайте нажимать, чтобы увидеть, как работает отладчик. Вы должны заметить, что он выделяет каждый шаг, который делает Python для оценки вашей программы. Как только он нажмет
+ create_add_string () +, вы увидите всплывающее окно. -
Внимательно осмотрите всплывающее окно. Вы должны увидеть, что он показывает значения для х и у. Нажимайте на маленький значок шага, пока не увидите значение, которое Python вернет вашей программе. Он будет заключен в голубую рамку:

о нет! Это ошибка! Похоже, что Python вернет строку, содержащую буквы+ x +и+ y +(означающие+ 'x + y' +, а не строку, содержащую значения этих переменных, например+ '2 + 2' + `, чего и ожидает калькулятор.) Каждый раз, когда вы видите светло-синий прямоугольник, вы можете думать об этом как о Python, заменяющем подвыражения их значениями, шаг за шагом. Всплывающее окно можно рассматривать как лист бумаги, который Python использует для определения этих значений. Продолжайте просматривать программу, чтобы увидеть, как эта ошибка приводит к вычислению `+ 0 +. -
Ошибка здесь связана с форматированием строки. Если вы не знакомы с форматированием строк, ознакомьтесь с этой статьей на Python Рекомендации по форматированию строк. Внутри
+ create_add_string () +следует использовать the метод форматирования f-строки. Обновите эту функцию следующим образом:
def create_add_string(x, y):
    '''Returns a string containing an addition expression.'''
return f'{x} + {y}'-
Запустите вашу программу снова. Вы должны увидеть следующий вывод:
>>> %Run calculations.py
4.0Успех! Вы только что продемонстрировали, как пошаговый отладчик может помочь вам найти проблему в вашем коде! Далее вы узнаете о некоторых других забавных функциях Thonny.
Подсветка переменной области
Тонни предлагает подсветку переменных, чтобы напомнить вам, что одно и то же имя не всегда означает одну и ту же переменную. Чтобы эта функция работала, в строке меню перейдите к Thonny> Preferences и убедитесь, что Highlight соответствует именам отмечен.
Обратите внимание на фрагмент кода ниже, что + create_add_string () + теперь имеет новую переменную с именем + my_calculator +, хотя это не то же самое, что + my_calculator + в строках 10 и 11. Вы должны быть в состоянии сказать, потому что Тонни выделяет переменные, которые ссылаются на одно и то же. Этот + my_calculator + внутри функции существует только внутри области действия этой функции, поэтому он не выделяется, когда курсор находится на другой переменной + my_calculator + в строке 10:
Эта функция действительно может помочь вам избежать опечаток и понять область действия ваших переменных.
Завершение кода
Тонни также предлагает завершение кода для API. Обратите внимание на снимок ниже, как нажатие клавиши [.keys] # Tab # показывает методы, доступные из библиотеки + random +:
Это может быть очень полезно, когда вы работаете с библиотеками и не хотите просматривать документацию, чтобы найти метод или имя атрибута.
Работа над уже существующим проектом
Теперь, когда вы изучили основные функции Thonny, давайте рассмотрим, как вы можете использовать его для работы над уже существующим проектом.
Найти файл на вашем компьютере
Открыть файл на вашем компьютере так же просто, как перейти к строке меню, выбрать File> Open и использовать браузер для перехода к файлу. Вы также можете использовать значок открытой папки в верхней части экрана, чтобы сделать это.
Если у вас есть файл + needs.txt + и + pip +, установленные локально, вы можете + pip install + из командной консоли Thonny. Если у вас не установлен pip, помните, что вы можете использовать ссылку: # the-package-manager [Package Manager], чтобы установить его:
$ pip install -r requirements.txtРабота над проектом от Github
Теперь, когда вы являетесь экспертом Thonny, вы можете использовать его для работы над упражнениями из Real Python Course 1: Введение в Python:
-
Перейдите к репозиторию Real Python GitHub, который называется book1-exercises.
-
Нажмите зеленую кнопку с надписью Clone или download и выберите Download Zip.
-
Нажмите на значок открывающейся папки, чтобы найти и найти загруженные файлы. Вы должны найти папку с именем
+ book1-упражнения1 +. -
Откройте один из файлов и начните работать!
Это полезно, потому что на GitHub есть множество интересных проектов!
Заключение
Удивительная работа, проходящая через этот урок на Тонни!
Теперь вы можете начать использовать Thonny для написания, отладки и запуска кода Python! Если вам нравится Thonny, вам также могут понравиться некоторые другие IDE, которые мы перечислили в Python IDE и редакторах кода (Руководство).
Тонни активно поддерживается, и все время добавляются новые функции. В настоящее время в бета-версии есть несколько потрясающих новых функций, которые можно найти в блоге Thonny. Основное развитие Тонни происходит в Institute of Computer Science University of Tartu, Эстония, а также авторами по всему миру.
Thonny is an Integrated Development Environment (IDE) for Python beginners. It is created with Python and released under MIT License. It is cross-platform and can run in Linux, macOS, Windows.
Why Thonny IDE
If you are new to programming or someone switching from a different language I suggest using thonny. The interface is clean and distraction-free. Newbies can concentrate on language instead of focusing on setting up the environment.
Some of the key features of thonny include
- Python 3.7 is installed by default with Thonny setup.
- Built-in Debugger and Step through evaluation.
- Variable Explorer.
- Heap, Stack, Assistant, Object Inspector.
- Built-in Python shell (Python 3.7).
- Simple PIP GUI Interface to install 3rd party packages.
- Support code completion.
- Highlights syntax errors and explain scopes.
In this article, you will learn how to install and use Thonny Python IDE in a Linux environment and exploring the features of thonny.
Setting Up Thonny Python IDE on Linux
The latest version of Thonny is 3.3.0 and there are three ways you can install thonny in Linux.
- Use Python package manager – PIP
- Download and run the install script
- Use default package manager to install it
Install Thonny IDE Using Pip
# pip3 install thonny
Install Thonny IDE Using Installer Script
# bash <(curl -s https://thonny.org/installer-for-linux)
Install Thonny IDE Using Package Manager
$ sudo apt install python3-tk thonny   [On Debian/Ubuntu]
$ sudo dnf install thonny   [On CentOS/RHEL & Fedora]
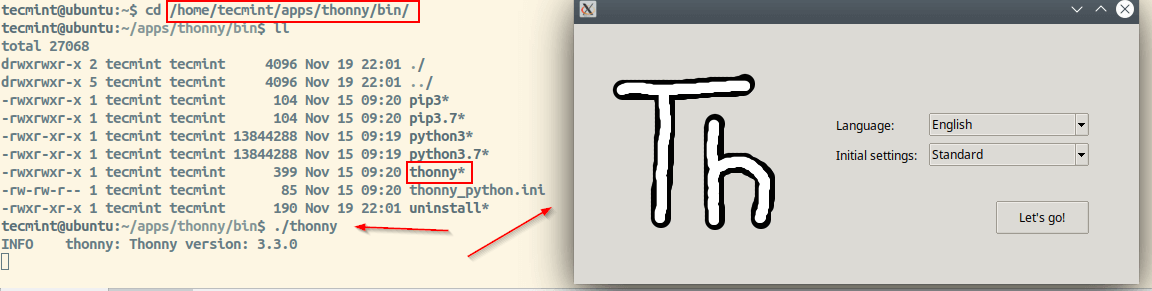
For demonstration purposes, I am using Ubuntu 20.04 and running the installer script with wget command as shown above to install thonny. At the end of the installation, you will come to know where is thonny installed. In my case, it is installed in my home directory.

To launch thonny, go to the installed directory and type “./thonny” or absolute path to thonny. Thonny will ask you to set up Language and Initial settings.
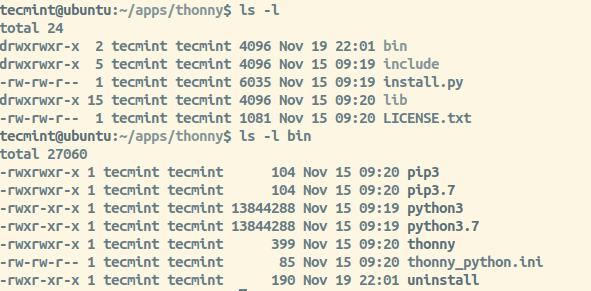
As shown in the installation section, Thonny is installed in the home directory. If you look at the thonny folder it has install script, necessary python libraries for thonny to work, binaries. Inside the bin directory, there is python 3.7 and PIP 3 that comes with thonny and thonny launch binary.
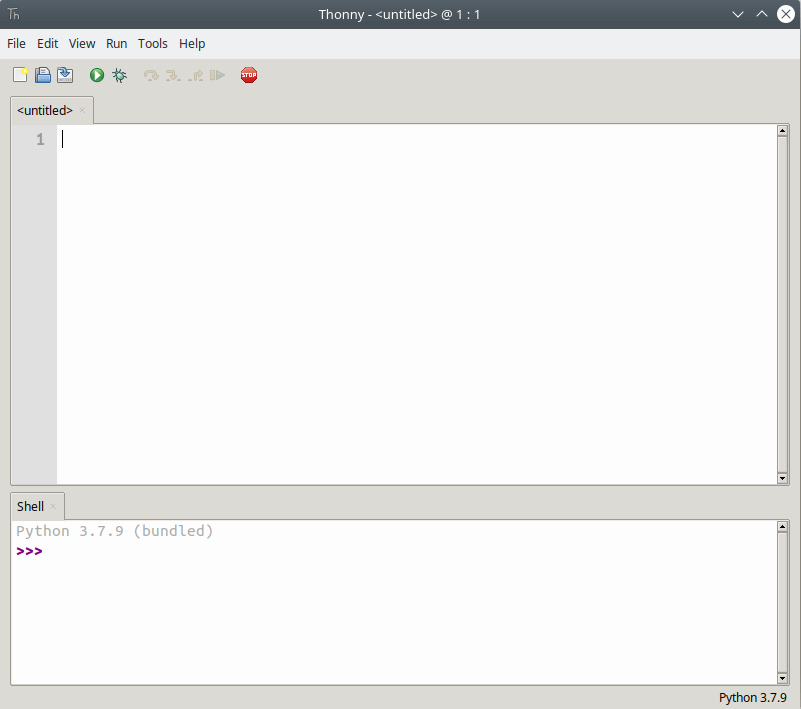
How to Use Thonny IDE in Linux
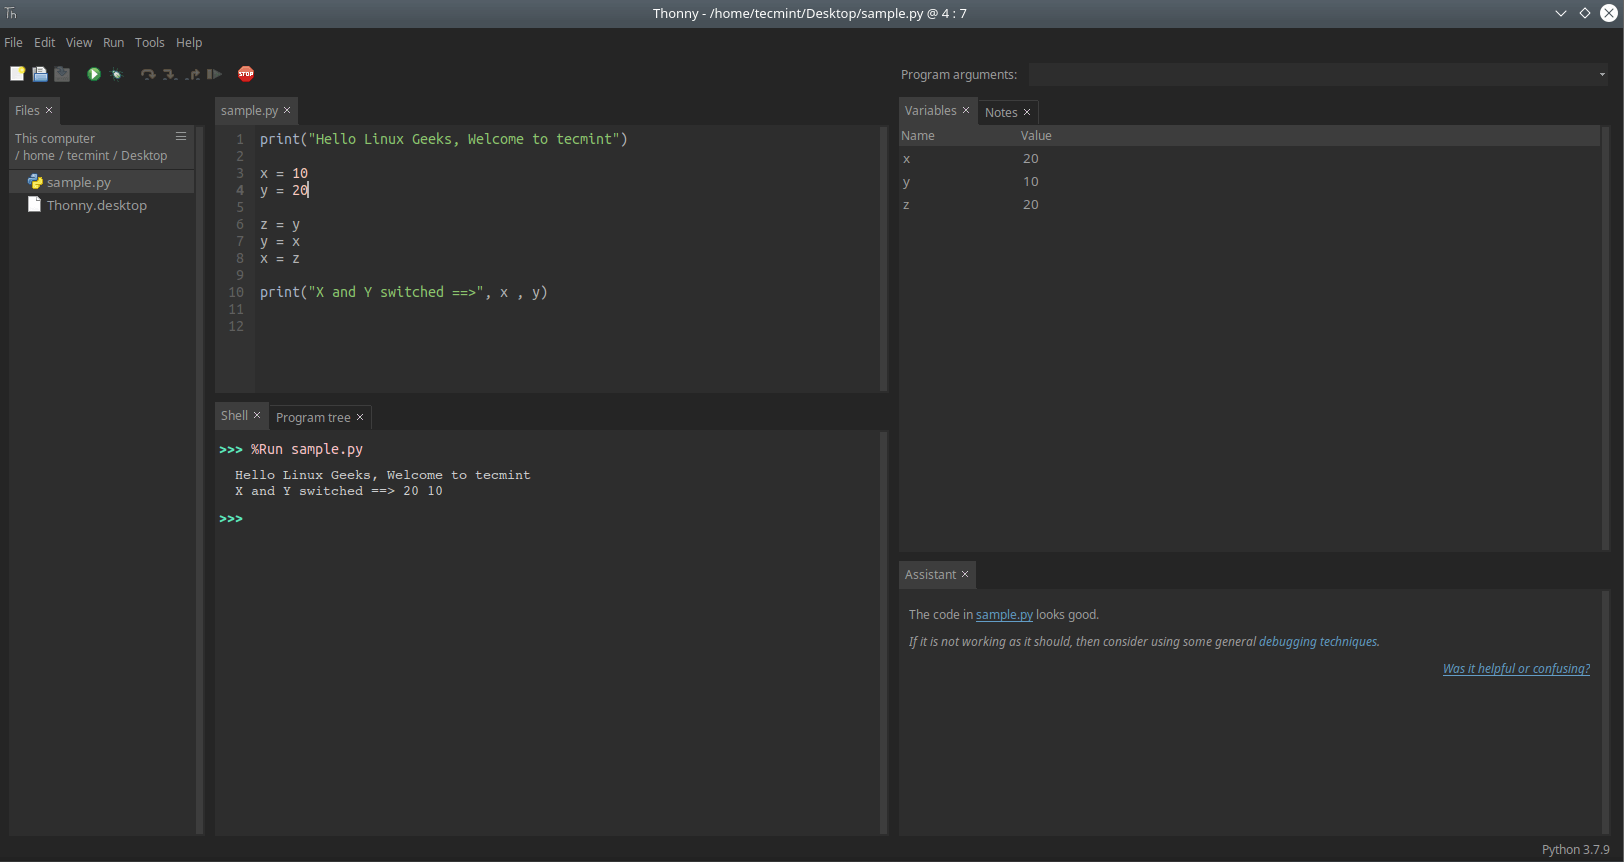
When you launch Thonny you will get a distraction-free GUI interface. You will have an editor area where you can code and shell to run the script or test codes interactively.
Linux distributions by default ships with python. Older version ships with Python2* and the latest versions ship with Python3*. We have already seen Python 3.7 is installed by default and thonny sets 3.7 as the default interpreter.
You can stick with the default interpreter (Python 3.7) or choose different interpreters available on the system. Go to “Menu Bar → Tools → Options → Interpreter → Set the path” or “Menu Bar → Run → Select Interpreter → Set the path”.
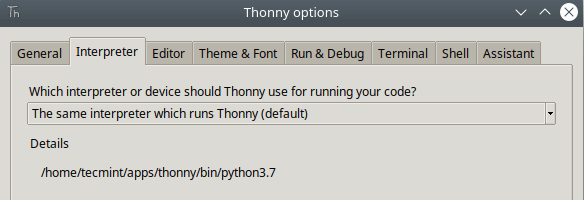
I suggest sticking with the default python installation unless you know how to fix it if something breaks when switching the interpreter.
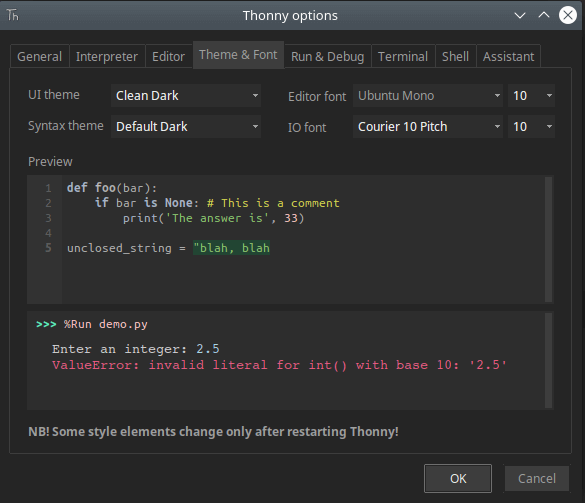
Thonny comes with Light and Dark themes. You can change themes for Editor as well as UI theme. To change Theme and Fonts Go to “Menu Bar → Tools → Options → Theme & Font”.
There are 3 ways you can run the code you created. First, your code should be saved to a file for Thonny to execute.
- Press F5 or Execute Icon as shown in Image.
- Go to “Menu Bar → Press Run → Run Current Script”.
- Press “CTRL+T” or Go to “Run → Press Run current script in terminal”.
The first two methods will switch the directory to wherever your code is and invoke the program file in the Built-in terminal.
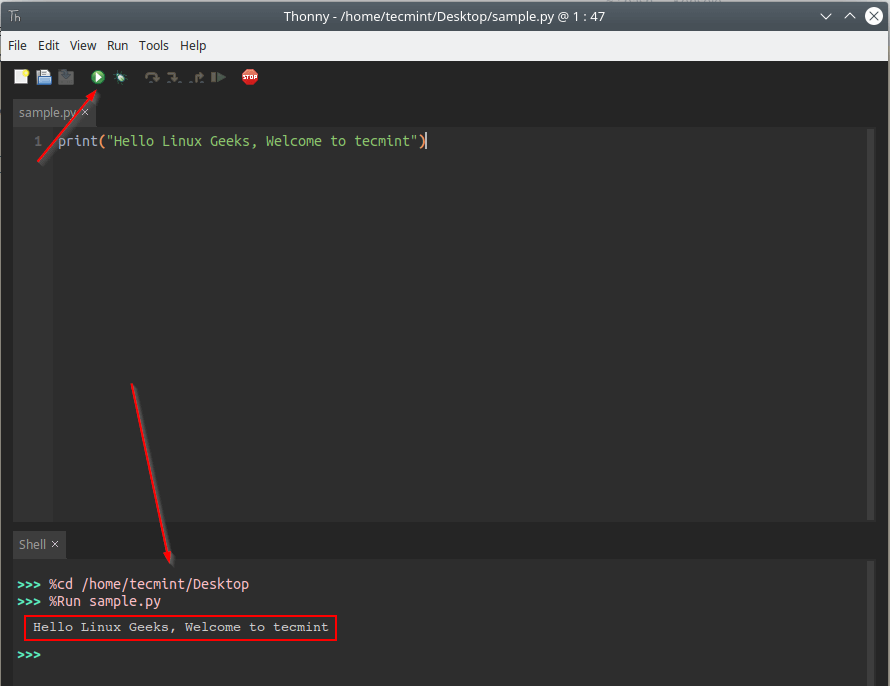
The third option allows you to run your code in an external terminal.

The real power of thonny comes with built-in features like File Explorer, Variable Explorer, Shell, Assistant, Notes, Heap, Outline, Stack. To Toggle on-off these features Go to “View → toggle Feature ON/OFF”.
Thonny Package Manager
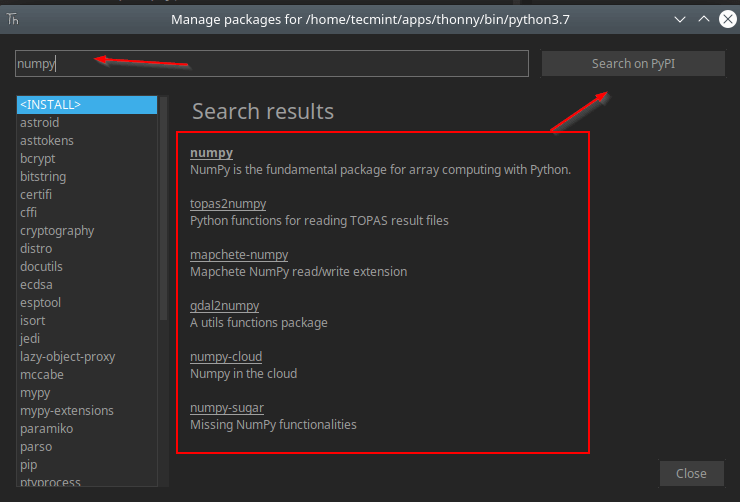
It is known that all the python packages are hosted at PyPI. We will normally use PIP (Python Package Manager) to install desired packages from PyPI. But with Thonny, a GUI interface is available to manage packages.
Go to “Menu Bar → Tools → Packages”. In the search bar, you can type a package name and press search. It will search the PyPI index and displays the list of package matching the name.
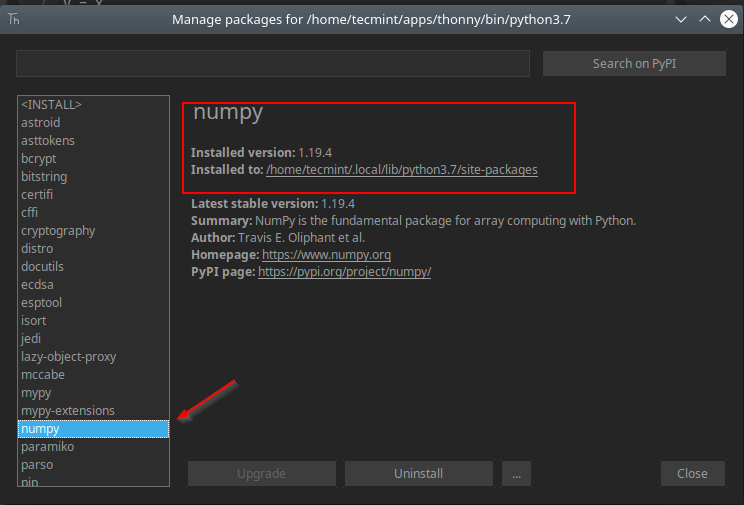
In my case, I am trying to install a package call numpy.
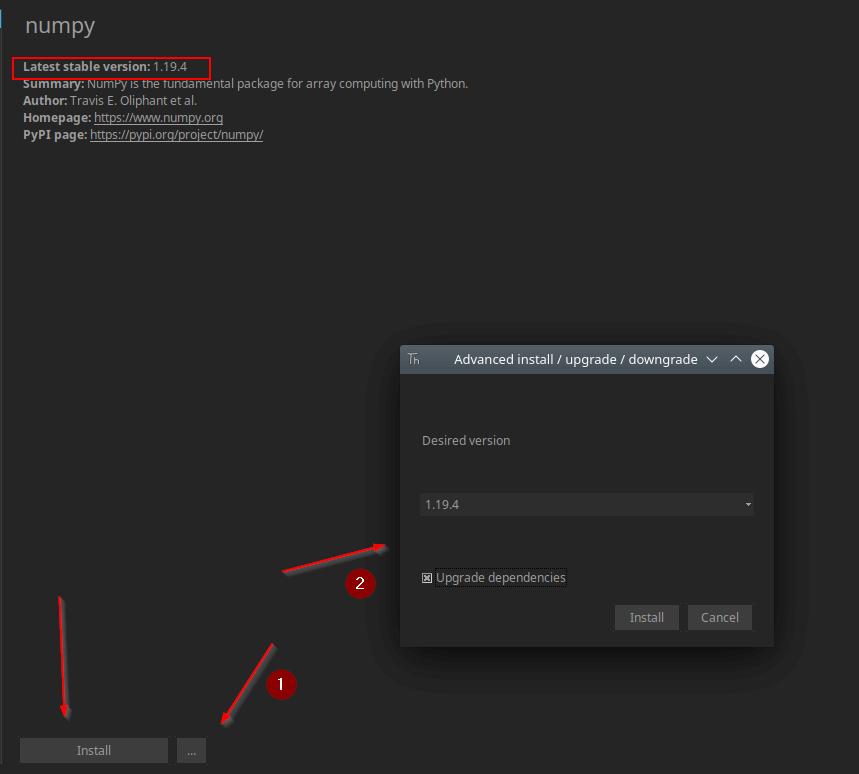
When you select the package from the list, It will take you to the installation page. You can install the latest version or choose different versions as shown in the image. Dependencies are automatically installed.
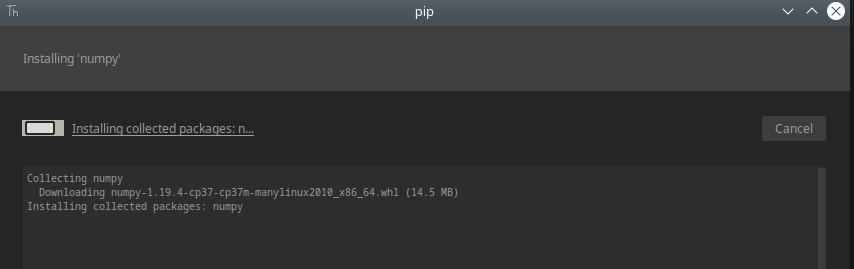
Once you press Install, it will install the package.
You can get the details like package version, library location once the package is installed. In case if you wish to uninstall the package, it is simple, go ahead and click the “uninstall” button at the bottom of the package as shown in the image.
Thonny Debugging
Thonny comes with a built-in debugger. Press Ctrl+F5 to run your program step-by-step, no breakpoints needed. Press F7 for a small step and F6 for a bigger step. You can also access these option from “Menu Bar → Run → Debugging options”.

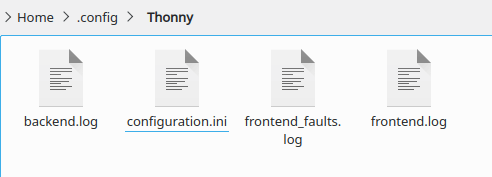
Thonny Configuration
All the configurations are stored in the “configuration.ini” file. Any changes you make with your thonny session is written to this file. You can also manually edit this file to set different parameters.
To open the file go to “Menu Bar → Tools → Open Thonny data folder”.
How to Uninstall Thonny IDE in Linux
If you wish to uninstall thonny, there is an uninstall script available under the thonny installation directory.
$ /home/tecmint/apps/thonny/bin/uninstall   [Installed using Script]
$ pip3 uninstall thonny                    [If Installed using PIP]
$ sudo apt purge thonny                    [On Debian/Ubuntu]
$ sudo dnf remove thonny                   [On CentOS/RHEL & Fedora]
That’s it for this article. There is a lot more to explore in Thonny than what we discussed here. Thonny is great for beginners but it is always a personal choice of programmers to choose which IDE or Text editor to work with. Install Thonny play with it, share your feedback with us.
If You Appreciate What We Do Here On TecMint, You Should Consider:
TecMint is the fastest growing and most trusted community site for any kind of Linux Articles, Guides and Books on the web. Millions of people visit TecMint! to search or browse the thousands of published articles available FREELY to all.
If you like what you are reading, please consider buying us a coffee ( or 2 ) as a token of appreciation.

We are thankful for your never ending support.
Learning to program is hard. Even when you finally get your colons and parentheses right, there is still a big chance that the program doesn’t do what you intended. Commonly, this means you overlooked something or misunderstood a language construct, and you need to locate the place in the code where your expectations and reality diverge.
Programmers usually tackle this situation with a tool called a debugger, which allows running their program step-by-step. Unfortunately, most debuggers are optimized for professional usage and assume the user already knows the semantics of language constructs (e.g. function call) very well.
Thonny is a beginner-friendly Python IDE, developed in University of Tartu, Estonia, which takes a different approach as its debugger is designed specifically for learning and teaching programming.
Although Thonny is suitable for even total beginners, this post is meant for readers who have at least some experience with Python or another imperative language.
Getting started
Thonny is included in Fedora repositories since version 27. Install it with sudo dnf install thonny or with a graphical tool of your choice (such as Software).
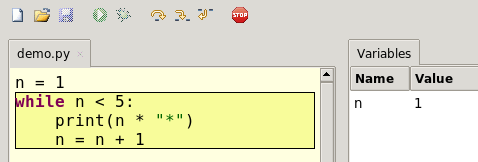
When first launching Thonny, it does some preparations and then presents an empty editor and the Python shell. Copy following program text into the editor and save it into a file (Ctrl+S).
n = 1
while n < 5:
    print(n * "*")
    n = n + 1
Let’s first run the program in one go. For this press F5 on the keyboard. You should see a triangle made of periods appear in the shell pane.
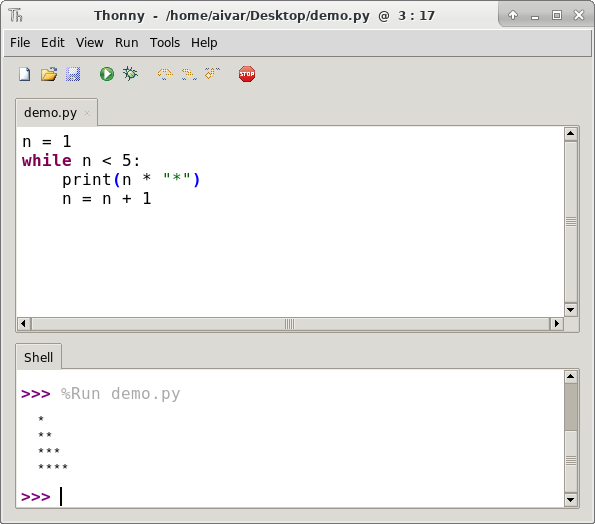
A simple program in Thonny
Did Python just analyze your code and understand that you wanted to print a triangle? Let’s find out!
Start by selecting “Variables” from the “View” menu. This opens a table which will show us how Python manages program’s variables. Now run the program in debug mode by pressing Ctrl+F5 (or Ctrl+Shift+F5 in XFCE). In this mode Thonny makes Python pause before each step it takes. You should see the first line of the program getting surrounded with a box. We’ll call this the focus and it indicates the part of the code Python is going to execute next.
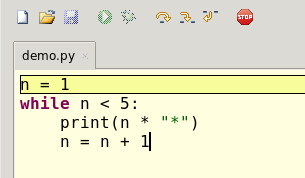
Thonny debugger focus
The piece of code you see in the focus box is called assignment statement. For this kind of statement, Python is supposed to evaluate the expression on the right and store the value under the name shown on the left. Press F7 to take the next step. You will see that Python focused on the right part of the statement. In this case the expression is really simple, but for generality Thonny presents the expression evaluation box, which allows turning expressions into values. Press F7 again to turn the literal 1 into value 1. Now Python is ready to do the actual assignment — press F7 again and you should see the variable n with value 1 appear in the variables table.
Thonny with variables table
Continue pressing F7 and observe how Python moves forward with really small steps. Does it look like something which understands the purpose of your code or more like a dumb machine following simple rules?
Function calls
Function call is a programming concept which often causes great deal of confusion to beginners. On the surface there is nothing complicated — you give name to a code and refer to it (call it) somewhere else in the code. Traditional debuggers show us that when you step into the call, the focus jumps into the function definition (and later magically back to the original location). Is it the whole story? Do we need to care?
Turns out the “jump model” is sufficient only with the simplest functions. Understanding parameter passing, local variables, returning and recursion all benefit from the notion of stack frame. Luckily, Thonny can explain this concept intuitively without sweeping important details under the carpet.
Copy following recursive program into Thonny and run it in debug mode (Ctrl+F5 or Ctrl+Shift+F5).
def factorial(n):
    if n == 0:
        return 1
    else:
        return factorial(n-1) * n

print(factorial(4))
Press F7 repeatedly until you see the expression factorial(4) in the focus box. When you take the next step, you see that Thonny opens a new window containing function code, another variables table and another focus box (move the window to see that the old focus box is still there).
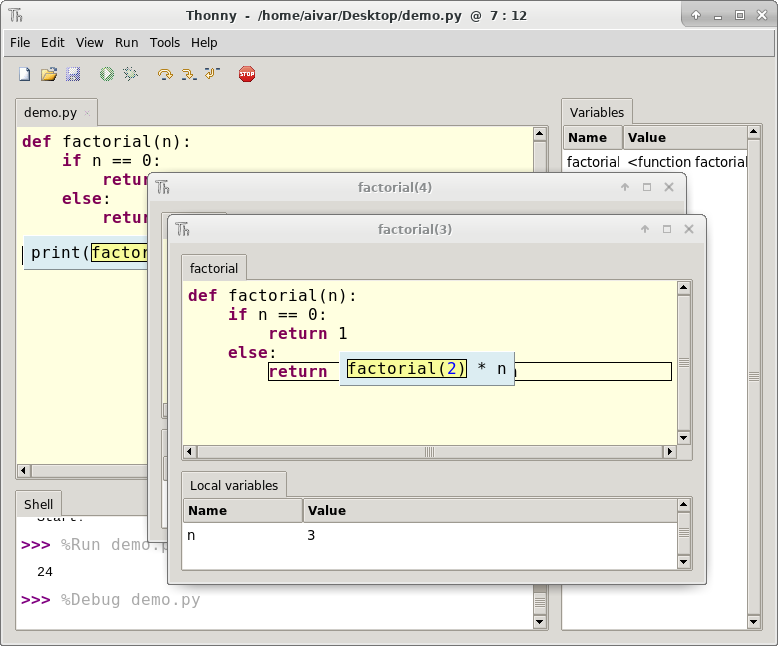
Thonny stepping through a recursive function
This window represents a stack frame, the working area for resolving a function call. Several such windows on top of each other is called the call stack. Notice the relationship between argument 4 on the call site and entry n in the local variables table. Continue stepping with F7 and observe how new windows get created on each call and destroyed when the function code completes and how the call site gets replaced by the return value.
Values vs. references
Now let’s make an experiment inside the Python shell. Start by typing in the statements shown in the screenshot below:
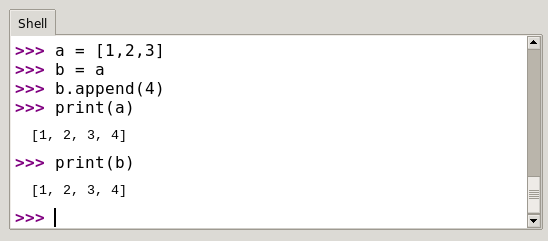
Thonny shell showing list mutation
As you see, we appended to list b, but list a also got updated. You may know why this happened, but what’s the best way to explain it to a beginner?
When teaching lists to my students I tell them that I have been lying about Python memory model. It is actually not as simple as the variables table suggests. I tell them to restart the interpreter (the red button on the toolbar), select “Heap” from the “View” menu and make the same experiment again. If you do this, then you see that variables table doesn’t contain the values anymore — they actually live in another table called “Heap”. The role of the variables table is actually to map the variable names to addresses (or ID-s) which refer to the rows in the heap table. As assignment changes only the variables table, the statement b = a only copied the reference to the list, not the list itself. This explained why we see the change via both variables.
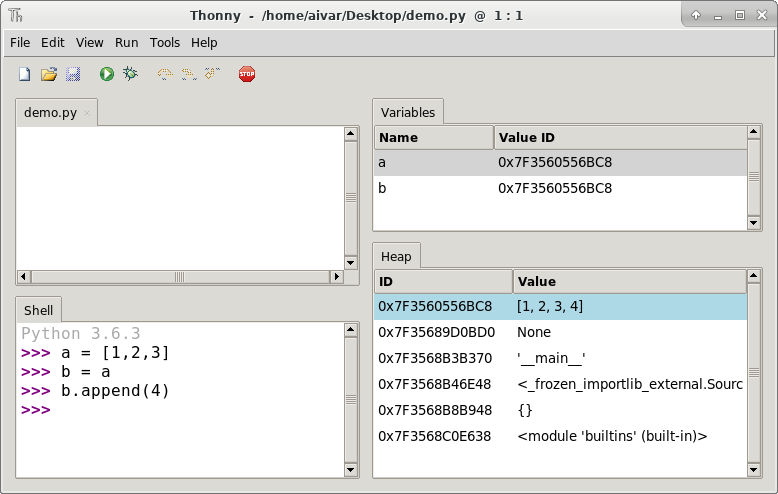
Thonny in heap mode
(Why do I postpone telling the truth about the memory model until the topic of lists? Does Python store lists differently compared to floats or strings? Go ahead and use Thonny’s heap mode to find this out! Tell me in the comments what do you think!)
If you want to understand the references system deeper, copy following program to Thonny and small-step (F7) through it with the heap table open.
def do_something(lst, x):
    lst.append(x)

a = [1,2,3]
n = 4
do_something(a, n)
print(a)
Even if the “heap mode” shows us authentic picture, it is rather inconvenient to use. For this reason, I recommend you now switch back to normal mode (unselect “Heap” in the View menu) but remember that the real model includes variables, references and values.
Conclusion
The features I touched in this post were the main reason for creating Thonny. It’s easy to form misconceptions about both function calls and references but traditional debuggers don’t really help in reducing the confusion.
Besides these distinguishing features, Thonny offers several other beginner friendly tools. Please look around at Thonny’s homepage to learn more!
In this tutorial you’ll see how to get started with Thonny IDE on Raspberry Pi OS.
So, you’ve installed Raspberry Pi OS on your Raspberry Pi 4 (also works for 2 & 3) to start programming with Python 3.
If you begin, you want to use tools that just work. You don’t want to waste time configuring stuff, thinking about which version you should use, or how to execute a program.
Thonny IDE is really great for that. You install Raspberry Pi OS, and then it just works. So now, let’s get a tour and see how you can best use this IDE.
What is an IDE, and what are the benefits you get from Thonny IDE on Raspberry Pi OS?
IDE means Integrated Development Environment. This may not help you much, but it’s good to know.
When you program, you need to:
You are learning how to use Raspberry Pi to build your own projects?
Check out Raspberry Pi For Beginners and learn step by step.
- Write your code with a text editor.
- Have language support such as auto completion, syntax highlighting, etc.
- Compile the code – for compiled languages like C++. Python doesn’t need one since it’s an interpreted language: each instruction is executed at runtime, one by one.
- Save your programs, open them, edit them.
- Debug your programs so you can see what’s happening during the execution.
- And many more things, but we’ll stick to that for now.
An IDE will contain all those features in just one software. So you can focus on writing code, which is the most important thing you can do.
The Thonny IDE will then allow you to be more productive when you write Python programs. Also, when you begin with programming, using an IDE is great because you don’t have to think about all the configuration, you can just start and learn step by step directly by programming.
And the icing on the cake: after you install Raspberry Pi OS, there is no extra step to do. Thonny IDE is already here ready to be used.
Watch this video as an additional resource to this article:
After watching the video, subscribe to the Robotics Back-End Youtube channel so you don’t miss the next tutorials!
How to start Thonny IDE on Raspberry Pi OS
First, obviously, you need to install Raspberry Pi OS on a microSD card, for your Raspberry Pi board.
Once this is done, starting Thonny IDE is very simple.
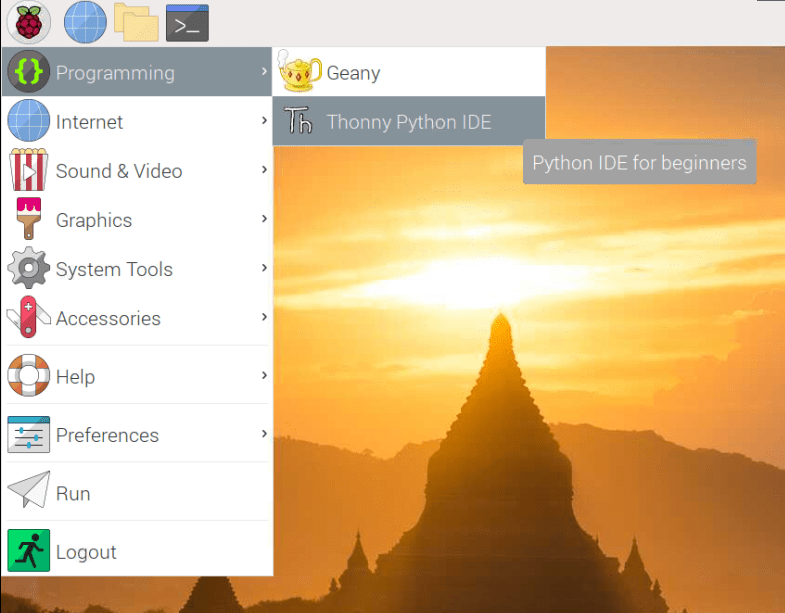
Click on the top left icon representing a raspberry > Programming > Thonny Python IDE.
You don’t need to configure anything related to Python. Just click on Thonny Python IDE and you can start programming.
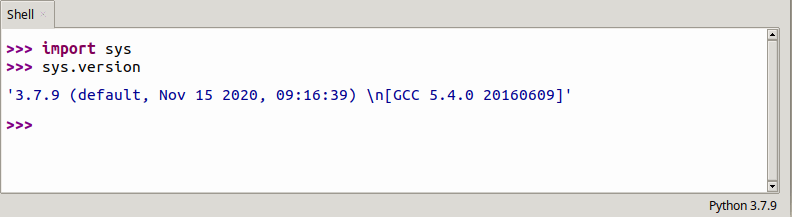
Run Python commands on the shell
As Python is an interpreted language, you can directly run Python commands one by one. To do that you’ll need to open a special environment (named Python shell, or Python interpreter). But in Thonny IDE, nothing to do, the shell is already here.

Just write commands on the “Shell” panel to start executing Python code.
This is very handy if you want to quickly test a 2-3 lines program, or if you want to test if a Python module is already installed on your environment. In this example, when you run the command import time, there is no error because the Python module time (which is a core module by the way), is already installed and available for you to use. If it was not, then you’d get an error.
Note: if you don’t have the “Shell” panel, or if you accidentally close it, you can reopen it by clicking on “View” > “Shell”.
And as you can see, you have syntax highlighting automatically done for you. Thonny IDE will recognize keywords (ex: import) and put a special font or color on them, so it becomes much more readable for you.
Write complete Python programs on Thonny IDE
Running Python commands directly on the shell is of course not a viable solution for the mid/long term. You want to be able to write longer programs, save them, execute them, reopen them, etc.
In this example, I’ve just run the same 2 lines I previously ran in the shell, but this time in the text editor.
This is how you’ll do:
- Write your Python program in the text editor area.
- Save the file (CTRL + S) and give it a name.
- Click on “play” button to execute the file. You will see the result in the “Shell” panel just below. If you haven’t saved the file yet, when you click on “play” you will first be asked to give a location and name for saving the program into a file.
- And then, repeat. Edit your file, execute it again, close your file, reopen it, replay it, etc.
Auto completion
Auto completion is one of the greatest feature you can get from an IDE.
When you start to write the name of a function or variable, you can press CTRL + SPACE, and Thonny IDE will give you a list of suggestions to finish what you’re currently writing. This is great, because this will save you a lot of time, and also will avoid you making mistakes.
In this example, when you start with time.ti, Thonny IDE gives you 3 possible words you can write. Then, use the arrows from your keyboard to choose what you want to write, and press either TAB or ENTER to auto complete.
Note: if there is only one possibility for auto completion, the word will automatically be written for you when you press CTRL + SPACE. If you’ve used the terminal before, the behavior is quite similar.
Debug your Python programs with the Thonny IDE debugger
Another great strength of an IDE is the integrated debugger.
So, basically, what can you do with a debugger?
A debugger will allow you to execute your program line by line, and make a pause between each command, so you can see:
- What is the order of the execution.
- What are the values stored in variables at any given time.
Your program may run without any error, but you might find that sometimes the behavior is not the one you want or expected. In this case, use the debugger. For example, maybe you’ll realize that one block of code is never executed because some variable is not correctly updated.
So, how to work with the Thonny IDE debugger on your Raspberry Pi?
First, click on “View”. If you want to be able to see what are the values inside the variables of your program, make sure to click on “Variables”.
Then, click on the icon next to the “play” button to start the execution of your program.
The IDE will wait for you to execute any line from the program. Click on the “Step over” button (second red arrow in the previous picture) to execute the next program instruction.
On the “Variables” panel you will see what are the values inside each variable existing in the program, at this specific moment and this specific line in the program. Click again on “Step over” to execute the next instruction, until the program is finished.
Getting errors in your programs
When you program you will often have errors that you have to fix – nobody is capable of writing a 100% perfect program on the first try!
If you have an error – syntax error, exception, etc. – in your program, then you’ll see this error in the “Shell” panel.
Sometimes the error will be very explicit, sometimes not and you’ll have to dig a little bit more, maybe by using the debugger functionality.
In the example on the picture, it’s quite clear that we forgot to end the string with a quote. You also have a nice explanation on the “Assistant” panel on the right, and some suggestions on what you can do.
Conclusion – Thonny IDE on Raspberry Pi OS
Thonny IDE is a great software to use when you write Python programs on Raspberry Pi OS.
As a beginner, this will help you focus on the most important thing: writing code.
Once you’ve made progress, this can make you more productive. Note however that at some point it will be good for you to understand each step of the process, and to be able to do them by yourself: how to handle files and execute scripts in the terminal, how to use different text editors (ex: How to use Vim on your Raspberry Pi), how to use the pip command to manage Python modules, etc.
And then, in the end it’s just a matter of preferences. Some people prefer using an IDE, some people don’t. There is no right and wrong solution. The best thing you can do is try a little bit of everything and see what really suits you and makes you the most productive.