Welcome to UBoat!
Beginnings
Boarding the ship
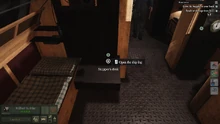
Once the game starts, you find yourself a fresh faced officer named Hilbert Kohler, standing before your assigned ship. It’s time to report in to the Captain, Klaus Graf.
The game starts in FPP (First Person Perspective), and there are three UI (User Interface) elements you’ll need to be aware of. Your selected character info, your objective, and your Uboat status bar (more on the ship status later, however the green envelope will indicate there is an unread message in the ship’s log).
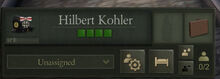
The selected character info box is in the lower left, and contains a bunch of information about the currently active officer you are controlling. In the top row, left to right, we have officer type (Iron Cross indicates a Leader type) and experience bar (currently at 0), name and health (Hilbert Kohler, 4 bars), a slot for worn personal worn equipment (currently empty), and a slot for backpack/carried item (currently contains a briefcase). The bottom row contains role menu (currently unassigned), character customization button, sleep button, and buttons to assign/relieve assistant crew.

The objective list in the upper right contains your current mission («Beginnings») and a list of active objectives. Objectives are indicated by a round green solid circle. Right now there is only one objective, «Meet the captain».
To complete the current objective, walk up to the Captain (WASD controls, mouse look) and when you mouse shows the Talk symbol, left click to speak to the Captain. The officer standing next to him is an un-named General Admiral, who will be instructing us during the tutorial.
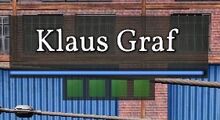
You’ll notice three pieces of information about Captain Graf when you hover your mouse over him. The first is his name, the second is his health (4 bars, same as you), and a blue line indicating his current energy/stamina, which is full.
Captain Graf will greet you, and assign you two new objectives:
- Leave the baggage at your bunk.
- Read the message from BdU.
New objectives always result in a notice box appearing, coupled with the sound of a drumbeat.
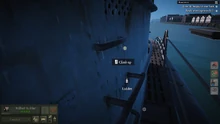
While these are your current objectives, you will not yet see a green objective marker for either one. This is because there is an intermediary objective, you need to board the ship first! Instead you’ll see a green objective marker with an up arrow on the conning tower. Walk across the gangway to the deck, walk around the tower until you find the ladder, and when the UI shows a ladder icon and «Climb Up», left click to climb up into the conning tower.
You may see some other white UI symbols, don’t worry about those for now, they are for indicating things you can use. We’ll talk about those later.
After climbing the tower, descend into the UBoat by climbing down the hatch. Click «Climb» and then use forward/backward (W/S) to climb up/down. You may need to click a closed hatch to open it first. The first ladder leads into the inside of the conning tower, then the next ladder down leads to the Control Room. At this point your two objective markers will appear.
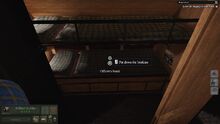
The first objective is to put your briefcase in your bunk. As you walk forward, you’ll automatically duck to go through hatches and bulkheads. Walk to your bunk, and left click to place your briefcase. Note that objectives in your mission list can be completed in any order.
Next up we have to read the message from BdU. BdU is the Supreme Commander of the Kriegsmarine’s UBoat fleets. The message is contained in your ship’s Journal, which can be accessed by clicking on the writing desk beside the Captain’s bunk.
Left click to open the Skipper’s Log. The Log currently contains two entries, ordered by date. Under September 1939 we have Orders and Activity. Orders are messages from BdU related to your missions, including events that occurred during your mission such as sinking ships or reporting sightings. Activity is where you can write your own notes.
If you click on Orders, you will see details of the current mission.
03 September 1939, Berlin
Before noon on September 1, the transport vessel Falcon left the port in Edinburgh. We have information that a radar technology prototype has been loaded onto it. We have reasons to think that the ship was sunk on its original course on the North Sea as a result of sabotage.
Your task is to find the wreckage, retrieve the equipment and if possible avoid being detected by the British units. We cannot be linked to the sabotage or attempts to seize the radar.
Section View
Once you have completed both objectives, the game will force you into «Section View», or 3PP (3rd person perspective). This is a «cut out» view that shows you the view from the starboard (right hand) side of the ship, with the walls removed so you can see inside. This view allows you to watch the action while an officer carries out your orders.
The game is playable in either mode, so you can use one, the other, or a mix, depending on your preferences.
The top bar in Section View has 6 status icons, and 5 menus.

The status icons can be hovered over to see what things are currently impacting them (for example, when Diesel Engines are running, they will recharge the batteries). The first 4 will also indicate how long until filled/depleted.
- Battery — Battery status and electricity consumption. Diesel engines recharge the battery, other devices drain it.
- Fuel — Total fuel and operating range based on current consumption
- Oxygen — Breathable air
- Discipline — Officer’s ability to control the crew. Low discipline may result in crew panic.
- Reputation — Points earned from missions, can be spent on HQ upgrades, such as being able to research more than one new tech at a time, or bring more officers on board.
- Budget — Credits earned through missions, researching caches, or reporting events such as ships spotted or sunk. Spent on supplies such as fuel, food and torpedoes, hire new crew, and to purchase available upgrades.
The menus bring up various controls or switch to new menus/view. Details will be discussed later as they come up in the tutorial.
- Telegraph — Used to request that the engine room set a screw speed.
- Depth — Used to set requested depth. Shortcuts on right hand side are for Surface, Deck Awash, Periscope, and Max Safe Depth.
- Rudder — Used to set requested rudder.
- Map — Brings up the map view.
- Menu — Opens the main menu, to access HQ (Research), Crew Roster, UBoatpedia, change settings or load/save/quit.
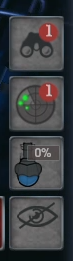
On the right hand side we have our ship notifications. It can indicate all sorts of info that may need our immediate attention. You can hover the mouse over them for more info. These may come and go as the situation changes. The 4 shown to the right are:
- Binoculars — Items our watch has detected and individually identified. Individual ships, wreckage, planes, and in the current case, the Wilhelmshaven Dock. Can be spotted visually, via radar detector, or through the hydrophone.
- Groups — Vague groupings that have not been individually identified but that we’ve detected. Can be groups of 1+ ships, «Masts over the horizon», «Chimney smoke», groups of aircraft, propeller noises, radio contacts, etc. We’re pretty sure something is there (or was reported to be there), and it will be marked on the map, we’re not not 100% sure what it is yet. Might be trackable, might just be a last reported location.
- Buoyancy — Our ship’s current buoyancy. Positive means we float, neutral means we can move up and down using the dive planes, and negative means we’re too heavy and will sink.
- Stealth — How easy it is to spot us. Broken up into 3 categories. Sight, sound and radar. If we’re close to being detected, this box will show a percentage. If we’ve been detected by the enemy, this will be a yellow box with an exclamation point. More on this later.
Other icons can include panicked, injured or dead crew, damage to the uboat, incoming radio transmissions, unread messages, available missions, and compressed air. These will be covered later as they come up.
Plotting a course and setting sail
Our next objective is to open the map, so we can plot a course to the wreckage of the Falcon. This can be done using the «M» key, or by clicking the map button in Section View.
In the upper left we have our current view level, location and date/time, and time compression settings (more on that later). On the left we have plotting tools (for making notes on the map), in the lower left we have shortcuts to various zoom levels, in the lower right we have our list of officers (currently only Herr Kohler is available to control), and in the upper right we have a status box, which includes our time at sea, current wind speed, our navigation error, depth and coordinates of the mouse pointer, and a button to centre the uboat in our view. The map can be left-clicked and dragged, use WASD, or use the mouse wheel to zoom in/out.
Right click on the objective marker to set our first waypoint. Distance will be printed for that waypoint. For the next waypoint, you need to hold Shift as you right click, otherwise the AI will do it’s best to plot a direct course. Keep holding adding waypoints, zooming out or scrolling if needed, until you have all four plotted.
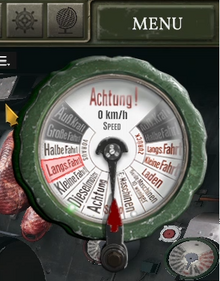
Once all four waypoints have been plotted, the game returns you to Section View to set sail by choosing second gear in the Telegraph.
Left click on the Telegraph button to open it, and click on Forward 2 (as highlighted). The gangplank is removed, and we’re on our way!
Time Compression
Now that we’re under way, it’s time to talk about Time Compression. The game switches to Orbit View, which allows us to rotate the view around the target, in this case our ship, using mouse left button drag, or WASD. Then they ask that we turn on time compression.
The time compression controls are in the upper left of the UI, next to the camera mode, our location and date/time.
![]()
There are 4 time compression modes.
- Paused (not a true pause, more an extreme slow motion)
- Normal (no compression selected)
- Time Compression (x1)
- Fast Travel (Time Compression x5)
If you are in First Person mode, you may only select Paused or Normal, unless you’re in Manual Mode at an assigned station (more on this later).

If you are in an «Open Sea» area, time works differently, there is already a level of time compression, so Normal is not «real time». Time Compression settings will affect this new «Open Sea Time» as expected, so Time Compression x1 will be Open Sea Time, compressed.
Fast Travel becomes available if you are in friendly or neutral areas. Time compression is also normally automatically disabled when you switch areas (such as approaching a shore, or when you encounter other vessels).
The game asks you to set Fast Travel, and you can watch the uboat sail on until we reach the Open Sea.
Interacting with crew and equipment
Now that we’re out of friendly seas and into the open ocean, it’s time to talk about Task and interacting with the uboat and enlisted crew. This section can be completed in First Person, or in Section View.
Kohler is currently in his bunk. His portrait shows that he is rested (the blue bar is full, with arrows showing that he is in a state that is increasing his energy), he has no crew assigned to assist him (two empty rectangles), he is an officer of the Leader class (more on classes later, suffice to say he can operate the periscope) and he is currently manually assigned to rest in his bunk (the circle shows a pillow, the yellow trim indicates you manually «stationed» him here when you put down the briefcase). It’s time to get to work!
You’ll see white or green (indicating it’s «turned on») icons on various things that show you what you can interact with. Some of the more common objects have their icons always visible, some are not so obvious, but if you hold down ALT you’ll see everything. If it’s purely informational, such as a ballast tank, the icon is a circle with an «i» in it. Hovering over it gives more information, such as whether you can use it, who’s using it, and its status. Most equipment has a gear icon, most storage has a box icon, and most doors have a door icon. Specific stations may have their own custom icon, such as hydrophone or periscope. Use this opportunity to look around the uboat, examining various equipment, just be careful what you touch!
Left clicking interacts in the default manner (depends on the item). Left clicking a Storage Locker opens it, clicking the pump turns it on or off, etc. Right clicking brings up a contextual menu, which can have 1 or more options depending on the object being interacted with. For example, the light switch in the Control Room; left clicking switches to the next lighting mode, right clicking brings up a menu where you can choose which mode you want.
You’ve been given two new objectives:
- Find and discipline sailors that don’t do their duties.
- Restock food in the galley.
Tasks in First Person Mode
Double click on Kohler’s portrait, or select him and click the black eyeball symbol on his portrait to switch to his First Person view. Both objectives should be visible as green circles as before.
Since he’s currently assigned to his bunk «station», you’ll need to click the «Leave» button, which will get him out of bed. From here you can use WASD and mouselook, hold shift to run, allowing you to move about the ship.
Tasks in Section View
Select Kohler by clicking on his portrait. If you want to jump the camera to his location, click the location icon (upsidedown teardrop) in his portrait. You can now scroll around the ship using WASD, or left mouse drag, and left click on things to interact with.
In Section View you can hold CTRL to «queue up» actions, such as changing the lights, turning on the pump, and then manning the periscope. Not all tasks can be queued up because they require further interaction (such as opening the storage room in the Galley).
Discipline Sailor
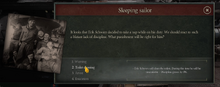
The sailor in question has decided to take a nap in the Stern Torpedo Room, since it’s not currently in use by other crew. The only equipment in here is the stern torpedo tube, the spare parts workshop, and the electric motors, so since we’re using diesel he figured he’d be undisturbed.
When you left click on him, you’ll open a dialog box to decide how to discipline him. You have 4 choices:
- Warning. The only punishment he’ll receive is a tongue lashing from you. He gets back to work.
- Toilet Cleaning. This provides a 5% boost to Discipline, and he will temporarily be unavailable while he scrubs the Aft Head (the toilet next to the Galley).
- Arrest. This provides a 10% boost to Discipline, and the crewman is confined to his bunk for the duration of the trip. He is not available to do anything else until you return to port.
- Execution. He is summarily shot, and buried at sea. This provides a 25% boost to Discipline.
Restock Food
Now that we’ve dealt with the napping sailor, it’s time to visit the Galley. An army marches on its stomach, and the navy is no different. A well fed crew is a happy and efficient crew.
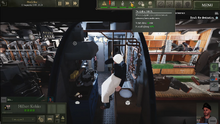
In the Galley, click on the main storage to open up a view our stores.
On the left you’ll see the current supplies in the main Storage Room, on the right a view of what’s in Kohler’s backpack, which should be empty. From here you can drag up to 30kg of food from the stores into his backpack (a stack of 6 items), or because you are transferring to the Galley Storage, which is in the same room, you can click the «Galley» tab on the right, which will show the current contents of the Galley.
Currently the Galley contains a stack of dried fish and a stack of potatoes. Great staple foods, and we do get a Discipline bonus of +4 for having 2 kinds of food in the Galley, but our crew deserve a treat. Drag the stack of Exotic Fruits over to the Galley, and you’ll add a 3rd type of food, which increases our Discipline bonus to +8! However the downside is that we will consume food faster over time.
After clicking the Exit button, closing the stores, you can hover the mouse over the Galley (pot) icon to see that at our current rate of consumption, your kitchen supply will last 13 days, for a total of 24 days including storage reserves. As food stacks are used up, the cook will automatically replenish an empty Galley from the Storage Room. If you have special items, you may want to restock manually to better manage your more expensive supplies! Some foods such as such as Exotic Fruits, or Sausages, provide a crew efficiency bonus, but are more expensive to replenish back in port.
Approaching the Wreck
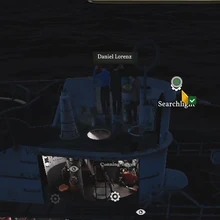
Crank your time compression up to 5x, and we’ll cruise along until we get close to our destination. Time compression will automatically shut off as we enter the area the wreck is believed to be located in. At this point our crew reports that they’ve detected «Masts over the horizon», and we get a «Visual Contact» on our Group icon.
Until we spot the wreck visually though, we only know it’s somewhere in this area. The game suggests we turn on the Searchlight to help with the search. It’s mounted on the front of the Conning Tower. Increase the time compression again until we get even closer.
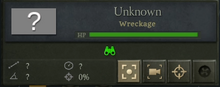
Once an officer has spotted the wreck, it’s time to use the map to plot an intercept course. Open the map, and click on the «Falcon Wreck». This will open an infobox with lots of potential information about our target. However most of it is currently «Unknown», marked with ?
In the upper half we have a flag for the Nationality, the ship’s name, and type. We haven’t yet gotten close enough to identify anything except that it’s a wreck, which means it has sunk. Below that is a green healthbar, which shows the overall health of the target, including an estimate of how flooded it is. Normally you can gauge how damaged a target is through this healthbar.
In the middle we have a pair of binoculars, which means we have visual sight of this target. Other icons can indicate if it’s on fire, if it’s equipped with radar/sonar/hydrophone/radio, whether we can target it via hydrophone, whether it has spotted us, if the crew has abandoned ship, and whether it has been sunk.
On the bottom left we have targeting data. Clockwise from top left we have distance, speed, angle on bow, and targeting solution. This is a percentage of how good a target lock we currently have from the officers that can «see» the target and are working on a firing solution.
The four buttons in the bottom right are (from left to right):
- Plot intercept course — based on target’s speed and bearing, and our speed, plots an interception course.
- Target camera — switch to an Orbit View of the target itself.
- Assign targeting — Pick which officers who can «see» the target (through visual or hydrophone) will work on calculating a targeting solution.
- Torpedo control — If solution is 50% or more, we can launch torpedoes at the target.
For now, just click the Intercept button, which will plot a course to the wreck. Increase the time compression to 5x.
Searching the Wreck
As soon as you arrive at the wreck, the game pauses and says you should check out the cargo floating on the surface. However first we need to stop so we don’t overshoot. Open the Telegraph and select «Stop», which cuts engine speed, allowing us to coast to a halt.
Normally if you want to stop faster, you can throw the screws into reverse, but in the tutorial we stop right where we need to.
On the surface you’ll see crates and pontoons, flotsam from the wreckage. Your objective is to check 3 containers. Select Kohler. You can now left click on Wooden Chests, allowing you to preview the contents and decide if you want to bring them onto the deck. The tutorial will also tell you to try out your flashlight using «F».
None of the containers has anything other than food, and once you have checked 3 different containers, we are told we need to hurry because warship masts have been spotted on the horizon!
The game switches control to another officer lying in their bunk. Since we didn’t find the equipment we came to find, it must be on the seabed down with the wreck. It’s time to send down a diver!
Select the new officer, and click on the Cabinet. Drag the Diving Suit to the backpack, and our chosen officer will get changed as our objective changes to «Send a diver». On the deck, you’ll see an objective marker on the bow marked «Winch». This assigns the diver to attach a rope to the winch and diver down to the wreck of the Falcon. A progress bar will indicate that they are moving to the wreck, and then investigating the wreck, at which point you’ll be asked what you want to do. Our only options here are return, and pull up a box. Click «pull up», so we can check its contents.
The box will appear on the stern deck, allowing Kohler to take a look inside. Sure enough, there’s our component! Drag it to his backpack, and once he fetches it, walk him down to the main storage to transfer it there. At this point you’ll be asked to speak to the Captain. He’s either on deck in front of the Conning Tower, or in the Galley, check your objective marker.
DIVE, DIVE, DIVE!
After you approach him, the Radioman will run up with a report, a destroyer has been spotted, and they’re readying battle stations. We’re under attack! You need to dive NOW, and unfortunately do not have the time to bring up your diver. The Captain orders you to cut the winch rope, abandoning your fellow officer to the depths. You may see the destroyer on the horizon, firing illumination shells, and armour piercing shots, one of which hits your conning tower!
You are ordered to flood the ballast tanks and dive quickly. First step is to flood the tanks, letting water in to reduce the uboat’s buoyancy. Go to the control room, clicking on the Valves. This will open the ballast tanks, allowing water to rush in. Next step is to set our depth to 50m. Open the depth control, and select 50m. The crew will seal the external hatches and prepare to dive. Will you manage to escape the destroyer?
MORE TUTORIAL INFO COMING SOON!
Overview
Версия игры b128.Задачи и расписание, не претендуют на что-то сверхгениальное.Душа требует графоманства.Честное слово, я и сам понятия не имею, зачем трачу своё время на это.ПОЕХАЛИ.
Начало.
Игра наглухо забагована, по этому расширенное управление командой, ручной расчёт торпедной атаки, походная система, режим сохранения, рекомендуется сделать согласно, не нотариально заверенному скриншоту. Остальное по желанию. Ещё, чем больше сохранений, тем лучше.

Команда
Собственно почему стоит включить “расширенное управление командой”. То ли я баг поймал, то ли одно из двух, но наличие уборщика и кока, ни на что не влияют и это при включённой настройке, при выключенной же, они в любом случае будут мести пол и готовить жрат, и занимать рабочее место. Разницы я не заметил, полезной по крайней мере.


Итого: для самых экстренных случаев, нужно 5 человек, 2 – дизели/электромоторы, 2 – наблюдение/рули глубины, 1 – штурвал. Просто смена, воду не таскает, воду таскают только те матросы, что привязаны к офицерам.
Кстати, смена перед офицерами, имеет приоритет. Ежели кого из смены грохнут, то их заменят матросы от офицеров.
В обычном режиме, на двигателях стоит офицер с матросами, и поэтому двое из смены, могут заниматься уборкой, готовкой и крутить вентили.
 Зелёные ячейки, матросы заняты полезным делом. Коричневые, курят бамбук. или же, меняют свет, включают/выключают помпу, дизельный и электрический компрессоры и т.д. В любом случае, если надо таскать воду, необходимо к каждому офицеру приставить матросов по максимуму.
Расписание и задачи.
Расписание делится на: работа, любая работа, отдых. При отдыхе, приоритеты не работают, единственное что может поднять механика для ремонта, это затопление его кроватки.
 Смена матросов по три часа, сделана ради смеха и атмосферности, т.к. наличие уборщика и кока, ни на что не влияет. но пусть будут, жрать не просят)
Кстати, прежде чем менять кол-во смен, нужно сохраниться, ибо самый багнутый момент в игре, который может потребовать начать игру заново) Выражается в бесполезности переключения вкладок.

Теперь офицеры, офицеры, ваше сееердце поод прицеелом
Расписание офицеров, работает нормально только если фпс не ниже 15, ниже 15 начинаются разного рода чудеса, не поддающиеся логическому объяснению.
 Командиры: главный приоритет, успокаивать паникёров, второй приоритет, внезапно, навигация (биполярка, бессердечная ты сука), затем наблюдение, т.к. первое случается редко, второе имеет конечный результат в виде 100%, а наблюдение они могут вести до посинения. Если что, навигация отображается на карте в верхнем правом углу, в виде восклицательного знака. В случае с навигацией, раньше приоритет был выше, но я словил баг, что они от неё не отходили даже при 100%, сделал как на скрине, вроде тоже нормально.
Адептус Механикус: соображать стоит на троих. В приоритете ремонт, но учтите, в большинстве случаев, они побегут вкручивать лампочку, в которую попал бронебойный снаряд, совершенно не обращая внимания на небольшой факт, что им в морду фигачит струя воды под давлением 5 атмосфер.
Затэм, работа с двигателями и загрузка торпед, после торпедирования, смотрите что бы они не загружали вдвоём одну сторону, будут мешать друг другу.
Прогрев можно повесить и на одного, если срочно, можно в ручную привлечь и второго механика.
Игра в карты и готовка, так же сделана ради смеха, они кроме как торпеды греть, ничего успевать не будут))
Радисты: те ещё полезные персонажи, кстати, на их место можно посадить механика и командира, только делать их работу, они будут раза в два дольше.
И так. радисты нужны, для приёма/отправки сообщений, они могут врубить музыку для поднятия дисциплины (умирать так с музыкой) и самое полезное это гидрофон, а ещё они местные целители (за этим тоже обязательно следить и лучше в ручную назначать на отхил неудачливого персонажа),
По идее, для радистов нужна отдельная глава, некогда объяснять, вперёд.
Радисты и их задачи на поле брани.

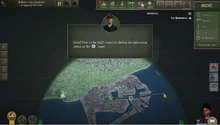
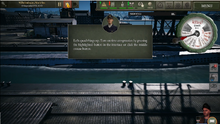
 Во время торпедирования, помимо гидрофона, необходимо что-бы на радио кто нибудь сидел. Читать сообщения тех кого вы топите, смысла мало, там ничего интересного, а вот если сообщение пришло с неизвестного корабля… Если сообщение как на первом скрине, значит вас заметил военный корабль из рядом проходящего конвоя, если там есть авианосец, могут прилететь самолёты, что крайне редко бывает.
Если сообщение как на втором скрине, соответственно, это гражданские суда (что, кстати, не отменяет наличия военных кораблей рядом с ними)
 При перехвате сообщения, есть небольшой шанс, что появится значок радио на карте, для преследования куда удобней, чем гидрофон.
Так же этот значок может появиться, если союзная подлодка заметит конвой и отправит сообщение в штаб.

С помощью радистов, можно поучаствовать в разных ситуёвинах.
самое весёлое, сбор волчьей стаи.
Приказы потопить определённый транспорт, или найти пропавшую подлодку, так же союзные лодки могут попросить запчасти, аптечки, фрукты ибо цинга.
Что там ещё было?
Ах, да, ещё туберкулёз. (который тоже не работает 🙂 )

Дисциплина.
Среди матросов могут быть, трусы, полуобмороки и морские волки. По прибытии в порт, выкидываете первых двух на мороз, волков оставляете. В конечном итоге, должно быть так.
 На этом моменте, на дисциплину можно забить.
Ручной расчёт торпедной атаки.
1) Дисперсия, это разброс торпед при залпе.
2) Если офицеры стоят на атакующем и зенитном перископах, торпедируя с АП, игра может заглючить и отправлять торпеды с ЗП, в какую-нибудь другую сторону.
3) При сильном ветре, высота волн может так нефигово затруднить оценку расстояния, увеличив расстояние раза в два, по сравнению с расстоянием на карте.
3) AOB он же Angle on Bow, только притворяется таковым, это Angriffsscheibe.
 Визуально подберите курс цели, да чёрта с два. В каком месте лодка стоит ко мне мордой? А знаете в чём дело? Я к ней бортом стою.
В левом нижнем углу, число 301.7, это сторона света, куда смотрит нос цели.
0 – Север.
90 – Восток
180 – Юг
270 – запад
Итого: Цель движется на северо-запад.
 Да, т.к. местный транспортир кривой, отнимаем от 90* — 57*, получаем 33* прибавляем к 270 и получаем курс цели 303 градуса, (погрешность никто не отменял).
Есть конечно более лёгкий способ, поставить мод Compass Navigation (B128) от Ruby, и с помощью линейки узнавать курс цели.
Ещё более лёгкий способ, доверить всё ботам.
Если что, в перископе три кратности увеличения
1.5 – кратное (100)
6 – кратное (400)
27 – кратное (1800)
1км = 0,54nm
 Ежели хотите упороться, то формула расчёт дальности и курсового угла для 27 – крат (которые бесполезны, но вдруг).
высота мачты / кол-во рисок * 1800 = расстояние
длина корабля / ( расстояние / 1800 ) = кол-во рисок
Расстояние:
21,3 / 9 * 1800 = 4260км
Курсовой угол цели:
79 / (4260 / 1800) = 33 риски (33 риски, это угол 90; в перископе их 16, значит курс цели, примерно 45 градусов)
Развлекайтесь
Короче, ставьте мод Ruby & Freekoly’s TDC mod и Compass Navigation (B128) от Ruby и будет вам счастье, или не будет.
Вы же помните что было написано в начале про ручной расчёт торпедной атаки, вот и я не помню и заново я это перечитывать не хочу.
И в завершении. Да неужели эта простыня закончилась.
Почти все приказы, можно отдавать через кнопку “TAB”
 Выдайте каждому офицеру дыхательные аппараты. Всем радистам аптечки, механикам запчасти, командирам болд. землю крестьянам, фабрики рабочим
Имейте запас.
 В режиме тишины, не забывайте про рули глубины

Союзными подлодками можно частично управлять. На карте лкм на союзную лодку, затем пкм на карте или вражьему кораблю, если будут торпеды будет торпедировать.
 Атака
Атака
Защита
Отступление

Если вам не хватает воздуха для всплытия, включаете электрический компрессор, он закачает его из лодки, а в лодку его наколдует вентиляция, не смотря что вы под водой.

Ну, собсна и всё на этом, ставьте лайки, репостите тем кого ненавидите и помните, что отца Гамлета убил его дядя, в жизни пригодится.
Встречайте наш короткий пост мини гайд, из цикла советов по игре UBOAT. В нём мы кратко расскажем про те консольные команды, которые узнали. Для того, чтобы открыть консоль нажмите — «~»
Поплыли!
Гайд и советы по управлению подводной лодкой в UBOAT — консольные команды и читы
Очень важно вводить консольные команды с большой буквы, консольные команды чувствительны к регистру.
Bomb — уронить бомбу на выбранную цель.
Budget «число» — добавить денег
Detect «число» — создать группу возле вашей позиции.
Leak — Создайте случайную утечку на лодке
Reputation «число» — повысить вашу репутацию
Spawn «Warships» «Convoy» «Transport» «Submarine» — добавляет выбранную группу врагов.
Teleport «два числа» — координаты.
Torpedo — выпустить торпеду
Weather — погоду поменять на «Fog» — туман, «Calm» — спокойная, «Cloudy» — облачная, «Storm» — шторм.
XP «число» — добавить опыта экипажу

An advanced guide covering food, crew & u-boat inventory management, faster warehouse resupply, crew morale, HQ research, crew skills and dodging aircraft depth charges.
Contents
- Food: Galley, Storage Room & Consumption
- Inventory Management: Uboat Storage
- Inventory Management: Officer Storage
- Faster Warehouse Resupply
- Remove Crew Morale Problems (No Cheating, Mods or Bugs)
- Faster HQ Research Through Multiple Crew Vacations
- HQ Research Summary
- HQ Research Recommended Sequence
- Crew Skill Points
- Airplane Attack: Avoiding Depth Charges
Food: Galley, Storage Room & Consumption
Galley Storage
To make food stored in your galley longer it is better to have a large amount of 1x item than having multiple items of different food types. The galley has 4x slots and can hold 600kg (each food item is 5kg).
Galley Storage Example 1:
- 30x Potatoes
- 30x Canned Meat
- 30x Sausage
- 30x Exotic Fruits
Galley Storage Example 2:
- 100x Potatoes (stack limit 100x)
- 20x Potatoes
See example 1 & 2 above. While example 1 contains the same total amount of food as example 2 at every ‘meal time’ the game will consume more food items from example 1 than example 2. The only positive to having multiple food items is to get the variety meals morale boost. The negative is that your food supply will deplete multiple times faster.
Likewise in the case of example 2 when your 100x stack of potatoes diminished over time to say 96x then you can transfer some potatoes from the smaller stack into the larger stack. Also despite it being the same food you will still get a +4 varied meal bonus by having food in a 2nd slot.
Storage Room
As of B125 you can get away with only having 3x places in the storage room taken by food (with a fully stacked galley) if you stack them up to high amounts. In most patrols you could probably get away with less.
Galley:
- 100x Potatoes
- 20x Potatoes
Storage:
- 100x Preserved Pork
- 86x Sausage (being replenished)
- 72x Fish (being replenished)
Deck Storage:
- 17x Cheese (picked up from past patrol and left)
Early on in the game when money is low you might have to make use of what you can take from wooden crates so you will have small amounts of different amounts. However later on in the game with more money and by replenishing from the warehouse every 24hrs (see resupply section) you can get stacks of 100x food.
Rate of Food Consumption:
While this is more on observation and I have not done extensive testing I would say that the Uboat crew will consume a quantity of 5-6x units of each food item in the galley per day. Thus 100x units of 1x food used correctly will last 16-20 days.
Thus in example 1 earlier a Uboat will consume 5x-6x potatoes, 5x-6x Canned meat, 5x-6x Sausage and 5x-6x exotic fruits; a total of 20x-24x units per day. Note that there is some randomisation on what items are picked. Meanwhile in example 2 early on in the patrol the crew will consume 10x-12x units daily. Later on in the patrol as the smaller potatoes stack is diminished through consumption and you transferring them to the larger potato stack only 5x-6x units will be eaten per day.
Inventory Management: Uboat Storage
When faced with the storage options available the first thought is that you have very few storage options. However with smart management you will actually find you have more than enough slots.
Uboat storage items slots number and weight
As a rule of thumb try to place the low weight items in storage areas where you have free slots but limited weight.
For example the flak gun has 4x storage slots but if you load only load 1x ammo then you have 2x slots spare. Thus rather than having these spaces spare you should put low weight stacks in here which would normally go in the storage room e.g. replacement parts, sonar decoys. These spare slots in the storage room (where the weight limit is 8,000kg) you can place ammunition.
Galley:
- 100x Food (500kg)
- 18x Food (90kg)
- 5x Replacement Parts (5kg)
- 5x Sonar Decoys (5kg)
Deck Gun:
- 40x AP Shells
- 40x AP Shells
- 2x AP Shells*
- 5x Replacement Parts
Flak Gun:
- 4000x AP Rounds
- 2250x AP Rounds (amount off memory)
- Spare Slot
- Spare Slot
Storage:
- Food 1
- Food 2
- Food 3
- 40x AP Shells
- 4000x AP Rounds
- 4000x AP Rounds
- Salvaged Parts
- 5x Replacement Parts
- 5x Sonar Decoys
- 5x Medikits
Ventilator:
- 40x Potassium Carbonate**
*You could remove these 2x AP Shells and add another low weight item
**When the ventilator is on it goes through these very quickly. Thus you might want to use a officer with an item spot spare to hold some of these.
Notes on Storage Room:
1) Replacement Parts: If a crew member needs to repair something then a replacement part needs to be either in the storage room or equipped on the person. Replacement parts in your galley or deck gun will not be automatically used.
2) Salvaged Parts: Salvaged parts should always be kept in the storage room. If you have no salvaged parts always leave a slot empty in your storage room so that they can go there. This is because if repairs are made the salvaged parts will automatically be placed in the storage room. If no spots are available in the storage room they will be put to other areas like the deck gun. When they are placed here they are extremely difficult to remove (likely a bug). When it happened to me I was able to get rid of them by selling them in the warehouse (but strangely only worked on my 5th attempt randomly).
As salvaged parts stack to 50x while replacement parts only stack to 5x I would recommend that you only get an engineer to salvage them if you desperately need them. If not you can accumulate 50x salvaged parts which if processed provide a reserve of 25x replacement parts while only taking up 1x storage slot.
Inventory Management: Officer Storage
Officer item & equipment slots
One trick to hold more things is to equip your officers at port with items and equipment rather than only holding them in storage areas. An example load out would be (7x Officers unlocked):
- Captain: 5x Sonar Decoys, Helmet
- Leader: None (can billage water or move ammo), Helmet
- Leader: None (can billage water or move ammo), Helmet
- Radioman: 5x Med Kits, Helmet
- Radioman: 5x Med Kits, Helmet
- Engineer: 5x Replacement Parts, Respirator
- Engineer: 5x Replacement Parts, Respirator
Thus by equipping officers with these we have saved 5x item slots and 7x equipment slots which would of otherwise taken up storage space in the Uboat. As officers can only carry 30kg it is better to carry the low weight items on them. Also as your officers already have equipment on you can stack the equipment cupboard with spare helmets and respirators (I do keep a diving suit and 1-2x stacks of coffee as well).
You can keep a space spare in the equipment locker to allow you to swap items. Alternatively this potential spare spot you could store coffee in and if you do need to swap equipment then just drink the stack of coffee to free up a slot.
Officer items and equipment lost
If you deselect officers from your Uboat (while speaking to the recruitment officer) then reassign them then any items or equipment held on them will be lost. Also be aware that this could also potentially happen when they go away on vacation (one time it did not happen to me but another time I got the impression it did).
Faster Warehouse Resupply
When first starting out when you go to the warehouse you will generally buy all your supplies in 1x or 2x goes. However as the warehouse supply (generally) replenishes every 24x hours then if you buy enough items for the time to progress by 24hrs then you will have a fully replenished warehouse next time you visit.
For example with food at the U-boat base they will only sell 8x different items of food in quanties of 6 to 16. However if you buy some food and some other items then come back 24hrs later the food on sale will be replenished. This also applies to equipment, ammunition and torpedo’s (espically T5 Torpedos.
Skip time by buying and selling
If you do not have enough stuff to buy for 24hrs to pass then sell a part or full stack of items in your storage area (I use AP shells) then buy the quantity you just sold up again.
Remove Crew Morale Problems (No Cheating, Mods or Bugs)
Sea Wolf Personality Trait
If all your crew have this then it does not matter if crew morale is 0% forever as none of them will have a breakdown. It also means that leadership skills like the ability to knockout a crewman having a breakdown are unnecessary and can be spent on something else.
Identifying strong and weak crew
On the earlier missions (would recommend from the 3rd onwards) you want to have a period in the middle of the mission where you allow the morale to continue falling to 0% to force a crewmen to potentially have a breakdown. After a while at 0% either the following happen:
- 1) Heart Attack: A radioman can then heal them and get XP, something they rarely get.
- 2) Panic Attack.
- 3) Sea Wold Trait earned.
After one of these three things happen morale will reset to 33%. At this point let it fall again and rinse and repeat.
Creating low morale conditions
The best way to cause low morale amongst the crew is to dive the submarine. The deeper the depth the lower the morale bonuses. Your officers should not be doing morale improving activities like playing cards and cooking food. Likewise you should only have 1x type of item (food or non-food) stored in one storage spot in the galley during this time so no “Varied meals” morale boost is gained. At the time of writing there is a bug where you can get “Varied Meals” bonus by storing non-food items in the Galley.
Depth morale penalties:
- Low (green) depth: -1 morale
- Medium (orange) Depth: -3 morale
- Large depth (red): -5 morale
You should do this in your patrol zone when you have covered about 1/2 the mileage and/or have met the tonnage and target objectives given to you. The reason being your crew (through breakdowns & heart attacks) and potentially submarine (if you go to deep depths) will take a battering so you won’t be in as a effective state as before doing this. Also if you do this after you have done the objectives and are close to the base then you can get a ‘Base’ morale bonus of between 1+ to 10+ which makes the fall in morale take longer.
Changing Crew at port
Once you have returned to port the crew members who have had heart attacks or panic attacks you want to remove and replace them with new recruits. Rinse and repeat and after 5+ missions you will have a near perfect crew.
Note: Water leakages
If you decide to do this at a large depth I would recommend putting the Uboat at just above 160m (start of the red area). This is deep enough to get the morale penalty and cause some minor leaks which engineers can repair and get XP (it’s one of the few ways they can get it). It also will allow you to create a stack of salvaged parts.
If you go deeper you can get some heavy leakages. While you could manage 1x or 2x leaks if you are not or have 3x leaks you will not be able to come up to the surface as you have negative buoyancy from all the water you have taken on and you are too deep for the pump to be of use.
Likewise if you dive in an area where the depth is about 170m then if you do encounter too much problems the Uboat will just rest on the bottom of the see and not keep plunging down to depths which will instant destroy the Uboat.
Faster HQ Research Through Multiple Crew Vacations
The crew vacations for the Salzburg Alpes and Eagles Nest give a 100% speed boost to HQ research for the full 14 days of vacation. These only cost 3,000 for each one. Thus a research project that would normally take 24 days will take 12 days.
After about 5+ missions money is not an issue so while in base you can take multiple vacations to quicken research, allowing you to get all the submarine updates by early to mid 1942 (when starting the U-96 scenario). When in port the process to go through is:
- 14 days vacation with 100% HQ research boost
- Resupply/upgrade/Waste 7 days until vacation available again
- 14 days vacation with 100% HQ research boost
- Resupply/upgrade/Waste 7 days until vacation available again
Ways to waste 7x days between vacation
1) Supplies & submarine updates: Do not buy supplies and submarine upgrades at the same time. Buy your supplies then when you have skipped the amount of days buy the submarine upgrades then skip those days.
2) Buying and selling ammunition: 40x 88mm shells take 29hrs and 59mins to fully transfer. Buy 40x shells, skip a day, sells those 40x shells then buy another 40x shells. Repeat until 7x days have passed. To sell in the warehouse right click the item you want to sell.
HQ Research Summary
What you research depends on your play style.
Snorkel:
Unlocks: Allows you to use a diesel engine and get oxygen when at periscope depth.
The best single upgrade to get. Allows you to travel long distances at periscope depth which mean you can avoid aircraft. Good in espionage missions or when crossing the straits of Gibraltar as without it the only way to get fresh oxygen (after the ventilator has doen what it can) would be to surface.
Conning Tower (all tiers):
Unlocks: More and better anti-aircraft guns.
If you like to play on the surface and engage aircraft this is great. The top tier one does take 3x researches where you get the quad 20mm AA and 2x extra 20mm cannons. These make easy work of an aircraft in just one pass and can do serious damage to Corvettes, Motor Speed Boats and merchant vessels in the 2,000 ton range. However for ships larger it’s impact is drastically less. While the quad 20mm AA can destroy an aircraft in one pass for an average AA gunner you will probably only 50% of the time destroy the aircraft before they drop their depth charges. Thus you need to still take avoiding action.
Ammunition Production:
Unlocks: Warehouse sells more AP shells and starts selling HE, AA and SS (Star Shell).
Not really worth it as AP shells are generally better. AA shells do not air burst (currently) so are basically just HE shells with less anti ship capability. The lower amount of shells in the warehouse are not too much of an issue if you buy the full stock every 24x hours (as per the section above about faster warehouse resupply).
Radar (all tiers):
Unlocks: Unlocks surface radar.
This is somewhat useful for early detection of aircraft, espically at night if you are operating on the surface. However from my experience it does not do much for ship detection. The best form of surface detection remains the lookout spotting for chiney smoke. If it worked as intended for surface ships it would be useful at night. At periscope depth there is also a +5 visibility penalty to your submarine from the radar antennas. In comparison the visibility penalty from the Snorkel is +10 (albeit ignoring the smoke plume it emits).
Torpedoes (all tiers):
Unlocks: T3 Electric then T5 Accoustic Homing Torpedos.
T3 torpedoes are like T2 torpedoes but with less chance of being duds. T5 are accoustic homing torpedos which will change their path when they are close to the ship and home onto the rear of the ship. Close misses are no more as they adjust their path for the target when close to the ship.
A drawback with the T5 torpedos is that they will change their path towards any ship that is closer by. In some cases they can even make turns of 90′ or 180′ degrees towards a different target further away. I have also had one case whereby I fired the torpedo with my engines running and when it was close to the target it did a 180′ degree turn and went directly towards my submraine. With the submarine engines on it did not hit so it is unknown if it is possible for you to be hit by your own ‘homing’ torpedo!
HQ Research Recommended Sequence
Recommended HQ research path:
As of version B125 from completing all of the HQ researches and influenced by my personal playstyle, I would recommend the following HQ upgrades sequence:
- 1) Snorkel: Tier 1
- 2) Torpedo: T3
- 3) Torpedo: T5
- 4) Hydrophone: Tier 1
- 5) Hydrophone: Tier 2
- 6) Sonar Decoy
- 7) Snorkel: Tier 2 (radar coating)
-
 Equipment production
 - 9) Armoured Conning Towers: Tier 1
- 10) Armoured Conning Towers: Tier 2
- 11) Armoured Conning Towers: Tier 3
- 12) Accumulators: Tier 1
- 13) Accumulators: Tier 2
- 14) Accumulators: Tier 3
- 15) Radar: Tier 1
- 16) Radar: Tier 2
- 17) Radar: Tier 3
- 18) Radar: Tier 4
- 19) Ammunition production
- 20) Improved toilets
- 21) Military Stash Nantes/Bergen
- 22) Military Stash Nantes/Bergen
 Equipment production
Air Reconnaissance:
If you want to do missions in Cardiff or Scapa Flow it is recommended that you complete the air reconnaissance missions before you attempt missions there.
Personal playstyle:
In relation to my playstyle influencing my choice of HQ research my playstyle can be described as:
- Avoid aircraft by travelling at periscope depth with snorkel
- Complete a lot of easy and medium missions to upgrade my Uboat and level up my crew. Only then do I play the hard missions
- Generally avoid contact with warships (unless it’s 1-2 corvettes)
- Prefer to spot contacts through the hydrophone
Thus if you have a differing playstyle it might be beneficial to do researches in a different sequence.
Crew Skill Points
The following are tips on what to choose when leveling up your character. At levels 3 & 5 you only have a choice of 1x random skill upgrade.
Leader-Level 2 (‘Gunner’ or ‘Focus’)
Choose: Focus
Reason: The accuracy boost ‘Gunner’ gives is only when the AI is firing. The recoil bonus on AA guns is little on lower tiers and practically non existent on the quad 20mm AA gun (unlocked with final armoured conning tower upgrade). The 25% faster torpedo targeting from ‘Focus’ is better in battle situations when you have limited time to get the highest target percentage on multiple ships, especially when you have a Corvette or Destroyer charging right at you.
Leader-Level 4 (‘Iron Fist’ or ‘Management’):
Choose: Management
Reason: If you follow the section earlier in the guide you can make crew morale not an issue by deliberately allowing crew morale to drop in controlled environments. The crew which are revealed to have the Seawolf personality and kick out the crewmen who have panic or heart attacks. The extra man ‘Management’ gives allows you to reload the deck gun faster or billage water faster.
Radioman-Level 2 (‘Paramedic’ or ‘Sensitive Hearing’)
Choose: Sensitive Hearing
Reason: The medic upgrade gives the impression that the radioman will no longer deplete medikits when healing someone, allowing you to save inventory space. However when a radioman has medikits in their personal inventory and heal someone they (at the time of writing) do not deplete anyway even without the ‘Paramedic’ skill. Likewise even if this was changed with good inventory management you can get 15x medikits on board by equipping 5x to each radioman (assuming you have 2x) and then placing another 5x in a storage area. Likewise if you are using 10-15 medikits during a mission I doubt you would either finish the mission or likely just load up a past save.
Engineer-Level 2 (‘Salvager’ or ‘Handyman’)
Choose: Handyman
At the time of writing the Engineer can create replacement parts from salvaged parts without this skill at the same rate that engineers with this skill can. Thus the ‘skill’ currently unlocks nothing.
Engineer-Level 4 (‘Torpedo Mechanic’ or ‘Explosive Charges’)
Choose: Torpedo Mechanic
Reason: The feature for engineers to blow up ships with explosive charges does not appear to be implemented yet (at the time of writing). Thus the skill adds nothing. Even if the skill was available and (I assume) allowed you to place explosive charges on abandoned ships in most cases 2-10 deck gun AP shells at the waterline on a certain spot is enough to finish off a abandoned, damaged ship. With gun inventory management you can carry more than enough AP shells.
Airplane Attack: Avoiding Depth Charges
Uboat Speed and Turn rate
As of B125 Uboats can decelerate quite quickly from 30kmh forwards to -10kmh in reverse. Meanwhile the turn rate of the U-Boat is very slow and sharp turns shed off a lot of speed. Thus when facing an enemy plane the best way to avoid it is to:
- 1) Watch the plane and if you believe the plane is going to start its attack run and you submarine is at a 45 degree angle turn it so the plane is attacking perpendicular to your sides (port and starboard) or your rear (stern). However weight it up against how much speed you will lose on the turn and if you have time to make it up.
- 2) Travel straight or with a few degrees of rudder at forward 4 (I found the deceleration better at Forward 4 better than forward 5).
- 3) When you are confident the plane has made it’s final adjustments (they do it relatively late) pause the game and switch the speed from Forward 4 to Reverse 4.
- 4) The plane will drop the depth charges at the position you would of been if you had carried on at 30kmh for the next 10seconds. In reality you are reversing away from that area and if everything goes to plan you will miss the depth charges
Airplane attack directions
Airplanes will most often attack from 2x directions:
- 1) From the rear (stern) at a slight angle
- 2) From the left or right (port or starboard respectively)
Shooting at the plane
Unless you have mastered how much you need to lead and elevate your shots I would recommend you save your ammo and only shoot when the planes are on their attack run or have just finished it.
You will need to also lead your shots. While I do not know how the bullet velocity and bullet drop are modelled in the game they do feel like they are somewhat accurately modelled of the real thing. This is comparing (what I observed) of the velocity and bullet drop to that of a game called ‘WW2 Online’ which accurately modelled bullet trajectory (for which there are some AA gun guides on youtube).
88mm Deck Gun AA Shell
These shells do not airburst so in the anti-air role currently they are no different than firing a HE shell from the deck gun. While they are a 1x hit kill on a planes direct approach (extremly little chance of hits when it is circling you) you will only have 1x or 2x shots to hit it. It’s better to stick to the light AA guns.
Save game before airplane attach
It is recommended that you save the game before a plane makes an attack. This will save you the frustration of being knocked out and also give you opportunities to practice.

Uboat наконец-то появился на ПК через Steam. «то будет новая игра от разработчиков Deep Water Studio и издателя PlayWay SA, в которой игроки будут управлять подводной лодкой времен Второй мировой войны и управлять ею.
Вам нужно будет убедиться, что все люди на корабле делают это. соответствующая работа. Каждый член экипажа имеет свою индивидуальность. поэтому вам нужно будет управлять моралью, дисциплиной и травмой, чтобы завершить миссию и поддерживать всех в живых.

Все элементы управления для ПК (клавиатура и мышь) в Uboat
На протяжении всей игры Вам понадобится микроуправлять различными аспектами игры. Lля этого вам необходимо знать основные элементы управления с помощью клавиатуры и мыши.
Ниже вы найдете все карты элементов управления для мыши и клавиатуры.
Элементы управления мышью
Щелчок правой кнопкой мыши по Cogs показывает набор с различными параметрами.
Щелчок правой кнопкой мыши по карте = установка маршрутных точек. Вы можете удерживать Shift, чтобы установить несколько путевых точек.
Средняя мышь = сжатие времени x2 / normal
Управление с клавиатуры
M = Открытая карта
U = Включение / выключение пользовательского интерфейса
F = Фонарик
B = приносит ручной бинокль
N = Free Camera
Tab = отображает список офисов на экране
Shift = Выполнение
Ctrl = позволяет пользователю добавлять заказ в конец очереди заказов.
Alt = Отображает пользовательский интерфейс в режиме от первого лица.
Space = Pause game
] = Смена постобработки
+ = Увеличение передачи двигателя
= Уменьшение передачи двигателя
Page Up, Page Down или R, F = перемещать свободную камеру вверх и вниз
F1 = Изменить вид на режим от первого лица
F2 = Изменить вид на вид сечения
F3 = Изменить вид на вид орбиты
1 , 2, 3 + = для выбора символов
Прохождение Wiki Гайд Руководства
Просмотров: 237
Рубрика: Гайды и прохождение игр
Prioritize tasks, plan shift schedules and compose squads in order to automate routine work on board in an effective way and reduce manual micro management.
ждун has created a crew management guide, available on the Steam Community Guides:
https://steamcommunity.com/sharedfiles/filedetails/?id=2082403141
Shifts
A shift requires a minimum number of stations to be manned by crew. If officers are not using these stations, crew will be allocated, based on task priority, to man these stations.
Surface
- Conning Tower — Observation (watch) — 2 crew (these are in addition to any crew assigned to a leader at the Targeting Sight)
- Helm (Expanded Sailor Management only) — 1 crew (may be replaced by any officer)
- Galley (Expanded Sailor Management only) — 1 crew (may be replaced by any officer with Cook skill)
- Engines — 2 crew (may be replaced by engineer and their assistants)
- Cleaning (Expanded Sailor Management only) — 1 crew
- Ballast Valve (Expanded Sailor Management only) — 1 crew will step away from their task to open the valve
Submerged
- Observation Periscope (watch) — 1 crew (may be replaced by leader assigned to either periscope)
- Helm (Expanded Sailor Management only) — 1 crew (may be replaced by any officer)
- Galley (Expanded Sailor Management only) — 1 crew (may be replaced by any officer with Cook skill)
- Engines — 2 crew (may be replaced by engineer and their assistants)
- Cleaning (Expanded Sailor Management only) — 1 crew
- Depth Steering (Expanded Sailor Management only) — 2 crew
- Ballast Valve (Expanded Sailor Management only) — 1 crew will step away from their task to blow the ballast
Expanded Sailor Management
In settings, an option is available to use «Expanded Sailor Management». This option creates crew tasks for cooking, cleaning, work at depth steers station and work at helmsman station. Each new task is also added to the crew priority list. All these jobs now have an underlying game mechanic.
This option creates a Helm station in the Conning Tower that can be manned by crew or any officer. When an officer is not manning this station, a crewman who is a member of the current shift will sit here. If this option is not enabled, these stations are purely cosmetic, and does not «use up» a crew slot.
Франшиза 2019 года от команды разработчиков Deep Water Studio. C игровым жанром продукта определиться достаточно сложно, поэтому аркадный симулятор – самое гуманное название этого медиа-продукта.

Оглавление
- 1 Жанровая классификация
- 2 Sim’s on The Boat
- 3 “Энигма”
- 4 Итерация номер 2
- 5 Изменения в механике игры
- 6 Послесловие
Жанровая классификация
UBOAT представляет из себя смешение игровых механик Bomber Crew и Diluvion: Resubmerged. Назвать подобную игру симулятором никак нельзя. Не смотря на то, что проект окупился за несколько суток, его крайне переоценили. Работа дизайнеров не вызывает нареканий (волны шумят, солнышко в них бликует) лодка максимально детализирована не только снаружи, но и внутри, а так-же в “поперечном разрезе”.

Sim’s on The Boat
Продольный разрез лодки во многом важен для целевой аудитории игры. Как же мы будем наблюдать за борьбой по живучести судна, и раздавать указания команде. Разве этим должен заниматься Капитан? Капитан должен отдавать приказы, выстраивать стратегии курсового патрулирования, и давать приказы на заряжение торпедных аппаратов и “топить тоннаж” с перископной глубины, учитывая упреждение по цели.

Но стоит отдать должное сценаристам игры, при переходе через Ламанш, (на время действия событий – очень тонкое “бутылочное горлышко”). Если Капитан увидит минный тральщик ( Эсминец) в перископ, идущий курсом прямо на вас, у моториста дизельного отсека может случиться паническая атака – что вполне добавляет реализма игре, потому-что вам придётся опуститься на максимальную глубину и надеяться на чудо. Так-как у нас не атомоход, а дизель -электрическая подводная лодка, то помимо глубинных бомб, есть ещё одна проблема, в подводном положении мы тратим заряд аккумуляторов, включаем аварийное освещение и пытаемся переждать данную “неприятность”. Война это не повод “разговоров по душам” и “пить чай под патефон”.
“Энигма”

В Войне все средства хороши, поэтому почему-бы не воспользоваться зашифрованным кодовым устройством: для того, чтобы не лежать и задыхаться на дне морском. На любой стадии игры нажимаем тильду (~) и вводим следующие консольные команды:
Reputation (число) – уровень репутации, для покупки дополнительного оснащения субмарины.
Skip (компрессия времени X и любое число) – промотать игровое время без использования ресурсов подводной лодки.
Teleport (координаты на плоскости x/y) – перемещает вашу подводную лодку по введенным координатам, для длинного востока используйте «-номер».
Weather (Туман, облачность, шторм) изменение погодных условий в игре.
XP (Любое число) – повысьте опыт своей команды на борту.
Bomb – ликвидировать цель бомбой.
Torpedo – ликвидировать цель торпедой.
Итерация номер 2
Не стоит отчаиваться, в том-же 2019 году вышла игра под названием Wolfpack. Данный продукт, хоть и с натяжкой, можно назвать симулятором. Хотя- бы потому, что это кооперативная игра, и вы играете вместе со своими друзьями, и можете управлять несколькими подводными лодками.

Изменения в механике игры
Благодаря кооперативной игре вы можете совместно принимать тактические решения, пользуясь внутренним чатом. Можно “прикрывать спину друг друга” или “путать следы”. Паттерны патрулирования можно согласовывать совместно.

Послесловие
Так или иначе, но более точная симуляция подводной лодки это – Silent Hunter от Ubisoft. Не стоит переплачивать за V версию франшизы, так-как там тоже дизайнеры “навели лоску и причесали” игру. Весь необходимый функционал вы найдёте и в третьей части продукта.
По историческим сведениям из 25 тысяч немецких подводников – выжила лишь одна четверть. Они тоже выполняли приказ, и сетовали на своего недальновидного “лидера”.
Отзывы и комментарии
Оцени статью:
Загрузка…