
4-132-765-61(1)
DCR-SX30E/SX31E/SX40E/SX41E/SX50E/SX60E
Digital Video Camera Recorder
2009 Sony Corporation
Руководство по эксплуатации
RU
Посібник з експлуатації
UA
 03:15
03:15
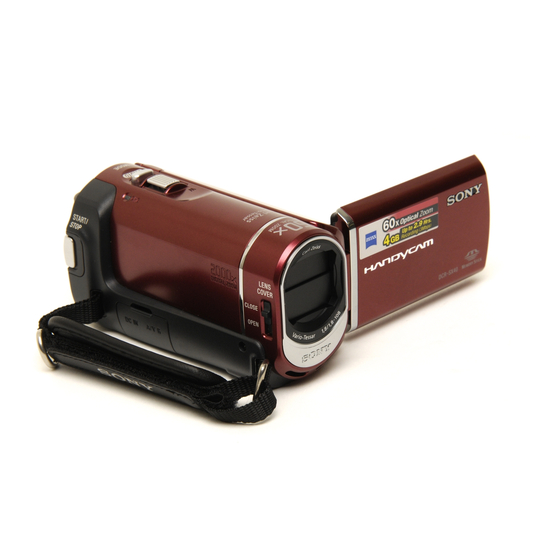
Видеокамера Sony DCR SX45E
 11:38
11:38
Видео камера SONY HanDycam DCR SR65 Легенда против современной экшн камеры Gitup Git 2P
 02:23
02:23
Sony DCR-SX40E проверка камеры на zoom 1
 06:14
06:14
Sony DCR SX40 Review
 08:35
08:35
Videocámara Sony handycam 4GB DCR-SX40
 05:58
05:58
Sony DCR-SX40 : A real test
 06:57
06:57
Sony SX40 Handycam 60x Optical Zoom Demo
 08:12
08:12
Видеокамера — Sony DCR — SX-44E /краткий обзор.
4-132-765-61(1)
DCR-SX30E/SX31E/SX40E/SX41E/SX50E/SX60E
Digital Video Camera Recorder
2009 Sony Corporation
Руководство по эксплуатации
RU
Посібник з експлуатації
UA

Прочтите перед началом работы, Предупреждение, Батарейный блок
Адаптер переменного тока
- Изображение
- Текст
2
RU
Прочтите перед началом работы
Перед началом работы с устройством
внимательно прочитайте данное
руководство и сохраните его для
обращения за справкой в будущем.
ПРЕДУПРЕЖДЕНИЕ
Для уменьшения опасности
возгорания или поражения
электрическим током не подвергайте
аппарат воздействию дождя или
влаги.
Не подвергайте аккумуляторные
батареи воздействию интенсивного
солнечного света, огня или какого-
либо источника излучения.
ПРЕДУПРЕЖДЕНИЕ
Батарейный блок
Неправильное обращение с батарейным
блоком может стать причиной его
взрыва, возгорания, а также химических
ожогов. Соблюдайте следующие меры
предосторожности.
Не разбирайте блок.
Не подвергайте батарейный блок каким бы
то ни было механическим воздействиям:
ударам, падениям или попаданиям под
тяжелые предметы.
Во избежание короткого замыкания не
допускайте контакта металлических
предметов с контактами батарейного блока.
Не допускайте нагрева батарейного
блока до температуры выше 60 °C:
избегайте воздействия на него прямых
солнечных лучей, а также не оставляйте в
припаркованном на солнце автомобиле.
Запрещается сжигать блок или бросать его
в огонь.
Не следует использовать поврежденные и
протекшие литий-ионные батареи.
Для зарядки батарейного блока используйте
оригинальное зарядное устройство Sony или
другое совместимое зарядное устройство.
Храните батарейный блок в недоступном
для детей месте.
Храните батарейный блок в сухом месте.
Замену следует выполнять только на
батарейный блок того же или аналогичного
типа, рекомендованный Sony.
Утилизация использованных батарейных
блоков должна производиться надлежащим
образом в соответствии с инструкциями.
Заменяйте батарею только на батарею
указанного типа. Несоблюдение
этого требования может привести к
возгоранию или получению телесных
повреждений.
Адаптер переменного тока
Не включайте адаптер переменного
тока, когда oн находится в узком месте,
например, между стеной и мебелью.
Подключайте адаптер переменного
тока в ближайшую сетевую розетку.
Немедленно отключите адаптер
переменного тока от розетки, если
возникнет какая-либо неисправность в
работе видеокамеры.
Если видеокамера подключена к
настенной розетке с помощью сeтевого
адаптера, питание от сeти переменного
тока подается, даже когда камера
отключена.
DCR-SX40E/SX41E/SX60E

3
RU
Дата изготовления изделия.
Вы можете узнать дату изготовления
изделия, взглянув на обозначение “P/D:”,
которое находится на этикетке со штрих
кодом картонной коробки.
Знаки, указанные на этикетке со штрих
кодом картонной коробки.
P/D:XX XXXX
1. Месяц изготовления
2. Год изготовления
A-0, B-1, C-2, D-3, E-4, F-5, G-6, H-7,
I-8, J-9.
Дата изготовления литий-ионного
батарейного блока указаны на
боковой стороне или на поверхности с
наклейкой.
5 буквенно-цифровых символов
XXXXX
7: 2007 г.
8: 2008 г.
9: 2009 г.
0: 2010 г.
A: Январь
B: Февраль
C: Март
D: Апрель
E: Май
F: Июнь
G: Июль
H: Август
I: Сентябрь
J: Октябрь
K: Ноябрь
L: Декабрь
ДЛЯ ПОЛЬЗОВАТЕЛЕЙ В ЕВРОПЕ
Примечание для покупателей в странах,
где действуют директивы ЕС
Производителем данного устройства
является корпорация Sony Corporation,
1-7-1 Konan Minato-ku Tokyo, 108-0075
Japan. Уполномоченным представителем
по электромагнитной совместимости
(EMC) и безопасности изделия является
компания Sony Deutschland GmbH,
Hedelfinger Strasse 61, 70327 Stuttgart,
Germany. По вопросам обслуживания
и гарантии обращайтесь по адресам,
указанным в соответствующих
документах.
Внимание
Электромагнитные поля определенных
частот могут влиять на изображение и
звук данного аппарата.
Данное изделие прошло испытания
и соответствует ограничениям,
установленным в Директиве EMC в
отношении соединительных кабелей,
длина которых не превышает 3 метров.
Уведомление
Если статическое электричество или
электромагнитные силы приводят к
сбою в передаче данных, перезапустите
приложение или отключите и снова
подключите коммуникационный кабель
(USB и т.д.).
RU

RU Утилизaция элeктpичecкого и элeктpонного обоpyдовaния…
Страница 4
- Изображение
- Текст
4
RU
Утилизaция элeктpичecкого и
элeктpонного обоpyдовaния
(диpeктивa пpимeняeтcя в
cтpaнax Eвpоcоюзa и дpyгиx
eвpопeйcкиx cтpaнax,
гдe дeйcтвyют cиcтeмы
paздeльного cбоpa отxодов)
Дaнный знaк нa ycтpойcтвe или eго
yпaковкe обознaчaeт, что дaнноe
ycтpойcтво нeльзя yтилизиpовaть
вмecтe c пpочими бытовыми отxодaми.
Eго cлeдyeт cдaть в cоотвeтcтвyющий
пpиeмный пyнкт пepepaботки
элeктpичecкого и элeктpонного
обоpyдовaния.
Heпpaвильнaя yтилизaция дaнного
издeлия можeт пpивecти к потeнциaльно
нeгaтивномy влиянию нa окpyжaющyю
cpeдy и здоpовьe людeй, поэтомy для
пpeдотвpaщeния подобныx поcлeдcтвий
нeобxодимо выполнять cпeциaльныe
тpeбовaния по yтилизaции этого
издeлия.
Пepepaботкa дaнныx мaтepиaлов
поможeт cоxpaнить пpиpодныe pecypcы.
Для полyчeния болee подpобной
инфоpмaции о пepepaботкe этого
издeлия обpaтитecь в мecтныe оpгaны
гоpодcкого yпpaвлeния, cлyжбy cбоpa
бытовыx отxодов или в мaгaзин, гдe
было пpиобpeтeно издeлиe.
Утилизация
использованных элементов
питания (применяется в
странах Евросоюза и других
европейских странах,
где действуют системы
раздельного сбора отходов)
Данный знак на элементе питания
или упаковке означает, что элемент
питания, поставляемый с устройством,
нельзя утилизировать вместе с прочими
бытовыми отходами. Обеспечивая
правильную утилизацию использованных
элементов питания, вы предотвращаете
негативное влияние на окружающую
среду и здоровье людей, возникающее при
неправильной утилизации. Вторичная
переработка материалов, использованных
при изготовлении элементов питания,
способствует сохранению природных
ресурсов. При работе устройств,
для которых в целях безопасности,
выполнения каких-либо действий
или сохранения имеющихся в памяти
устройств данных необходима подача
постоянного питания от встроенного
элемента питания, замену такого
элемента питания следует производить
только в специализированных сервисных
центрах. Для правильной утилизации
использованных элементов питания,
после истечения срока службы, сдавайте
их в соответствующий пункт по
сбору электронного и электрического
оборудования. Об использовании прочих
элементов питания, пожалуйста, узнайте
в разделе, в котором даны инструкции
по извлечению элементов питания из
устройства, соблюдая меры безопасности.
Сдавайте использованные элементы
питания в соответствующие пункты по
сбору и переработке использованных
элементов питания. Для получения более
подробной информации о вторичной
переработке данного изделия или
использованного элемента питания,
пожалуйста, обратитесь в местные
органы городского управления, службу
сбора бытовых отходов или в магазин, где
было приобретено изделие.

Прилагаемые принадлежности, Примечания по эксплуатации, Эксплуатация видеокамеры
О записи
- Изображение
- Текст
RU
Прилагаемые принадлежности
Числа в ( ) обозначают количество
принадлежностей.
Адаптер переменного тока (1)
Кабель питания (1)
A/V соединительный кабель (1)
USB кабель (1)
Аккумуляторный батарейный блок
NP-FH30 (1)
CD-ROM “Handycam Application
Software” (1) (стр. 24)
“PMB” (программное обеспечение),
включая “Руководство по PMB”
“Руководство по Handycam” (PDF)
“Руководство по эксплуатации”
(данное руководство) (1)
Дополнительные сведения о “Memory
Stick”, которые можно использовать с этой
видеокамерой, см. на стр. 38.
Примечания по эксплуатации
Эксплуатация видеокамеры
Видеокамера не защищена от
проникновения пыли, капель или воды. См.
“Меры предосторожности” (стр. 49).
Не выполняйте приведенных ниже
действий, когда горят или мигают
индикаторы (Фильм)/ (Фото) (стр. 12)
или индикатор доступа (стр. 39). Это может
привести к повреждению носителя записи,
потере записанных изображений или
другим неисправностям.
извлечение “Memory Stick PRO Duo”
отсоединение батарейного блока
или адаптера переменного тока от
видеокамеры
При подключении видеокамеры к другому
устройству с помощью кабеля обеспечьте
правильную установку штекерного
разъема. Применение чрезмерной силы при
установке штекера в гнездо может привести
к повреждению гнезда и неполадкам в
работе видеокамеры.
При длительном повторном выполнении
операций записи/удаления изображений на
носителе записи возникает фрагментация
данных. Это исключает возможность
сохранения и записи изображений. В этом
случае сначала сохраните изображения
на внешний носитель, затем выполните
операцию [ФОРМАТ.НОСИТ.] (стр. 36).
Экран ЖКД изготавливается с применением
технологии высокой точности, что
обеспечивает эффективную работу более
99,99% пикселей. Однако на экране ЖКД
могут постоянно отображаться мелкие
черные и/или яркие точки (белого, красного,
синего или зеленого цвета). Появление этих
точек является нормальным следствием
производственного процесса и никак не
влияет на качество записи.
О записи
Перед началом записи проверьте работу
функции записи, чтобы убедиться в том,
что изображение и звук записываются
нормально.
Компенсация за содержание записанных
материалов не выплачивается, даже если
запись или воспроизведение невозможны
по причине неисправности видеокамеры,
носителя записи и т. п.
Системы цветного телевидения различаются
в зависимости от страны/региона.
Для просмотра записей на телевизоре
необходимо использовать телевизор,
поддерживающий систему PAL.
Телевизионные программы, кинофильмы,
видеокассеты и другие материалы могут
быть защищены авторским правом.
Несанкционированная запись таких
материалов может противоречить законам
об авторском праве.

6
RU
Во избежание потери данных изображений
периодически сохраняйте все записанные
изображения на внешнем носителе.
Рекомендуется сохранять данные
изображений на диске, например, на
диске DVD-R, используя для этого
компьютер. Также можно сохранить данные
изображений с помощью устройства
записи DVD, видеомагнитофона или
DVD/HDD-рекордера.
О выборе языка интерфейса
Индикация на экране с сообщениями на
языке той или иной страны используется
для пояснения выполняемых процедур.
При необходимости перед использованием
видеокамеры измените язык экранных
сообщений (стр. 13).
О данном руководстве
Изображения экрана ЖКД, используемые
в данном руководстве для иллюстраций,
сфотографированы с использованием
цифровой фотокамеры и поэтому могут
несколько отличаться от фактически
отображаемых на экране ЖКД данных.
В данном дoкyмeнтe Руководство по
эксплуатации внутренняя память
видеокамеры и “Memory Stick PRO Duo”
называются “носителями записи”.
В данном дoкyмeнтe Руководство по
эксплуатации оба носителя — “Memory Stick
PRO Duo” и “Memory Stick PRO-HG Duo”
— именуются “Memory Stick PRO Duo”.
Документ “Руководство по Handycam”
(PDF) содержится на прилагаемом CD-ROM
(стр. 45).
Моментальные снимки экрана сделаны в
Windows Vista. Экраны могут различаться
в зависимости от операционной системы
компьютера.

Последовательность операций, Запись видеофильмов и фотографий (стр. 14), Сохранение видеофильмов и фотографий на диске
Удаление видеофильмов и фотографий (стр. 36)
- Изображение
- Текст
RU
Последовательность операций
Запись видеофильмов и фотографий
(стр. 14)
При настройке по умолчанию видеофильмы и фотографии
записываются на внутреннюю память.
Можно изменить носитель записи (стр. 37).
Воспроизведение видеофильмов и
фотографий (стр. 18)
Воспроизведение видеофильмов и фотографий на
видеокамере (стр. 18)
Воспроизведение видеофильмов и фотографий на
экране подключенного телевизора (стр. 21)
Сохранение видеофильмов и
фотографий на диске
Сохранение видеофильмов и фотографий на
компьютере (стр. 23)
Создание диска с использованием устройства записи
DVD или рекордера (стр. 30)
Выполняя операции с помощью экрана видеокамеры,
можно создать диск и воспроизвести его на DVDirect
Express, подключив специализированное устройство записи
DVD, DVDirect Express (продается отдельно) к видеокамере.
Удаление видеофильмов и фотографий
(стр. 36)
Можно освободить пространство для записи на внутренней
памяти, удалив с нее видеофильмы и фотографии,
предварительно сохраненные на другом носителе.


Правильное использование видеокамеры, Дополнительная информация
Страница 9
- Изображение
- Текст

10
RU
Начало работы
Шаг 1. Зарядка батарейного блока
Можно зарядить батарейный блок “InfoLITHIUM” (серия H) после его подключения к
видеокамере.
К данной видеокамере нельзя подключать батарейный блок “InfoLITHIUM”, отличающийся от
блока серии H.
1
Выключите видеокамеру, закрыв экран ЖКД.
2
Подсоедините батарейный блок, сдвинув его в направлении стрелки
до щелчка.
3
Подсоедините адаптер переменного тока и шнур питания к
видеокамере и настенной сетевой розетке.
Убедитесь, что метка на штекере DC направлена вниз.
Загорается индикатор CHG (зарядка), и начинается зарядка. Индикатор зарядки
CHG (зарядка) погаснет, когда батарейный блок будет полностью заряжен.
4
По окончании зарядки батареи отключите адаптер переменного тока
от гнезда DC IN видеокамеры.
Батарейный блок
Гнездо
DC IN
Штекер DC
Адаптер переменного тока
Кабель питания
Индикатор CHG
К настенной
сетевой розетке

Комментарии
-
Contents
-
Table of Contents
-
Troubleshooting
-
Bookmarks
Available languages
-
EN
-
ES
Quick Links
DCR-SX40/SX41/SX60
Digital Video Camera Recorder
Operating Guide
Guía de operaciones
2009 Sony Corporation
4-132-764-11(1)
US
ES
Related Manuals for Sony Handycam DCR-SX40
Summary of Contents for Sony Handycam DCR-SX40
-
Page 1
4-132-764-11(1) DCR-SX40/SX41/SX60 Digital Video Camera Recorder Operating Guide Guía de operaciones 2009 Sony Corporation … -
Page 2
Owner’s Record The model and serial numbers are located on the bottom. Record the serial number in the space provided below. Refer to these numbers whenever you call upon your Sony dealer regarding this product. Model No. DCR- Serial No. -
Page 3: Important Safety Instructions
IMPORTANT SAFETY INSTRUCTIONS SAVE THESE INSTRUCTIONS. DANGER — TO REDUCE THE RISK OF FIRE OR ELECTRIC SHOCK, CAREFULLY FOLLOW THESE INSTRUCTIONS. Read these instructions. Keep these instructions. Heed all warnings. Follow all instructions. Do not use this apparatus near water. …
-
Page 4
Representative plug of power supply cord of countries/regions around the world. A Type B Type BF Type B3 Type C Type SE Type O Type (American (British Type) (British Type) (British Type) (CEE Type) (CEE Type) (Ocean Type) Type) The representative supply voltage and plug type are described in this chart. Depend on an area, Different type of plug and supply voltage are used. -
Page 5
Countries/regions Voltage Frequency (Hz) Plug type Vietnam Oceania Countries/regions Voltage Frequency (Hz) Plug type Australia New Zealand 230/240 North America Countries/regions Voltage Frequency (Hz) Plug type Canada Central America Countries/regions Voltage Frequency (Hz) Plug type Bahamas 120/240 Costa Rica Cuba 110/220 Dominican (rep) El Salvador… -
Page 6: Read This First
Lithium-Ion batteries. Be sure to charge the battery pack using a genuine Sony battery charger or a device that Battery pack can charge the battery pack. This device complies with Part 15 of the Keep the battery pack out of the reach of small …
-
Page 7: Declaration Of Conformity
If you have any questions about this installation. If this equipment does cause product, you may call: harmful interference to radio or television Sony Customer Information Center reception, which can be determined by 1-800-222-SONY (7669). turning the equipment off and on, the…
-
Page 8
TV color systems differ depending on the Notes on use country/region. To view your recordings on a TV, you need an NTSC system-based TV. Using the camcorder Television programs, films, video tapes, The camcorder is not dustproofed, dripproofed … -
Page 9: Operation Flow
Operation flow Recording movies and photos (p. 16) In the default settings, movies and photos are recorded on the internal memory. You can change the recording media (p. 37). Playing movies and photos (p. 20) Playing movies and photos on your camcorder (p. 20) Playing movies and photos on a connected TV (p.
-
Page 10: Table Of Contents
Table of contents IMPORTANT SAFETY INSTRUCTIONS…………. 3 Read this first.
-
Page 11
Making good use of your camcorder Deleting movies and photos…………..36 Coping with shooting conditions. -
Page 12: Getting Started
Getting started Step 1: Charging the battery pack CHG lamp DC plug DC IN jack To the wall outlet AC Adaptor (wall socket) Battery pack Power cord (Mains lead) You can charge the “InfoLITHIUM” battery pack (H series) after attaching it to your camcorder.
-
Page 13: Charging The Battery Pack Abroad
When your camcorder is on, you can check the approximate amount of remaining battery power with the remaining battery indicator at the upper left on the LCD screen. To remove the battery pack Close the LCD screen. Slide the BATT (battery) release lever and remove the battery pack .
-
Page 14: Step 2: Turning The Power On, And Setting The Date And Time
Step 2: Turning the power on, and setting the date and time Open the LCD screen of your camcorder. Your camcorder is turned on. To turn on your camcorder when the LCD screen is open, press POWER. POWER button (Movie): To record movies (Photo): To record photos Select the desired geographical area with…
-
Page 15: Changing The Language Setting
To turn off the power Close the LCD screen. The (Movie) lamp flashes for a few seconds and the power is turned off. POWER button You can turn off your camcorder also by pressing POWER. When [POWER ON BY LCD] (p. 42) is set to [OFF], turn off your camcorder by pressing POWER. …
-
Page 16: Recording
Recording Recording Recording movies In the default setting, movies are recorded on the internal memory (p. 37). Fasten the grip belt. Open the lens cover. Open the LCD screen of your camcorder. Your camcorder is turned on. To turn on your camcorder when the LCD screen is already open, press POWER (p.
-
Page 17
Press START/STOP to start recording. START/STOP button Power zoom lever Wide Telephoto [STBY] [REC] To stop recording, press START/STOP again. You can magnify images with the power zoom lever. Move the power zoom lever slightly for a slower zoom. -
Page 18
Shooting photos In the default setting, photos are recorded on the internal memory (p. 37). Open the lens cover. Open the LCD screen of your camcorder. Your camcorder is turned on. To turn on your camcorder when the LCD screen is already open, press POWER (p. 14). … -
Page 19: Recording And Playing Movies And Photos Easily
Press PHOTO lightly to adjust the focus, then press it fully. Power zoom lever Wide Telephoto Flashes Lights up When disappears, the photo is recorded. Move the power zoom lever slightly for a slower zoom. Move it further for a faster zoom. …
-
Page 20: Playback
Playback Playback .on.the.camcorder In the default setting, movies and photos on the internal memory are played (p. 37). Playing movies Open the LCD screen of your camcorder. Your camcorder is turned on. To turn on your camcorder when the LCD screen is already open, press POWER (p. 14). …
-
Page 21
Your camcorder starts playing the selected movie. Previous Next Volume adjustment OPTION MENU To stop To fast-forward To fast-reverse To pause/play When playback from the selected movie reaches the last movie, the screen returns to the VISUAL INDEX screen. Touch during pause to play back movies slowly. -
Page 22
Your camcorder displays the selected photo. Previous To start/stop slide show Next To the VISUAL OPTION MENU INDEX screen You can zoom in the photo by moving the power zoom lever while viewing photos (PB ZOOM). If you touch a point in the PB ZOOM frame, the point comes to the center in the frame. When viewing photos recorded on “Memory Stick PRO Duo”… -
Page 23: Playing Images On A Tv
Playing images on a TV Connect your camcorder to the input jack of a TV or VCR using the A/V connecting cable or an A/V connecting cable with S VIDEO . Connect your camcorder to the wall outlet (wall socket) using the supplied AC Adaptor for this operation (p. 13). Refer also to the instruction manuals supplied with the devices to be connected.
-
Page 24: Saving Movies And Photos With A Computer
Unrewritable To process photos using a Macintosh DVD-RW/DVD+RW: computer connected to your camcorder, Rewritable see the following website. http://guide.d-imaging.sony.co.jp/mac/ Step 1 Checking the computer ms/us/ system Step 2 Installing the supplied Microsoft Windows XP SP3 /Windows Vista software “PMB”…
-
Page 25
See page 44 on the “Handycam Handbook”. Confirm that your camcorder is not connected to the computer. The [USB SELECT] screen appears on Turn on the computer. the camcorder screen automatically. Log on as an Administrator for … -
Page 26: Creating A Disc With One Touch (One Touch Disc Burn)
Creating a disc with one touch (One Touch Disc Burn) When the installation is completed, following icons will appear. You can save movies and photos on a disc Remove the CD-ROM from your by simply pressing (DISC BURN) computer. on your camcorder. Movies and photos recorded on your camcorder that have not yet been saved with One Touch Disc Burn can be saved on a disc automatically.
-
Page 27: Importing Movies And Photos To A Computer (Easy Pc Back-Up)
Importing movies and photos to a computer (Easy PC Back-up) Follow the instructions on the Movies and photos recorded on your computer screen. camcorder that have not yet been saved with Easy PC Back-up can be imported to a computer automatically. Turn on the computer beforehand.
-
Page 28: Changing The Destination Drive Or Folder For Movies And Photos
If the icon is not displayed on the computer screen, click [Start] [All Programs] [Sony Picture Utility] [PMB] to start “PMB. ” You can view, edit, or create discs of movies Movies and photos are imported to and photos using “PMB.
-
Page 29: Creating A Disc
You can copy a recorded disc to another automatically, shut it down. disc using “Video Disc Copier. ” Click [Start] [All Programs] [Sony Double-click the “PMB” short-cut Picture Utility] [Video Disc Copier] icon on the computer screen to to start the software.
-
Page 30: Saving Images With A Dvd Writer, Recorder
12cm DVD+R The device does not support two-layered discs. tray on the DVD writer opens and you Sony DVD writer may not be available in some can remove the disc. countries/regions. You can also operate with (DISC …
-
Page 31
To create a disc with the selected To play back a disc on the DVD writer images To dub a desired image onto the disc or to create many of the same discs, perform this operation. Touch [DISC BURN OPTION] in step 3 above. … -
Page 32
If the total memory size of movies to be burnt by the DISC BURN operation exceeds that of the disc, disc creation stops when the limit is reached. The last movie on the disc may be cut off. Disc creation time to dub movies to the limit of … -
Page 33: Creating A Disc With A Dvd Writer, Etc., Other Than Dvdirect Express
Connect your camcorder to the wall outlet (wall socket) using the supplied AC Adaptor for this Disconnect the USB cable. operation (p. 13). Sony DVD writer may not be available in some countries/regions. Turn on your camcorder, and connect a DVD writer, etc., to the …
-
Page 34: Creating A Disc With A Recorder, Etc
Connector camcorder to a disc or video cassette, by connecting your camcorder to a disc recorder, a Sony DVD writer other than DVDirect Express, ect., with the A/V connecting cable. Connect the device in either way of or . Refer also to the instruction manuals supplied with the devices to be connected.
-
Page 35: Your Camcorder
A/V connecting cable to the video input jack, and the white (left channel) or the red (right channel) plug to the audio input jack on the device. Sony DVD writer may not be available in some countries/regions.
-
Page 36: Making Good Use Of Your Camcorder
Making good use of your camcorder Deleting movies and photos Formatting the recording media You can free media space by deleting Formatting deletes all the movies and movies and photos from recording media. photos to recover recordable free space. Select the recording medium that contains Connect your camcorder to the wall outlet (wall …
-
Page 37: Coping With Shooting Conditions
Coping with shooting Changing the conditions recording media A wide variety of settings and adjustment You can select the internal memory or options are available on the menu (p. 40). “Memory Stick PRO Duo” media as the recording, playback, or editing medium on Adjusting the exposure for backlit your camcorder.
-
Page 38: To Check The Recording Media Settings
Types of “Memory Stick” media you can Selecting the recording media for use with your camcorder photos For recording movies, it is recommended that you use “Memory Stick PRO Duo” media of (HOME) Touch 512MB or larger marked with: (MANAGE MEDIA) …
-
Page 39
Touch [YES]. To record only photos on “Memory Stick PRO Duo” media, touch [NO]. If [Failed to create a new Image Database File. It may be possible that there is not enough free space.] is displayed in step 2, format the “Memory Stick PRO Duo”… -
Page 40: Customizing Your Camcorder With Menus
Customizing your camcorder with menus Menu items are described in more details with Using the HELP function color photos in the “Handycam Handbook” (p. 44). To see the descriptions on the HOME MENU, touch (HELP) on the HOME Using the HOME MENU MENU screen.
-
Page 41
List of the HOME MENU (CAMERA) category MOVIE ……… p. 16 PHOTO ……..p. 18 (VIEW IMAGES) category VISUAL INDEX ……p. 20 FILM ROLL ……p. 20 FACE……..p. 20 PLAYLIST……..Displays and plays a movie playlist. (OTHERS) category DELETE DELETE …… -
Page 42
MEDIA FORMAT ……. p. 36 REPAIR IMG.DB F…… p. 46 (SETTINGS) category MOVIE SETTINGS REC MODE……Sets the mode to record movies. When recording fast moving subjects, a high image quality, such as [HQ], is recommended. WIDE SELECT….Sets the horizontal to vertical ratio when recording movies. DIGITAL ZOOM …. -
Page 43
List of the OPTION MENU The following items are available on the OPTION MENU only. SPOT MTR/FCS….Adjusts the brightness and focus for the seleted subject simultaneously. SPOT METER ….Adjusts the brightness of images to a subject you touch on the screen. SPOT FOCUS …. -
Page 44: Getting Detailed Information From The «Handycam Handbook
Getting detailed information from the “Handycam To view the “Handycam Handbook, ” Handbook” double-click the short-cut icon on the computer screen. The “Handycam Handbook” is a user guide designed to be read on a computer screen. The functions of your camcorder are described, some of them with color photos.
-
Page 45: Additional Information
However, The recording media is full. Delete your Sony dealer will neither copy nor retain unnecessary images (p. 36). your data. The total number of movie scenes or photos See the “Handycam Handbook”…
-
Page 46
(p. 36), or format the have tried to fix a couple of times, contact “Memory Stick PRO Duo” media (p. 36) after your Sony dealer or local authorized Sony storing the images on other media. service facility. The Image Database File is damaged. Check … -
Page 47: Precautions
casing, unplug your camcorder and have it dirty, it is recommended that you use a soft checked by a Sony dealer before operating it cloth to clean it. When you use the LCD any further. Cleaning Kit (sold separately), do not apply the Avoid rough handling, disassembling, …
-
Page 48
Using chemicals such as thinner, benzine, Note on disposal/transfer of the alcohol, chemical cloths, repellent, insecticide camcorder and sunscreen Even if you perform [MEDIA FORMAT] (p. 36) Handling the camcorder with above or formatting, some data might not be entirely substances on your hands deleted from the internal memory. -
Page 49: Specifications
Specifications System LCD screen Signal format: NTSC color, EIA standards Picture: 6.7 cm (2.7 type, aspect ratio 16:9) Movie recording format Total number of pixels: 123 200 (560 × 220) Video: MPEG2-PS General Audio: Dolby Digital 2ch Power requirements: DC 6.8 V/7.2 V (battery Dolby Digital Stereo Creator pack) DC 8.4 V (AC Adaptor) Photo file format…
-
Page 50
The number in ( ) is the minimum recordable time. Recording condition: Recording mode [SP] A Sony “Memory Stick PRO Duo” media is Typical recording time shows the time when you repeat recording start/stop, switching the used. -
Page 51
Stick PRO-HG Duo, ” “ , ” “Memory Stick Micro, ” “MagicGate, ” “ , ” “MagicGate Memory Stick” and “MagicGate Memory Stick Duo” are trademarks or registered trademarks of Sony Corporation. “InfoLITHIUM” is a trademark of Sony Corporation. -
Page 52: Screen Indicators
Screen indicators Upper left Center Upper right Indicator Meaning Approximate number of 9999 recordable photos and 9999 recording media Playback folder Current playing movie or 100/112 photo/Number of total recorded movies or photos Bottom Bottom Upper left Indicator Meaning Indicator Meaning Face Index HOME button…
-
Page 53: Parts And Controls
Parts and controls Figures in ( ) are reference pages. Grip belt (16) Hook for a shoulder belt DC IN jack (12) A/V Remote Connector (23, 34) LCD screen/Touch panel (14) Lens (Carl Zeiss lens) If you rotate the LCD panel 180 degrees, you …
-
Page 54: Operation Flow
Index A/V connecting cable…23, 34 Macintosh ……..24 USB ………24, 30 Maintenance ……..47 Using a wall outlet (wall socket) as a power source ……13 “Memory Stick” media ….38 Backlight ……..37 “Memory Stick PRO-HG Duo” Battery ……….12 media ……….38 VISUAL INDEX ……20 “Memory Stick PRO Duo”…
-
Page 56
No la incinere ni la arroje al fuego. No manipule baterías de iones de litio dañadas o que presenten fugas. Asegúrese de cargar la batería con un cargador de baterías original de Sony o con un dispositivo que pueda cargarla. -
Page 57
Si graba o elimina imágenes repetidamente Elementos suministrados durante mucho tiempo, los datos del soporte de grabación se fragmentarán. Las imágenes no se Los números entre ( ) indican la cantidad pueden guardar ni grabar. En tal caso, guarde suministrada. -
Page 58: Acerca De Este Manual
Acerca del cambio del ajuste de idioma Para ilustrar los procedimientos operativos se utilizan indicaciones en pantalla en cada idioma local. Si es necesario, cambie el idioma de la pantalla antes de utilizar la videocámara (pág. 11). Acerca de este manual Las imágenes de la pantalla de cristal líquido …
-
Page 59: Flujo De Funcionamiento
Flujo de funcionamiento Grabación de películas y fotografías (pág. 12) En la configuración predeterminada, las películas y las fotografías se graban en la memoria interna. Es posible cambiar el soporte de grabación (pág. 34). Reproducción de películas y fotografías (pág.
-
Page 60
Tabla de contenido Lea este apartado en primer lugar…………..2 Flujo de funcionamiento.. -
Page 61
Utilización correcta de la videocámara Eliminación de películas y fotografías…………33 Copia con condiciones de filmación.. -
Page 62: Procedimientos Iniciales
Procedimientos iniciales Paso 1: Carga de la batería Indicador CHG Clavija de cc Toma DC IN Al tomacorriente de Adaptador de alimentación de ca pared Batería Cable de alimentación Puede cargar la batería “InfoLITHIUM” (serie H) después de instalarla en la videocámara. No es posible conectar ninguna batería “InfoLITHIUM”…
-
Page 63: Carga De La Batería En El Extranjero
Para extraer la batería Cierre la pantalla de cristal líquido. Deslice la palanca de desbloqueo BATT (batería) y extraiga la batería . Para utilizar un tomacorriente de pared como fuente de alimentación Realice las mismas conexiones que se indican en el apartado “Paso 1: Carga de la batería”. Notas sobre la batería y el adaptador de alimentación de ca Antes de extraer la batería o de desconectar el adaptador de alimentación de ca cierre la pantalla de cristal …
-
Page 64: Paso 2: Encendido Y Ajuste De La Fecha Y La Hora
Paso 2: Encendido y ajuste de la fecha y la hora Abra la pantalla de cristal líquido de la videocámara. La videocámara se enciende. Para encender la videocámara cuando la pantalla de cristal líquido está abierta, presione POWER. Botón POWER (película): para grabar películas (fotografía): para grabar fotografías Seleccione la zona geográfica deseada con…
-
Page 65: Cambio Del Ajuste De Idioma
Para apagar la videocámara Cierre la pantalla de cristal líquido. El indicador (película) parpadea durante unos segundos y la videocámara se apaga. Botón POWER También puede apagar la videocámara al presionar POWER. Si ajusta [ENCEND.CON LCD] (pág. 40) en [DESACTIV.], presione POWER para apagar la …
-
Page 66: Grabación
Grabación Grabación Grabación de películas En el ajuste predeterminado, las películas se graban en la memoria interna (pág. 34). Ajuste la correa de sujeción. Abra la tapa del objetivo. Abra la pantalla de cristal líquido de la videocámara. La videocámara se enciende.
-
Page 67
Presione START/STOP para iniciar la grabación. Palanca del Botón START/STOP zoom motorizado Gran Teleobjetivo angular [ESPERA] [GRAB.] Para detener la grabación, presione de nuevo START/STOP. Es posible ampliar imágenes mediante la palanca del zoom motorizado. Mueva la palanca del zoom … -
Page 68
Captura de fotografías En el ajuste predeterminado, las fotografías se graban en la memoria interna (pág. 34). Abra la tapa del objetivo. Abra la pantalla de cristal líquido de la videocámara. La videocámara se enciende. Para encender la videocámara cuando la pantalla de cristal líquido ya está abierta, presione … -
Page 69: Grabación Y Reproducción Sencilla De Películas Y Fotografías
Presione PHOTO levemente para ajustar el enfoque y luego presiónelo completamente. Palanca del zoom motorizado Gran Teleobjetivo angular Parpadea Se enciende Cuando desaparece, se graba la fotografía. Mueva la palanca del zoom motorizado levemente para obtener un zoom más lento. Muévala más …
-
Page 70: Reproducción
Reproducción Reproducción .en.la.videocámara En el ajuste predeterminado, se reproducen las películas y fotografías almacenadas en la memoria interna (pág. 34). Reproducción de películas Abra la pantalla de cristal líquido de la videocámara. La videocámara se enciende. Para encender la videocámara cuando la pantalla de cristal líquido ya está abierta, presione …
-
Page 71
La videocámara comenzará a reproducir la película seleccionada. Anterior Siguiente Ajuste del volumen OPTION MENU Detención Avance rápido Rebobinado rápido Pausa/reproducción Cuando la reproducción desde la película seleccionada llega a la última película, vuelve a mostrarse la pantalla VISUAL INDEX. Toque durante la pausa para reproducir la película en cámara lenta. -
Page 72
La videocámara muestra la fotografía seleccionada. Permite iniciar o detener una presentación de Anterior diapositivas Siguiente Permite visualizar la OPTION MENU pantalla VISUAL INDEX Para acercar una fotografía, mueva la palanca del zoom motorizado mientras visualiza fotografías (PB ZOOM). Si toca un punto en el marco de PB ZOOM, el punto aparece en el centro del marco. Si visualiza fotografías grabadas en un “Memory Stick PRO Duo”, aparece (carpeta de … -
Page 73: Reproducción De Imágenes En Un Televisor
Reproducción de imágenes en un televisor Conecte la videocámara a la toma de entrada de un televisor o una videograbadora mediante el cable de conexión de A/V o un cable de conexión de A/V con S VIDEO . Conecte la videocámara al tomacorriente de pared con el adaptador de alimentación de ca suministrado para esta operación (pág.
-
Page 74
Reproduzca películas y fotografías en la videocámara (pág. 16). (HOME) Para ajustar el formato según el televisor conectado (panorámico/4:3) toque (AJUSTES) [AJUSTES SALIDA] [TIPO TV] [16:9] o [4:3] … -
Page 75: Grabación De Películas Y Fotografías Con Una Computadora
Macintosh conectada a la videocámara, consulte el siguiente sitio Web. Microsoft Windows XP SP3 /Windows Vista http://guide.d-imaging.sony.co.jp/mac/ ms/es/ Intel Pentium III: 1 GHz o más veloz Aplicación DirectX 9.0c o posterior (este producto se basa en la tecnología DirectX. Es necesario tener DirectX instalado).
-
Page 76
Paso 2 Instalación del software Haga clic en [Instalar]. suministrado “PMB” Instale “PMB” antes de conectar la videocámara a la computadora. Si ya tiene instalada una versión de “PMB” suministrada con otro dispositivo, revise la versión. (El número de versión aparece al hacer clic en [Ayuda] — [Acerca de PMB]). -
Page 77
Haga clic en [Continuar] en la Para desconectar la videocámara de la computadora pantalla de la computadora. Haga clic en el icono que se Lea con atención los términos encuentra en la parte inferior del acuerdo de licencia. Si está de derecha del escritorio de la acuerdo con los términos, cambie computadora … -
Page 78: Creación De Un Disco Con Un Solo Toque (One Touch Disc Burn)
Creación de un disco con un solo toque (One Touch Disc Burn) Puede guardar películas y fotografías en un Presione (DISC BURN). disco con solo presionar el botón (DISC BURN) de la videocámara. Las películas y fotografías grabadas en la videocámara que todavía no se hayan guardado con One Touch Disc Burn se pueden grabar en un disco automáticamente.
-
Page 79: Importación De Películas Y Fotografías A Una Computadora (Easy Pc Back-Up)
Importación de películas y fotografías a una computadora (Easy PC Back-up) En la pantalla de la computadora, haga clic en [Easy PC Back-up] Las películas y fotografías grabadas [Importar]. en la videocámara que todavía no se hayan guardado con Easy PC Back-up se pueden importar a una computadora automáticamente.
-
Page 80: Inicio De Pmb (Picture Motion Browser)
[Inicio] [Todos Si algún programa de software que no sea los programas] [Sony Picture Utility] “PMB” se inicia automáticamente, ciérrelo. [PMB] para iniciar “PMB”. Puede ver, editar o crear discos de películas Haga doble clic en el icono de y fotografías usando “PMB”.
-
Page 81: Copia De Un Disco
Es posible copiar un disco grabado en otro disco mediante “Video Disc Copier”. Haga clic en [Inicio] [Todos los programas] [Sony Picture Utility] [Video Disc Copier] para iniciar el software. Consulte la ayuda de “Video Disc Copier” para obtener información…
-
Page 82: Almacenamiento De Imágenes Con Una Grabadora De Dvd
El dispositivo no es compatible con discos de doble capa. Presione (DISC BURN) en la Es posible que la grabadora de DVD de Sony grabadora de DVD. no se encuentre disponible en algunos países Las películas grabadas en la memoria o regiones.
-
Page 83
Si toca la fecha, podrá buscar las imágenes por fecha. Cuando finalice la operación, [SÍ] en la pantalla de la Toque [FIN] en la pantalla toque videocámara. de la videocámara. La bandeja de discos de la grabadora de DVD se abre después de crear el disco. -
Page 84
Reproduzca el disco creado para asegurarse de suministrado para esta operación (pág. 9). que la copia se realizó correctamente antes de Es posible que la grabadora de DVD de Sony eliminar las películas de la videocámara. no se encuentre disponible en algunos países Si aparece [Se produjo un error.] o [Error al… -
Page 85: Creación De Un Disco Con Una Grabadora, Etc
[ CONEXIÓN USB] si de DVD de Sony que no sea DVDirect las graba en un “Memory Stick Express, etc. con el cable de conexión de PRO Duo”.
-
Page 86
(canal derecho) en la toma de entrada de de conexión de A/V con S VIDEO audio del dispositivo. (se vende por separado). Es posible que la grabadora de DVD de Sony Conecte la videocámara a las tomas de … -
Page 87: Utilización Correcta De La Videocámara
Utilización correcta de la videocámara Eliminación de películas y fotografías Formateo de los soportes de grabación Puede liberar espacio en el soporte de grabación si borra películas y fotografías El formateo borra todas las películas y almacenadas en él. fotografías para recuperar espacio libre Seleccione el soporte de grabación grabable.
-
Page 88: Copia Con Condiciones De Filmación
Copia con condiciones Cambio del soporte de de filmación grabación En el menú existe una amplia variedad Puede seleccionar la memoria interna o el de opciones de ajustes y configuración “Memory Stick PRO Duo” como soporte (pág. 36). de grabación, reproducción o edición en la videocámara.
-
Page 89: Para Comprobar Los Ajustes Del Soporte De Grabación
Tipos de “Memory Stick” que pueden Selección del soporte de grabación utilizarse con la videocámara para las fotos Para grabar películas, se recomienda utilizar un “Memory Stick PRO Duo” de 512 MB o (HOME) Toque de capacidad superior con una de las marcas (GESTIONAR SOPORTE) …
-
Page 90: Copia De Películas Y Fotografías De La Memoria Interna En Un
Personalización de la videocámara mediante los menús Toque [SÍ]. Los elementos de menú se describen con más detalles y fotografías en color en la “Guía Para grabar solamente fotos en un “Memory Stick PRO Duo”, toque [NO]. práctica de Handycam”…
-
Page 91: Uso De La Función Help
Toque la ficha deseada el Cuando finalice el ajuste, toque elemento cuyo ajuste desea cambiar. Si el elemento no aparece en la pantalla, toque Elemento de menú Para volver a la pantalla anterior, toque Para ocultar la pantalla HOME MENU, …
-
Page 92
Lista del HOME MENU Categoría (TOMA DE IMÁGENES) PELÍCULA ……..pág. 12 FOTO ……….pág. 14 Categoría (VISUALIZAR IMÁGENES) VISUAL INDEX ……pág. 16 ROLLO PELÍC……. pág. 16 CARA ……..pág. 16 PLAYLIST……..Permite visualizar y reproducir una playlist de películas. Categoría (OTROS) BORRAR… -
Page 93
Categoría (GESTIONAR SOPORTE) AJ.SOPORTE PEL….. pág. 34 AJ.SOPORTE FOTO ….pág. 35 INFO SOPORTE ……Permite visualizar información sobre el soporte de grabación como, por ejemplo, el espacio libre. FORMAT.SOPORTE ….pág. 33 REP.ARCH.BD.IM…… pág. 43 Categoría (AJUSTES) AJUSTES PEL.CÁM MODO GRAB. -
Page 94
AJ.REL./IDIOM. AJUS.RELOJ …… pág. 10 AJUS.ZONA …… pág. 10 HORA VERANO ….pág. 10 ..pág. 11 AJUSTE IDIOMA AJUST.GENERALES MODO DEMO….Permite establecer si debe mostrarse la demostración. CALIBRACIÓN ….Permite calibrar el panel táctil. APAGADO AUTO …. Permite cambiar el ajuste de [APAGADO AUTO] (pág. 9). ENCEND.CON LCD .. -
Page 95: Obtención De Información Detallada En La «Guía Práctica De Handycam
Obtención de información detallada en la “Guía práctica de Handycam” Haga clic en [Exit] [Exit] y, a continuación, extraiga el La “Guía práctica de Handycam” es una CD-ROM de la computadora. guía de usuario diseñada para leerse en la pantalla de una computadora.
-
Page 96: Información Complementaria
Al presionar START/STOP o PHOTO no se problema. Sin embargo, el distribuidor de Sony graban las imágenes. no copiará ni conservará sus datos. Presione MODE para encender el indicador …
-
Page 97
La videocámara requiere una reparación. Póngase en contacto con su distribuidor de Sony o con el centro de servicio técnico local Se restringió el acceso al “Memory Stick PRO autorizado de Sony. Indíquele el código de 5 … -
Page 98: Precauciones
Si dentro de la videocámara entra algún objeto o líquido, desconéctela y haga que la revise un distribuidor de Sony antes de volver a utilizarla. Evite manipular, desmontar o modificar la videocámara bruscamente y exponerla a golpes o impactos como martillazos, caídas o…
-
Page 99
Póngase en contacto con un centro de servicio la unidad con un paño suave y seco. técnico local autorizado de Sony. No realice ninguna de las acciones siguientes Límpiese con agua cualquier líquido que haya … -
Page 100: Especificaciones
Especificaciones de pared a través del adaptador de alimentación Sistema de ca o cuando tiene la batería insertada. La Formato de la señal: color NTSC, estándares EIA batería recargable se descargará completamente Formato de grabación de películas transcurridos aproximadamente 3 meses si Video: MPEG2-PS Audio: Dolby Digital de 2 canales, no utiliza la videocámara en absoluto.
-
Page 101
El diseño y las especificaciones de la videocámara Pantalla de cristal líquido y los accesorios están sujetos a modificaciones sin Imagen: 6,7 cm (tipo 2,7, formato 16:9) previo aviso. Número total de píxeles: 123 200 (560 × 220) Fabricado bajo licencia de Dolby Laboratories. … -
Page 102: Marcas Comerciales
Intel Corporation o de sus subsidiarias en los Se usa un “Memory Stick PRO Duo” de Sony. Estados Unidos y otros países. El tiempo de grabación variará en función …
-
Page 103: Indicadores De La Pantalla
Indicadores de la pantalla Parte superior Parte superior Indicador Significado izquierda Parte central derecha DESVANECEDOR Número aproximado de 9999 fotografías que se pueden grabar y soporte de 9999 grabación Carpeta de reproducción Película o imagen en reproducción/número 100/112 Parte inferior total de películas o imágenes grabadas Parte superior izquierda…
-
Page 104: Piezas Y Controles
Piezas y controles Los números entre ( ) corresponden a las Botón START/STOP (13) páginas de referencia. Correa de sujeción (12) Gancho para la bandolera Toma DC IN (8) Conector remoto de A/V (19, 32) …
-
Page 105: Índice
Índice Tipo TV ……..20 Trípode ………34 Ajuste de la fecha y la hora ..10 HOME MENU ……36, 38 Unidad o carpeta de destino ..25 Batería ……….8 Idioma ……….11 USB ………21, 28 BORRAR ……..33 Indicadores de advertencia ..43 Indicadores de la pantalla ..49 Instalación ……..21 VISUAL INDEX ……16 Cable de conexión de A/V…
-
Page 108
Additional information on this product and answers to frequently asked questions can be found at our Customer Support Website. http://www.sony.net/ Printed on 70% or more recycled paper using VOC (Volatile Organic Compound)- free vegetable oil based ink. Printed in China…
инструкцияSony DCR-SX40E

Содержание Полезные приемы записи Алфавитный указатель
Щелкните
Руководство по Handycam
DCR-SX30E/SX31E/SX40E/SX41E/SX50E/
SX60E
2009 Sony Corporation 4-132-762-91(1)
RU
Посмотреть инструкция для Sony DCR-SX40E бесплатно. Руководство относится к категории Видеокамеры, 1 человек(а) дали ему среднюю оценку 8.6. Руководство доступно на следующих языках: русский. У вас есть вопрос о Sony DCR-SX40E или вам нужна помощь? Задайте свой вопрос здесь
- Использование Руководство по Handycam
- Начало работы
- Запись/воспроизведение
- Редактирование
- Использование носителя записи
- Настройка видеокамеры
- Устранение неполадок
- Дополнительная информация
Нужна помощь?
У вас есть вопрос о Sony а ответа нет в руководстве? Задайте свой вопрос здесь Дай исчерпывающее описание проблемы и четко задайте свой вопрос. Чем детальнее описание проблемы или вопроса, тем легче будет другим пользователям Sony предоставить вам исчерпывающий ответ.
Галина • 9-10-2022Нет комментариев
Где можно достать карту памяти
Ответить на вопрос
Количество вопросов: 1

Главная
| Sony | |
| DCR-SX40E | |
| Видеокамера | |
| русский | |
| Руководство пользователя (PDF) |
Не можете найти ответ на свой вопрос в руководстве? Вы можете найти ответ на свой вопрос ниже, в разделе часто задаваемых вопросов о Sony DCR-SX40E.
Что такое мегапиксель?
Что означает аббревиатура MП?
Инструкция Sony DCR-SX40E доступно в русский?
Не нашли свой вопрос? Задайте свой вопрос здесь
Нет результатов

Sony Handycam DCR-SX30E
инструкция219 страниц(ы)

Sony DCR-SX45E
инструкция265 страниц(ы)

Sony DCR-HC40E
инструкция312 страниц(ы)

Sony DCR-SX44E
инструкция271 страниц(ы)

Sony HDR-CX405
инструкция155 страниц(ы)

Sony HDR-CX240E
инструкция351 страниц(ы)

Sony DCR-SX34E
инструкция271 страниц(ы)

Sony DCR-HC51E
инструкция88 страниц(ы)

Sony DCR-HC17E
инструкция100 страниц(ы)

Sony DCR-SX43E
инструкция271 страниц(ы)
Посмотреть все Sony руководства Посмотреть все Sony Видеокамера руководства
Скачать
4-132-764-11(1)
DCR-SX40/SX41/SX60
Digital Video Camera Recorder
2009 Sony Corporation
Operating Guide
US
Guía de operaciones
ES
Краткое содержание страницы № 1
4-132-764-11(1)
DCR-SX40/SX41/SX60
Digital Video Camera Recorder
Operating Guide US
Guía de operaciones ES
2009 Sony Corporation
Краткое содержание страницы № 2
Owner’s Record The model and serial numbers are located on the bottom. Record the serial number in the space provided below. Refer to these numbers whenever you call upon your Sony dealer regarding this product. Model No. DCR- Serial No. Model No. AC- Serial No. WARNING To reduce fire or shock hazard, do not expose the unit to rain or moisture. Do not expose the batteries to excessive heat such as sunshine, fire or the like. This symbol is intended to alert the user to the presence of u
Краткое содержание страницы № 3
IMPORTANT SAFETY INSTRUCTIONS SAVE THESE INSTRUCTIONS. DANGER — TO REDUCE THE RISK OF FIRE OR ELECTRIC SHOCK, CAREFULLY FOLLOW THESE INSTRUCTIONS.
=> Read these instructions.
=> Keep these instructions.
=> Heed all warnings.
=> Follow all instructions.
=> Do not use this apparatus near water.
=> Clean only with dry cloth.
=> Do not block any ventilation openings. Install in accordance with the manufacturer’s instructions.
=> Do not install near any heat sources such as radiators, heat registers, st
Краткое содержание страницы № 4
Representative plug of power supply cord of countries/regions around the world. A Type B Type BF Type B3 Type C Type SE Type O Type (American (British Type) (British Type) (British Type) (CEE Type) (CEE Type) (Ocean Type) Type) The representative supply voltage and plug type are described in this chart. Depend on an area, Different type of plug and supply voltage are used. Attention: Power cord meeting demands from each country shall be used. For only the United States Use a UL Listed, 1
Краткое содержание страницы № 5
Countries/regions Voltage Frequency (Hz) Plug type Vietnam 220 50 A/C Oceania Countries/regions Voltage Frequency (Hz) Plug type Australia 240 50 O New Zealand 230/240 50 O North America Countries/regions Voltage Frequency (Hz) Plug type Canada 120 60 A USA 120 60 A Central America Countries/regions Voltage Frequency (Hz) Plug type Bahamas 120/240 60 A Costa Rica 110 60 A Cuba 110/220 60 A/C Dominican (rep) 110 60 A El Salvador 110 60 A Guatemala 120 60 A Honduras 110 60 A Jamaica 110 50 A Mexic
Краткое содержание страницы № 6
Read this first Before operating the unit, please read this Even if your camcorder is turned off, AC manual thoroughly, and retain it for future power source (mains) is still supplied to reference. it while connected to the wall outlet (wall socket) via the AC Adaptor. CAUTION For customers in the U.S.A. and CANADA Battery pack RECYCLING LITHIUM-ION BATTERIES If the battery pack is mishandled, the battery pack can burst, cause a fire or even Lithium-Ion batteries are chemical burns. Observ
Краткое содержание страницы № 7
If you have any questions about this installation. If this equipment does cause product, you may call: harmful interference to radio or television Sony Customer Information Center reception, which can be determined by 1-800-222-SONY (7669). turning the equipment off and on, the The number below is for the FCC related user is encouraged to try to correct the matters only. interference by one or more of the following measures: Regulatory Information Reorient or relocate the receiving anten
Краткое содержание страницы № 8
=> TV color systems differ depending on the Notes on use country/region. To view your recordings on a TV, you need an NTSC system-based TV. Using the camcorder
=> Television programs, films, video tapes,
=> The camcorder is not dustproofed, dripproofed and other materials may be copyrighted. or waterproofed. See “Precautions” (p. 47). Unauthorized recording of such materials may
=> Do not do any of the following when the be contrary to the copyright laws. (Movie)/ (Photo) lamps (p. 14) or
Краткое содержание страницы № 9
Operation flow Recording movies and photos (p. 16)
=> In the default settings, movies and photos are recorded on the internal memory.
=> You can change the recording media (p. 37). Playing movies and photos (p. 20) Playing movies and photos on your camcorder (p. 20) Playing movies and photos on a connected TV (p. 23) Saving movies and photos on a disc Saving movies and photos with a computer (p. 24) Creating a disc with a DVD writer or recorder (p. 30)
=> Operating by the camcorder screen, you can
Краткое содержание страницы № 10
Table of contents IMPORTANT SAFETY INSTRUCTIONS.. . . . . . . . . . . . . . . . . . . . . . . . . . . . . . . . . . . . . . . . . . . . . . . . . . . . . . . . . . . . 3 Read this first.. . . . . . . . . . . . . . . . . . . . . . . . . . . . . . . . . . . . . . . . . . . . . . . . . . . . . . . . . . . . . . . . . . . . . . . . . . . . . . . . . . . . . . . . . 6 Operation flow.. . . . . . . . . . . . . . . . . . . . . . . . . . . . . . . . . . . . . . . . . . . . . . . . . . . . . . . . . . . .
Краткое содержание страницы № 11
Table of contents Making good use of your camcorder Deleting movies and photos.. . . . . . . . . . . . . . . . . . . . . . . . . . . . . . . . . . . . . . . . . . . . . . . . . . . . . . . . . . . . . . . . . . . . 36 Coping with shooting conditions.. . . . . . . . . . . . . . . . . . . . . . . . . . . . . . . . . . . . . . . . . . . . . . . . . . . . . . . . . . . . . . 37 Changing the recording media. . . . . . . . . . . . . . . . . . . . . . . . . . . . . . . . . . . . . . . . . . . . . . . .
Краткое содержание страницы № 12
Getting started Step 1: Charging the battery pack CHG lamp DC plug DC IN jack To the wall outlet AC Adaptor (wall socket) Battery pack Power cord (Mains lead) You can charge the “InfoLITHIUM” battery pack (H series) after attaching it to your camcorder.
=> You cannot attach any “InfoLITHIUM” battery pack other than the H series to your camcorder. Turn off your camcorder by closing the LCD screen. 1 Attach the battery pack by sliding it in the direction of the arrow until it 2 clicks.
Краткое содержание страницы № 13
Getting started
=> When your camcorder is on, you can check the approximate amount of remaining battery power with the remaining battery indicator at the upper left on the LCD screen. To remove the battery pack Close the LCD screen. Slide the BATT (battery) release lever and remove the battery pack . To use a wall outlet (wall socket) as a power source Make the same connections as “Step 1: Charging the battery pack.” Notes on the battery pack and the AC Adaptor
=> When you remove the battery
Краткое содержание страницы № 14
Step 2: Turning the power on, and setting the date and time Open the LCD screen of your camcorder. 1 Your camcorder is turned on.
=> To turn on your camcorder when the LCD screen is open, press POWER. POWER button (Movie): To record movies (Photo): To record photos Select the desired geographical area with / , then touch [NEXT]. 2 Touch the button on the LCD screen.
=> To set the date and time again, touch (HOME) (SETTINGS) [CLOCK/ LANG] [CLOCK SET]. When an item is not on the s
Краткое содержание страницы № 15
Getting started To turn off the power Close the LCD screen. The (Movie) lamp flashes for a few seconds and the power is turned off. POWER button
=> You can turn off your camcorder also by pressing POWER.
=> When [POWER ON BY LCD] (p. 42) is set to [OFF], turn off your camcorder by pressing POWER. Changing the language setting You can change the on-screen displays to show messages in a specified language. Touch (HOME) (SETTINGS) [CLOCK/ LANG] [ LANGUAGE SET] a desired language
Краткое содержание страницы № 16
Recording Recording Recording movies In the default setting, movies are recorded on the internal memory (p. 37). Fasten the grip belt. Open the lens cover. Open the LCD screen of your camcorder. Your camcorder is turned on.
=> To turn on your camcorder when the LCD screen is already open, press POWER (p. 14). US 1
Краткое содержание страницы № 17
Recording Press START/STOP to start recording. START/STOP button Power zoom lever Wide Telephoto [STBY] [REC] To stop recording, press START/STOP again.
=> You can magnify images with the power zoom lever. Move the power zoom lever slightly for a slower zoom. Move it further for a faster zoom.
=> If you close the LCD screen during recording, the camcorder stops recording.
=> See page 50 on the recordable time of movies.
=> When a movie file exceeds 2 GB, the next movie file is created automa
Краткое содержание страницы № 18
Shooting photos In the default setting, photos are recorded on the internal memory (p. 37). Open the lens cover. Open the LCD screen of your camcorder. Your camcorder is turned on.
=> To turn on your camcorder when the LCD screen is already open, press POWER (p. 14). Press MODE to turn on the (Photo) lamp.
=> The aspect ratio of the screen becomes 4:3. US 1
Краткое содержание страницы № 19
Recording Press PHOTO lightly to adjust the focus, then press it fully. Power zoom lever Wide Telephoto Flashes Lights up When disappears, the photo is recorded.
=> Move the power zoom lever slightly for a slower zoom. Move it further for a faster zoom.
=> You can check the recordable number of photos on the LCD screen (p. 52).
=> To change the image size, touch (HOME) (SETTINGS) [PHOTO SETTINGS] [ IMAGE SIZE] a desired setting .
=> You cannot record photos while is disp
Краткое содержание страницы № 20
Playback Playback.on.the.camcorder In the default setting, movies and photos on the internal memory are played (p. 37). Playing movies Open the LCD screen of your camcorder. Your camcorder is turned on.
=> To turn on your camcorder when the LCD screen is already open, press POWER (p. 14). Touch (VIEW IMAGES). (VIEW IMAGES) The VISUAL INDEX screen appears after some seconds. Touch the (Movie) tab a desired movie . To the index screen of To the index screen of scenes by a cert