- Manuals
- Brands
- Volvo Manuals
- Automobile
- C70
- Owner’s manual
-
Contents
-
Table of Contents
-
Bookmarks
Quick Links
VOLVO C70
Owners Manual
Web Edition
Related Manuals for Volvo C70
Summary of Contents for Volvo C70
-
Page 1: Owners Manual
VOLVO C70 Owners Manual Web Edition…
-
Page 3
DEAR VOLVO OWNER THANK YOU FOR CHOOSING VOLVO We hope you will enjoy many years of driving pleasure in your Volvo. In order to increase your enjoyment of the car, we recommend that The car has been designed for the safety and comfort of you and your you familiarise yourself with the equipment, instructions and mainte- passengers. -
Page 4: Table Of Contents
01 Safety 02 Instruments and controls Important information……. 10 Seatbelts……….. 18 Overview, left-hand drive cars….46 Volvo and the environment……. 14 Airbag system……….. 21 Overview, right-hand drive cars….48 Airbags…………22 Driver’s door control panel……. 50 Activating/deactivating the airbag*… 24 Combined instrument panel……
-
Page 5
Table of contents 03 Climate control 04 Interior 05 Locks and alarm General information on climate control..86 Front seats……….98 Remote control key with key blade..120 Electronic climate control, ECC*….88 Electrically operated roof ……. 103 Active locks……….123 Air distribution……….. -
Page 6
Table of contents 06 Starting and driving 07 Wheels and tyres 08 Car care General………… 140 General………… 186 Cleaning……….202 Refuelling……….142 Tyre pressure………. 190 Touching up paintwork……206 Alcoguard*……….146 Warning triangle* and spare wheel * ..191 Rustproofing……….. 207 Starting the engine…….. -
Page 7
Table of contents 09 Maintenance and service 10 Infotainment system 11 Specifications Volvo service……….. 210 General………… 238 Type designation……..272 Self-maintenance……..211 Audio functions……..240 Dimensions and weights……274 Bonnet and engine compartment… 212 Radio functions……..245 Engine specifications……277 Oils and fluids……… -
Page 8
Table of contents 12 Alphabetical Index Alphabetical Index……..292… -
Page 9
Table of contents… -
Page 10: Introduction
Important information Reading the Owner’s Manual In the event of uncertainty over what is stand- lighted in the owner’s manual by means of the ard or an option/accessory, contact a Volvo text being slightly larger and printed in grey. Introduction dealer.
-
Page 11
Introduction Important information warning is ignored, may result in serious per- Information Procedure lists sonal injury or fatality. Procedures where action must be taken in a certain sequence are numbered in the owner’s Risk of property damage manual. When there is a series of illustrations for step-by-step instructions each step is numbered in the same way as the corres- ponding illustration. -
Page 12
If the car has Volvo On Call and there is a or others who may assert a legal right to have so that Volvo can fulfil legal requirements and change of owner, it is very important that these access to it. -
Page 13
Introduction Important information Information on the Internet At www.volvocars.com there is further infor- mation concerning your car. -
Page 14: Volvo And The Environment
Introduction Volvo and the environment Volvo Cars’ environmental philosophy Environmental care is one of Volvo Car Corpo- Fuel consumption many cases the exhaust emissions are well ration’s core values which influence all opera- below the applicable standards. Volvo cars have competitive fuel consumption tions.
-
Page 15
Interior • If the car is equipped with an engine block The interior of a Volvo is designed to be plea- The owner’s manual and the heater*, use it before starting from cold — it sant and comfortable, even for people with… -
Page 16
Seatbelts………………..18 Airbag system………………21 Airbags………………..22 Activating/deactivating the airbag*…………24 Side airbags (SIPS bags)……………. 26 Inflatable Curtain (DMIC)…………….. 28 WHIPS………………… 29 Roll-Over Protection System (ROPS)…………31 When the systems deploy…………… 32 Crash mode……………….. 34 Child safety………………… 35 Option/accessory, for more information, see Introduction. -
Page 17
S A F E T Y… -
Page 18: 01 Safety
WARNING The seatbelt locks and cannot be with- drawn: Never modify or repair the seatbelt yourself. Volvo recommends that you contact an • if it is pulled out too quickly authorised Volvo workshop. If the seatbelt •…
-
Page 19
01 Safety Seatbelts Seatbelts and pregnancy such that they can easily maintain control of the Child seats are not covered by the seatbelt vehicle as they drive (which means that they reminder system. must be able to easily operate the foot pedals Rear seat and steering wheel). -
Page 20
01 Safety Seatbelts Seatbelt tensioner Seatbelt guide All the seatbelts are equipped with seatbelt tensioners. A mechanism in the seatbelt ten- sioner tightens the seatbelt in the event of a sufficiently violent collision. The seatbelt then provides more effective restraint for occu- pants. -
Page 21: Airbag System
The symbol indi- cates a fault in the seatbelt tensioner sys- The warning symbol in the combined instru- tem, SIPS, SRS or the IC system. Volvo rec- ment panel illuminates when the remote con- ommends that you contact an authorised trol key is turned to key position I, II or III.
-
Page 22: Airbags
01 Safety Airbags Airbag system WARNING NOTE Volvo recommends that you contact an The sensors react differently depending on authorised Volvo workshop for repair. the course of the collision and whether or Defective work in the airbag system could not the seatbelts on the driver’s side and cause malfunction and result in serious per- passenger side are used.
-
Page 23
01 Safety Airbags Airbag on the driver’s side WARNING The car has an airbag to supplement the pro- Never place a child in a child seat or on a tection afforded by the seatbelt on the driver’s booster cushion in the front seat if the airbag side. -
Page 24: Activating/Deactivating The Airbag
Check that the switch is in the required posi- Switch location recommends that you visit an authorised tion. Volvo recommends that the key blade is Volvo workshop as soon as possible. The airbag is activated. With the switch in used to change position.
-
Page 25
01 Safety Activating/deactivating the airbag* A text message and a symbol in the roof panel WARNING NOTE indicate that the airbag for the front passenger Activated airbag (passenger seat): When the remote control key is turned to seat is deactivated (see preceding illustration). key position II or III the warning symbol for Never place a child in a child seat or on a the airbag is displayed on the combined… -
Page 26: Side Airbags (Sips Bags)
• Volvo recommends the use only of car seat covers approved by Volvo. Other seat covers may impede the operation of the side airbags.
-
Page 27
01 Safety Side airbags (SIPS bags) Front passenger seat, left-hand drive. The SIPS bag system consists of side airbags and sensors. A sufficiently violent collision trips the sensors and the side airbags are inflated. The airbag inflates between the occupant and the door panel and thereby cushions the initial impact. -
Page 28: Inflatable Curtain (Dmic)
It is fitted along the inside of the driv- compromise the intended protection. Volvo er’s and passenger doors and protects both recommends that you only ever use Volvo front seat occupants. The inflatable curtain is genuine parts that are approved for place- activated by sensors in the event of a suffi- ment in these areas.
-
Page 29: Whips
Never modify or repair the seat or WHIPS the seat with as little space as possible system yourself. Volvo recommends that The WHIPS system is a supplement to the between the head and the head restraint. seatbelts. Always use a seatbelt. you contact an authorised Volvo workshop.
-
Page 30
WARNING If a seat has been subjected to extreme forces, such as due to a rear-end collision, the WHIPS system must be checked. Volvo recommends that it is checked by an authorised Volvo workshop. Part of the WHIPS system’s protective capacity may have been lost even if the seats appear to be undamaged. -
Page 31: Roll-Over Protection System (Rops)
The roll bars are deployed irrespective of whether the roof is open or closed. Volvo recommends that you always contact an authorised Volvo workshop if the ROPS system has deployed.
-
Page 32: When The Systems Deploy
Volvo workshop. Do not drive with uid, disconnect the battery cables. Do not deployed airbags. attempt to start the car since the airbags may deploy. Recovering the car. Volvo rec- • Volvo recommends that you engage an ommends that you have it conveyed to an authorised Volvo workshop to handle the authorised Volvo workshop.
-
Page 33
01 Safety When the systems deploy WARNING Never drive with deployed airbags. They can make steering difficult. Other safety systems may also be damaged. The smoke and dust created when the airbags are deployed can cause skin and eye irritation/ injury after intensive exposure. -
Page 34: Crash Mode
If the car is in crash mode it must not be towed. It must be transported from its loca- Moving the car tion. Volvo recommends that you have it NORMAL MODE is shown after CRASH conveyed to an authorised Volvo workshop.
-
Page 35: Child Safety
In the event of questions when fitting child beams under the seat. Sharp edges can dam- Volvo recommends that children travel in rear- safety products, contact the manufacturer age the straps. facing child seats until as late an age as pos- for clearer instructions.
-
Page 36
01 Safety Child safety Label Airbag WARNING WARNING Never place a child in a child seat or on a Booster cushions/child seats with steel booster cushion in the front seat if the airbag braces or some other design that could rest on the seatbelt buckle’s opening button is activated must not be used, as they could cause the… -
Page 37
Child safety Recommended child seats Weight Rear seat Front seat Group 0 Volvo infant seat (Volvo Infant Seat) — rear-facing child seat, secured with the ISOFIX fixture system. max. 10 kg Type approval: E1 04301146 Group 0+ max. 13 kg… -
Page 38
Rear seat Front seat Group 1 Volvo rear-facing/turnable child seat (Volvo Convertible Child Volvo rear-facing/turnable child seat (Volvo Convertible Child Seat) — rear-facing child seat, secured with the car’s seatbelt Seat) — rear-facing child seat, secured with the car’s seatbelt 9 –… -
Page 39
Rear seat Front seat Group 2 Volvo rear-facing/turnable child seat (Volvo Convertible Child Volvo rear-facing/turnable child seat (Volvo Convertible Child Seat) — rear-facing child seat, secured with the car’s seatbelt Seat) — rear-facing child seat, secured with the car’s seatbelt 15-25 kg and straps. -
Page 40
UF: Suitable for front-facing universally approved child seats in this weight class. For information on activated/deactivated airbag, see page 24. To install a rear-facing child seat in the rear seat, Volvo recommends that you contact an authorised Volvo dealer to have the mounting points installed. WARNING… -
Page 41
Volvo recommends that you contact an seat illustration above). authorised Volvo dealer for recommenda- Press the seat cushion down to access the tions about which ISOFIX child seats Volvo Reduced size, rear-facing mounting points. recommends. child seat Always follow the manufacturer’s installation… -
Page 42
01 Safety Child safety Types of ISOFIX child seat Type of child seat Weight Size class Passenger seats for ISOFIX installation of child seats Front seat Outer rear seat Infant seat transverse max. 10 kg Infant seat, rear-facing max. 10 kg (IL) Infant seat, rear-facing max. -
Page 43
IUF: Suitable for front-facing ISOFIX child seats that are universally approved in this weight class. In order to be able to fit the infant/child seat in the rear seat, the front passenger seat has been adjusted to a location in front of centre position. Volvo recommends rear-facing child seats for this group. -
Page 44
Overview, left-hand drive cars…………..46 Overview, right-hand drive cars………….. 48 Driver’s door control panel…………..50 Combined instrument panel…………..51 Indicator and warning symbols…………… 52 Information display……………… 56 Electrical socket………………58 Lighting panel………………59 Left-hand stalk switch…………….62 Right-hand stalk switch…………….65 Cruise control*……………… -
Page 45
I N S T R U M E N T S A N D C O N T R O L S… -
Page 46: 02 Instruments And Controls
02 Instruments and controls Overview, left-hand drive cars 13 14 23 24 25…
-
Page 47
02 Instruments and controls Overview, left-hand drive cars Steering wheel adjustment Switch, optional equipment Opening handle, bonnet Switch, passenger compartment auto- matic lighting Control panel, windows and door mirrors Switch, optional equipment Direction indicators, main beam, trip com- Switch, passenger compartment lighting, puter right-hand side Lighting panel and fuel filler flap opener… -
Page 48: Overview, Right-Hand Drive Cars
02 Instruments and controls Overview, right-hand drive cars 21 22…
-
Page 49
02 Instruments and controls Overview, right-hand drive cars Electrical socket and cigarette lighter Rearview mirror, interior Switch, roof control Ignition switch Parking brake Stalk switch, left Control panel, windows and door mirrors Keypad, steering wheel, left Glovebox Combined instrument panel Door handle and lock button Horn and airbags Indicator lamp, locking… -
Page 50: Driver’s Door Control Panel
02 Instruments and controls Driver’s door control panel Driver’s door control panel Power windows, all windows down/up Power windows Door mirror, left-hand side Door mirrors, setting Door mirror, right-hand side…
-
Page 51: Combined Instrument Panel
02 Instruments and controls Combined instrument panel Speedometer. Tachometer – Indicates engine speed in Temperature gauge — Used for the engine thousands of revolutions per minute (rpm). cooling system. A message will appear on Direction indicators, left. the display if the temperature becomes too Indicator and warning symbols.
-
Page 52: Indicator And Warning Symbols
02 Instruments and controls Indicator and warning symbols Functionality check, symbols Symbols in the centre of the instrument When the symbol illuminates: panel All indicator and warning symbols illuminate 1. Stop in a safe manner. Do not drive the car when the remote control key is turned to posi- further.
-
Page 53
ABS fault 3. Drive to a workshop to have the ABS sys- tem checked if the symbol remains lit. Rear fog lamp Volvo recommends that you seek assis- Stability system DSTC tance from an authorised Volvo workshop. No function Rear fog lamp… -
Page 54
If the faulty. symbol illuminates and the oil level is normal Volvo recommends that you contact an author- Parking brake applied ised Volvo workshop. The symbol illuminates when the parking brake is applied. -
Page 55
02 Instruments and controls Indicator and warning symbols ± Stop the car in a safe place and check the have the brake system checked. Volvo rec- High speed level in the brake fluid reservoir, see ommends that you seek assistance from If the car is moving faster than page 219. -
Page 56: Information Display
Specification Message Specification STOP SAFELY Stop the car in a safe TIME FOR REGU- Time for regular manner and turn off service. Volvo rec- LAR SERVICE the engine. Serious ommends that an risk of damage. authorised Volvo workshop carries SERVICE Volvo recommends out the service.
-
Page 57
000 km (certain the message clears, engine variants). For see page 157. information on If shown repeatedly checking the oil then Volvo recom- level, see page 215. mends that an authorised Volvo SOOT FILTER Diesel particle filter workshop is contac-… -
Page 58: 12 V Electrical Socket
02 Instruments and controls Electrical socket 12 V electrical socket WARNING Always leave the plug in the socket when the socket is not in use. NOTE Optional equipment and accessories — e.g. TV screens, music players and mobile phones — which are connected to one of the passenger compartment’s 12V electrical sockets, could be activated by the climate control system, even when the remote con-…
-
Page 59: Lighting Panel
Thumbwheel for headlamp levelling centre position. If necessary, the automatic the height of the beam. dipped beam can be deactivated. Volvo rec- Light switches 1. Turn the remote control key to position II. ommends that this is performed by an author- Thumbwheel for adjusting display and ised Volvo workshop.
-
Page 60
02 Instruments and controls Lighting panel The lamps are switched off automatically when Fog lamps Fuel filler flap the remote control key is turned to position I or Press button (5) to open the fuel filler flap when NOTE the car is unlocked, see page 130. Regulations for use of fog lamps vary from Instrument lighting country to country. -
Page 61
02 Instruments and controls Lighting panel event of a malfunction. The function is only Daytime running lights — DRL* NOTE active in twilight or darkness and only when the To save fuel, daytime running lights (Daytime To achieve minimal energy consumption, car is moving. -
Page 62: Left-Hand Stalk Switch
02 Instruments and controls Left-hand stalk switch Stalk switch positions Direction indicators Switching, main and dipped beam The remote control key must be in position II Continuous flash sequence and the headlamp control in end position, see ± Move the stalk switch up or down to page 59, for main beam to be switched on.
-
Page 63
02 Instruments and controls Left-hand stalk switch Trip computer* car is stationary, » —.- » appears on the display. NOTE During the period for regeneration fuel con- If a warning message interrupts while you sumption may increase, see page 144. are using the trip computer, this message AVERAGE must be acknowledged. -
Page 64
02 Instruments and controls Left-hand stalk switch MPH ACTUAL SPEED. Current speed is displayed in mph. Resetting 1. Select — KM/H AVERAGE SPEED —.- L/100 KM AVERAGE 2. Reset with one press on the RESET but- ton. Press and hold the RESET button for at least five seconds to reset the average speed and average consumption at the same time. -
Page 65: Right-Hand Stalk Switch
02 Instruments and controls Right-hand stalk switch Windscreen wipers Single sweep Windscreen/headlamp washer Raise the stalk switch to make a Move the stalk switch toward the steering single sweep. wheel to start the windscreen and headlamp washers. The wipers will make several more sweeps once the stalk switch is released.
-
Page 66
02 Instruments and controls Right-hand stalk switch Rain sensor* Activating the rain sensor: selected, or the sensitivity to rain when the rain sensor is selected. ± Press the button (B), see page 65. A display symbol shows that the rain sensor is active. -
Page 67: Cruise Control
02 Instruments and controls Cruise control* Activating Increasing or decreasing speed NOTE A temporary increase in speed (less than one minute) using the accelerator, such as while overtaking, does not affect the cruise control setting. When you release the accel- erator, the car will return to the programmed speed.
-
Page 68
02 Instruments and controls Cruise control* Return to the set speed – Press this button to resume the previously set speed. CRUISE appears on the combined instrument panel. Disengaging ± Press CRUISE to disengage the cruise control. CRUISE ON clears on the com- bined instrument panel. -
Page 69: Keypad In The Steering Wheel
02 Instruments and controls Keypad in the steering wheel* Button functions in order to enable control of the phone system with the arrow keys. To return to Audio only, press EXIT.. To return to the phone menu, press EXIT once again. With the ENTER button you can select, acti- vate and deactivate options in menus.
-
Page 70: Steering Wheel Adjustment, Hazard Warning Flashers
02 Instruments and controls Steering wheel adjustment, hazard warning flashers Steering wheel adjustment WARNING NOTE Adjust the steering wheel before driving off, Regulations regarding the use of hazard never while driving. Before driving, check warning flashers vary from country to coun- that the steering wheel is fixed in position.
-
Page 71: Parking Brake
02 Instruments and controls Parking brake Handbrake > The instrument panel’s warning symbol Disengaging the parking brake is illuminated. 1. Press the foot brake pedal down firmly. 2. Pull the parking brake lever up slightly, NOTE press the button, lower the parking brake lever and release the button.
-
Page 72: Power Windows
02 Instruments and controls Power windows Operation The driver can operate all of the power win- WARNING dows from the driver’s seat. The power windows are operated using the Make sure that children and other passen- controls in the doors. The ignition key must be The windows can be opened and closed in two gers cannot be trapped in any way when in position I or II for the power windows to…
-
Page 73
02 Instruments and controls Power windows Passenger seat WARNING The function that interrupts the movement of the windows in the event of them being blocked works with both automatic and manual closing, although not with pinch protection deployed. WARNING If there are children in the car: Remember to switch off the supply to the power windows by removing the remote control key if the driver leaves the car. -
Page 74: Windows, Rearview And Door Mirrors
02 Instruments and controls Windows, rearview and door mirrors Interior rearview mirror Interior rearview mirror with compass* Calibrating the compass The earth is divided into 15 magnetic zones. Bright light from behind could be reflected in The upper right-hand corner of the rearview The compass is set for the geographical area the rearview mirror and dazzle the driver.
-
Page 75
02 Instruments and controls Windows, rearview and door mirrors 4. Press the button (1) repeatedly until the 1– number for the required magnetic zone ( ) is shown, refer to the map of magnetic zones for the compass. 5. Wait until the display returns to showing the character 6. -
Page 76
02 Instruments and controls Windows, rearview and door mirrors Door mirrors Retractable power door mirrors* NOTE The mirrors can be retracted for parking/driving The door mirrors will not be extended auto- in narrow spaces. This can be carried out in matically during unlocking if they were ignition position I and II. -
Page 77
02 Instruments and controls Windows, rearview and door mirrors Blind Spot Information System, BLIS* BLIS is an information system that under cer- tain conditions can help to draw the driver’s attention to vehicles moving in the same direc- tion in the so-called «blind spot», see page 165. -
Page 78: Personal Preferences
02 Instruments and controls Personal preferences Possible settings Display Clock, adjustment Personal preferences can be set for some of The hour and minute are each adjusted sepa- MENU the car’s functions. This applies to locks, cli- rately. mate control and audio functions. For audio EXIT 1.
-
Page 79
02 Instruments and controls Personal preferences ± Select On/Off depending on whether or not Lock confirm. light Simultaneous opening of all windows you wish the recirculation timer to be The hazard warning flashers can provide feed- This function can be selected for the unlock active. -
Page 80
02 Instruments and controls Personal preferences Information • VIN number… — (Vehicle Identification Number) is the car’s unique identity num- ber. • Number of keys… — The number of keys registered for the car is shown. -
Page 81: Homelink
02 Instruments and controls HomeLink * General NOTE WARNING HomeLink is designed not to work if the car If HomeLink is used to operate a garage is locked from the outside. door or gate, ensure that nobody is in the vicinity of the door or gate while it is in Save the original remote controls for future motion.
-
Page 82
02 Instruments and controls HomeLink * The particular distance that is required ess is repeated for approx. 20 seconds Programming individual buttons and indicates that the device has a «roll- between the original remote control and To reprogram an individual button, proceed in ing code». -
Page 83
02 Instruments and controls HomeLink * • Constant glow: The indicator lamp illu- 7. Depress the programmed button on minates with a constant glow when the HomeLink , while the «programming but- button is kept depressed, this indicates ton» is still flashing, keep it depressed for that the programming is complete. -
Page 84
General information on climate control……….. 86 Electronic climate control, ECC*…………. 88 Air distribution………………91 Fuel-driven engine block heater and passenger compartment heater*…………. 92 Fuel-driven auxiliary heater* (diesel)…………95 Option/accessory, for more information, see Introduction. -
Page 85
C L I M A T E C O N T R O L… -
Page 86: 03 Climate Control
Fault tracing and repair Display The climate control system cools or heats as Volvo recommends that you only entrust fault There is a display above the climate control well as dehumidifies the air in the passenger tracing and repair of the climate control system panel.
-
Page 87: Climate Control
03 Climate control General information on climate control Air vents in the dashboard Side windows and sunroof To ensure that the air conditioning works sat- Actual temperature isfactorily, close all side windows and the roof. The temperature you select corresponds to the physical experience with reference to factors Acceleration such as air speed, humidity and solar radiation…
-
Page 88: Electronic Climate Control, Ecc
03 Climate control Electronic climate control, ECC* Control panel AUTO If you select one or more manual functions, the Functions other functions continue to be controlled auto- 1. AUTO matically. All manual settings are switched off The AUTO function automat- when AUTO is switched on.
-
Page 89
03 Climate control Electronic climate control, ECC* 3. Air quality system* Keep the following in mind: NOTE Same button as recirculation. • As a rule, the air quality sensor should If the knob is turned anticlockwise and the always be engaged. The air quality system con- fan indicator in the display goes out, the fan and the air conditioning are switched off. -
Page 90
03 Climate control Electronic climate control, ECC* 5. Air distribution 7 and 8. Heated front seats* on the button. Automatic switching off discon- nects the rear window and door mirrors after The airflow can be distributed To activate front seat heating: 12 –… -
Page 91: Air Distribution
03 Climate control Air distribution Air distribution Use: Air distribution Use: Air to windows. Some air to remove ice and Air to the floor and windows. to ensure comfortable flows from the air vents. The misting quickly. Some air flows from the dash- conditions and good air is not recirculated.
-
Page 92: Fuel-Driven Engine Block Heater And Passenger Compartment Heater
03 Climate control Fuel-driven engine block heater and passenger compartment heater* General information about heaters Refuelling Battery and fuel If the battery has insufficient charge or the fuel The parking heater heats the engine and pas- level is too low, the parking heater is switched senger compartment and can be started off automatically and a message appears on directly or with the timer.
-
Page 93
03 Climate control Fuel-driven engine block heater and passenger compartment heater* Activating the heater Symbols and display messages Display Specification When one of the timer’s settings or HEATER STOP- The heater has been Direct start is activated, the infor- stopped by the car’s PED LOW BAT- mation symbol in the combined electronics in order… -
Page 94
03 Climate control Fuel-driven engine block heater and passenger compartment heater* Heating of the passenger compartment will After setting TIMER 1 a second start time can NOTE begin as soon as the engine coolant has be programmed with TIMER 2 by scrolling with All timer programming will be cleared if the reached the correct temperature. -
Page 95: Fuel-Driven Auxiliary Heater* (Diesel)
03 Climate control Fuel-driven auxiliary heater* (diesel) Auxiliary heater (diesel) In diesel-engined cars the auxiliary heater may be required for achieving the correct tempera- ture in the engine and passenger compartment during cold weather. The heater starts automatically when extra heat is required when the engine is running.
-
Page 96
Front seats………………..98 Electrically operated roof …………..103 Wind deflector*………………106 Interior lighting………………107 Storage spaces in the passenger compartment ……..110 Cargo area……………….. 114 Option/accessory, for more information, see Introduction. -
Page 97
I N T E R I O R… -
Page 98: 04 Interior
04 Interior Front seats Seating position, manual seat Backrest rake: turn the wheel. Seating position, power seat* Control panel for power seat*. Lever (2) is not available on all seat models. WARNING Adjust the position of the driver’s seat and adjust the seatbelt, see page 18, before set- ting off, never while driving.
-
Page 99
04 Interior Front seats An overload protection is deployed if one of the the button then the movement of the seat will Entry to rear seat, manual seat seats is blocked. If this happens, turn off the stop. ignition and wait a short time before adjusting Emergency stop the seat again. -
Page 100
04 Interior Front seats Push the seat forward Push the seat backward: Lift the handle Release the seatbelt from the seatbelt Lift the handle and fold back the backrest. Fold the backrest forward to the locked guide, see also page 20. position. -
Page 101
04 Interior Front seats 3. Continue to lift of the handle, and push the seat forward to the desired position and release the handle. Entry to rear seat, power seat Push the seat forward Lift the handle. Hold down the front section of the button. If the seat is set in a higher position — then Fold the backrest forward to the locked it will be lowered automatically to avoid the… -
Page 102
The belt on the front passenger side must be in the belt guide during driving, even when there is no passenger sitting in the seat. Inlaid mats* Volvo supplies inlay mats which are especially produced for your car. WARNING Before setting off check that the inlaid mat Lift the handle and fold back the backrest. -
Page 103: Electrically Operated Roof
IMPORTANT the roof’s opening and closing mechanisms. Water collecting on the roof can run down Volvo also recommends that the following is into the cargo area and the passenger com- observed: partment if the roof is opened.
-
Page 104
04 Interior Electrically operated roof Hatch cover Opening and closing the roof Release the button when a signal sounds and ROOF CLOSED ROOF the message OPEN is shown on the information display. WARNING Never pull the release wire for the hydraulic system that is located under the rear seat cushion. -
Page 105
2. Press the closing button again. Press the fully. The roof cannot be operated. This requires closing button again. Keep it pressed in for service by an authorised Volvo workshop. at least 30 seconds until the roof and boot • CLOSE BOOT SEP. FOR ROOF lid are closed. -
Page 106: Wind Deflector
04 Interior Wind deflector* General NOTE Be careful of the car’s upholstery. The zips in the wind deflector are used for stor- ing/retrieving luggage on the rear seat. WARNING Check that the wind deflector is secured firmly. Otherwise it may detach in the event of sudden movement for example and then cause injury and damage.
-
Page 107: Interior Lighting
04 Interior Interior lighting Reading lamps and interior lighting Roof lighting Vanity mirror* The reading lamps are switched on or off by pressing the relevant button in the roof con- sole. Rear seat lighting Controls in roof console for front reading lamps The lamp is automatically switched on and off and passenger compartment lighting.
-
Page 108
04 Interior Interior lighting Automatic lighting Passenger compartment lighting comes on and remains on for 5 minutes if one of the doors Using the switch (2), see page 107, three posi- is open. tions can be selected for the lighting the pas- senger compartment: If any lighting is switched on manually and the car is locked then it will be switched off auto-… -
Page 109
04 Interior Interior lighting… -
Page 110: Storage Spaces In The Passenger Compartment
04 Interior Storage spaces in the passenger compartment Storage spaces…
-
Page 111
04 Interior Storage spaces in the passenger compartment Storage compartment in door panel. Glovebox Coat hanger Coat hanger, only for light garments. Storage pocket on front edge of front seat cushions. Ticket clip Glovebox Storage compartment behind the centre console Cup holder (with roller cover*) Tunnel compartment (e.g. -
Page 112
04 Interior Storage spaces in the passenger compartment Storage compartment in door panel Storage compartment in rear side Storage under the front armrest panel The storage compartment is opened by lifting There is a storage space under the armrest. the lower front edge of the lid, and closed with There is also a smaller storage space in the The storage compartment is opened and a touch on its upper section. -
Page 113
04 Interior Storage spaces in the passenger compartment Cup holder in centre console Close the roller cover by gripping its front edge from below and pulling forward. Storage compartment behind the handbrake In the deeper compartment there is space for 10 normal CD cases. -
Page 114: Cargo Area
04 Interior Cargo area Cargo separator Loading assistance Label on cargo separator. Button for raising and lowering the roof. The purpose of the separator is to limit the NOTE In open position the roof is folded up in the amount of the load in the cargo area so that the Too much load in the cargo area prevents cargo area.
-
Page 115
Straps that are suitable for the Lower the roof to its lowest position, wait a cargo separator. eyelets are supplied by Volvo dealers. few seconds and then close the boot lid. 4. Press the button so that the roof is low- ered. -
Page 116
04 Interior Cargo area Electrical socket in cargo area Ski hatch Close the centre section in the back of the rear seat 1. Refit the centre section with the lower part first. 2. Fold in the centre section and press until a clicking sound is heard. -
Page 117
04 Interior Cargo area WARNING Stop the engine and apply the parking brake when loading or unloading long objects. A loose object weighing 20 kg can, in a frontal collision at a speed of 50 km/h carry the impact of an item weighing 1000 kg. Always secure the load. -
Page 118
Remote control key with key blade…………120 Active locks………………. 123 Privacy locking*………………124 Keyless drive*………………126 Battery in remote control key…………..129 Locking and unlocking…………….130 Alarm*………………..134 Option/accessory, for more information, see Introduction. -
Page 119
L O C K S A N D A L A R M… -
Page 120: 05 Locks And Alarm
The car is supplied with 2 remote control keys. If you lose a remote control key, take the car and the other remote control keys to a Volvo The remote control keys contain detachable workshop — an authorised Volvo workshop is metal key blades for mechanical locking/ recommended.
-
Page 121
05 Locks and alarm Remote control key with key blade Approach lighting – Switches on the light- Detachable key blade Removing the key blade ing at a distance – lights up the area around To remove the key blade from the remote con- a car parked in a dark location. -
Page 122
05 Locks and alarm Remote control key with key blade Turn the key blade 90 degrees clockwise. NOTE The keyhole is horizontal in the locked When the driver’s door is unlocked using the position. key blade and is opened, the alarm is trig- gered. -
Page 123: Active Locks
05 Locks and alarm Active locks Active locks for remote control key with key blade. Active locks for remote control key with- out key blade. For a description of the different storage areas, see page 110.
-
Page 124: Privacy Locking
05 Locks and alarm Privacy locking* General information on privacy locking Activate privacy locking NOTE The privacy locking function is intended for CLOSE The information display will show when the car is left for service, with a hotel BOOT SEP. FOR ROOF OPERAT. parking valet or similar.
-
Page 125
05 Locks and alarm Privacy locking* 2. Refit the key blade into the remote control key, see page 121. 3. Open the boot lid and fold down the cargo separator which blocked the operation of the folding roof — the information display text about the cargo separator is then cleared. -
Page 126: Keyless Drive
05 Locks and alarm Keyless drive* • Keyless lock and ignition system Remote control key max. 1.5 m from the the READ button has been pressed. Never leave any remote control key in the In order to open a door or the boot lid, a remote control key must be no more than approx.
-
Page 127
05 Locks and alarm Keyless drive* Locking Unlocking doors with the key blade NOTE On cars with the keyless drive system and automatic transmission the gear selector must be moved to the P position and the ignition dial turned to the 0 position. Other- wise the car cannot be locked or alarmed. -
Page 128
05 Locks and alarm Keyless drive* Centre console, under the rear section NOTE Door handle, right When the driver’s door is unlocked using the key blade and is opened, the alarm is trig- Centre console, under the front section gered. It is switched off by inserting the remote control key in the ignition switch, see page 135. -
Page 129: Battery In Remote Control Key
05 Locks and alarm Battery in remote control key Low battery in remote control key 1. Place the remote control key with the key- pad downward and prize up the cover When the battery runs down and full function- using a small screwdriver. ality cannot be guaranteed, the information symbol and display show…
-
Page 130: Locking And Unlocking
05 Locks and alarm Locking and unlocking Locking/unlocking the car from Opening the boot lid mechanically WARNING outside Be aware of the risk of being locked in the For cars with the Keyless system, see car when it is locked from the outside using page 126.
-
Page 131
05 Locks and alarm Locking and unlocking With the central locking buttons on the doors, Lock indicator IMPORTANT the doors and boot lid can be locked or The roof must be fully closed or fully open unlocked simultaneously. before mechanical opening can be used for the boot lid. -
Page 132
05 Locks and alarm Locking and unlocking Automatic locking WARNING When the speed of the car exceeds 7 km/h the Do not allow anyone to remain in the car doors and boot lid are locked automatically. without first deactivating the deadlocks in order to avoid the risk of anyone being When the function is activated and the doors locked in. -
Page 133
05 Locks and alarm Locking and unlocking Deactivation is carried out as follows: ment and tilt detectors* then these are switched off at the same time, see 1. Access the menu system under page 135. SETTINGS (for a detailed description of The next time the remote control key is turned the menu system, see page 79). -
Page 134: Alarm
— an authorised objects in the centre console’s cup holder Volvo workshop is recommended. • a non-approved key is used in the ignition as such objects could accidentally trigger or if an attempt is made to force the lock the alarm.
-
Page 135
05 Locks and alarm Alarm* Disarming the alarm Remote control key not working Alarm signals ± Press the remote control key unlock but- When the alarm is triggered, the following hap- ton. Two short flashes from the car’s direc- pens: tion indicators confirm that the alarm is •… -
Page 136
05 Locks and alarm Alarm* 4. Test the movement detector by lifting out 4. Open the bonnet with the handle under the a bag from a seat for example. dashboard. > A siren should sound and all direction > A siren should sound and all direction indicators should flash. -
Page 137
05 Locks and alarm… -
Page 138
General………………..140 Refuelling………………..142 Alcoguard*……………….. 146 Starting the engine…………….150 Keyless drive*………………152 Manual gearbox………………153 Automatic gearbox…………….154 Brake system………………159 DSTC – Stability and traction control system*……..161 Park Assist*………………. 163 BLIS* – Blind Spot Information System……….165 Towing and recovery……………. -
Page 139
S T A R T I N G A N D D R I V I N G… -
Page 140: 06 Starting And Driving
06 Starting and driving General Economical driving For more information and further advice, see brake linings wet resulting in delayed brake the pages 15 and 282. function. Driving economically means driving smoothly while thinking ahead and adjusting your driving • Clean the electric contacts of the electric WARNING style and speed to the prevailing conditions.
-
Page 141
Do not use functions one of a greater capacity than the standard which use a lot of power when the engine is model. Check with your nearest Volvo dealer switched off. Examples of such functions are: regarding the options for your car. -
Page 142: Refuelling
06 Starting and driving Refuelling Opening the fuel filler flap Opening from the cargo area Fuel cap 1. Turn the fuel cap until an obvious resis- tance is felt. 2. Turn past the resistance until it comes to a stop. 3.
-
Page 143
Mixing different types of fuel or the use of adjusted. These adjustments create optimal WARNING fuel not recommended invalidates Volvo’s conditions for efficient combustion of harmful guarantees, and any associated service Always avoid inhaling fuel vapour and get- emissions (hydrocarbons, carbon monoxide agreement. -
Page 144
IMPORTANT specified in the Service and Warranty Booklet damage that is not covered by the Volvo or if you suspect that the car has been filled warranty. The sulphur content must be a maximum of with contaminated fuel. -
Page 145
06 Starting and driving Refuelling called «regeneration» is started in order to burn way. The car should then be driven for approx- away the particles and empty the filter. This imately 20 minutes more. requires the engine to have reached normal NOTE operating temperature. -
Page 146: Alcoguard
06 Starting and driving Alcoguard* General information on the Alcolock Functions Operation The function of the Alcolock is to prevent the Battery car from being driven by individuals under the Alcolock indicator lamp (4) shows battery sta- influence of alcohol. Before the engine can be tus: started the driver must take a breath test that verifies that he/she is not under the influence…
-
Page 147
30 minutes within these 30 days then normal engine star- without a new breath test. ting will be blocked — only starting with the An authorised Volvo workshop is recommended. Option/accessory, for more information, see Introduction. -
Page 148
This setting can be nect the power supply cable from the glovebox changed afterwards at a workshop and wait until indicator lamp (6) is green. An authorised Volvo workshop is recommended. Option/accessory, for more information, see Introduction. -
Page 149
Test failed — take a INVALID TEST new breath test. ALCOGUARD Blowing too short — blow for longer. BLOW LONGER ALCOGUARD Blowing too hard — blow more gently. BLOW SOFTER An authorised Volvo workshop is recommended. Option/accessory, for more information, see Introduction. -
Page 150: Starting The Engine
06 Starting and driving Starting the engine ± Before starting the engine Turn the ignition key to the start position NOTE III and just release it — the starter motor ± Apply the parking brake. The idling speed can be noticeably higher then works automatically until the engine than normal for certain engine types during Note that if the car is equipped with an alcolock…
-
Page 151
06 Starting and driving Starting the engine II – Driving position 2. Hold the steering wheel in this position. Reinsert the key and make a new attempt The remote control key’s to start the car. position when driving. The whole electrical system is engaged. -
Page 152: Keyless Drive
06 Starting and driving Keyless drive* General Starting the car Starting with the remote control key ± Depress the clutch pedal (cars with manual gearbox) or brake pedal (cars with auto- matic gearbox). Petrol engine ± Press in and turn the ignition dial to key position III.
-
Page 153: Manual Gearbox
06 Starting and driving Manual gearbox • Gear positions Start from neutral position N and only engage reverse gear R when the car is sta- tionary. NOTE With the upper variant of the shifting pattern for 6-speed gearbox (see previous illustra- tion) — first press down the gear lever in the N position in order to engage reverse gear.
-
Page 154: Automatic Gearbox
06 Starting and driving Automatic gearbox Geartronic automatic gear positions Geartronic manual gear positions (+/-) NOTE The driver can also change gear manually The brake pedal must be depressed in order using the Geartronic automatic gearbox. The to be able to disengage the gear lever from car engine-brakes when the accelerator pedal the P position.
-
Page 155
06 Starting and driving Automatic gearbox Kick-down Mechanical gear selector inhibitor Automatic gear selector inhibitor When the accelerator pedal is pressed all the Cars with an automatic gearbox have special way to the floor (beyond the position normally safety systems: regarded as full acceleration) a lower gear is Keylock immediately engaged. -
Page 156
06 Starting and driving Automatic gearbox Disengaging the gear selector inhibitor Cold start Automatic gearbox, Powershift* When starting in low temperatures, the gear changes can sometimes feel hard. This is due to the gearbox oil’s viscosity at low tempera- tures. To reduce engine emissions, the gear- box shifts up later than normal when the engine is started at low temperatures. -
Page 157
06 Starting and driving Automatic gearbox In the event of uncertainty as to whether or not message. The transmission can also overheat For important information regarding Powershift the car is equipped with Powershift transmis- during slow driving in queues (10 km/h or transmission and towing — see page 168. -
Page 158
06 Starting and driving Automatic gearbox Symbol Display Driving characteristics Action TRANSM. OVERHEAT BRAKE TO Difficulty in maintaining even speed at con- Gearbox overheated. Keep the car station- stant engine speed. HOLD ary using the foot brake TRANSM. OVERHEAT PARK SAFELY Significant pulling in the car’s traction. -
Page 159: Brake System
06 Starting and driving Brake system Brake servo Dampness can affect braking Bear in mind that driving with a trailer puts an additional load on the car’s brakes. characteristics If the car is rolling or is being towed with the Brake components become wet when the car engine turned off, the brake pedal must be is driven in heavy rain, through pools of water…
-
Page 160
— an author- 10 km/h the brake light returns from flashing to ised Volvo workshop is recommended. the normal constant glow — while at the same time the hazard warning flashers are activated,… -
Page 161: Dstc — Stability And Traction Control System
06 Starting and driving DSTC – Stability and traction control system* General Reduced operation Operation 1. Turn the thumbwheel until the DSTC menu The stability and traction control system, DSTC appears. (Dynamic Stability and Traction Control) helps the driver to avoid skidding and improves the DSTC ON means that the system function car’s traction.
-
Page 162
DSTC system. > If the message remains when the engine is restarted, drive to a workshop. An authorised Volvo workshop is recom- mended. Symbols in the combined instrument panel DSTC system Information Option/accessory, for more information, see Introduction. -
Page 163: Park Assist
Rear parking assistance is deactivated then this is automatically lowered. automatically when towing a trailer if a Volvo The tone becomes constant at a distance of genuine trailer cable is used. about 30 cm. If there are obstacles within this…
-
Page 164
When the speed is below attention, contact a workshop — an authorised 10 km/h the system is reactivated. Volvo workshop is recommended. The distance covered to the front of the car is about 0.8 metres. The signal for obstacles in IMPORTANT front comes from the front loudspeakers. -
Page 165: Blis* — Blind Spot Information System
06 Starting and driving BLIS* – Blind Spot Information System General BLIS is an information system that under cer- Blind spots tain conditions can help to draw the driver’s attention to vehicles moving in the same direc- tion in the so-called «blind spot». The system is designed to work most effec- tively when driving in dense traffic on multi-lane highways.
-
Page 166
06 Starting and driving BLIS* – Blind Spot Information System Activate/deactivate BLIS system message WARNING Text on the dis- Specification BLIS does not work in sharp bends. play BLIS does not work when the car is revers- ing. The BLIS system is BLIS ON A wide trailer coupled to the car can conceal activated. -
Page 167
BLIS SERVICE must only be performed by a workshop — an REQUIRED authorised Volvo workshop is recom- mended. Here are several examples of situations where the BLIS indicator lamp may illuminate even if Low sun in the camera. -
Page 168: Towing And Recovery
06 Starting and driving Towing and recovery ± Start assistance Move the gear selector to position N and WARNING release the parking brake. Use a donor battery if the battery is discharged The steering lock remains in the position it and the engine does not start.
-
Page 169
06 Starting and driving Towing and recovery IMPORTANT Avoid towing. • However, the car can be towed for a short distance at low speed to move it from a dangerous position — not further than 10 km and not faster than 10 km/h. -
Page 170
06 Starting and driving Towing and recovery Towing eye • Open the variant with a recess using a The towing eye is screwed into a threaded After use, unscrew the towing eye and coin or similar inserted in the recess, socket behind a cover on the right-hand side return it to its place. -
Page 171
06 Starting and driving Towing and recovery NOTE On certain cars with fitted towbar the towing eye cannot be secured in the rear mounting. In which case, secure the tow rope in the towbar. For this reason it is advisable to store the towbar’s towball in the car, see page 175. -
Page 172: Start Assistance
06 Starting and driving Start assistance Starting with a donor battery 4. Connect one of the red jump lead’s clamps IMPORTANT to the donor battery’s positive terminal (1). Do not touch the crocodile clips during the start procedure. There is a risk of sparks IMPORTANT forming.
-
Page 173: Driving With A Trailer
• Avoid driving with a trailer on inclines of If the towing bracket is fitted by an authorised more than 12%. Volvo workshop, then the car is delivered with Overheating • For safety reasons, the maximum permit- the necessary equipment for driving with a…
-
Page 174
06 Starting and driving Driving with a trailer Automatic gearbox hitched trailer. Always use the parking brake. Overheating • Block the wheels with chocks when park- When driving with a trailer in hilly terrain in a hot ing a car with hitched trailer on a hill. climate there may be a risk of overheating. -
Page 175: Towing Equipment
If the car is equipped with a detachable towbar, the installation instructions for the loose sec- tion must be followed carefully, see page 177. WARNING If the car is fitted with a Volvo detachable towbar: • Follow the installation instructions care- fully.
-
Page 176
06 Starting and driving Towing equipment* Specifications Dimensions for mounting points (mm) Fixed or detachable towbar standard 1172 Side member Ball centre Option/accessory, for more information, see Introduction. -
Page 177: Detachable Towbar
06 Starting and driving Detachable towbar* Fitting the towbar 2. Ensure that the mechanism is in the 3. Check that the indicator window (3) shows unlocked position by turning the key clock- red. If the window does not show red, 1.
-
Page 178
06 Starting and driving Detachable towbar* 5. Check that the indicator window shows green. 4. Insert the towbar until you hear a click. 7. Check that the towbar is secure by pulling it up, down and back. WARNING 6. Turn the key anticlockwise to locked posi- tion. -
Page 179
06 Starting and driving Detachable towbar* Removing the towbar 8. Safety cable. 2. Push in the locking wheel and turn it 1. Insert the key and turn it clockwise to the anticlockwise until you hear a click. WARNING unlocked position. Be sure to attach the trailer’s safety cable to the correct place. -
Page 180
06 Starting and driving Detachable towbar* 3. Turn the locking wheel down fully, until it 4. Push on the protective cover. comes to a stop. Hold it in this position while pulling the towbar rearward and upward. WARNING Secure the towbar safely if it is stored in the car, see page 175. -
Page 181: Loading
06 Starting and driving Loading General WARNING Payload depends on the car’s kerb weight. The A loose object weighing 20 kg can, in a total of the weight of the passengers and all frontal collision at a speed of 50 km/h, carry accessories reduces the car’s payload by a the impact of an item weighing 1000 kg.
-
Page 182: Adjusting Headlamp Pattern
On cars with Xenon headlamps, the dazzling oncoming motorists. replacement of Xenon lamps must be car- ried out at a workshop — an authorised Volvo The correct pattern will also better illuminate workshop is recommended. Working with the verge.
-
Page 183
06 Starting and driving… -
Page 184
General………………..186 Tyre pressure………………190 Warning triangle* and spare wheel * ………… 191 Changing wheels………………. 194 Emergency puncture repair* …………..196 Option/accessory, for more information, see Introduction. -
Page 185
W H E E L S A N D T Y R E S… -
Page 186: 07 Wheels And Tyres
07 Wheels and tyres General Driving characteristics and tyres Speed ratings New tyres The tyres greatly affect the car’s driving cha- The car is approved as a whole, which means racteristics. The type of tyre, dimensions, tyre that dimensions and speed ratings must not pressure and speed rating are important for differ from those specified on the vehicle reg- how the car performs.
-
Page 187
A suitable dis- cially the studs, a longer service life. tance for the first change is approx. 5000 km and then at 10 000 km intervals. Volvo recom- NOTE mends that you contact an authorised Volvo Tread wear indicators. -
Page 188
1. Tighten the wheel nuts of model (1) to 110 washer. Only use wheel rims that are tested and Nm. Tighten the wheel nuts of model (2) to approved by Volvo and which are included in 130 Nm. NOTE the Volvo genuine accessories range. -
Page 189
The spare wheel (Temporary spare) is only Volvo recommends that you contact an author- intended for use temporarily and must be ised Volvo workshop for checking if you are replaced by an ordinary wheel as soon as pos- uncertain about tread depth. -
Page 190: Tyre Pressure
07 Wheels and tyres Tyre pressure Recommended tyre pressure NOTE Tyre pressure decreases over time, this is a natural phenomenon. Tyre pressure also varies depending on ambient temperature. Even after several kilometres of driving, the tyres warm up and the pressure increases. So air must not be released if the pressure is checked when the tyres are warm.
-
Page 191: Warning Triangle* And Spare Wheel
The jack* and wheel wrench* are located in a foam block in the cargo area. NOTE Volvo recommends only using the jack* that belongs to the car model in question, which is indicated on the jack’s label. The label also indicates the jack’s maximum lift capacity at a specified minimum lifting height.
-
Page 192
07 Wheels and tyres Warning triangle* and spare wheel * Spare wheel and tools Spare wheel and tools. (Location, tools also for emergency puncture repair kit.) The spare wheel* is supplied in a tyre bag that sure to follow the instructions on the spare is located in the cargo area’s spare wheel well. -
Page 193
07 Wheels and tyres Warning triangle* and spare wheel * Tools — returning into place Tools and jack* must be returned into place in the correct manner after use. • For cars equipped with spare wheel, the jack must be cranked so that it fits into the spare wheel. -
Page 194: Changing Wheels
07 Wheels and tyres Changing wheels Removing wheels NOTE Volvo recommends only using the jack* that belongs to the car model in question, which is indicated on the jack’s label. The label also indicates the jack’s maximum lift capacity at a specified minimum lifting height.
-
Page 195
07 Wheels and tyres Changing wheels Fitting the wheel 1. Clean the contact surfaces between wheel and hub. 2. Put on the wheel. Tighten the wheel nuts. 3. Lower the car so that the wheel cannot rotate. 4. Tighten the wheel nuts crosswise. It is important that the wheel nuts are tightened properly. -
Page 196: Emergency Puncture Repair
It consists of a compressor Cable used. Volvo recommends that you visit an and a bottle with sealing fluid. The kit works as authorised Volvo workshop for inspection of Bottle holder (orange cap) a temporary repair.
-
Page 197
07 Wheels and tyres Emergency puncture repair* Sealing punctured tyres 3. Check that the switch is in position 0 and WARNING locate the cable and the air hose. Never stand next to the tyre when the com- pressor is running. If cracks or unevenness NOTE arise then the compressor must be switched off immediately. -
Page 198
The journey should not be tom of the thread on the tyre’s air valve. continued. Contact a tyre centre. 7. Volvo recommends that you drive to the nearest authorised Volvo workshop for the 4. If the tyre pressure is higher than 1.3 bar, replacement/repair of the damaged tyre. -
Page 199
07 Wheels and tyres Emergency puncture repair* Changing the sealing fluid canister WARNING Replace the bottle before the expiration date Do not leave children in the car without has passed. Treat the old bottle as environ- supervision when the engine is running. mentally hazardous waste. -
Page 200
Cleaning………………..202 Touching up paintwork…………….. 206 Rustproofing………………207… -
Page 201
C A R C A R E… -
Page 202: 08 Car Care
08 Car care Cleaning Washing the car very quickly. This discoloration can only be IMPORTANT removed by a specialist. Wash the car as soon as it becomes dirty. Use Dirty headlamps have impaired functional- car shampoo. Dirt and road salt can lead to ity.
-
Page 203
Polish and wax the car if the paintwork is dull sweeping movements and make sure that the A special cleaning agent available from Volvo or to give the paintwork extra protection. nozzle does not come closer than 30 cm to the… -
Page 204
(or more if Vacuuming is important prior to using cleaning the upholstery. necessary). The Volvo Leather Care kit is avail- agents. able from your Volvo dealer. Option/accessory, for more information, see Introduction. -
Page 205
• Leather needs to breathe. Never cover the Volvo dealer. Make sure the seatbelt is dry leather steering wheel with protective plas- 3. Dab accurately with the sponge on the before allowing it to retract. -
Page 206: Touching Up Paintwork
08 Car care Touching up paintwork Paintwork Stone chips and scratches If the stone chip has penetrated to the bare metal Paint is an important part of the car’s rust- 1. Apply a piece of masking tape over the proofing and should therefore be checked reg- damaged surface.
-
Page 207: Rustproofing
The car’s rustproofing does not normally require treatment for approximately 12 years. After this period, it should be treated at three- year intervals. If the car needs further treat- ment, Volvo recommends that you engage an authorised Volvo workshop for assistance.
-
Page 208
Volvo service………………210 Self-maintenance……………… 211 Bonnet and engine compartment…………212 Oils and fluids………………214 Wiper blades………………220 Battery………………..221 Replacing bulbs………………223 Fuses………………… 229… -
Page 209
M A I N T E N A N C E A N D S E R V I C E… -
Page 210: 09 Maintenance And Service
It was checked again in accord- ance with Volvo Car Corporation regulations before it was handed over to you. To keep your Volvo as safe and reliable as pos- sible, follow the Volvo service programme specified in the Service and Warranty Booklet.
-
Page 211: Self-Maintenance
NOTE filled. Use washer antifreeze at tempera- High output from the ignition system. The Volvo recommends only using the jack that voltage in the ignition system is highly dan- tures around freezing. belongs to the car model in question. If a gerous.
-
Page 212: Bonnet And Engine Compartment
09 Maintenance and service Bonnet and engine compartment Opening the bonnet The illustration shows a left-hand drive car. 1. Pull the handle on the far left under the Engine oil dipstick WARNING instrument panel. (In right-hand drive cars Radiator Check that the bonnet locks properly when the handle is on the far right.) You will hear closed.
-
Page 213
09 Maintenance and service Bonnet and engine compartment Battery Relay and fuse box, engine compartment Air filter Engines with electronic oil level sensor have no dipstick (5-cyl. diesel). -
Page 214: Oils And Fluids
Using oil of a higher than specified grade is permitted. If the car is driven in adverse con- ditions, Volvo recommends using an oil of a higher grade than that specified on the decal, see page 278.
-
Page 215: Maintenance And Service
The 1. Ensure that the car is level. After switching ried out at a workshop — an authorised Volvo dipstick will indicate that the level is too low off the engine it is important to wait workshop is recommended.
-
Page 216
09 Maintenance and service Oils and fluids 5. If the level is close to MIN then 0.5 litres For engines with electronic oil level should be added. If the level is significantly sensor below, then an additional amount is required. 6. -
Page 217
09 Maintenance and service Oils and fluids Measuring the oil level Washer fluid, topping up IMPORTANT If the oil level needs to be checked then it Engine oil In the event of the message should be carried out in accordance with the level Fill with 0.5 l oil , only fill with 0.5 litres. -
Page 218
• Mix the coolant with approved quality overpressure. tap water. In the event of any doubt about water quality, used ready-mixed coolant in accordance with Volvo rec- NOTE ommendations. The engine must only be run with a well- • When changing coolant/replacing cool- filled cooling system. -
Page 219
09 Maintenance and service Oils and fluids Checking and topping up the brake and WARNING clutch fluid If the brake fluid is under the MIN level in the brake fluid reservoir, do not drive further before topping up the brake fluid. The reason for the loss of brake fluid must be investigated. -
Page 220: Wiper Blades
09 Maintenance and service Wiper blades Wiper blades Replacing the wiper blades, windscreen 1. Turn up the wiper arm. 2. Press the button located on the wiper blade mounting and pull straight out (1), parallel with the wiper arm. 3. Slide in (2) the new wiper blade until a «click»…
-
Page 221: Battery
09 Maintenance and service Battery Operation Symbols on the battery NOTE The service life and function of the battery is Use protective goggles. The life of the battery is shortened if it influenced by factors such as the number of becomes discharged repeatedly.
-
Page 222
09 Maintenance and service Battery Changing the battery 2. Tighten the clamp that holds the battery. Avoid sparks and naked flames. 3. Connect the ventilation hose. Removal > Check that it is correctly connected to 1. Remove the remote control key from the both battery and outlet in the body. -
Page 223: Replacing Bulbs
On cars with Xenon headlamps, the replacement of Xenon lamps must be car- Removing the lamp housing ried out at a workshop — an authorised Volvo 5. Lift out the lamp housing and place it on a 1. Remove the remote control key and turn workshop is recommended.
-
Page 224
09 Maintenance and service Replacing bulbs on or the remote control key inserted into the Main beam ignition switch. Dipped beam Fitting a new bulb 1. Remove the entire lamp housing. 1. Fit the new bulb. It can only fit in one posi- tion. -
Page 225
09 Maintenance and service Replacing bulbs Position/parking lamps Direction indicators Side marker lamps 1. Twist the bulb holder anticlockwise and 1. Twist the bulb holder anticlockwise and 1. Twist the bulb holder anticlockwise and withdraw it. Replace the bulb. remove it. withdraw it. -
Page 226
NOTE If an error message remains after the broken bulb has been replaced then we recom- mend that you visit an authorised Volvo workshop. 1. Switch off all lights and turn the remote control key to position 0. -
Page 227
09 Maintenance and service Replacing bulbs Location of bulbs in the rear bulb Number plate lighting Cargo area holder 1. Switch off all lights and turn the remote 1. Insert a screwdriver and gently turn so that Bulb holder (right-hand bulb holder shown). control key to position 0. -
Page 228
09 Maintenance and service Replacing bulbs Vanity mirror lighting* Fitting the mirror glass 1. First, press the three lugs at top edge of mirror glass back into position. 2. Then press the three lower lugs back into position. Interior lighting, rear Removing the mirror glass 1. -
Page 229: Fuses
Each fuse box has space for several spare fuses. If the same fuse fails repeatedly then there is a fault in the component. In which case, Volvo recommends that you visit an authorised Volvo workshop for this to be checked.
-
Page 230
• Fuses 19-36 are of the «Mini Fuse» type. and fitting of fuses. • Fuses 7-18 are of the «JCASE» type and should be replaced by a workshop. An authorised Volvo workshop is recommended. -
Page 231
09 Maintenance and service Fuses Cooling fan 50 A Engine functions 30 A Windscreen wipers 30 A Power steering 80 A Ventilation fan 40 A Supply to passenger com- partment fuse box 40 A Supply to passenger com- Headlamp washer, Power partment fuse box 60 A roof, Lockable storage com-… -
Page 232
09 Maintenance and service Fuses Engine control module (5-cyl. Ignition coils (petrol), Pres- petrol), Transmission control sure switch, climate control module (5-cyl.) 10 A system (5-cyl.), Control mod- ule, glow plugs (5-cyl. diesel), EGR emission control (5-cyl. Heated fuel filter (5-cyl. die- diesel) 10 A sel), PTC element, oil trap (5-… -
Page 233
09 Maintenance and service Fuses Relay/Fuse box in the passenger compartment The fuse box has 50 fuse positions. The fuses completely. The fuse box can be fully are located under the glovebox. The box also unhooked. provides space for several spare fuses. Tools 4. -
Page 234
09 Maintenance and service Fuses Telematics*, Audio sys- Washer 15 A Parking assistance*, tem, RTI*, Bluetooth* 15 A Xenon* 10 A SRS system 10 A SRS system, Engine con- Control module Keyless* 20 A Reserve – trol module (5-cyl.) 10 A Remote control receiver, PTC element, air pre- Electrical socket, passen-… -
Page 235
09 Maintenance and service Fuses Seat heating (driver’s Overhead console for Power seat, driver 25 A side) 15 A interior lighting, Seatbelt Interior lighting, cargo reminder, rear, Dimming, Seat heating (passenger area lighting, power seats interior rearview mirror* side) 15 A Fuel pump 15 A Reserve… -
Page 236
General………………..238 Audio functions………………240 Radio functions………………245 CD functions………………250 Menu structure – audio system…………. 253 Phone functions*………………. 254 Menu structure – phone*…………… 261 Bluetooth handsfree*…………….264 Option/accessory, for more information, see Introduction. -
Page 237
I N F O T A I N M E N T S Y S T E M… -
Page 238: 10 Infotainment System
10 Infotainment system General • Infotainment system system can be easily operated using the con- EXIT (6) leads back one step in the menu structure. A long press on EXIT will exit the trol panel or the steering wheel keypad*, see menu system.
-
Page 239: Infotainment System
10 Infotainment system General Dolby Surround Pro Logic II Dolby Surround Pro Logic II distributes the two stereo audio channels to left, centre, right and rear speakers. This provides a more real- istic sound quality than that provided by stand- ard two-channel stereo.
-
Page 240: Audio Functions
10 Infotainment system Audio functions Audio controls ume adjusts automatically depending on vehi- External audio sources cle speed, see page 243. AUX, USB* Audio source selection General Repeatedly pressing AM/FM switches between FM1, FM2 and AM. Repeatedly pressing MODE changes between CD, USB, AUX and BT.
-
Page 241
10 Infotainment system Audio functions Use the MODE button to select the external iPod NOTE audio source you wish to use. An iPod is charged and supplied with power The system supports the playback of music by the USB connection via the player’s con- 1. -
Page 242
Bluetooth function in the car’s audio sys- free* and a mobile phone is connected then the the following options. Adjust by turning tem. Volvo recommends that you contact an audio system can wirelessly play back stream- TUNING. authorised Volvo dealer or visit ing audio files from the mobile phone. -
Page 243
10 Infotainment system Audio functions Activating/deactivating the subwoofer 3. Scroll to Surround FM… Surround Automatic volume control • Press MENU and then ENTER. AM… Surround CD… Surround The auto volume control function allows the AUX… and press ENTER. • audio volume to increase as the speed of the Scroll to Audio settings…… -
Page 244
10 Infotainment system Audio functions Optimum sound reproduction The audio system is calibrated for optimum sound reproduction by means of digital signal processing. This calibration takes into account loudspeak- ers, amplifiers, passenger compartment acoustics, listener position etc. for each com- bination of car model and audio system. -
Page 245: Radio Functions
10 Infotainment system Radio functions Radio controls Tuning Storing stations Ten station presets can be stored per wave- Automatic tuning length. FM has two memories for presets: 1. Select wavelength using AM/FM (1). . Preset stations are selected 2. Give a brief press on using the preset buttons (2) or the steering wheel keypad.
-
Page 246
10 Infotainment system Radio functions Selecting an auto-stored preset Scanning RDS functions Allowing the radio to remain in Auto mode pro- SCAN (4) automatically searches through a Radio Data System — RDS links FM transmitters vides access to the autostored presets. wavelength for strong stations. -
Page 247
10 Infotainment system Radio functions gramme types ( ) interrupt one another in TP from current station/all stations News order of priority, where alarm has the highest The radio can interrupt with traffic information This function allows news broad- priority and programme types has the lowest. from only the set (current) station or from all casts within a set station’s stations. -
Page 248
10 Infotainment system Radio functions Programme types – PTY 4. Scroll to Search PTY and press ENTER. Automatic frequency update – AF The PTY function can be used to The AF function selects one of the strongest If the radio finds any of the selected pro- select different programme types, transmitters for a set station. -
Page 249
10 Infotainment system Radio functions Enhanced Other Networks – EON Resetting RDS functions The EON function is especially useful in urban Resets all radio settings to the original factory areas with many regional radio stations. It settings. allows the distance between the car and the 1. -
Page 250: Cd Functions
10 Infotainment system CD functions CD function controls automatically. Otherwise, load a disc and Pause change to CD mode by pressing MODE. If the volume is turned down completely, the CD player is stopped. The player is restarted Start playback (CD changer*) when volume is increased.
-
Page 251
10 Infotainment system CD functions cally when all files in the current folder have Activating/deactivating, random (CD NOTE been played back. changer) It is only possible to scroll between random If a normal music CD is being played: Press left/right on the navigation button if the CD tracks on the current disc. -
Page 252
10 Infotainment system CD functions Using low quality CD discs could result in poor or non-existent sound. IMPORTANT Only use standard discs (12 cm in diameter). Do not use CD discs with adhesive disc labels. The heat in the CD player may cause the label to come off, damaging the CD player. -
Page 253: Menu Structure — Audio System
10 Infotainment system Menu structure – audio system Overview News AUX MENU FM MENU AUX input volume… News Disc text News Audio settings… PTY… CD MENU Audio settings… Radio text For CD changer* with CD disc USB MENU* selected. Advanced radio settings… Playlist Random……
-
Page 254: Phone Functions
10 Infotainment system Phone functions* Phone system components. Option/accessory, for more information, see Introduction.
-
Page 255
• Volvo recommends that an authorised the current traffic situation still requires a high NOTE Volvo workshop carries out phone system level of attention from the driver then the servicing. The built-in phone cannot read 3G type SIM incoming call is diverted to the voice mail. -
Page 256
10 Infotainment system Phone functions* Extra SIM card Phone controls Steering wheel keypad Many network operators offer two SIM cards for the same phone number. The extra SIM card can be used in the car. Inserting the SIM card 1. Switch off the phone and open the glove- box. -
Page 257
10 Infotainment system Phone functions* On/Off Activating from standby mode 2. Scroll to Hold Resume and press ± ENTER. Press PHONE. A handset appears in the display when the phone system is active or in standby mode Dialling a third party (standby). -
Page 258
If the phone book contains a live caller’s con- see menu 6.4.3, on page 261. This function tact information then this is shown in the dis- only applies to the Volvo integrated phone sys- play. Contact information can be stored on the tem. -
Page 259
10 Infotainment system Phone functions* 6. Scroll to SIM card Phone memory 4. Enter the first few letters of the item and 6. Enter the first few letters of the item and press ENTER, or simply press ENTER. press ENTER, or simply press ENTER. press ENTER. -
Page 260
10 Infotainment system Phone functions* SMS — Short Message Service IMEI number NOTE To block the phone, you must provide your Press ENTER to dial. Reading SMS network operator with the phone’s IMEI num- 1. Press MENU. ber. This is a 15 digit serial number that is pro- NOTE 2. -
Page 261: Menu Structure — Phone
10 Infotainment system Menu structure – phone* Phone menu 2.4. Speed dial… 4.6.2. When busy Call register… 2.4.1. Active 4.6.3. Not answered 1.1. Last 10 missed calls 2.4.2. Select numbers 4.6.4. Not reachable 1.2. Last 10 received calls 2.5. Erase SIM 4.6.5.
-
Page 262
10 Infotainment system Menu structure – phone* 6.2.3. Automatic 1.4.1. All calls 2.4. Speed dial A number stored in the phone book can be 6.3. Edit PIN code 1.4.2. Missed calls stored as a speed dial number. 6.4. Sounds and volume… 1.4.3. -
Page 263
10 Infotainment system Menu structure – phone* operator for information on message settings. 4.6.2 When busy 6.1.2. Manual select Normally, these settings should not be altered. 4.6.3. Not answered 6.2. SIM security 3.3.1. SMSC number Select if the PIN code should be on, off or if the 4.6.4. -
Page 264: Bluetooth Handsfree
Volvo recommends that you seek assis- Connect mobile phone tance from an authorised Volvo dealer or A mobile phone is connected in different ways visit www.volvocars.com for information on depending on whether or not it has been con- compatible phones.
-
Page 265
The call is interrupted with EXIT. the mobile phone’s manual. Auto answer Disconnecting the mobile phone 3. Select My Volvo Car in the list of units The automatic answer function means that Automatic disconnection takes place if the detected in your mobile phone. -
Page 266
10 Infotainment system Bluetooth handsfree* Ring volume More on registering and connecting NOTE Go to Phone Menu… Phone settings… A maximum of three mobile phones can be With certain mobile phones the connection registered. Registration is performed once per Sounds and volume… Ring volume is terminated when the privacy function is phone. -
Page 267
List is empty compatible with the voice recognition func- tion. Volvo recommends that you contact an shown when copying is finished. tion is made under Phone Menu… authorised Volvo dealer or visit Bluetooth…… -
Page 268
10 Infotainment system Bluetooth handsfree* twice for the second etc. Continue pressing for Bluetooth… Menu structure — Bluetooth more characters, see the table on page 258. handsfree with built-in phone 3.1. Change phone Call register… A short press on EXIT deletes an input char- 3.1.1. -
Page 269
10 Infotainment system Bluetooth handsfree* Phone settings… 6.1. Sounds and volume… 6.1.1. Ring volume 6.1.2. Ring signals… 6.1.3. Mute radio 6.2. Synchronise phone book Option/accessory, for more information, see Introduction. -
Page 270
Type designation………………. 272 Dimensions and weights…………… 274 Engine specifications…………….277 Engine oil………………..278 Fluids and lubricants…………….280 Fuel………………….. 282 Wheel and tyres, dimensions and pressure ……… 284 Electrical system………………. 286 Type approval………………288 Symbols in the display…………….289… -
Page 271
S P E C I F I C A T I O N S… -
Page 272: 11 Specifications
11 Specifications Type designation…
-
Page 273
S40 and V50: The label is visible when the right rear door is opened. C30 and C70: The label is visible when the right door is opened. Label for parking heater. -
Page 274: Dimensions And Weights
11 Specifications Dimensions and weights Dimensions Dimensions Dimensions Dimensions Wheelbase 2640 Load height with roof Width including door mirrors 2025 Length 4615 Load height with roof Width including Load length, floor down folded-in door mirrors 1847 Boot lid, raised approx. 200 Front track 1550 with Keyless drive*…
-
Page 275
11 Specifications Dimensions and weights Weights Max. roof load: 75 kg. WARNING Kerb weight includes the driver, the fuel tank The car’s driving characteristics change 90% full and all fluids. Towing capacity and towball load depending on how heavily it is loaded and how the load is distributed. -
Page 276
11 Specifications Dimensions and weights Maximum weight, braked trailer (kg) Maximum towball load (kg) 1500 Maximum weight, unbraked trailer (kg) Maximum towball load (kg) -
Page 277: Engine Specifications
11 Specifications Engine specifications Overview NOTE Not all engines are available in all markets. Engine Engine Output Output Torque (Nm/ No. of Bore Stroke Swept Com- (kW/rpm) (hp/rpm) rpm) cylinders (mm) (mm) volume pression code (litres) ratio B5254T7 169/5000 230/5000 320/1500 –…
-
Page 278: Engine Oil
Volvo Car Corporation disclaims all war- tances at low temperatures. ranty liability if engine oil of the prescribed grade and viscosity is not used. Volvo recommends that oil changes are car- ried out at a workshop — an authorised Volvo workshop is recommended.
-
Page 279
11 Specifications Engine oil Engine oil grade Engine Engine code Recommended oil grade Volume, incl. oil filter (litres) B5254T7 Oil grade: ACEA A5/B5 approx. 5.8 Viscosity: SAE 0W–30 D5204T5 approx. 5.9 D5204T approx. 5.9 For filling engine oil, see page 214. -
Page 280: Fluids And Lubricants
Prescribed transmission fluid AW55-51 JWS 3309 TF-80SC Fluids Fluid System Volume (litres) Recommended oil grade Coolant T5, automatic gear- Coolant recommended by Volvo mixed with 50% water , see the packaging. The thermostat starts opening at 90 ºC D3 and D4…
-
Page 281
Petrol: see page 143 Diesel engine approx. 60 Diesel: see page 144 Water quality must fulfil the standard STD 1285.1. Refrigerant quantity varies depending on engine variant. Volvo recommends that you contact an authorised Volvo workshop for the correct information. -
Page 282: Fuel
11 Specifications Fuel emissions and fuel consumption 14.0 C = combined driving the basic version and without extra equipment. : gram/km The car’s weight may increase depending on Fuel consumption and emissions of equipment. This, as well as how heavily the car : litre/100 km carbon dioxide is loaded, increases fuel consumption and car-…
-
Page 283
11 Specifications Fuel • There are several reasons for increased fuel Drive gently and avoid unnecessary accel- eration as well as braking too hard. consumption compared with the table’s val- ues. Examples of this are: • Drive with the correct air pressure in the tyres and check this regularly — select ECO •… -
Page 284: Wheel And Tyres, Dimensions And Pressure
11 Specifications Wheel and tyres, dimensions and pressure Approved dimensions shows all approved combinations of wheel drive (AWD) and the type of transmission is rims and tyres, and the lowest permitted load needed to read the table. For information with In certain countries not all approved dimen- index (LI) and speed rating (SS).
-
Page 285
11 Specifications Wheel and tyres, dimensions and pressure Approved tyre pressures Engine Tyre size Speed (km/h) Load, 1 — 3 persons Max. load Rear (kPa) Front (kPa) Rear (kPa) Front (kPa) ECO pressure 0–160 215/55 R16 91W 160+ 215/50 R17 91W 0–160 235/45 R17 94W 160+… -
Page 286: Electrical System
11 Specifications Electrical system General The battery capacity is dependent upon the capacity as the original battery (see the label equipment level in the vehicle. If the starter on the battery). The car has a voltage-regulated AC alternator. battery is replaced, therefore, you must ensure The electrical system is single-pole and uses that you switch to a battery with the same the chassis and engine casing as a conductor.
-
Page 287
11 Specifications Electrical system Lighting Output (W) Type Side marker lamps, front WY5W LL Fog lamps Side direction indicators, door mirrors WY5W LL Front courtesy lighting T10 Socket W2.1×9.5d Glovebox lighting T10 Socket W2.1×9.5d Vanity mirror lighting* Socket SV5.5 Length 35 mm Cargo area lighting Socket SV8.5 Length 38 mm Number plate lighting… -
Page 288: Type Approval
11 Specifications Type approval Remote control key system Certification of the Keyless Drive system Country and Siemens VDO Automotive A.G. hereby certifies region that this equipment type 5WK4 8952, 5WK48956, 5WK48812 conforms to the A, B, CY, CZ, D, DK, essential characteristic requirements and other E, EST, F, FIN, GB, Delphi hereby…
-
Page 289: Symbols In The Display
11 Specifications Symbols in the display General Symbols in the display Symbol Meaning Page There are a variety of different symbols in the Indicator and warning symbols in the Stability sys- 53, 161, 162 display in the car. The symbols are divided into combined instrument panel tem, DSTC* warning, indicator and information symbols.
-
Page 290
11 Specifications Symbols in the display Information symbols in the centre Symbol Meaning Page Symbol Meaning Page console display Low oil pres- 52, 54 Left direction Symbol Meaning Page sure indicators Surround sound (only Premium Sound) Seatbelt 18, 54 Right direc- reminder tion indicators News… -
Page 291
11 Specifications Symbols in the display Information symbols in the roof console display Symbol Meaning Page Seatbelt reminder Airbag, passenger 24, 25 seat, activated Airbag, passenger seat, deactivated… -
Page 292: Alphabetical Index
12 Alphabetical Index Alarm…………134 Automatic gearbox alarm indicator……..134 manual gear positions (Geartronic)..154 alarm signals……..135 towing and recovery……168 electronic climate control….. 90 arming……….134 trailer……….. 173, 174 automatic alarm activation….135 ABS fault……….53, 159 Automatic locking……..132 deactivating a triggered alarm….
-
Page 293
12 Alphabetical Index Bluetooth Bulbs, see Lighting……223, 286 Checking and topping up the coolant..218 handsfree……….264 Checking the engine oil level….214 mute microphone……. 265 Checks transfer call to mobile……265 fluids and oils……..215 Bluetooth Children…………. 35 Calls media………. -
Page 294
12 Alphabetical Index Climate control settings Driving in water……..140 auto…………88 Driving with a trailer Deadlock Clock, adjustment……..78 towball load……..275 deactivation……..132 towing capacity……..275 Clutch fluid, checking & topping up..219 temporary deactivation……. 132 DSTC, see also Stability control system.. 161 Coat hanger………. -
Page 295
12 Alphabetical Index Engine block heater parking heater……..92 fuel-driven……….92 refuelling……….142 Engine compartment……. 212 Fuses…………229 ECC…………88 coolant……….218 box in the engine compartment..230 oil…………214 Fast-wind……….251 changing……….229 power steering fluid……219 general……….229 First aid equipment…….. -
Page 296
12 Alphabetical Index Headlamp pattern adjustment Inlaid mats……….102 Keyless drive……126, 152, 288 Active Bending Lights (ABL) ….182 starting the car……..152 Instrument lighting……..60 Headlamps……….59 Keyless entry……….79 Instrument overview Heating left-hand drive……..46 Keyless start (keyless drive)….. 126 front seats………. -
Page 297
12 Alphabetical Index lighting panel, passenger compart- Locking………… 127 Memory function in seats……99 ment…………59 unlocking……….130 Menus main/dipped beam……59, 62 Locking/unlocking……..130 audio system……..238 position/parking lamps……59 inside……….131 Menu structure………. 78 reading lamps……..107 outside……….130 media player…….. -
Page 298
12 Alphabetical Index Parking heater making calls……..265 battery and fuel……..92 on/off……….257 News…………247 general……….92 one-key dial……..259 parking on a hill……..92 phone book……… 267 symbols and display messages…. 93 phone book, shortcut……267 time setting……….. 94 receiving a call…….. -
Page 299
12 Alphabetical Index Recommended child seats ……. 35 Rims cleaning……….202 Reduced guard Radio settings……….79 Roll-over protection……..31 EON………… 249 Refrigerant……….86 Roof frequency update…….. 248 error messages……..105 Refuelling news……….. 247 hatch cover……… 104 fuel cap……….142 programme types……. 246 lowering………. -
Page 300
12 Alphabetical Index Seatbelts………… 18 Stability and traction control system..161 Symbols and display messages parking heater……..93 Seats Stains…………204 manual setting……..98 Standby, phone……..257 power seat……….98 Start assistance……..172 Service programme……… 210 Starting the engine……..150 Side airbags………. -
Page 301
12 Alphabetical Index Traffic information……..247 Washers headlamps……….65 Trailer…………173 Unlocking……… 127, 130 washer fluid, filling……217 cable……….. 175 settings……….79 windscreen……….. 65 Trip computer……….63 USB, connection……..240 Water and dirt-repellent coating….77 Tuning Radio……….245 Water-repellent surface, cleaning…. 204 Type approval, remote control key sys- Waxing…………. -
Page 302
12 Alphabetical Index Wiper blades……….220 cleaning……….220 replacing, windscreen……220… -
Page 304
Kdakd 8Vg 8dgedgVi^dc ©…
Всем доброго дня!
Для удобства использования решил собрать в данной записи документацию, технические характеристики, мануалы, руководства, инструкции и прочий полезный материал для своей машины, найденные за несколько лет на просторах интернета. Предвижу, что данная подборка для местных олдовых корифеев покажется несколько скучной, тем не менее, не исключаю, что для кого-то она также может быть информативной и полезной. Информация актуальна для владельцев автомобилей Volvo C30/S40/V50/C70.
— Регламентированный перечень работ по ТО
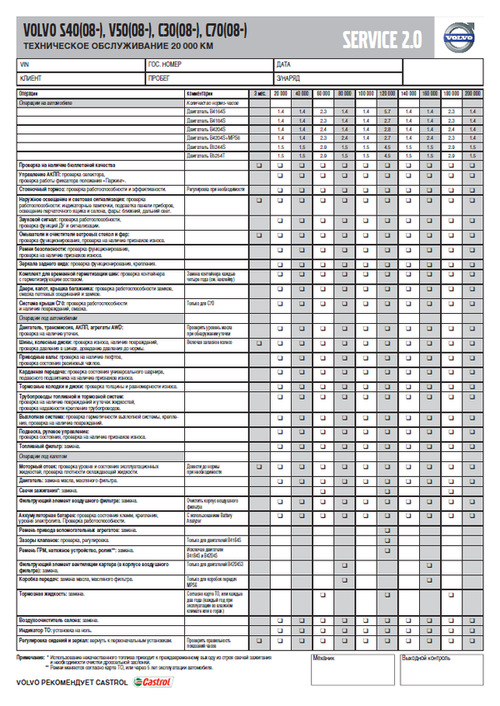
Регламентированный перечень работ по ТО для Volvo C30/S40/V50/C70
Ссылка на файл в формате PDF (ОД Обухов)
— Каталоги запчастей и аксессуаров Volvo
Carcats.ru
Elcats.ru
Emex.ru
accessories.volvocars.com — официальный каталог аксессуаров
Инструкция подбора запчастей и комплектующих Volvo по VIN-номеру — Часть 1, Часть 2
— Руководство/инструкция по эксплуатации
Ссылка на руководство для Volvo V50 MY2012
Ссылка на руководства для других моделей и/или модельных годов
Ссылка на различные инструкции для всех моделей Volvo (Eng, официальный сайт Volvo)
Ссылка на различные инструкции для Volvo S40/V50 (Eng, ресурс владельцев Volvo в UK)
— Quick Guide
Ссылка на файл в формате PDF
— Схемы соединений проводки (Электрика)
Полный размер
Схема по электрической проводке для Volvo C30/S40/V50/C70
Ссылка на файл в формате PDF
— Характеристики и годы производства двигателей для Volvo C30/S40/V50
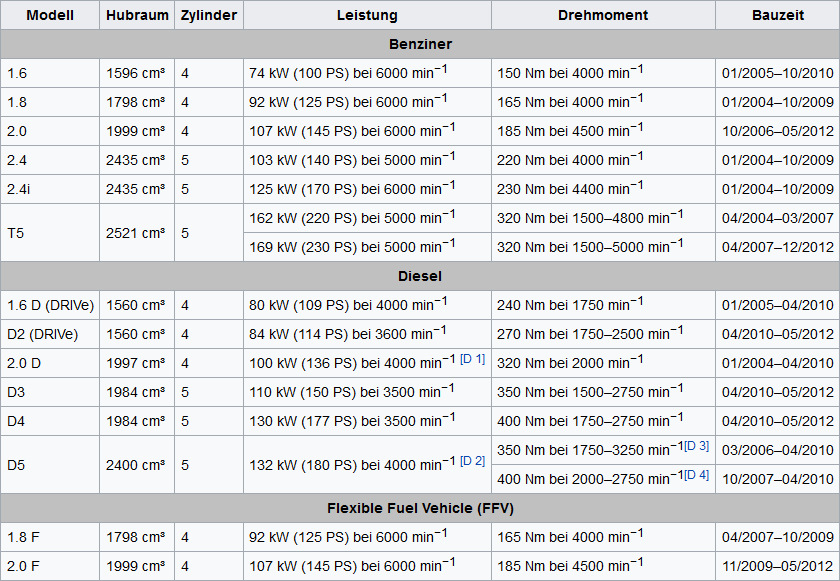
Характеристики и годы производства двигателей для Volvo C30/S40/V50
Ссылка на источник
— Технические характеристики бензиновых двигателей 2.4 (B5244S4/B5244S5) и 2.5 (B5254T3)
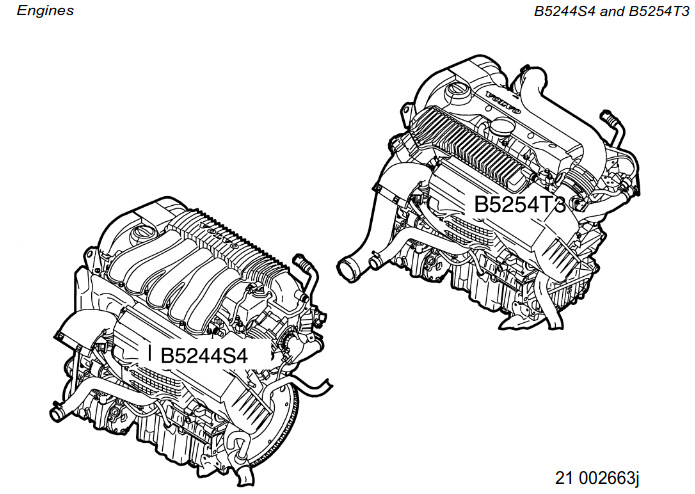
Manual Volvo C30/S40/V50 engines B5244S4 and B5254T3
Ссылка на файл в формате PDF (Eng)
— Технические характеристики бензинового двухлитрового двигателя B4204S3 (он же Mazda MZR LF 2.0, он же Ford Duratec HE 2.0)
Ссылка на изображение в полном размере (источник VIDA)
Ссылка на подборку полезной информации о двигателе Volvo B4204S3/Mazda MZR LF 2.0/Ford Duratec HE 2.0
— Моторное масло
Моторное масло — объём, допуск, эксплуатационные свойства, вязкость, артикулы канистр для бензиновых двигателей B4164S3, B4184S8, B4184S11, B4204S3, B4204S4, B5244S4, B5244S5, B5254T3, B5254T7 и дизельных двигателей D4162T, D4164T, D4204T, D4204T2, D5204T, D5204T5, D5244T8, D5244T9, D5244T13.
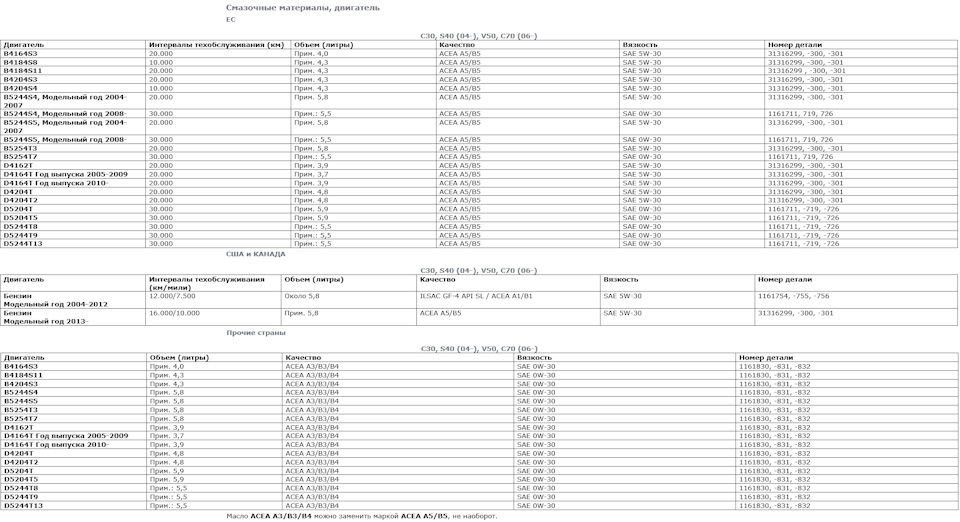
Полный размер
Моторное масло для двигателей Volvo C30/S40/V50
Ссылка на изображение в полном размере (источник VIDA)
— Объём масла между минимальной и максимальной отметками на щупе двигателей Volvo C30/S40/V50
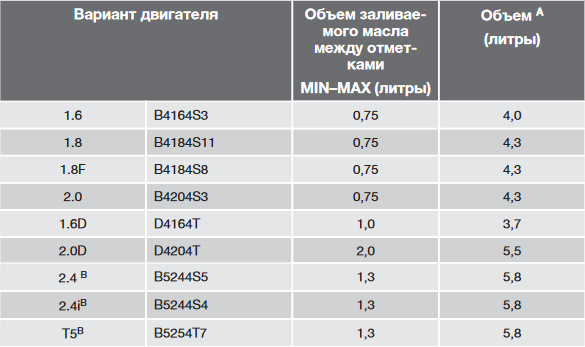
Объём масла между минимальной MIN и максимальной MAX отметкой на щупе моторов Volvo C30/S40/V50
— Автоматическая 5-ти ступенчатая коробка передач Aisin AW55-50/51SN
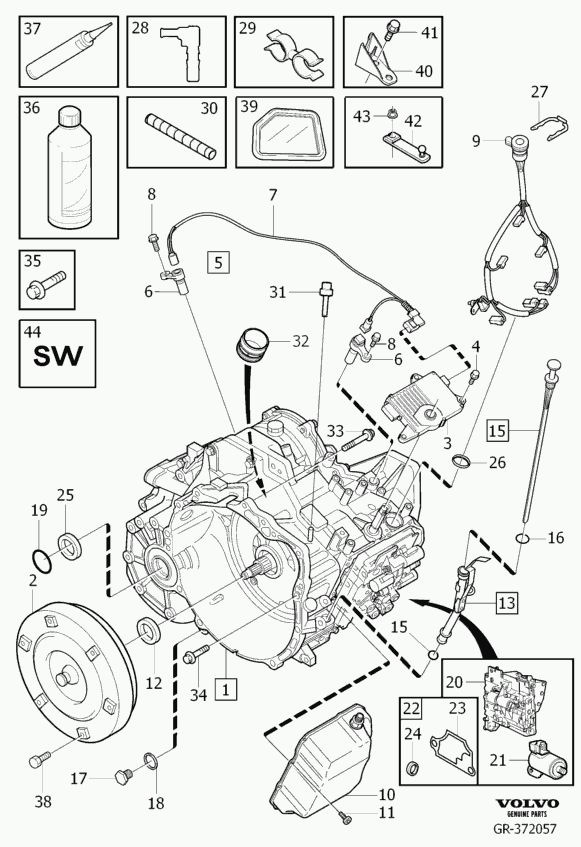
Запчасти на фото: 0835631, 303943
Ссылка на каталог запчастей в формате PDF (Eng)
Ссылка на мануал в формате PDF (Eng)
— Роботизированная 6-ти ступенчатая коробка передач Getrag 6DCT450 (MPS6, она же PowerShift)
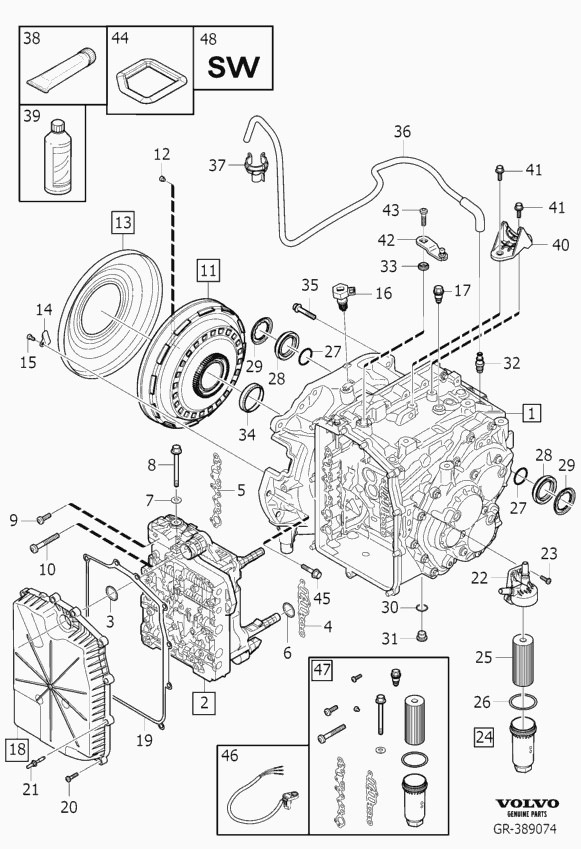
Серия публикаций о PowerShift от технического специалиста Сергея glimmer:
Эксплуатация PowerShift (6DCT450)
Функции коробки PowerShift (6DCT450)
Принцип работы Powershift 6DCT450
Замена масла в коробке PowerShift (6DCT450)
VIDA 2021: Инструкция по замене масла АКПП PowerShift (6DCT450) — NEW!
Замена сцепления 6DCT450 и Eco Boost 203(240)л.с)
Замена уплатнения сцепления 6DCT450 и Eco Boost 203(240)л.с
Модуль управления коробки передач (TCM). Часть 1
Модуль управления коробки передач (TCM). Часть 2
Модуль управления коробки передач (TCM). Замена датчика входного вала
Powershift 6DCT450 в деталях. Часть 1
Powershift 6DCT450 в деталях. Часть 2. Принципиальные схемы ТСМ
Powershift 6DCT450 в деталях. Часть 3. Демпфер.
Powershift 6DCT450 в деталях. Часть 4. Соленоиды ТСМ.
— Типы цоколей и мощность ламп
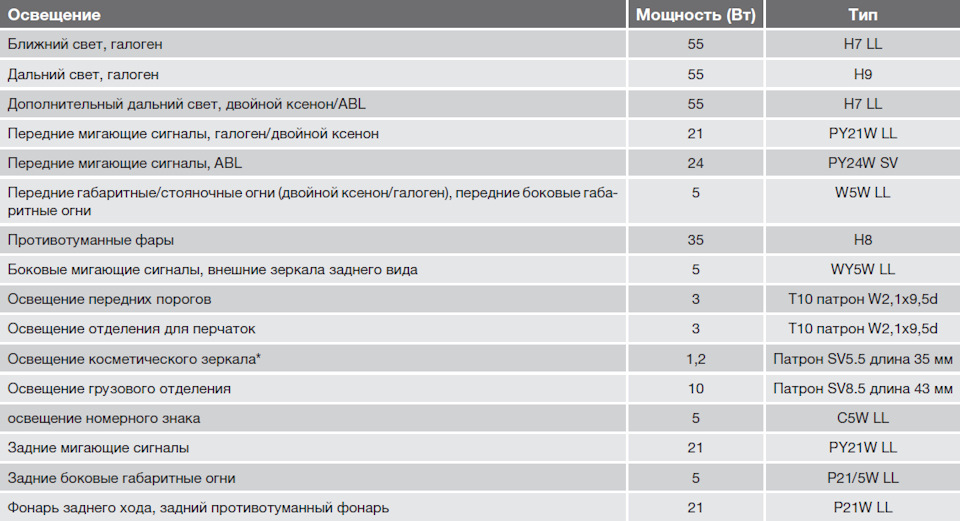
Полный размер
Типы цоколей и мощность ламп
— Брошюра Volvo V50 (Volvo Cars Russia)
Полный размер
Брошюра Volvo V50 (Volvo Cars Russia)
Скачать в формате PDF — описание, фото, комплектации, экстерьер, интерьер, аксессуары
— Официальные пресс-релизы и фото Volvo V50 (Volvo Cars)
Ссылка на официальные пресс-релизы, фото и видео
— Каталог оригинальных литых дисков Volvo (артикулы и размерность)
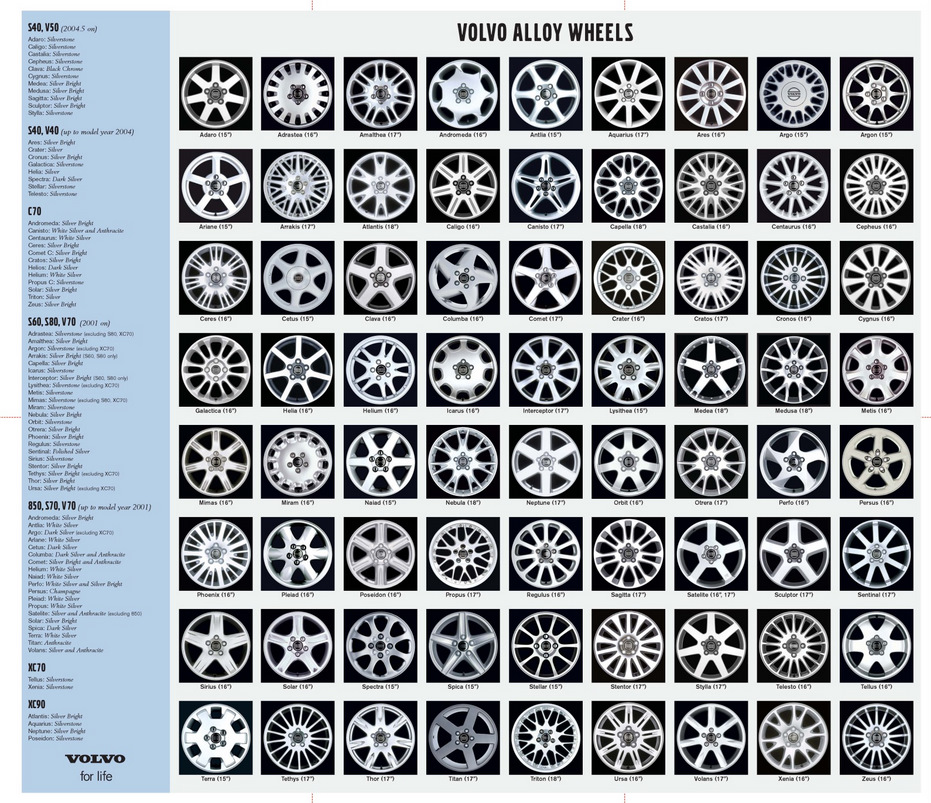
Каталог оригинальных литых дисков Volvo
Ссылка на каталог — названия дисков, размерность и артикулы
— Комплектации Volvo V50
Ссылка
— Проверка доступности обновлений Service 2.0 для всех автомобилей Volvo по VIN-коду

Обновления Volvo Service 2.0
Ссылка
— Расшифровка информации о комплектации для всех автомобилей Volvo по VIN-коду
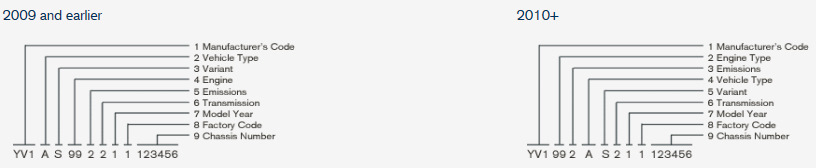
Ссылка на форму отправки запроса на расшифровку информации по VIN-коду в ОД Volvo Car M1
— Volvo VIDA
VIDA Online (для пользователей clubvolvo.ru)
VIDA 2014D + DiCE (Установка, настройка и использование)
— Кузов
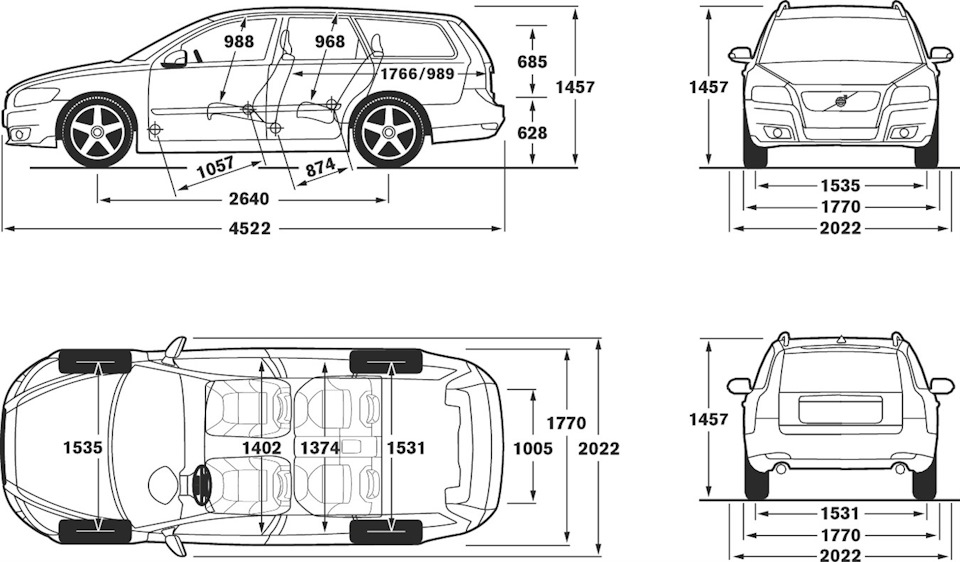
Полный размер
Размеры кузова Volvo V50

VOLVO C70
РУКОВОДСТВО ПО ЭКСПЛУАТАЦИИ
WEB EDITION

PDF инструкция · 257 страниц(ы) русский
инструкцияVolvo C70 (2007)

VOLVO C70
РУКОВОДСТВО ПО ЭКСПЛУАТАЦИИ
WEB EDITION
Посмотреть инструкция для Volvo C70 (2007) бесплатно. Руководство относится к категории Автомобили, 2 человек(а) дали ему среднюю оценку 8.8. Руководство доступно на следующих языках: русский. У вас есть вопрос о Volvo C70 (2007) или вам нужна помощь? Задайте свой вопрос здесь
- C70_owners_manual_RU_w0720.pdf
Главная
Не можете найти ответ на свой вопрос в руководстве? Вы можете найти ответ на свой вопрос ниже, в разделе часто задаваемых вопросов о Volvo C70 (2007).
Как перевести мили в километры?
Где я могу узнать идентификационный номер транспортного средства Volvo?
Что такое идентификационный номер транспортного средства (VIN)?
Когда транспортному средству Volvo требуется техническое обслуживание?
Когда следует заменять тормозную жидкость на Volvo?
В чем разница между топливом E10 и E5?
Одна или несколько дверей не открываются изнутри. Что мне делать?
Автомобильный радиоприемник не включается, что делать?
Инструкция Volvo C70 (2007) доступно в русский?
Не нашли свой вопрос? Задайте свой вопрос здесь
(скачивание инструкции бесплатно)
Формат файла: PDF
Доступность: Бесплатно как и все руководства на сайте. Без регистрации и SMS.
Дополнительно: Чтение инструкции онлайн

C70; 7; 3
2008-03-14T14:41:59+01:00; Page 1
evastarck
VOLVO C70
Руководство По Эксплуатации
WEB EDITION
Страница:
(1 из 322)
навигация

1

2

3

4

5

6

7

8

9

10

11

12

13

14

15

16

17

18

19

20

21

22

23

24

25

26

27

28

29

30

31

32

33

34

35

36

37

38

39

40

41

42

43

44

45

46

47

48

49

50

51

52

53

54

55

56

57

58

59

60

61

62

63

64

65

66

67

68

69

70

71

72

73

74

75

76

77

78

79

80

81

82

83

84

85

86

87

88

89

90

91

92

93

94

95

96

97

98

99

100

101

102

103

104

105

106

107

108

109

110

111

112

113

114

115

116

117

118

119

120

121

122

123

124

125

126

127

128

129

130

131

132

133

134

135

136

137

138

139

140

141

142

143

144

145

146

147

148

149

150

151

152

153

154

155

156

157

158

159

160

161

162

163

164

165

166

167

168

169

170

171

172

173

174

175

176

177

178

179

180

181

182

183

184

185

186

187

188

189

190

191

192

193

194

195

196

197

198

199

200

201

202

203

204

205

206

207

208

209

210

211

212

213

214

215

216

217

218

219

220

221

222

223

224

225

226

227

228

229

230

231

232

233

234

235

236

237

238

239

240

241

242

243

244

245

246

247

248

249

250

251

252

253

254

255

256

257

258

259

260

261

262

263

264

265

266

267

268

269

270

271

272

273

274

275

276

277

278

279

280

281

282

283

284

285

286

287

288

289

290

291

292

293

294

295

296

297

298

299

300

301

302

303

304

305

306

307

308

309

310

311

312

313

314

315

316

317

318

319

320

321

322
Оглавление инструкции
- Страница 1 из 323
C70; 7; 3 evastarck 2008-03-14T14:41:59+01:00; Page 1 VOLVO C70 Руководство По Эксплуатации WEB EDITION - Страница 2 из 323
C70; 7; 3 evastarck 2008-03-17T16:24:08+01:00; Page 1 УВАЖАЕМЫЕ ВЛАДЕЛЬЦЫ АВТОМОБИЛЯ VOLVO! СПАСИБО ЗА ВАШ ВЫБОР АВТОМОБИЛЯ VOLVO! Мы надеемся, что Вы в течение многих лет получите наслаждение от управления Вашим автомобилем Volvo. Этот автомобиль создан для обеспечения комфорта и безопасности Вам - Страница 3 из 323
C70; 7; 3 evastarck 2008-03-17T16:24:08+01:00; Page 2 Содержание 00 01 02 00 Введение 01 Безопасность Важная информация…………………………… 8 Volvo и окружающая среда……………….. 12 Ремни безопасности…………………………. Система - Страница 4 из 323
C70; 7; 3 evastarck 2008-03-17T16:24:08+01:00; Page 3 Содержание 03 04 05 03 Климатическая установка Общие сведения о климатической установке……………………………………………….. Электронная климатическая установка, ЕСС*………………………………………. Распределение - Страница 5 из 323
C70; 7; 3 evastarck 2008-03-17T16:24:08+01:00; Page 4 Содержание 06 07 08 06 Запуск двигателя и вождение Общие сведения……………………………… Заправка топливом…………………………. Запуск двигателя……………………………. Keyless - Страница 6 из 323
C70; 7; 3 evastarck 2008-03-17T16:24:08+01:00; Page 5 Содержание 09 10 11 09 Уход и техобслуживание Плановое техобслуживание Volvo……. Уход за автомобилем своими силами. Капот и двигательный отсек……………. Масла и жидкости…………………………… Щетки - Страница 7 из 323
C70; 7; 3 evastarck 2008-03-17T16:24:08+01:00; Page 6 Содержание 12 12 Алфавитный указатель Алфавитный указатель……………………. 299 6 - Страница 8 из 323
C70; 7; 3 evastarck 2008-03-17T16:24:08+01:00; Page 7 Содержание 7 - Страница 9 из 323
C70; 7; 3 evastarck 2008-03-17T16:24:08+01:00; Page 8 Введение Важная информация Читайте Руководство по эксплуатации Введение Лучший способ познакомиться с Вашим новым автомобилем — это прочитать настоящее руководство, желательно до первой поездки. Из руководства Вы можете узнать о новых функциях, - Страница 10 из 323
C70; 7; 3 evastarck 2008-03-17T16:24:08+01:00; Page 9 Введение Важная информация Таблички Повреждение имущества Информация В автомобиле имеются различные таблички, в которых ясно и четко приводится важная информация. Эти таблички в автомобиле по нисходящей указывают степень важности - Страница 11 из 323
C70; 7; 3 evastarck 2008-03-17T16:24:08+01:00; Page 10 Введение Важная информация Если поэтапная инструкция оснащена серией рисунков, то нумерация каждого момента аналогична соответствующему рисунку. Серии рисунков сопровождаются пронумерованными списками с буквенными обозначениями, в которых - Страница 12 из 323
C70; 7; 3 evastarck 2008-03-17T16:24:08+01:00; Page 11 Введение Важная информация Информация в сети Интернет На сайте www.volvocars.com можно найти дополнительную информацию о вашем автомобиле. 11 - Страница 13 из 323
C70; 7; 3 evastarck 2008-03-17T16:24:08+01:00; Page 12 Введение Volvo и окружающая среда G000000 Экологическая концепция Volvo Car Corporation Забота об окружающей среде является одним из основополагающих принципов деятельности всех подразделений Volvo Car Corporation. Мы также верим, что наши - Страница 14 из 323
C70; 7; 3 evastarck 2008-03-17T16:24:08+01:00; Page 13 Введение Volvo и окружающая среда Эффективная очистка отработавших газов Ваш автомобиль Volvo изготовлен в соответствии с концепцией «Чистота внутри и снаружи» – концепция, которая предусматривает как чистую среду в салоне, так и высокую - Страница 15 из 323
C70; 7; 3 evastarck 2008-03-17T16:24:08+01:00; Page 14 Введение Volvo и окружающая среда • • Если в автомобиле установлен предпусковой подогреватель, обязательно включайте его перед холодным пуском. Это позволяет уменьшить расход топлива и выбросы в атмосферу. • Ведите автомобиль плавно, избегая - Страница 16 из 323
C70; 7; 3 evastarck 2008-03-17T16:24:08+01:00; Page 15 Введение 15 - Страница 17 из 323
C70; 7; 3 evastarck 2008-03-17T16:24:08+01:00; Page 16 16 * Опция/дополнительное оборудование, дополнительную информацию см. Введение. 18 21 22 25 28 30 31 33 34 36 37 G020871 Ремни безопасности………………………………………………………………….. Система - Страница 18 из 323
C70; 7; 3 evastarck БЕЗОПАСНОСТЬ 2008-03-17T16:24:08+01:00; Page 17 01 - Страница 19 из 323
C70; 7; 3 evastarck 2008-03-17T16:24:08+01:00; Page 18 01 Безопасность 01 Ремни безопасности Общая информация Пристегивание ремня безопасности Медленно вытяните ремень безопасности и застегните его, вставив язычок в замок. Громкий щелчок указывает на фиксацию ремня безопасности. Как отстегнуть - Страница 20 из 323
C70; 7; 3 evastarck 2008-03-17T16:24:08+01:00; Page 19 01 Безопасность Ремни безопасности допускайте, чтобы она скользила вверх по животу. Необходимо, чтобы ремень безопасности плотно прилегал к телу, не провисая без необходимости. Следите также за тем, чтобы ремень не был перекручен. - Страница 21 из 323
C70; 7; 3 evastarck 2008-03-17T16:24:08+01:00; Page 20 01 Безопасность 01 Ремни безопасности также подтверждаться вручную нажатием клавиши READ. Направляющая ремня К сообщению на информационном дисплее, показывающему, какие ремни безопасности используются, имеется постоянный доступ. Чтобы - Страница 22 из 323
C70; 7; 3 evastarck 2008-03-17T16:24:08+01:00; Page 21 01 Безопасность Система Airbag Предупреждающий символ в комбинированном приборе G029041 Если это необходимо, то одновременно с предупреждающим символом на дисплее появляется сообщение. Если предупреждающий символ неисправен, загорается - Страница 23 из 323
C70; 7; 3 evastarck 2008-03-17T16:24:08+01:00; Page 22 01 Безопасность 01 Надувные подушки безопасности (SRS) Система подушек безопасности ПРЕДОСТЕРЕЖЕНИЕ ВНИМАНИЕ G020111 Ремонт может выполняться только на официальной станции техобслуживания Volvo. Любое вмешательство в систему подушек - Страница 24 из 323
C70; 7; 3 evastarck 2008-03-17T16:24:08+01:00; Page 23 01 Безопасность Надувные подушки безопасности (SRS) Подушка безопасности (SRS) на стороне водителя ПРЕДОСТЕРЕЖЕНИЕ Ремень безопасности и подушка безопасности срабатывают согласованно. Если ремень безопасности не пристегнут или используется - Страница 25 из 323
C70; 7; 3 evastarck 2008-03-17T16:24:08+01:00; Page 24 01 Безопасность Надувные подушки безопасности (SRS) 01 надувной подушкой безопасности 1, которая в сложенном виде находится в отделении над перчаточным ящиком, Такая панель имеет маркировку SRS AIRBAG. ПРЕДОСТЕРЕЖЕНИЕ Запрещено сажать детей в - Страница 26 из 323
C70; 7; 3 evastarck 2008-03-17T16:24:08+01:00; Page 25 01 Безопасность Активирование/отключение подушки безопасности (SRS)* Общая информация Подушку безопасности (SRS) на стороне пассажира можно отключить, если в автомобиле установлен переключатель PACOS. Информацию об том, как активировать/ - Страница 27 из 323
C70; 7; 3 evastarck 2008-03-17T16:24:08+01:00; Page 26 01 Безопасность 01 Активирование/отключение подушки безопасности (SRS)* ПРЕДОСТЕРЕЖЕНИЕ Messages Активированная подушка безопасности (место пассажира): Ребенку в детском кресле или на опорной подушке запрещается сидеть на месте пассажира на - Страница 28 из 323
C70; 7; 3 evastarck 2008-03-17T16:24:08+01:00; Page 27 01 Безопасность Активирование/отключение подушки безопасности (SRS)* 01 ВНИМАНИЕ При установке дистанционного пульта в положение зажигания II или III в комбинированном приборе в течение прим. 6 секунд показывается предупреждающий символ подушки - Страница 29 из 323
C70; 7; 3 evastarck 2008-03-17T16:24:08+01:00; Page 28 01 Безопасность Боковая подушка безопасности (SIPS-bag) 01 Боковая подушка безопасности – SIPS-bag ПРЕДОСТЕРЕЖЕНИЕ Ремонт может выполняться только на официальной станции техобслуживания Volvo. Любое вмешательство в систему подушек SIPS может - Страница 30 из 323
C70; 7; 3 evastarck 2008-03-17T16:24:08+01:00; Page 29 01 Безопасность Боковая подушка безопасности (SIPS-bag) 01 Место водителя, автомобиль с левосторонним управлением Место пассажира, автомобиль с левосторонним управлением G032246 G025316 G025315 Подушка SIPS Расположение таблички для боковой - Страница 31 из 323
C70; 7; 3 evastarck 2008-03-17T16:24:08+01:00; Page 30 01 Безопасность 01 Надувной занавес (DMIC) Назначение ПРЕДОСТЕРЕЖЕНИЕ G025424 G025425 Водитель и пассажир могут получить травмы, если облокачиваются на дверную панель в момент срабатывания надувного занавеса. Кроме того, надувной занавес может - Страница 32 из 323
C70; 7; 3 evastarck 2008-03-17T16:24:08+01:00; Page 31 01 Безопасность WHIPS 01 G020347 Защита от плетевых травм шеи – WHIPS Система WHIPS (Whiplash Protection System) состоит из энергопоглощающей спинки и специально адаптированного к данной системе подголовника в передних сидениях. Система - Страница 33 из 323
C70; 7; 3 evastarck 2008-03-17T16:24:08+01:00; Page 32 01 Безопасность 01 WHIPS Не создавайте помех для функционирования системы WHIPS ПРЕДОСТЕРЕЖЕНИЕ Если сиденье подвергается сильной перегрузке, например, в момент удара сзади, систему WHIPS следует проверить на официальной станции техобслуживания - Страница 34 из 323
C70; 7; 3 evastarck 2008-03-17T16:24:08+01:00; Page 33 01 Безопасность Roll-Over Protection System (ROPS) — Система защиты при переворачивании автомобиля Функция ROPS 01 ПРЕДОСТЕРЕЖЕНИЕ Запрещены любые вмешательства в систему ROPS. G020797 Сверху на системе ROPS или позади подголовников пассажиров - Страница 35 из 323
C70; 7; 3 evastarck 2008-03-17T16:24:08+01:00; Page 34 01 Безопасность Когда срабатывают системы 01 Активирование систем Система Активируется Преднатяжитель ремня безопасности, передние сидения При фронтальном и/или боковом столкновении и/или наезде сзади и/или перевороте. Преднатяжитель ремней - Страница 36 из 323
C70; 7; 3 evastarck 2008-03-17T16:24:08+01:00; Page 35 01 Безопасность Когда срабатывают системы 01 ПРЕДОСТЕРЕЖЕНИЕ Запрещается управлять автомобилем со сработавшими подушками безопасности. Это может затруднить управление автомобилем. Другие системы защиты также могут быть повреждены. Интенсивное - Страница 37 из 323
C70; 7; 3 evastarck 2008-03-17T16:24:08+01:00; Page 36 01 Безопасность 01 Crash mode (aварийный режим) Вождение после столкновения Попытка пуска двигателя Сначала убедитесь, что из автомобиля не вытекает топливо. Запах топлива также не допускается. G029042 Если все выглядит нормально, то после - Страница 38 из 323
C70; 7; 3 evastarck 2008-03-17T16:24:08+01:00; Page 37 01 Безопасность Безопасность детей Дети должны сидеть так, чтобы им было удобно и безопасно Место ребенка в автомобиле и необходимое оборудование выбирается в зависимости от веса и роста ребенка. Подробную информацию см. стр. 39. ВНИМАНИЕ - Страница 39 из 323
C70; 7; 3 evastarck 2008-03-17T16:24:08+01:00; Page 38 01 Безопасность Безопасность детей 01 пассажира активирована. Ребенок может получить серьезные травмы, если при срабатывании надувной подушки безопасности он находится на сиденье пассажира. ПРЕДОСТЕРЕЖЕНИЕ Никогда не размещайте ребенка в - Страница 40 из 323
C70; 7; 3 evastarck 2008-03-17T16:24:08+01:00; Page 39 01 Безопасность Безопасность детей 01 Размещение детей в автомобиле 3 Вес/возраст Переднее сиденье A Заднее сиденье Группа 0 Детское кресло Volvo – Повернутое назад детское защитное кресло с креплением ремнем безопасности автомобиля, крепежной - Страница 41 из 323
C70; 7; 3 evastarck 2008-03-17T16:24:08+01:00; Page 40 01 Безопасность Безопасность детей 01 Вес/возраст Переднее сиденье A Заднее сиденье Группа 1 Детское кресло Volvol – повернутое назад детское защитное кресло, крепится с помощью ремня безопасности автомобиля и крепежной ленты. Используйте - Страница 42 из 323
C70; 7; 3 evastarck 2008-03-17T16:24:08+01:00; Page 41 01 Безопасность Безопасность детей ПРЕДОСТЕРЕЖЕНИЕ Никогда не размещайте ребенка в детском кресле или на детской опорной подушке на переднем сиденье, если подушка безопасности (SRS) активирована4. 01 Система креплений ISOFIX для детских кресел - Страница 43 из 323
C70; 7; 3 evastarck 2008-03-17T16:24:08+01:00; Page 42 44 46 48 49 51 55 58 59 62 65 68 70 71 72 73 75 79 HomeLink ЕС*…………………………………………………………………………… 83 42 * Опция/дополнительное оборудование, дополнительную информацию см. Введение. G020901 - Страница 44 из 323
C70; 7; 3 evastarck ПРИБОРЫ И ОРГАНЫ УПРАВЛЕНИЯ 2008-03-17T16:24:08+01:00; Page 43 02 - Страница 45 из 323
C70; 7; 3 evastarck 2008-03-17T16:24:08+01:00; Page 44 02 Приборы и органы управления Обзор, автомобили с левосторонним управлением 20 18 02 22 17 21 16 10 9 8 7 6 5 11 12 13 14 15 19 8 26 8 23 24 25 8 9 7 27 28 29 4 3 2 1 3 31 30 32 34 44 G028206 33 - Страница 46 из 323
C70; 7; 3 evastarck 2008-03-17T16:24:08+01:00; Page 45 02 Приборы и органы управления Обзор, автомобили с левосторонним управлением Регулировка положения рулевого колеса Ручка открытия капота Панель управления, стекла и внешние зеркала заднего вида Указатели поворотов, дальний свет, бортовой - Страница 47 из 323
C70; 7; 3 evastarck 2008-03-17T16:24:08+01:00; Page 46 02 Приборы и органы управления Обзор, автомобили с правосторонним управлением 15 17 02 13 18 14 19 16 10 11 12 9 26 9 20 21 22 23 24 25 9 8 8 7 9 6 7 5 27 32 28 4 29 2 3 1 4 30 31 34 46 G019491 33 - Страница 48 из 323
C70; 7; 3 evastarck 2008-03-17T16:24:08+01:00; Page 47 02 Приборы и органы управления Обзор, автомобили с правосторонним управлением Электрическое гнездо и прикуриватель Переключатель, управление люком в крыше Стояночный тормоз Переключатель для установки дополнительного оборудования Переключатель - Страница 49 из 323
C70; 7; 3 evastarck 2008-03-17T16:24:08+01:00; Page 48 02 Приборы и органы управления Панель управления в двери водителя G018241 02 Панель управления в двери водителя Стеклоподъемники, все стекла вниз/ вверх Стеклоподъемники Наружное зеркало заднего вида, левая сторона Наружное зеркало заднего - Страница 50 из 323
C70; 7; 3 evastarck 2008-03-17T16:24:08+01:00; Page 49 02 Приборы и органы управления Комбинированный прибор G029046 02 Спидометр Информационный символ Указатель поворотов, левый Указатель поворотов, правый Аварийная сигнализация Тахометр – Показывает частоту вращения двигателя в тысяча х - Страница 51 из 323
C70; 7; 3 evastarck 02 Приборы и органы управления Комбинированный прибор 02 Указатель температуры – Используется для системы охлаждения двигателя. Если температура повышается сверх нормы и стрелка перемещается в красную зону, на дисплее появляется сообщение. Помните, что, например, дополнительные - Страница 52 из 323
C70; 7; 3 evastarck 2008-03-17T16:24:08+01:00; Page 51 02 Приборы и органы управления Контрольные и предупреждающие символы Проверка функционирования, символы Символы в центре прибора Когда этот символ горит: 1. Остановите автомобиль, соблюдая меры безопасности. Автомобилем управлять далее - Страница 53 из 323
C70; 7; 3 evastarck 2008-03-17T16:24:08+01:00; Page 52 02 Приборы и органы управления Контрольные и предупреждающие символы 02 Контрольные символы – левая сторона Система очистки отработанных газов Если символ горит, это может быть связано с неисправностью в системе очистки отработанных газов - Страница 54 из 323
C70; 7; 3 evastarck 2008-03-17T16:24:08+01:00; Page 53 02 Приборы и органы управления Контрольные и предупреждающие символы Контрольные символы – правая сторона Контрольный символ прицепа Символ мигает, когда включаются указатели поворотов и подсоединен прицеп. Если символ не мигает, одна из ламп - Страница 55 из 323
C70; 7; 3 evastarck 2008-03-17T16:24:08+01:00; Page 54 02 Приборы и органы управления Контрольные и предупреждающие символы Неисправность в тормозной системе Этот символ загорается при возможном низком уровне тормозной жидкости. 02 Остановите автомобиль в безопасном месте и проверьте уровень - Страница 56 из 323
C70; 7; 3 evastarck 2008-03-17T16:24:08+01:00; Page 55 02 Приборы и органы управления Информационный дисплей Сообщения ВНИМАНИЕ Сообщение Если предупреждающее сообщение отображается во время использования бортового компьютера, работу можно возобновить только после прочтения сообщения (нажать на - Страница 57 из 323
C70; 7; 3 evastarck 2008-03-17T16:24:08+01:00; Page 56 02 Приборы и органы управления Информационный дисплей Сообщение 02 Значение Сообщение Значение Сообщение Значение ВРЕМЯ ТЕХОБСЛУЖ Время планового техобслуживания на официальной станции техобслуживания Volvo. Это время техобслуживания зависит от - Страница 58 из 323
C70; 7; 3 evastarck 2008-03-17T16:24:08+01:00; Page 57 02 Приборы и органы управления Информационный дисплей Сообщение КОР.ПЕРЕДАЧ ВЫСОК.ТЕМП.М АСЛА Двигайтесь медленно или остановитесь, соблюдая меры безопасности. Выключите передачу и дайте двигателю поработать на холостых оборотах до тех пор, - Страница 59 из 323
C70; 7; 3 evastarck 2008-03-17T16:24:08+01:00; Page 58 02 Приборы и органы управления Электрическое гнездо Электрическое гнездо 12 В Прикуриватель* Прикуриватель активируется нажатием на кнопку. Когда прикуриватель нагрет, кнопка выскакивает обратно. Выньте прикуриватель и прикурите от раскаленной - Страница 60 из 323
C70; 7; 3 evastarck 2008-03-17T16:24:08+01:00; Page 59 02 Приборы и органы управления Панель освещения Общие сведения Положение Значение Автоматический/отключенный ближний свет фар. Только мигание дальним светом. G020139 Габаритный/стояночный свет Регулировочное кольцо для регулировки высоты - Страница 61 из 323
C70; 7; 3 evastarck 2008-03-17T16:24:08+01:00; Page 60 02 Приборы и органы управления Панель освещения 02 Автоматический ближний свет, дальний свет фар Дополнительная подсветка дисплеев 1. Поверните ключ зажигания в положение II. Чтобы облегчить просмотр счетчика пробега, счетчика пройденного пути, - Страница 62 из 323
C70; 7; 3 evastarck 2008-03-17T16:24:08+01:00; Page 61 02 Приборы и органы управления Панель освещения вновь не начнете ускоряться, но их можно отключить соответствующей кнопкой, см. стр. 71. 02 61 - Страница 63 из 323
C70; 7; 3 evastarck 2008-03-17T16:24:08+01:00; Page 62 02 Приборы и органы управления Левый подрулевой рычаг Положения подрулевого рычага Указатели поворотов Непрерывное мигание 02 Переместите подрулевой рычаг вверх или вниз в крайнее положение (2). 2 Рычаг остается в крайнем положении и - Страница 64 из 323
C70; 7; 3 evastarck 2008-03-17T16:24:08+01:00; Page 63 02 Приборы и органы управления Левый подрулевой рычаг 2. Переместите подрулевой рычаг в направлении рулевого колеса в крайнее положение (4) и отпустите. 3. Выйдите из автомобиля и заприте дверь. Органы управления Для доступа к информации в - Страница 65 из 323
C70; 7; 3 evastarck 02 Приборы и органы управления Левый подрулевой рычаг 02 вается на основании среднего расхода топлива за последние 30 км пути. Когда на дисплее отображается » — км на ост. топливе», гарантированного пробега не остается. Без промедления заправьте автомобиль топливом. ВНИМАНИЕ - Страница 66 из 323
C70; 7; 3 evastarck 2008-03-17T16:24:08+01:00; Page 65 02 Приборы и органы управления Правый подрулевой рычаг Очистители ветрового стекла Одинарный ход Потяните рычаг вверх, чтобы щетки очистителя сделали один ход. B C 0 02 Интервальный режим работы A G025419 0 ВАЖНО Используйте достаточное - Страница 67 из 323
C70; 7; 3 evastarck 2008-03-17T16:24:08+01:00; Page 66 02 Приборы и органы управления Правый подрулевой рычаг 02 ных интервалах фары омываются каждый раз. Датчик дождя* положении I или II, а рычаг очистителей ветрового стекла должен быть установлен в положение 0 (не активирован). - Страница 68 из 323
C70; 7; 3 evastarck 2008-03-17T16:24:08+01:00; Page 67 02 Приборы и органы управления Правый подрулевой рычаг Регулировочное кольцо Регулирующее кольцо используется для установки частоты работы щеток стеклоочистителя в интервальном режиме работы или для регулировки чувствительности по отношению к - Страница 69 из 323
C70; 7; 3 evastarck 2008-03-17T16:24:08+01:00; Page 68 02 Приборы и органы управления Система поддержания постоянной скорости* Активирование Увеличение или уменьшение скорости 02 ВНИМАНИЕ Временное повышение скорости (менее одной минуты) при помощи педали газа, например, при обгоне, не влияет на - Страница 70 из 323
C70; 7; 3 evastarck 2008-03-17T16:24:08+01:00; Page 69 02 Приборы и органы управления Система поддержания постоянной скорости* Возврат к скорости – Нажмите на кнопку для возврата к ранее установленной скорости. В комбинированном приборе появляется CRUISE ON. 02 Отключение Нажмите CRUISE для - Страница 71 из 323
2008-03-17T16:24:08+01:00; Page 70 C70; 7; 3 evastarck 02 Приборы и органы управления Клавиатура на рулевом колесе* Функции кнопок ками со стрелками, его следует активировать кнопкой ENTER. 02 G020142 Для возврата только в режим Аудио, нажмите EXIT. Четыре нижние кнопки клавиатуры рулевого колеса - Страница 72 из 323
C70; 7; 3 evastarck 2008-03-17T16:24:08+01:00; Page 71 02 Приборы и органы управления Регулировка положения рулевого колеса, аварийная мигающая сигнализация Регулировка положения рулевого колеса ПРЕДОСТЕРЕЖЕНИЕ Отрегулируйте положение рулевого колеса перед поездкой, но не занимайтесь этим во время - Страница 73 из 323
C70; 7; 3 evastarck 2008-03-17T16:24:08+01:00; Page 72 02 Приборы и органы управления Стояночный тормоз Стояночный тормоз (ручной тормоз) 02 3. Отпустите педаль ножного тормоза и убедитесь, что автомобиль неподвижен. 4. Если автомобиль катится, стояночный тормоз следует затянуть с еще большим - Страница 74 из 323
C70; 7; 3 evastarck 2008-03-17T16:24:08+01:00; Page 73 02 Приборы и органы управления Электрические стеклоподъемники Управление Управление электрическими стеклоподъемниками осуществляется при помощи переключателей в дверях. Стеклоподъемники работают, когда зажигание находится в положении I и II. По - Страница 75 из 323
C70; 7; 3 evastarck 2008-03-17T16:24:08+01:00; Page 74 02 Приборы и органы управления Электрические стеклоподъемники ПРЕДОСТЕРЕЖЕНИЕ 02 Место пассажира Функция отключения движения стекол при блокировании посторонним предметом действует как при автоматическом закрытии, так и при закрытии вручную, но - Страница 76 из 323
C70; 7; 3 evastarck 2008-03-17T16:24:08+01:00; Page 75 02 Приборы и органы управления Зеркала заднего вида Внутреннее зеркало заднего вида Автоматическая защита от ослепления* В случае яркого свет сзади зеркало заднего вида затемняется автоматически. Регулятор (1) на зеркалах с автоматическим - Страница 77 из 323
C70; 7; 3 evastarck 2008-03-17T16:24:08+01:00; Page 76 02 Приборы и органы управления Зеркала заднего вида 02 2. Не менее 6 секунд удерживайте нажатой кнопку (1). После этого появляется обозначение C (кнопка утоплена, поэтому воспользуйтесь, например, скрепой, чтобы ее нажать). G020150 4. Повторным - Страница 78 из 323
C70; 7; 3 evastarck 2008-03-17T16:24:08+01:00; Page 77 02 Приборы и органы управления Зеркала заднего вида Наружные зеркала заднего вида Электроуправляемые складные зеркала заднего вида* Для парковки/проезда в узком пространстве наружные зеркала можно сложить. Это можно сделать в положении - Страница 79 из 323
C70; 7; 3 evastarck 2008-03-17T16:24:08+01:00; Page 78 02 Приборы и органы управления Зеркала заднего вида раскладывания наружных зеркал после их смещения со своего места вследствие внешнего механического воздействия. Автоматическое складывание/ раскладывание 02 2. Отпустите клавиши. Зеркала - Страница 80 из 323
C70; 7; 3 evastarck 2008-03-17T16:24:08+01:00; Page 79 02 Приборы и органы управления Персональные настройки 02 A B D C G026307 E Панель управления. 79 - Страница 81 из 323
C70; 7; 3 evastarck 2008-03-17T16:24:08+01:00; Page 80 02 Приборы и органы управления Персональные настройки Возможные настройки Закрытие меню: Часы, установка Панель управления 02 Для некоторых функций автомобиля можно провести персональные настройки. Это относится в настройке замков, климата и - Страница 82 из 323
C70; 7; 3 evastarck 2008-03-17T16:24:08+01:00; Page 81 02 Приборы и органы управления Персональные настройки Настройки автомобиля Сложить зеркала при запирании* При запирании/отпирании автомобиля дистанционным пультом зеркала заднего вида можно сложить/раскрыть автоматически. Имеются варианты - Страница 83 из 323
C70; 7; 3 evastarck 02 Приборы и органы управления Персональные настройки 02 Информация • НОМЕР VIN – (Vehicle Identification Number) – идентификационный номер автомобиля. • КОЛИЧЕСТВО КЛЮЧЕЙ – показывается, сколько ключей зарегистрировано для данного автомобиля. 82 2008-03-17T16:24:08+01:00; Page - Страница 84 из 323
C70; 7; 3 evastarck 2008-03-17T16:24:08+01:00; Page 83 02 Приборы и органы управления HomeLink ЕС* Общие сведения ВНИМАНИЕ Конструктивно HomeLink создан так, что он не действует, если автомобиль заперт снаружи. Сохраните исходные пульты дистанционного управления для дальнейшего программирования - Страница 85 из 323
C70; 7; 3 evastarck 2008-03-17T16:24:08+01:00; Page 84 02 Приборы и органы управления HomeLink ЕС* Первое программирование 02 При выполнении первого пункта происходит очистка памяти HomeLink, и его не следует выполнять, если перепрограммируется только одна кнопка. 1. Нажмите две внешние кнопки и не - Страница 86 из 323
C70; 7; 3 evastarck 2008-03-17T16:24:08+01:00; Page 85 02 Приборы и органы управления HomeLink ЕС* 2. Когда индикаторная лампа на HomeLink начинает мигать (прим. через 20 секунд), поместите исходный пульт дистанционного управления на расстоянии 2-8 см от HomeLink. Не упускайте из виду индикаторную - Страница 87 из 323
2008-03-17T16:24:08+01:00; Page 86 Общие сведения о климатической установке……………………………… Электронная климатическая установка, ЕСС*……………………………. Распределение воздуха……………………………………………………………… Топливный - Страница 88 из 323
C70; 7; 3 evastarck КЛИМАТИЧЕСКАЯ УСТАНОВКА 2008-03-17T16:24:08+01:00; Page 87 03 - Страница 89 из 323
C70; 7; 3 evastarck 2008-03-17T16:24:08+01:00; Page 88 03 Климатическая установка Общие сведения о климатической установке Кондиционирование воздуха 03 Лед и снег Климатическая установка охлаждает или нагревает, а также осушает воздух в салоне. Автомобиль оснащен либо системой ручного управления - Страница 90 из 323
C70; 7; 3 evastarck 2008-03-17T16:24:08+01:00; Page 89 03 Климатическая установка Общие сведения о климатической установке Вентиляционные сопла в приборной панели более эффективного устранения запотевания. ЕСС ВНИМАНИЕ Не закрывайте или не блокируйте датчики одеждой или другими предметами. Открыто - Страница 91 из 323
C70; 7; 3 evastarck 2008-03-17T16:24:08+01:00; Page 90 03 Климатическая установка Электронная климатическая установка, ЕСС* Панель управления 3 9 4 2 5 1 10 03 5 7 AUTO Вентилятор 8 G026309 6 Электрообогрев заднего стекла и наружных зеркал заднего вида Регулятор температуры Рециркуляция/Система - Страница 92 из 323
C70; 7; 3 evastarck 2008-03-17T16:24:08+01:00; Page 91 03 Климатическая установка Электронная климатическая установка, ЕСС* 2. Вентилятор При включенном таймере (при условии, что выбрана рециркуляция) снижается риск обледенения, запотевания и сохраняется свежий воздух в салоне. Для активации/ - Страница 93 из 323
C70; 7; 3 evastarck 2008-03-17T16:24:08+01:00; Page 92 03 Климатическая установка Электронная климатическая установка, ЕСС* 4. Дефростер 03 Для быстрого удаления запотевания и обледенения с переднего и боковых стекол. Поток воздуха направляется к стеклам на высокой скорости вентилятора. Лампа в - Страница 94 из 323
C70; 7; 3 evastarck 2008-03-17T16:24:08+01:00; Page 93 03 Климатическая установка Электронная климатическая установка, ЕСС* Отключить можно вручную или автоматически. Вручную, если нажать на кнопку. Заднее стекло и зеркала заднего вида отключаются автоматически через 12 – 20 минут в зависимости от - Страница 95 из 323
C70; 7; 3 evastarck 2008-03-17T16:24:08+01:00; Page 94 03 Климатическая установка Распределение воздуха Распределение воздуха Используется: Воздух к стеклам. Некоторое количество воздуха поступает из вентиляционных сопел. Рециркуляция воздуха не работает. Кондиционирование воздуха всегда - Страница 96 из 323
C70; 7; 3 evastarck 2008-03-17T16:24:08+01:00; Page 95 03 Климатическая установка Топливный обогреватель двигателя и отопитель салона* Общие сведения об отопителях ней частью вниз, чтобы обеспечить надежное поступление топлива в стояночный отопитель. Заправка топливом Стояночный отопитель - Страница 97 из 323
C70; 7; 3 evastarck 2008-03-17T16:24:08+01:00; Page 96 03 Климатическая установка Топливный обогреватель двигателя и отопитель салона* Активирование отопителя Символы и сообщения на дисплее Если активирована настройка одного из таймеров или немедленный пуск, в комбинированном приборе загорается - Страница 98 из 323
C70; 7; 3 evastarck 2008-03-17T16:24:08+01:00; Page 97 03 Климатическая установка Топливный обогреватель двигателя и отопитель салона* При прямом пуске отопителя время его непрерывной работы составляет 50 минут. 6. Кратко нажмите RESET для подтверждения выбранной настройки. Обогрев салона - Страница 99 из 323
C70; 7; 3 evastarck 03 Климатическая установка Дополнительный топливный отопитель* (дизель) Дополнительный отопитель (дизель) В автомобилях с дизельным двигателем дополнительный отопитель может потребоваться в холодную погоду для обеспечения в салоне нужной температуры. 03 Для получения - Страница 100 из 323
C70; 7; 3 evastarck 2008-03-17T16:24:08+01:00; Page 99 03 Климатическая установка 03 99 - Страница 101 из 323
2008-03-17T16:24:08+01:00; Page 100 Передние кресла……………………………………………………………………… Откидная крыша с электроприводом ………………………………………. Ветровая - Страница 102 из 323
C70; 7; 3 evastarck ИНТЕРЬЕР САЛОНА 2008-03-17T16:24:08+01:00; Page 101 04 - Страница 103 из 323
C70; 7; 3 evastarck 2008-03-17T16:24:08+01:00; Page 102 04 Интерьер салона Передние кресла Регулировка опоры поясницы 1, поворот ручки. Положение на сиденье Доступ на заднее сидение Регулировка наклона спинки сидения, вращение рукоятки. Панель управления кресла с электроприводом*. Рычаг (2) имеется - Страница 104 из 323
C70; 7; 3 evastarck 2008-03-17T16:24:08+01:00; Page 103 04 Интерьер салона Передние кресла Перемещение кресла назад: 1. Переместите кресло назад в исходное положение. 2. Потяните ручку (1) вверх и, удерживая в этом положении, одновременно откиньте спинку назад. 3. Установите ремень в направляющей. - Страница 105 из 323
C70; 7; 3 evastarck 2008-03-17T16:24:08+01:00; Page 104 04 Интерьер салона Передние кресла Положение переднего края подушки сидения вверх/вниз Сохранение установки в памяти 1. Установка кресла и внешних зеркал заднего вида. Кресло вперед/назад 2. Удерживая нажатой клавишу M, одновременно нажмите - Страница 106 из 323
C70; 7; 3 evastarck 2008-03-17T16:24:08+01:00; Page 105 04 Интерьер салона Откидная крыша с электроприводом При маневрировании крышей соблюдайте следующее: На крыше или в багажнике не должно быть льда, снега или незакрепленных предметов. • • ПРЕДОСТЕРЕЖЕНИЕ Подвижные детали крыши или багажника - Страница 107 из 323
C70; 7; 3 evastarck 2008-03-17T16:24:08+01:00; Page 106 04 Интерьер салона Откидная крыша с электроприводом Защитная крышка Открытие и закрытие крыши Отпустите кнопу, когда услышите звуковой сигнал и на информационном дисплее появится сообщение ЗАКРЫТА КРЫША или ОТКРЫТА КРЫША. ПРЕДОСТЕРЕЖЕНИЕ - Страница 108 из 323
C70; 7; 3 evastarck 2008-03-17T16:24:08+01:00; Page 107 04 Интерьер салона Откидная крыша с электроприводом • НАЖ. ТОРМОЗ ДЛЯ ОПЕР. КРЫШЕЙ – Для управления крышей выжмите педаль тормоза. грета, подождите прим. пять минут до исчезновения сообщения и повторите попытку. • ЗАКРОЙТЕ БАГАЖН. ДЛЯ ОПЕР. - Страница 109 из 323
C70; 7; 3 evastarck 2008-03-17T16:24:08+01:00; Page 108 04 Интерьер салона Откидная крыша с электроприводом ПРЕДОСТЕРЕЖЕНИЕ Никогда не тяните за разъединяющий трос гидравлической системы, расположенный под подушкой заднего сидения. Только квалифицированный персонал может использовать функцию - Страница 110 из 323
C70; 7; 3 evastarck 2008-03-17T16:24:08+01:00; Page 109 04 Интерьер салона Откидная крыша с электроприводом 4. Пропустите зеркало заднего вида через отверстие (3) и закрепите крюки (2) в передних колесных нишах. 5. Пропустите пластиковый чехол между щетками стеклоочистителя и ветровым стеклом и - Страница 111 из 323
2008-03-17T16:24:08+01:00; Page 110 C70; 7; 3 evastarck 04 Интерьер салона Ветровая защита* Общие сведения ВНИМАНИЕ Не повредите обивку салона. Застежки-молнии на ветровой защите используются, если Вы хотите положить/ взять багаж с заднего сидения. ПРЕДОСТЕРЕЖЕНИЕ G020804 04 Убедитесь, что ветровая - Страница 112 из 323
C70; 7; 3 evastarck 2008-03-17T16:24:08+01:00; Page 111 04 Интерьер салона Освещение салона • двигатель остановлен, и зажигание находится в положении 0 вая дверь соответственно открывается или закрывается. • Лампы для чтения и освещение салона автомобиль отперт, но двигатель не запущен. - Страница 113 из 323
C70; 7; 3 evastarck 2008-03-17T16:24:08+01:00; Page 112 04 Интерьер салона Освещение салона Освещение отделения для перчаток Освещение салона отключается, когда: Освещение перчаточного ящика включается или выключается, когда крышка соответственно открывается или закрывается. • • Автоматическое - Страница 114 из 323
C70; 7; 3 evastarck 2008-03-17T16:24:08+01:00; Page 113 04 Интерьер салона Освещение салона 04 113 - Страница 115 из 323
C70; 7; 3 evastarck 2008-03-17T16:24:08+01:00; Page 114 04 Интерьер салона Места для хранения вещей в салоне Места для хранения вещей 1 2 3 4 5 04 10 9 7 114 6 G019514 8 - Страница 116 из 323
C70; 7; 3 evastarck 2008-03-17T16:24:08+01:00; Page 115 04 Интерьер салона Места для хранения вещей в салоне Отделение для хранения в дверной панели (с замком*). Отделение для перчаток Вешалка для легкой одежды Вешалка, только для легкой одежды. Карман для хранения в передней кромке подушек - Страница 117 из 323
C70; 7; 3 evastarck 2008-03-17T16:24:08+01:00; Page 116 04 Интерьер салона Места для хранения вещей в салоне Отделение для хранения в дверной панели Отделение для хранения в задней боковой панели Отделение для хранения под передним подлокотником Чтобы открыть отделение для хранения, поднимите - Страница 118 из 323
C70; 7; 3 evastarck 2008-03-17T16:24:08+01:00; Page 117 04 Интерьер салона Места для хранения вещей в салоне Подстаканник в центральной консоли В автомобилях с противоугонной сигнализацией с датчиком движения* подстаканник не вынимается. Чтобы закрыть шторку, захватите снизу шторку за передний край - Страница 119 из 323
C70; 7; 3 evastarck 2008-03-17T16:24:08+01:00; Page 118 04 Интерьер салона Багажное отделение Перегородка в багажнике Помощь для загрузки ВАЖНО Не размещайте какие-либо предметы на или рядом с перегородкой в багажнике, когда она закрыта. Не размещайте багаж так, чтобы по высоте он располагался выше - Страница 120 из 323
C70; 7; 3 evastarck 2008-03-17T16:24:08+01:00; Page 119 04 Интерьер салона Багажное отделение Опасность защемления пассажиров или предметов, препятствующих опусканию или подъему крыши. Использование помощи для загрузки Одним нажатием на клавишу запускается и отменяется поднятие/опускание. Начало - Страница 121 из 323
C70; 7; 3 evastarck 2008-03-17T16:24:08+01:00; Page 120 04 Интерьер салона Багажное отделение Электрическое гнездо в багажном отделении Люк для лыж Закройте среднюю часть в спинке заднего сидения 1. Установите на место среднюю часть, начиная снизу. 2. Поднимите среднюю часть и нажмите до щелчка. - Страница 122 из 323
C70; 7; 3 evastarck 2008-03-17T16:24:08+01:00; Page 121 04 Интерьер салона Багажное отделение Если в автомобилей предусмотрен чехол для лыж, пропустите ремень через ручку в чехле. ПРЕДОСТЕРЕЖЕНИЕ При загрузке или выгрузке длинномерных предметов выключите двигатель и затяните стояночный тормоз. - Страница 123 из 323
C70; 7; 3 evastarck 2008-03-17T16:24:08+01:00; Page 122 Пульт дистанционного управления с плоским ключом………………. Скрытое запирание*………………………………………………………………… Точки - Страница 124 из 323
C70; 7; 3 evastarck ЗАМКИ И СИГНАЛИЗАЦИЯ 2008-03-17T16:24:08+01:00; Page 123 05 - Страница 125 из 323
C70; 7; 3 evastarck 2008-03-17T16:24:08+01:00; Page 124 05 Замки и сигнализация Пульт дистанционного управления с плоским ключом Автомобиль поставляется с двумя пультами дистанционного управления. Они также являются ключами зажигания. В пульт дистанционного управления вставлен металлический плоский - Страница 126 из 323
C70; 7; 3 evastarck 2008-03-17T16:24:08+01:00; Page 125 05 Замки и сигнализация Пульт дистанционного управления с плоским ключом Комфортное освещение – Включение освещения на расстоянии и освещение пространства вокруг автомобиля, находящегося в неосвещенном месте. Одним нажатием на кнопку - Страница 127 из 323
C70; 7; 3 evastarck 2008-03-17T16:24:08+01:00; Page 126 05 Замки и сигнализация Пульт дистанционного управления с плоским ключом Отпирание двери плоским ключом Запирание перчаточного ящика Отпирание проводится в обратном порядке. Если центральный замок не срабатывает от пульта дистанционного - Страница 128 из 323
C70; 7; 3 evastarck 2008-03-17T16:24:08+01:00; Page 127 05 Замки и сигнализация G019416 Скрытое запирание* Точки запирания центральным замком с помощью пульта дистанционного управления в обычном режиме. Точки запирания дистанционным пультом без плоского ключа, когда скрытое запирание активировано. - Страница 129 из 323
C70; 7; 3 evastarck 2008-03-17T16:24:08+01:00; Page 128 05 Замки и сигнализация Скрытое запирание* нения в дверных панелях (D), люк для лыж (Е) и крышка багажника (F) не могут отпираться пультом дистанционного управления. Отключение скрытого запирания G020032 Для подключения запираемых отделений - Страница 130 из 323
C70; 7; 3 evastarck 2008-03-17T16:24:08+01:00; Page 129 05 Замки и сигнализация G019415 Точки запирания Точки запирания дистанционного ключом. Отделения для хранения в дверных панелях Двери Люк для лыж Замок рулевого колеса Люк для лыж Крышка багажника 05 Крышка багажника Описание различных - Страница 131 из 323
C70; 7; 3 evastarck 2008-03-17T16:24:08+01:00; Page 130 05 Замки и сигнализация Keyless drive* Система запирания и запуска без ключа цией. Вы можете заказать еще несколько штук. Эта система может обслуживать до шести пультов дистанционного управления с бесключевой функцией. Нахождение пульта - Страница 132 из 323
C70; 7; 3 evastarck 2008-03-17T16:24:08+01:00; Page 131 05 Замки и сигнализация Keyless drive* Помехи в работе пульта дистанционного управления Запирание Включается диод на внутренней стороне соответствующей двери, см. стр. 135. Бесключевая функция может быть нарушена электромагнитными помехами и - Страница 133 из 323
C70; 7; 3 evastarck 2008-03-17T16:24:08+01:00; Page 132 05 Замки и сигнализация Keyless drive* Кресло с электроприводом – функция памяти в пульте дистанционного управления Если в автомобиле находится более одного пассажира с дистанционным пультом с бесключевой системой keyless, то кресло водителя - Страница 134 из 323
C70; 7; 3 evastarck 2008-03-17T16:24:08+01:00; Page 133 05 Замки и сигнализация Батарейка в пульте дистанционного управления Разряженная батарейка пульта дистанционного управления расстояния, следует заменить батарейку (тип CR 2450, 3 В). Когда состояние батарейки приближается к уровню, не - Страница 135 из 323
C70; 7; 3 evastarck 2008-03-17T16:24:08+01:00; Page 134 05 Замки и сигнализация Запирание и отпирание Для автомобилей с системой без ключа Keyless; см. стр. 130. Отпирание Кнопкой отпирания на пульте дистанционного управления можно отпирать автомобиль двумя разными способами (способ выбирается в - Страница 136 из 323
C70; 7; 3 evastarck 2008-03-17T16:24:08+01:00; Page 135 05 Замки и сигнализация Запирание и отпирание 1. Чтобы получить доступ к замочной скважине внизу в полу, сложите вперед спинку левого кресла. Запирание/отпирание изнутри Два раза потяните дверную ручку, двери отпираются и открываются. 2. - Страница 137 из 323
C70; 7; 3 evastarck 2008-03-17T16:24:08+01:00; Page 136 05 Замки и сигнализация Запирание и отпирание Автоматическое запирание Если кто-либо хочет остаться в автомобиле, а двери должны быть заперты снаружи, функцию блокировки замков можно временно отключить. Временное отключение На скорости выше 7 - Страница 138 из 323
C70; 7; 3 evastarck 2008-03-17T16:24:08+01:00; Page 137 05 Замки и сигнализация Запирание и отпирание крена*, одновременно отключаются также и эти датчики, см. стр. 140. В следующий раз при повороте ключа в положение II система сбрасывается, и на дисплее приборной панели отображается сообщение - Страница 139 из 323
C70; 7; 3 evastarck 2008-03-17T16:24:08+01:00; Page 138 05 Замки и сигнализация Охранная сигнализация* Система сигнализации Индикатор сигнализации ВНИМАНИЕ При включенной охранной сигнализации осуществляется непрерывный мониторинг всех охраняемых входов. Не пытайтесь самостоятельно проводить ремонт - Страница 140 из 323
C70; 7; 3 evastarck 2008-03-17T16:24:08+01:00; Page 139 05 Замки и сигнализация Охранная сигнализация* Отключение охранной сигнализации Нажмите кнопку отпирания на пульте дистанционного управления. Два коротких мигающих сигнала указателей поворотов автомобиля подтверждают отключение охранной - Страница 141 из 323
C70; 7; 3 evastarck 2008-03-17T16:24:08+01:00; Page 140 05 Замки и сигнализация Охранная сигнализация* Частичное подключение сигнализации Навигация Можно временно отключать датчики движения и крена для предотвращения непреднамеренного срабатывания сигнализации, например, если в автомобиле оставлена - Страница 142 из 323
C70; 7; 3 evastarck 2008-03-17T16:24:08+01:00; Page 141 05 Замки и сигнализация Охранная сигнализация* 3. Подождите 30 секунд. 3. Подождите 30 секунд. 4. Проверьте датчик движения в салоне, для чего, например, поднимите сумку с сидения. Должна включиться сирена и одновременно мигать указатели - Страница 143 из 323
2008-03-17T16:24:08+01:00; Page 142 Общие сведения………………………………………………………………………. Заправка топливом………………………………………………………………….. Запуск - Страница 144 из 323
C70; 7; 3 evastarck ЗАПУСК ДВИГАТЕЛЯ И ВОЖДЕНИЕ 2008-03-17T16:24:08+01:00; Page 143 06 - Страница 145 из 323
C70; 7; 3 evastarck 2008-03-17T16:24:08+01:00; Page 144 06 Запуск двигателя и вождение Общие сведения Экономичное вождение Скользкое дорожное покрытие Экономичное вождение и забота об окружающей среде означают предвидение дорожной ситуации и плавное вождение, а также адаптацию манеры вождения и - Страница 146 из 323
C70; 7; 3 evastarck 2008-03-17T16:24:08+01:00; Page 145 06 Запуск двигателя и вождение Общие сведения ВАЖНО Двигатель можно повредить, если вода проникнет в воздушный фильтр. На большой глубине вода может попасть в трансмиссию. При этом снижаются смазочные свойства масла, что сокращает срок службы - Страница 147 из 323
C70; 7; 3 evastarck 2008-03-17T16:24:08+01:00; Page 146 06 Запуск двигателя и вождение Заправка топливом Открытие крышки топливного бака 2. Пройдите через положение сопротивления до конца. делается, если из салона ее открыть невозможно. 3. Выньте пробку. 1. Снимите крышку с корпуса фонаря справа - Страница 148 из 323
C70; 7; 3 evastarck 2008-03-17T16:24:08+01:00; Page 147 06 Запуск двигателя и вождение Заправка топливом ПРЕДОСТЕРЕЖЕНИЕ Топливо, пролитое на землю, может воспламениться от отработанных газов. ВАЖНО В холодный сезон используйте специальное зимнее топливо. Перед заправкой топливом выключайте - Страница 149 из 323
C70; 7; 3 evastarck 2008-03-17T16:24:08+01:00; Page 148 06 Запуск двигателя и вождение Запуск двигателя Перед пуском двигателя Затяните стояночный тормоз. Автоматическая коробка передач Установите селектор передач в положение P или N. Ручная коробка передач Установите рычаг переключения передач в - Страница 150 из 323
C70; 7; 3 evastarck 2008-03-17T16:24:08+01:00; Page 149 06 Запуск двигателя и вождение Запуск двигателя I – Положение радио Могут быть подключены определенные электрические компоненты. Электросистема двигателя не подключена. II – Положение вождения Положение ключа во время движения. Электросистема - Страница 151 из 323
C70; 7; 3 evastarck 2008-03-17T16:24:08+01:00; Page 150 06 Запуск двигателя и вождение Keyless drive* Общие сведения Пуск двигателя Выжмите педаль сцепления (автомобиль с механической коробкой передач) или педаль тормоза (автомобиль с автоматической коробкой передач). Пуск с помощью пульта - Страница 152 из 323
C70; 7; 3 evastarck 2008-03-17T16:24:08+01:00; Page 151 06 Запуск двигателя и вождение Ручная коробка передач Блокиратор включения заднего хода – пять передач Для достижения по возможности наилучшей топливной экономичности используйте как можно более высокие передачи как можно чаще. • Полностью - Страница 153 из 323
C70; 7; 3 evastarck 2008-03-17T16:24:08+01:00; Page 152 06 Запуск двигателя и вождение Ручная коробка передач Блокировка передачи заднего хода ограничивает возможность по ошибке включить передачу заднего хода при движении вперед. Включайте передачу заднего хода, только когда автомобиль стоит - Страница 154 из 323
C70; 7; 3 evastarck 2008-03-17T16:24:08+01:00; Page 153 06 Запуск двигателя и вождение Ручная коробка передач Включайте передачу заднего хода, только когда автомобиль стоит неподвижно. • Чтобы включить передачу заднего хода, нажмите, а затем переместите влево рычаг переключения передач. 06 153 - Страница 155 из 323
C70; 7; 3 evastarck 2008-03-17T16:24:08+01:00; Page 154 06 Запуск двигателя и вождение Автоматическая коробка передач Автоматические положения передач Geartronic ВНИМАНИЕ Для перемещения рычага переключения передач из положения P следует выжать педаль тормоза. P положении коробка передач - Страница 156 из 323
C70; 7; 3 evastarck 2008-03-17T16:24:08+01:00; Page 155 06 Запуск двигателя и вождение Автоматическая коробка передач Для возврата в автоматический режим движения: переместите рычаг в левое крайнее положение D. Во избежание неравномерной работы и остановки двигателя Geartronic автоматически - Страница 157 из 323
C70; 7; 3 evastarck 2008-03-17T16:24:08+01:00; Page 156 06 Запуск двигателя и вождение Автоматическая коробка передач Электронная блокировка пуска двигателя – Shiftlock Стояночное положение (положение P) Отключение блокиратора переключения передач 3. Удерживайте плоский ключ в нажатом положении и - Страница 158 из 323
C70; 7; 3 evastarck 2008-03-17T16:24:08+01:00; Page 157 06 Запуск двигателя и вождение Автоматическая коробка передач Символ Динамические характеристики Меры по устранению ПЕРЕГР.КОР.ПЕР. ДЕРЖАТЬ ТОРМОЗ Трудно поддерживать одинаковую скорость на постоянных оборотах двигателя. Коробка передач - Страница 159 из 323
C70; 7; 3 evastarck 2008-03-17T16:24:08+01:00; Page 158 06 Запуск двигателя и вождение Тормозная система Сервоусилитель тормозов При откатывании или буксировке автомобиля с выключенным двигателем необходимо прикладывать к педали тормоза усилие прим. в пять раз больше, чем при торможении с - Страница 160 из 323
C70; 7; 3 evastarck 2008-03-17T16:24:08+01:00; Page 159 06 Запуск двигателя и вождение Тормозная система Антиблокировочная система тормозов (ABS) Система ABS (Anti-lock Braking System) препятствует блокировке колес во время торможения. Благодаря этой системе автомобиль сохраняет управляемость и, - Страница 161 из 323
C70; 7; 3 evastarck 2008-03-17T16:24:08+01:00; Page 160 06 Запуск двигателя и вождение DSTC – Система динамической стабилизации и силы тяги* Общие сведения Сниженная функция Использование Поверните регулировочное кольцо до появления меню STC/DSTC. Система динамической стабилизации и силы тяги - Страница 162 из 323
C70; 7; 3 evastarck 2008-03-17T16:24:08+01:00; Page 161 06 Запуск двигателя и вождение DSTC – Система динамической стабилизации и силы тяги* Сообщения на информационном дисплее Если одновременно появляются символы и : Прочтите сообщение в информационном дисплее. КУРС. УСТ. ВРЕМЕННО ВЫКЛ означает, - Страница 163 из 323
C70; 7; 3 evastarck 2008-03-17T16:24:08+01:00; Page 162 06 Запуск двигателя и вождение Радар парковки* Общие сведения о помощи при парковке ПРЕДОСТЕРЕЖЕНИЕ Помощь при парковке никогда не может заменить собственную ответственность водителя во время парковки. У датчиков имеются «мертвые зоны», в - Страница 164 из 323
C70; 7; 3 evastarck 2008-03-17T16:24:08+01:00; Page 163 06 Запуск двигателя и вождение Радар парковки* Помощь при парковке, как впереди, так и сзади Расстояние, измеряемое перед автомобилем по прямой, составляет прим. 0,8 м. Звуковой сигнал при наличии препятствия впереди поступает из передних - Страница 165 из 323
C70; 7; 3 evastarck 2008-03-17T16:24:08+01:00; Page 164 06 Запуск двигателя и вождение Радар парковки* G020952 Очистка датчиков Датчики помощи при парковке 06 Для того чтобы датчики правильно функционировали, их необходимо регулярно чистить водой и шампунем для автомобилей. ВНИМАНИЕ Грязь, лед и - Страница 166 из 323
C70; 7; 3 evastarck 2008-03-17T16:24:08+01:00; Page 165 06 Запуск двигателя и вождение BLIS* – Blind Spot Information System Общие сведения ПРЕДОСТЕРЕЖЕНИЕ G020295 Система является лишь дополнением и не заменяет безопасного вождения и использования зеркал заднего вида. Она ни при каких - Страница 167 из 323
C70; 7; 3 evastarck 2008-03-17T16:24:08+01:00; Page 166 06 Запуск двигателя и вождение BLIS* – Blind Spot Information System «Мертвые зоны» скоростью, которая в пределах до 70 км/ч превышает скорость вашего автомобиля. B ПРЕДОСТЕРЕЖЕНИЕ BLIS не работает на крутых поворотах. A G020296 BLIS не - Страница 168 из 323
C70; 7; 3 evastarck 2008-03-17T16:24:08+01:00; Page 167 06 Запуск двигателя и вождение BLIS* – Blind Spot Information System сообщения. Детальную информацию об использовании сообщений см. стр. 55. Активирование/отключение Сообщения системы BLIS Значение BLIS ВКЛ. BLIS СНИЖ. РАБОТАЕТ Работе камеры - Страница 169 из 323
C70; 7; 3 evastarck 2008-03-17T16:24:08+01:00; Page 168 06 Запуск двигателя и вождение BLIS* – Blind Spot Information System ВАЖНО Ограничения В некоторых ситуациях индикаторная лампа BLIS может гореть даже в отсутствии транспортного средства в «мертвой зоне». G018176 Объективы оснащены - Страница 170 из 323
C70; 7; 3 evastarck 2008-03-17T16:24:08+01:00; Page 169 06 Запуск двигателя и вождение Буксировка и эвакуация Пуск от вспомогательного источника Пользуйтесь вспомогательным аккумулятором в том случае, если аккумулятор вашего автомобиля разряжен так, что двигатель не запускается. Запрещается - Страница 171 из 323
C70; 7; 3 evastarck 06 Запуск двигателя и вождение Буксировка и эвакуация ВАЖНО Буксировка при температуре ниже точки замерзания абсолютно недопустима. 06 170 2008-03-17T16:24:08+01:00; Page 170 - Страница 172 из 323
C70; 7; 3 evastarck 2008-03-17T16:24:08+01:00; Page 171 06 Запуск двигателя и вождение Буксировка и эвакуация G020953 Буксирная скоба Если автомобиль следует отбуксировать по дороге, используйте буксировочную скобу. Буксировочная скоба закрепляется в нише с правой стороны переднего или заднего - Страница 173 из 323
C70; 7; 3 evastarck 06 Запуск двигателя и вождение Буксировка и эвакуация Эвакуация Пользуйтесь услугами специалистов для проведения эвакуационных работ. Колеса автомобиля при такой буксировке должны вращаться только вперед. ВАЖНО Буксировка автомобиля с автоматической коробкой передач разрешается - Страница 174 из 323
C70; 7; 3 evastarck 2008-03-17T16:24:08+01:00; Page 173 06 Запуск двигателя и вождение Пуск от вспомогательного источника Пуск от другой аккумуляторной батареи 2. Убедитесь, что вспомогательная аккумуляторная батарея рассчитана на 12 В. 3. Если вспомогательная аккумуляторная батарея находится в - Страница 175 из 323
C70; 7; 3 evastarck 2008-03-17T16:24:08+01:00; Page 174 06 Запуск двигателя и вождение Езда с прицепом Общие сведения Допустимая нагрузка зависит от дополнительного оборудования, установленного на автомобиле, например, буксирного крюка, багажника и кофра на крыше, суммарного веса всех пассажиров и - Страница 176 из 323
C70; 7; 3 evastarck 2008-03-17T16:24:08+01:00; Page 175 06 Запуск двигателя и вождение Езда с прицепом ния передачи в коробке передач, и масло в коробке передач будет меньше нагреваться. ВНИМАНИЕ Указанные значения являются максимальными массами прицепа, разрешенными Volvo. Национальные правила - Страница 177 из 323
C70; 7; 3 evastarck 2008-03-17T16:24:08+01:00; Page 176 06 Запуск двигателя и вождение Сцепное устройство* Буксировочный крюк Если автомобиль оборудован съемным буксирным крюком, при установке шарового устройства требуется строго выполнять указания по его монтажу, см. стр. 178. Кабель прицепа - Страница 178 из 323
C70; 7; 3 evastarck 2008-03-17T16:24:08+01:00; Page 177 06 Запуск двигателя и вождение Сцепное устройство* G010393 G010391 G010392 Технические данные Расстояния до точек крепления (мм) A В C D Е F G Н I J K Несъемный или съемный буксирный крюк, стандарт 1160 77 964 482 40 141 538 150 113 100 140 1 - Страница 179 из 323
2008-03-17T16:24:08+01:00; Page 178 C70; 7; 3 evastarck 06 Запуск двигателя и вождение Съемный буксирный крюк* 1. Снимите защитную крышку, надавив сначала на фиксатор, а затем потянув крышку назад . 2. Повернув ключ по часовой стрелке, убедитесь, что механизм находится в незапертом положении. 06 - Страница 180 из 323
C70; 7; 3 evastarck 2008-03-17T16:24:08+01:00; Page 179 06 Запуск двигателя и вождение 4. Вставьте и вдавите шаровое устройство до щелчка. 5. Убедитесь, что индикатор в окошке имеет зеленый цвет. G020307 G020306 G020304 Съемный буксирный крюк* 6. Поверните ключ против часовой стрелки в запертое - Страница 181 из 323
C70; 7; 3 evastarck 2008-03-17T16:24:08+01:00; Page 180 06 Запуск двигателя и вождение Съемный буксирный крюк* 7. Убедитесь, что шаровое устройство зафиксировано, подергав вверх, вниз и назад. 06 ПРЕДОСТЕРЕЖЕНИЕ Если шаровое устройство установлено неправильно, его следует снять и вновь установить в - Страница 182 из 323
C70; 7; 3 evastarck 2008-03-17T16:24:08+01:00; Page 181 06 Запуск двигателя и вождение 2. Нажмите стопорную ручку (1) и поверните против часовой стрелки (2) до щелчка. 3. Поверните вниз до упора стопорную ручку и, удерживая ее, одновременно выньте шаровое устройство назад и вверх. G017318 G020314 - Страница 183 из 323
C70; 7; 3 evastarck 2008-03-17T16:24:08+01:00; Page 182 06 Запуск двигателя и вождение Погрузка Общие сведения Допустимая нагрузка зависит от дополнительного оборудования, установленного на автомобиле, а также буксирного крюка и давления на сцепной шар. Допустимая нагрузка автомобиля снижается в - Страница 184 из 323
C70; 7; 3 evastarck 2008-03-17T16:24:08+01:00; Page 183 06 Запуск двигателя и вождение Регулировка направления света фар Фары с галогенными лампами Фары с би-ксеноновыми лампами G020317 Форма светового пятна для левостороннего движения Форма светового пятна для правостороннего движения Чтобы не - Страница 185 из 323
2008-03-17T16:24:08+01:00; Page 184 Общие сведения………………………………………………………………………. Давление воздуха в шинах……………………………………………………….. Треугольный знак аварийной остановки* и запасное колесо…….. Замена - Страница 186 из 323
C70; 7; 3 evastarck КОЛЕСА И ШИНЫ 2008-03-17T16:24:08+01:00; Page 185 07 - Страница 187 из 323
C70; 7; 3 evastarck 2008-03-17T16:24:08+01:00; Page 186 07 Колеса и шины Общие сведения Управление автомобилем и шины 91 Для управляемости автомобилем шины имеют очень большое значение. От типа шин, размера, давления в шинах и класса скорости зависит поведение автомобиля. Цифровой код для - Страница 188 из 323
C70; 7; 3 evastarck 2008-03-17T16:24:08+01:00; Page 187 07 Колеса и шины Общие сведения Все шины старше шести лет следует проверять у специалиста даже при отсутствии видимых повреждений. Это связано с тем, что шины стареют и разрушаются, даже если их использовали мало или совсем не использовали. Их - Страница 189 из 323
C70; 7; 3 evastarck 2008-03-17T16:24:08+01:00; Page 188 07 Колеса и шины Общие сведения Проконсультируйтесь у дилера Volvo относительно наиболее подходящих дисков и типа шин. Шипованные шины На протяжении первых 500–1000 км после установки новых ошипованных шин необходимо ездить как можно более - Страница 190 из 323
C70; 7; 3 evastarck 2008-03-17T16:24:08+01:00; Page 189 07 Колеса и шины Общие сведения Колесные гайки следует затягивать с усилием 110 Нм. При слишком большом усилии можно повредить резьбовое соединение. Стальные диски – короткая колесная гайка (1) Стальные диски обычно крепятся короткими гайками, - Страница 191 из 323
C70; 7; 3 evastarck 07 Колеса и шины Общие сведения случае не с левой стороны на правую или наоборот. Неправильная установка шин приводит к ухудшению тормозных характеристик и потере способности выдавливать воду, снег и грязь с дорожного покрытия. Шины с наибольшей высотой рисунка протектора - Страница 192 из 323
C70; 7; 3 evastarck 2008-03-17T16:24:08+01:00; Page 191 07 Колеса и шины Давление воздуха в шинах Рекомендуемое давление в шинах На наклейке приводится: • Давление в шинах колес, рекомендованных для Вашего автомобиля • • Давление ECO Давление в запасном колесе (Temporary Spare). Проверка давления в - Страница 193 из 323
C70; 7; 3 evastarck 2008-03-17T16:24:08+01:00; Page 192 07 Колеса и шины Давление воздуха в шинах Таблица давления в шинах Вариант Размер шин Скорость (км/ч) Груз, 1 – 3 человека Макс. груз Задние (кПа) Передние (кПа) Задние (кПа) 0-160 210 210 250 250 160+ 250 210 280 260 215/50 R17 91W 0-160 220 - Страница 194 из 323
C70; 7; 3 evastarck 2008-03-17T16:24:08+01:00; Page 193 07 Колеса и шины Давление воздуха в шинах Вариант Размер шин Скорость (км/ч) Груз, 1 – 3 человека Макс. груз Передние (кПа) A Задние (кПа) Передние (кПа) Задние (кПа) Все 0-160 250 B 250 250 250 Запасное колесо C A B C Все T125/85R16 99M 0-80 - Страница 195 из 323
C70; 7; 3 evastarck 2008-03-17T16:24:08+01:00; Page 194 07 Колеса и шины Треугольный знак аварийной остановки* и запасное колесо G020959 Запасное колесо и домкрат G020956 Треугольный знак аварийной остановки Следуйте действующим правилам использования треугольного знака аварийной остановки*. - Страница 196 из 323
C70; 7; 3 evastarck 2008-03-17T16:24:08+01:00; Page 195 07 Колеса и шины Треугольный знак аварийной остановки* и запасное колесо G020960 Запасное колесо и инструменты Запасное колесо и инструменты. Запасное колесо*, поставляемое в чехле, находится в углублении для запасного колеса в багажном - Страница 197 из 323
C70; 7; 3 evastarck 2008-03-17T16:24:08+01:00; Page 196 07 Колеса и шины Треугольный знак аварийной остановки* и запасное колесо Инструменты – положение для хранения ВАЖНО Инструменты и домкрат, если они не используются, следует хранить в багажном отделении автомобиля в предназначенном для этого - Страница 198 из 323
C70; 7; 3 evastarck 2008-03-17T16:24:08+01:00; Page 197 07 Колеса и шины Замена колес Демонтаж колес помощи баллонного ключа или сдерните его руками. 5. Баллонным ключом отпустите колесные гайки на ½–1 оборот против часовой стрелки. ПРЕДОСТЕРЕЖЕНИЕ Убедитесь, что домкрат чистый, без повреждений и - Страница 199 из 323
C70; 7; 3 evastarck 2008-03-17T16:24:08+01:00; Page 198 07 Колеса и шины Замена колес имеется углубление в пластмассовой защите. Опустите ногу домкрата так, чтобы она плотно прижалась к поверхности земли. Убедитесь, что домкрат надежно зафиксирован в упоре, как это показано на рисунке, а его нога - Страница 200 из 323
C70; 7; 3 evastarck 2008-03-17T16:24:08+01:00; Page 199 07 Колеса и шины Временная герметизация шин* Временная герметизация шин, общие сведения Шиноремонтный комплект используется для герметизации прокола, а также для контроля и регулировки давления в шинах. В него входит компрессор и упаковка с - Страница 201 из 323
C70; 7; 3 evastarck 2008-03-17T16:24:08+01:00; Page 200 07 Колеса и шины Временная герметизация шин* Герметизация прокола в шине 3. Убедитесь, что переключатель находится в положении 0 и выньте провод и воздушный шланг. ВНИМАНИЕ Не нарушайте герметичность банки. Когда банка закручивается до упора, - Страница 202 из 323
C70; 7; 3 evastarck 2008-03-17T16:24:08+01:00; Page 201 07 Колеса и шины Временная герметизация шин* ПРЕДОСТЕРЕЖЕНИЕ Если давление ниже 1,8 бар, отверстие в шине слишком большого размера. От дальнейшей поездки следует отказаться. Обратитесь за помощью в официальную шиноремонтную мастерскую. 10. - Страница 203 из 323
C70; 7; 3 evastarck 2008-03-17T16:24:08+01:00; Page 202 07 Колеса и шины Временная герметизация шин* ПРЕДОСТЕРЕЖЕНИЕ Вдыхание выхлопных газов может быть опасно для жизни. Обязательно глушите двигатель в закрытых помещениях или при отсутствии достаточной вентиляции. 7. Установите колпачок ниппеля на - Страница 204 из 323
C70; 7; 3 evastarck 2008-03-17T16:24:08+01:00; Page 203 07 Колеса и шины 07 203 - Страница 205 из 323
2008-03-17T16:24:08+01:00; Page 204 Чистка…………………………………………………………………………………….. 206 Восстановление лакокрасочного покрытия……………………………… 210 Антикоррозионная - Страница 206 из 323
C70; 7; 3 evastarck УХОД ЗА АВТОМОБИЛЕМ 2008-03-17T16:24:08+01:00; Page 205 08 - Страница 207 из 323
C70; 7; 3 evastarck 2008-03-17T16:24:08+01:00; Page 206 08 Уход за автомобилем Чистка Мойка автомобиля Мойте автомобиль, как только он загрязняется. Пользуйтесь автомошампунем. Грязь и соль на дороге могут легко вызвать коррозию. ВАЖНО Не обливайте автомобиль водой при опущенной крыше во избежание - Страница 208 из 323
C70; 7; 3 evastarck 2008-03-17T16:24:08+01:00; Page 207 08 Уход за автомобилем Чистка красочное покрытие. Такое обесцвечивание может восстановить только специалист. Хромированные колеса ВАЖНО Чистящие средства для дисков могут оставить пятна на хромированных колесах. Для мойки используйте губку, - Страница 209 из 323
C70; 7; 3 evastarck 2008-03-17T16:24:08+01:00; Page 208 08 Уход за автомобилем Чистка Полировка и нанесение воскового покрытия Полируйте и наносите восковое покрытие, если краска автомобиля стала матовой или для обеспечения ей дополнительной защиты. Автомобиль не нуждается в полировке, по меньшей - Страница 210 из 323
C70; 7; 3 evastarck 2008-03-17T16:24:08+01:00; Page 209 08 Уход за автомобилем Чистка сохранения свойств и внешнего вида кожу необходимо регулярно чистить. Volvo предлагает полный спектр продуктов для чистки и последующей обработки обивки из кожи, при использовании которых в соответствии с - Страница 211 из 323
C70; 7; 3 evastarck 2008-03-17T16:24:08+01:00; Page 210 08 Уход за автомобилем Восстановление лакокрасочного покрытия Лакокрасочное покрытие Сколы от камней и царапины Небольшие сколы от камней и царапины Лакокрасочное покрытие является важной частью антикоррозионной защиты автомобиля, и, - Страница 212 из 323
C70; 7; 3 evastarck 2008-03-17T16:24:08+01:00; Page 211 08 Уход за автомобилем Антикоррозионная защита Контроль и уход Ваш автомобиль уже на заводе подвергся тщательной и всеобъемлющей антикоррозийной обработке. Элементы кузова изготовлены из оцинкованного листового металла. Днище защищено - Страница 213 из 323
2008-03-17T16:24:08+01:00; Page 212 Плановое техобслуживание Volvo…………………………………………….. Уход за автомобилем своими силами……………………………………….. Капот и двигательный отсек…………………………………………………….. Масла и - Страница 214 из 323
C70; 7; 3 evastarck УХОД И ТЕХОБСЛУЖИВАНИЕ 2008-03-17T16:24:08+01:00; Page 213 09 - Страница 215 из 323
C70; 7; 3 evastarck 2008-03-17T16:24:08+01:00; Page 214 09 Уход и техобслуживание 09 Плановое техобслуживание Volvo Программа техобслуживания Volvo Специальные сервисные операции Перед тем, как автомобиль покинул завод, он прошел тщательные испытания. Он был снова проверен в соответствии с - Страница 216 из 323
C70; 7; 3 evastarck 2008-03-17T16:24:08+01:00; Page 215 09 Уход и техобслуживание Уход за автомобилем своими силами Перед началом работ в автомобиле Аккумуляторная батарея Проверьте правильность подсоединения и надежность крепления проводов аккумуляторной батареи. Никогда не отключайте - Страница 217 из 323
C70; 7; 3 evastarck 2008-03-17T16:24:08+01:00; Page 216 09 Уход и техобслуживание 09 Капот и двигательный отсек G010599 Открытие капота 1. Потяните ручку слева под приборной панелью. Вы услышите, что защелка отпущена. 2. Заведите руку под передний край посередине капота и отожмите собачку вправо - Страница 218 из 323
C70; 7; 3 evastarck 2008-03-17T16:24:08+01:00; Page 217 09 Уход и техобслуживание Масла и жидкости Наклейка в двигательном отсеке с указанием марки масла. 09 условиях Volvo рекомендует использовать масло более высокого качества по сравнению с указанным на наклейке, см. стр. 285. G020341 G020340 - Страница 219 из 323
C70; 7; 3 evastarck 2008-03-17T16:24:08+01:00; Page 218 09 Уход и техобслуживание Масла и жидкости ВАЖНО Для соблюдения интервалов техобслуживания во все двигатели производителем заливается специализированное синтетическое моторное масло. При выборе масла большое внимание уделено сроку службы, - Страница 220 из 323
C70; 7; 3 evastarck 2008-03-17T16:24:08+01:00; Page 219 09 Уход и техобслуживание Масла и жидкости MAX, чем MIN. Заправочные объемы на см. стр. 285. Проверка уровня масла на прогретом двигателе 1. Остановите автомобиль на ровной горизонтальной поверхности, выключите двигатель и подождите 10 – 15 - Страница 221 из 323
C70; 7; 3 evastarck 2008-03-17T16:24:08+01:00; Page 220 09 Уход и техобслуживание 09 Масла и жидкости Охлаждающая жидкость, проверка уровня и заправка ВАЖНО • Высокое содержание, хлора, хлоридов и других солей может вызывать коррозию в системе охлаждения. Используйте охлаждающую жидкость с - Страница 222 из 323
C70; 7; 3 evastarck 2008-03-17T16:24:08+01:00; Page 221 09 Уход и техобслуживание Масла и жидкости Жидкость тормозов и сцепления, проверка уровня и заправка гористой местности, или во влажном тропическом климате, необходимо заменять тормозную жидкость раз в год. 09 Однако при этом поворот руля - Страница 223 из 323
C70; 7; 3 evastarck 2008-03-17T16:24:08+01:00; Page 222 09 Уход и техобслуживание 09 Щетки стеклоочистителей Щетки стеклоочистителей 1. Поднимите рычаг стеклоочистителя. Замена щеток стеклоочистителей, ветровое стекло 2. Нажмите на кнопку, расположенную на креплении щетки, и вытяните (1) - Страница 224 из 323
C70; 7; 3 evastarck 2008-03-17T16:24:08+01:00; Page 223 09 Уход и техобслуживание Аккумуляторная батарея Уход за аккумуляторной батареей Срок службы и рабочее состояние аккумуляторной батареи зависит от числа пусков двигателя, разрядов, манеры вождения, условий эксплуатации, климата и т.д. ВНИМАНИЕ - Страница 225 из 323
C70; 7; 3 evastarck 09 Уход и техобслуживание 09 Аккумуляторная батарея 4. Отсоедините отрицательный провод. 5. Отсоедините положительный провод. 6. С помощью отвертки снимите переднюю стенку коробки аккумулятора. 7. Освободите зажим, фиксирующий аккумуляторную батарею. 8. Выньте аккумуляторную - Страница 226 из 323
C70; 7; 3 evastarck 2008-03-17T16:24:08+01:00; Page 225 09 Уход и техобслуживание Замена ламп накаливания Общие сведения Список всех ламп накаливания приведен на стр. 296. Лампы накаливания и точечные лампы специального типа или, замена которых возможна только на станции техобслуживания: • • • Не - Страница 227 из 323
C70; 7; 3 evastarck 2008-03-17T16:24:08+01:00; Page 226 09 Уход и техобслуживание 09 Замена ламп накаливания Ближний свет Установка на место новой лампы Снятие защитной крышки и лампы накаливания: Установка на место корпуса фары 1. Снимите корпус лампы в сборе. 1. Подсоедините разъем и установите - Страница 228 из 323
C70; 7; 3 evastarck 2008-03-17T16:24:08+01:00; Page 227 09 Уход и техобслуживание Замена ламп накаливания 2. Левая фара: поверните держатель лампы против часовой стрелки. Правая фара: поверните держатель лампы по часовой стрелке. 1. Выньте держатель лампы щипцами. Не вынимайте держатель лампы, - Страница 229 из 323
C70; 7; 3 evastarck 2008-03-17T16:24:08+01:00; Page 228 09 Уход и техобслуживание 09 Замена ламп накаливания Боковые габаритные фонари Противотуманные фары 8. Закрепите корпус фары винтами и вдавите на место панель. 2. Установите держатель лампы на место. Она может фиксироваться только в одном - Страница 230 из 323
C70; 7; 3 evastarck 2008-03-17T16:24:08+01:00; Page 229 09 Уход и техобслуживание Замена ламп накаливания Если сообщение о неисправности НЕИСПР.ЛАМПА/ПРОВЕРЬТЕ СТОПСИГНАЛЫ сохраняется после замены неисправной лампы накаливания, необходимо устранить неисправность на официальной станции - Страница 231 из 323
C70; 7; 3 evastarck 2008-03-17T16:24:08+01:00; Page 230 09 Уход и техобслуживание Замена ламп накаливания Багажное отделение Освещение косметического зеркала* Освещение порогов расположено под приборной панелью на стороне водителя и пассажира. 1. Вставьте отвертку и осторожно поверните ее, чтобы - Страница 232 из 323
C70; 7; 3 evastarck 2008-03-17T16:24:08+01:00; Page 231 09 Уход и техобслуживание Замена ламп накаливания 09 Установка зеркальной вставки 1. Сначала вдавите на место три выступа у верхнего края зеркального стекла. 2. Затем вдавите на место три нижних выступа. G020969 Освещение салона сзади 1. - Страница 233 из 323
C70; 7; 3 evastarck 2008-03-17T16:24:08+01:00; Page 232 09 Уход и техобслуживание Предохранители 09 Общие сведения Все электрические устройства и компоненты защищены плавкими предохранителя, которые предотвращают повреждение системы электрооборудования в случае короткого замыкания или перегрузки. - Страница 234 из 323
C70; 7; 3 evastarck 2008-03-17T16:24:08+01:00; Page 233 09 Уход и техобслуживание Предохранители 09 G007446 Блок реле/предохранителей в двигательном отсеке В блоке находятся 36 гнезд предохранителей. При замене перегоревшего предохранителя убедитесь, что новый предохранитель имеет такие же цвет и - Страница 235 из 323
C70; 7; 3 evastarck 2008-03-17T16:24:08+01:00; Page 234 09 Уход и техобслуживание Предохранители G020250 09 1. Вентилятор радиатора 2. Сервоуправление (за исключ. двигателя 1,6 л) 80 A Питание блока предохранителей в салоне Питание блока предохранителей в салоне 3. 4. 5. 6. Элемент климатической - Страница 236 из 323
C70; 7; 3 evastarck 2008-03-17T16:24:08+01:00; Page 235 09 Уход и техобслуживание Предохранители 21. Дополнительный топливный отопитель, отопитель салона 20 A 22. Subwoofer 25 A 23. Модуль управления двигателем ЕСМ (5-цил. бензин) трансмиссия (ТСМ) 24. Топливный фильтр с электрообогревом, элемент - Страница 237 из 323
C70; 7; 3 evastarck 2008-03-17T16:24:08+01:00; Page 236 09 Уход и техобслуживание 09 Предохранители G020601 Блок реле/предохранителей в салоне В блоке находятся 50 гнезд предохранителей. Предохранители находятся под отделением для перчаток. Там же предусмотрены гнезды для резервных предохранителей. - Страница 238 из 323
C70; 7; 3 evastarck 2008-03-17T16:24:08+01:00; Page 237 09 Уход и техобслуживание 09 G020246 Предохранители 43. 44. 45. 46. Телефон, Звуковоспроизведение, RTI (опция) Система SRS, модуль управления двигателем ЕСМ (5-цил.) Электрическое гнездо в салоне Освещение салона, перчаточного ящика и порогов - Страница 239 из 323
C70; 7; 3 evastarck 2008-03-17T16:24:08+01:00; Page 238 09 Уход и техобслуживание 09 Предохранители 59. 60. 61. Дальний свет фар, слева Обогрев кресла на стороне водителя Обогрев кресла на стороне пассажира 70. 15 A — 71. Резервное гнездо — 72. Резервное гнездо — Консоль освещения в салоне (ОНС) - Страница 240 из 323
C70; 7; 3 evastarck 2008-03-17T16:24:08+01:00; Page 239 09 Уход и техобслуживание 09 239 - Страница 241 из 323
2008-03-17T16:24:08+01:00; Page 240 Общие сведения………………………………………………………………………. Функции аудиосистемы……………………………………………………………. Функции - Страница 242 из 323
C70; 7; 3 evastarck ИНФОРМАЦИОННО-РАЗВЛЕКАТЕЛЬНАЯ СИСТЕМА 2008-03-17T16:24:08+01:00; Page 241 10 - Страница 243 из 323
C70; 7; 3 evastarck 2008-03-17T16:24:08+01:00; Page 242 10 Информационно-развлекательная система Общие сведения 10 Информационно-развлекательная система В информационно-развлекательную систему интегрированы функции звуковоспроизведения и телефона*. С этой системой можно легко работать с панели - Страница 244 из 323
C70; 7; 3 evastarck 2008-03-17T16:24:08+01:00; Page 243 10 Информационно-развлекательная система Общие сведения Оснащение В аудиосистему может входить различное оборудование по выбору и по классу. Существует три класса аудиосистемы: • • • 10 Performance High Performance Premuim Sound При этом радио - Страница 245 из 323
C70; 7; 3 evastarck 2008-03-17T16:24:08+01:00; Page 244 10 Информационно-развлекательная система Функции аудиосистемы 10 Органы управления функциями аудиосистемы Громкость Используйте VOLUME (1) или клавиатуру на рулевом колесе для регулировки громкости, см. стр. 70. Громкость звука регулируется - Страница 246 из 323
C70; 7; 3 evastarck 2008-03-17T16:24:08+01:00; Page 245 10 Информационно-развлекательная система Функции аудиосистемы внешнего источника качество звука может снизиться. Это можно избежать, если отрегулировать громкость на входе AUX. Подключение USB/iPod 2 2. Подключите медиа-носитель к разъему в - Страница 247 из 323
C70; 7; 3 evastarck 2008-03-17T16:24:08+01:00; Page 246 10 Информационно-развлекательная система Функции аудиосистемы Память USB 10 настройки следует активировать сабвуфер, см. под рубрикой Активирование/ отключение сабвуфера ниже. ВНИМАНИЕ Для удобства обращения с памятью USB сохраняйте в ней - Страница 248 из 323
C70; 7; 3 evastarck 2008-03-17T16:24:08+01:00; Page 247 10 Информационно-развлекательная система Функции аудиосистемы Эквалайзер впереди/сзади 5 Автомат. громкость 6 Настройки объемного звучания обеспечивают пространственное восприятие звука. Настройки и активирование/отключение производятся - Страница 249 из 323
C70; 7; 3 evastarck 10 Информационно-развлекательная система Функции аудиосистемы Оптимальное звуковосприятие 10 Аудиосистема откалибрована для оптимального восприятия звучания с помощью цифровой обработки сигнала. Эта калибровка проводится для каждой комбинации модели автомобиля и аудиосистемы с - Страница 250 из 323
C70; 7; 3 evastarck 2008-03-17T16:24:08+01:00; Page 249 10 Информационно-развлекательная система Функции радиоприемника Органы управления радио Поиск радиостанций Сохранение станций Автоматический поиск радиостанций 1. Выберите диапазон частот с помощью AM/FM (1). 2. Кратко нажмите на или . Поиск - Страница 251 из 323
C70; 7; 3 evastarck 2008-03-17T16:24:08+01:00; Page 250 10 Информационно-развлекательная система Функции радиоприемника 10 Когда Автом. сохран… исчезает с дисплея, процесс сохранения завершен. Радио возвращается к автоматическому режиму и на дисплее появляется Auto. После этого автоматически - Страница 252 из 323
C70; 7; 3 evastarck 2008-03-17T16:24:08+01:00; Page 251 10 Информационно-развлекательная система Функции радиоприемника Программные функции Тревога Радио в режиме FM может вести поиск радиостанций, транслирующих определенный тип программ. Если найдена программа определенного типа, радиоприемник - Страница 253 из 323
C70; 7; 3 evastarck 2008-03-17T16:24:08+01:00; Page 252 10 Информационно-развлекательная система Функции радиоприемника Поиск PTY С помощью функции PTY Вы можете выбирать различные типы программ, например, Попмузыка и Серьезн.классика. Символ PTY показывает, что данная функция активирована. Данная - Страница 254 из 323
C70; 7; 3 evastarck 2008-03-17T16:24:08+01:00; Page 253 10 Информационно-развлекательная система Функции радиоприемника 3. Перейдите к Показать PTY и нажмите ENTER. 2. Перейдите к Расширенные настройки радио и нажмите ENTER. 3. Перейдите к AF и нажмите ENTER. Радиотекст Активирование/отключение - Страница 255 из 323
C70; 7; 3 evastarck 10 Информационно-развлекательная система Функции радиоприемника 10 Возврат к исходным настройкам функций RDS Возвращает все настройки радиоприемника к исходным заводским. 1. Нажмите MENU, а затем ENTER. 2. Перейдите к Расширенные настройки радио и нажмите ENTER. 3. Перейдите к - Страница 256 из 323
C70; 7; 3 evastarck 2008-03-17T16:24:08+01:00; Page 255 10 Информационно-развлекательная система Функции CD Органы управления функциями CD Запуск воспроизведения (проигрыватель компакт-дисков) Если при установке аудиосистемы в режим компакт-диска в проигрывателе уже имеется музыкальный диск, - Страница 257 из 323
C70; 7; 3 evastarck 2008-03-17T16:24:08+01:00; Page 256 10 Информационно-развлекательная система Функции CD TUNING (или клавиатурой на рулевом колесе). • СЛУЧАЙНАЯ означает, что проигры- Навигация и воспроизведение Сканирование компакт-диска Если в проигрывателе компакт-дисков находится диск со - Страница 258 из 323
C70; 7; 3 evastarck 2008-03-17T16:24:08+01:00; Page 257 10 Информационно-развлекательная система Функции CD Активирование/отключение (чейнджер компакт-дисков) Если проигрывается обычный музыкальный диск: 1. Нажмите MENU, а затем ENTER. 2. Перейдите к Случайный выбор и нажмите ENTER. 3. Перейдите к - Страница 259 из 323
C70; 7; 3 evastarck 2008-03-17T16:24:08+01:00; Page 258 10 Информационно-развлекательная система Структура меню – аудиосистема Обзор 10 Меню aux Меню fm 1. Громкость AUX 1. Новости 2. Новости 2. TP 3. TP 3. PTY 4. Настройки аудио* 4. Радиотекст 5. Расширенные настройки радио 6. Настройки аудио* - Страница 260 из 323
C70; 7; 3 evastarck 2008-03-17T16:24:08+01:00; Page 259 10 Информационно-развлекательная система Функции телефона* Обзор – Компоненты системы телефона 2 3 10 4 1 5 G019841 6 * Опция/дополнительное оборудование, дополнительную информацию см. Введение. 259 - Страница 261 из 323
C70; 7; 3 evastarck 2008-03-17T16:24:08+01:00; Page 260 10 Информационно-развлекательная система Функции телефона* Элементы телефонной системы 10 1. Антенна 2. Клавиатура на рулевом колесе Общие сведения IDIS • На первом месте всегда должна быть безопасность движения. • Если водитель автомобиля - Страница 262 из 323
C70; 7; 3 evastarck 2008-03-17T16:24:08+01:00; Page 261 10 Информационно-развлекательная система Функции телефона* ВНИМАНИЕ Встроенный телефон не может считывать SIM-карту типа только 3G. Комбинированная 3G/GSM-карта принимается. Обратитесь к оператору сети для замены SIM-карты. Двойная SIM-карта - Страница 263 из 323
C70; 7; 3 evastarck 2008-03-17T16:24:08+01:00; Page 262 10 Информационно-развлекательная система Функции телефона* 10 ENTER – Принять вызов. При нажатии на клавишу появляется последний набранный номер. PHONE – Вкл/Выкл и положение ожидания (standby) Клавиатура на рулевом колесе ENTER – Функция, - Страница 264 из 323
C70; 7; 3 evastarck 2008-03-17T16:24:08+01:00; Page 263 10 Информационно-развлекательная система Функции телефона* Совершение вызова 1. Активируйте систему телефона (если необходимо). 2. Наберите номер или воспользуйтесь телефонной книжкой, см. стр. 265. 3. Нажмите ENTER или поднимите трубку. - Страница 265 из 323
C70; 7; 3 evastarck 2008-03-14T14:39:14+01:00; Page 264 10 Информационно-развлекательная система Функции телефона* Ввод текста 10 Ввод текста осуществляется с клавиатуры на телефоне. 1. Нажмите на кнопку с обозначением требуемого знака — один раз для введения первого обозначенного знака, два раза - Страница 266 из 323
C70; 7; 3 evastarck 2008-03-17T16:24:08+01:00; Page 265 10 Информационно-развлекательная система Функции телефона* 1. Нажмите MENU. 2. Перейдите к Телефонная книга и нажмите ENTER. 3. Перейдите к Поиск и нажмите ENTER. 4. Введите начальную букву имени и нажмите ENTER или нажмите только ENTER. 5. - Страница 267 из 323
C70; 7; 3 evastarck 2008-03-17T16:24:08+01:00; Page 266 10 Информационно-развлекательная система Функции телефона* 10 жаемых записей можно уменьшить вводом части искомого имени. 3. Перейдите к записи и нажмите ENTER. ВНИМАНИЕ Нажмите ENTER, чтобы осуществить соединение. ВНИМАНИЕ Удерживайте - Страница 268 из 323
C70; 7; 3 evastarck 2008-03-17T16:24:08+01:00; Page 267 10 Информационно-развлекательная система Функции телефона* Технические данные Выходная мощность SIM карта Малого размера Позиции памяти 250 A SMS — Short message service (Служба коротких сообщений) Да Компьютер/Факс Нет Двойной диапазон - Страница 269 из 323
C70; 7; 3 evastarck 2008-03-14T14:39:14+01:00; Page 268 10 Информационно-развлекательная система Структура меню – телефон* Меню телефона Однокноп. набор 4.6.3. Not answered Call register (Регистрация звонков) 2.4.1. включ 4.6.4. Not reachable 1.1. Пропущенные звонки 2.4.2. Выбрать номера 4.6.5. Fax - Страница 270 из 323
C70; 7; 3 evastarck 2008-03-14T14:39:14+01:00; Page 269 10 Информационно-развлекательная система Структура меню – телефон* Описание пунктов меню 1.5.1. Последний звонок 2.7. Статус памяти 1. Регистрация звонков 1.5.2. Количество звонков 1.1. Пропущ. вызовы 1.5.3. Общее время Список пропущенных - Страница 271 из 323
C70; 7; 3 evastarck 2008-03-14T14:39:14+01:00; Page 270 10 Информационно-развлекательная система Структура меню – телефон* 4. Опции вызова 10 4.6.5. Fax calls (Сигналы факса) 4.1. Передача номера 4.6.6. Data calls (Компьютерные звонки) 4.6.7. Отменить все Показывать или нет Ваш номер телефона - Страница 272 из 323
2008-03-17T16:24:08+01:00; Page 271 C70; 7; 3 evastarck 10 Информационно-развлекательная система Bluetooth, «свободные руки»* Общие сведения ственной клавиатурой мобильного телефона независимо от того, подключен он или нет. ВНИМАНИЕ G029503 Только некоторые модели мобильных телефонов полностью - Страница 273 из 323
C70; 7; 3 evastarck 2008-03-17T16:24:08+01:00; Page 272 10 Информационно-развлекательная система Bluetooth, «свободные руки»* Найденные мобильные телефоны показываются на дисплее с соответствующими именами в BluetoothТМ. Название функции «свободные руки» в BluetoothТМ показывается в мобильном - Страница 274 из 323
C70; 7; 3 evastarck 2008-03-17T16:24:08+01:00; Page 273 10 Информационно-развлекательная система Bluetooth, «свободные руки»* Автомат. ответ ВНИМАНИЕ Функция авто-ответа позволяет принимать входящие звонки автоматически. Активируется/отключается в Меню телефона Настройки телефона Опции вызова - Страница 275 из 323
C70; 7; 3 evastarck 2008-03-17T16:24:08+01:00; Page 274 10 Информационно-развлекательная система Bluetooth, «свободные руки»* 10 Подробнее о регистрации и подключении 1. Установите аудиосистему в режим телефона. Можно зарегистрировать максимум пять мобильных телефонов. Каждый телефон проходит - Страница 276 из 323
C70; 7; 3 evastarck 2008-03-17T16:24:08+01:00; Page 275 10 Информационно-развлекательная система Bluetooth, «свободные руки»* 6. Управление голосом Ввод текста Функция управления голосом для совершения звонков в мобильном телефоне может использоваться удерживанием ENTER. Ввод текста осуществляется - Страница 277 из 323
2008-03-17T16:24:08+01:00; Page 276 Обозначение типа……………………………………………………………………. Размеры и массы……………………………………………………………………… Технические данные - Страница 278 из 323
C70; 7; 3 evastarck ТЕХНИЧЕСКИЕ ДАННЫЕ 2008-03-17T16:24:08+01:00; Page 277 11 - Страница 279 из 323
C70; 7; 3 evastarck 2008-03-17T16:24:08+01:00; Page 278 11 Технические данные Обозначение типа G032086 11 278 - Страница 280 из 323
C70; 7; 3 evastarck 2008-03-17T16:24:08+01:00; Page 279 11 Технические данные Обозначение типа Общение с дилером Volvo или заказ запасных частей и аксессуаров для автомобиля существенно упрощается, если Вам известны обозначение типа, номер шасси и номер двигателя автомобиля. Обозначение типа, номер - Страница 281 из 323
C70; 7; 3 evastarck 2008-03-17T16:24:08+01:00; Page 280 11 Технические данные Размеры и массы Размеры G017402 11 Обозначение на рисун ке Размеры (мм) Обозначение на рисун ке A Колесная база 2640 В Длина 4582 C Длина груза, пол, сложенное сидение 850 Крышка багажника, в открытом положении прим. 200 - Страница 282 из 323
C70; 7; 3 evastarck 2008-03-17T16:24:08+01:00; Page 281 11 Технические данные Размеры и массы Массы Прицеп с тормозами: В рабочий вес автомобиля включается вес водителя, вес топливного бака, заполненного на 90 %, прочие омывающие/охлаждающие жидкости и т.п. Вес пассажиров и установленное - Страница 283 из 323
C70; 7; 3 evastarck 2008-03-17T16:24:08+01:00; Page 282 11 Технические данные Технические данные двигателя Обзор 2.4 T5 Обозначение двигателя B5244S5 B5244S4 B5254T7 Мощность (кВт/об/м) 103/5000 125/6000 169/5000 Мощность (л.с./об/мин) 140/5000 170/6000 230/5000 Крутящий момент (Нм/об/м) 220/4000 - Страница 284 из 323
C70; 7; 3 evastarck 2008-03-17T16:24:08+01:00; Page 283 11 Технические данные Технические данные двигателя 2.0D D5 D5 D5 85 81 81 81 Рабочий ход поршня (мм) 88,0 93,2 93,2 93,2 Рабочий объем цилиндров (литры) 2,00 2,40 2,40 2,40 18,5:1 17,3:1 17,3:1 17,3:1 Диаметр цилиндра (мм) Коэффициент сжатия A - Страница 285 из 323
C70; 7; 3 evastarck 2008-03-17T16:24:08+01:00; Page 284 11 Технические данные Масло для двигателя Неблагоприятные условия эксплуатации Проверяйте уровень масла более часто при длительной эксплуатации: Volvo рекомендует маслопродукты Castrol. • • • • для буксировки кемпера или прицепа в гористой - Страница 286 из 323
C70; 7; 3 evastarck 2008-03-17T16:24:08+01:00; Page 285 11 Технические данные Масло для двигателя Наклейка с указанием масла Качество моторного масла Вариант двигателя Объем заливаемого масла между отметками Объем A (литры) 11 MIN–MAX (литры) B B5244S5 1,3 5,8 2.4iB B5244S4 1,3 5,8 T5B B5254T7 1,3 - Страница 287 из 323
C70; 7; 3 evastarck 2008-03-17T16:24:08+01:00; Page 286 11 Технические данные Масло для двигателя Качество моторного масла Вариант двигателя Объем заливаемого масла между отметками Объем A (литры) MIN–MAX (литры) 11 D5 D5244T8 1,5 6 2,0 5,5 D5244T9 D5244T13 G032079 2.0D Расположение наклейки с - Страница 288 из 323
C70; 7; 3 evastarck 2008-03-17T16:24:08+01:00; Page 287 11 Технические данные Масло для двигателя Качество моторного масла Вариант двигателя Объем заливаемого масла между отметками Объем A (литры) MIN–MAX (литры) 11 B5244S5 B 1,3 5,5 2.4i B5244S4 B 1,3 5,5 T5 B5254T7 B 1,3 5,5 D5 D5244T8 1,5 6 - Страница 289 из 323
C70; 7; 3 evastarck 2008-03-17T16:24:08+01:00; Page 288 11 Технические данные Жидкости и смазки Обзор ВАЖНО 11 Для сохранения коробки передач следует использовать рекомендуемое трансмиссионное масло, которое запрещается смешивать с другими трансмиссионными маслами. Если залито другое - Страница 290 из 323
C70; 7; 3 evastarck 2008-03-17T16:24:08+01:00; Page 289 11 Технические данные Жидкости и смазки Жидкости Жидкость Система Объем (литры) Охлаждающая жидкость 5-цил., механическая коробка передач 9,5 5-цил. автомат. коробка передач 10,0 4-цил. дизель Рекомендуемое качество: 9,5 Охлаждающая жидкость с - Страница 291 из 323
C70; 7; 3 evastarck 2008-03-17T16:24:08+01:00; Page 290 11 Технические данные Топливо Расход, выброс и объем Двигатель Коробка передач Расход (литры/100 км) Выброс диоксида углерода CO2 (г/км) Объем бака (литры) 2.4 B5244S5 Механическая, 5-ступенчатая M56 8,9 212 прим. 62 2.4 B5244S5 Автоматическая - Страница 292 из 323
C70; 7; 3 evastarck 2008-03-17T16:24:08+01:00; Page 291 11 Технические данные Топливо Двигатель 2.0D Коробка передач D4204T (EURO3) (EURO4) 2.0D D4204T (EURO3) (EURO4) Расход (литры/100 км) Выброс диоксида углерода CO2 (г/км) Объем бака (литры) Механическая, 6 передач (MMT6) 6,1 161 прим. 52 - Страница 293 из 323
C70; 7; 3 evastarck 2008-03-17T16:24:08+01:00; Page 292 11 Технические данные Топливо ВАЖНО Использование топлива, не рекомендованного Volvo для соответствующего типа двигателя, может приводить к повреждению двигателя и снижению разгонных характеристик. 11 Использование других видов топлива также - Страница 294 из 323
C70; 7; 3 evastarck 2008-03-17T16:24:08+01:00; Page 293 11 Технические данные Топливо ВАЖНО Запрещается использовать следующее топливо, аналогичное дизельному: специальные добавки, дизельное топливо для судовых дизелей, котельное топливо, RME1(растительный метиловый эфир) и растительное масло. - Страница 295 из 323
C70; 7; 3 evastarck 11 Технические данные Топливо После завершения регенерации сообщение удаляется автоматически. ВАЖНО 11 Если фильтр полностью забит частицами, он не будет функционировать. При этом могут появиться трудности с пуском двигателя, и существует риск необходимости замены фильтра. - Страница 296 из 323
C70; 7; 3 evastarck 2008-03-17T16:24:08+01:00; Page 295 11 Технические данные Катализатор Общие сведения Катализатор предназначен для очистки отработавших газов. Он установлен в потоке выхлопных газов близко к двигателю, чтобы быстро достигалась рабочая температура. Катализатор состоит из - Страница 297 из 323
C70; 7; 3 evastarck 2008-03-17T16:24:08+01:00; Page 296 11 Технические данные Электросистема Общие сведения Система на 12 В с генератором переменного тока, регулируемым напряжением. Однополюсная система, в которой шасси и корпус двигателя используются как проводники. 11 При замене аккумуляторной - Страница 298 из 323
C70; 7; 3 evastarck 2008-03-17T16:24:08+01:00; Page 297 11 Технические данные Электросистема Освещение Мощность (Вт) Type (Тип) 5 C5W 1,2 Светодиодная лампа Передние габаритные/стояночные огни, передние боковые габаритные огни 5 W5W Противотуманные фары 55 H8 Освещение отделения для перчаток 3 - Страница 299 из 323
C70; 7; 3 evastarck 2008-03-17T16:24:08+01:00; Page 298 11 Технические данные Тип разрешения Система дистанционногоуправления BR Страна и регион 11 A, B, CY, CZ, D, DK, E, EST, F, FIN, GB, GR, H, I, IRL, L, LT, LV, M, NL, P, PL, S, SK, SLO IS, LI, N, CH HR ROK 298 Страна и регион Настоящим Delphi - Страница 300 из 323
C70; 7; 3 evastarck 2008-03-17T16:24:08+01:00; Page 299 12 Алфавитный указатель A D I A/C электронный климат-контроль……… 92 Dolby Surround Pro Logic II………… 243, 247 IDIS – Intelligent Driver Information System…………………………………………….. 260 ABS, неисправность - Страница 301 из 323
C70; 7; 3 evastarck 2008-03-17T16:24:08+01:00; Page 300 12 Алфавитный указатель R T REG – Региональные радиопрограммы……………………………………………. 253 Telephone one-key dial (быстрый вызов)……….. безопасность движения………………. ввод - Страница 302 из 323
C70; 7; 3 evastarck 2008-03-17T16:24:08+01:00; Page 301 12 Алфавитный указатель Аккумуляторная батарея перегрузка………………………………….. 145 пуск от вспомогательного источника……………………………………………. 173 технические данные……………………. 296 - Страница 303 из 323
C70; 7; 3 evastarck 2008-03-17T16:24:08+01:00; Page 302 12 Алфавитный указатель Гремучий газ……………………………………. 173 12 Громкость звука автоматическая регулировка громкости………………………………………….. 247 аудиосистема……………………………… - Страница 304 из 323
C70; 7; 3 evastarck 2008-03-17T16:24:08+01:00; Page 303 12 Алфавитный указатель Жидкость усилителя руля, проверка и заправка…………………………………………. 221 удаление дефростером…………………. 92 функция таймера………………………….. 91 - Страница 305 из 323
C70; 7; 3 evastarck 2008-03-17T16:24:08+01:00; Page 304 12 Алфавитный указатель Ключи запуска…………………………………. 149 Код цвета, лакокрасочное покрытие… 210 Кожаная обивка, рекомендации по чистке…………………………………………….. 208 12 Колеса - Страница 306 из 323
C70; 7; 3 evastarck 2008-03-17T16:24:08+01:00; Page 305 12 Алфавитный указатель Мобильный телефон «свободные руки»……………………….. 271 подключение………………………………. 274 регистрация телефона………………… 271 О Мойка автомобиля…………………………… - Страница 307 из 323
C70; 7; 3 evastarck 2008-03-17T16:24:08+01:00; Page 306 12 Алфавитный указатель Освещение при выходе из автомобиля…………………………………………….. 62, 78 настройки…………………………………….. 81 Отделение для перчаток………………….. 115 - Страница 308 из 323
C70; 7; 3 evastarck 2008-03-17T16:24:08+01:00; Page 307 12 Алфавитный указатель Проверка системы охранной сигнализации………………………………………………….. 140 Р Программа техобслуживания…………… 214 Рабочий вес…………………………………….. 281 - Страница 309 из 323
C70; 7; 3 evastarck 2008-03-17T16:24:08+01:00; Page 308 12 Алфавитный указатель отключение сработавшей сигнализации………………………………………….. 139 проверка системы охранной сигнализации………………………………………. 140 частичная сигнализация……………… - Страница 310 из 323
C70; 7; 3 evastarck 2008-03-17T16:24:08+01:00; Page 309 12 Алфавитный указатель телефонная книжка…………………….. 274 телефонная книжка, быстрый вызов………………………………………….. 274 Температура салон, электронный - Страница 311 из 323
C70; 7; 3 evastarck 2008-03-17T16:24:08+01:00; Page 310 12 Алфавитный указатель обивка………………………………………… 208 ремни безопасности……………………. 209 Э Эквалайзер……………………………………… 247 Ш 12 Шины герметизация - Страница 312 из 323
C70; 7; 3 evastarck 2008-03-17T16:24:08+01:00; Page 311 Примечания 311 - Страница 313 из 323
C70; 7; 3 evastarck Примечания 312 2008-03-17T16:24:08+01:00; Page 312 - Страница 314 из 323
C70; 7; 3 evastarck 2008-03-17T16:24:08+01:00; Page 313 Примечания 313 - Страница 315 из 323
C70; 7; 3 evastarck Примечания 314 2008-03-17T16:24:08+01:00; Page 314 - Страница 316 из 323
C70; 7; 3 evastarck 2008-03-17T16:24:08+01:00; Page 315 Примечания 315 - Страница 317 из 323
C70; 7; 3 evastarck Примечания 316 2008-03-17T16:24:08+01:00; Page 316 - Страница 318 из 323
C70; 7; 3 evastarck 2008-03-17T16:24:08+01:00; Page 317 Примечания 317 - Страница 319 из 323
C70; 7; 3 evastarck Примечания 318 2008-03-17T16:24:08+01:00; Page 318 - Страница 320 из 323
C70; 7; 3 evastarck 2008-03-17T16:24:08+01:00; Page 319 Примечания 319 - Страница 321 из 323
C70; 7; 3 evastarck Примечания 320 2008-03-17T16:24:08+01:00; Page 320 - Страница 322 из 323
C70; 7; 3 evastarck 2008-03-14T14:41:59+01:00; Page 1 VOLVO C70 Руководство По Эксплуатации - Страница 323 из 323