Параметры
- Источник питания: 90В~250В переменного тока Макс. Ток: 2200W/10A
- Стандарт Wi-Fi: 2,4 ГГц b/g/n RF:433Mhz
- Материал: ABS V0
- Размер: 88*38*22 мм
Контрольный список перед использованием устройства
- Ваш смартфон или планшет подключился к WiFi 2.4G с интернетом.
- У вас правильный WiFi PWD.
- Ваш смартфон или планшет должен иметь доступ к APP Store, Google Play.
- Ваш маршрутизатор открыт по MAC-адресу.
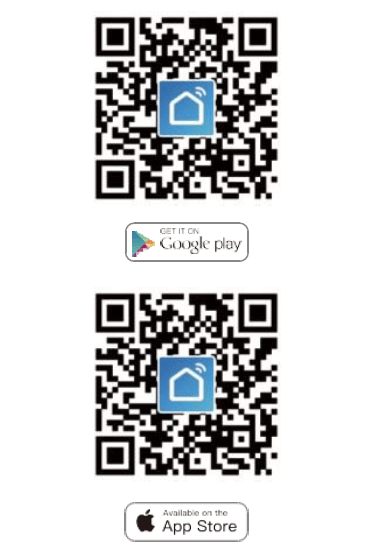
Инструкция по скачиванию Smart Life APP
Просканируйте QR-код или загрузите Smart Life в App Store или Google Play.
Запуск в работу
- Начните с приложения «Smart Life».
- Зарегистрируйте учетную запись Smart Life Smart.
- Если у вас есть учетная запись Smart Life, просто войти в систему.
- Включите питание. Принцип работы ON/OFF: Подключенные приборы работают/останавливаются при включении/выключении питания через провод под напряжением.

Инструкция по подключению прибора.
Инструкция по подключению светодиодной лампы.
Инструкция по подключению освещения.
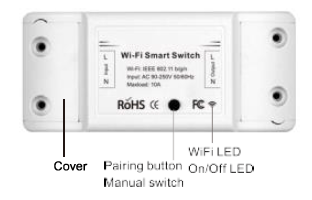
5. Нажмите и удерживайте кнопку в течение примерно 7 секунд, пока зеленый светодиод WiFi не начнет быстро мигать.
6. Войдите в приложение, нажмите «+» в правом верхнем углу страницы, чтобы перейти на страницу подключения к сети.
7. Существует два способа подключения к сети (обычный режим и режим точки доступа). Обычный режим используется по умолчанию. Пользователи могут нажать правый верхний угол, чтобы переключить метод подключения на режим точки доступа.
8. Убедитесь, что индикатор устройства быстро мигает (2 раза в секунду), нажмите, чтобы перейти к следующему шагу.
9. Если индикатор не мигает быстро, нажмите «как настроить индикатор на быстрое мигание», чтобы просмотреть процесс работы.
10. Введите пароль WiFi.
11. Назовите свое устройство.
12. Устройство находится в режиме онлайн.
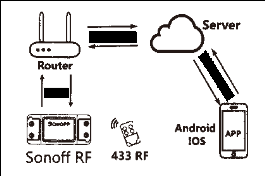
Метод дистанционного радиочастотного (RF) соединения.
- Нажмите кнопку сопряжения 5 раз, пока ваши электрические устройства не вспыхнут около 2 раз, а затем включите передатчик настенной панели для успешного сопряжения. После завершения сопряжения вы сможете управлять выключателем дистанционно.
- Повторите описанную выше процедуру для сопряжения другого передатчика настенной панели. Максимальное количество переключателей — шесть.
- Нажмите кнопку сопряжения 10 раз, пока ваши электрические устройства не вспыхнут около 4 раз, а затем начнется сброс.
Настроить индикатор на быстрое мигание.
- Включите устройство.
- Удерживайте кнопку сброса в течение 5 с.
- Индикатор подтверждения теперь быстро мигает.
WiFi Switch не удалось подключиться к вашему WiFi.
- Возможно, вы ввели неправильный пароль WiFi.
- Переключатель WiFi находится слишком далеко от вашего WiFi, пожалуйста, установите его ближе.
- Убедитесь, что ваш маршрутизатор открыт по MAC-адресу.
Если все еще не удалось, попробуйте открыть мобильный hot apot и добавить снова.
Скачать полное руководство.
RU
Moes MS-101
Главным элементом системы “Умный дом” любой сложности являются выключатели, управляемые интеллектуальными приложениями. MS-101 — титульный образец таких устройств. Он прост в конструкции, легок в установке, к тому же имеет одну отличительную особенность — модульность. Иными словами, из таких выключателей удобно собирать группы, которые будут управлять определенной функцией автоматизированного дома, например, созданием световых сцен. Устройство работает под управлением приложение Tuya
и Smart life
Описание.
MS-101 представляет собой небольшую (88 х 39 мм) пластиковую коробку, которая с “рабочих” сторон имеет пару клемм для присоединения проводов электрической сети. Само устройство крепится к чему угодно саморезами посредством внешних петель, поэтому установка проста и не требует разборки корпуса девайса.

Взаимодействие с управляющим приложением происходит по Wi-Fi. MS-101 легко и просто сопрягается с популярными голосовыми помощниками, такими как Alexa или Google Nest, Яндекс Алиса.
Функционал.
-
Включение / выключение / создание сценариев, таймеров и расписания.
-
Просмотр текущего состояния устройства.
-
Предоставление управления устройством доверенным аккаунтам.
Особенности.
-
Компактность
-
Простота монтажа
-
Низкая стоимость.
MS-101-16A Wifi Smart Switch
User Manual
The product user guide contains product features, how to use, and the operating procedure. Read the user manual carefully to get the best experience and avoid unnecessary damage. Keep this manual for future reference. If you have any questions or comments about the device, please contact the customer line.
Parameter
| Power Supply: | 90V~250V AC |
| Max. Load: | 2200W/10A or 3520W/16A |
| Wi-Fi Standard: | 2.4 GHz b/g/n |
| RF: | 433Mhz |
| Material | ABS V0 |
| Size: | 88*38*22mm |
Check list before using the device
Your smart phone or tablet has connected to a 2.4G WiFi with internet. You have the correct WiFi PWD.
Your smart phone or tablet mush have access to APP Store, Google Play. Your router is MAC-open.Download Smart Life APP
http://app.yimusmart.com/smartlifehttp://app.yimusmart.com/smartlife
Please scan the QR code or download Smart Life on App Store or Google Play.
User Guide
Wi-Fi link method
(Only for MS-101/MS-101WR)
- Start with “Smart Life” App
- Register and Smart Life Smart account.
- If you have Smart Life account, just log in.
- Power up.
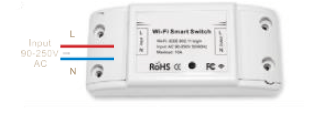
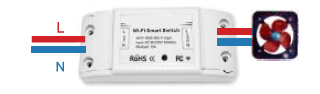
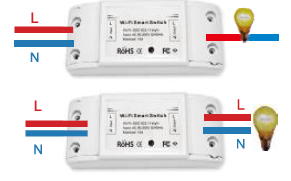
ON/OFF operating principle: The connected appliances work/stop through live wire power on/off.4.1 Appliance wiring instruction
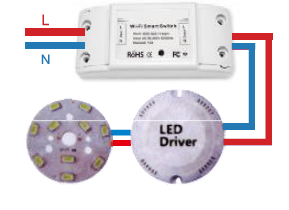
4.2 Celling lamp wiring instruction
4.3 Light wiring instruction.
*Note: The WiFi switch must be powered up by N and L wires.
- Press and hold the button for about 7 seconds until the WiFi green LED blinks fast.
- Enter the App, tap “+”in the upper right of the page to enter network connection page.
- There are two network connection methods (Normal mode and AP mode). Normal mode is default. Users could tap the upper right corner to switch the connection method to AP mode.
- Please make sure the device’s indicator light rapidly flashes (2 times per second), tap to go on to the next step.
- If indicator light is not rapidly flashing, tap “how to set indicator light as rapid flashes” to view operation processes.
- Input your WiFi password.
- Name your device.
- The device is online.
Remote radio frequency (RF) link method
(Only for MS-101R/MS-101WE)
- Press the pairing button for 5 times until your electric devices flash for about 2 times, and then turn on the wall panel transmitter to successfully pair. After the pairing is done, you will be able to control the switch remotely.
- Repeat the procedure above to pair another wall panel transmitter. The maximum number of the transmitter switch is six.
- Press the pairing button for 10 times until your electric devices flash for about 4 times, and then it will start to reset.
TROUBLESHOOTING
Q: How to set indicator light as rapid flashing?
1. Power on device.
2. Hold the reset button for 5s.
3. Confirm indicator light is now rapidly flashing.
Q: How to set indicator light as slow flashing?
1. Power on device.
2. Hold the reset button for 5s.
3. Confirm indicator light is now rapidly flashing.
4. Hold reset button for 8s until indicator light is slowly flashing.
– The new added device needs 1min to connect to WiFi and the Internet if it stays offline for a long time, please judge the problem by the WiFi LED status. WiFi LED quickly blinks one time every second.
Q: Wi Fi Switch failed to connect to your Wi Fi:
1. Maybe you have entered wrong WiFi password.
2. WiFi Switch is too far away from your WiFi please take it closer.
3. Make sure your router is MAC-open. If still failed, try to open a mobile hot spot and add again.
Set your Echo speaker by Alexa APP
(Only for MS-101/MS-101WR)
- If you have finished to install Smart Life, then open Amazon Alexa App; sign in your Alexa account and enter password.
- Click the menu on the left corner-click “Settings”; choose “Set up a new device” (choose a device, like Echo) Note: When the below page appears, long press the small dot on your Echo device until the light turns to yellow. Then click Continue on App.
Note: at this moment, the mobile phone can not open a variety of WPN software. - Choose your own WiFi and wait for a few minutes. After an introduction video click next step, it will enter Home Page automatically. Noe the Echo has connected to Wi-Fi successfully.
Enable Smart Life Skill in Alexa APP
Choose “Skills” in the options bar, and then search “Smart Life” in the input box.
Select Smart Life in the search results, and then click “Enable Skill”Then input the username and password of Smart Life APP that you had previously registered.
Control the Light Switch by Voice
After above operation is successful, you can control the Light Switch via Echo.
- Discover Devices
Firstly, you need to say to the Echo: Echo (or Alexa), discover my devices. Echo will start to find the device which is added in Smart Life APP. It will take about 20 seconds, then Echo will tell you the result. You can also click “Discover devices” in Alexa APP, then it will show the devices that have been found successfully. - Control Device by Voice
Note: The name of the device mut be consistent with the addition of Smart Life APP. You can also group the Light Switch and give instructions to control them together.Note: Echo is one of the wake-up names, which can be any of the three names (Settings): Alexa, Echo, Amazon.
- Support Skill List
You can control the device by instructions like these:
- Alexa (or Echo) turn on the Light Switch.
- Alexa (or Echo) turn off the Light Switch.
Google Assistant – Activate Smart Life in Google Home App
Preparation
- Have downloaded the Google Home App-compatible with Android (4.2 or higher) or iOS (8.0 or higher) smartphones or table.
- Have registered your Google Account.
- Have paired Light Switch with Smart Life App and named it with a recognizable name.
- Have finished setting up Google Home.
STEP 1
Open Google Home App: tap “” on the upper left corner, select “More Settings” to enter the next interface. STEP 2
Choose “Services” in the options bar and select “Smart Life” to enter the next interface. STEP 3
Tap “Link Account”, then sign in your Smart Life Account. STEP 4
Tap “Link Now”, after your Smart Life account has linked to Google Assistant, the smart devices will automatically appear.
Command the Device through Your Voice
After the above operation is successful, you can control the device via Google Home. Firstly you need to say “OK Google, talk to Smart Life” to wake up the Smart Life. Then you can control the device by instructions like these:
- Turn on the Light Switch
- Turn off the Light Switch
Note:
After Smart Life has been wakened up, you can say “Cancel” or “Stop” toexit Smart Life or say “Nothing” when you hear “What can I do for you”. Then you can say “OK Google, talk to Smart Life” to start voice control.
IFTTT-Setup and Usage
Get Started: How to connect the product to IFTTT?
STEP 1
Visit the IFTTT official website on your PC and sight in with your IFTT account.
Note: You can also use IFTTT app and follow similar steps to connect your device to the IFTTT. In this FAQ we take the website setting method for example.
STEP 2
Search for “Smart Life”, and then click “Smart Life” service.
STEP 3
Click “Connect”, then log in your Smart Life ID and tap “Link Now”. (The Smart Life ID in the same with that of Smart Life APP.) STEP 4
After successfully connecting your IFTTT account to your Smart Life ID. You are ready to enjoy the IFTTT service of the product now.
Instructions: 2 methods to use IFTTT with the products
Method 1
On Smart Life service page, choose an existing applet you need, turn it on and then finish the configuration.
Method 2
Create a new Applet on your own.
Click “My Applet” on the top and then click “New Applet” on the right top corner of the webpage to create a new Applet.
STEP 1
Create a Trigger Tap “this” to choose a Trigger. You can search for “Weather Underground” to choose a Trigger. We select “Sunset” as the Trigger.
STEP 2
Create an Action
Tap “that” to choose an Action. You can search for “Smart Life” to choose a Smart Life Action. We select “Turn on” of the Light Switch as the Action in this case.
STEP 3
New Applet “If sunset, then turn on Light Switch” has created as a result.
Note:
The Smart Life service can only work when creating an action. You cant use “Smart Life” as a trigger.
Warranty Conditions
A new product purchased in the Alza.cz sales network is guaranteed for 2 years. If you need repair or other services during the warranty period, contact the product seller directly, you must provide the original proof of purchase with the date of purchase. The following are considered to be a conflict with the warranty conditions, for which the claimed claim may not be recognized:
- Using the product for any purpose other than that for which the product is intended or failing to follow the instructions for maintenance, operation and service of the product.
- Damage to the product by a natural disaster, the intervention of an unauthorized person or mechanically through the fault of the buyer (e.g. during transport, cleaning by inappropriate means, etc.).
- Natural wear and aging of consumables or components during use (such as batteries, etc.).
- Exposure to adverse external influences, such as sunlight and other radiation or electromagnetic fields, fluid intrusion, object intrusion, mains overvoltage, electrostatic discharge voltage (including lightning), faulty supply or input voltage and inappropriate polarity of this voltage, chemical processes such as used power supplies, etc.
- If anyone has made modifications, modifications, alterations to the design or adaptation to change or extend the functions of the product compared to the purchased design or use of non-original components.

EU Declaration of Conformity
Identification data of the manufacturer’s / importer’s authorized representative:
Importer: Alza.cz a.s.
Registered office: Jankovcova 1522/53, Holešovice, 170 00 Prague 7
CIN: 27082440
Subject of the declaration:
Title: Wi-Fi Smart Switch
Model / Type: MS-101 + MS-101-16A
The above product has been tested in accordance with the standard(s) used to demonstrate compliance with the essential requirements laid down in the Directive(s):
Directive (EU) 2014/53/EU
Directive (EU) 2011/65/EU as amended 2015/863/EU
Prague, 7.1.2022WEEE
This product must not be disposed of as normal household waste in accordance with the EU Directive on Waste Electrical and Electronic Equipment (WEEE – 2012/19 / EU).
Instead, it shall be returned to the place of purchase or handed over to a public collection point for the recyclable waste. By ensuring this product is disposed of correctly, you will help prevent potential negative consequences for the environment and human health, which could otherwise be caused by inappropriate waste handling of this product. Contact your local authority or the nearest collection point for further details. Improper disposal of this type of waste may result in fines in accordance with national regulations.

✉ www.alza.co.uk/kontakt
✆ +44 (0)203 514 4411
Importer: Alza.cz a.s., Jankovcova 1522/53, Holešovice, 170 00 Praha 7, www.alza.cz