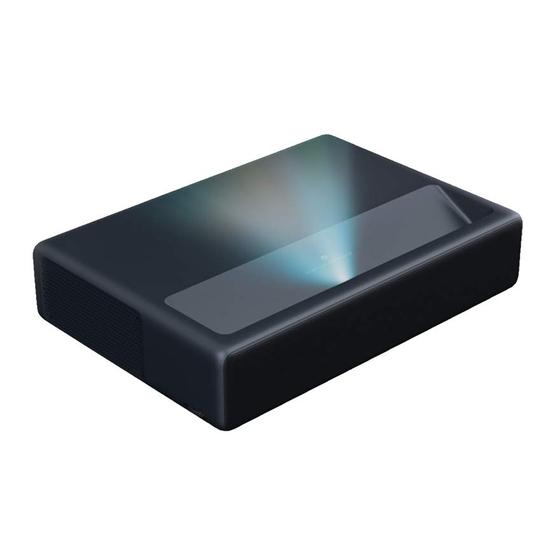
Лазерный проектор Xiaomi 4K 150

Уведомление пользователя
Благодарим вас за выбор лазерного проектора Mi 4K Laser Projector 150 ″.
Внимательно прочтите это руководство перед использованием и сохраните его для использования в будущем.
Иллюстрации продукта, аксессуаров и пользовательского интерфейса в руководстве пользователя служат только для справки. Фактический продукт и функции могут отличаться из-за улучшений продукта.
Правовое уведомление
Все продукты, отмеченные этим символом, являются отходами электрического и электронного оборудования (WEEE согласно директиве 2012/19 / EU), которые нельзя смешивать с несортированными бытовыми отходами. Вместо этого вам следует защищать здоровье человека и окружающую среду, передавая свое использованное оборудование в специальный пункт сбора отходов электрического и электронного оборудования, назначенный правительством или местными властями. Правильная утилизация и переработка помогут предотвратить возможные негативные последствия для окружающей среды и здоровья человека. Пожалуйста, свяжитесь с установщиком или местными властями для получения дополнительной информации о местонахождении, а также об условиях использования таких пунктов сбора.
Настоящим компания Fengmi (Beijing) Technology Co., Ltd заявляет, что радиооборудование типа Mi 4K Laser Projector 150 ″ соответствует Директиве 2014/53 / EU. Полный текст декларации соответствия ЕС доступен по следующему адресу в Интернете: http://www.mi.com/global/service/support/declaration.html
Это устройство можно использовать только внутри помещений при работе в диапазоне частот от 5150 до 5350 МГц.
Рабочая частота: 2.4–2.4835 ГГц (для Bluetooth)
Максимальная выходная мощность RF: 20 мВт (для Bluetooth)
Рабочая частота: 2.4–2.4835 ГГц (для Wi-Fi 2.4 ГГц)
Максимальная выходная мощность RF: 100 мВт (для Wi-Fi 2.4 ГГц)
Рабочая частота: 5.15–5.35 ГГц и 5.47–5.725 ГГц (для Wi-Fi 5 ГГц)
Максимальная выходная мощность RF: 200 мВт (для Wi-Fi 5 ГГц)
Примечание: При нормальных условиях использования это оборудование должно находиться на расстоянии не менее 20 см между антенной и телом пользователя.
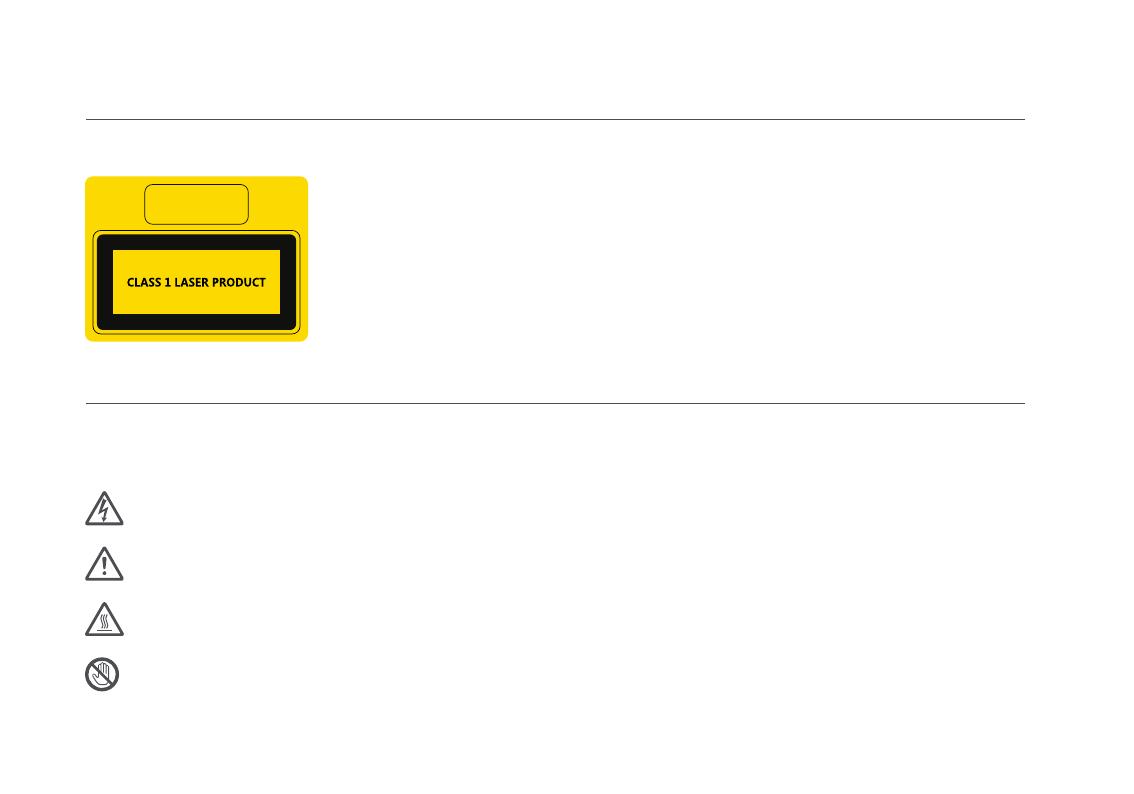
Информация о лазерной безопасности

Изделие соответствует стандартам IEC 60825-1: 2014, класс 1 и RG2 IEC 62471-5: 2015. Как и в случае с любым другим источником яркого света, не смотрите на луч, RG2 IEC 62471-5: 2015
Инструкции по технике безопасности
Перед использованием продукта внимательно прочтите следующие инструкции по безопасности.
- Использование неподходящего шнура питания может привести к снижению производительности продукта и даже к поражению электрическим током или возгоранию. Для обеспечения работоспособности и безопасности проектора используйте только оригинальный шнур питания или идентичный ему.
- Если вы используете удлинитель, он не должен иметь номинального тока ниже, чем у оригинального шнура питания проектора. Несоблюдение этого предупреждения может привести к перегреву удлинителя и стать причиной таких опасностей, как поражение электрическим током или возгорание.
- Во избежание повреждений, вызванных скачком напряжения или ударами молнии, отключайте проектор от розетки во время грозы или когда он не используется в течение длительного времени.
- Во избежание возгорания не размещайте рядом с проектором легковоспламеняющиеся предметы.
- Не закрывайте объектив никакими предметами, когда проектор включен. Любой объект, расположенный близко к объективу, может сильно нагреться и / или деформироваться и даже стать причиной пожара.
- Не закрывайте вентиляционные отверстия проектора, так как это может вызвать перегрев внутри изделия и привести к возгоранию.
Меры безопасности:
- Не ставьте проектор на неустойчивую платформу, подставку или стол, чтобы не допустить его падения и причинения серьезных повреждений или травм.
- Не смотрите прямо в объектив, когда проектор включен, чтобы не повредить глаза.
- Не пытайтесь разбирать проектор, так как он может содержать опасно высокий уровень громкости.tagе компоненты. Этот проектор должен обслуживаться и ремонтироваться только квалифицированным или авторизованным специалистом.
- Не устанавливайте проектор в вертикальном положении, так как он может упасть и нанести травму или повреждение.
- Не подвергайте проектор воздействию дождя или влаги (рабочая влажность 20–80%).
- Не погружайте проектор и не подвергайте его воздействию воды или других жидкостей. Немедленно отключите проектор от сети, если в его корпус попала какая-либо жидкость или предмет, и перед повторным использованием обратитесь к квалифицированному специалисту.
- Не размещайте проектор в следующих условиях:
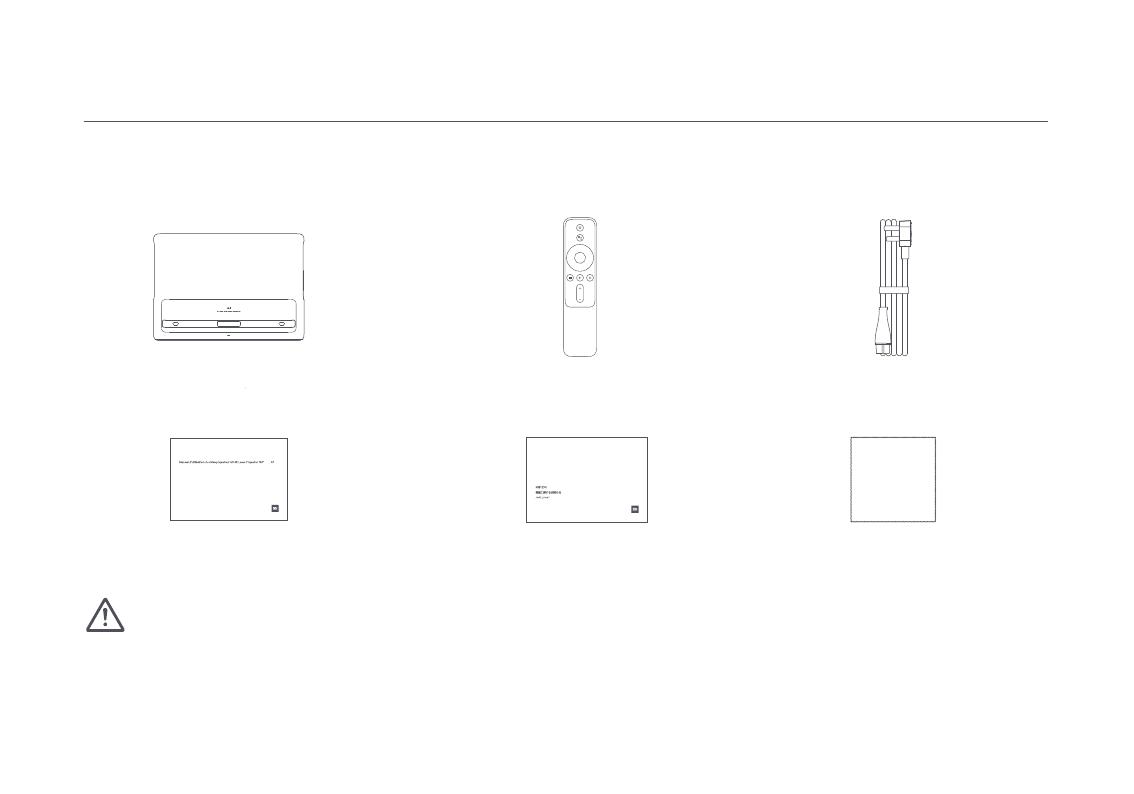
Комплект поставки
Открывая упаковку, сверьте содержимое коробки с приведенным ниже списком. Если чего-то не хватает, своевременно свяжитесь с продавцом.
Примечание:
- Фактическое содержимое может отличаться в зависимости от страны (или региона) продажи, пожалуйста, обращайтесь к фактическому продукту.
- Сохраните оригинальную упаковку для будущего хранения или транспортировки.
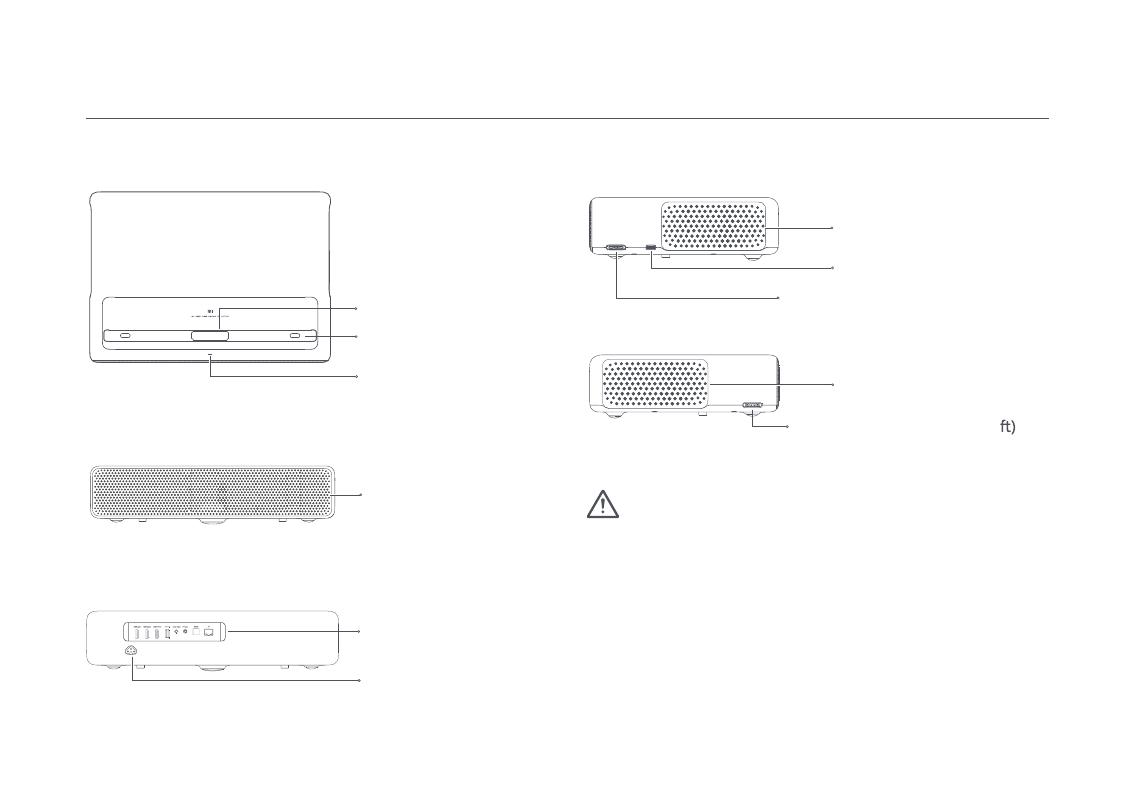
Продукт закончилсяview
Наружное освещение

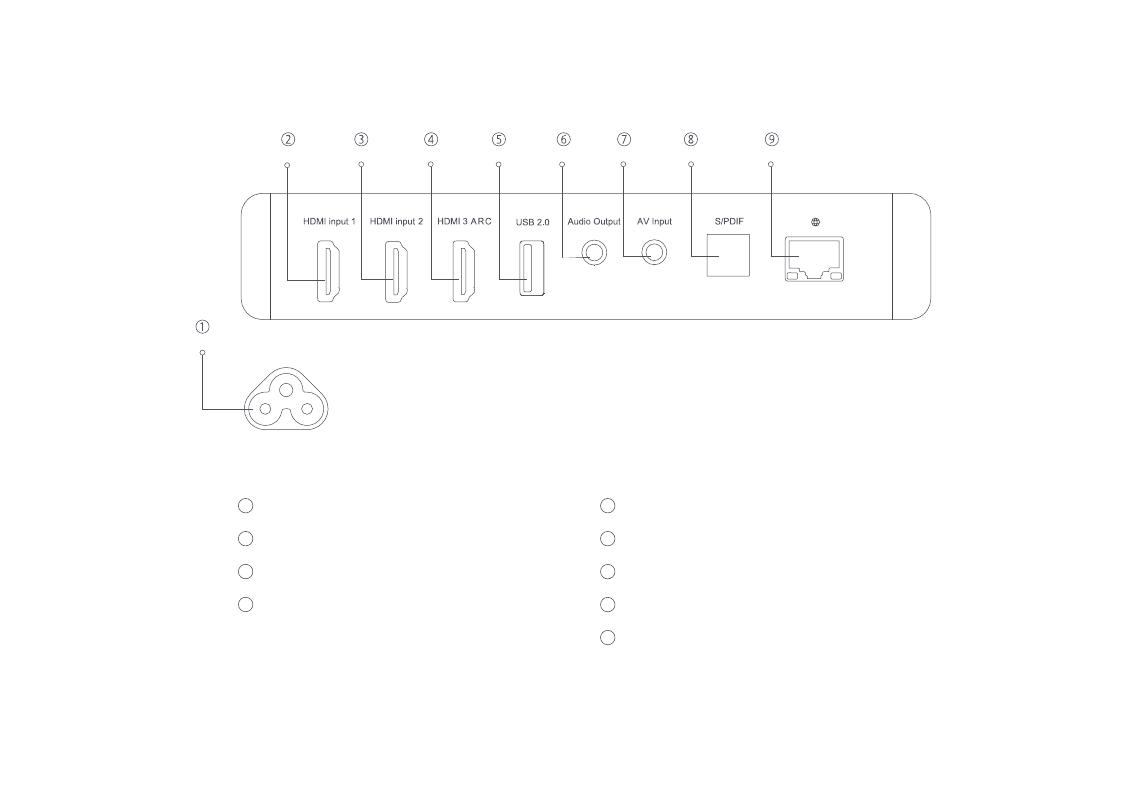
Порты подключения

- Порт питания
- Входной порт HDMI 1
- Входной порт HDMI 2
- Входной порт HDMI 3 Порт обратного аудиоканала
- Поддерживает протокол связи USB 2.0
- Порт аудиовыхода (поддерживает сабвуферы)
- Входной AV-порт (композитный AV-порт 3.5 мм)
- Выходной порт оптического цифрового аудиосигнала
- Порт Ethernet
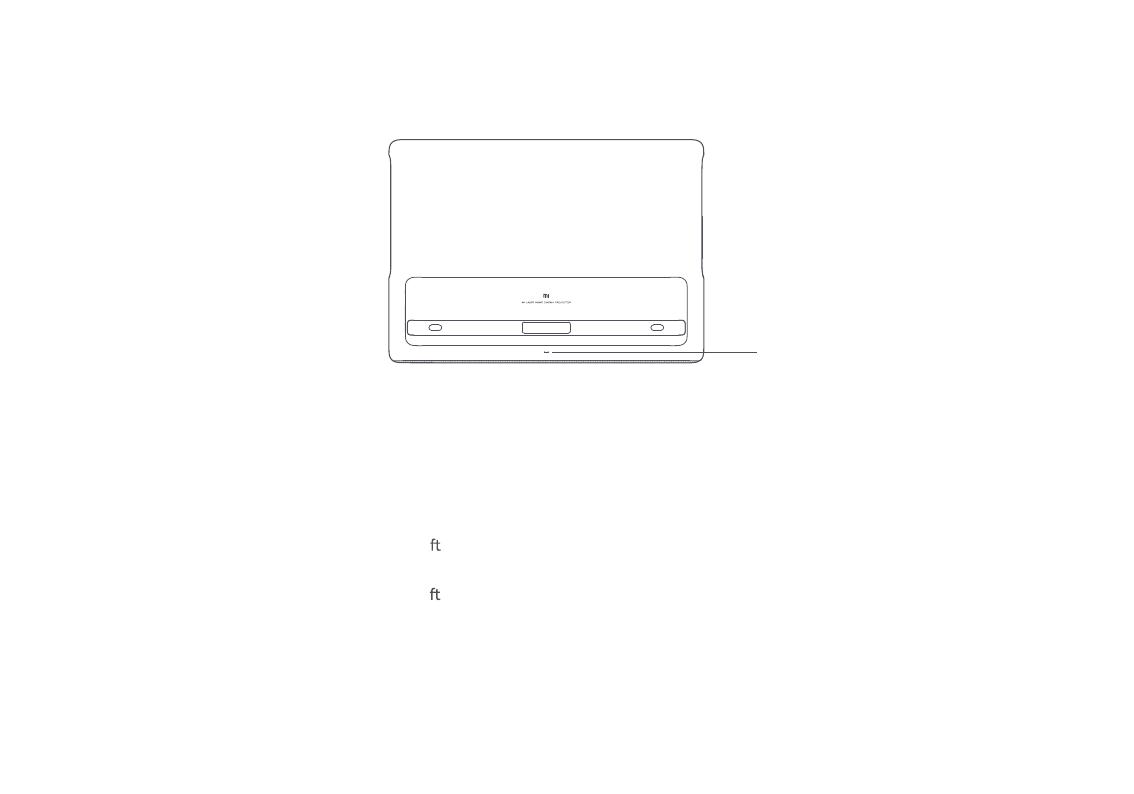
Индикатор питания

Индикатор питания (белый свет) соответствующего состояния проектора выглядит следующим образом:
- Подключите к розетке, проектор автоматически включится.
- Индикатор мигает, когда проектор включается.
- Индикатор гаснет после включения проекта.
- Индикатор мигает, когда проектор выключается.
дистанционное управление

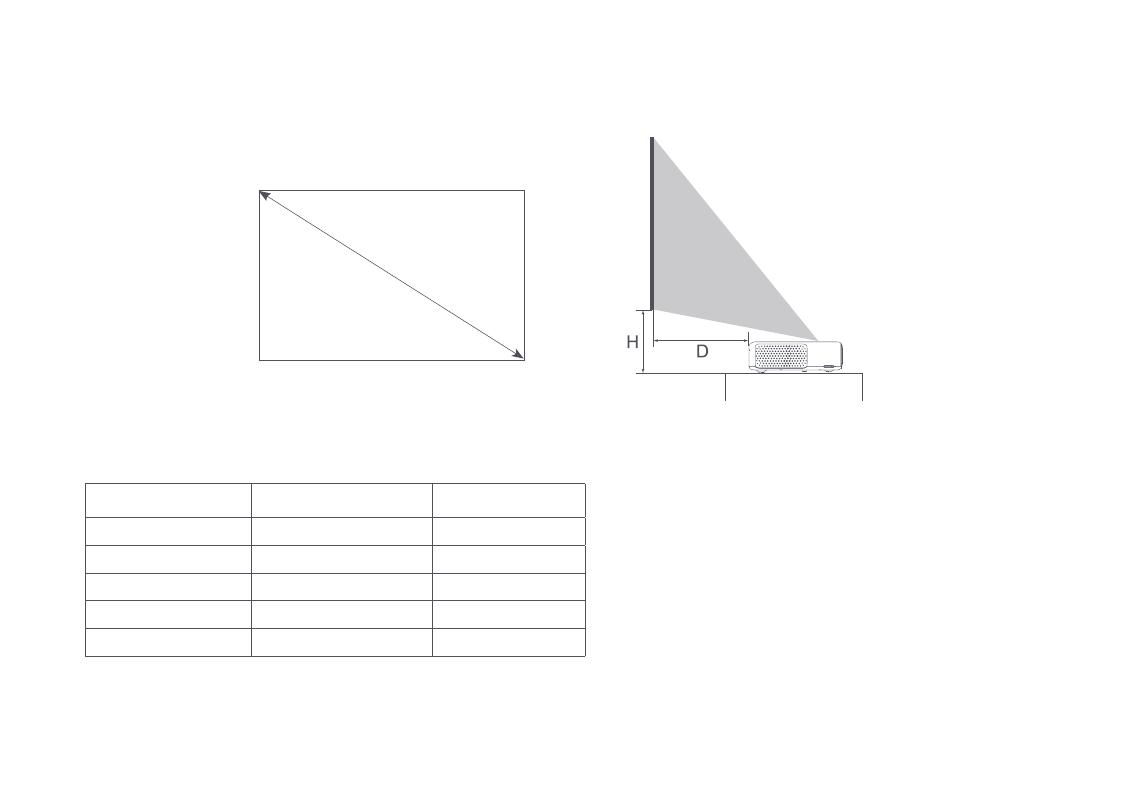
Расстояние проецирования и размер экрана

Определите расстояние между проектором и стеной или экраном в соответствии с желаемым размером экрана.
| Размеры экрана (SD) | Расстояние проецирования (D) | Относительная высота (H) |
| 80 « | 14 см | 29 см |
| 90 « | 19 см | 32 см |
| 100 « | 24 см | 35 см |
| 120 « | 34 см | 41 см |
| 150 « | 49 см | 50 см |
Размеры экрана (SD):
Размер диагонали проекционного экрана (в дюймах).
Расстояние проецирования (D):
Расстояние между проектором и стеной или экраном (в см).
Относительная высота (H):
Расстояние от нижней части проектора до нижнего края проецируемого изображения (в см).
Примечание: Размеры в таблице выше приведены только для справки, они приблизительны и могут незначительно отличаться от фактических значений.
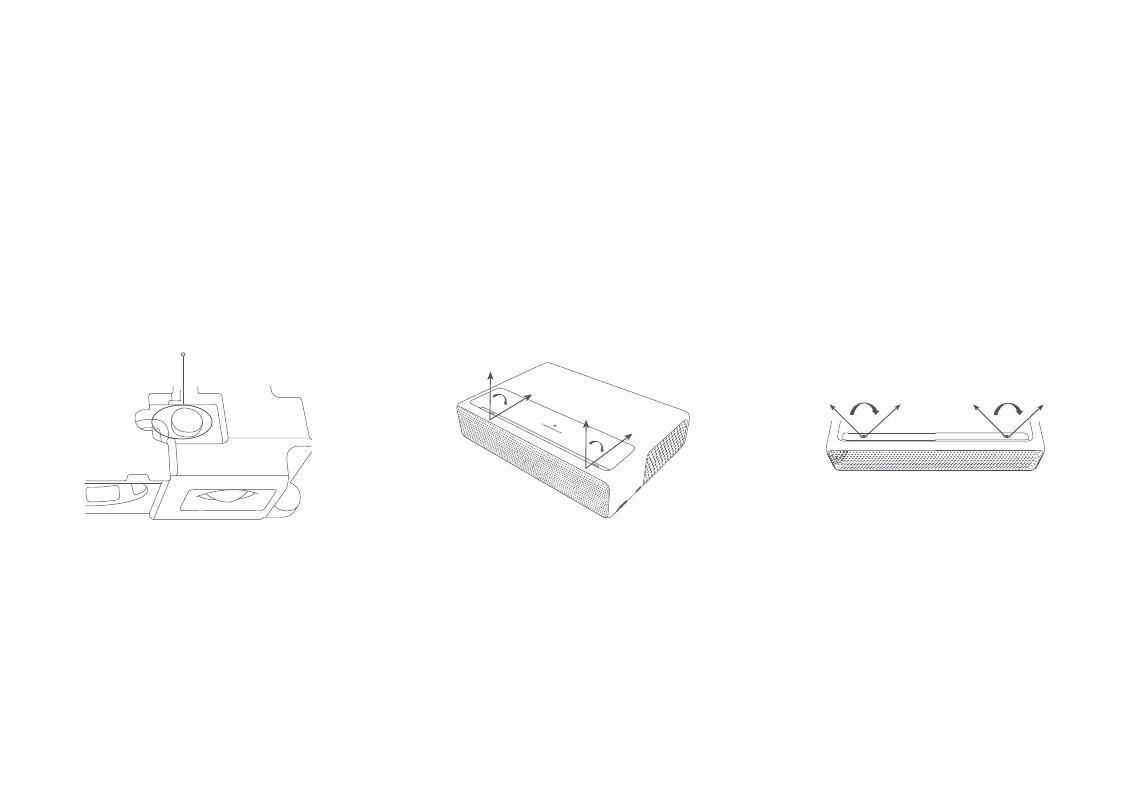
Установка подвесного потолка
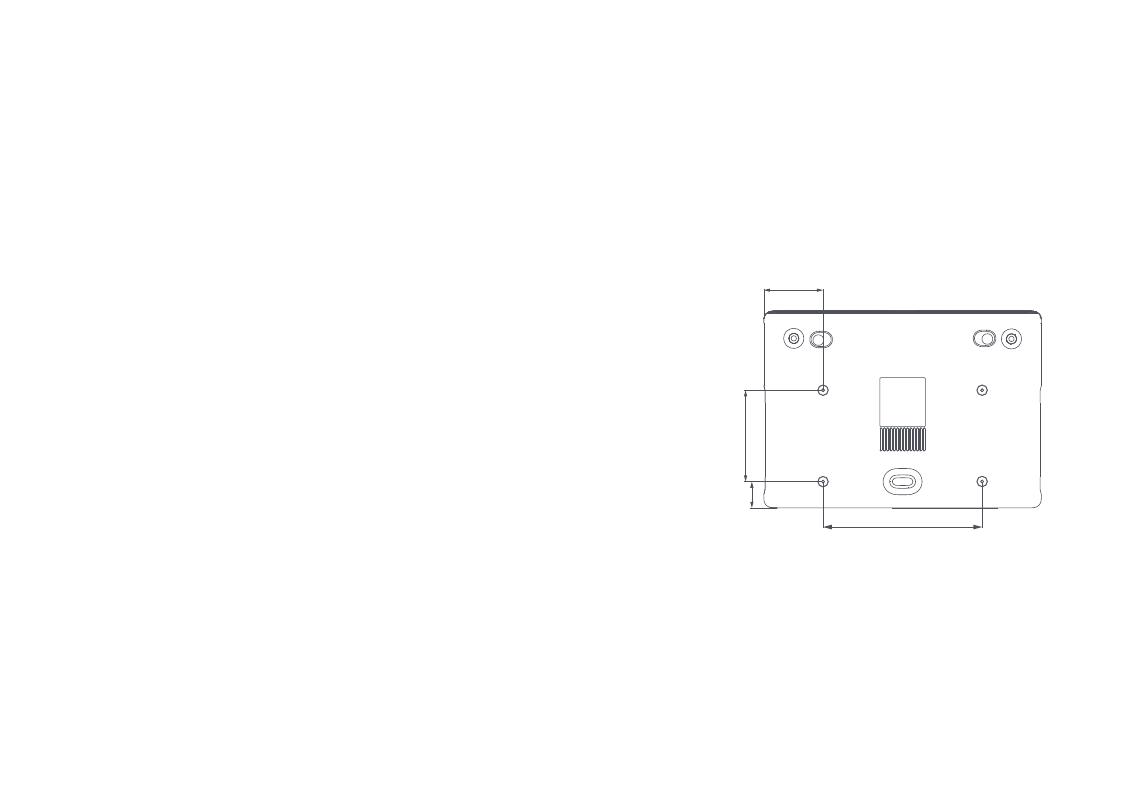
Подвесной потолок — это один из способов установки проектора над головой, напримерampле, на высоком потолке, через потолочное крепление. У проектора, поддерживающего установку подвесного потолка, снизу есть резьбовые отверстия, вы можете установить проект на крепление, вставив винты в отверстия.
Шаги установки следующие:
- Установите крепление.
Убедитесь, что крепление, используемое для установки проектора, может выдержать вес, по крайней мере, в пять раз превышающий вес проектора. Для выполнения установки требуется профессионал. - При установке проектора на потолочное крепление убедитесь, что винты соответствуют следующим характеристикам:
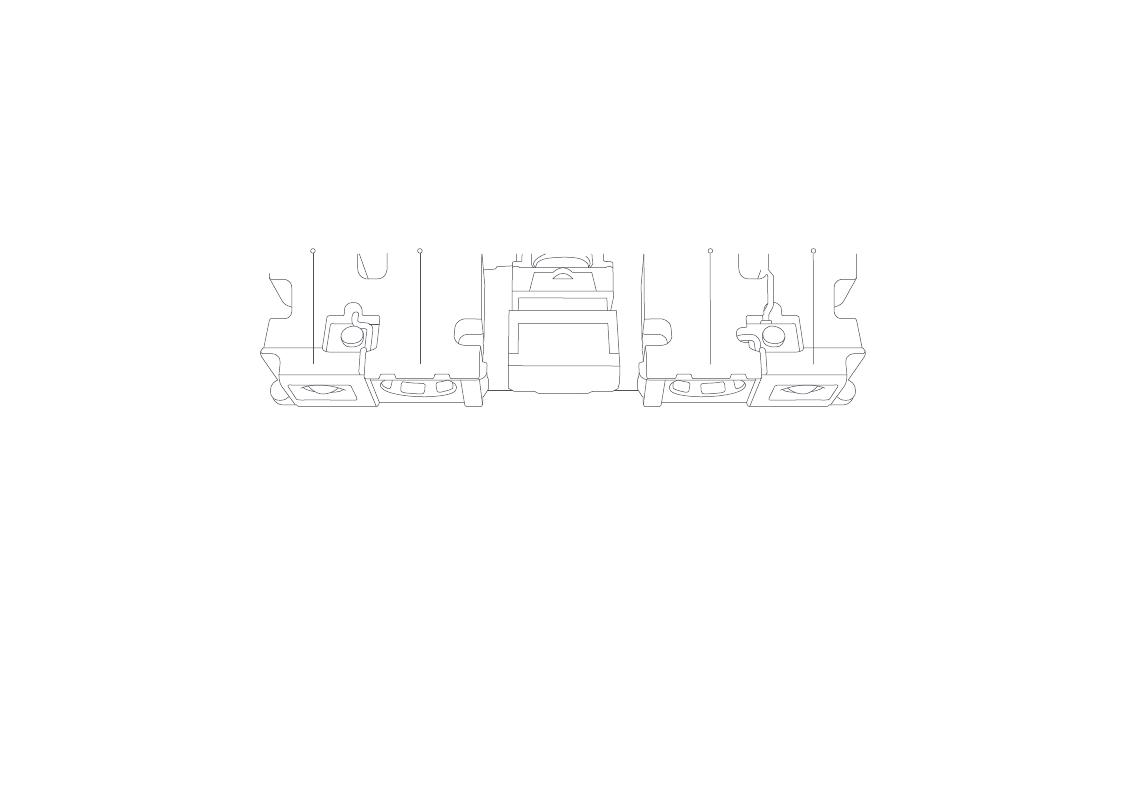
Тип винта: Саморез М4 × 10 (диаметр 4 мм, длина 10 мм), 4 шт.
Размеры монтажа: См. Рисунок справа. - Отрегулируйте крепление в соответствии с вашими потребностями и надежно затяните винты, чтобы завершить установку.
Особые указания:
- Чтобы избежать конвективного теплообмена между входами и выходами воздуха, убедитесь, что в пределах 50 см от входных и теплоотводящих отверстий нет препятствий.
- При подвешивании держите нижнюю часть проектора на расстоянии 10 см от потолка.
- Повреждения, вызванные неправильной установкой, аннулируют гарантию.
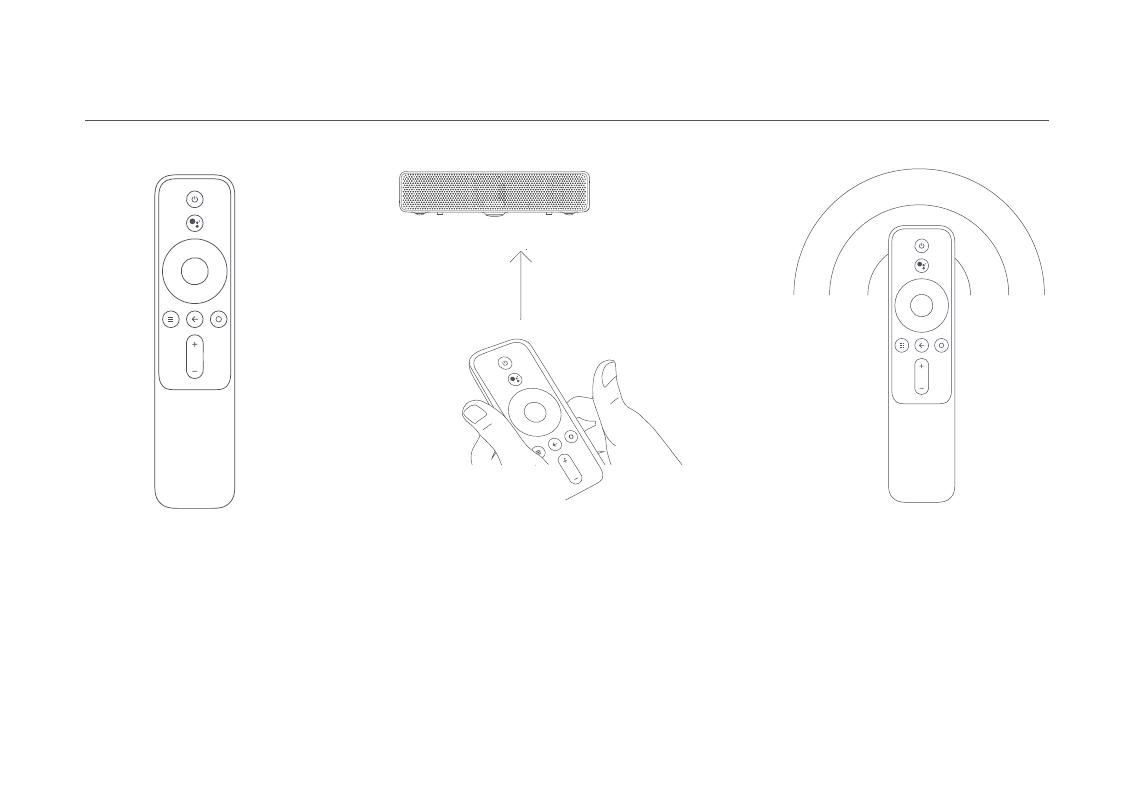
Сопряжение пульта дистанционного управления

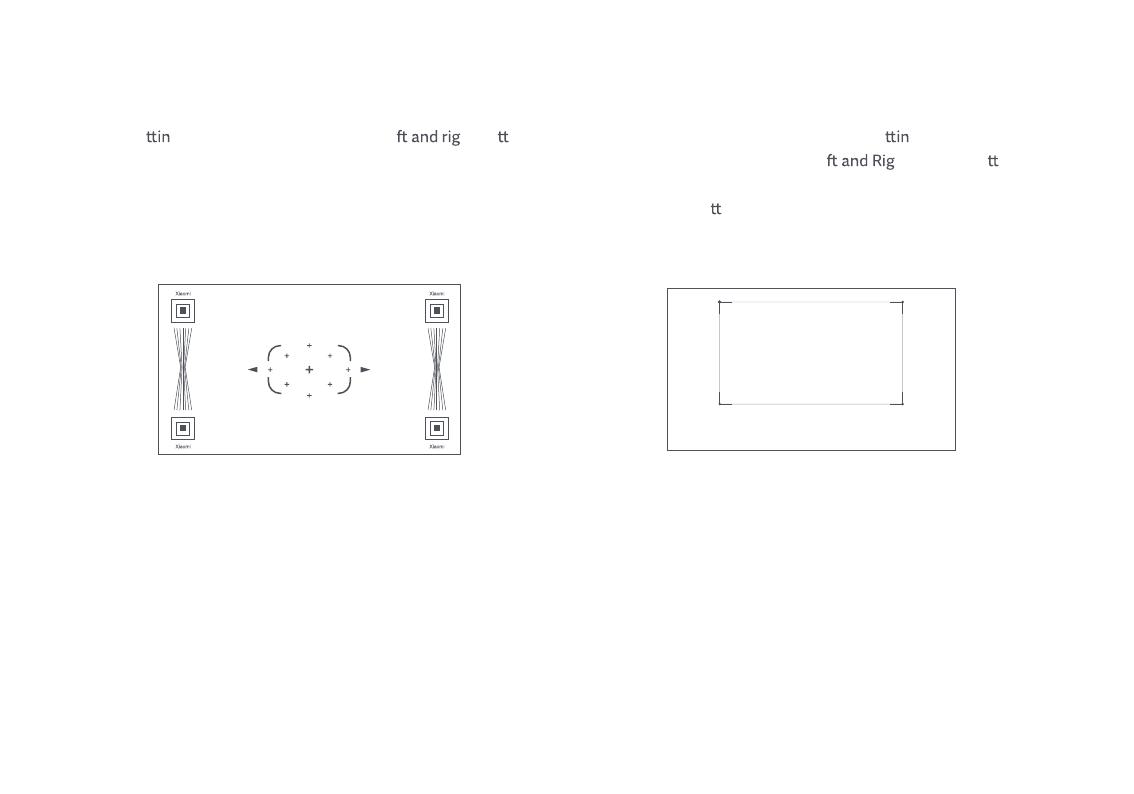
Коррекция трапецеидальных искажений
Чтобы выполнить коррекцию трапецеидальных искажений, выберите «Настройки»> «Изображение»> «Коррекция трапецеидальных искажений». Используйте левую и правую кнопки пульта ДУ для выбора 8-точечной коррекции трапецеидальных искажений, точной настройки или сброса. Нажмите кнопку OK, чтобы выбрать режим, затем с помощью навигационной панели пульта дистанционного управления настройте форму проецируемого изображения.

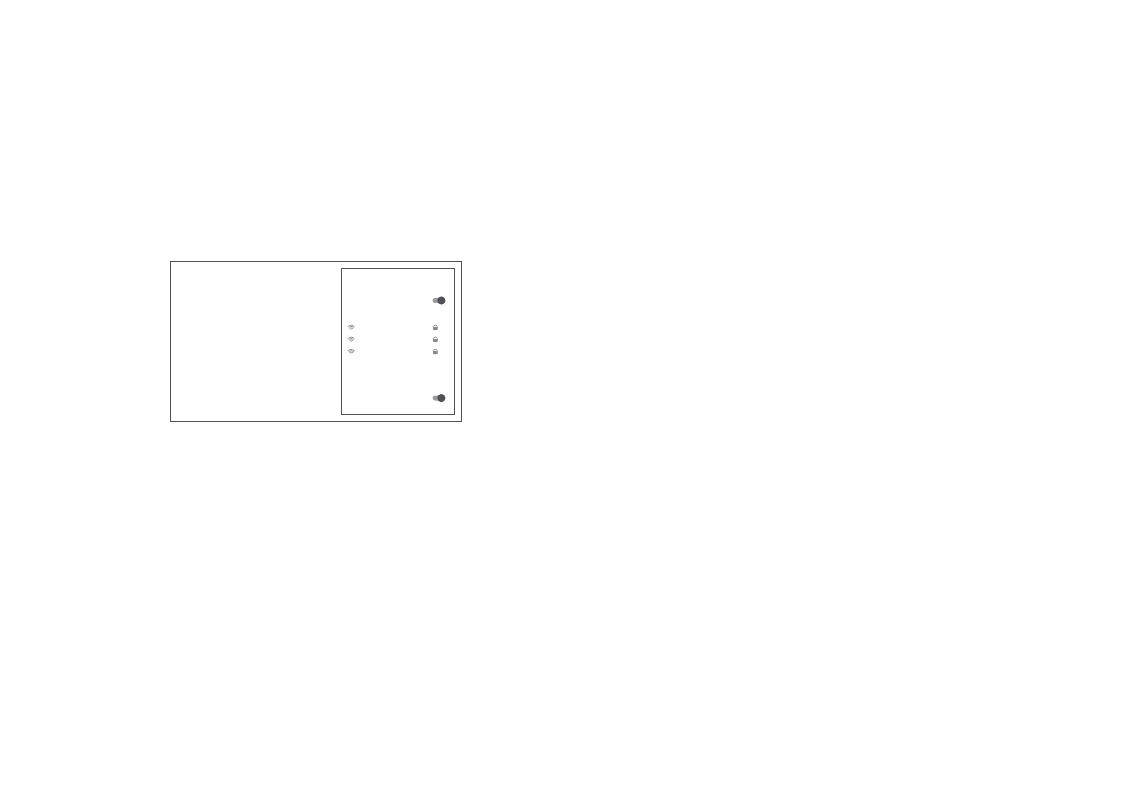
Сеть и Интернет
Откройте «Настройки»> «Сеть и Интернет». Выберите беспроводную сеть для подключения, введите пароль и дождитесь подключения проектора.
Умный контроль температуры
Проектор автоматически контролирует температуру окружающей среды (диапазон рабочих температур от 0 ° C до 40 ° C), температуру проектора и температуру цветового круга, а скорость вращения вентилятора проектора автоматически регулируется на основе обнаруженных значений температуры.
- У проектора есть три режима яркости на выбор при работе при нормальной температуре. Чтобы настроить уровень яркости проектора, выберите «Настройки»> «Изображение»> «Режим яркости».
- Если проектор станет слишком горячим, появится предупреждение о перегреве, и проектор автоматически переключится в режим низкой яркости. Предупреждения о температуре и ошибках будут отображаться автоматически, когда температура превышает максимально допустимый диапазон, чтобы сообщить вам, что проектор будет автоматически выключен.
Безопасность и защита
Проектор оснащен инфракрасным датчиком, который способен интеллектуально обнаруживать и защищать человеческий глаз от повреждений, вызванных сильным светом в проецируемой области.
При срабатывании датчика проектор снизит яркость до минимально возможного значения и выдаст следующее уведомление: «Не смотрите прямо на источник света». Для выхода нажмите любую кнопку на пульте дистанционного управления.

Bluetooth Выступающие
Проектор имеет четыре встроенных высококачественных динамика с общей мощностью около 30 Вт. Эти динамики также можно использовать в качестве автономной стереосистемы Bluetooth.
Чтобы использовать динамики в качестве стереосистемы Bluetooth, нажмите кнопку «Домой», затем выберите «Настройки»> «Пульты и аксессуары»> «Режим динамика Bluetooth» на главном экране. Включите функцию Bluetooth на вашем телефоне. Найдите и найдите имя проектора в списке Bluetooth, затем выполните сопряжение проектора с телефоном.
Примечание: Для подключения и сопряжения с другими устройствами Bluetooth, такими как динамики и наушники, выберите «Настройки»> «Пульты и аксессуары»> «Добавить аксессуар». Убедитесь, что устройство находится в режиме ожидания соединения с включенной функцией Bluetooth.
Уход и обслуживание
Уход за рассеиванием тепла
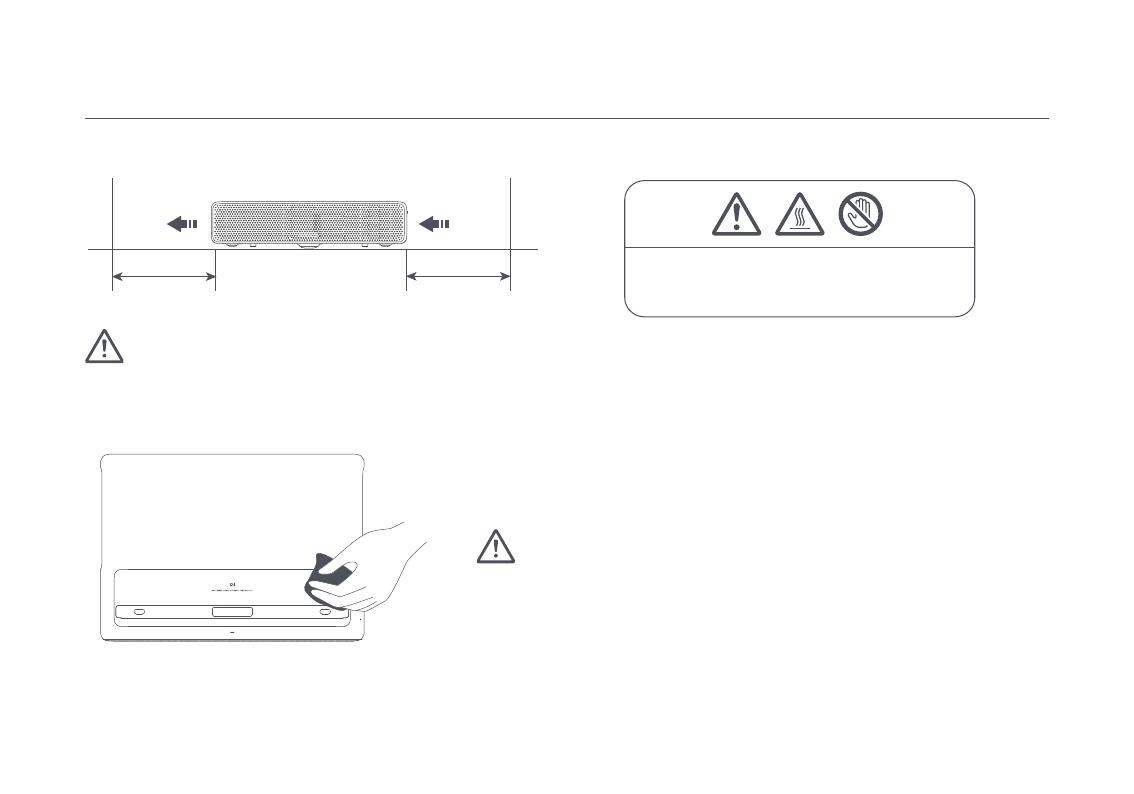
Примечание: Не прикасайтесь к отверстиям для отвода тепла или вентиляционным отверстиям, так как температура может достигать 65 ° C.
Примечание: Не размещайте какие-либо предметы ближе 50 см от вентиляционных отверстий проектора, так как это повлияет на его эффект рассеивания тепла.
Чистка и уход

Для очистки стекла проектора используйте только ткань для чистки, которая входит в комплект поставки проектора, или профессиональную ткань для чистки.
Не используйте абразивные чистящие средства, растворители, химикаты или другие грубые предметы, чтобы избежать царапин или коррозии.
Примечание:
- Проектор не является водонепроницаемым. Не допускайте попадания жидкостей в проектор, особенно в такие области, как индикатор питания, стеклянная крышка, вентиляционные отверстия, порты подключения и решетки динамиков.
- Для чистки линз проектора используйте только салфетку для чистки, которая входит в комплект поставки проектора, или профессиональную салфетку для чистки.
Характеристики
| Основная информация | Имя и фамилия | Лазерный проектор Mi 4K 150 ” |
| Модель | XMJGTYDS01FM | |
| Пункт Размеры | 410 × × 291 88 мм | |
| вес нетто | 7.0 кг | |
| Электрические характеристики | потребляемая мощность | <300 Вт (режим высокой яркости) |
| Номинальный вход | 100–120 / 200–240 В ~, 3 / 2.5 А, 50/60 Гц | |
| Энергопотребление в режиме ожидания | <0.5 W | |
| Оптические параметры | Технология дисплея | 0.47 ″ DMD |
| Технология источника света | ALPD | |
| Стандартное разрешение | 4К (3840 × 2160) | |
| Параметры проекции | Проекционное отношение (TR) | 0.233 (* фактический результат может отличаться) |
| Размер экрана | От 80 до 150 дюймов | |
| Фокус объектива | Моторный фокус | |
| Коррекция трапецеидальных искажений | 8-точечная коррекция трапецеидальных искажений | |
| Оперативная память | Оперативная память | 2GB DDR3 |
| Встроенное хранение | 16 ГБ высокоскоростной флэш-памяти eMMC | |
| Программное обеспечение | Operating System | Android TV |
| Андройд Приложение | Предустановленные сторонние приложения | |
| Режим яркости | Режим высокой яркости, View режим | |
| Блютуз | Bluetooth 4.1 / BLE |
|
Динамик Аудио |
Аудиоэффекты | Dolby Audio / |
| Динамик | Полный диапазон × 2 / ВЧ-динамики × 2 | |
| Напряжение питания | Встроенный блок питания | Встроенный AC-DC, DC-DC |
|
Безопасность и защита |
Умный контроль температуры | Автоматическая регулировка яркости / умная регулировка скорости вентилятора |
| Переключатель температуры | Автоматическое отключение при перегреве | |
| Защита глаз для лазерного проектора | Датчик обнаружения человеческого тела (можно отключить) | |
| Другое | Уровень шума | дБ (режим при температуре окружающей среды 25 ° C) |
| дистанционное управление | Пульт дистанционного управления Bluetooth | |
| Индикаторные | Белый свет | |
| Температура хранения | -20 55 ° C до ° C | |
| Рабочая Температура | 0 ° C до 40 ° C | |
| Влажность при эксплуатации | 20% -80% |
Решение Проблем
| Вина | Решения |
| Нет проецируемого изображения | Выключите проектор и отключите его от сети, затем подключите шнур питания и включите проектор. |
| Система Android вылетает | Выключите проектор и подключите диск к источнику питания, затем подключите шнур питания и включите проектор. |
| Ошибка отображения экрана | Выключите проектор и подключите диск к источнику питания, затем подключите шнур питания и включите проектор. |
| Пульт дистанционного управления отсутствует или не сопряжен и
проектор нельзя включить дистанционно. |
Выключите проектор и отключите его от сети. Подождите пять минут, затем подключите шнур питания.
и включите проектор. После перезапуска проектора снова выполните сопряжение пульта ДУ. |
| Если проектор перегревается,
он автоматически выключится. |
Пожалуйста, удалите все препятствия на входных и выходных отверстиях для воздуха, чтобы обеспечить беспрепятственный поток воздуха через воздухозаборник.
проектор. Следуйте приведенным выше инструкциям, чтобы перезапустить проектор. |
| Другие внутренние системные ошибки | Обратитесь к квалифицированному специалисту для обслуживания устройства или верните проектор в отдел продаж. |
Сертификация продукции

Изготовлено для: Сяоми Коммуникейшнс Ко., Лтд.
Изготовлены по: Fengmi (Beijing) Technology Co., Ltd. (компания Mi Ecosystem)
Адрес: 301, 3F, корпус 3, № 10, южная улица казарм, город Ренхе, район Шуньи, Пекин, Китай. Для получения дополнительной информации перейдите по адресу www.mi.com
![]()
Документы / Ресурсы
Рекомендации
-
Contents
-
Table of Contents
-
Troubleshooting
-
Bookmarks
Quick Links
Mi 4K Laser Projector 150″
User Manual
Related Manuals for Xiaomi Mi 4K Laser Projector 150”
Summary of Contents for Xiaomi Mi 4K Laser Projector 150”
-
Page 1
Mi 4K Laser Projector 150” User Manual… -
Page 2: User Notice
User Notice Thank you for choosing the Mi 4K Laser Projector 150″. Read this manual carefully before use, and retain it for future reference. Illustrations of product, accessories, and user interface in the user manual are for reference purposes only. Actual product and functions may vary due to product enhancements.
-
Page 3: Laser Safety Information
Laser Safety Information Laser Information Label Caution Do not stare into the beam The product complies with IEC 60825-1:2014 Class 1 and RG2 IEC 62471-5:2015. As with any bright light source, do not stare into the beam, RG2 IEC 62471-5:2015 Safety Instructions Before using the product, please carefully read the following safety instructions.
-
Page 4
Grounding Warning: This product must be grounded when in use. Transportation Instructions: It is recommended to transport this projector in its original or similar packaging. Preventing Electric Shocks and Fire Hazards: — Using an incorrect power cord may result in decreased product performance and even electric shock or fire. To ensure the projector’s performance and safety, only use its original power cord or an identical replacement. -
Page 5
— Do not place this projector in an upright position, as it may fall over and cause injury or damage. — Do not expose this projector to rain or moisture (operating humidity is 20%–80%). — Do not immerse this projector in, nor expose it to water or other liquids. Immediately unplug the projector if any liquid or object got into its housing, and have it checked by a qualified technician before using it again. -
Page 6: Package Contents
Package Contents When opening the packaging, check the contents of the box against the list below. If there is anything missing, please contact the seller in time. Laser Projector Remote Control Power Cord Mi 4K Laser Projector 150” User Manual WARRANTY NOTICE Mi 4K Laserprojektor 150’’…
-
Page 7: Product Overview
Product Overview Exterior Vents USB 2.0 Port Height Adjustable Wheel (Right) Projection Lens Human Body Detection Power Indicator Heat Dissipation Vents Height Adjustable Wheel (Le Metal Speaker Grille Caution — Do not place any flammable objects nearthe heat dissipation vent. — Do not place any objects near the vents, as this may cause heat to build up inside the projector.
-
Page 8
Connection Ports Power Port Supports USB 2.0 communication protocol Audio output port (supports subwoofers) HDMI input port 1 HDMI input port 2 AV input port (3.5 mm composite AV port) HDMI input port 3 Optical digital audio signal output port Audio return channel port Ethernet port… -
Page 9
Power Indicator Power Indicator The power indicator (a white light) to the corresponding projector’s status is as follows: — Connect to the power outlet, the projector automatically turns on. — The indicator blinks when the projector is turning on. — The indicator turns off a er the project is turned on. — The indicator blinks when the projector is turning off. -
Page 10
Remote Control Power Bu on: When the projector is turned Google Assistant: off, press to turn on. When the Press the Assistant bu on on your remote projector is on, press to select to talk to Google Assistant Power off, Restart, Bluetooth OK: Confirm the selected option or se ing speaker mode or Screenshot. -
Page 11
Projection Distance & Screen Size Projection screen Projection screen Determine the distance between the projector and the wall or screen according to the desired screen size. Screen Dimensions (SD): Projection Distance (D) Relative Height (H) Screen Dimensions (SD) The diagonal size of the projection screen (in inches). 80″… -
Page 12
Suspended Ceiling Installation Suspended ceiling installation is one of the installation methods that you hang the projector in an overhead location, for example, on a high ceiling, through a ceiling mount. A projector supporting suspended ceiling installation has threaded holes on the bottom, you can install the project on the mount by attaching the screws into the holes. -
Page 13
Quick Start Guide Pairing the Remote 20 cm A er installing the ba eries Place the remote control close to the bo om right A notification will appear on the in the remote control, press corner of the projector, then simultaneously press projected image once the remote the OK bu on to start pairing. -
Page 14
Image Focus Keystone Correction Go to Se gs > Image > Focus, press the le ht bu on To perform keystone correction, go to Se gs > Image > on the remote control to manually fine tune. Keystone Correction. Use the Le ht remote bu ons to select 8-Point Keystone Correction, Fine Tune, or Reset. -
Page 15
Network & Internet Smart Temperature Control Go to Settings > Network & Internet. Select a wireless network The projector automatically monitors the ambient temperature to connect to, enter the password, and wait for the projector to (operating temperature range is 0°C to 40°C), projector connect. -
Page 16
Safety & Protection The projector comes with an infrared sensor which is able to intelligently detect and protect the human eye from damage caused by strong light within the projected area. The projector will reduce its brightness to the lowest possible value when the sensor is triggered and issue the following notification: «Do not look directly at the light source.»… -
Page 17
Bluetooth Speakers The projector has four high-quality built-in speakers with a total output of about 30 W. The speakers can also be used as a standalone Bluetooth stereo. Tweeter Full Range Speakers Full Range Speakers Tweeter To use speakers as the Bluetooth stereo, press the Home button, then select Settings > Remotes & Accessories > Bluetooth speaker mode from the home screen. -
Page 18: Care And Maintenance
Care & Maintenance Heat Dissipation Maintenance Inlet Outlet Note: Do not touch the heat dissipation vent or 50 cm 50 cm ventilation vents as temperatures can reach up to 65°C. Note: Do not place any objects within 50 cm of the projector’s air vents, as this will affect its heat dissipation effect. Cleaning &…
-
Page 19: Specifications
Specifications Name Mi 4K Laser Projector 150” Model XMJGTYDS01FM Basic Information Item Dimensions 410 × 291 × 88 mm Net Weight 7.0 kg Power Consumption < 300 W (High Brightness Mode) Electrical Specifications Rated Input 100–120/200–240 V ~, 3/2.5 A, 50/60 Hz Standby Power Consumption <…
-
Page 20
Audio Effects Dolby Audio/DTS-HD Speaker Audio Speaker Full Range × 2/Tweeters × 2 Power Supply Built-in Power Supply Built-in AC-DC, DC-DC Smart Temperature Control Automatic Brightness Adjustment/Smart Fan Speed Adjustment Safety & Protection Temperature Switch Overheating Auto Turn-off Laser Projector Eye Protection Human Body Detection Sensor (can be disabled) Noise Level ≤32 dB (View mode at an ambient temperature of 25°C) -
Page 21: Troubleshooting
Troubleshooting Fault Solution No projected image Turn off the projector and disconnect from the power, then plug in the power cord and turn on the projector. Android system crashes Turn off the projector and disconnect from the power, then plug in the power cord and turn on the projector. Screen display error Turn off…
-
Page 22: Product Certifications
The Bluetooth® word mark and logos are registered trademarks Manufactured under license from Dolby Laboratories. Dolby, Dolby Audio, and the double-D symbol are owned by Bluetooth SIG, Inc. and any use of such marks by [Xiaomi trademarks of Dolby Laboratories.

Mi 4K Laser Projector 150” User Manual 3
Mi 4K Laserprojektor 150’’ Benutzerhandbuch 25
Manuel d’utilisation du vidéoprojecteur Mi4KLaserProjector150” 47
Manual de usuario de Mi 4K Laser Projector 150” 69
Manuale utente Mi 4K Laser Projector 150” 91
Руководство пользователя Лазерного проектора Mi 4K (150 дюймов) 113
Projektor laserowy Mi 4K 150” Instrukcja obsługi 135
Mi 레이저 프로젝터 150 인치 사용 설명서
157
Mi 4K レーザープロジェクター 150 インチ 取扱説明書
177
Mi ﻦﻣ ﺔﺻﻮﺑ 150 ﻢﺠﺣ 4K ﺔﻴﻨﻘﺘﺑ رﺰﻴﻟ رﻮﺘﻜﺟوﺮﺑ مﺪﺨﺘﺴﻣ ﻞﻴﻟد
197


3
Table of Contents
User Notice ……………………………………………………………………………………..4
Legal Notice…………………………………………………………………………………….4
Laser Safety Information ……………………………………………………………….5
Safety Instructions …………………………………………………………………………5
Package Contents ………………………………………………………………………….8
Product Overview …………………………………………………………………………..9
Exterior ………………………………………………………………………………………..9
Connection Ports ……………………………………………………………………….10
Power Indicator ………………………………………………………………………….11
Remote Control ………………………………………………………………………….12
Projection Distance & Screen Size…………………………………………..13
Suspended Ceiling Installation ………………………………………………..14
Quick Start Guide …………………………………………………………………………..15
Pairing the Remote
Control
…………………………………………………………………….
15
Image Focus ………………………………………………………………………………..16
Keystone Correction ………………………………………………………………….16
Network & Internet …………………………………………………………………….17
Smart Temperature Control ……………………………………………………..17
Safety & Protection ……………………………………………………………………18
Bluetooth Speakers ……………………………………………………………………19
Care & Maintenance ………………………………………………………………………20
Heat Dissipation Maintenance ………………………………………………..20
Cleaning & Maintenance …………………………………………………………..20
Specifications …………………………………………………………………………………21
Troubleshooting ……………………………………………………………………………..23
Product Certifications …………………………………………………………………..24
4
User Notice
Thank you for choosing the Mi 4K Laser Projector 150″.
Read this manual carefully before use, and retain it for future reference.
Illustrations of product, accessories, and user interface in the user manual are for reference purposes only. Actual product and
functions may vary due to product enhancements.
Legal Notice
All products bearing this symbol are waste electrical and electronic equipment (WEEE as in directive 2012/19/EU) which should
not be mixed with unsorted household waste. Instead, you should protect human health and the environment by handing over
your waste equipment to a designated collection point for the recycling of waste electrical and electronic equipment, appointed
by the government or local authorities. Correct disposal and recycling will help prevent potential negative consequences to the
environment and human health. Please contact the installer or local authorities for more information about the location as well as
terms and conditions of such collection points.
H
ereby, Fengmi (Beijing) Technology Co., Ltd declares that the radio equipment type Mi 4K Laser Projector 150″ is in compliance
with Directive 2014/53/EU. The full text of the EU declaration of conformity is available at the following internet address:
h w.mi.com/global/service/support/declaration.html
This device is restricted to indoor use when operating in the 5150 to 5350 MHz frequency range.
Operating Frequency: 2.4 GHz–2.4835 GHz (for Bluetooth)
Maximum RF Power Output:
20 mW (for Bluetooth)
Operating Frequency: 2.4 GHz–2.4835 GHz (for Wi-Fi 2.4 GHz)
Maximum RF Power Output:
100 mW (for Wi-Fi 2.4 GHz)
Operating Frequency: 5.15 GHz–5.35 GHz and 5.47 GHz–5.725 GHz (for Wi-Fi 5 GHz)
Maximum RF Power Output:
200 mW (for Wi-Fi 5 GHz)
Note: Under normal use of condition, this equipment should be kept a separation distance of at least 20 cm between the
antenna and the body of the user.
5
Laser Information Label
The product complies with IEC 60825-1:2014 Class 1 and RG2 IEC 62471-5:2015.
As with any bright light source, do not stare into the beam, RG2 IEC 62471-5:2015
Laser Safety Information
Caution
Do not stare into the beam
RG2
Safety Instructions
Before using the product, please carefully read the following safety instructions.
Safety Label Description
This warning symbol informs the user that this product contains non-insulated voltage sources that can cause an electric
shock. Coming into contact with any internal component may result in an electric shock.
This symbol informs the user about important handling and maintenance related information. Please read this information
carefully to ensure proper use.
This symbol informs the user to be aware of high temperatures.
This symbol informs the user to avoid touching this part.

6
Preventing Electric Shocks and Fire Hazards:
Safety Precautions:
— Using an incorrect power cord may result in decreased product performance and even electric shock or fire. To ensure the
projector’s performance and safety, only use its original power cord or an identical replacement.
— If you use an extension cord, it must not have a current rating lower than the projector’s original power cord. Failure to heed this
warning may result in the extension cord overheating and could pose hazards such as electric shock and fire.
— To avoid damage caused by a power surge or lightning strike, unplug the projector from the power outlet during thunderstorms or
when it is not in use for a long time.
— Do not place any flammable objects near this projector so as to avoid fire.
— Do not block the lens with any object when the projector is turned on. Any object placed close to the lens may get very hot and/or
deformed, and may even cause a fire.
— Do not block any of the vents of the projector, as this may cause a buildup of heat within the product and result in a fire.
— Do not place this projector on an unstable platform, stand or table so as to prevent it from falling and causing serious damage or
personal injury.
— Do not look directly into the lens when the projector is turned on to avoid eye damage.
— Do not attempt to disassemble this projector as it may contain dangerous high voltage components. This projector must only be
maintained and repaired by a qualified or authorized technician.
Transportation Instructions: It is recommended to transport this projector in its original or similar packaging.
Grounding Warning: This product must be grounded when in use.

7
• In poorly ventilated or narrow spaces.
• Near devices that produce a strong magnetic field.
• In direct sunlight.
• Close to a fire alarm.
• In extremely hot, cold or humid environments.
— Do not place this projector in an upright position, as it may fall over and cause injury or damage.
— Do not expose this projector to rain or moisture (operating humidity is 20%–80%).
— Do not immerse this projector in, nor expose it to water or other liquids. Immediately unplug the projector if any liquid or object got
into its housing, and have it checked by a qualified technician before using it again.
— Do not place this projector in any of the following environments:
8
When opening the packaging, check the contents of the box against the list below. If there is anything missing, please contact the
seller in time.
Package Contents
Note:
Laser Projector Remote Control Power Cord
User Manual Warranty Notice
— The actual contents may vary depending on the country (or region) of sale, please refer to the actual product.
— Retain the original packaging for future storage or transportation.
WARRANTY NOTICE 3
12
10
AVISO DE GARANTÍA 6
AVVISO SULLA GARANZIA 7
GWARANCJA 9
11
GARANTIE 5
GARANTIEERKLÄRUNG 4
ГАРАНТИЙНОЕ УВЕДОМЛЕНИЕ 8
Mi 4K Laser Projector 150” User Manual 3
Mi 4K Laserprojektor 150’’ Benutzerhandbuch 25
Manual de usuario de Mi 4K Laser Projector 150” 69
Manuale utente Mi 4K Laser Projector 150” 91
Руководство пользователя Лазерного проектора Mi 4K (150 дюймов) 113
Projektor laserowy Mi 4K 150” Instrukcja obsługi 135
Mi 레이저 프로젝터 150 인치 사용 설명서
157
Mi 4K レーザープロジェクター 150 インチ 取扱説明書
177
Mi ﻦﻣ ﺔﺻﻮﺑ 150 ﻢﺠﺣ 4K ﺔﻴﻨﻘﺘﺑ رﺰﻴﻟ رﻮﺘﻜﺟوﺮﺑ مﺪﺨﺘﺴﻣ ﻞﻴﻟد
197
Cleaning Cloth
9
Projection Lens
Power Indicator
Height Adjustable Wheel (Le
Power Port
Metal Speaker Grille
Heat Dissipation Vents
Vents
USB 2.0 Port
Height Adjustable Wheel (Right)
Caution
Connection Ports
Human Body Detection
—
Do not place any flammable objects nearthe heat dissipation vent.
— Do not place any objects near the vents, as this may cause heat
to build up inside the projector.
— Do not look directly into the lens so as to avoid eye damage as
this projector emits strong light during use.
Product Overview
Exterior
10
Connection Ports
Power Port
HDMI input port 1
HDMI input port 2
HDMI input port 3
1
3
4
5
6
7
8
9
Audio return channel port
Supports USB 2.0 communication protocol
Audio output port (supports subwoofers)
AV input port (3.5 mm composite AV port)
Optical digital audio signal output port
Ethernet port
2
11
Power Indicator
Power Indicator
The power indicator (a white light) to the corresponding projector’s status is as follows:
— Connect to the power outlet, the projector automatically turns on.
— The indicator blinks when the projector is turning on.
— The indicator turns off a
er the project is turned on.
— The indicator blinks when the projector is turning off.
— The indicator turns off a
er the projector is turned off.

12
OK: Confirm the selected option or seing
Directional Pad (Right): Move Right
Directional Pad (Down): Move Down
Google Assistant:
Press the Assistant buon on your remote
to talk to Google Assistant
Baery Cover:
Slide down the baery cover, and install or
replace the baeries with two new AAA baeries.
— Pay aention to the positive and negative poles when installing
baeries in the remote control.
— When baery leaks, immediately wipe away any fluid with a dry cloth
and replace the baeries with new ones.
— Dispose of used baeries according to local waste disposal rules
and regulations of the country or area you live in.
Home: Return to the home screen
Return: Return to the previous menu
Volume — : Decrease the volume
Note:
Remote Control
Directional Pad (Up):
Move Up
Directional Pad (Le):
Move Le
App:
Access the app interface
Volume + :
Increase the volume
Note: With Mi 4K Laser Projector 150″ and the Google
Assistant, quickly access entertainment, control smart
devices, get answers on screen, and more using your
voice.
Power Buon:
When the projector is turned
off, press to turn on. When the
projector is on, press to select
Power off, Restart, Bluetooth
speaker mode or Screenshot.
13
Projection Distance & Screen Size
Determine the distance between the projector and the wall or screen according to the desired screen size.
Screen Dimensions (SD):
The diagonal size of the projection screen (in inches).
Projection Distance (D):
The distance between the projector and the wall or screen (in cm).
Relative Height (H):
The distance from the bottom of the projector to the
bottom edge of the projected image (in cm).
Projection screen
Projection screen
SD
Screen Dimensions (SD)
Projection Distance (D) Relative Height (H)
80″ 14 cm 29 cm
90″ 19 cm 32 cm
100″ 24 cm 35 cm
120″ 34 cm 41 cm
150″ 49 cm 50 cm
Note: The dimensions in the table above are for reference only, they are approximate and may slightly differ from the actual values.
14
1. Install the mount.
Make sure the mount used to install the projector onto can
support at least five times the weight of the projector. It requires
a professional to carry out the installation.
2. When installing the projector onto a ceiling mount, make sure
the screws meet the following specifications:
Screw Type: Non self-tapping screw M4 × 10 (diameter: 4 mm,
length: 10 mm), 4 pcs.
Assembly Dimensions: See the figure on the right.
3. Adjust the mount depending on your needs and firmly fix the
screws to complete the installation.
Cautions:
— To avoid the convective heat transfer between the air inlets and air outlets, make sure there are no obstructions within 50 cm of the
air inlets and heat dissipation vents.
— Keep the bottom of the projector 10 cm away from the ceiling when suspending it.
— Damage caused by incorrect installation will void the warranty.
Suspended Ceiling Installation
Suspended ceiling ins
tallation is one of the installation methods that you hang the projector in an overhead location, for example, on a
high ceiling, through a ceiling mount. A projector supporting suspended ceiling installation has threaded holes on the bottom, you can
install the project on the mount by attaching the screws into the holes.
The installation steps are as follows:
235 mm
87.5 mm
38.84 mm
15
Pairing the Remote
Aer installing the baeries
in the remote control, press
the OK buon to start pairing.
Note: Keep the remote control within 20 cm of the projector during the pairing process.
Place the remote control close to the boom right
corner of the projector, then simultaneously press
and hold the Home and the App buons. Release
the buons once you hear a beep, then the remote
control is pairing with the projector. Ensure they
are close to each other until the pairing completes.
Quick Start Guide
A notification will appear on the
projected image once the remote
control has been paired successfully.
20 cm
16
Image Focus
Keystone Correction
Go to Se
gs > Image > Focus, press the le ht bu on
on the remote control to manually fine tune.
To perform keystone correction, go to Se gs > Image >
Keystone Correction. Use the Le ht remote bu ons
to select 8-Point Keystone Correction, Fine Tune, or Reset.
Press the OK bu on to select a mode, then use the remote‘s
directional pad to adjust the shape of the projected image.
8-Point Keystone
Correction
Fine Tune Reset
17
Go to Settings > Network & Internet. Select a wireless network
to connect to, enter the password, and wait for the projector to
connect.
The projector automatically monitors the ambient temperature
(operating temperature range is 0°C to 40°C), projector
temperature, and color wheel temperature, and the projector’s
fan speed is automatically adjusted based on the detected
temperature values.
— The projector has three brightness modes to choose
from when operating at a normal temperature. To adjust
the projector’s brightness level, go to Settings > Image >
Brightness Mode.
— If the projector gets too hot, an overheating warning will
appear and the projector will automatically switch to low
brightness mode. Temperature and error warnings will be
displayed automatically whenever the temperature exceeds
its maximum range to inform you that the projector will be
automatically turned off.
Network & Internet Smart Temperature Control
Wi-Fi
Available networks
Other options
Add new network
Scanning always available
Let Google’s location service and
other apps
xiaomi_2.4G
xiaomi_5G
Formovie_5G
Network & Internet
18
The projector comes with an infrared sensor which is able to intelligently detect and protect the human eye from damage caused by
strong light within the projected area.
The projector will reduce its brightness to the lowest possible value when the sensor is triggered and issue the following notification:
«Do not look directly at the light source.» Press any button on the remote to exit.
Human infrared sensor &
fresnel optical lens
Front sensor range: Approximately 55°
Left and right side sensor
range: Approximately 70°
Safety & Protection
19
The projector has four high-quality built-in speakers with a total output of about 30 W.
The speakers can also be used as a standalone Bluetooth stereo.
To use speakers as the Bluetooth stereo, press the Home button, then select Settings > Remotes & Accessories > Bluetooth speaker
mode from the home screen. Enable the Bluetooth function on your phone. Search and locate the projector name in the Bluetooth list,
then pair the projector with your phone.
Note:
To connect and pair with other Bluetooth devices such as speakers and earphones, select Settings > Remotes & Accessories > Add
accessory. Make sure the device is in an awaiting connection mode with its Bluetooth function enabled.
Bluetooth Speakers
Tweeter TweeterFull Range Speakers Full Range Speakers
20
Turn off and unplug the projector before cleaning.
Only use the cleaning cloth that comes with the projector or a professional
grade cleaning cloth to clean the projector’s glass.
Do not use any abrasive cleaning products, solvents, chemicals, or other rough
objects so as to avoid scratches or corrosion.
— The projector is not water resistant. Do not allow liquids to penetrate the
projector, especially areas such as the power indicator, glass cover, air vents,
connection ports, and speaker grilles.
— Only use the cleaning cloth that comes with the projector or a professional
grade cleaning cloth to clean the projector’s lens.
Care & Maintenance
Heat Dissipation Maintenance
Cleaning & Maintenance
Note: Do not place any objects within 50 cm of the projector’s air vents, as this will affect its heat dissipation effect.
Note: Do not touch the heat dissipation vent or
ventilation vents as temperatures can reach up to 65°C.
Outlet
Inlet
Note:
50 cm
50 cm
-
Contents
-
Table of Contents
-
Troubleshooting
-
Bookmarks
Quick Links
Mi 4K Laser Projector 150″ User Manual
3
Mi 4K Laserprojektor 150» Benutzerhandbuch
25
Manuel d’utilisation du vidéoprojecteur Mi 4K Laser Projector 150″
47
Manual de usuario de Mi 4K Laser Projector 150″
69
Manuale utente Mi 4K Laser Projector 150″
91
Руководство пользователя Лазерного проектора Mi 4K (150 дюймов)
113
Projektor laserowy Mi 4K 150″ Instrukcja obsługi
135
Mi 레이저 프로젝터 150 인치 사용 설명서
157
177
Mi 4K レーザープロジェクター 150 インチ 取扱説明書
197
Mi
150
4K
Chapters