
- Главная
- Продукты
- Аудио, домашний кинотеатр
- Компоненты Hi-Fi
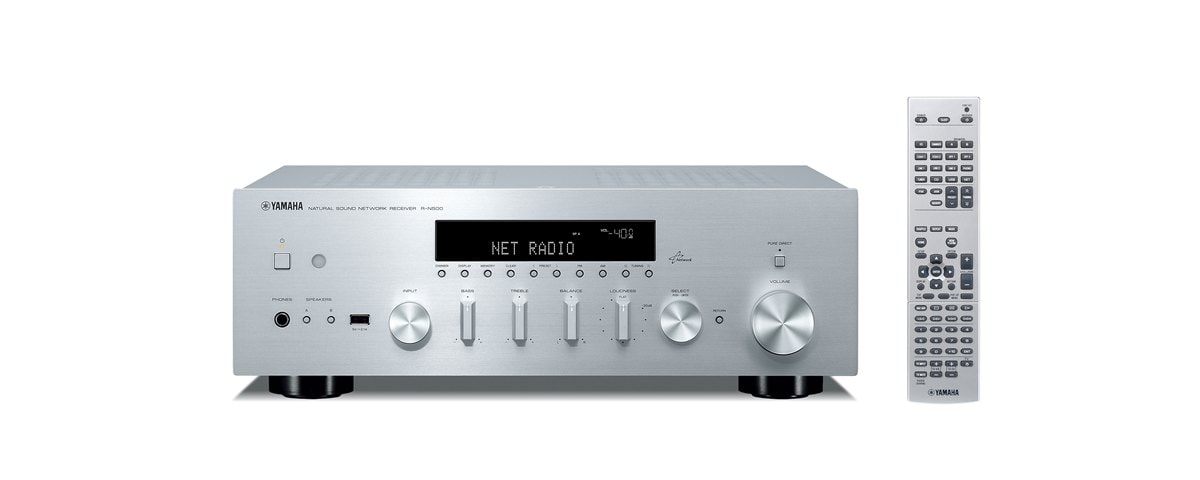
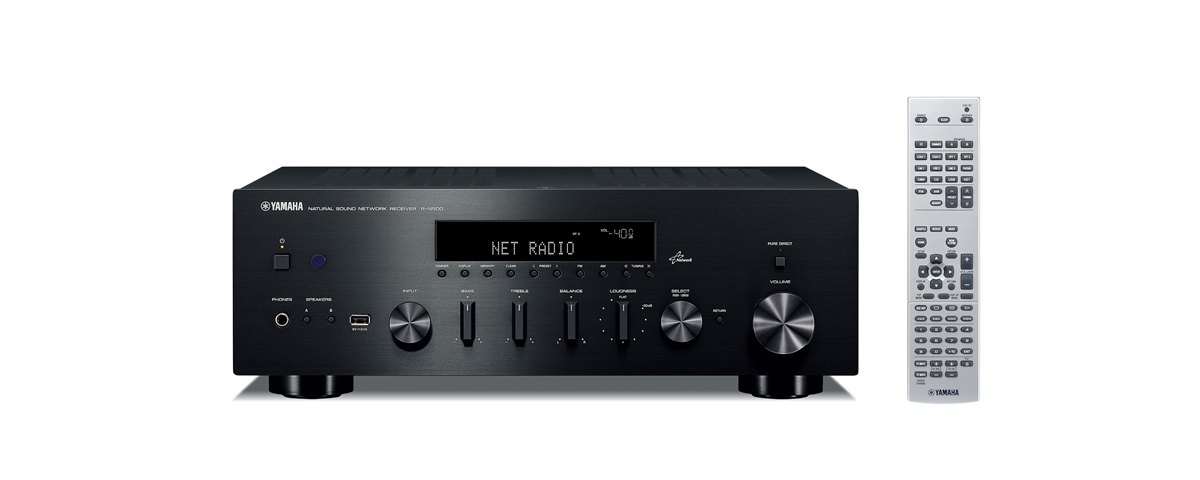
- R-N500
- Загрузки
- Описание
- Функциональные особенности
- Приложения
- Потоковые сервисы
- Спецификации
- Поддержка
Прошивки / ПО
Операционная система
| Название | Операционная система | Размер | Последнее обновление |
|---|---|---|---|
| R-N500 Firmware Update Version 1.17 | — | 9.6MB | 2017-12-26 |
Руководства
| Название | Русский | English |
|---|---|---|
| R-N500 Additional Features | — |
[108KB] |
| R-N500 Owner’s Manual | — |
[12.3MB] |
| R-N500 Инструкция по эксплуатации |
[12.3MB] |
[12.3MB] |
| R-N500 Инструкция по эксплуатации |
[108KB] |
[108KB] |

Новости и события

Загрузки

Дополнительно
- Главная
- Продукты
- Аудио, домашний кинотеатр
- Компоненты Hi-Fi
- R-N500
- Загрузки
Посмотреть инструкция для Yamaha R-N500 бесплатно. Руководство относится к категории Приемники, 2 человек(а) дали ему среднюю оценку 7.9. Руководство доступно на следующих языках: русский, английский. У вас есть вопрос о Yamaha R-N500 или вам нужна помощь? Задайте свой вопрос здесь
Не можете найти ответ на свой вопрос в руководстве? Вы можете найти ответ на свой вопрос ниже, в разделе часто задаваемых вопросов о Yamaha R-N500.
Когда звук считается слишком громким?
Могут ли устройства разных марок подключаться друг к другу при помощи Bluetooth?
Как лучше всего выполнять чистку Приемник?
Какая высота Yamaha R-N500?
Какая ширина Yamaha R-N500?
Какая толщина Yamaha R-N500?
Инструкция Yamaha R-N500 доступно в русский?
Не нашли свой вопрос? Задайте свой вопрос здесь
- Manuals
- Brands
- Yamaha Manuals
- Receiver
- R-N500
- Owner’s manual
-
Contents
-
Table of Contents
-
Bookmarks
Quick Links
RL
Network Receiver
OWNER’S MANUAL
MANUAL DE INSTRUCCIONES
Related Manuals for Yamaha R-N500
Summary of Contents for Yamaha R-N500
-
Page 1
Network Receiver OWNER’S MANUAL MANUAL DE INSTRUCCIONES… -
Page 2
12 Only voltage specified on this unit must be used. Using this unit with a higher voltage than specified is dangerous and may cause fire, damage to this unit, and/or personal injury. Yamaha will not be held responsible for any damage resulting from use of this unit with a voltage other than specified. -
Page 3: Table Of Contents
Contents INTRODUCTION ADVANCED OPERATION Useful features …………2 Configuring playback settings for different Supplied accessories ……….. 3 playback sources (OPTION menu)……31 Controls and functions ……….4 OPTION menu items ……….. 31 Configuring various functions (SETUP menu) ..32 Front panel …………..4 Front display …………..
-
Page 4: Introduction
• Selecting songs and starting/stopping playback • Playing back music from the iPhone or Android device • To download the application or see the latest information, access the App Store or Google Play and search for “NP Controller.” For details, please visit Yamaha website.
-
Page 5: Supplied Accessories
Supplied accessories Supplied accessories Check that the following accessories are supplied with the product. Remote control AM antenna FM antenna Batteries (x2) (AAA, R03, UM-4) CODE SET SOURCE RECEIVER SLEEP SPEAKERS DIMMER COAX1 COAX2 OPT1 OPT2 LINE1 LINE2 LINE3 PHONO TUNER PRESET TUNING…
-
Page 6: Controls And Functions
Selects the tuning frequency when TUNER is selected as Switch the remote control ID between ID1 and ID2 when using the input source (p.18). multiple Yamaha receivers or amplifiers (p.35). B PURE DIRECT and indicator 4 DIMMER Allows you to listen to a source in the purest possible Changes the brightness level of the front display.
-
Page 7
Controls and functions F INPUT selector Selects the input source you want to listen to. G BASS control Increases or decreases the low frequency response. The center position produces a flat response (p.16). H TREBLE control Increases or decreases the high frequency response. The center position produces a flat response (p.16). -
Page 8: Front Display
Controls and functions Front display VOL. SLEEP SP A STEREO TUNED SP B MUTE 1 Information display Displays the current status (such as input name sound mode name). You can switch the information that is displayed when you press DISPLAY (p.30). 2 STEREO Lights up when the unit is receiving a stereo FM radio signal.
-
Page 9: Rear Panel
REMOTE IN/OUT jacks of this unit, using cables with 3 ANTENNA terminals monaural miniplugs. For connecting to FM and AM antennas (p.12). Up to six Yamaha components (including this unit) can be 4 COAXIAL 1-2 jacks connected. For connecting to audio components equipped with a Rear panel of R-N500 coaxial digital output (p.10).
-
Page 10: Remote Control
This section describes the function of each key on the Input selection keys remote control used to control this unit or other Select an input source for playback. components made by Yamaha or other manufacturers. COAX 1-2 COAXIAL 1-2 jacks OPT 1-2…
-
Page 11: Using The Remote Controls
Controls and functions Using the remote controls ■ Installing batteries AAA, R03, UM-4 batteries ■ Operation range The remote controls transmit a directional infrared beam. Be sure to aim the remote controls directly at the remote control sensor on the front panel of this unit. Approximately 6 m (20 ft) 30°…
-
Page 12: Preparation
PREPARATION Connections Connections Connecting speakers and source components CAUTION • Do not connect this unit or other components to the main power until all connections between components are complete. • All connections must be correct: L (left) to L, R (right) to R, “+” to “+” and “–” to “–”. If the connections are faulty, no sound will be heard from the speakers, and if the polarity of the speaker connections is incorrect, the sound will be unnatural and lack bass.
-
Page 13: Connecting The Speakers
Connections ■ Connecting via banana plug Connecting the speakers (Asia model only) Tighten the knob and then insert the banana plug into the ■ Setting the speaker impedance end of the corresponding terminal. Under its default settings, the unit is configured for 8-ohm speakers.
-
Page 14: Connecting The Fm And Am Antennas
The antennas for receiving FM and AM broadcasts are included with this unit. In general, these antennas should provide sufficient signal strength. Connect each antenna correctly to the designated terminals. Note If you experience poor reception quality, install an outdoor antenna. Consult the nearest authorized Yamaha dealer or service center about outdoor antennas. AM antenna (included) •…
-
Page 15: Connecting To A Network
Connections Connecting to a network You can enjoy Internet radio or music files stored on media servers, such as PCs and Network Attached Storage (NAS), on the unit. Connect the unit to your router with a commercially-available STP network cable (CAT-5 or higher straight cable). Network Attached Storage Internet (NAS)
-
Page 16: Connecting Power Cable
Connections Connecting power cable Before connecting the power cable (General model only) Set the switch position of VOLTAGE SELECTOR according to your local voltage. Voltages are AC 110–120/220–240 V, 50/60 Hz. Note Make sure you set VOLTAGE SELECTOR of the unit BEFORE plugging the power cable into an AC wall outlet.
-
Page 17: Basic Operation
BASIC OPERATION Playback Playback CAUTION Extreme caution should be exercised when you play back CDs encoded in DTS. If you play back a CD encoded in DTS on a CD player that does not support DTS, only noise will be heard, and this noise may damage your speakers.
-
Page 18
Playback ■ Adjusting the BASS and TREBLE ■ Adjusting the LOUDNESS control controls LOUDNESS VOLUME TREBLE BASS HOME PLAYING SETUP OPTION The BASS and TREBLE controls adjust high and low frequency response. VOLUME +/– ENTER VOLUME The center position produces a flat response. DISPLAY RETURN POP-UP… -
Page 19: Using The Sleep Timer
Playback Using the sleep timer Use this feature to automatically set this unit to standby mode after a certain amount of time. The sleep timer is useful when you are going to sleep while this unit is playing or recording a source. CODE SET SOURCE RECEIVER…
-
Page 20: Listening To Fm/Am Radio
Listening to FM/AM radio Listening to FM/AM radio Setting the frequency steps Press TUNER to select TUNER as the input source. At the factory, the frequency step setting is set to 50 kHz for FM and 9 kHz for AM. Depending on your country or region, set the frequency steps to 100 kHz for FM and 10 Press FM or AM to select the reception band kHz for AM.
Инструкцию для Yamaha R-N500 Black на русском языке, в формате pdf можно скачать с нашего сайта. Наш каталог предоставляем Вам инструкцию производителя фирмы Yamaha, которая была взята из открытых источников. Ознакомившись с руководством по эксплуатации от Yamaha, Вы на все 100% и правильно сможете воспользоваться всеми функциями устройства.
Для сохранения инструкции «Ресивер Yamaha R-N500 Black» на русском языке на вашем компьютере либо телефоне, нажмите кнопку «Скачать инструкцию». Если активна кнопка «Инструкция онлайн», то Вы можете просмотреть документ (manual), в своём браузере онлайн.
Если у Вас нет возможности скачать инструкцию по эксплуатации либо просмотреть её, Вы можете поделиться ссылкой на эту страницу в социальных сетях и при удобном моменте скачать инструкцию. Либо добавьте эту страницу в закладки Вашего браузера, нажав кнопку «Добавить страницу в закладки браузера».
Перед вами файл pdf, где представлена инструкция (руководство) на русском для YAMAHA R-N500. Вы можете скачать ее либо изучить в онлайн режиме.
Подробные сведения об инструкции:
Устройство из раздела: ресивер
Бренд-производитель: YAMAHA
Наименование модели: YAMAHA R-N500
Язык: Руководство на русском языке
Файл: pdf
Размер файла: 9,13 MB
Скачать инструкцию к HARPER HDT2-1110
ЗАГРУЗИТЬ
Просмотр инструкции онлайн