Маленькая книга о Lua

Карлу Сегуину — с благодарностью за «маленькую библиотеку».
Введение
Есть прекрасная книга «Программирование на Lua», написанная автором языка. Это настоящий учебник, освещающий все тонкости и особенности языка. Там даже упражнения есть. Будете ли вы её читать просто для ознакомления с еще одним языком программирования? Я думаю, что нет.
Другая крайность — это «Lua за 60 минут». Я видел подобные статьи и не могу однозначно сказать, приносят ли они пользу или причиняют вред. Для меня знакомство с Lua началось именно с этой статьи, но я понял из нее только то, что нуждаюсь в более глубоких источниках, чем прокомментированные сниппеты.
«Маленькие книги» Карла Сегуина настолько точно отвечают на мой запрос, что я набрался смелости присоединиться к жанру. Если моя «маленькая книга» будет хотя бы наполовину настолько хороша, то я сочту задачу выполненной.
Читайте подряд. Последовательность изложения отличается от канонической, зато вам ни разу не встретится раздражающее «вы поймете это потом». Это быстрое чтиво, простое и легкое (надеюсь!), которое поможет понять, стоит ли переходить к более глубокому изучению или уже пора остановиться и больше не тратить время.
Применимость
Применимость — это ответ на вопрос «зачем». Существует совершенно безумное количество языков программирования и у каждого есть свой ответ на этот вопрос. Lua появился в недрах университетской кафедры компьютерной графики как встраиваемый язык для приложений на С.
Описывая Lua, автор называет его расширяемым (то есть умеющим вызывать функции приложения) и расширяющим (то есть умеющим предоставлять свои функции приложению). Будучи сам написан на C, он легко встраивается в C-приложения и взаимодействует с ним. Это совсем не означает, что единственная аудитория языка это программисты на C, но… да, им он полезней всего.
При этом Lua предлагает и самостоятельный интерпретатор, который может использовать внешние динамические библиотеки — как написанные специально для Lua, так и любые другие — с помощью механизма FFI. Во втором случае, правда, дополнительно потребуется библиотека expat или интерпретатор LuaJIT (написанный другим автором, но полностью совместимый с оригинальным Lua), в котором не только реализован FFI, но есть еще и JIT-компиляция, многократно ускоряющий и без того быстрый Lua.
Кстати, о быстродействии. Lua быстр — настолько, что из интерпретаторов с ним могут сравниться лишь Python и JavaScript, а LuaJIT в некоторых задачах их даже опережает (но это спорный момент, поэтому лучше остановимся на «сравним по быстродействию»).
Lua компактен — настолько, что его используют в маршрутизаторах Miktotik, телефонных станциях Asterisk и даже «зашивают» в микросхемы.
И он прост. Его включают в сетевые сканеры nmap и wireshark, он работает внутри баз данных Redis и Tarantool, на нем пишут плагины для медиаплеера Rhythmbox… даже биржевых ботов на платформе Quik. Это немного похоже на «бойцовский клуб» — многие используют Lua, ничего о нем не зная, просто как часть платформы.
Кроме того, на Lua неплохо получаются веб-приложения — благодаря реализованной в проекте OpenResty интеграции c Nginx получаются весьма выносливые к нагрузкам системы. Такие как AliExpress, например. Или CloudFlare.
С легкостью создаются настольные приложения с графическим интерфейсом — с помощью IUP, QT, wxWidgets, FLTK или чего-нибудь еще. Не только под Linux, но и под Windows, MacOS или вообще без графической среды, в «сыром» framebuffer.
Графика, «то, ради чего» Lua писался изначально, открывает дорогу в игровую индустрию. Love2D, специально написанный игровой движок, работает не только в настольных операционных системах, но и на мобильных устройствах. Unity, трехмерный игровой движок, лежит в основе довольно серьезных игровых проектов. Для игр класса AAA, правда, потребуется написать платформу на более «машинном» языке, но внутри MTA, World of Warcraft и S.T.A.L.K.E.R. используется все тот же Lua.
А вот задачи реального времени на Lua делать нельзя, даже если использовать микросхемы NodeMCU. Это интерпретатор для виртуальной машины и доступа к реальному оборудованию у него нет. Не поможет даже написать «подложку» с прямым доступом и управлять ею (в играх так и делается), это будет лишь приближением к желаемому — виртуальная машина асинхронно выполняет свои задачи и вы никогда не сможете выполнить что-то «прямо сейчас». Как бы ни была мала эта задержка, «взрослые» задачи реального времени не для Lua. Оставим это Erlang-у.
Установка
Можно собрать Lua из исходников с сайта lua.org. Это самый суровый путь, но если вы линуксоид, то вам не привыкать. При помощи MinGW, CygWin или Windows Platform SDK вы точно так же можете собрать его и для Windows. Но это необязательно — во многих дистрибутивах Linux бинарные сборки доступны из менеджера пакетов. Для Windows их тоже можно найти и скачать из Интернета. Ну, или установить при помощи Chocolatey — тамошнего аналога пакетного менеджера.
Запуск программ
Если просто запустить интерпретатор — он запустится в интерактивном режиме, где весьма неплох в качестве калькулятора.
$ lua
Lua 5.3.5  Copyright (C) 1994-2018 Lua.org, PUC-Rio
> 2 + 2 * 2
6
В интерактивном режиме можно поэкспериментировать со всеми возможностями языка, но для реального применения лучше все-таки написать программу и передавать имя с файлом программы интерпретатору для выполнения.
$ lua hello.lua
Hello, World!
Содержимое файла hello.lua — каноничная первая программа. Те, кто считает, что первая программа должна быть более осмысленной, упускают самое главное её предназначение — проверить работоспособность установленной среды.
print ("Hello, world!") -- print это функция вывода из стандартной библиотеки
Вы можете использовать Lua в командных файлах Linux, как и любой другой скриптовый язык.
#!/usr/bin/env lua
print "Hello, world!" -- для вывода одной строки можно обойтись без скобок
Сохраните эту программу в файл hello.lua, выполните команду chmod +x hello.lua, и вы сможете запускать её прямо из консоли:
$ ./hello.lua
Hello, world!
Комментарии
Самая бесполезная часть программы — текст комментариев для интерпретатора не существует. Но это еще и самый лучший способ объяснить, что происходит, прямо в коде.
-- это короткий комментарий
--[[ длинные комментарии нужны не только для долгих "лирических отступлений",
     но и позволяют временно "отключить" часть кода, не удаляя его ]]
Переменные
Переменные не нужно специально объявлять или каким-то образом инициализировать: при первой записи они создается, при повторных — перезаписывается, по завершении программы — удаляется.
Также нет необходимости определять тип данных, которые будут хранится в переменной — при каждой записи определяется тип сохраняемого значения и выделяется требуемое количество памяти.
Имена переменных могут содержать латинские буквы, цифры (но не могут с них начинаться) и знак подчеркивания. Нет никаких специальных правил — СamelCase, isHungarianNotation, underscore_delimited_names или любой другой способ могут быть использованы без ограничений и в любом сочетании.
Имена переменных (как и остальные языковые конструкции) регистрозависимы — and является зарезервированным словом и не может использоваться в качестве переменной, а And и AND — могут.
Единственное пожелание автора — не использовать переменные, которые начинаются со знака подчеркивания, за которым следуют заглавные буквы. Внутренние переменные могут совпасть с вашими и программа может повести себя, скажем так, странно.
Выражения
Для записи данных используется операция присваивания. Математически это не равенство, а линейное отображение справа налево. Слева от знака операции должно быть имя переменной, справа — выражение.
4 = a -- это не работает; слева от знака операции только имена переменных
Выражение это способ представления данных при помощи цифр, операций и имен переменных. А значение выражения — это результат его вычисления. Всякий раз, когда интерпретатору встречается выражение, он его вычисляет, а всякий раз, когда встречается присваивание — сохраняет значение в память и связывает с именем переменной.
a = 4 -- теперь у нас есть переменная "a" и в ней содержится число 2
a, b = 4, 8 -- так тоже можно; это называется множественным присваиванием
a = 2 + 2 * 2-- значение можно записать как результат математической операции
a = b / 2 -- чтение переменных происходит при использовании их в выражениях
a, b = b, a -- простой и элегантный способ поменять значения переменных местами
i = i + 1 -- просто увеличение значения переменной на 1
x = a  = b -- теперь и X, и A равны 4
Когда в переменной пропадает нужда — она уничтожается сборщиком мусора. В общем, все как везде, где произносятся слова «автоматическая сборка мусора»
Пустое значение
Оно всего одно и записывается латинским словом nil, что переводится как «ничего». Это не нуль, не пустая строка и не нулевой указатель. Это ничего. Его не существует.
При чтении несуществующей переменной вы получите nil. При записи в переменную значения nil вы эту переменную уничтожите. А если вы попробуете присвоить nil несуществующей переменной, ничего не произойдет. Вообще.
Логические значения
Их два — true («истина») и false («ложь»).
a, b = true, false -- их можно напрямую присваивать

-- они могут быть результатом логических операций
x = not b -- true; логическое НЕ
x = a and b -- false; логическое И
x = a or b -- true; логическое ИЛИ

--[[ можно выполнять эти операции и с другими типами данных,
     логика в этом случае несколько своеобразная, но она есть ]]

x = not nil -- true; nil аналогичен false
x = not 0 -- false; все остальные значения ведут себя как true, даже 0
x = 4 and 5 -- 5; and возвращает первый аргумент, если он ложный, иначе второй
x = 4 or 5 -- 4; or возвращает первый аргумент, если он НЕ ложный, иначе второй
x = 3 and 4 or 5 -- 4; это аналог тернарной операции "a?b:c" в Си
Числа
Для хранения чисел Lua использует 64-битные блоки памяти. Это аналогично типу double в С. В версии 5.3 появились целые числа, но это мало что меняет. Единственная разница — вы можете явно создать число с плавающей точкой, если используете десятичную точку, после которой может быть и нуль.
n = 42 -- ответ на Главный вопрос жизни, вселенной и всего такого
n = 42.0 -- это значение типа double, а не int
n = 0x2A -- он же в шестнадцатиричной системе счисления
n = 420e-1 -- в экспоненциальной форме
n = 0x2A0p-1 -- или даже в экспоненциальной форме шестнадцатиричного счисления
x = 3.1415926 -- у вещественных чисел дробная часть отделяется точкой
y = .5 -- нуль перед десятичным разделителем необязателен
z = -500 -- как и в случае с отрицательными значениями; фактически это "z = 0 - 500"
Для чисел доступны основные арифметические операции:
a = 2 + 2 -- 4; сложение
a = 2 - 2 -- 0; вычитание
a = 2 * 2 -- 4; умножение
a = 2 ^ 2 -- 4; возведение в степень
a = 5 / 2 -- 2.5; деление
a = 5 //2 -- 2; целочисленной деление (без дробной части)
a = 5 % 2 -- 1; остаток от целочисленного деления
a = 2 + 2 * 2 -- 6; приоритеты операций, как в школе
a =(2 + 2)* 2 -- 8; но его так же можно менять скобками
А также операции сравнения:
a, b = 3, 4

x = a  > b -- false; больше
x = a  < b -- true; меньше
x = a >= b -- false; больше или равно
x = a <= b -- true; меньше или равно
x = a == b -- false; равно
x = a ~= b -- true; не равно
Строки
Строка — это массив байт. Строка может содержать нулевые символы и это не станет признаком конца строки, символы могут быть в любой кодировке или вообще непечатными. В строках можно хранить любые двоичные данные. Между строками в 1 байт и строками в 10 мегабайт нет разницы. И нет ограничений, кроме размера оперативной памяти.
Строки нельзя менять, но можно перезаписывать. То есть нельзя влезть в строку и поменять в ней пятый байт, но можно сформировать такую же строку, но с другим пятым байтом и записать в ту же переменную. Как вы понимаете, это означает копирование строки со всеми накладными расходами этой операции.
s = "Для записи строк используются кавычки"
s = 'одиночные кавычки тоже допустимы'
s = "можно комбинировать 'одиночные' и "двойные" кавычки в любом сочетании"
s = [[А если в тексте много строк,
никто не мешает хранить его в строке целиком.
Да, при помощи двойных квадратных скобок, как в многострочным комментарии.]]

с = #'Hello' -- 5; операция # позволяет узнать длину строки (количество байт, не букв!)
s = "строки"..'можно'..[[объединять]] -- это называется "конкатенация"

w = [[
Экранирование специальных символов делается как в Си:
a - звонок (beep)
b - возврат на одну позицию (backspace)
r - перевод страницы
n - перевод строки (newline)
r - возврат каретки (carriage return)
t - горизонтальная табуляция
v - вертикальная табуляция
\ - обратная косая черта (backslash)
" - одиночная кавычка
' - двойная кавычка
]]

-- строки можно сравнивать
x = s == w -- false, строки НЕ равны
y = s ~= w -- true,  строка НЕ равны
Привидение типов
Если к числу применяются строковые операции, оно превращается в строку. И наоборот, если это возможно.
a = 100..500 -- 100500
a = "10" + 7 -- 17
a = 12 + "a" -- ошибка
Это спорная идея. Лучше использовать явные преобразования и не рисковать.
a = tostring( 10 ) -- "10"; строка
b = tonumber("10") --  10 ; число
c = tonumber("XY") --  nil
Таблицы
Используйте таблицы, если вам нужны массивы, словари, структуры, объекты. Таблицы — это всё. Хотя, на самом деле, таблицы это просто способ хранить множество пар «ключ-значение», а все остальное — это то, какие вы выбираете ключи и какие значения.
Если в качестве ключей использовать натуральные числа, то это будет массив.
a = {42,616,999}
a[#a + 1] = "Земля-616" -- функция # возвращает количество элементов
print (a[4]) --> Земля-616
А еще «натуральные» означает, что нумерация индексов начинается с единицы, а не с нуля. Программистам на C нужно всегда об этом помнить.
Массивы не надо объявлять и под них не выделяется пространство. И индексы у них необязательно последовательные. Можно использовать большие числа и не бояться, что закончится память — в таблице будет только те ключи, которые вы внесли. Если ключи в таблице не являются натуральной последовательностью, то это разряженный массив.
a = {}
a[13] = 666
a[100500] = "Alpha Centauri"
a[42] = "The Ultimate Question of Life, the Universe, and Everything answer"
print(#a) --> 0, для разряженных массивов операция # неприменима
Значения элементов таблицы сами могут быть таблицами. Ограничений на вложенность никаких, таблицы могут быть многомерными матрицами.
a = {
    {101,102,103},
    {201,202,203},
    {301,302,303}, -- эта запятая лишняя, но это допустимо
}
print (a[2][3]) --> 203
Индексы могут быть строковыми. С их помощью можно реализовать ассоциативные массивы (их еще называют словарями).
a = {
    ["one"] = 1,["two"] = 2,["three"] = 3, four = 4, five = "пять"
}
print (a.one) --> 1
print (a["four"]) --> 4
Можно заметить, что элементы таблицы определены по-разному и по-разному же вызываются. Вы можете обращаться с таблицей как со словарем, так и как со структурой — это будет все та же таблица.
Фрагменты
У английского «chunk» есть масса смыслов. Если вы во имя точности предпочитаете англицизмы, используйте «чанк» — вполне сложившийся термин (в описании, например, HTTP-протокола). Если нет, то «фрагмент» ничем не хуже. Суть в том, что это просто какое-то количество инструкций языка без начала, конца и какого-то обрамления.
a = 1
print (a) --> 1
a = a + 1
b = a / 2
print (b) --> 1
В программе на Lua не нужно как-то специально оформлять «точку входа», как это делается в C функцией main(). Что касается точки выхода, то её тоже нет — выполнив все инструкции фрагмента, интерпретатор останавливается.
Вы, конечно, можете написать что-то вроде этого:
function main ()
    a = 1
    print (a) --> 1
    a = a + 1
    b = a / 2
    print (b) --> 1
end
main ()
…но особого смысла в этом нет. Да, сначала объявится функция, но её потом все равно надо будет явным образом вызвать после объявления. И интерпретатору совершенно без разницы, какое у нее имя и надо ли её вообще выполнять.
Полученный код выполняется «как есть», все остальное — на ваше усмотрение.
Блоки и области видимости
Несколько инструкций (тот самый «фрагмент») можно разместить между словами do и end. Это то же самое, что фигурные скобки в C/C++ или begin .. end в Pascal. Блок, группирующий инструкции, является отдельной исполнимой сущностью и применим везде, где применима единичная инструкция.
По умолчанию все переменные глобальные, но при помощи слова local можно явным образом определять переменные, доступные только внутри блока.
a = 1
do
    local a = 10
    print(a) --> 10
    b = 2
end
print(a) --> 1
print(b) --> 2
Блоки могут быть вложенными. Во внутренних блоках локальные переменные внешних доступны так же, как и глобальные. При создании внутри блока глобальной переменной она будет доступна везде.
Управление потоком
Программа — это набор действий, выполняемых последовательно. В теории автоматов любую программу можно представить в виде графа, где есть начальное, конечное и множество промежуточных состояний, по которым переходит исполнитель, выполняя инструкции. Поток выполнения — это маршрут, которым исполнитель добирается от начальной до конечной точки.
А команды управляющие этим маршрутом называются инструкциями управления потоком. Что позволяет вложить в программу множество маршрутов, которые будут зависеть от разных факторов.
Безусловный переход
Есть разные мнения по поводу инструкции goto, но иногда она действительно полезна. Она имеет неудобный синтаксис и массу ограничений — нельзя «впрыгивать» внутрь блока, «выпрыгивать» из функции и «впрыгивать» внутрь области видимости локальной переменной. Это сделано намеренно — чтобы не возникало желания ею пользоваться без насущной необходимости.
do
    a = 0
    ::loop:: -- имя метки подчиняется тем же правилам, что и имена переменных
        a = a + 1 -- это не блок, отступы просто для читаемости
        if a % 2 == 0 then goto continue end
        if a > 100 then goto exit end -- прыгать внутрь области видимости переменной нельзя
        print (a)
        ::continue::
    goto loop
    local b = -a
    ::exit::
    -- но если после метки до конца области видимости ничего нет, то можно
end
Условия
Программа не всегда должна делать одно и то же.
В зависимости от условий поток выполнения может разделяться на ветки, поэтому условное выполнение называется ветвлением. Каждая ветка может разделяться ещё на ветки и так далее.
if a > 0 then
    print ("'a' is positive") -- если выполняется уловие
end

if b > 0 then
    print ("'b' is positive")
else
    print ("'b' is NOT positive") -- есть не выполняется
end

if c > 0 then
    print ("'c' is positive")
elseif c < 0 then -- это вместо switch-case, elseif-ов может быть много
    print ("'c' is negative")
else
    print ("'c' is zero")
end
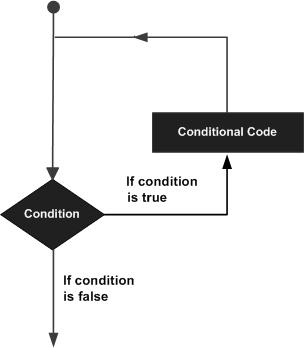
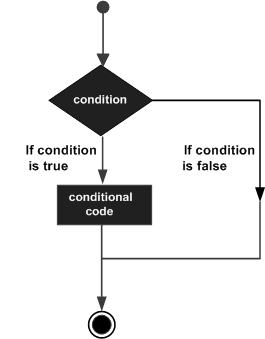
Циклы
Циклы нужны для многократного повторения одинаковых действий.
Цикл с предусловием проверяют условие повторения и выполняют блок, пока оно истинно. Циклы с постусловием сначала выполняют блок, а потом проверяют, достигнуто ли условие завершения.
while false do
    print ('Hello?')
end -- не выполнится ни разу

repeat
    print ('yes, hello!')
until true -- выполнится один раз
Цикл с выходом из середины не имеют граничных условий, поэтому в блоке необходимо явным образом предусмотреть выход. При помощи break можно «выпрыгнуть» из цикла, функции и вообще из любого блока. Нет continue, но его можно реализовать с помощью goto.
a = 0
while true do
    ::continue::
    a = a + 2
    if a == 13 then -- правильно выбирайте условие выхода из цикла!
        break
    end
    if a % 10 == 0 then goto continue end -- пропускаем всё, кратное 10
    print (a)
end
В цикле со счётчиком некоторая переменная изменяет своё значение от заданного начального значения до конечного значения с некоторым шагом, и для каждого значения этой переменной блок выполняется один раз.
for i = 0,9,1 do -- если шаг равен 1, третий параметр можно пропустить
    print(i)
end
print(i) --> nil; счетчик является локальной переменной и снаружи не доступен
Совместный цикл задает выполнение некоторой операции для объектов из множества.
x = {4, 8, 15, 16, 23, 42}
for k,v in ipairs(x)
    print ('code #'..k..' is '..v)
end
print(k,v) --> nil    nil
Функции
В последнем примере ipairs() это функция. И не просто функция, а итератор. Она получает таблицу и при первом вызове возвращает её первое значение, а при последующих — второй, третье и так далее.
Работает она примерно так:
x = {4, 8, 15, 16, 23, 42}
function values(t)
    local i = 0
    return function()
        i = i + 1
        return t[i] -- мы могли бы возвращать еще и i, но ipairs у нас уже есть
    end
end
for v in values(x) do -- обратите внимание, что здесь мы тоже обходимся без ключа
    print (v)
end
Этот коротенький пример сразу дает нам массу информации.
Во-первых, функции являются значениями первого класса. То есть их можно присваивать переменным, передавать параметром в другие функции и использовать в качестве возвращаемого значения.
sum = function (a,b)
    return a + b
end
print (sum (2,2)) --> 4

function mul (a, b) -- более привычный способ записи всего лишь "семантический сахар"
    return a*b
end
print (mul (2,2)) --> 4
Во-вторых, значение не знает имя переменной, в котором оно содержится. Таким образом все функции анонимны. Но не всегда…
function fact(n)
    if n == 0 then return 1 else return n*fact(n-1) end
end
В-третьих, возвращаемых значений может быть несколько. Не один, не два, а столько, сколько захочет вернуть функция. Если при этом мы используем множественное присваивание, то можем получить все значения. Если имен переменных меньше — то «лишние» значения будут отброшены. А если больше — то они получат nil.
Ну, и четвертых, функция является блоком со своей областью видимости для локальных переменных, имея доступ к переменным глобальным. А, будучи объявлена внутри другого блока, локальные переменные внешнего блока воспринимает как глобальные. Это и позволяет нам создавать замыкания — то есть функции, сохраняющие контекст. Весь контекст, без уточнений. Будьте благоразумны и не создавайте лишние сущности.
Кстати, кроме ipairsв стандартной библиотеке Lua есть еще pairs — более общий итератор, который позволяет работать с любыми таблицами, не только с массивами. Но в случае с массивами мы получим значения не по возрастанию ключей, а произвольно.
Сопрограммы
Прежде, чем мы перейдем к сопрограммам (для вас, любители англицизмов, это «корутины»), несколько слов о многозадачности.
Мы уже говорили об графе состояний, исполнителе и потоке выполнения. В многозадачном алгоритме исполнителей несколько и у каждого из них — свое состояние и свой путь в графе состояний. Многопоточные алгоритмы — просто другое название для многозадачных.
Не так важно, выполняются ли потоки разными физическими процессорами или разными потоками одного, переключаются ли они операционной системой, «главным» потоком или явно передают управление друг другу — главное, что каждый поток (строго говоря «нить», от английского «thread» — для англоманов «тред») имеет свое состояние.
В Lua реализована «совместная многопоточность», когда потоки явно уступают выполнение друг другу и сохраняют состояние до следующего момента, когда выполнение столь же явно будет передано им снова. Никакого разделения на физические процессоры или совместного использования процессорного времени. Никакой вытесняющей многозадачности, неблокирующего доступа, семафором, диспетчеров. Только явная передача управление и сохранение состояния. Это логическая многозадачность — на самом деле в любой момент времени выполняется только один поток. Просто их несколько и они переключаются между собой.
c = coroutine.create(
  function (t)
    local i = coroutine.yield("initialized")
    repeat
      i = coroutine.yield(t[i])
    until not t[i]
    return "finished"
  end
)
print (c,coroutine.status(c)) --> thread: 0x416e52a8    suspended
s = {2,3,5,7,11,13,17,19}
print (coroutine.resume(c,s)) --> true    initialized
print (coroutine.resume(c,1)) --> true    2
print (coroutine.resume(c,3)) --> true    5
print (coroutine.resume(c,9)) --> true    finished
print (c,coroutine.status(c)) --> thread: 0x416e52a8    dead
print (coroutine.resume(c,5)) --> false   cannot resume dead coroutine
В этом примере описан весь функционал сопрограмм. Давайте разберемся с ним, шаг за шагом.
Вызов corutine.create получает функцию и возвращает спящую («suspended») сопрограмму. Её можно «разбудить» вызовом coroutine.resume и тогда она начинает выполняться.
Выполняется она до тех пор, пока не встретиться вызов coroutine.yield. В этот момент управление возвращается к вызывающему потоку. Следующий вызов coroutine.resume восстановит выполнение сопрограммы, передавая управление ровно в то место, где она была приостановлена.
Сопрограмма может быть вечной — если она время от времени уступает выполнение, то в какой-то момент её можно просто не возобновить. Но она может и завершится и перейти в состояние «dead», возобновить из которого её будет уже невозможно.
Вызовы .resume и .yield могут не только передавать управление, но и обмениваться данными. В примере первый вызов .resume передает сопрограмме таблицу простых чисел, как если бы она передавалась функции в параметре, два других вызова передают данные внутрь сопрограммы, а она, в свою очередь, передает при помощи .yield обратно запрашиваемые значение из таблицы. При попытке получить значение за пределами таблицы сопрограмма заканчивается и возвращает сообщение при помощи return, как самая заурядная функция.
Вот, собственно, и все. Эта простая реализация дает возможность реализовывать многозадачные алгоритмы даже не в многозадачной среде. Впрочем, никто не мешает вам создать на С приложение на с «настоящей» многопоточностью и запустить по виртуальной машине в каждом потоке, предоставив им возможность вызывать специально написанные потокобезопасные функции вашего приложения.
ООП, «которого нет»
Структура с методами это простейший вариант объекта. Метод это функция, сохраненная в элементе таблицы.
a = {
    name = "Nick",
    sayHello = function (t)
        print ("Hello, "..t.name)
    end
}
a.sayHello(a) --> Hello, Nick
a:sayHello() --> Hello, Nick
Обратите внимание на две последние строчки. Они выполняют одно и то же, но по разному.
Чтобы функция знала, с какой таблицей она работает, ей это надо сообщить. В первом случае таблица явно передается параметром, во втором (когда используется двоеточие вместо точки) имя таблицы неявно передается первым параметром.
Есть несколько способов определять методы.
a = {
    name = "Nick",
    whoami = function (t) -- метод можно определить сразу в таблице
        return t.name
    end
}
-- а можно и отдельно от неё
function a.hello(t,name) -- здесь таблица передается в явном виде
    local me = name or t.whoami()
    print("Hello, "..me)
end

function a:bye(name)
    local me = name or self.name -- а здесь появляется "магическая" переменная self
    print("Goodbye, "..me)
end

-- способ вызова метода не зависит от того, как он был определен
a:hello() --> Hello, Nick
a.bye(a) --> Goodbye, Nick
a.hello(a,"John") --> Hello, John
a:bye("John") --> Goodbye, John
print(a:whoami()) --> Nick
Все это тоже семантический сахар.
Метатаблицы
Латинское «meta» буквально означает «после» в том смысле, в каком слово «метафизика» означает «не только физика». Метатаблица способна менять обычное поведение других таблиц.
a,b = {},{}
setmetatable (a,b) -- назначаем одну таблицу метатаблицей для другой
print (getmetatable (a) == b) --> true

b.x = 2

print (a.x) --> 1
print (getmetatable(a).x) --> 2
Что же нам это дает? В описанном примере — практические ничего. Вся сила метатаблиц в метаметодах.
Метаметоды
Это «магические» методы, которые позволяют менять существующее поведение таблицы. «Магические» они потому, что их логика зависит от того, как они называются.
t = {
    a = 42
}
print (t.a) --> 42
print (t.b) --> nil; стандартное поведение таблицы
-- создадим метатаблицу с измененной логикой
mt = {
    -- этот метод вызывается при чтении несуществующей переменной
    __index = function (t,k)
        return k.." : ключ отсуствует"
    end
}
setmetatable (t,mt) -- задаем метатаблицу для нашей таблицы и повторяем те же действия
-- теперь таблица ведет себя иначе
print (t.a) --> 42
print (t.b) --> b: ключ отсуствует"
Если вы попытаетесь прочесть из таблицы значение по несуществующему ключу, вы получите nil. Но если у таблицы есть метатаблица, а в ней — метод __index, то будет вызван он.
t, mt = {}, {}
t.a.b = 42 -- ошибка: t.a равно nil, а не пустая таблица
-- определяем новую логику
function mt:__index(k)
    self[k] = {}
    setmetatable (self[k], mt)
    return self[k]
end
setmetatable (t,mt) -- и применяем её к нашей таблице
t.a.b.l.e = 42 -- больше никаких проблем с таблицами любой вложенности
print (t.a.b.l.e) --> 42
Наследование:
n = {name = "Nick"}
j = {name = "John"}
m = {
    __index = m, -- если присвоить этому методу таблицу, поиск ключа будет вестить в ней
    hello = function (t)
        print ("Hello, "..t.name)
    end
}
setmetatable(n,m)
setmetatable(j,m)
n:hello() --> ошибка: вы пытаетесь вызвать метод 'hello' (а он равен nil)
Внимание! Это красивый, но неправильный пример.
И дело тут не в том, что __index вместо функции является таблицей (для этого «магического» метода это допустимо). И не в том, что элемент таблицы ссылается на саму таблицу — это тоже нормально. Просто до завершения объявления таблицы она не существует и метод __index не к чему «привязывать».
А вот правильный вариант:
n = {name = "Nick"}
j = {name = "John"}
m = { -- сначала создаем метатаблицу
    hello = function (t)
        print ("Hello, "..t.name)
    end
}
m.__index = m -- потом назначаем её
setmetatable(n,m)
setmetatable(j,m)
n:hello() --> Hello, Nick
j:hello() --> Hello, John
Здесь мы затрагиваем одну интересную особенность. Пока элемент не определен — он недоступен. Возможно, стоило бы разрешить «ранее связывание», чтобы первый вариант тоже был рабочим. Возможно, это даже будет сделано в будущем, но это уж как решит профессор Иерусалемски — автор и «пожизненный великодушный диктор» Lua.
Впрочем, для функций милостиво сделано исключение.
--[[ специально определяем функцию как переменную,
     чтобы быть увереным, что тут нет никакого "скрытого сахара" ]]
fact = function (n)
    if n == 1 then
        return 1
    else
        return n * fact(n-1) -- формально определение функции еще не завершено
    end
end
print (fact(5)) --> 120; тем не менее, все работает (но только начиная с версии 5.3)
Не индексом единым…
m = {
    __index = function (t,k)
        print ("Чтение "..k)
        return t[k]
    end,
    __nexindex = function (t,k,v)
        print ("Запись "..k)
        t[k] = v
    end
}
a = {x = 12}
setmetatable (a,m)
print (a.x) --> 12
a.y = 1 --[[ операция уходит в бесконечный цикл и завершается,
             когда интерпретатор это понимает]]
(простите, но это был еще один неправильный пример)
Вопреки ожиданиям, программа ведет себя не так, как ожидалось. Это потому, что при обращении к таблице сначала выполняется обращение к элементам, а потом (если их нет) идет поиск «альтернативной логики» в метатаблице (опять же, если она есть).
Если элементы существуют, интерпретатору нет необходимости обращаться к метаметодам. Но мы можем «вынудить» его это делать.
m = {
    __index = function (t,k)
        print ("Чтение "..k)
        return t.data[k]
    end,
    __newindex = function (t,k,v)
        print ("Запись "..k)
        t.data[k] = v
    end
}
a = {data = {}}

setmetatable (a,m)
a.x = 12    --> Запись x
print (a.x) --> Чтение x
            --> 12
a.y = 1     --> Запись y
print (a.z) --> Чтение z
            --> nil
Мы переносим значения таблицы в таблицу внутри таблицы. Этот прием позволяет перехватывать все операции чтения и записи в таблицу и менять их.
Или не позволять получать элементы, который мы посчитаем закрытыми, как в «классическом» ООП. Хотя на этот счет профессор высказался предельно ясно: «если вам нужны приватные свойства, просто не обращайтесь к ним«.
Арифметические метатметоды
__add: сложение (+)__sub: вычитание (-)__mul: умножение (*)__div: деление (/)__mod: остаток от деления (%)__pow: возведение в степень (^)__unm: унарный (одноместный) минус (-)__idiv: целочисленное деление (//)
В общем случае, если операнды не числа и не строки (которые можно преобразовать в числа), то при выполнении операции будут искаться метаметоды сначала в первом (левом) операнде, а затем во втором (правом). Как только метаметод будет найден, ему передадутся оба операнда, а результат выполнения будет обрезан до одного значения. Иначе будет выдана ошибка.
Обратите внимание на то, что если нужный метаматод будет найдет во втором операнде, они все равно будут переданы в том порядке, в котором записаны в выражении. Эту ситуацию нужно предвидеть и корректно обработать.
Логические метаметоды
__band: битовое И (&)__bor: битовое ИЛИ (|)__bxor: битовое ИЛИ-НЕ (~)__bnot: битовое одноместное НЕ (~)__shl: битовый сдвиг влево (<<)__shr: битовый сдвиг вправо (>>)
Логика схожая.
Строковые метаметоды
__concat: конкатенация (..)__len: длина (#)
Разница в том, что метаметоды будут использоваться, если аргументы не строки и не числа (которые можно привести к строкам). Если в таблице отсутствует реализация __len , то будет вызвана стандартная функция #, а она, как мы помним, не везде применима.
Метаметоды сравнения
__eq: равенство (==)__lt: меньше (<)__le: меньше или равно (<=)
Тут немного веселее. Во-первых, оба операнда должны быть таблицами. Во-вторых, при встрече операций «больше» и «больше или равно», они предварительно будут «перевернуты» в «меньше» и «меньше или равно». В-третьих, результат будет преобразован к логическому типу (то есть к значениям true или false)
Метаметоды доступа
__index: чтение из таблицы__newindex: запись в таблицу нового значения__call: обращение к таблице как к функции__gc: выполняется перед уничтожением таблицы сборщиком мусора
Тут надо заметить, что первые два метода вызываются только при обращении к отсутствующим элементам таблицы. Эти методы получают в параметрах саму таблицу и ключ.
Третий метод очень удобен в качестве «конструктора» — метода по умолчанию. Он получает в параметрах таблицу, за которой следуют все оригинальные аргументы вызова. Ну, а последний метод можно использовать в качестве «деструктора».
Перегрузка операций
Если при выполнении арифметической операции один из операндов является таблицей, то произойдет ошибка. Но с целой «колодой» метаметодов в рукаве мы можем это изменить.
Если один из операндов сложения является таблицей, интерпретатор будет искать метод __sum в его метатаблице. Если оба операнда отвечают этим требованиям — будет использован метаметод первого (левого) операнда.
odd  = {1,3,5,7,9} -- таблица нечетных чисел
even = {2,4,6,8} -- таблица четных чисел
set  = {
    __add = function (a,b)  -- передаются операдны операции сложения
        if type(b) ~= "table" then -- операнд может не быть таблицей
            a[#a + 1] = b -- тогда просто добавляем его ко множеству
        else -- в противном случае
            for _,v in pairs (b) do
                a[#a + 1] = v -- добавляем по одному все элементы этой таблицы
               end
           end
        return a
    end
}
setmetatable(odd,set) -- превращаем таблицы во "множества"
setmetatable(even,set)
even = even + 10 -- будьте осторожны, ситуацию "even = 10 + even" мы не предусмотрели
for _,v in pairs(odd + even) do
    print(v) -- сумма множеств представляем собой множество всех элементов подмножеств
end
Исходя их постулата «таблица это объект» можно реализовать перегрузку всех арифметических и логических операций, чтения и записи, вызова функции… но все это работает только для таблиц — мета-таблицы нельзя назначать никаким другим типам данных. Это сделано специально, чтобы не давать слишком много возможностей «выстрелить себе в ногу».
Стандартная библиотека
В Lua граница между языком и библиотеками очень четкая. Все, что не касается непосредственно языка, вынесено в стандартную библиотеку. Можно собрать Lua без нее и тогда ваша программа не сможет даже вывести на экран строку «привет, мир». Что является огромным преимуществом при использовании Lua внутри другого приложения в качестве встроенного языка, который должен уметь только то, что ему позволено и не оставит скрипту ни малейшего шанса «выбраться из песочницы».
Стандартный библиотек немного и функционал их не впечатляет. Причина в том, что во имя переносимости в стандартных библиотеках есть только то, что может быть реализовано на всех платформах, где есть ANSI C. Все остальные библиотеки так или иначе являются сторонними.
Модули
Принцип повторного использования кода подразумевает, что написанный функционал может быть использован повторно. Примем необязательно автором. Отчуждаемый код — это модули, пакеты, библиотеки, все то, благодаря чему нам не нужно каждый раз писать все самим. Девиз «все уже украдено написано до нас» особенно близок адептам Python-а, но не чужд и нам.
local lunajson = require 'lunajson' -- теперь мы умеет работать с JSON

local jsonstr = '{"Hello":["lunajson",1.5]}'
local t = lunajson.decode(jsonstr)
print(t.Hello[2]) --> 1.5
print(lunajson.encode(t)) --> {"Hello":["lunajson",1.5]}
Разумеется, не все так просто. Для того, чтобы использовать пакет, он должен присутствовать в одном из мест, где его будет искать require.
В переменной package.path содержится строка с вариантами шаблона путей для поиска. Вы можете увидеть из при помощи команды print.
> print (package.path)
/usr/share/lua/5.3/?.lua;/usr/share/lua/5.3/?/init.lua;/usr/lib/lua/5.3/?.lua;/usr/lib/lua/5.3/?/init.lua;./?.lua;./?/init.lua
Подставьте вместо вопросительного знака имя модуля — и у вас будет список всех возможных файлов, который будет пытаться открыть команда require.
Это обычная переменная и её можно переопределить или дополнить прямо в программе. И после этого команда require будет исходить их её нового значения.
Проще всего разместить подключаемый модуль в той же директории, что и ваша программа. Создайте файл с именем module.lua и впишите в него следующее:
local complex = {
    __add = function (x, y)
        return {a = x.a + y.a, b = x.b + y.b}
    end,
    __tostring = function (z)
        -- этот метаметод вызывается, когда с таблицей пытаются обращаться, как со строкой
        return z.a..'+'..z.b..'i'
    end
}
return function (a, b)
    z = {a = a, b = b}
    setmetatable (z, {
        __index = complex
    })
    return z
end
Теперь в своей программе вы можете написать так:
local complex = require "complex"

x = complex(3,2)
y = complex(4,5)
print (x + y) -- вот здесь перед выводом выполняется метатметод __tostring
Пакеты
Имя модуля может содержать точки. При поиске модуля точка превращается в разделитель директории (прямая косая черта для Linux и обратная — для Windows, операционные системы без иерархической файловой системы могут использовать знак подчеркивания). Пакет — это все дерево модулей в одной директории.
Глубина вложенности не важна, дерево пакета может быть довольно разветвленным. Модули пакета являются автономными и связаны только логически.
А если вы снова внимательно посмотрите на значение переменной package.path, то увидите там такую подстроку:
Это позволяет загружать пакет, в модуле init.lua которого будет выполняться загрузка его компонентов или другие действия инициализации.
Заключение
Теперь вы знаете, что такое Lua. Теперь переходите к «Программирование на Lua», той самой книге, о которой мы говорили в самом начале. Если вы решили включить Lua в свой инструментальный набор, эта книга станет для вас настольной. В том числе и потому, что в ней автор рассказывает, что и почему в Lua реализовано именно так, а не иначе.
А еще — там есть такой громадный пласт материала, как встраивание в приложение на C и взаимодействие к кодом, написанным на C. Я посчитал, что для «маленькой книги» это слишком глубокий материал.
Мы также обошли стороной luarocks — это пакетный менеджер, который Hisham Muhammad написал и поддерживает с 2006 года. Это не единственный менеджер пакетов, но для Lua он стал стандартом «де-факто». Строго говоря, он не является частью языка, поэтому я не стал его описывать. Так же, как ZeroBrane Studio, которая является великолепной IDE и удачным примером приложения, полностью написанного на Lua.
Засим откланиваюсь.
Спасибо, что дочитали.
Lua — Overview
Lua is an extensible, lightweight programming language written in C. It started as an in-house project in 1993 by Roberto Ierusalimschy, Luiz Henrique de Figueiredo, and Waldemar Celes.
It was designed from the beginning to be a software that can be integrated with the code written in C and other conventional languages. This integration brings many benefits. It does not try to do what C can already do but aims at offering what C is not good at: a good distance from the hardware, dynamic structures, no redundancies, ease of testing and debugging. For this, Lua has a safe environment, automatic memory management, and good facilities for handling strings and other kinds of data with dynamic size.
Features
Lua provides a set of unique features that makes it distinct from other languages. These include −
- Extensible
- Simple
- Efficient
- Portable
- Free and open
Example Code
print("Hello World!")
How Lua is Implemented?
Lua consists of two parts — the Lua interpreter part and the functioning software system. The functioning software system is an actual computer application that can interpret programs written in the Lua programming language. The Lua interpreter is written in ANSI C, hence it is highly portable and can run on a vast spectrum of devices from high-end network servers to small devices.
Both Lua’s language and its interpreter are mature, small, and fast. It has evolved from other programming languages and top software standards. Being small in size makes it possible for it to run on small devices with low memory.
Learning Lua
The most important point while learning Lua is to focus on the concepts without getting lost in its technical details.
The purpose of learning a programming language is to become a better programmer; that is, to become more effective in designing and implementing new systems and at maintaining old ones.
Some Uses of Lua
-
Game Programming
-
Scripting in Standalone Applications
-
Scripting in Web
-
Extensions and add-ons for databases like MySQL Proxy and MySQL WorkBench
-
Security systems like Intrusion Detection System.
Lua — Environment
Local Environment Setup
If you are still willing to set up your environment for Lua programming language, you need the following softwares available on your computer — (a) Text Editor, (b) The Lua Interpreter, and (c) Lua Compiler.
Text Editor
You need a text editor to type your program. Examples of a few editors include Windows Notepad, OS Edit command, Brief, Epsilon, EMACS, and vim or vi.
Name and version of the text editor can vary on different operating systems. For example, Notepad will be used on Windows, and vim or vi can be used on Windows as well as Linux or UNIX.
The files you create with your editor are called source files and these files contain the program source code. The source files for Lua programs are typically named with the extension «.lua».
The Lua Interpreter
It is just a small program that enables you to type Lua commands and have them executed immediately. It stops the execution of a Lua file in case it encounters an error unlike a compiler that executes fully.
The Lua Compiler
When we extend Lua to other languages/applications, we need a Software Development Kit with a compiler that is compatible with the Lua Application Program Interface.
Installation on Windows
There is a separate IDE named «SciTE» developed for the windows environment, which can be downloaded from https://code.google.com/p/luaforwindows/ download section.
Run the downloaded executable to install the Lua IDE.
Since it’s an IDE, you can both create and build the Lua code using the same.
In case, you are interested in installing Lua in command line mode, you need to install MinGW or Cygwin and then compile and install Lua in windows.
Installation on Linux
To download and build Lua, use the following command −
$ wget http://www.lua.org/ftp/lua-5.2.3.tar.gz
$ tar zxf lua-5.2.3.tar.gz
$ cd lua-5.2.3
$ make linux test
In order to install on other platforms like aix, ansi, bsd, generic linux, mingw, posix, solaris by replacing Linux in make Linux, test with the corresponding platform name.
We have a helloWorld.lua, in Lua as follows −
print("Hello World!")
Now, we can build and run a Lua file say helloWorld.lua, by switching to the folder containing the file using cd, and then using the following command −
$ lua helloWorld
We can see the following output.
Hello World!
Installation on Mac OS X
To build/test Lua in the Mac OS X, use the following command −
$ curl -R -O http://www.lua.org/ftp/lua-5.2.3.tar.gz
$ tar zxf lua-5.2.3.tar.gz
$ cd lua-5.2.3
$ make macosx test
In certain cases, you may not have installed the Xcode and command line tools. In such cases, you won’t be able to use the make command. Install Xcode from mac app store. Then go to Preferences of Xcode, and then switch to Downloads and install the component named «Command Line Tools». Once the process is completed, make command will be available to you.
It is not mandatory for you to execute the «make macosx test» statement. Even without executing this command, you can still use Lua in Mac OS X.
We have a helloWorld.lua, in Lua, as follows −
print("Hello World!")
Now, we can build and run a Lua file say helloWorld.lua by switching to the folder containing the file using cd and then using the following command −
$ lua helloWorld
We can see the following output −
Hello World!
Lua IDE
As mentioned earlier, for Windows SciTE, Lua IDE is the default IDE provided by the Lua creator team. The alternate IDE available is from ZeroBrane Studio, which is available across multiple platforms like Windows, Mac and Linux.
There are also plugins for eclipse that enable the Lua development. Using IDE makes it easier for development with features like code completion and is highly recommended. The IDE also provides interactive mode programming similar to the command line version of Lua.
Lua — Basic Syntax
Let us start creating our first Lua program!
First Lua Program
Interactive Mode Programming
Lua provides a mode called interactive mode. In this mode, you can type in instructions one after the other and get instant results. This can be invoked in the shell by using the lua -i or just the lua command. Once you type in this, press Enter and the interactive mode will be started as shown below.
$ lua -i
$ Lua 5.1.4  Copyright (C) 1994-2008 Lua.org, PUC-Rio
quit to end; cd, dir and edit also available
You can print something using the following statement −
print("test")
Once you press enter, you will get the following output −
test
Default Mode Programming
Invoking the interpreter with a Lua file name parameter begins execution of the file and continues until the script is finished. When the script is finished, the interpreter is no longer active.
Let us write a simple Lua program. All Lua files will have extension .lua. So put the following source code in a test.lua file.
print("test")
Assuming, lua environment is setup correctly, let’s run the program using the following code −
$ lua test.lua
We will get the following output −
test
Let’s try another way to execute a Lua program. Below is the modified test.lua file −
#!/usr/local/bin/lua

print("test")
Here, we have assumed that you have Lua interpreter available in your /usr/local/bin directory. The first line is ignored by the interpreter, if it starts with # sign. Now, try to run this program as follows −
$ chmod a+rx test.lua
$./test.lua
We will get the following output.
test
Let us now see the basic structure of Lua program, so that it will be easy for you to understand the basic building blocks of the Lua programming language.
Tokens in Lua
A Lua program consists of various tokens and a token is either a keyword, an identifier, a constant, a string literal, or a symbol. For example, the following Lua statement consists of three tokens −
io.write("Hello world, from ",_VERSION,"!n")
The individual tokens are −
io.write
(
   "Hello world, from ",_VERSION,"!n"
)
Comments
Comments are like helping text in your Lua program and they are ignored by the interpreter. They start with —[[ and terminates with the characters —]] as shown below −
--[[ my first program in Lua --]]
Identifiers
A Lua identifier is a name used to identify a variable, function, or any other user-defined item. An identifier starts with a letter ‘A to Z’ or ‘a to z’ or an underscore ‘_’ followed by zero or more letters, underscores, and digits (0 to 9).
Lua does not allow punctuation characters such as @, $, and % within identifiers. Lua is a case sensitive programming language. Thus Manpower and manpower are two different identifiers in Lua. Here are some examples of the acceptable identifiers −
mohd         zara      abc     move_name    a_123
myname50     _temp     j       a23b9        retVal
Keywords
The following list shows few of the reserved words in Lua. These reserved words may not be used as constants or variables or any other identifier names.
| and | break | do | else |
| elseif | end | false | for |
| function | if | in | local |
| nil | not | or | repeat |
| return | then | true | until |
| while |
Whitespace in Lua
A line containing only whitespace, possibly with a comment, is known as a blank line, and a Lua interpreter totally ignores it.
Whitespace is the term used in Lua to describe blanks, tabs, newline characters and comments. Whitespace separates one part of a statement from another and enables the interpreter to identify where one element in a statement, such as int ends, and the next element begins. Therefore, in the following statement −
local age
There must be at least one whitespace character (usually a space) between local and age for the interpreter to be able to distinguish them. On the other hand, in the following statement −
fruit = apples + oranges --get the total fruit
No whitespace characters are necessary between fruit and =, or between = and apples, although you are free to include some if you wish for readability purpose.
Lua — Variables
A variable is nothing but a name given to a storage area that our programs can manipulate. It can hold different types of values including functions and tables.
The name of a variable can be composed of letters, digits, and the underscore character. It must begin with either a letter or an underscore. Upper and lowercase letters are distinct because Lua is case-sensitive. There are eight basic types of values in Lua −
In Lua, though we don’t have variable data types, we have three types based on the scope of the variable.
-
Global variables − All variables are considered global unless explicitly declared as a local.
-
Local variables − When the type is specified as local for a variable then its scope is limited with the functions inside their scope.
-
Table fields − This is a special type of variable that can hold anything except nil including functions.
Variable Definition in Lua
A variable definition means to tell the interpreter where and how much to create the storage for the variable. A variable definition have an optional type and contains a list of one or more variables of that type as follows −
type variable_list;
Here, type is optionally local or type specified making it global, and variable_list may consist of one or more identifier names separated by commas. Some valid declarations are shown here −
local    i, j
local    i
local    a,c
The line local i, j both declares and defines the variables i and j; which instructs the interpreter to create variables named i, j and limits the scope to be local.
Variables can be initialized (assigned an initial value) in their declaration. The initializer consists of an equal sign followed by a constant expression as follows −
type variable_list = value_list;
Some examples are −
local d , f = 5 ,10     --declaration of d and f as local variables.
d , f = 5, 10;          --declaration of d and f as global variables.
d, f = 10               --[[declaration of d and f as global variables.
                           Here value of f is nil --]]
For definition without an initializer: variables with static storage duration are implicitly initialized with nil.
Variable Declaration in Lua
As you can see in the above examples, assignments for multiples variables follows a variable_list and value_list format. In the above example local d, f = 5,10 we have d and f in variable_list and 5 and 10 in values list.
Value assigning in Lua takes place like first variable in the variable_list with first value in the value_list and so on. Hence, the value of d is 5 and the value of f is 10.
Example
Try the following example, where variables have been declared at the top, but they have been defined and initialized inside the main function −
-- Variable definition:
local a, b

-- Initialization
a = 10
b = 30

print("value of a:", a)

print("value of b:", b)

-- Swapping of variables
b, a = a, b

print("value of a:", a)

print("value of b:", b)

f = 70.0/3.0
print("value of f", f)
When the above code is built and executed, it produces the following result −
value of a:	10
value of b:	30
value of a:	30
value of b:	10
value of f	23.333333333333
Lvalues and Rvalues in Lua
There are two kinds of expressions in Lua −
-
lvalue − Expressions that refer to a memory location is called «lvalue» expression. An lvalue may appear as either the left-hand or right-hand side of an assignment.
-
rvalue − The term rvalue refers to a data value that is stored at some address in memory. An rvalue is an expression that cannot have a value assigned to it, which means an rvalue may appear on the right-hand side, but not on the left-hand side of an assignment.
Variables are lvalues and so may appear on the left-hand side of an assignment. Numeric literals are rvalues and so may not be assigned and cannot appear on the left-hand side. Following is a valid statement −
g = 20
But following is not a valid statement and would generate a build-time error −
10 = 20
In Lua programming language, apart from the above types of assignment, it is possible to have multiple lvalues and rvalues in the same single statement. It is shown below.
g,l = 20,30
In the above statement, 20 is assigned to g and 30 is assigned to l.
Lua — Data Types
Lua is a dynamically typed language, so the variables don’t have types, only the values have types. Values can be stored in variables, passed as parameters and returned as results.
In Lua, though we don’t have variable data types, but we have types for the values. The list of data types for values are given below.
| Sr.No | Value Type & Description |
|---|---|
| 1 |
nil Used to differentiate the value from having some data or no(nil) data. |
| 2 |
boolean Includes true and false as values. Generally used for condition checking. |
| 3 |
number Represents real(double precision floating point) numbers. |
| 4 |
string Represents array of characters. |
| 5 |
function Represents a method that is written in C or Lua. |
| 6 |
userdata Represents arbitrary C data. |
| 7 |
thread Represents independent threads of execution and it is used to implement coroutines. |
| 8 |
table Represent ordinary arrays, symbol tables, sets, records, graphs, trees, etc., and implements associative arrays. It can hold any value (except nil). |
Type Function
In Lua, there is a function called ‘type’ that enables us to know the type of the variable. Some examples are given in the following code.
print(type("What is my type"))   --> string
t = 10

print(type(5.8*t))               --> number
print(type(true))                --> boolean
print(type(print))               --> function
print(type(nil))                 --> nil
print(type(type(ABC)))           --> string
When you build and execute the above program, it produces the following result on Linux −
string
number
boolean
function
nil
string
By default, all the variables will point to nil until they are assigned a value or initialized. In Lua, zero and empty strings are considered to be true in case of condition checks. Hence, you have to be careful when using Boolean operations. We will know more using these types in the next chapters.
Lua — Operators
An operator is a symbol that tells the interpreter to perform specific mathematical or logical manipulations. Lua language is rich in built-in operators and provides the following type of operators −
- Arithmetic Operators
- Relational Operators
- Logical Operators
- Misc Operators
This tutorial will explain the arithmetic, relational, logical, and other miscellaneous operators one by one.
Arithmetic Operators
Following table shows all the arithmetic operators supported by Lua language. Assume variable A holds 10 and variable B holds 20 then −
Show Examples
| Operator | Description | Example |
|---|---|---|
| + | Adds two operands | A + B will give 30 |
| — | Subtracts second operand from the first | A — B will give -10 |
| * | Multiply both operands | A * B will give 200 |
| / | Divide numerator by de-numerator | B / A will give 2 |
| % | Modulus Operator and remainder of after an integer division | B % A will give 0 |
| ^ | Exponent Operator takes the exponents | A^2 will give 100 |
| — | Unary — operator acts as negation | -A will give -10 |
Relational Operators
Following table shows all the relational operators supported by Lua language. Assume variable A holds 10 and variable B holds 20 then −
Show Examples
| Operator | Description | Example |
|---|---|---|
| == | Checks if the value of two operands are equal or not, if yes then condition becomes true. | (A == B) is not true. |
| ~= | Checks if the value of two operands are equal or not, if values are not equal then condition becomes true. | (A ~= B) is true. |
| > | Checks if the value of left operand is greater than the value of right operand, if yes then condition becomes true. | (A > B) is not true. |
| < | Checks if the value of left operand is less than the value of right operand, if yes then condition becomes true. | (A < B) is true. |
| >= | Checks if the value of left operand is greater than or equal to the value of right operand, if yes then condition becomes true. | (A >= B) is not true. |
| <= | Checks if the value of left operand is less than or equal to the value of right operand, if yes then condition becomes true. | (A <= B) is true. |
Logical Operators
Following table shows all the logical operators supported by Lua language. Assume variable A holds true and variable B holds false then −
Show Examples
| Operator | Description | Example |
|---|---|---|
| and | Called Logical AND operator. If both the operands are non zero then condition becomes true. | (A and B) is false. |
| or | Called Logical OR Operator. If any of the two operands is non zero then condition becomes true. | (A or B) is true. |
| not | Called Logical NOT Operator. Use to reverses the logical state of its operand. If a condition is true then Logical NOT operator will make false. | !(A and B) is true. |
Misc Operators
Miscellaneous operators supported by Lua Language include concatenation and length.
Show Examples
| Operator | Description | Example |
|---|---|---|
| .. | Concatenates two strings. | a..b where a is «Hello » and b is «World», will return «Hello World». |
| # | An unary operator that return the length of the a string or a table. | #»Hello» will return 5 |
Operators Precedence in Lua
Operator precedence determines the grouping of terms in an expression. This affects how an expression is evaluated. Certain operators have higher precedence than others; for example, the multiplication operator has higher precedence than the addition operator −
For example, x = 7 + 3 * 2; Here x is assigned 13, not 20 because operator * has higher precedence than + so it first get multiplied with 3*2 and then adds into 7.
Here, operators with the highest precedence appear at the top of the table, those with the lowest appear at the bottom. Within an expression, higher precedence operators will be evaluated first.
Show Examples
| Category | Operator | Associativity |
|---|---|---|
| Unary | not # — | Right to left |
| Concatenation | .. | Right to left |
| Multiplicative | * / % | Left to right |
| Additive | + — | Left to right |
| Relational | < > <= >= == ~= | Left to right |
| Equality | == ~= | Left to right |
| Logical AND | and | Left to right |
| Logical OR | or | Left to right |
Lua — Loops
There may be a situation when you need to execute a block of code several number of times. In general, statements are executed sequentially: the first statement in a function is executed first, followed by the second, and so on.
Programming languages provide various control structures that allow for more complicated execution paths.
A loop statement allows us to execute a statement or group of statements multiple times. Following is the general form of a loop statement in most of the programming languages −
Lua provides the following types of loops to handle looping requirements.
| Sr.No. | Loop Type & Description |
|---|---|
| 1 | while loop
Repeats a statement or group of statements while a given condition is true. It tests the condition before executing the loop body. |
| 2 | for loop
Executes a sequence of statements multiple times and abbreviates the code that manages the loop variable. |
| 3 | repeat…until loop
Repeats the operation of group of statements till the until condition is met. |
| 4 | nested loops
You can use one or more loop inside any another while, for or do..while loop. |
Loop Control Statement
Loop control statement changes execution from its normal sequence. When execution leaves a scope, all automatic objects that were created in that scope are destroyed.
Lua supports the following control statements.
| Sr.No. | Control Statement & Description |
|---|---|
| 1 | break statement
Terminates the loop and transfers execution to the statement immediately following the loop or switch. |
The Infinite Loop
A loop becomes infinite loop if a condition never becomes false. The while loop is often used for this purpose. Since we directly give true for the condition, it keeps executing forever. We can use the break statement to break this loop.
while( true )
do
   print("This loop will run forever.")
end
Lua — Decision Making
Decision making structures require that the programmer specifies one or more conditions to be evaluated or tested by the program, along with a statement or statements to be executed, if the condition is determined to be true, and optionally, other statements to be executed if the condition is determined to be false.
Following is the general form of a typical decision making structure found in most of the programming languages −
Lua programming language assumes any combination of Boolean true and non-nil values as true, and if it is either boolean false or nil, then it is assumed as false value. It is to be noted that in Lua, zero will be considered as true.
Lua programming language provides the following types of decision making statements.
| Sr.No. | Statement & Description |
|---|---|
| 1 | if statement
An if statement consists of a boolean expression followed by one or more statements. |
| 2 | if…else statement
An if statement can be followed by an optional else statement, which executes when the boolean expression is false. |
| 3 | nested if statements
You can use one if or else if statement inside another if or else if statement(s). |
Lua — Functions
A function is a group of statements that together perform a task. You can divide up your code into separate functions. How you divide up your code among different functions is up to you, but logically the division usually unique, is so each function performs a specific task.
The Lua language provides numerous built-in methods that your program can call. For example, method print() to print the argument passed as input in console.
A function is known with various names like a method or a sub-routine or a procedure etc.
Defining a Function
The general form of a method definition in Lua programming language is as follows −
optional_function_scope function function_name( argument1, argument2, argument3........,
argumentn)
function_body
return result_params_comma_separated
end
A method definition in Lua programming language consists of a method header and a method body. Here are all the parts of a method −
-
Optional Function Scope − You can use keyword local to limit the scope of the function or ignore the scope section, which will make it a global function.
-
Function Name − This is the actual name of the function. The function name and the parameter list together constitute the function signature.
-
Arguments − An argument is like a placeholder. When a function is invoked, you pass a value to the argument. This value is referred to as the actual parameter or argument. The parameter list refers to the type, order, and number of the arguments of a method. Arguments are optional; that is, a method may contain no argument.
-
Function Body − The method body contains a collection of statements that define what the method does.
-
Return − In Lua, it is possible to return multiple values by following the return keyword with the comma separated return values.
Example
Following is the source code for a function called max(). This function takes two parameters num1 and num2 and returns the maximum between the two −
--[[ function returning the max between two numbers --]]
function max(num1, num2)

   if (num1 > num2) then
      result = num1;
   else
      result = num2;
   end

   return result;
end
Function Arguments
If a function is to use arguments, it must declare the variables that accept the values of the arguments. These variables are called the formal parameters of the function.
The formal parameters behave like other local variables inside the function and are created upon entry into the function and destroyed upon exit.
Calling a Function
While creating a Lua function, you give a definition of what the function has to do. To use a method, you will have to call that function to perform the defined task.
When a program calls a function, program control is transferred to the called function. A called function performs the defined task and when its return statement is executed or when its function’s end is reached, it returns program control back to the main program.
To call a method, you simply need to pass the required parameters along with the method name and if the method returns a value, then you can store the returned value. For example −
function max(num1, num2)

   if (num1 > num2) then
      result = num1;
   else
      result = num2;
   end

   return result;
end

-- calling a function
print("The maximum of the two numbers is ",max(10,4))
print("The maximum of the two numbers is ",max(5,6))
When we run the above code, we will get the following output.
The maximum of the two numbers is 	10
The maximum of the two numbers is 	6
Assigning and Passing Functions
In Lua, we can assign the function to variables and also can pass them as parameters of another function. Here is a simple example for assigning and passing a function as parameter in Lua.
myprint = function(param)
   print("This is my print function -   ##",param,"##")
end

function add(num1,num2,functionPrint)
   result = num1 + num2
   functionPrint(result)
end

myprint(10)
add(2,5,myprint)
When we run the above code, we will get the following output.
This is my print function -   ##	10	##
This is my print function -   ##	7	##
Function with Variable Argument
It is possible to create functions with variable arguments in Lua using ‘…’ as its parameter. We can get a grasp of this by seeing an example in which the function will return the average and it can take variable arguments.
function average(...)
   result = 0
   local arg = {...}
   for i,v in ipairs(arg) do
      result = result + v
   end
   return result/#arg
end

print("The average is",average(10,5,3,4,5,6))
When we run the above code, we will get the following output.
The average is 5.5
Lua — Strings
String is a sequence of characters as well as control characters like form feed. String can be initialized with three forms which includes −
- Characters between single quotes
- Characters between double quotes
- Characters between [[ and ]]
An example for the above three forms are shown below.
string1 = "Lua"
print(""String 1 is"",string1)

string2 = 'Tutorial'
print("String 2 is",string2)

string3 = [["Lua Tutorial"]]
print("String 3 is",string3)
When we run the above program, we will get the following output.
"String 1 is" Lua
String 2 is	Tutorial
String 3 is	"Lua Tutorial"
Escape sequence characters are used in string to change the normal interpretation of characters. For example, to print double inverted commas («»), we have used » in the above example. The escape sequence and its use is listed below in the table.
| Escape Sequence | Use |
|---|---|
| a | Bell |
| b | Backspace |
| f | Formfeed |
| n | New line |
| r | Carriage return |
| t | Tab |
| v | Vertical tab |
| \ | Backslash |
| « | Double quotes |
| ‘ | Single quotes |
| [ | Left square bracket |
| ] | Right square bracket |
String Manipulation
Lua supports string to manipulate strings −
| Sr.No. | Method & Purpose |
|---|---|
| 1 |
string.upper(argument) Returns a capitalized representation of the argument. |
| 2 |
string.lower(argument) Returns a lower case representation of the argument. |
| 3 |
string.gsub(mainString,findString,replaceString) Returns a string by replacing occurrences of findString with replaceString. |
| 4 |
string.find(mainString,findString, optionalStartIndex,optionalEndIndex) Returns the start index and end index of the findString in the main string and nil if not found. |
| 5 |
string.reverse(arg) Returns a string by reversing the characters of the passed string. |
| 6 |
string.format(…) Returns a formatted string. |
| 7 |
string.char(arg) and string.byte(arg) Returns internal numeric and character representations of input argument. |
| 8 |
string.len(arg) Returns a length of the passed string. |
| 9 |
string.rep(string, n)) Returns a string by repeating the same string n number times. |
| 10 |
.. Thus operator concatenates two strings. |
Now, let’s dive into a few examples to exactly see how these string manipulation functions behave.
Case Manipulation
A sample code for manipulating the strings to upper and lower case is given below.
string1 = "Lua";

print(string.upper(string1))
print(string.lower(string1))
When we run the above program, we will get the following output.
LUA
lua
Replacing a Substring
A sample code for replacing occurrences of one string with another is given below.
string = "Lua Tutorial"

-- replacing strings
newstring = string.gsub(string,"Tutorial","Language")
print("The new string is "..newstring)
When we run the above program, we will get the following output.
The new string is Lua Language
Finding and Reversing
A sample code for finding the index of substring and reversing string is given below.
string = "Lua Tutorial"

-- replacing strings
print(string.find(string,"Tutorial"))
reversedString = string.reverse(string)
print("The new string is",reversedString)
When we run the above program, we will get the following output.
5	12
The new string is	lairotuT auL
Formatting Strings
Many times in our programming, we may need to print strings in a formatted way. You can use the string.format function to format the output as shown below.
string1 = "Lua"
string2 = "Tutorial"

number1 = 10
number2 = 20

-- Basic string formatting
print(string.format("Basic formatting %s %s",string1,string2))

-- Date formatting
date = 2; month = 1; year = 2014
print(string.format("Date formatting %02d/%02d/%03d", date, month, year))

-- Decimal formatting
print(string.format("%.4f",1/3))
When we run the above program, we will get the following output.
Basic formatting Lua Tutorial
Date formatting 02/01/2014
0.3333
Character and Byte Representations
A sample code for character and byte representation, which is used for converting the string from string to internal representation and vice versa.
-- Byte conversion

-- First character
print(string.byte("Lua"))

-- Third character
print(string.byte("Lua",3))

-- first character from last
print(string.byte("Lua",-1))

-- Second character
print(string.byte("Lua",2))

-- Second character from last
print(string.byte("Lua",-2))

-- Internal Numeric ASCII Conversion
print(string.char(97))
When we run the above program, we will get the following output.
76
97
97
117
117
a
Other Common Functions
The common string manipulations include string concatenation, finding length of string and at times repeating the same string multiple times. The example for these operations is given below.
string1 = "Lua"
string2 = "Tutorial"

-- String Concatenations using ..
print("Concatenated string",string1..string2)

-- Length of string
print("Length of string1 is ",string.len(string1))

-- Repeating strings
repeatedString = string.rep(string1,3)
print(repeatedString)
When we run the above program, we will get the following output.
Concatenated string	LuaTutorial
Length of string1 is 	3
LuaLuaLua
Lua — Arrays
Arrays are ordered arrangement of objects, which may be a one-dimensional array containing a collection of rows or a multi-dimensional array containing multiple rows and columns.
In Lua, arrays are implemented using indexing tables with integers. The size of an array is not fixed and it can grow based on our requirements, subject to memory constraints.
One-Dimensional Array
A one-dimensional array can be represented using a simple table structure and can be initialized and read using a simple for loop. An example is shown below.
array = {"Lua", "Tutorial"}

for i = 0, 2 do
   print(array[i])
end
When we run the above code, we wil get the following output.
nil
Lua
Tutorial
As you can see in the above code, when we are trying to access an element in an index that is not there in the array, it returns nil. In Lua, indexing generally starts at index 1. But it is possible to create objects at index 0 and below 0 as well. Array using negative indices is shown below where we initialize the array using a for loop.
array = {}

for i= -2, 2 do
   array[i] = i *2
end

for i = -2,2 do
   print(array[i])
end
When we run the above code, we will get the following output.
-4
-2
0
2
4
Multi-Dimensional Array
Multi-dimensional arrays can be implemented in two ways.
- Array of arrays
- Single dimensional array by manipulating indices
An example for multidimensional array of 3. 3 is shown below using array of arrays.
-- Initializing the array
array = {}

for i=1,3 do
   array[i] = {}

   for j=1,3 do
      array[i][j] = i*j
   end

end

-- Accessing the array

for i=1,3 do

   for j=1,3 do
      print(array[i][j])
   end

end
When we run the above code, we will get the following output.
1
2
3
2
4
6
3
6
9
An example for multidimensional array is shown below using manipulating indices.
-- Initializing the array

array = {}

maxRows = 3
maxColumns = 3

for row=1,maxRows do

   for col=1,maxColumns do
      array[row*maxColumns +col] = row*col
   end

end

-- Accessing the array

for row=1,maxRows do

   for col=1,maxColumns do
      print(array[row*maxColumns +col])
   end

end
When we run the above code, we will get the following output.
1
2
3
2
4
6
3
6
9
As you can see in the above example, data is stored based on indices. It is possible to place the elements in a sparse way and it is the way Lua implementation of a matrix works. Since it does not store nil values in Lua, it is possible to save lots of memory without any special technique in Lua as compared to special techniques used in other programming languages.
Lua — Iterators
Iterator is a construct that enables you to traverse through the elements of the so called collection or container. In Lua, these collections often refer to tables, which are used to create various data structures like array.
Generic For Iterator
A generic for iterator provides the key value pairs of each element in the collection. A simple example is given below.
array = {"Lua", "Tutorial"}

for key,value in ipairs(array)
do
   print(key, value)
end
When we run the above code, we will get the following output −
1  Lua
2  Tutorial
The above example uses the default ipairs iterator function provided by Lua.
In Lua we use functions to represent iterators. Based on the state maintenance in these iterator functions, we have two main types −
- Stateless Iterators
- Stateful Iterators
Stateless Iterators
By the name itself we can understand that this type of iterator function does not retain any state.
Let us now see an example of creating our own iterator using a simple function that prints the squares of n numbers.
function square(iteratorMaxCount,currentNumber)

   if currentNumber<iteratorMaxCount
   then
      currentNumber = currentNumber+1
      return currentNumber, currentNumber*currentNumber
   end

end

for i,n in square,3,0
do
   print(i,n)
end
When we run the above program, we will get the following output.
1	1
2	4
3	9
The above code can be modified slightly to mimic the way ipairs function of iterators work. It is shown below.
function square(iteratorMaxCount,currentNumber)

   if currentNumber<iteratorMaxCount
   then
      currentNumber = currentNumber+1
      return currentNumber, currentNumber*currentNumber
   end

end

function squares(iteratorMaxCount)
   return square,iteratorMaxCount,0
end

for i,n in squares(3)
do
   print(i,n)
end
When we run the above program, we will get the following output.
1	1
2	4
3	9
Stateful Iterators
The previous example of iteration using function does not retain the state. Each time the function is called, it returns the next element of the collection based on a second variable sent to the function. To hold the state of the current element, closures are used. Closure retain variables values across functions calls. To create a new closure, we create two functions including the closure itself and a factory, the function that creates the closure.
Let us now see an example of creating our own iterator in which we will be using closures.
array = {"Lua", "Tutorial"}

function elementIterator (collection)

   local index = 0
   local count = #collection

   -- The closure function is returned

   return function ()
      index = index + 1

      if index <= count
      then
         -- return the current element of the iterator
         return collection[index]
      end

   end

end

for element in elementIterator(array)
do
   print(element)
end
When we run the above program, we will get the following output.
Lua
Tutorial
In the above example, we can see that elementIterator has another method inside that uses the local external variables index and count to return each of the element in the collection by incrementing the index each time the function is called.
We can create our own function iterators using closure as shown above and it can return multiple elements for each of the time we iterate through the collection.
Lua — Tables
Introduction
Tables are the only data structure available in Lua that helps us create different types like arrays and dictionaries. Lua uses associative arrays and which can be indexed with not only numbers but also with strings except nil. Tables have no fixed size and can grow based on our need.
Lua uses tables in all representations including representation of packages. When we access a method string.format, it means, we are accessing the format function available in the string package.
Representation and Usage
Tables are called objects and they are neither values nor variables. Lua uses a constructor expression {} to create an empty table. It is to be known that there is no fixed relationship between a variable that holds reference of table and the table itself.
--sample table initialization
mytable = {}

--simple table value assignment
mytable[1]= "Lua"

--removing reference
mytable = nil

-- lua garbage collection will take care of releasing memory
When we have a table a with set of elements and if we assign it to b, both a and b refer to the same memory. No separate memory is allocated separately for b. When a is set to nil, table will be still accessible to b. When there are no reference to a table, then garbage collection in Lua takes care of cleaning up process to make these unreferenced memory to be reused again.
An example is shown below for explaining the above mentioned features of tables.
-- Simple empty table
mytable = {}
print("Type of mytable is ",type(mytable))

mytable[1]= "Lua"
mytable["wow"] = "Tutorial"

print("mytable Element at index 1 is ", mytable[1])
print("mytable Element at index wow is ", mytable["wow"])

-- alternatetable and mytable refers to same table
alternatetable = mytable

print("alternatetable Element at index 1 is ", alternatetable[1])
print("alternatetable Element at index wow is ", alternatetable["wow"])

alternatetable["wow"] = "I changed it"

print("mytable Element at index wow is ", mytable["wow"])

-- only variable released and and not table
alternatetable = nil
print("alternatetable is ", alternatetable)

-- mytable is still accessible
print("mytable Element at index wow is ", mytable["wow"])

mytable = nil
print("mytable is ", mytable)
When we run the above program we will get the following output −
Type of mytable is 	table
mytable Element at index 1 is 	Lua
mytable Element at index wow is 	Tutorial
alternatetable Element at index 1 is 	Lua
alternatetable Element at index wow is 	Tutorial
mytable Element at index wow is 	I changed it
alternatetable is 	nil
mytable Element at index wow is 	I changed it
mytable is 	nil
Table Manipulation
There are in built functions for table manipulation and they are listed in the following table.
| Sr.No. | Method & Purpose |
|---|---|
| 1 |
table.concat (table [, sep [, i [, j]]]) Concatenates the strings in the tables based on the parameters given. See example for detail. |
| 2 |
table.insert (table, [pos,] value) Inserts a value into the table at specified position. |
| 3 |
table.maxn (table) Returns the largest numeric index. |
| 4 |
table.remove (table [, pos]) Removes the value from the table. |
| 5 |
table.sort (table [, comp]) Sorts the table based on optional comparator argument. |
Let us see some samples of the above functions.
Table Concatenation
We can use the concat function to concatenate two tables as shown below −
fruits = {"banana","orange","apple"}

-- returns concatenated string of table
print("Concatenated string ",table.concat(fruits))

--concatenate with a character
print("Concatenated string ",table.concat(fruits,", "))

--concatenate fruits based on index
print("Concatenated string ",table.concat(fruits,", ", 2,3))
When we run the above program we will get the following output −
Concatenated string 	bananaorangeapple
Concatenated string 	banana, orange, apple
Concatenated string 	orange, apple
Insert and Remove
Insertion and removal of items in tables is most common in table manipulation. It is explained below.
fruits = {"banana","orange","apple"}

-- insert a fruit at the end
table.insert(fruits,"mango")
print("Fruit at index 4 is ",fruits[4])

--insert fruit at index 2
table.insert(fruits,2,"grapes")
print("Fruit at index 2 is ",fruits[2])

print("The maximum elements in table is",table.maxn(fruits))

print("The last element is",fruits[5])

table.remove(fruits)
print("The previous last element is",fruits[5])
When we run the above program, we will get the following output −
Fruit at index 4 is 	mango
Fruit at index 2 is 	grapes
The maximum elements in table is	5
The last element is	mango
The previous last element is	nil
Sorting Tables
We often require to sort a table in a particular order. The sort functions sort the elements in a table alphabetically. A sample for this is shown below.
fruits = {"banana","orange","apple","grapes"}

for k,v in ipairs(fruits) do
   print(k,v)
end

table.sort(fruits)
print("sorted table")

for k,v in ipairs(fruits) do
   print(k,v)
end
When we run the above program we will get the following output −
1	banana
2	orange
3	apple
4	grapes
sorted table
1	apple
2	banana
3	grapes
4	orange
Lua — Modules
What is a Module?
Module is like a library that can be loaded using require and has a single global name containing a table. This module can consist of a number of functions and variables. All these functions and variables are wrapped in to the table, which acts as a namespace. Also, a well behaved module has necessary provisions to return this table on require.
Specialty of Lua Modules
The usage of tables in modules helps us in numerous ways and enables us to manipulate the modules in the same way we manipulate any other Lua table. As a result of the ability to manipulate modules, it provides extra features for which other languages need special mechanisms. Due to this free mechanism of modules in Lua, a user can call the functions in Lua in multiple ways. A few of them are shown below.
-- Assuming we have a module printFormatter
-- Also printFormatter has a funtion simpleFormat(arg)
-- Method 1
require "printFormatter"
printFormatter.simpleFormat("test")

-- Method 2
local formatter = require "printFormatter"
formatter.simpleFormat("test")

-- Method 3
require "printFormatter"
local formatterFunction = printFormatter.simpleFormat
formatterFunction("test")
In the above sample code, you can see how flexible programming in Lua is, without any special additional code.
The require Function
Lua has provided a high level function called require to load all the necessary modules. It is kept as simple as possible to avoid having too much information on module to load it. The require function just assumes the modules as a chunk of code that defines some values, which is actually functions or tables containing functions.
Example
Let us consider a simple example, where one function has the math functions. Let’s call this module as mymath and filename being mymath.lua. The file content is as follows −
local mymath =  {}

function mymath.add(a,b)
   print(a+b)
end

function mymath.sub(a,b)
   print(a-b)
end

function mymath.mul(a,b)
   print(a*b)
end

function mymath.div(a,b)
   print(a/b)
end

return mymath
Now, in order to access this Lua module in another file, say, moduletutorial.lua, you need to use the following code segment.
mymathmodule = require("mymath")
mymathmodule.add(10,20)
mymathmodule.sub(30,20)
mymathmodule.mul(10,20)
mymathmodule.div(30,20)
In order to run this code, we need to place the two Lua files in the same directory or alternatively, you can place the module file in the package path and it needs additional setup. When we run the above program, we will get the following output.
30
10
200
1.5
Things to Remember
-
Place both the modules and the file you run in the same directory.
-
Module name and its file name should be the same.
-
It is a best practice to return modules for require function and hence the module should be preferably implemented as shown above eventhough you can find other types of implementations elsewhere.
Old Way of Implementing Modules
Let me now rewrite the same example in the older way, which uses package.seeall type of implementation. This was used in Lua versions 5.1 and 5.0. The mymath module is shown below.
module("mymath", package.seeall)

function mymath.add(a,b)
   print(a+b)
end

function mymath.sub(a,b)
   print(a-b)
end

function mymath.mul(a,b)
   print(a*b)
end

function mymath.div(a,b)
   print(a/b)
end
The usage of modules in moduletutorial.lua is shown below.
require("mymath")
mymath.add(10,20)
mymath.sub(30,20)
mymath.mul(10,20)
mymath.div(30,20)
When we run the above, we will get the same output. But it is advised on to use the older version of the code and it is assumed to less secure. Many SDKs that use Lua for programming like Corona SDK has deprecated the use of this.
Lua — Metatables
A metatable is a table that helps in modifying the behavior of a table it is attached to with the help of a key set and related meta methods. These meta methods are powerful Lua functionality that enables features like −
-
Changing/adding functionalities to operators on tables.
-
Looking up metatables when the key is not available in the table using __index in metatable.
There are two important methods that are used in handling metatables which includes −
-
setmetatable(table,metatable) − This method is used to set metatable for a table.
-
getmetatable(table) − This method is used to get metatable of a table.
Let’s first look at how to set one table as metatable of another. It is shown below.
mytable = {}
mymetatable = {}
setmetatable(mytable,mymetatable)
The above code can be represented in a single line as shown below.
mytable = setmetatable({},{})
_index
A simple example of metatable for looking up the meta table when it’s not available in table is shown below.
mytable = setmetatable({key1 = "value1"}, {
   __index = function(mytable, key)

      if key == "key2" then
         return "metatablevalue"
      else
         return mytable[key]
      end
   end
})

print(mytable.key1,mytable.key2)
When we run the above program, we will get the following output.
value1 metatablevalue
Let us explain what happened in the above example in steps.
-
The table mytable here is {key1 = «value1»}.
-
Metatable is set for mytable that contains a function for __index, which we call as a metamethod.
-
The metamethod does a simple job of looking up for an index «key2», if it’s found, it returns «metatablevalue», otherwise returns mytable’s value for corresponding index.
We can have a simplified version of the above program as shown below.
mytable = setmetatable({key1 = "value1"},
   { __index = { key2 = "metatablevalue" } })
print(mytable.key1,mytable.key2)
__newindex
When we add __newindex to metatable, if keys are not available in the table, the behavior of new keys will be defined by meta methods. A simple example where metatable’s index is set when index is not available in the main table is given below.
mymetatable = {}
mytable = setmetatable({key1 = "value1"}, { __newindex = mymetatable })

print(mytable.key1)

mytable.newkey = "new value 2"
print(mytable.newkey,mymetatable.newkey)

mytable.key1 = "new  value 1"
print(mytable.key1,mymetatable.newkey1)
When you run the above program, you get the following output.
value1
nil	new value 2
new  value 1	nil
You can see in the above program, if a key exists in the main table, it just updates it. When a key is not available in the maintable, it adds that key to the metatable.
Another example that updates the same table using rawset function is shown below.
mytable = setmetatable({key1 = "value1"}, {

   __newindex = function(mytable, key, value)
      rawset(mytable, key, """..value..""")
   end
})

mytable.key1 = "new value"
mytable.key2 = 4

print(mytable.key1,mytable.key2)
When we run the above program we will get the following output.
new value "4"
rawset sets value without using __newindex of metatable. Similarly there is rawget that gets value without using __index.
Adding Operator Behavior to Tables
A simple example to combine two tables using + operator is shown below −
mytable = setmetatable({ 1, 2, 3 }, {
   __add = function(mytable, newtable)

      for i = 1, table.maxn(newtable) do
         table.insert(mytable, table.maxn(mytable)+1,newtable[i])
      end
      return mytable
   end
})

secondtable = {4,5,6}

mytable = mytable + secondtable

for k,v in ipairs(mytable) do
   print(k,v)
end
When we run the above program, we will get the following output.
1	1
2	2
3	3
4	4
5	5
6	6
The __add key is included in the metatable to add behavior of operator +. The table of keys and corresponding operator is shown below.
| Sr.No. | Mode & Description |
|---|---|
| 1 |
__add Changes the behavior of operator ‘+’. |
| 2 |
__sub Changes the behavior of operator ‘-‘. |
| 3 |
__mul Changes the behavior of operator ‘*’. |
| 4 |
__div Changes the behavior of operator ‘/’. |
| 5 |
__mod Changes the behavior of operator ‘%’. |
| 6 |
__unm Changes the behavior of operator ‘-‘. |
| 7 |
__concat Changes the behavior of operator ‘..’. |
| 8 |
__eq Changes the behavior of operator ‘==’. |
| 9 |
__lt Changes the behavior of operator ‘<‘. |
| 10 |
__le Changes the behavior of operator ‘<=’. |
__call
Adding behavior of method call is done using __call statement. A simple example that returns the sum of values in main table with the passed table.
mytable = setmetatable({10}, {
   __call = function(mytable, newtable)
   sum = 0

      for i = 1, table.maxn(mytable) do
         sum = sum + mytable[i]
      end

      for i = 1, table.maxn(newtable) do
         sum = sum + newtable[i]
      end

      return sum
   end
})

newtable = {10,20,30}
print(mytable(newtable))
When we run the above program, we will get the following output.
70
__tostring
To change the behavior of the print statement, we can use the __tostring metamethod. A simple example is shown below.
mytable = setmetatable({ 10, 20, 30 }, {
   __tostring = function(mytable)
   sum = 0

      for k, v in pairs(mytable) do
         sum = sum + v
      end

      return "The sum of values in the table is " .. sum
   end
})
print(mytable)
When we run the above program, we will get the following output.
The sum of values in the table is 60
If you know the capabilities of meta table fully, you can really perform a lot of operations that would be very complex without using it. So, try to work more on using metatables with different options available in meta tables as explained in the samples and also create your own samples.
Lua — Coroutines
Introduction
Coroutines are collaborative in nature, which allows two or more methods to execute in a controlled manner. With coroutines, at any given time, only one coroutine runs and this running coroutine only suspends its execution when it explicitly requests to be suspended.
The above definition may look vague. Let us assume we have two methods, one the main program method and a coroutine. When we call a coroutine using resume function, its starts executing and when we call yield function, it suspends executing. Again the same coroutine can continue executing with another resume function call from where it was suspended. This process can continue till the end of execution of the coroutine.
Functions Available in Coroutines
The following table lists all the available functions for coroutines in Lua and their corresponding use.
| Sr.No. | Method & Purpose |
|---|---|
| 1 |
coroutine.create (f) Creates a new coroutine with a function f and returns an object of type «thread». |
| 2 |
coroutine.resume (co [, val1, …]) Resumes the coroutine co and passes the parameters if any. It returns the status of operation and optional other return values. |
| 3 |
coroutine.running () Returns the running coroutine or nil if called in the main thread. |
| 4 |
coroutine.status (co) Returns one of the values from running, normal, suspended or dead based on the state of the coroutine. |
| 5 |
coroutine.wrap (f) Like coroutine.create, the coroutine.wrap function also creates a coroutine, but instead of returning the coroutine itself, it returns a function that, when called, resumes the coroutine. |
| 6 |
coroutine.yield (…) Suspends the running coroutine. The parameter passed to this method acts as additional return values to the resume function. |
Example
Let’s look at an example to understand the concept of coroutines.
co = coroutine.create(function (value1,value2)
   local tempvar3 = 10
   print("coroutine section 1", value1, value2, tempvar3)

   local tempvar1 = coroutine.yield(value1+1,value2+1)
   tempvar3 = tempvar3 + value1
   print("coroutine section 2",tempvar1 ,tempvar2, tempvar3)

   local tempvar1, tempvar2= coroutine.yield(value1+value2, value1-value2)
   tempvar3 = tempvar3 + value1
   print("coroutine section 3",tempvar1,tempvar2, tempvar3)
   return value2, "end"

end)

print("main", coroutine.resume(co, 3, 2))
print("main", coroutine.resume(co, 12,14))
print("main", coroutine.resume(co, 5, 6))
print("main", coroutine.resume(co, 10, 20))
When we run the above program, we will get the following output.
coroutine section 1	3	2	10
main	true	4	3
coroutine section 2	12	nil	13
main	true	5	1
coroutine section 3	5	6	16
main	true	2	end
main	false	cannot resume dead coroutine
What Does the Above Example Do?
As mentioned before, we use the resume function to start the operation and yield function to stop the operation. Also, you can see that there are multiple return values received by resume function of coroutine.
-
First, we create a coroutine and assign it to a variable name co and the coroutine takes in two variables as its parameters.
-
When we call the first resume function, the values 3 and 2 are retained in the temporary variables value1 and value2 till the end of the coroutine.
-
To make you understand this, we have used a tempvar3, which is 10 initially and it gets updated to 13 and 16 by the subsequent calls of the coroutines since value1 is retained as 3 throughout the execution of the coroutine.
-
The first coroutine.yield returns two values 4 and 3 to the resume function, which we get by updating the input params 3 and 2 in the yield statement. It also receives the true/false status of coroutine execution.
-
Another thing about coroutines is how the next params of resume call is taken care of, in the above example; you can see that the variable the coroutine.yield receives the next call params which provides a powerful way of doing new operation with the retentionship of existing param values.
-
Finally, once all the statements in the coroutines are executed, the subsequent calls will return in false and «cannot resume dead coroutine» statement as response.
Another Coroutine Example
Let us look at a simple coroutine that returns a number from 1 to 5 with the help of yield function and resume function. It creates coroutine if not available or else resumes the existing coroutine.
function getNumber()
   local function getNumberHelper()
      co = coroutine.create(function ()
      coroutine.yield(1)
      coroutine.yield(2)
      coroutine.yield(3)
      coroutine.yield(4)
      coroutine.yield(5)
      end)
      return co
   end

   if(numberHelper) then
      status, number = coroutine.resume(numberHelper);

      if coroutine.status(numberHelper) == "dead" then
         numberHelper = getNumberHelper()
         status, number = coroutine.resume(numberHelper);
      end

      return number
   else
      numberHelper = getNumberHelper()
      status, number = coroutine.resume(numberHelper);
      return number
   end

end

for index = 1, 10 do
   print(index, getNumber())
end
When we run the above program, we will get the following output.
1	1
2	2
3	3
4	4
5	5
6	1
7	2
8	3
9	4
10	5
There is often a comparison of coroutines with the threads of multiprogramming languages, but we need to understand that coroutines have similar features of thread but they execute only one at a time and never execute concurrently.
We control the program execution sequence to meet the needs with the provision of retaining certain information temporarily. Using global variables with coroutines provides even more flexibility to coroutines.
Lua — File I/O
I/O library is used for reading and manipulating files in Lua. There are two kinds of file operations in Lua namely implicit file descriptors and explicit file descriptors.
For the following examples, we will use a sample file test.lua as shown below.
-- sample test.lua
-- sample2 test.lua
A simple file open operation uses the following statement.
file = io.open (filename [, mode])
The various file modes are listed in the following table.
| Sr.No. | Mode & Description |
|---|---|
| 1 |
«r» Read-only mode and is the default mode where an existing file is opened. |
| 2 |
«w» Write enabled mode that overwrites the existing file or creates a new file. |
| 3 |
«a» Append mode that opens an existing file or creates a new file for appending. |
| 4 |
«r+» Read and write mode for an existing file. |
| 5 |
«w+» All existing data is removed if file exists or new file is created with read write permissions. |
| 6 |
«a+» Append mode with read mode enabled that opens an existing file or creates a new file. |
Implicit File Descriptors
Implicit file descriptors use the standard input/ output modes or using a single input and single output file. A sample of using implicit file descriptors is shown below.
-- Opens a file in read
file = io.open("test.lua", "r")

-- sets the default input file as test.lua
io.input(file)

-- prints the first line of the file
print(io.read())

-- closes the open file
io.close(file)

-- Opens a file in append mode
file = io.open("test.lua", "a")

-- sets the default output file as test.lua
io.output(file)

-- appends a word test to the last line of the file
io.write("-- End of the test.lua file")

-- closes the open file
io.close(file)
When you run the program, you will get an output of the first line of test.lua file. For our program, we got the following output.
-- Sample test.lua
This was the first line of the statement in test.lua file for us. Also the line «— End of the test.lua file» would be appended to the last line of the test.lua code.
In the above example, you can see how the implicit descriptors work with file system using the io.»x» methods. The above example uses io.read() without the optional parameter. The optional parameter can be any of the following.
| Sr.No. | Mode & Description |
|---|---|
| 1 |
«*n» Reads from the current file position and returns a number if exists at the file position or returns nil. |
| 2 |
«*a» Returns all the contents of file from the current file position. |
| 3 |
«*l» Reads the line from the current file position, and moves file position to next line. |
| 4 |
number Reads number of bytes specified in the function. |
Other common I/O methods includes,
-
io.tmpfile() − Returns a temporary file for reading and writing that will be removed once the program quits.
-
io.type(file) − Returns whether file, closed file or nil based on the input file.
-
io.flush() − Clears the default output buffer.
-
io.lines(optional file name) − Provides a generic for loop iterator that loops through the file and closes the file in the end, in case the file name is provided or the default file is used and not closed in the end of the loop.
Explicit File Descriptors
We often use explicit file descriptor which allows us to manipulate multiple files at a time. These functions are quite similar to implicit file descriptors. Here, we use file:function_name instead of io.function_name. The following example of the file version of the same implicit file descriptors example is shown below.
-- Opens a file in read mode
file = io.open("test.lua", "r")

-- prints the first line of the file
print(file:read())

-- closes the opened file
file:close()

-- Opens a file in append mode
file = io.open("test.lua", "a")

-- appends a word test to the last line of the file
file:write("--test")

-- closes the open file
file:close()
When you run the program, you will get a similar output as the implicit descriptors example.
-- Sample test.lua
All the modes of file open and params for read for external descriptors is same as implicit file descriptors.
Other common file methods includes,
-
file:seek(optional whence, optional offset) − Whence parameter is «set», «cur» or «end». Sets the new file pointer with the updated file position from the beginning of the file. The offsets are zero-based in this function. The offset is measured from the beginning of the file if the first argument is «set»; from the current position in the file if it’s «cur»; or from the end of the file if it’s «end». The default argument values are «cur» and 0, so the current file position can be obtained by calling this function without arguments.
-
file:flush() − Clears the default output buffer.
-
io.lines(optional file name) − Provides a generic for loop iterator that loops through the file and closes the file in the end, in case the file name is provided or the default file is used and not closed in the end of the loop.
An example to use the seek method is shown below. It offsets the cursor from the 25 positions prior to the end of file. The read function prints remainder of the file from seek position.
-- Opens a file in read
file = io.open("test.lua", "r")

file:seek("end",-25)
print(file:read("*a"))

-- closes the opened file
file:close()
You will get some output similar to the following.
sample2 test.lua
--test
You can play around all the different modes and parameters to know the full ability of the Lua file operations.
Lua — Error Handling
Need for Error Handling
Error handling is quite critical since real-world operations often require the use of complex operations, which includes file operations, database transactions and web service calls.
In any programming, there is always a requirement for error handling. Errors can be of two types which includes,
- Syntax errors
- Run time errors
Syntax Errors
Syntax errors occur due to improper use of various program components like operators and expressions. A simple example for syntax error is shown below.
a == 2
As you know, there is a difference between the use of a single «equal to» and double «equal to». Using one instead of the other can lead to an error. One «equal to» refers to assignment while a double «equal to» refers to comparison. Similarly, we have expressions and functions having their predefined ways of implementation.
Another example for syntax error is shown below −
for a= 1,10
   print(a)
end
When we run the above program, we will get the following output −
lua: test2.lua:2: 'do' expected near 'print'
Syntax errors are much easier to handle than run time errors since, the Lua interpreter locates the error more clearly than in case of runtime error. From the above error, we can know easily that adding a do statement before print statement is required as per the Lua structure.
Run Time Errors
In case of runtime errors, the program executes successfully, but it can result in runtime errors due to mistakes in input or mishandled functions. A simple example to show run time error is shown below.
function add(a,b)
   return a+b
end

add(10)
When we build the program, it will build successfully and run. Once it runs, shows a run time error.
lua: test2.lua:2: attempt to perform arithmetic on local 'b' (a nil value)
stack traceback:
	test2.lua:2: in function 'add'
	test2.lua:5: in main chunk
	[C]: ?
This is a runtime error, which had occurred due to not passing two variables. The b parameter is expected and here it is nil and produces an error.
Assert and Error Functions
In order to handle errors, we often use two functions − assert and error. A simple example is shown below.
local function add(a,b)
   assert(type(a) == "number", "a is not a number")
   assert(type(b) == "number", "b is not a number")
   return a+b
end

add(10)
When we run the above program, we will get the following error output.
lua: test2.lua:3: b is not a number
stack traceback:
	[C]: in function 'assert'
	test2.lua:3: in function 'add'
	test2.lua:6: in main chunk
	[C]: ?
The error (message [, level]) terminates the last protected function called and returns message as the error message. This function error never returns. Usually, error adds some information about the error position at the beginning of the message. The level argument specifies how to get the error position. With level 1 (the default), the error position is where the error function was called. Level 2 points the error to where the function that called error was called; and so on. Passing a level 0 avoids the addition of error position information to the message.
pcall and xpcall
In Lua programming, in order to avoid throwing these errors and handling errors, we need to use the functions pcall or xpcall.
The pcall (f, arg1, …) function calls the requested function in protected mode. If some error occurs in function f, it does not throw an error. It just returns the status of error. A simple example using pcall is shown below.
function myfunction ()
   n = n/nil
end

if pcall(myfunction) then
   print("Success")
else
	print("Failure")
end
When we run the above program, we will get the following output.
Failure
The xpcall (f, err) function calls the requested function and also sets the error handler. Any error inside f is not propagated; instead, xpcall catches the error, calls the err function with the original error object, and returns a status code.
A simple example for xpcall is shown below.
function myfunction ()
   n = n/nil
end

function myerrorhandler( err )
   print( "ERROR:", err )
end

status = xpcall( myfunction, myerrorhandler )
print( status)
When we run the above program, we will get the following output.
ERROR:	test2.lua:2: attempt to perform arithmetic on global 'n' (a nil value)
false
As a programmer, it is most important to ensure that you take care of proper error handling in the programs you write. Using error handling can ensure that unexpected conditions beyond the boundary conditions are handled without disturbing the user of the program.
Lua — Debugging
Lua provides a debug library, which provides all the primitive functions for us to create our own debugger. Even though, there is no in-built Lua debugger, we have many debuggers for Lua, created by various developers with many being open source.
The functions available in the Lua debug library are listed in the following table along with its uses.
| Sr.No. | Method & Purpose |
|---|---|
| 1 |
debug() Enters interactive mode for debugging, which remains active till we type in only cont in a line and press enter. User can inspect variables during this mode using other functions. |
| 2 |
getfenv(object) Returns the environment of object. |
| 3 |
gethook(optional thread) Returns the current hook settings of the thread, as three values − the current hook function, the current hook mask, and the current hook count. |
| 4 |
getinfo(optional thread, function or stack level, optional flag) Returns a table with info about a function. You can give the function directly, or you can give a number as the value of function, which means the function running at level function of the call stack of the given thread − level 0 is the current function (getinfo itself); level 1 is the function that called getinfo; and so on. If function is a number larger than the number of active functions, then getinfo returns nil. |
| 5 |
getlocal(optional thread, stack level, local index) Returns the name and the value of the local variable with index local of the function at level of the stack.Returns nil if there is no local variable with the given index, and raises an error when called with a level out of range. |
| 6 |
getmetatable(value) Returns the metatable of the given object or nil if it does not have a metatable. |
| 7 |
getregistry() Returns the registry table,a pre-defined table that can be used by any C code to store whatever Lua value it needs to store. |
| 8 |
getupvalue(function, upvalue index) This function returns the name and the value of the upvalue with index up of the function func. The function returns nil if there is no upvalue with the given index. |
| 9 |
setfenv(function or thread or userdata, environment table) Sets the environment of the given object to the given table. Returns object. |
| 10 |
sethook(optional thread, hook function, hook mask string with «c» and/or «r» and/or «l», optional instruction count) Sets the given function as a hook. The string mask and the number count describes when the hook will be called. Here, c, r and l are called every time Lua calls, returns, and enters every line of code in a function respectively. |
| 11 |
setlocal(optional thread, stack level, local index, value) Assigns the value to the local variable with index local of the function at level of the stack. The function returns nil if there is no local variable with the given index, and raises an error when called with a level out of range. Otherwise, it returns the name of the local variable. |
| 12 |
setmetatable(value, metatable) Sets the metatable for the given object to the given table (which can be nil). |
| 13 |
setupvalue(function, upvalue index, value) This function assigns the value to the upvalue with index up of the function func. The function returns nil if there is no upvalue with the given index. Otherwise, it returns the name of the upvalue. |
| 14 |
traceback(optional thread, optional message string, optional level argument) Builds an extended error message with a traceback. |
The above list is the complete list of debug functions in Lua and we often use a library that uses the above functions and provides easier debugging. Using these functions and creating our own debugger is quite complicated and is not preferable. Anyway, we will see an example of simple use of debugging functions.
function myfunction ()
   print(debug.traceback("Stack trace"))
   print(debug.getinfo(1))
   print("Stack trace end")

   return 10
end

myfunction ()
print(debug.getinfo(1))
When we run the above program, we will get the stack trace as shown below.
Stack trace
stack traceback:
	test2.lua:2: in function 'myfunction'
	test2.lua:8: in main chunk
	[C]: ?
table: 0054C6C8
Stack trace end
In the above sample program, the stack trace is printed by using the debug.trace function available in the debug library. The debug.getinfo gets the current table of the function.
Debugging — Example
We often need to know the local variables of a function for debugging. For that purpose, we can use getupvalue and to set these local variables, we use setupvalue. A simple example for this is shown below.
function newCounter ()
   local n = 0
   local k = 0

   return function ()
      k = n
      n = n + 1
      return n
   end

end

counter = newCounter ()

print(counter())
print(counter())

local i = 1

repeat
   name, val = debug.getupvalue(counter, i)

   if name then
      print ("index", i, name, "=", val)

      if(name == "n") then
         debug.setupvalue (counter,2,10)
      end

      i = i + 1
   end -- if

until not name

print(counter())
When we run the above program, we will get the following output.
1
2
index	1	k	=	1
index	2	n	=	2
11
In this example, the counter updates by one each time it is called. We can see the current state of the local variable using the getupvalue function. We then set the local variable to a new value. Here, n is 2 before the set operation is called. Using setupvalue function, it is updated to 10. Now when we call the counter function, it will return 11 instead of 3.
Debugging Types
- Command line debugging
- Graphical debugging
Command Line Debugging
Command line debugging is the type of debugging that uses command line to debug with the help of commands and print statements. There are many command line debuggers available for Lua of which a few are listed below.
-
RemDebug − RemDebug is a remote debugger for Lua 5.0 and 5.1. It lets you control the execution of another Lua program remotely, setting breakpoints and inspecting the current state of the program. RemDebug can also debug CGILua scripts.
-
clidebugger − A simple command line interface debugger for Lua 5.1 written in pure Lua. It’s not dependent on anything other than the standard Lua 5.1 libraries. It was inspired by RemDebug but does not have its remote facilities.
-
ctrace − A tool for tracing Lua API calls.
-
xdbLua − A simple Lua command line debugger for the Windows platform.
-
LuaInterface — Debugger − This project is a debugger extension for LuaInterface. It raises the built in Lua debug interface to a higher level. Interaction with the debugger is done by events and method calls.
-
Rldb − This is a remote Lua debugger via socket, available on both Windows and Linux. It can give you much more features than any existing one.
-
ModDebug − This allows in controlling the execution of another Lua program remotely, set breakpoints, and inspect the current state of the program.
Graphical Debugging
Graphical debugging is available with the help of IDE where you are provided with visual debugging of various states like variable values, stack trace and other related information. There is a visual representation and step by step control of execution with the help of breakpoints, step into, step over and other buttons in the IDE.
There are number of graphical debuggers for Lua and it includes the following.
-
SciTE − The default windows IDE for Lua provides multiple debugging facilities like breakpoints, step, step into, step over, watch variables and so on.
-
Decoda − This is a graphical debugger with remote debugging support.
-
ZeroBrane Studio − Lua IDE with integrated remote debugger, stack view, watch view, remote console, static analyzer, and more. Works with LuaJIT, Love2d, Moai, and other Lua engines; Windows, OSX, and Linux. Open source.
-
akdebugger − Debugger and editor Lua plugin for Eclipse.
-
luaedit − This features remote debugging, local debugging, syntax highlighting, completion proposal list, parameter proposition engine, advance breakpoint management (including condition system on breakpoints and hit count), function listing, global and local variables listing, watches, solution oriented management.
Lua — Garbage Collection
Lua uses automatic memory management that uses garbage collection based on certain algorithms that is in-built in Lua. As a result of automatic memory management, as a developer −
- No need to worry about allocating memory for objects.
- No need to free them when no longer needed except for setting it to nil.
Lua uses a garbage collector that runs from time to time to collect dead objects when they are no longer accessible from the Lua program.
All objects including tables, userdata, functions, thread, string and so on are subject to automatic memory management. Lua uses incremental mark and sweep collector that uses two numbers to control its garbage collection cycles namely garbage collector pause and garbage collector step multiplier. These values are in percentage and value of 100 is often equal to 1 internally.
Garbage Collector Pause
Garbage collector pause is used for controlling how long the garbage collector needs to wait, before; it is called again by the Lua’s automatic memory management. Values less than 100 would mean that Lua will not wait for the next cycle. Similarly, higher values of this value would result in the garbage collector being slow and less aggressive in nature. A value of 200, means that the collector waits for the total memory in use to double before starting a new cycle. Hence, depending on the nature and speed of application, there may be a requirement to alter this value to get best performance in Lua applications.
Garbage Collector Step Multiplier
This step multiplier controls the relative speed of garbage collector to that of memory allocation in Lua program. Larger step values will lead to garbage collector to be more aggressive and it also increases the step size of each incremental step of garbage collection. Values less than 100 could often lead to avoid the garbage collector not to complete its cycle and its not generally preferred. The default value is 200, which means the garbage collector runs twice as the speed of memory allocation.
Garbage Collector Functions
As developers, we do have some control over the automatic memory management in Lua. For this, we have the following methods.
-
collectgarbage(«collect») − Runs one complete cycle of garbage collection.
-
collectgarbage(«count») − Returns the amount of memory currently used by the program in Kilobytes.
-
collectgarbage(«restart») − If the garbage collector has been stopped, it restarts it.
-
collectgarbage(«setpause») − Sets the value given as second parameter divided by 100 to the garbage collector pause variable. Its uses are as discussed a little above.
-
collectgarbage(«setstepmul») − Sets the value given as second parameter divided by 100 to the garbage step multiplier variable. Its uses are as discussed a little above.
-
collectgarbage(«step») − Runs one step of garbage collection. The larger the second argument is, the larger this step will be. The collectgarbage will return true if the triggered step was the last step of a garbage-collection cycle.
-
collectgarbage(«stop») − Stops the garbage collector if its running.
A simple example using the garbage collector example is shown below.
mytable = {"apple", "orange", "banana"}

print(collectgarbage("count"))

mytable = nil

print(collectgarbage("count"))

print(collectgarbage("collect"))

print(collectgarbage("count"))
When we run the above program, we will get the following output. Please note that this result will vary due to the difference in type of operating system and also the automatic memory management feature of Lua.
23.1455078125   149
23.2880859375   295
0
22.37109375     380
You can see in the above program, once garbage collection is done, it reduced the memory used. But, it’s not mandatory to call this. Even if we don’t call them, it will be executed automatically at a later stage by Lua interpreter after the predefined period.
Obviously, we can change the behavior of the garbage collector using these functions if required. These functions provide a bit of additional capability for the developer to handle complex situations. Depending on the type of memory need for the program, you may or may not use this feature. But it is very useful to know the memory usage in the applications and check it during the programming itself to avoid undesired results after deployment.
Lua — Object Oriented
Introduction to OOP
Object Oriented Programming (OOP), is one the most used programming technique that is used in the modern era of programming. There are a number of programming languages that support OOP which include,
- C++
- Java
- Objective-C
- Smalltalk
- C#
- Ruby
Features of OOP
-
Class − A class is an extensible template for creating objects, providing initial values for state (member variables) and implementations of behavior.
-
Objects − It is an instance of class and has separate memory allocated for itself.
-
Inheritance − It is a concept by which variables and functions of one class is inherited by another class.
-
Encapsulation − It is the process of combining the data and functions inside a class. Data can be accessed outside the class with the help of functions. It is also known as data abstraction.
OOP in Lua
You can implement object orientation in Lua with the help of tables and first class functions of Lua. By placing functions and related data into a table, an object is formed. Inheritance can be implemented with the help of metatables, providing a look up mechanism for nonexistent functions(methods) and fields in parent object(s).
Tables in Lua have the features of object like state and identity that is independent of its values. Two objects (tables) with the same value are different objects, whereas an object can have different values at different times, but it is always the same object. Like objects, tables have a life cycle that is independent of who created them or where they were created.
A Real World Example
The concept of object orientation is widely used but you need to understand it clearly for proper and maximum benefit.
Let us consider a simple math example. We often encounter situations where we work on different shapes like circle, rectangle and square.
The shapes can have a common property Area. So, we can extend other shapes from the base object shape with the common property area. Each of the shapes can have its own properties and functions like a rectangle can have properties length, breadth, area as its properties and printArea and calculateArea as its functions.
Creating a Simple Class
A simple class implementation for a rectangle with three properties area, length, and breadth is shown below. It also has a printArea function to print the area calculated.
-- Meta class
Rectangle = {area = 0, length = 0, breadth = 0}

-- Derived class method new

function Rectangle:new (o,length,breadth)
   o = o or {}
   setmetatable(o, self)
   self.__index = self
   self.length = length or 0
   self.breadth = breadth or 0
   self.area = length*breadth;
   return o
end

-- Derived class method printArea

function Rectangle:printArea ()
   print("The area of Rectangle is ",self.area)
end
Creating an Object
Creating an object is the process of allocating memory for the class instance. Each of the objects has its own memory and share the common class data.
r = Rectangle:new(nil,10,20)
Accessing Properties
We can access the properties in the class using the dot operator as shown below −
print(r.length)
Accessing Member Function
You can access a member function using the colon operator with the object as shown below −
r:printArea()
The memory gets allocated and the initial values are set. The initialization process can be compared to constructors in other object oriented languages. It is nothing but a function that enables setting values as shown above.
Complete Example
Lets look at a complete example using object orientation in Lua.
-- Meta class
Shape = {area = 0}

-- Base class method new

function Shape:new (o,side)
   o = o or {}
   setmetatable(o, self)
   self.__index = self
   side = side or 0
   self.area = side*side;
   return o
end

-- Base class method printArea

function Shape:printArea ()
   print("The area is ",self.area)
end

-- Creating an object
myshape = Shape:new(nil,10)

myshape:printArea()
When you run the above program, you will get the following output.
The area is 100
Inheritance in Lua
Inheritance is the process of extending simple base objects like shape to rectangles, squares and so on. It is often used in the real world to share and extend the basic properties and functions.
Let us see a simple class extension. We have a class as shown below.
-- Meta class
Shape = {area = 0}

-- Base class method new

function Shape:new (o,side)
   o = o or {}
   setmetatable(o, self)
   self.__index = self
   side = side or 0
   self.area = side*side;
   return o
end

-- Base class method printArea

function Shape:printArea ()
   print("The area is ",self.area)
end
We can extend the shape to a square class as shown below.
Square = Shape:new()

-- Derived class method new

function Square:new (o,side)
   o = o or Shape:new(o,side)
   setmetatable(o, self)
   self.__index = self
   return o
end
Over-riding Base Functions
We can override the base class functions that is instead of using the function in the base class, derived class can have its own implementation as shown below −
-- Derived class method printArea

function Square:printArea ()
   print("The area of square is ",self.area)
end
Inheritance Complete Example
We can extend the simple class implementation in Lua as shown above with the help of another new method with the help of metatables. All the member variables and functions of base class are retained in the derived class.
-- Meta class
Shape = {area = 0}

-- Base class method new

function Shape:new (o,side)
   o = o or {}
   setmetatable(o, self)
   self.__index = self
   side = side or 0
   self.area = side*side;
   return o
end

-- Base class method printArea

function Shape:printArea ()
   print("The area is ",self.area)
end

-- Creating an object
myshape = Shape:new(nil,10)
myshape:printArea()

Square = Shape:new()

-- Derived class method new

function Square:new (o,side)
   o = o or Shape:new(o,side)
   setmetatable(o, self)
   self.__index = self
   return o
end

-- Derived class method printArea

function Square:printArea ()
   print("The area of square is ",self.area)
end

-- Creating an object
mysquare = Square:new(nil,10)
mysquare:printArea()

Rectangle = Shape:new()

-- Derived class method new

function Rectangle:new (o,length,breadth)
   o = o or Shape:new(o)
   setmetatable(o, self)
   self.__index = self
   self.area = length * breadth
   return o
end

-- Derived class method printArea

function Rectangle:printArea ()
    print("The area of Rectangle is ",self.area)
end

-- Creating an object

myrectangle = Rectangle:new(nil,10,20)
myrectangle:printArea()
When we run the above program, we will get the following output −
The area is 	100
The area of square is 	100
The area of Rectangle is 	200
In the above example, we have created two derived classes − Rectangle and Square from the base class Square. It is possible to override the functions of the base class in derived class. In this example, the derived class overrides the function printArea.
Lua — Web Programming
Lua is a highly flexible language and it is often used in multiple platforms including web applications. The Kepler community that was formed in 2004 to provide open source web components in Lua.
Even though, there are other web frameworks using Lua that have been developed, we will be primarily focusing on the components provided by Kepler community.
Applications and Frameworks
-
Orbit is an MVC web framework for Lua, based on WSAPI.
-
WSAPI is the API that abstracts the web host server from Lua web applications and is the base for many projects.
-
Xavante is a Lua Web server that offers a WSAPI interface.
-
Sputnik is a wiki/CMS developed over WSAPI on Kepler Project used for humor and entertainment.
-
CGILua offers LuaPages and LuaScripts web page creation, based on WSAPI but no longer supported. Use Orbit, Sputnik or WSAPI instead.
In this tutorial, we will try to make you understand what Lua can do and to know more about its installation and usage, refer kepler the website
Orbit
Orbit is an MVC web framework for Lua. It completely abandons the CGILua model of «scripts» in favor of applications, where each Orbit application can fit in a single file, but you can split it into multiple files if you want.
All Orbit applications follow the WSAPI protocol, so they currently work with Xavante, CGI and Fastcgi. It includes a launcher that makes it easy to launch a Xavante instance for development.
The easiest way to install Orbit is using LuaRocks. Luarocks install orbit is the command for installing. For this, you need to install LuaRocks first.
If you haven’t installed all the dependencies, here are the steps to be followed to setup Orbit in Unix/Linux environment.
Installing Apache
Connect to your server. Install Apache2, its support modules and enable required Apache2 modules using −
$ sudo apt-get install apache2 libapache2-mod-fcgid libfcgi-dev build-essential
$ sudo a2enmod rewrite
$ sudo a2enmod fcgid
$ sudo /etc/init.d/apache2 force-reload
Install LuaRocks
$ sudo apt-get install luarocks
Install WSAPI, FCGI, Orbit, and Xavante
$ sudo luarocks install orbit
$ sudo luarocks install wsapi-xavante
$ sudo luarocks install wsapi-fcgi
Setting up Apache2
$ sudo raj /etc/apache2/sites-available/default
Add this following section below the <Directory /var/www/> section of the config file. If this section has an ‘AllowOverride None’ then you need to change the ‘None’ to ‘All’ so that the .htaccess file can override the configuration locally.
<IfModule mod_fcgid.c>

   AddHandler fcgid-script .lua
   AddHandler fcgid-script .ws
   AddHandler fcgid-script .op

   FCGIWrapper "/usr/local/bin/wsapi.fcgi" .ws
   FCGIWrapper "/usr/local/bin/wsapi.fcgi" .lua
   FCGIWrapper "/usr/local/bin/op.fcgi" .op

   #FCGIServer "/usr/local/bin/wsapi.fcgi" -idle-timeout 60 -processes 1
   #IdleTimeout 60
   #ProcessLifeTime 60

</IfModule>
Restart the server to ensure the changes made comes into effect.
To enable your application, you need to add +ExecCGI to an .htaccess file in the root of your Orbit application − in this case, /var/www.
Options +ExecCGI
DirectoryIndex index.ws
Simple Example − Orbit
#!/usr/bin/env index.lua

-- index.lua
require"orbit"

-- declaration
module("myorbit", package.seeall, orbit.new)

-- handler

function index(web)
   return my_home_page()
end

-- dispatch
myorbit:dispatch_get(index, "/", "/index")

-- Sample page

function my_home_page()

   return [[
      <head></head>
      <html>
         <h2>First Page</h2>
      </html>
   ]]

end
Now, you should be able to launch your web browser. Go to http://localhost:8080/ and you should see the following output −
First Page
Orbit provides another option, i.e., Lua code can generate html.
#!/usr/bin/env index.lua

-- index.lua
require"orbit"

function generate()
   return html {
      head{title "HTML Example"},

      body{
         h2{"Here we go again!"}
      }
   }
end

orbit.htmlify(generate)

print(generate())
Creating Forms
A simple form example is shown below −
#!/usr/bin/env index.lua
require"orbit"

function wrap (inner)
   return html{ head(), body(inner) }
end

function test ()
   return wrap(form (H'table' {
      tr{td"First name",td( input{type = 'text', name='first'})},
      tr{td"Second name",td(input{type = 'text', name='second'})},
      tr{ td(input{type = 'submit', value = 'Submit!'}),
         td(input{type = 'submit',value = 'Cancel'})
      },
   }))
end

orbit.htmlify(wrap,test)

print(test())
WSAPI
As mentioned earlier, WSAPI acts as the base for many projects and have multiple features embedded in it. You can use WSAPI and support the following platforms,
- Windows
- UNIX-based systems
The supported servers and interfaces by WSAPI includes,
- CGI
- FastCGI
- Xavante
WSAPI provides a number of libraries, which makes it easier for us in web programming using Lua. Some of the supported features in Lua includes,
- Request processing
- Output buffering
- Authentication
- File uploads
- Request isolation
- Multiplexing
A simple example of WSAPI is shown below −
#!/usr/bin/env wsapi.cgi

module(..., package.seeall)
function run(wsapi_env)
   local headers = { ["Content-type"] = "text/html" }

   local function hello_text()
      coroutine.yield("<html><body>")
      coroutine.yield("<p>Hello Wsapi!</p>")
      coroutine.yield("<p>PATH_INFO: " .. wsapi_env.PATH_INFO .. "</p>")
      coroutine.yield("<p>SCRIPT_NAME: " .. wsapi_env.SCRIPT_NAME .. "</p>")
      coroutine.yield("</body></html>")
   end

   return 200, headers, coroutine.wrap(hello_text)
end
You can see in the above code a simple html page is formed and returned. You can see the usage of coroutines that makes it possible to return statement by statement to calling function. Finally, html status code(200), headers and html page is returned.
Xavante
Xavante is a Lua HTTP 1.1 Web server that uses a modular architecture based on URI mapped handlers. Xavante currently offers,
- File handler
- Redirect handler
- WSAPI handler
File handler is used for general files. Redirect handler enables URI remapping and WSAPI handler for handing with WSAPI applications.
A simple example is shown below.
require "xavante.filehandler"
require "xavante.cgiluahandler"
require "xavante.redirecthandler"

-- Define here where Xavante HTTP documents scripts are located
local webDir = XAVANTE_WEB

local simplerules = {

   { -- URI remapping example
      match = "^[^%./]*/$",
      with = xavante.redirecthandler,
      params = {"index.lp"}
   },

   { -- cgiluahandler example
      match = {"%.lp$", "%.lp/.*$", "%.lua$", "%.lua/.*$" },
      with = xavante.cgiluahandler.makeHandler (webDir)
   },

   { -- filehandler example
      match = ".",
      with = xavante.filehandler,
      params = {baseDir = webDir}
   },
}

xavante.HTTP{
   server = {host = "*", port = 8080},

   defaultHost = {
      rules = simplerules
   },
}
To use virtual hosts with Xavante, the call to xavante.HTTP would be changed to something like as follows −
xavante.HTTP{
   server = {host = "*", port = 8080},

   defaultHost = {},

   virtualhosts = {
      ["www.sitename.com"] = simplerules
   }
}
Lua Web Components
-
Copas, a dispatcher based on coroutines that can be used by TCP/IP servers.
-
Cosmo, a «safe templates» engine that protects your application from arbitrary code in the templates.
-
Coxpcall encapsulates Lua native pcall and xpcall with coroutine compatible ones.
-
LuaFileSystem, a portable way to access the underlying directory structure and file attributes.
-
Rings, a library which provides a way to create new Lua states from within Lua.
Ending Note
There are so many Lua based web frameworks and components available for us and based on the need, it can be chosen. There are other web frameworks available which include the following −
-
Moonstalk enables efficient development and hosting of dynamically generated web-based projects built with the Lua language; from basic pages to complex applications.
-
Lapis, a framework for building web applications using MoonScript (or Lua) that runs inside of a customized version of Nginx called OpenResty.
-
Lua Server Pages, a Lua scripting engine plug-in that blows away any other approach to embedded web development, offers a dramatic short cut to traditional C server pages.
These web frameworks can leverage your web applications and help you in doing powerful operations.
Lua — Database Access
For simple data operations, we may use files, but, sometimes, these file operations may not be efficient, scalable, and powerful. For this purpose, we may often switch to using databases. LuaSQL is a simple interface from Lua to a number of database management systems. LuaSQL is the library, which provides support for different types of SQL. This include,
- SQLite
- Mysql
- ODBC
In this tutorial, we will be covering database handling of MySQL an SQLite in Lua. This uses a generic interface for both and should be possible to port this implementation to other types of databases as well. First let see how you can do the operations in MySQL.
MySQL db Setup
In order to use the following examples to work as expected, we need the initial db setup. The assumptions are listed below.
-
You have installed and setup MySQL with default user as root and password as ‘123456’.
-
You have created a database test.
-
You have gone through MySQL tutorial to understand MySQL Basics.
Importing MySQL
We can use a simple require statement to import the sqlite library assuming that your Lua implementation was done correctly.
mysql = require "luasql.mysql"
The variable mysql will provide access to the functions by referring to the main mysql table.
Setting up Connection
We can set up the connection by initiating a MySQL environment and then creating a connection for the environment. It is shown below.
local env  = mysql.mysql()
local conn = env:connect('test','root','123456')
The above connection will connect to an existing MySQL file and establishes the connection with the newly created file.
Execute Function
There is a simple execute function available with the connection that will help us to do all the db operations from create, insert, delete, update and so on. The syntax is shown below −
conn:execute([[ 'MySQLSTATEMENT' ]])
In the above syntax, we need to ensure that conn is open and existing MySQL connection and replace the ‘MySQLSTATEMENT’ with the correct statement.
Create Table Example
A simple create table example is shown below. It creates a table with two parameters id of type integer and name of type varchar.
mysql = require "luasql.mysql"

local env  = mysql.mysql()
local conn = env:connect('test','root','123456')

print(env,conn)

status,errorString = conn:execute([[CREATE TABLE sample2 (id INTEGER, name TEXT);]])
print(status,errorString )
When you run the above program, a table named sample will be created with two columns namely, id and name.
MySQL environment (004BB178)	MySQL connection (004BE3C8)
0	nil
In case there is any error, you would be returned an error statement instead of nil. A simple error statement is shown below.
LuaSQL: Error executing query. MySQL: You have an error in your SQL syntax; check the manual that corresponds to your MySQL server version for the right syntax to use near '"id INTEGER, name TEXT)' at line 1
Insert Statement Example
An insert statement for MySQL is shown below.
conn:execute([[INSERT INTO sample values('11','Raj')]])
Update Statement Example
An update statement for MySQL is shown below.
conn:execute([[UPDATE sample3 SET name='John' where id ='12']])
Delete Statement Example
A delete statement for MySQL is shown below.
conn:execute([[DELETE from sample3 where id ='12']])
Select Statement Example
As far as select statement is concerned, we need to loop through each of the rows and extract the required data. A simple select statement is shown below.
cursor,errorString = conn:execute([[select * from sample]])
row = cursor:fetch ({}, "a")

while row do
   print(string.format("Id: %s, Name: %s", row.id, row.name))
   -- reusing the table of results
   row = cursor:fetch (row, "a")
end
In the above code, conn is an open MySQL connection. With the help of the cursor returned by the execute statement, you can loop through the table response and fetch the required select data.
A Complete Example
A complete example including all the above statements is given below.
mysql = require "luasql.mysql"

local env  = mysql.mysql()
local conn = env:connect('test','root','123456')
print(env,conn)

status,errorString = conn:execute([[CREATE TABLE sample3 (id INTEGER, name TEXT)]])
print(status,errorString )

status,errorString = conn:execute([[INSERT INTO sample3 values('12','Raj')]])
print(status,errorString )

cursor,errorString = conn:execute([[select * from sample3]])
print(cursor,errorString)

row = cursor:fetch ({}, "a")

while row do
   print(string.format("Id: %s, Name: %s", row.id, row.name))
   row = cursor:fetch (row, "a")
end

-- close everything
cursor:close()
conn:close()
env:close()
When you run the above program, you will get the following output.
MySQL environment (0037B178)	MySQL connection (0037EBA8)
0	nil
1	nil
MySQL cursor (003778A8)	nil
Id: 12, Name: Raj
Performing Transactions
Transactions are a mechanism that ensures data consistency. Transactions should have the following four properties −
-
Atomicity − Either a transaction completes or nothing happens at all.
-
Consistency − A transaction must start in a consistent state and leave the system in a consistent state.
-
Isolation − Intermediate results of a transaction are not visible outside the current transaction.
-
Durability − Once a transaction was committed, the effects are persistent, even after a system failure.
Transaction starts with START TRANSACTION; and ends with commit or rollback statement.
Start Transaction
In order to initiate a transaction, we need to execute the following statement in Lua, assuming conn is an open MySQL connection.
conn:execute([[START TRANSACTION;]])
Rollback Transaction
We need to execute the following statement to rollback changes made after start transaction is executed.
conn:execute([[ROLLBACK;]])
Commit Transaction
We need to execute the following statement to commit changes made after start transaction is executed.
conn:execute([[COMMIT;]])
We have known about MySQL in the above and following section explains about basic SQL operations. Remember transactions, though not explained again for SQLite3 but the same statements should work for SQLite3 as well.
Importing SQLite
We can use a simple require statement to import the SQLite library assuming that your Lua implementation was done correctly. During installation, a folder libsql that contains the database related files.
sqlite3 = require "luasql.sqlite3"
The variable sqlite3 will provide access to the functions by referring to the main sqlite3 table.
Setting Up Connection
We can set up the connection by initiating an SQLite environment and then creating a connection for the environment. It is shown below.
local env  = sqlite3.sqlite3()
local conn = env:connect('mydb.sqlite')
The above connection will connect to an existing SQLite file or creates a new SQLite file and establishes the connection with the newly created file.
Execute Function
There is a simple execute function available with the connection that will help us to do all the db operations from create, insert, delete, update and so on. The syntax is shown below −
conn:execute([[ 'SQLite3STATEMENT' ]])
In the above syntax we need to ensure that conn is open and existing sqlite3 connection and replace the ‘SQLite3STATEMENT’ with the correct statement.
Create Table Example
A simple create table example is shown below. It creates a table with two parameters id of type integer and name of type varchar.
sqlite3 = require "luasql.sqlite3"

local env  = sqlite3.sqlite3()
local conn = env:connect('mydb.sqlite')
print(env,conn)

status,errorString = conn:execute([[CREATE TABLE sample ('id' INTEGER, 'name' TEXT)]])
print(status,errorString )
When you run the above program, a table named sample will be created with two columns namely, id and name.
SQLite3 environment (003EC918)	SQLite3 connection (00421F08)
0	nil
In case of an error, you would be returned a error statement instead of nil. A simple error statement is shown below.
LuaSQL: unrecognized token: ""'id' INTEGER, 'name' TEXT)"
Insert Statement Example
An insert statement for SQLite is shown below.
conn:execute([[INSERT INTO sample values('11','Raj')]])
Select Statement Example
As far as select statement is concerned, we need to loop through each of the rows and extract the required data. A simple select statement is shown below.
cursor,errorString = conn:execute([[select * from sample]])
row = cursor:fetch ({}, "a")

while row do
   print(string.format("Id: %s, Name: %s", row.id, row.name))
   -- reusing the table of results
   row = cursor:fetch (row, "a")
end
In the above code, conn is an open sqlite3 connection. With the help of the cursor returned by the execute statement, you can loop through the table response and fetch the required select data.
A Complete Example
A complete example including all the above statements is given below.
sqlite3 = require "luasql.sqlite3"

local env  = sqlite3.sqlite3()
local conn = env:connect('mydb.sqlite')
print(env,conn)

status,errorString = conn:execute([[CREATE TABLE sample ('id' INTEGER, 'name' TEXT)]])
print(status,errorString )

status,errorString = conn:execute([[INSERT INTO sample values('1','Raj')]])
print(status,errorString )

cursor,errorString = conn:execute([[select * from sample]])
print(cursor,errorString)

row = cursor:fetch ({}, "a")

while row do
   print(string.format("Id: %s, Name: %s", row.id, row.name))
   row = cursor:fetch (row, "a")
end

-- close everything
cursor:close()
conn:close()
env:close()
When you run the above program, you will get the following output.
SQLite3 environment (005EC918)	SQLite3 connection (005E77B0)
0	nil
1	nil
SQLite3 cursor (005E9200)	nil
Id: 1, Name: Raj
We can execute all the available queries with the help of this libsql library. So, please don’t stop with these examples. Experiment various query statement available in respective MySQL, SQLite3 and other supported db in Lua.
Lua — Game Programing
Lua is used in a lot of game engines due to its simple language structure and syntax. The garbage collection feature is often quite useful in games which consume a lot of memory due to rich graphics that is used. Some game engines that use Lua includes −
- Corona SDK
- Gideros Mobile
- ShiVa3D
- Moai SDK
- LOVE
- CryEngine
Each of these game engines are based on Lua and there is a rich set of API available in each of these engines. We will look at the capabilities of each in brief.
Corona SDK
Corona SDK is a cross platform mobile game engine that supports iPhone, iPad, and Android platforms. There is a free version of Corona SDK that can be used for small games with limited features. You can upgrade to other versions when needed.
Corona SDK provides a number of features which includes the following −
- Physics and Collision handling APIs
- Web and Network APIs
- Game Network API
- Ads API
- Analytics API
- Database and File System APIs
- Crypto and Math APIs
- Audio and Media APIs
It is easier and faster to develop an application using the above APIs rather than using the native APIs separately for iOS and Android.
Gideros Mobile
Gideros provides the cross-platform SDK to create games for iOS and Android. It is free to use with a made with Gideros splash. Some of the striking advantages in Gideoros includes, the following −
-
Development IDE − It provides its own IDE which makes it easier to develop Gideros apps.
-
Instant testing − While developing your game, it can be tested on a real device through Wifi in only 1 second. You don’t need to waste your time with an export or deploy process.
-
Plugins − You can easily extend the core with plugins. Import your existing (C, C++, Java or Obj-C) code, bind to Lua and interpret them directly. Dozens of open-source plugins are already developed and ready to use.
-
Clean OOP approach − Gideros provides its own class system with all the basic OOP standards, enabling you to write clean and reusable code for any of your future games.
-
Native speed − Developed on top of C/C++ and OpenGL, your game runs at native speed and fully utilizes the power of CPUs and GPUs underneath.
ShiVa3D
ShiVa3D is one of 3D game engines which provides a graphical editor designed to create applications and video games for the Web, Consoles and Mobile devices. It supports multiple platforms which includes, Windows, Mac, Linux, iOS, Android, BlackBerry, Palm OS, Wii and WebOS.
Some of the major features include
- Standard plugins
- Mesh modification API
- IDE
- Built-in Terrain, Ocean and animation editor
- ODE physics engine support
- Full lightmap control
- Live preview for materials, particles, trails and HUDs
- Collada exchange format support
The web edition of Shiva3d is completely free and other editions you have subscribe.
Moai SDK
Moai SDK is a cross platform mobile game engine that supports iPhone, iPad, and Android platforms. Moai platform initially consisted of Moai SDK, an open source game engine, and Moai Cloud, a cloud platform as a service for the hosting and deployment of game services. Now the Moai Cloud is shutdown and only the game engine is available.
Moai SDK runs on multiple platforms including iOS, Android, Chrome, Windows, Mac and Linux.
LOVE
LOVE is a framework that you can use to make 2D games. It is free and open-source. It supports Windows, Mac OS X and Linux platforms.
It provides multiple features which include,
- Audio API
- File System API
- Keyboard and Joystick APIs
- Math API
- Window and Mouse APIs
- Physics API
- System and timer APIs
CryEngine
CryEngine is a game engine developed by the German game developer Crytek. It has evolved from generation 1 to generation 4 and is an advanced development solution. It supports PC, Xbox 360, PlayStation3 and WiiU games.
It provides multiple features which include,
-
Visual effects like Natural Lighting & Dynamic Soft Shadows, Real-time Dynamic Global Illumination, Light Propagation Volume, Particle Shading, Tessellation and so on.
-
Character Animation System and Character Individualization System.
-
Parametric Skeletal Animation and Unique Dedicated Facial Animation Editor
-
AI Systems like Multi-Layer Navigation Mesh and Tactical Point System. Also provides Designer-Friendly AI Editing System.
-
In Game Mixing & Profiling, Data-driven Sound System Dynamic Sounds & Interactive Music and so on.
-
Physics features like Procedural Deformation and Advanced Rope Physics.
An Ending Note
Each of these Game SDKs/frameworks have their own advantages and disadvantages. A proper choice between them makes your task easier and you can have a better time with it. So, before using it, you need to know the requirements for your game and then analyze which satisfies all your needs and then should use them.
Lua — Standard Libraries
Lua standard libraries provide a rich set of functions that is implemented directly with the C API and is in-built with Lua programming language. These libraries provide services within the Lua programming language and also outside services like file and db operations.
These standard libraries built in official C API are provided as separate C modules. It includes the following −
- Basic library, which includes the coroutine sub-library
- Modules library
- String manipulation
- Table manipulation
- Math library
- File Input and output
- Operating system facilities
- Debug facilities
Basic Library
We have used the basic library throughout the tutorial under various topics. The following table provides links of related pages and lists the functions that are covered in various part of this Lua tutorial.
| Sr.No. | Library / Method & Purpose |
|---|---|
| 1 |
Error Handling Includes error handling functions like assert, error as explained in Lua — Error Handling. |
| 2 |
Memory Management Includes the automatic memory management functions related to garbage collection as explained in Lua — Garbage Collection. |
| 3 |
dofile ([filename]) It opens the file and executes the contents of the file as a chunk. If no parameter is passed, then this function executes the contents of standard input. The errors will be propagated to the caller. |
| 4 |
_G Thus is the global variable that holds the global environment (that is, _G._G = _G). Lua itself does not use this variable. |
| 5 |
getfenv ([f]) Returns the current environment in use by the function. f can be a Lua function or a number that specifies the function at that stack level − Level 1 is the function calling getfenv. If the given function is not a Lua function, or if f is 0, getfenv returns the global environment. The default for f is 1. |
| 6 |
getmetatable (object) If object does not have a metatable, returns nil. Otherwise, if the object’s metatable has a «__metatable» field, returns the associated value. Otherwise, returns the metatable of the given object. |
| 7 |
ipairs (t) This functions fetches the indices and values of tables. |
| 8 |
load (func [, chunkname]) Loads a chunk using function func to get its pieces. Each call to func must return a string that concatenates with previous results. |
| 9 |
loadfile ([filename])) Similar to load, but gets the chunk from file filename or from the standard input, if no file name is given. |
| 10 |
loadstring (string [, chunkname]) Similar to load, but gets the chunk from the given string. |
| 11 |
next (table [, index]) Allows a program to traverse all fields of a table. Its first argument is a table and its second argument is an index in this table. next returns the next index of the table and its associated value. |
| 12 |
pairs (t) Suspends the running coroutine. The parameter passed to this method acts as additional return values to the resume function. |
| 13 |
print (…) Suspends the running coroutine. The parameter passed to this method acts as additional return values to the resume function. |
| 14 |
rawequal (v1, v2) Checks whether v1 is equal to v2, without invoking any metamethod. Returns a boolean. |
| 15 |
rawget (table, index) Gets the real value of table[index], without invoking any metamethod. table must be a table; index may be any value. |
| 16 |
rawset (table, index, value) Sets the real value of table[index] to value, without invoking any metamethod. table must be a table, index any value different from nil, and value any Lua value. This function returns table. |
| 17 |
select (index, …) If index is a number, returns all arguments after argument number index. Otherwise, index must be the string «#», and select returns the total number of extra arguments it received. |
| 18 |
setfenv (f, table) Sets the environment to be used by the given function. f can be a Lua function or a number that specifies the function at that stack level − Level 1 is the function calling setfenv. setfenv returns the given function. As a special case, when f is 0 setfenv changes the environment of the running thread. In this case, setfenv returns no values. |
| 19 |
setmetatable (table, metatable) Sets the metatable for the given table. (You cannot change the metatable of other types from Lua, only from C.) If metatable is nil, removes the metatable of the given table. If the original metatable has a «__metatable» field, raises an error. This function returns table. |
| 20 |
tonumber (e [, base]) Tries to convert its argument to a number. If the argument is already a number or a string convertible to a number, then tonumber returns this number; otherwise, it returns nil. |
| 21 |
tostring (e) Receives an argument of any type and converts it to a string in a reasonable format. For complete control of how numbers are converted, use string.format. |
| 22 |
type (v) Returns the type of its only argument, coded as a string. The possible results of this function are «nil» (a string, not the value nil), «number», «string», «boolean», «table», «function», «thread», and «userdata». |
| 23 |
unpack (list [, i [, j]]) Returns the elements from the given table. |
| 24 |
_VERSION A global variable (not a function) that holds a string containing the current interpreter version. The current contents of this variable is «Lua 5.1». |
| 25 |
Coroutines Includes the coroutine manipulation functions as explained in Lua — Coroutines. |
Modules Library
The modules library provides the basic functions for loading modules in Lua. It exports one function directly in the global environment: require. Everything else is exported in a table package. The details about the modules library is explained in the earlier chapter Lua — Modules tutorial.
String manipulation
Lua provides a rich set of string manipulation functions. The earlier Lua — Strings tutorial covers this in detail.
Table manipulation
Lua depends on tables in almost every bit of its operations. The earlier Lua — Tables tutorial covers this in detail.
File Input and output
We often need data storage facility in programming and this is provided by standard library functions for file I/O in Lua. It is discussed in earlier Lua — File I/O tutorial.
Debug facilities
Lua provides a debug library which provides all the primitive functions for us to create our own debugger. It is discussed in earlier Lua — Debugging tutorial.
Lua — Math library
We often need math operations in scientific and engineering calculations and we can avail this using the standard Lua library math. The list of functions available in math library is shown in the following table.
| Sr.No. | Library / Method & Purpose |
|---|---|
| 1 |
math.abs (x) Returns the absolute value of x. |
| 2 |
math.acos (x) Returns the arc cosine of x (in radians). |
| 3 |
math.asin (x) Returns the arc sine of x (in radians). |
| 4 |
math.atan (x) Returns the arc tangent of x (in radians). |
| 5 |
math.atan2 (y, x) Returns the arc tangent of y/x (in radians), but uses the signs of both parameters to find the quadrant of the result. (It also handles correctly the case of x being zero.) |
| 6 |
math.ceil (x) Returns the smallest integer larger than or equal to x. |
| 7 |
math.cos (x) Returns the cosine of x (assumed to be in radians). |
| 8 |
math.cosh (x) Returns the hyperbolic cosine of x. |
| 9 |
math.deg (x) Returns the angle x (given in radians) in degrees. |
| 10 |
math.exp (x) Returns the value e power x. |
| 11 |
math.floor (x) Returns the largest integer smaller than or equal to x. |
| 12 |
math.fmod (x, y) Returns the remainder of the division of x by y that rounds the quotient towards zero. |
| 13 |
math.frexp (x) Returns m and e such that x = m2e, e is an integer and the absolute value of m is in the range [0.5, 1) (or zero when x is zero). |
| 14 |
math.huge The value HUGE_VAL, a value larger than or equal to any other numerical valu. |
| 15 |
math.ldexp (m, e) Returns m2e (e should be an integer). |
| 16 |
math.log (x) Returns the natural logarithm of x. |
| 17 |
math.log10 (x) Returns the base-10 logarithm of x. |
| 18 |
math.max (x, …) Returns the maximum value among its arguments. |
| 19 |
math.min (x, …) Returns the minimum value among its arguments. |
| 20 |
math.modf (x) Returns two numbers, the integral part of x and the fractional part of x. |
| 21 |
math.pi The value of pi. |
| 22 |
math.pow (x, y) Returns xy. (You can also use the expression x^y to compute this value.) |
| 23 |
math.rad (x) Returns the angle x (given in degrees) in radians. |
| 24 |
math.random ([m [, n]]) This function is an interface to the simple pseudo-random generator function rand provided by ANSI C.When called without arguments, returns a uniform pseudo-random real number in the range [0,1). When called with an integer number m, math.random returns a uniform pseudo-random integer in the range [1, m]. When called with two integer numbers m and n, math.random returns a uniform pseudo-random integer in the range [m, n]. |
| 25 |
math.randomseed (x) Sets x as the «seed» for the pseudo-random generator: equal seeds produce equal sequences of numbers. |
| 26 |
math.sin (x) Returns the sine of x (assumed to be in radians). |
| 27 |
math.sinh (x) Returns the hyperbolic sine of x. |
| 28 |
math.sqrt (x) Returns the square root of x. (You can also use the expression x^0.5 to compute this value.) |
| 29 |
math.tan (x) Returns the tangent of x (assumed to be in radians). |
| 30 |
math.tanh (x) Returns the hyperbolic tangent of x. |
Trigonometric functions
A simple example using trigonometric function is shown below.
radianVal = math.rad(math.pi / 2)

io.write(radianVal,"n")

-- Sin value of 90(math.pi / 2) degrees
io.write(string.format("%.1f ", math.sin(radianVal)),"n")

-- Cos value of 90(math.pi / 2) degrees
io.write(string.format("%.1f ", math.cos(radianVal)),"n")

-- Tan value of 90(math.pi / 2) degrees
io.write(string.format("%.1f ", math.tan(radianVal)),"n")

-- Cosh value of 90(math.pi / 2) degrees
io.write(string.format("%.1f ", math.cosh(radianVal)),"n")

-- Pi Value in degrees
io.write(math.deg(math.pi),"n")
When we run the above program, we will get the following output.
0.027415567780804
0.0
1.0
0.0
1.0
180
Other common math functions
A simple example using common math functions is shown below.
-- Floor
io.write("Floor of 10.5055 is ", math.floor(10.5055),"n")

-- Ceil
io.write("Ceil of 10.5055 is ", math.ceil(10.5055),"n")

-- Square root
io.write("Square root of 16 is ",math.sqrt(16),"n")

-- Power
io.write("10 power 2 is ",math.pow(10,2),"n")
io.write("100 power 0.5 is ",math.pow(100,0.5),"n")

-- Absolute
io.write("Absolute value of -10 is ",math.abs(-10),"n")

--Random
math.randomseed(os.time())
io.write("Random number between 1 and 100 is ",math.random(),"n")

--Random between 1 to 100
io.write("Random number between 1 and 100 is ",math.random(1,100),"n")

--Max
io.write("Maximum in the input array is ",math.max(1,100,101,99,999),"n")

--Min
io.write("Minimum in the input array is ",math.min(1,100,101,99,999),"n")
When we run the above program, we will get the following output.
Floor of 10.5055 is 10
Ceil of 10.5055 is 11
Square root of 16 is 4
10 power 2 is 100
100 power 0.5 is 10
Absolute value of -10 is 10
Random number between 1 and 100 is 0.22876674703207
Random number between 1 and 100 is 7
Maximum in the input array is 999
Minimum in the input array is 1
The above examples are just a few of the common examples, we can use math library based on our need, so try using all the functions to be more familiar.
Lua — Operating System Facilities
In any application, it is often required for to access Operating System level functions and it is made available with Operating System library. The list of functions available are listed in the following table.
| Sr.No. | Library / Method & Purpose |
|---|---|
| 1 |
os.clock () Returns an approximation of the amount in seconds of CPU time used by the program. |
| 2 |
os.date ([format [, time]]) Returns a string or a table containing date and time, formatted according to the given string format. |
| 3 |
os.difftime (t2, t1) Returns the number of seconds from time t1 to time t2. In POSIX, Windows, and some other systems, this value is exactly t2-t1. |
| 4 |
os.execute ([command]) This function is equivalent to the ANSI C function system. It passes command to be executed by an operating system shell. Its first result is true if the command terminated successfully, or nil otherwise. |
| 5 |
os.exit ([code [, close]) Calls the ANSI C function exit to terminate the host program. If code is true, the returned status is EXIT_SUCCESS; if code is false, the returned status is EXIT_FAILURE; if code is a number, the returned status is this number. |
| 6 |
os.getenv (varname) Returns the value of the process environment variable varname, or nil if the variable is not defined. |
| 7 |
os.remove (filename) Deletes the file (or empty directory, on POSIX systems) with the given name. If this function fails, it returns nil, plus a string describing the error and the error code. |
| 8 |
os.rename (oldname, newname) Renames file or directory named oldname to newname. If this function fails, it returns nil, plus a string describing the error and the error code. |
| 9 |
os.setlocale (locale [, category]) Sets the current locale of the program. locale is a system-dependent string specifying a locale; category is an optional string describing which category to change: «all», «collate», «ctype», «monetary», «numeric», or «time»; the default category is «all». The function returns the name of the new locale, or nil if the request cannot be honored. |
| 10 |
os.time ([table]) Returns the current time when called without arguments, or a time representing the date and time specified by the given table. This table must have fields year, month, and day, and may have fields hour (default is 12), min (default is 0), sec (default is 0), and isdst (default is nil). For a description of these fields, see the os.date function. |
| 11 |
os.tmpname () Returns a string with a file name that can be used for a temporary file. The file must be explicitly opened before its use and explicitly removed when no longer needed. |
Common OS functions
A simple example using common math functions is shown below.
-- Date with format
io.write("The date is ", os.date("%m/%d/%Y"),"n")

-- Date and time
io.write("The date and time is ", os.date(),"n")

-- Time
io.write("The OS time is ", os.time(),"n")

-- Wait for some time
for i=1,1000000 do
end

-- Time since Lua started
io.write("Lua started before ", os.clock(),"n")
When we run the above program, we will get similar output to the following.
The date is 01/25/2014
The date and time is 01/25/14 07:38:40
The OS time is 1390615720
Lua started before 0.013
The above examples are just a few of the common examples, we can use OS library based on our need, so try using all the functions to be more familiar. There are functions like remove which helps in removing file, execute that helps us executing OS commands as explained above.
замечания

Lua — минималистичный, легкий и встраиваемый язык сценариев. Он разрабатывается, внедряется и поддерживается командой в PUC-Rio , Папском католическом университете Рио-де-Жанейро в Бразилии. Список рассылки открыт для участия.
Обычные прецеденты для Lua включают в себя скриптовые видеоигры, расширение приложений с помощью плагинов и конфигов, перенос некоторых бизнес-логик высокого уровня или просто внедрение в такие устройства, как телевизоры, автомобили и т. Д.
Для высокопроизводительных задач существует независимая реализация с использованием доступного во времени компилятора LuaJIT .
Версии
| Версия | Заметки | Дата выхода |
|---|---|---|
| 1,0 | Первоначальный, непубличный выпуск. | 1993-07-28 |
| 1,1 | Первый публичный выпуск. В документе описывается это. | 1994-07-08 |
| 2,1 | Начиная с Lua 2.1, Lua стал свободно доступным для всех целей, включая коммерческое использование. Журнал, описывающий его. | 1995-02-07 |
| 2,2 | Длинные строки, интерфейс отладки, лучшие трассировки стека | 1995-11-28 |
| 2,4 | Внешний компилятор luac |
1996-05-14 |
| 2.5 | Совмещение шаблонов и функции vararg. | 1996-11-19 |
| 3.0 | Введена auxlib, библиотека для помощи в написании библиотек Lua | 1997-07-01 |
| 3,1 | Анонимные функции и закрытие функций с помощью «upvalues». | 1998-07-11 |
| 3,2 | Библиотека отладки и новые функции таблицы | 1999-07-08 |
| 3.2.2 | 2000-02-22 | |
| 4,0 | Несколько состояний, «для» операторов, API revamp. | 2000-11-06 |
| 4.0.1 | 2002-07-04 | |
| 5.0 | Coroutines, metatables, полный лексический охват, tail calls, booleans переходят на лицензию MIT. | 2003-04-11 |
| 5.0.3 | 2006-06-26 | |
| 5,1 | Обновление системы модулей, инкрементный сборщик мусора, метаданные для всех типов, luaconf.h revamp, полностью реентеративный парсер, вариативные аргументы. | 2006-02-21 |
| 5.1.5 | 2012-02-17 | |
| 5,2 | Экстренный сборщик мусора, goto, финализаторы для столов. | 2011-12-16 |
| 5.2.4 | 2015-03-07 | |
| 5,3 | Базовая поддержка UTF-8, побитовые операции, 32/64-битные целые числа. | 2015-01-12 |
| 5.3.4 | Последняя версия. | 2017-01-12 |
Монтаж
Бинарные
Бинарные файлы Lua предоставляются большинством дистрибутивов GNU / Linux в качестве пакета.
Например, на Debian, Ubuntu и их производных можно получить, выполнив следующее:
sudo apt-get install lua50
sudo apt-get install lua51
sudo apt-get install lua52
В SourceForge есть некоторые полуофициальные сборки для Windows, MacOS и некоторых других операционных систем.
Пользователи Apple также могут легко установить Lua с помощью Homebrew :
brew install lua
(В настоящее время Homebrew имеет 5.2.4, для 5.3 см. Homebrew / версии .)
Источник
Источник доступен на официальной странице . Приобретение источников и их создание должны быть тривиальными. В системах Linux должно быть достаточно:
$ wget http://lua.org/ftp/lua-5.3.3.tar.gz
$ echo "a0341bc3d1415b814cc738b2ec01ae56045d64ef ./lua-5.3.3.tar.gz" | sha1sum -c -
$ tar -xvf ./lua-5.3.3.tar.gz
$ make -C ./lua-5.3.3/ linux
В приведенном выше примере мы в основном загружаем исходный tarball с официального сайта, проверяем его контрольную сумму и извлекаем и выполняем make . (Дважды проверьте контрольную сумму на официальной странице .)
Примечание: вы должны указать, какую цель сборки вы хотите. В этом примере мы указали linux . Другие доступные цели сборки включают solaris , aix , bsd , freebsd , macosx , mingw и т. Д. Для получения более подробной информации macosx doc/readme.html , который включен в источник. (Вы также можете найти последнюю версию README в Интернете .)
Модули
Стандартные библиотеки ограничены примитивами:
- Функции управления сопрограммой
coroutine— coroutine -
debug— отладочные крючки и инструменты -
io— основные примитивы ввода-вывода - функциональность управления
packageмодулей -
string— строка и функциональная совместимость с Lua -
table— примитивы для обработки существенного, но сложного типа Lua — таблицы -
os— основные операции ОС -
utf8— базовые примитивы UTF-8 (начиная с Lua 5.3)
Все эти библиотеки могут быть отключены для конкретной сборки или загружены во время выполнения.
Сторонние библиотеки Lua и инфраструктура для распространения модулей редки, но улучшаются. Такие проекты, как LuaRocks , Lua Toolbox и LuaDist , улучшают ситуацию. Много информации и множество предложений можно найти на старшей Lua Wiki , но имейте в виду, что некоторые из этих данных довольно старые и устаревшие.
Комментарии
Однострочные комментарии в Lua начинаются с -- и продолжаются до конца строки:
-- this is single line comment
-- need another line
-- huh?
Заблокировать комментарии начинаются с --[[ и заканчиваются с ]] :
--[[
    This is block comment.
    So, it can go on...
    and on...
    and on....
]]
Блочные комментарии используют тот же стиль разделителей, что и длинные строки; любое количество знаков равенства может быть добавлено между скобками, чтобы разграничить комментарий:
--[=[
    This is also a block comment
    We can include "]]" inside this comment
--]=]

--[==[
    This is also a block comment
    We can include "]=]" inside this comment
--]==]
Чистый трюк, чтобы прокомментировать фрагменты кода, состоит в том, чтобы окружить его --[[ и --]] :
--[[
    print'Lua is lovely'
--]]
Чтобы повторно активировать кусок, просто добавьте a - в последовательность открытия комментария:
---[[
    print'Lua is lovely'
--]]
Таким образом, последовательность -- в первой строке запускает однострочный комментарий, как и предыдущая строка, и оператор print не закомментирован.
Сделав еще один шаг, два блока кода могут быть настроены таким образом, что если первый блок будет закомментирован, второй не будет, и наоборот:
---[[
  print 'Lua is love'
--[=[]]
  print 'Lua is life'
--]=]
Чтобы активировать второй фрагмент при отключении первого фрагмента, удалите ведущий - в первой строке:
--[[
  print 'Lua is love'
--[=[]]
  print 'Lua is life'
--]=]
Обычно Lua поставляется с двумя двоичными файлами:
-
lua— автономный интерпретатор и интерактивная оболочка - компилятор
luac— байт-код
Допустим, у нас есть пример программы ( bottles_of_mate.lua ) следующим образом:
local string = require "string"

function bottle_take(bottles_available)

    local count_str = "%d bottles of mate on the wall."
    local take_str = "Take one down, pass it around, " .. count_str
    local end_str = "Oh noes, " .. count_str
    local buy_str = "Get some from the store, " .. count_str
    local bottles_left = 0

    if bottles_available > 0 then
         print(string.format(count_str, bottles_available))
         bottles_left = bottles_available - 1
         print(string.format(take_str, bottles_left))
    else
        print(string.format(end_str, bottles_available))
        bottles_left = 99
        print(string.format(buy_str, bottles_left))
    end

    return bottles_left
end

local bottle_count = 99

while true do
    bottle_count = bottle_take(bottle_count)
end
Сама программа может быть запущена, выполнив следующую команду в своей оболочке:
$ lua bottles_of_mate.lua
Результат должен выглядеть следующим образом: бег в бесконечном цикле:
Get some from the store, 99 bottles of mate on the wall.
99 bottles of mate on the wall.
Take one down, pass it around, 98 bottles of mate on the wall.
98 bottles of mate on the wall.
Take one down, pass it around, 97 bottles of mate on the wall.
97 bottles of mate on the wall.
...
...
3 bottles of mate on the wall.
Take one down, pass it around, 2 bottles of mate on the wall.
2 bottles of mate on the wall.
Take one down, pass it around, 1 bottles of mate on the wall.
1 bottles of mate on the wall.
Take one down, pass it around, 0 bottles of mate on the wall.
Oh noes, 0 bottles of mate on the wall.
Get some from the store, 99 bottles of mate on the wall.
99 bottles of mate on the wall.
Take one down, pass it around, 98 bottles of mate on the wall.
...
Вы можете скомпилировать программу в байт-код Lua, выполнив следующую команду в своей оболочке:
$ luac bottles_of_mate.lua -o bottles_of_mate.luac
Также перечисление байт-кода доступно, выполнив следующие действия:
$ luac -l bottles_of_mate.lua


main <./bottles.lua:0,0> (13 instructions, 52 bytes at 0x101d530)
0+ params, 4 slots, 0 upvalues, 2 locals, 4 constants, 1 function
    1    [1]    GETGLOBAL    0 -1    ; require
    2    [1]    LOADK        1 -2    ; "string"
    3    [1]    CALL         0 2 2
    4    [22]    CLOSURE      1 0    ; 0x101d710
    5    [22]    MOVE         0 0
    6    [3]    SETGLOBAL    1 -3    ; bottle_take
    7    [24]    LOADK        1 -4    ; 99
    8    [27]    GETGLOBAL    2 -3    ; bottle_take
    9    [27]    MOVE         3 1
    10    [27]    CALL         2 2 2
    11    [27]    MOVE         1 2
    12    [27]    JMP          -5    ; to 8
    13    [28]    RETURN       0 1

function <./bottles.lua:3,22> (46 instructions, 184 bytes at 0x101d710)
1 param, 10 slots, 1 upvalue, 6 locals, 9 constants, 0 functions
    1    [5]    LOADK        1 -1    ; "%d bottles of mate on the wall."
    2    [6]    LOADK        2 -2    ; "Take one down, pass it around, "
    3    [6]    MOVE         3 1
    4    [6]    CONCAT       2 2 3
    5    [7]    LOADK        3 -3    ; "Oh noes, "
    6    [7]    MOVE         4 1
    7    [7]    CONCAT       3 3 4
    8    [8]    LOADK        4 -4    ; "Get some from the store, "
    9    [8]    MOVE         5 1
    10    [8]    CONCAT       4 4 5
    11    [9]    LOADK        5 -5    ; 0
    12    [11]    EQ           1 0 -5    ; - 0
    13    [11]    JMP          16    ; to 30
    14    [12]    GETGLOBAL    6 -6    ; print
    15    [12]    GETUPVAL     7 0    ; string
    16    [12]    GETTABLE     7 7 -7    ; "format"
    17    [12]    MOVE         8 1
    18    [12]    MOVE         9 0
    19    [12]    CALL         7 3 0
    20    [12]    CALL         6 0 1
    21    [13]    SUB          5 0 -8    ; - 1
    22    [14]    GETGLOBAL    6 -6    ; print
    23    [14]    GETUPVAL     7 0    ; string
    24    [14]    GETTABLE     7 7 -7    ; "format"
    25    [14]    MOVE         8 2
    26    [14]    MOVE         9 5
    27    [14]    CALL         7 3 0
    28    [14]    CALL         6 0 1
    29    [14]    JMP          15    ; to 45
    30    [16]    GETGLOBAL    6 -6    ; print
    31    [16]    GETUPVAL     7 0    ; string
    32    [16]    GETTABLE     7 7 -7    ; "format"
    33    [16]    MOVE         8 3
    34    [16]    MOVE         9 0
    35    [16]    CALL         7 3 0
    36    [16]    CALL         6 0 1
    37    [17]    LOADK        5 -9    ; 99
    38    [18]    GETGLOBAL    6 -6    ; print
    39    [18]    GETUPVAL     7 0    ; string
    40    [18]    GETTABLE     7 7 -7    ; "format"
    41    [18]    MOVE         8 4
    42    [18]    MOVE         9 5
    43    [18]    CALL         7 3 0
    44    [18]    CALL         6 0 1
    45    [21]    RETURN       5 2
    46    [22]    RETURN       0 1
Начиная
переменные
var = 50 -- a global variable
print(var) --> 50
do
  local var = 100 -- a local variable
  print(var) --> 100
end
print(var) --> 50
-- The global var (50) still exists
-- The local var (100) has gone out of scope and can't be accessed any longer.
типы
num = 20 -- a number
num = 20.001 -- still a number
str = "zaldrizes buzdari iksos daor" -- a string
tab = {1, 2, 3} -- a table (these have their own category)
bool = true -- a boolean value
bool = false -- the only other boolean value
print(type(num)) --> 'number'
print(type(str)) --> 'string'
print(type(bool)) --> 'boolean'
type(type(num)) --> 'string'

-- Functions are a type too, and first-class values in Lua.
print(type(print)) --> prints 'function'
old_print = print
print = function (x) old_print "I'm ignoring the param you passed me!" end
old_print(type(print)) --> Still prints 'function' since it's still a function.
-- But we've (unhelpfully) redefined the behavior of print.
print("Hello, world!") --> prints "I'm ignoring the param you passed me!"
Специальный тип nil
Другой тип в Lua — nil . Единственное значение в nil типа является nil . nil существует, чтобы отличаться от всех других значений в Lua. Это своего рода неценовое значение.
print(foo) -- This prints nil since there's nothing stored in the variable 'foo'.
foo = 20
print(foo) -- Now this prints 20 since we've assigned 'foo' a value of 20.

-- We can also use `nil` to undefine a variable
foo = nil -- Here we set 'foo' to nil so that it can be garbage-collected.

if nil then print "nil" end --> (prints nothing)
-- Only false and nil are considered false; every other value is true.
if 0 then print "0" end --> 0
if "" then print "Empty string!" --> Empty string!
выражения
a = 3
b = a + 20 a = 2 print(b, a) -- hard to read, can also be written as
b = a + 20; a = 2; print(a, b) -- easier to read, ; are optional though
true and true --> returns true
true and 20 --> 20
false and 20 --> false
false or 20 --> 20
true or 20 --> true
tab or {}
  --> returns tab if it is defined
  --> returns {} if tab is undefined
  -- This is useful when we don't know if a variable exists
tab = tab or {} -- tab stays unchanged if it exists; tab becomes {} if it was previously nil.

a, b = 20, 30 -- this also works
a, b = b, a -- switches values
Определение функций
function name(parameter)
    return parameter
end
print(name(20)) --> 20
-- see function category for more information
name = function(parameter) return parameter end -- Same as above
булевы
Только false и nil оцениваются как false, все остальное, включая 0 а пустая строка оценивается как истина.
вывоз мусора
tab = {"lots", "of", "data"}
tab = nil; collectgarbage()
-- tab does no longer exist, and doesn't take up memory anymore.
таблицы
tab1 = {"a", "b", "c"}
tab2 = tab1
tab2[1] = "d"
print(tab1[1]) --> 'd' -- table values only store references.
--> assigning tables does not copy its content, only the reference.

tab2 = nil; collectgarbage()
print(tab1) --> (prints table address) -- tab1 still exists; it didn't get garbage-collected.

tab1 = nil; collectgarbage()
-- No more references. Now it should actually be gone from memory.
Это основы, но есть раздел о таблицах с дополнительной информацией.
условия
if (condition) then
    -- do something
elseif (other_condition) then
    -- do something else
else
    -- do something
end
для петель
Существует два типа цикла for в Lua: числовое значение for цикла и общий for цикла.
-
Цифры
forцикла имеют следующий вид:for a=1, 10, 2 do -- for a starting at 1, ending at 10, in steps of 2 print(a) --> 1, 3, 5, 7, 9 endТретье выражение в числовой
forцикла представляет собой этап , по которому цикл будет увеличиваться. Это упрощает выполнение обратных циклов:for a=10, 1, -1 do print(a) --> 10, 9, 8, 7, 6, etc. endЕсли выражение шага не указано, Lua принимает шаг по умолчанию 1.
 for a=1, 10 do
   print(a) --> 1, 2, 3, 4, 5, etc.
 end
Также обратите внимание, что переменная цикла является локальной
forциклаfor. Он не будет существовать после завершения цикла.
-
Общие
forциклов работают через все значения, возвращаемые функцией итератора:for key, value in pairs({"some", "table"}) do print(key, value) --> 1 some --> 2 table endLua предоставляет несколько встроенных итераторов (например,
pairs,ipairs), и пользователи могут определять свои собственные итераторы, а также использовать общиеforциклов.
делать блоки
local a = 10
do
print(a) --> 10
local a = 20
print(a) --> 20
end
print(a) --> 10
Некоторые сложные вещи
Иногда Lua не ведет себя так, как можно было бы подумать после прочтения документации. Некоторые из этих случаев:
Ниль и Ничто не то же самое (ОБЩИЙ ПИТФАЛ!)
Как и ожидалось, table.insert(my_table, 20) добавляет значение 20 в таблицу, а table.insert(my_table, 5, 20) добавляет значение 20 в 5-ю позицию. Что делает table.insert(my_table, 5, nil) ? Можно было бы ожидать, что он будет обрабатывать nil как никакой аргумент вообще и вставить значение 5 в конце таблицы, но фактически добавляет значение nil в пятую позицию таблицы. Когда это проблема?
(function(tab, value, position)
table.insert(tab, position or value, position and value)
end)({}, 20)
-- This ends up calling table.insert({}, 20, nil)
-- and this doesn't do what it should (insert 20 at the end)
Аналогичная ситуация происходит с tostring() :
print (tostring(nil)) -- this prints "nil"
table.insert({}, 20) -- this returns nothing
-- (not nil, but actually nothing (yes, I know, in lua those two SHOULD
-- be the same thing, but they aren't))
-- wrong:
print (tostring( table.insert({}, 20) ))
-- throws error because nothing ~= nil
--right:
local _tmp = table.insert({}, 20) -- after this _tmp contains nil
print(tostring(_tmp)) -- prints "nil" because suddenly nothing == nil
Это также может привести к ошибкам при использовании стороннего кода. Если, например, документация некоторых состояний функций «возвращает пончики, если повезет, нуль в противном случае», реализация может выглядеть примерно так:
function func(lucky)
if lucky then
return "donuts"
end
end
эта реализация может показаться разумной вначале; он возвращает пончики, когда это необходимо, и когда вы вводите result = func(false) результат будет содержать значение nil .
Тем не менее, если нужно написать print(tostring(func(false))) lua выдаст ошибку, которая выглядит примерно так stdin:1: bad argument #1 to 'tostring' (value expected)
Это почему? tostring явно получает аргумент, хотя его nil . Неправильно. func ничего не возвращает, поэтому tostring(func(false)) является тем же, что и tostring() и NOT то же, что и tostring(nil) .
Ошибки, говорящие о «ожидаемом значении», являются убедительным доказательством того, что это может быть источником проблемы.
Устранение пробелов в массивах
Это огромная ошибка, если вы новичок в lua, и в таблице есть много информации
Привет, мир
Это приветственный мировой код:
print("Hello World!")
Как это устроено? Это просто! Lua выполняет функцию print() и использует строку "Hello World" качестве аргумента.
Программирование предусматривает разнообразные языки. Все они в той или иной степени имеют преимущества и недостатки, используются для конкретных целей. Многие слышали о LUA. Эта статья как раз и будет посвящена этому языку программирования.
Язык программирования – это…
Язык программирования – некий перечень формальных правил и принципов, используемых при написании контентна. Общий язык помогает коммуникации людей, а упомянутый термин относится к устройствам и программному обеспечению.
Язык программирования – способ «общения»:
- пользователя с компьютером;
- устройств друг с другом;
- программного обеспечения между собой;
- устройств с утилитами.
В зависимости от выбранного варианта можно весьма легко создавать программы, приложения, игры и даже писать веб-страницы.
Луа – язык программирования, в основе которого лежат скрипты. Называется скриптовым. Используется для того, чтобы создавать бизнес-логику утилит.
Относится к мультипарадигменным. Lua обладает неплохой поддержкой декларативного стиля создания программного обеспечения. Написан на C. Язык был представлен миру в 1993 году в качестве самостоятельной разработки.
Немного истории
LUA изначально разработан Роберто Иерусалимши, Вальдемаром Селесом и Луисом Энрике. Изначально «средство» было представлено программным обеспечением, интегрируемым кодификациями на C и иных «традиционных» языках. За счет этого разработчики могли значительно ускорить процесс создания собственных утилит.
Прародителями LUA считаются SOL и DEL. С самых первых дней обладал открытый исходный код. Это значит, что в развитии оного имеет право поучаствовать каждый желающий. Выделился тем, что основан в Бразилии, которая на рынке IT-разработок практически не фигурировала.
Текущая версия языка – 5.4.0. Вышло во второй половине 2020 года. Активно используется в IT-областях и бизнесе.
Преимущества и недостатки
У языка LUA есть сильные и слабые стороны. Изучить оные необходимо перед тем, как приступать к обучению соответствующему способу «общения» с ПО и устройствами.
О сильных сторонах
Плюсы LUA:
- Портатируемость. Утилиты, написанные на Луа, неплохо переносятся с Windows на Linux и другие операционные системы.
- Количество библиотек. Их очень много. Большинство представлены на официальном сайте LUA. Предлагаемые библиотеки подходят для решения основной массы задач, стоящих перед пользователями.
- Право на добавление собственных библиотек. Достигается за счет открытого исходного кода. Добавляемые библиотеки должны быть разработаны на C.
- Синтаксис. LUA – простой язык, который читается без каких-либо проблем. Осваивается быстро даже новичками в IT-области.
- Адаптивность. Программное обеспечение, написанное на Луа, занимает меньше памяти на задействованных устройствах.
Это – компактный мультиплатформенный язык, который легко «настроить под себя».
О слабых сторонах
Но, как и любой другой язык, LUA имеет некоторые изъяны:
- Выступает в качестве скриптового. Это значит, что часто применяется совместно с другими языками.
- Для полноценного применения разработчику необходимо знать дополнительно 2-3 programming languages.
- Не всегда быстро работает.
Профессионалы раньше считали, что данный вариант подходит лишь для мелких проектов. Частично данное заверение правильно. Связано это с тем, что LUA относится к модульным языкам. Но посредством их сочетания нередко удается добиться колоссальных результатов.
Перспективы
Сейчас на передовой линии находится разработка игр. Луа для этих целей – не лучшее решение. Индекс Tiobe показывает, что данный вариант находится на позиции под номером 30.
Соответствующее явление связано с тем, что language обычно применяется в сочетании с другими «способами общения» и создания ПО. Луа задействуют преимущественно для того, чтобы решать отдельные задачи. Только через него создать хорошую игру не получится.
При трудоустройстве LUA-разработчики нередко сталкиваются с проблемами. Лишь некоторые компании действительно набирают таких работников. В подобных местах возможна конкуренция.
В качестве основного LUA использовать не рекомендуется. Он может быть изучен в виде дополнительного, на первых порах осваивания программирования. Особенно, если хочется заниматься игровой разработкой.
Как можно использовать
Вот несколько направлений, в которых иногда пригодится Луа:
- разработка игрового контента;
- создание сценариев для автономного программного обеспечения;
- интернет-сценарии;
- расширения и дополнительных софт БД;
- создание систем безопасности.
Разработка обычно требует применения одного или нескольких иных языков программирования. Иначе контент окажется не слишком функциональным.
Окружающая среда
Весь процесс написания исходного кода осуществляется в разнообразных средах. Этому моменту требуется уделить должное внимание, иначе наладить работу не получится.
Локальная
Чтобы провести настройку локальной среды, требуется обеспечить наличие на задействованном устройстве:
- текстового редактора;
- компилятор;
- интерпретатор.
Далее все перечисленные компоненты будут рассмотрены более подробно. Информация предназначена преимущественно для новичков.
Редактор текста
Он требуется для того, чтобы осуществлять запись программного кода утилиты. Воспользоваться можно любым известным текстовым редактором. Примеры:
- «Блокнот» в Windows;
- команда «Редактирование операционной системы»;
- VIM;
- Epsilon.
Версия и имя редактора способны отличаться друг от друга в зависимости от операционной системы.
Создаваемые здесь документы – исходные файлы, содержащие непосредственный код приложения. Для рассматриваемого «способа общения» актуально расширение .lua.
Немного об интерпретаторе
Интерпретатор – программное обеспечение небольшого размера, которое позволит набирать команды Lua и сразу же выполнять. Помогает останавливать выполнение файла при обнаружении ошибок.
Подойдет любой доступный интерпретатор Луа.
А что там с компиляторами
Компилятор – специализированное программное обеспечение. Его знают все программисты и разработчики. Так называются утилиты, которые обрабатывают исходный код и преобразовывают его в машинный.
Компиляция позволяет исполнить имеющуюся кодификацию, проверить ее работоспособность и наличие ошибок. Для работы с Луа и его дальнейшим внедрением в другой язык программирования потребуется компилятор, совместимый с интерфейсами оных.
Для Windows
Для того, чтобы работать с Луа в Windows, был создан специальный компилятор – SciTE. Чтобы его «поставить» в Виндовс, потребуется выполнить следующие манипуляции:
- Открыть официальный сайт SciTE.
- Переключиться в раздел загрузки.
- Выбрать желаемый файл и его версию.
- Дождаться завершения операции.
- Активировать исполняемый файл.
- Завершить манипуляции, следуя подсказкам на экране.
В ходе описанных действий пользователь получит LUA IDE. Действия можно проводить через командную строчку. Тогда предварительно осуществляется инициализация MinGW. Там происходит компиляция и установка для Windows.
Для Linux
Linux – операционная система, которая стала пользоваться в последние годы определенным спросом. Хороший бесплатный конкурент коммерческим операционным системам. Но работать с ней «рядовому» пользователю бывает трудно.
Для сбора LUA потребуется открыть командную строку Линукс и выполнить следующую кодификацию:

Теперь все готово к полноценной работе. Но это еще не все, о чем рекомендуется знать каждому разработчику.
Для MacOS
У компании Apple есть собственная компьютерная операционная система, которая имеет ряд особенностей. Но в ней тоже можно программировать на различных языках. Главное грамотно осуществить подготовку.
Компилятор Луа здесь собирается при помощи команды такого типа:

Последняя строчка не является обязательной. Пользователь при помощи нее сможет провести тестирование «среды».
IDE
Для Windows SciTE IDE Lua является IDE изначально предусмотренной разработчиками «способа общения». Для других платформ можно использовать альтернативное программное обеспечение от ZeroBrane Studio.
Без установки
Изучение рассматриваемого варианта создания контента – это рассмотрение основных его особенностей и функций. Компилятор здесь стоит далеко не на самом последнем месте.
Если требуется проверить работу небольшой программы, можно не задумываться над установкой компилятора. Подобное ПО находится в свободном доступе в Сети.
Пример — этот и этот сайты. Здесь можно программировать и проверять имеющиеся кодификации в режиме реального времени. Отличительной чертой такого подхода является его компактность и кроссплатформенность.
Синтаксис
Для того, чтобы программировать на LUA, важно изучить его синтаксис. Возможна работа в нескольких режимах:
- интерактивном;
- по умолчанию.
Записывать текст допустимо в свободном формате. Команды предусматривают разделение пробелом. Иногда для реализации поставленной задачи ставят точку с запятой (символ).
Лексика
Обучение рассматриваемому языку программирования не доставит существенных хлопот ни новичкам, ни опытным разработчикам. Связано это с тем, что его авторы постарались сделать свое детище универсальным.
Рассматривая лексику, стоит запомнить следующие данные:
- Основной алфавит – это английский язык. Люди, хорошо его знающие, быстрее остальных разберутся в командах.
- Строковые литералы могут использовать символы из иных ЯП.
- Идентификаторы включают в себя: буквы, цифры, подчеркивание. Не могут начинаться с цифр.
- Нельзя в качестве идентификатора использовать вариант ключевого слова.
- Программеры рекомендуют отказаться от идентификаторов, начинающихся с подчеркивания.
Последний момент обоснован тем, что подобные «нестандартные» символы применяются на практике для системных задач.
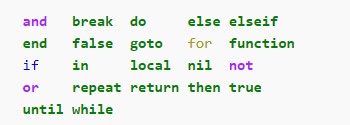
Выше приведены слова, которые не применяются в процессе присваивания имен.
Типы данных
Язык, который мы изучаем — вариант с неявным динамическим обозначением типов информации. Переменная будет содержать значение того или иного вида. Значение выступает в роли аргумента, если осуществляется вызов функции. После этого оные отправляются на исходные позиции в виде результата.
Предусматриваются следующие типы данных:
- Булево. Boolean. Это – истина и ложь.
- Nil – постой элемент. Указывает на отсутствие пригодного значения.
- Число. Number. Это тип данных, представленный теми или иными числами. В основном вещественными.
- Строка – string. Используется для того, чтобы описать символьные массивы. Преимущественно применяются 8-битные символы. Строки являются константами – они не меняются ни при каких обстоятельствах. Функции – полноправные объекты, позволяющие присваивать и передавать в параметрах интересующую информацию.
- Thread. Тип, предусматривающий сопрограммы.
- Userdata. Требуется для получения внешних сведений, полученных из других programming language.
Углубленное изучение можно провести позже. В качестве «базы» предложенные сведения являются достаточными.
Присваивание
В качестве оператора присваивания выступает символ «равно». Здесь допускается параллельное присваивание, как и в иных ЯП. Можно составлять выражения типа:
a, b = b, a.
Не нужно обеспечивать полное соответствие числа переменных количеству имеющихся значений. А значить, пользоваться оператором присваивания будет проще, чем в аналогичных languages.
Табличные дела
Таблицы – это динамические ассоциативные массивы. Представлены парами «ключ-значение» в больших объемах. Единственный составной тип информации. Лежат в основе всех пользовательских БД.
Может наблюдаться следующее:
- Ключи представлены литералами.
- В виде ключа допускается применение любого значения, исключая nil.
- Если nil записывается в элементы, манипуляция будет рассматриваться в качестве удаления соответствующего объекта.
- Создание – как и массивы, но в виде значений принимаются целые числа компонентов в множестве.
- Списки – это массивы двухэлементных массивов, хранящий значения и ссылки на иные компоненты.
Также стоит обратить внимание на то, что при многомерных массивах чаще всего встречается реализация по типу «массив массивов». Многогранные и сложные составляющие реализовываются посредством таблиц. Как именно – зависит от поставленной перед разработчиком задачи.
Метатаблицы
Помогают в реализации большинства языков опций. Если выучить принципы работы с метатаблицами, удастся значительно упростить реализацию тех или иных задач.
Важно запомнить следующее:
- Метатаблица своими свойствами напоминает обычную таблицу с возможностью соответствия всем правилам и нормам.
- Отвечает за хранение разнообразных метаданных типов и объектов. Здесь хранятся сведения, связанные с опциями и параметрами типов/объектов ЯП.
- Используемые материалы могут применяться через интерпретатор, расширяя функциональные возможности ПО.
- Может быть связана со значениями любого типа.
- Допускается применение всех метаметодов для арифметических манипуляций.
Рассматриваемый ЯП позволяет организовывать реализацию арифметики любых имеющихся объектов. Для этого осуществляется работа со стандартными и библиотечными метаметодами (через специальные библиотеки).
Особенности реализации
Изучение любого ЯП – это обучение базовым навыкам и принципам работы выбранного варианта. При должной подготовке и на начальных порах все это не доставит никаких существенных хлопот. Главное значить, с чего начинать.
Реализация Луа предусматривает:
- компилятор исходного кода (может быть запущен в режиме онлайн);
- виртуальную машину.
Обработка кода происходит так:
- Пользователь пишет кодификацию.
- Происходит обработка оной компилятором и преобразование в байт-коды.
- Виртуальная машина запускает байт-коды.
- Последние не выступают в виде команды сетевой машины – они рассматриваются как команды виртуального процессора с разнообразными регистрами.
Классическая ВМ предусматривает распределение памяти задействованного устройства совместно со сборкой ненужной информации. Здесь имеет место единый строковый пул, который снижает требования к расходу памяти, необходимой для хранения строчек.
Если есть ошибки
Выучить язык программирования LUA – это не значит, что кодификации будут функционировать без ошибок. Корректировки иногда необходимы даже контенту от опытных разработчиков. Главное вовремя обнаружить проблемное место и внести те или иные изменения.
Если при обработке программной кодификации в процессе компиляции обнаруживается ошибка (или если исполняется ее часть), система передаст управление хосту. Последний сможет увидеть ошибку и предпринять определенные меры. Пример – сообщить об обнаруженной неполадке.
Как получить образование и лучше разбираться в ЯП
Выучить ЯП можно несколькими способами. Все зависит от того, чего именно хочет добиться пользователь:
- Обращение в ВУЗ. Вариант для тех, кто выпустился из школы и хочет полноценно работать программистом. Отнимает много средств, времени и сил. По выпуску выдается диплом государственного образца. Здесь затрагиваются самые известные ЯП.
- Поступление в техникум. Отличное начало для старта в мире разработки. Обучение длиться меньше, чем в ВУЗе. По выпуску студент получит диплом о среднем профессиональном образовании. Этот документ поможет при поступлении в ВУЗ. Здесь достаточно много практики, но большинство ЯП не затрагиваются.
- Самообразование. Никаких документов, подтверждающих знания, не будет. Человек полностью самостоятельно старается познать ЯП. Зато такой подход может не требовать вообще никаких вложений – в Сети полно необходимой информации и туториалов. Часто самообразование используется людьми с хорошим самоконтролем. Позволяет больше практиковаться и полностью собственными силами контролировать процедуру обучения.
Но самым современным, простым и эффективным вариантом является обучение на специализированных курсах для новичков и продвинутых разработчиков. Там объяснят, что такое for i, как работать с компиляторами и многое другое. Обучение длится до года. В конце выдается электронный сертификат.
Хотите освоить современную IT-специальность? Огромный выбор курсов по востребованным IT-направлениям есть в Otus!
Исправленная версия статьи: Lua за 60 минут
- Учебник по LuaRu — см. LuaRu
Содержание
- 1 Исправлены
- 2 Lua? Что это?
- 3 Зачем?
- 4 Что надо для того, чтобы читать дальше?
- 5 Первые впечатления
- 6 Операторы языка
- 7 Типы данных
- 8 Таблицы
- 9 Функции
- 9.1 Функции могут принимать переменное количество аргументов:
- 10 Объекты = таблицы + функции
- 10.1 Специальные функции
- 11 Наследование
- 12 Расширение функциональности
- 13 Области видимости
- 14 Обработка ошибок
- 15 Стандартные библиотеки
- 16 Между Lua и не-Lua
- 17 см. также
- 18 Ссылки
Исправлены
- сообщения переведены на русский
- исправлены ошибки в примерах
И насчет битовых операций учебнике LuaRu устаревшая информация, в версии 5.3 добавлена полноценная их поддержка.
Lua? Что это?
Lua — простой встраиваемый язык (его можно интегрировать с вашими программами, написанными на других языках), легкий и понятный, с одним типом данных, с однообразным синтаксисом. Идеальный язык для изучения.
Зачем?
Lua может вам пригодится:
- если вы геймер (плагины для World of Warcraft и множества других игр)
- если вы пишете игры (очень часто в играх движок пишут на C/C++, а AI — на Lua)
- если вы системный программист (на Lua можно писать плагины для nmap, wireshark, nginx и других утилит)
- если вы embedded-разработчик (Lua очень быстрый, компактный и требует очень мало ресурсов)
Что надо для того, чтобы читать дальше?
1. Научитесь программировать. Хотя бы немного. Не важно на каком языке.
2. Установите Lua. Для этого либо скачайте здесь версию 5.3 (http://www.lua.org/download.html), либо ищите ее в репозиториях для linux.
Все примеры из статьи запускайте в терминале командой наподобие «lua file.lua».
Первые впечатления
Lua — язык с динамической типизацией (переменные получают типы «на лету» в зависимости от присвоенных значений). Писать на нем можно как в императивном, так и в объектно-ориентированном или функциональном стиле (даже если вы не знаете как это — ничего страшного, продолжайте читать). Вот программа «Привет мир» на Lua:
-- my first lua app: hello.lua
print "Привет мир!";
print("Пока мир.")
Что уже можно сказать о языке:
- однострочные комментарии начинаются с двух дефисов «—«
- скобки и точки-с-запятыми можно не писать
Операторы языка
Набор условных операторов и циклов довольно типичен:
-- условные операторы (ветки else может не быть)
if a == 0 then
print("a is zero")
else
print("a is not zero")
end
-- сокращенная форма if/elseif/end (вместо switch/case)
if a == 0 then
print("zero")
elseif a == 1 then
print("one")
elseif a == 2 then
print("two")
else
print("other")
end
-- цикл со счетчиком
for i = 1, 10 do
print(i)
end
-- цикл с предусловием
b = 5
while b > 0 do
b = b - 1
end
-- цикл с постусловием
repeat
b = b + 1
until b >= 5
ПОДУМАЙТЕ: что может означать цикл «for i = 1, 10, 2 do … end»?
В выражениях можно использовать такие вот операторы над переменными:
- присваивание: x = 0
- арифметические: +, -, *, /, % (остаток от деления), ^ (возведение в степень)
- логические: and, or, not
- сравнение: >, <, ==, <=, >=, ~= (не-равно, да-да, вместо привычного «!=»)
- склеивание строк (оператор «..»), напр.: s1=»hello»; s2=»world»; s3=s1..s2
- длина/размер (оператор #): s=»hello»; a = #s (‘a’ будет равно 5).
- получение элемента по индексу, напр.: s[2]
Битовых операций в языке долгое время не было, но в версии 5.2 появилась библиотека bit32, которая их реализует (как функции, не как операторы).
Типы данных
Я вам соврал, когда сказал что у языка один тип данных. Их у него много (как и у каждого серьезного языка):
- nil (ровным счетом ничего)
- логические переменные (true/false)
- числа (numbers) — без деления на целые/вещественные. Просто числа.
- строки — кстати, они очень похожи на строки в паскале
- функции — да, переменная может быть типа «функция»
- поток (thread)
- произвольные данные (userdata)
- таблица (table)
Если с первыми типами все понятно, то что же такое userdata? Вспомним о том, что Lua — язык встраиваемый, и обычно тесно работает с компонентами программ, написанными на других языках. Так вот, эти «чужие» компоненты могут создавать данные под свои нужды и хранить эти данные вместе с lua-объектами. Так вот, userdata — и есть подводная часть айсберга, которая с точки зрения языка lua не нужна, но и просто не обращать внимания на нее мы не можем.
А теперь самое важное в языке — таблицы.
Таблицы
Я вам снова соврал, когда сказал, что у языка 8 типов данных. Можете считать что он один: всё — это таблицы (это, кстати, тоже неправда). Таблица — это очень изящная структура данных, она сочетает в себе свойства массива, таблицы «ключ»-«значение» (хэш-таблицы), структуры, объекта.
-- Итак, вот пример таблицы как массива:
a = {1, 2, 3} -- массив из 3-х элементов
print(a[2]) -- выведет "2", потому что индексы считаются с единицы
-- А таблица в виде разреженного массива (у которого есть не все элементы)
a = {} -- пустая таблица
a[1] = 1
a[3] = 5
ПОДУМАЙТЕ: чему равно a[2] в случае разреженного массива?
В примере выше таблица ведет себя как массив, но на самом деле — у нас ведь есть ключи (индексы) и значения (элементы массива). И при этом ключами могут быть какие угодно типы, не только числа:
a = {}
a["hello"] = true
a["world"] = false
a[true] = 1
-- или так:
a = {
hello = 123,
world = 456
}
print(a["hello"])
print(a.hello) -- то же самое, что и a["hello"], хотя выглядит как структура с полями
Кстати, раз уж у таблицы есть ключи и значения, то можно в цикле перебрать все ключи и соответствующие им значения:
t = {
a = 3,
b = 4
}
for key, value in pairs(t) do
print(key, value) -- выведет "a 3", потом "b 4"
end
А как же объекты? О них мы узнаем чуть позже, вначале — о функциях.
Функции
Вот пример обычной функции.
function add(a, b) return a + b end print(add(5, 3)) -- напечатает "8"
Функции языка позволяют принимать несколько аргументов, и возвращать несколько аргументов. Так аргументы, значения которых не указаны явно, считаются равными nil.
ПОДУМАЙТЕ: зачем может понадобиться возвращать несколько аргументов?
function swap(a, b) return b, a end x, y = swap(x, y) -- кстати, это можно сделать и без функции: x, y = y, x -- и если уж функция возвращает несколько аргументов, -- а они вам не нужны - игнорируйте их с помощью -- специальной переменной-подчеркивания "_" a, _, _, d = some_function()
Функции могут принимать переменное количество аргументов:
-- в прототипе переменное число аргументов записывается как троеточие
function sum(...)
s = 0
for _, n in pairs(arg) do -- в функции обращаются к ним, как к таблице "arg"
s = s + n
end
return s
end
print (sum(1, 2, 3)) -- вернет 9 print (sum(1, 2, 3, 4)) -- вернет 14
Все аргументы, скрытые за многоточием, собираются в локальную таблицу arg. У этой таблицы есть явное поле n, которое возвращает количество аргументов, скрытых за многоточием:
НАПРИМЕР
funcion func(...) print(arg.n); end
func(1,2,3); -- 3 func(1,4,562,6,26,); -- 5
—Немного изменим программу с функцией sum(…)
function sum(...) s = 0 for i=1,arg.n do s=s+arg[i] end return s end print (sum(1, 2, 3))-- вернет 6
print (sum(1, 2, 3, 4)) -- вернет 10
Замечание
- pairs(arg) — перебирает пары ключ-значение аргументов функции (_ и n)
- значение «ключ» — номер по порядку аргумента канализируется в переменную _
- вновь вводимая переменная n суммируется в s
Поскольку функции — это полноценный тип данных, то можно создавать переменные-функции, а можно передавать функции как аргументы других функций
a = function(x) -- функция, умножающая X на 2
return x * 2
end
-- краткая форма записи
b = function(x) return x + 1 end -- функция, увеличивающая X на 1
function apply(table, f)
result = {} -- создание пустой таблицы
for k, v in pairs(table) do
result[k] = f(v) -- заменяем элемент на какую-то функцию от этого элемента
print (result[k]) -- печать результата применения функции f к элементу массива t
end
end
-- ПОДУМАЙТЕ: что вернут вызовы
t = {1, 3, 5}
print (apply(t, a))
print (apply(t, b))
Ответ
- 2, 6, 10
- 2, 4, 6
Объекты = таблицы + функции
Раз мы можем сохранять функции в переменных, то и в полях таблиц тоже сможем. А это уже получаются как-бы-методы. Для тех, кто не знаком с ООП скажу, что основная его польза (по крайней мере в Lua) в том, что функции и данные, с которыми они работают находятся рядом — в пределах одного объекта. Для тех, кто знаком с ООП скажу, что классов здесь нет, а наследование прототипное.
Перейдем к примерам. Есть у нас объект, скажем, лампочка. Она умеет гореть и не гореть. Ну а действия с ней можно сделать два — включить и выключить:
-- в таблицу lamp заносится ключ=значение on=false
lamp = {
on = false
}
function turn_on(lmp) -- в таблицу передаваемую переменной lmp записывается пара ключ-значение on = true
lmp.on = true
end
-- или в кратком виде
function turn_off(lmp) lmp.on = false end -- в таблицу передаваемую переменной lmp записывается пара ключ-значение on = false
-- это просто функции для работы со структурой
turn_on(lamp) -- в таблицу lamp записывается пара ключ-значение on = true
print (lamp.on) -- вывод состояния переменной lamp.on (вывод ЗНАЧЕНИЯ переменной on из таблицы lamp)
turn_off(lamp) -- в таблицу lmp записывается пара ключ-значение on = false
print (lamp.on) -- вывод состояния переменной lamp.on
А если лампочку сделать объектом, и функции turn_off и turn_on сделать полями объекта, то получится:
lamp = {
on = false,
turn_on = function(lmp) -- в таблице lamp ключу turn_on присваивается значение - функция с аргументом lmp
lmp.on = true
end,
turn_off = function(lmp) lmp.on = false end
}
lamp.turn_on(lamp)
print (lamp.on) -- вывод состояния переменной lamp.on
lamp.turn_off(lamp)
print (lamp.on) -- вывод состояния переменной lamp.on
Мы вынуждены передавать сам объект лампочки в качестве 1-го аргумента, потому что иначе наша функция не узнает с какой именно лампочкой надо работать, чтобы сменить состояние on/off. Но чтобы не быть многословными, в Lua есть сокращенная запись, которую обычно и используют — lamp:turn_on(). Итого, мы уже знаем несколько таких упрощений синтаксиса:
lamp:turn_on() -- самая общепринятая запись lamp.turn_on(lamp) -- то с точки зрения синтаксиса это тоже правильно lamp["turn_on"](lamp) -- в таблице lamp ключу turn_on
Продолжая говорить о сокращениях, функции можно описывать не только явно, как поля структуры, но и в более удобной форме:
lamp = {
on = false
}
-- через точку, тогда аргумент надо указывать
function lamp.turn_on(l) l.on = true end
-- через двоеточие, тогда аргумент неявно задается сам, как переменная "self"
-- "self" - и есть та лампочка, для которой вызвали метод
function lamp:turn_off() self.on = false end
Интересно?
Специальные функции
Раскрыть тему Lua.Специальные функции
Некоторые имена функций таблиц (методов) зарезервированы, и они несут особый смысл:
- __add(a, b), __sub(a, b), __div(a, b), __mul(a, b), __mod(a, b), __pow(a, b) — вызываются, когда выполняются арифметические операции над таблицей
- __unm(a) — унарная операция «минус» (когда пишут что-то типа «x = -x»)
- __lt(a, b), __le(a, b), __eq(a, b) — вычисляют результат сравнения (<, <=, ==)
- __len(a) — вызывается, когда делается «#a»
- __concat(a, b) — вызывается при «a..b»
- __call(a, …) — вызывается при «a()». Переменные аргументы — это аргументы при вызове
- __index(a, i) — обращение к a[i], при условии, что такого элемента не существует
- __newindex(a, i, v) — создание «a[i] = v»
- __gc(a) — когда объект удаляется при сборке мусора
Ниже список всех доступных событий и их описание:
- __index( self, key ) чтение по ключу
- __newindex( self, key, value ) запись по ключу
- __call( self, … ) вызов как функции
- __add( self, arg ) сложение
- __sub( self, arg ) вычитание
- __mul( self, arg ) умножение
- __div( self, arg ) деление
- __mod( self, arg ) остаток от деления
- __pow( self, arg ) возведение в степень
- __unm( self ) унарный минус
- __concat( self, arg ) конкатенация строк
- __len( self ) длина
- __eq( self, arg ) оператор «равно»
- __lt( self, arg ) оператор «меньше»
- __le( self, arg ) оператор «меньше или равно»
- __tostring( self ) Вызывается при попытке перевести объект в строковое представление (например с помощью функции tostring)
- __gc Вызывается для userdata-объектов при сборке мусора
- __metatable Если задать это поле в метатаблице, то getmetatable будет просто возвращать его значение, а setmetatable вернет ошибку.
Подменяя эти методы, можно перегружать операторы и использовать синтаксис языка для своих целей. Главное не переусердствовать.
Наследование
Для тех, кто не знает ООП, наследование позволяет расширить функциональность уже существующего класса. Например, просто лампочка умеет включаться-выключаться, а супер-лампочка будет еще и яркость менять. Зачем нам переписывать методы turn_on/turn_off, если можно их повторно использовать?
В Lua для этого есть понятие мета-таблицы, т.е. таблицы-предка. У каждой таблицы есть одна таблица-предок, и дочерняя таблица умеет делать все, что умеет предок.
- Метатаблица — это обычная таблица в которой описываются определённые события (например сложение, вычитание, сравнивание и т.д.)
- В качестве названия события выступает индекс таблицы, а её значение — обработчик события (метод)
setmetatable связывает таблицы новую и таблицу-предок, с помощью метода __index. Этот метод вызывается всякий раз, когда запрашиваемый атрибут таблицы не найдет (в нашем случае — superlamp:turn_on). И поскольку superlamp.__index == nil и lamp.__index == nil, то вызова метода не происходит.
Допустим, что объект-таблицу lamp мы уже создали. Тогда супер-лампочка будет выглядеть так:
lamp = {
on = false;
turn_on = function(l) l.on = true end;
turn_off = function(l) l.on = false end;
}
-- говорим искать в таблице lamp все неизвестные атрибуты
lamp.__index = lamp
superlamp = {
brightness = 100
}
-- указываем родительскую таблицу
setmetatable(superlamp, lamp)
-- и ее методы теперь доступны (ищутся в таблице, superlamp, потом в superlamp.__index, потом в ее метатаблице lamp.__index
superlamp:turn_on()
print (superlamp.on)
superlamp:turn_off()
print (superlamp.on)
Расширение функциональности
Работает но непонятно
Родительские таблицы есть у многих типов (ну у строк и таблиц точно, у чисел и булевых чисел, и у nil их нет). Допустим, мы хотим складывать все строки с помощью оператора «+», а не «..». Для этого надо подменить функцию «+» (__add) для родительской таблицы всех строк:
s = getmetatable("") -- получили родительскую таблицу строки
s.__add = function(s1, s2) return s1..s2 end -- подменили метод
-- проверяем
a = "Привет"
b = "Мир!"
print(a + b) -- напишет "ПриветМир!"
Собственно, мы еще можем заменить функцию print с помощью «print = myfunction», да и много других хакерских дел можно сделать.
Области видимости
Не понятно. Надо примеры
Переменные бывают глобальные и локальные. При создании все переменные в Lua являются глобальными.
ПОДУМАЙТЕ: почему?
Для указания локальной области видимости пишут ключевое слово local:
local x local var1, var2 = 5, 3
Не забывайте об этом слове.
Обработка ошибок
Часто, если возникают ошибки, надо прекратить выполнение определенной функции. Можно, конечно, сделать множество проверок и вызывать «return», если что-то пошло не так. Но это увеличит объем кода. В Lua используется что-то наподобие исключений (exceptions).
Ошибки порождаются с помощью функции error(x). В качестве аргумента можно передать все, что угодно (то, что имеет отношение к ошибке — строковое описание, числовой код, объект, с которым произошла ошибка и т.д.)
Обычно после этой функции вся программа аварийно завершается. А это надо далеко не всегда. Если вы вызываете функцию, которая может создать ошибку (или ее дочерние функции могут создать ошибку), то вызывайте ее безопасно, с помощью pcall():
function f(x, y)
...
if ... then
error("failed to do somthing")
end
...
end
status, err = pcall(f, x, y) -- f:функция, x-y: ее аргументы
if not status then
-- обработать ошибку err. В нашем случае в err находится текст ошибки
end
Стандартные библиотеки
Стандартных библиотек мало, зато это позволяет запускать Lua где угодно. Подробнее можно получить их список здесь — http://www.lua.org/manual/5.2/manual.html
Нестандартных библиотек много, их можно найти на LuaForge, LuaRocks и в других репозиториях.
Между Lua и не-Lua
ВНИМАНИЕ: эту часть рекомендуется читать людям со знанием языка C.
А если нам недостаточно функциональности стандартных библиотек? Если у нас есть наша программа на C, а мы хотим вызывать ее функции из Lua? Для этого есть очень простой механизм.
Допустим, мы хотим создать свою функцию, которая возвращает случайное число (в Lua есть math.random(), но мы хотим поучиться). Нам придется написать вот такой код на C:
#include <lua.h>
#include <lauxlib.h>
#include <time.h>
/* собственно, что делать при вызове `rand(from, to)` */
static int librand_rand(lua_State *L) {
int from, to;
int x;
from = lua_tonumber(L, 1); /* первый параметр функции */
to = lua_tonumber(L, 2); /* второй параметр функции */
x = rand() % (to - from + 1) + from;
lua_pushnumber(L, x); /* возвращаемое значение */
return 1; /* возвращаем только один аргумент */
}
/* в Lua "rand" соответствует нашей функции librand_rand() */
static const luaL_reg R[] = {
{"rand", librand_rand},
{NULL, NULL} /* конец списка экспортируемых функций */
};
/* вызывается при загрузке библиотеку */
LUALIB_API int luaopen_librand(lua_State *L) {
luaL_openlib(L, "librand", R, 0);
srand(time(NULL));
return 1; /* завершаемся успешно */
}
Т.е. Lua предоставляет нам функции для работы с типами данных, для получения аргументов функций и возврата результатов. Функций очень мало, и они довольно простые. Теперь мы собираем нашу библиотеку как динамическую, и можем использовать функцию rand():
random = require("librand") -- загружаем библиотеку
print(random.rand(1, 100))
print(random.rand(0, 1))
А если мы хотим вызывать код, написанный на Lua из наших программ? Тогда наши программы должны создавать виртуальную машину Lua, в которой и будут выполняться Lua-скрипты. Это намного проще:
#include "lua.h"
#include "lauxlib.h"
int main() {
lua_State *L = lua_open(); // создаем виртуальную машину Lua
luaL_openlibs(L); // загружаем стандартные библиотеку
luaL_dofile(L, "rand.lua"); // выполняем скрипт
lua_close(L); // закрываем Lua
return 0;
}
Все.
Вы теперь можете писать на Lua. Если вы узнаете интересные моменты про Lua, которые можно было бы отразить в статье — пишите!
см. также
- Lua
- Lua. Справочное руководство по языку Lua 5.1
Ссылки
- Lua за 60 минут — внесено сюда
- Lua Метатаблицы
- Хочу всё знать
- Справочное руководство по языку Lua 5.1
- lua за 15 минут
- учебник Lua англ